Managing newcomers with Connect
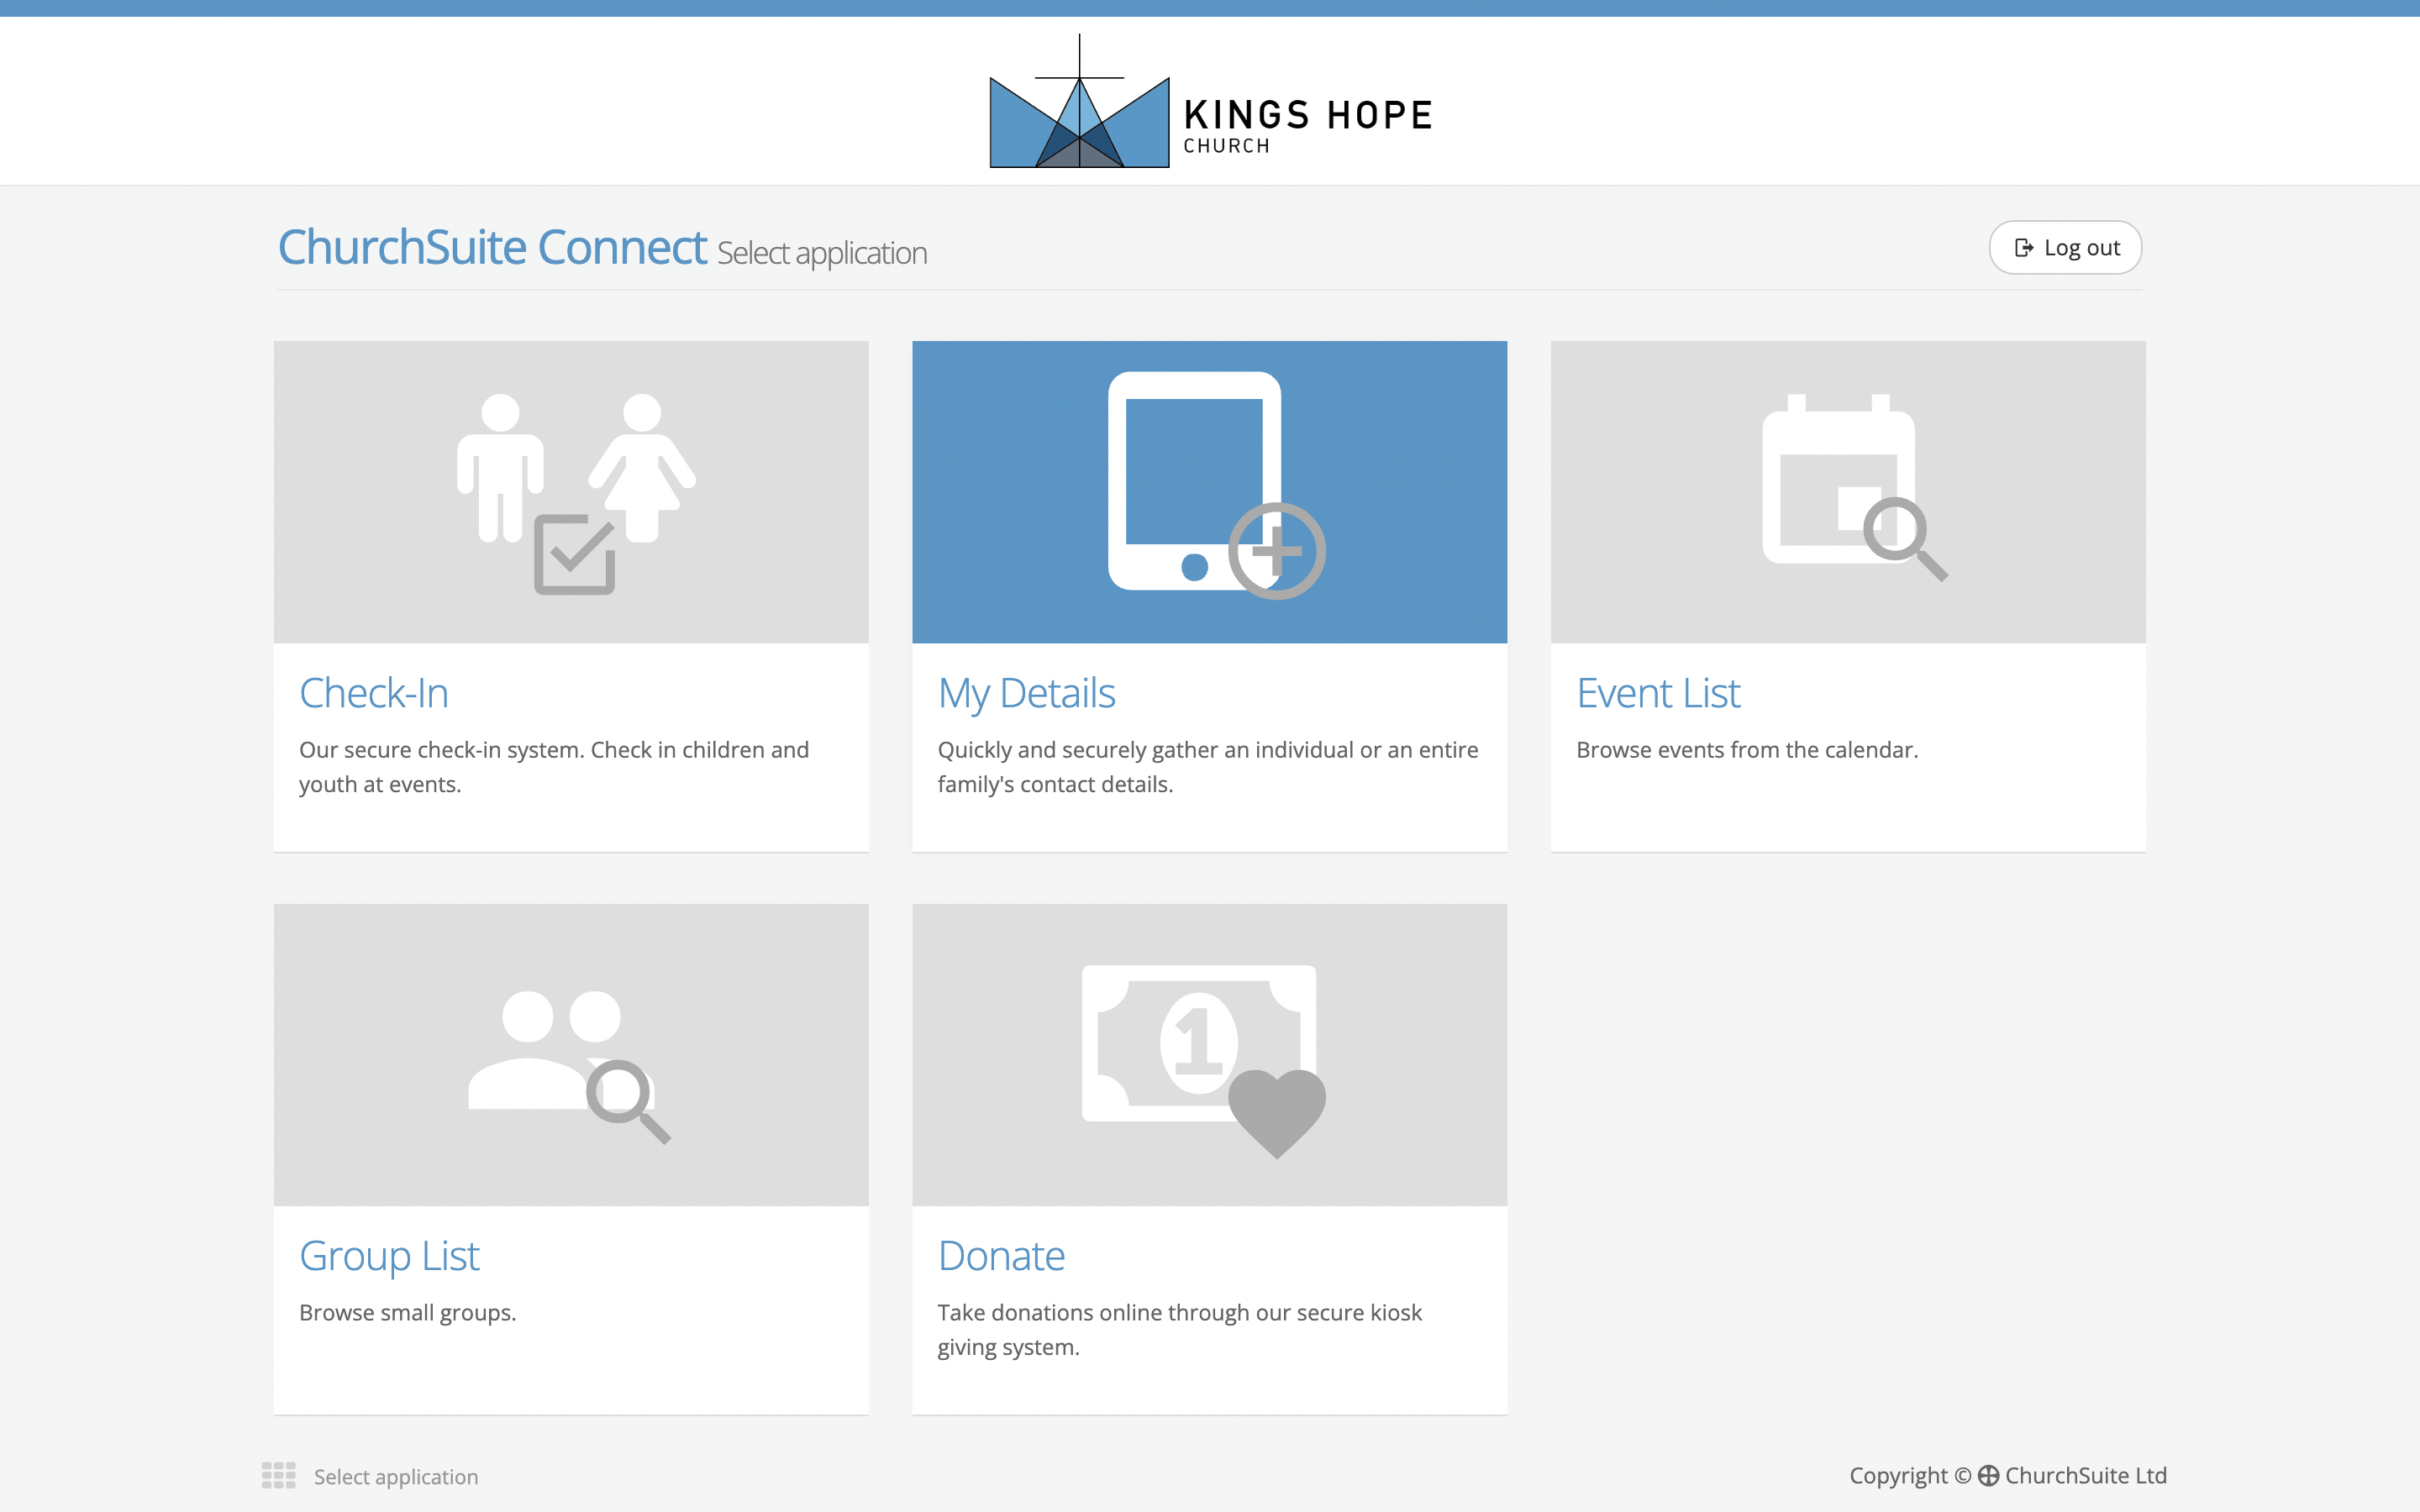
ChurchSuite Connect includes several useful applications designed to be used at your Information point at weekend services and in-person events and gatherings, including the My Details form designed to collect newcomer details and their areas of interest. Submitted details are added directly to your ChurchSuite modules, with optional notifications sent to key ministry overseers. Newcomers added in this way can also be added directly into Flows, ensuring a consistent welcome and follow-up with everyone who connects with you. And when newcomers submit details for their spouse/partner and children, ChurchSuite links the whole family together automatically.
In this article
Overview of the My Details form
Customising the My Details form
What happens when a newcomer submits the form?
Note: See the related support article, What is Connect?, for further information about Connect and the other Connect applications available.
Overview of the My Details form
Through a customisable form, branded with your logo and colour styling, new families and individuals can submit their details directly into your Address Book and Children module
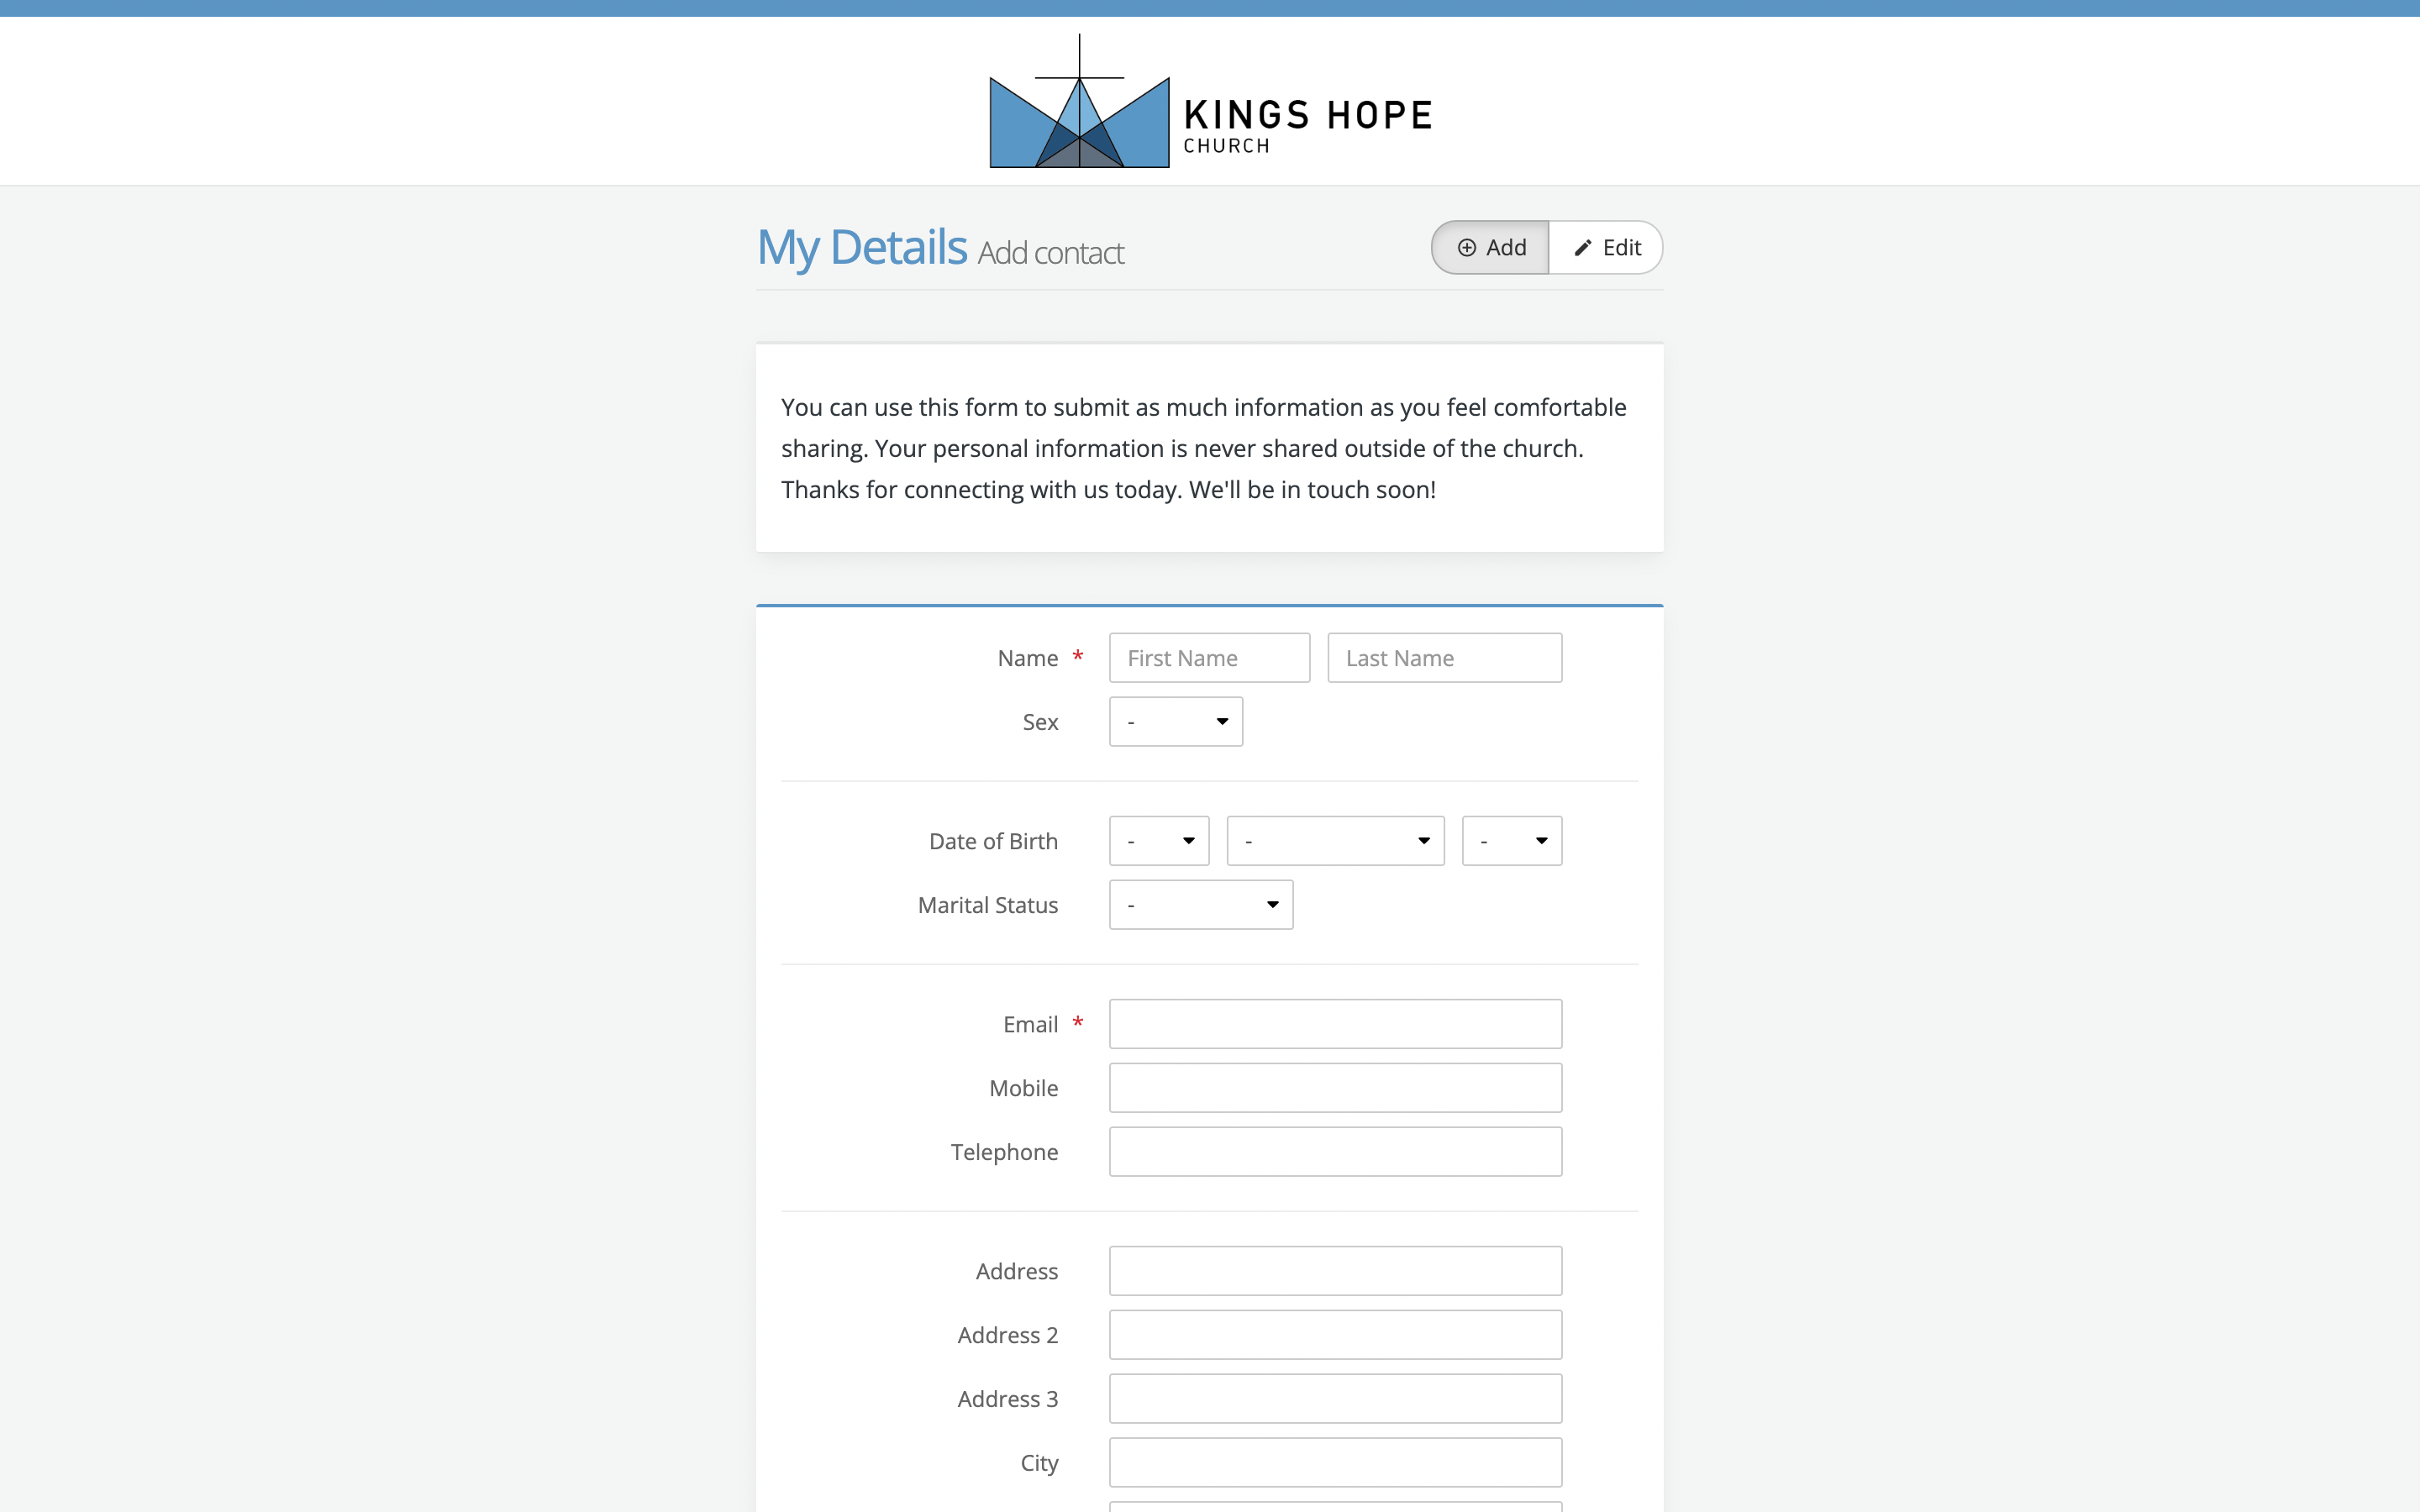
The My Details form can be used in staffed and unstaffed contexts, enabling you to securely gather important newcomer details with data protection and privacy compliance assured. The form reduces the need for paper processes and eliminates issues around deciphering handwriting on connection cards.
An optional Edit mode enables your existing Address Book contacts to search and view their own obfuscated personal details and update them as necessary - ideal for members who don't have My ChurchSuite access or who may prefer some assistance with updating their details.
The form can be customised to best suit your preferred newcomer process, perhaps reproducing an existing visitor connect card user experience. For multi-site organisations, newcomers can be assigned to a preferred default site or you may prefer the newcomer to choose their site on the form. In this article, we'll explore how to customise the fields shown on the form and the user experience and actions that can happen when a form is submitted.
You can access the My Details form from your ChurchSuite Dashboard using the Connect Quick Link.

Customising the My Details form
Most of the form's settings are controlled from the Address Book module settings; however, some additional Connect settings in the Children module's settings determine the fields shown on the form when Add child is clicked. Let's begin in the Address Book.
Access the Address Book module's settings using the cogwheels icon in the top-right corner of the module and click on the Connect Options tab.

Working through each form setting or option, in turn, click Edit to make changes. In the Settings section, enabling Search and edit existing contacts allows people to switch between Add mode (the default) and Edit mode. In Edit mode, those in your Address Book can search and manage their details. You can disable this option if you only wish the form to be used in Add mode.

Optionally add one or more email addresses to receive notifications when new contact details are submitted through the form - perhaps a Newcomers Pastor. Separate multiple email addresses with a comma.

Optionally add a short Welcome Message that is shown at the top of the form when viewed. The message content may depend on whether the form is used in a staffed or unstaffed context, perhaps extending a brief welcome and telling people what will happen when they submit their details using the form.

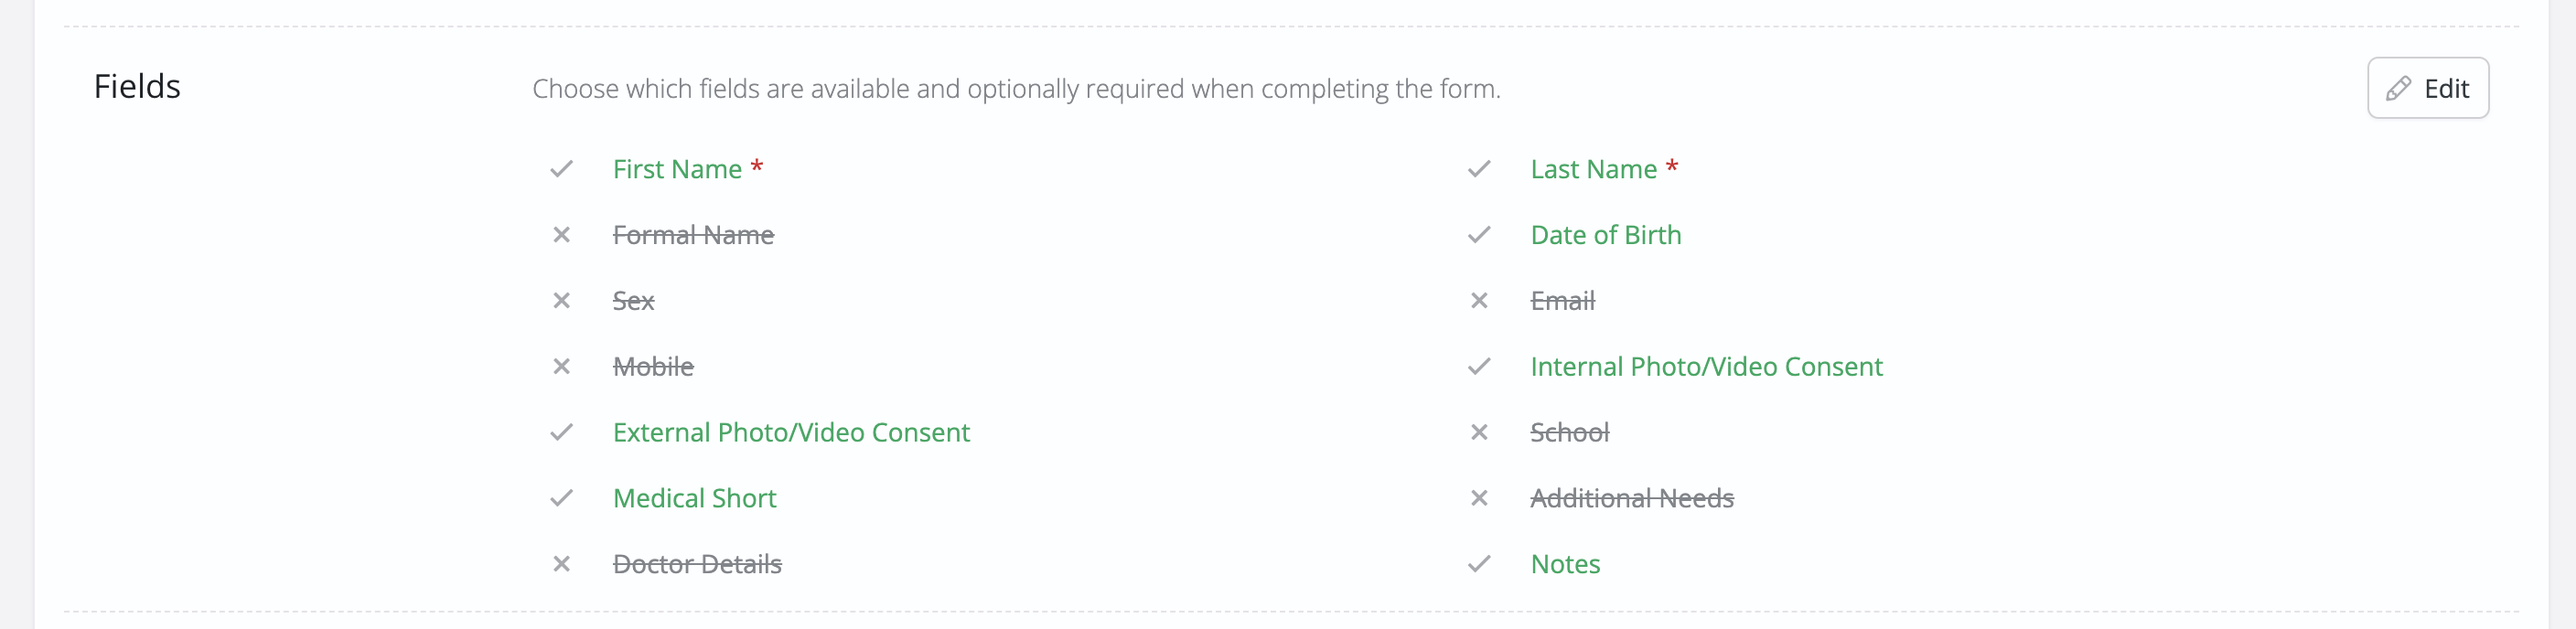
While you can't set the order of fields on the form, you can choose which fields are shown on the form and whether those fields are required. This list of Fields available on the form will depend on the fields in use in the Address Book module. ChurchSuite has several optional fields that you will first need to enable in the Module Options tab before you can make them available on the My Details form.

Those using multi-site can select the sites people can choose from when completing the form. This section will only be surfaced if the Site field has been set available in the previous Fields settings (explained above). If only one site is selected, new contacts and children will be added to that site and no site selector is surfaced on the form. If multiple sites are selected, a site selector will be included on the form so that newcomers can select a site from those you choose to make available. All family members submitted through the form are assigned to the same site - a spouse or child can't be assigned to a different site than the primary contact on the form.

Moving on, and thinking about how you might follow up with new people, the next section enables you to assign new people to Tags, Key dates and Flows. For example, you might assign a "First Connected" or "Ongoing Consent" key date to each newcomer at the start of their connection journey. You may have a newcomer Flow through which you take new people through a series of steps in a welcome or integration process. The settings here in the Address Book will not apply to new children added through the form - see later in this article for the separate children settings.

Next, optionally add some Areas of Interest. This is a great way of linking a newcomer's first connection to your next steps or follow-up. We suggest keeping the list of interest areas and descriptions short, using easy-to-understand terminology. Avoid newcomers having to endlessly scroll - perhaps just three to six "next steps", rather than listing every area of ministry or service you provide! Try to ensure there's something for everyone to choose at least one area of interest, rather than leaving a potential responder uninterested in what you offer next. A great question for your next "team time" might be to consider "What things would we want every newcomer to know about that's relevant to them in terms of their next steps with us?"
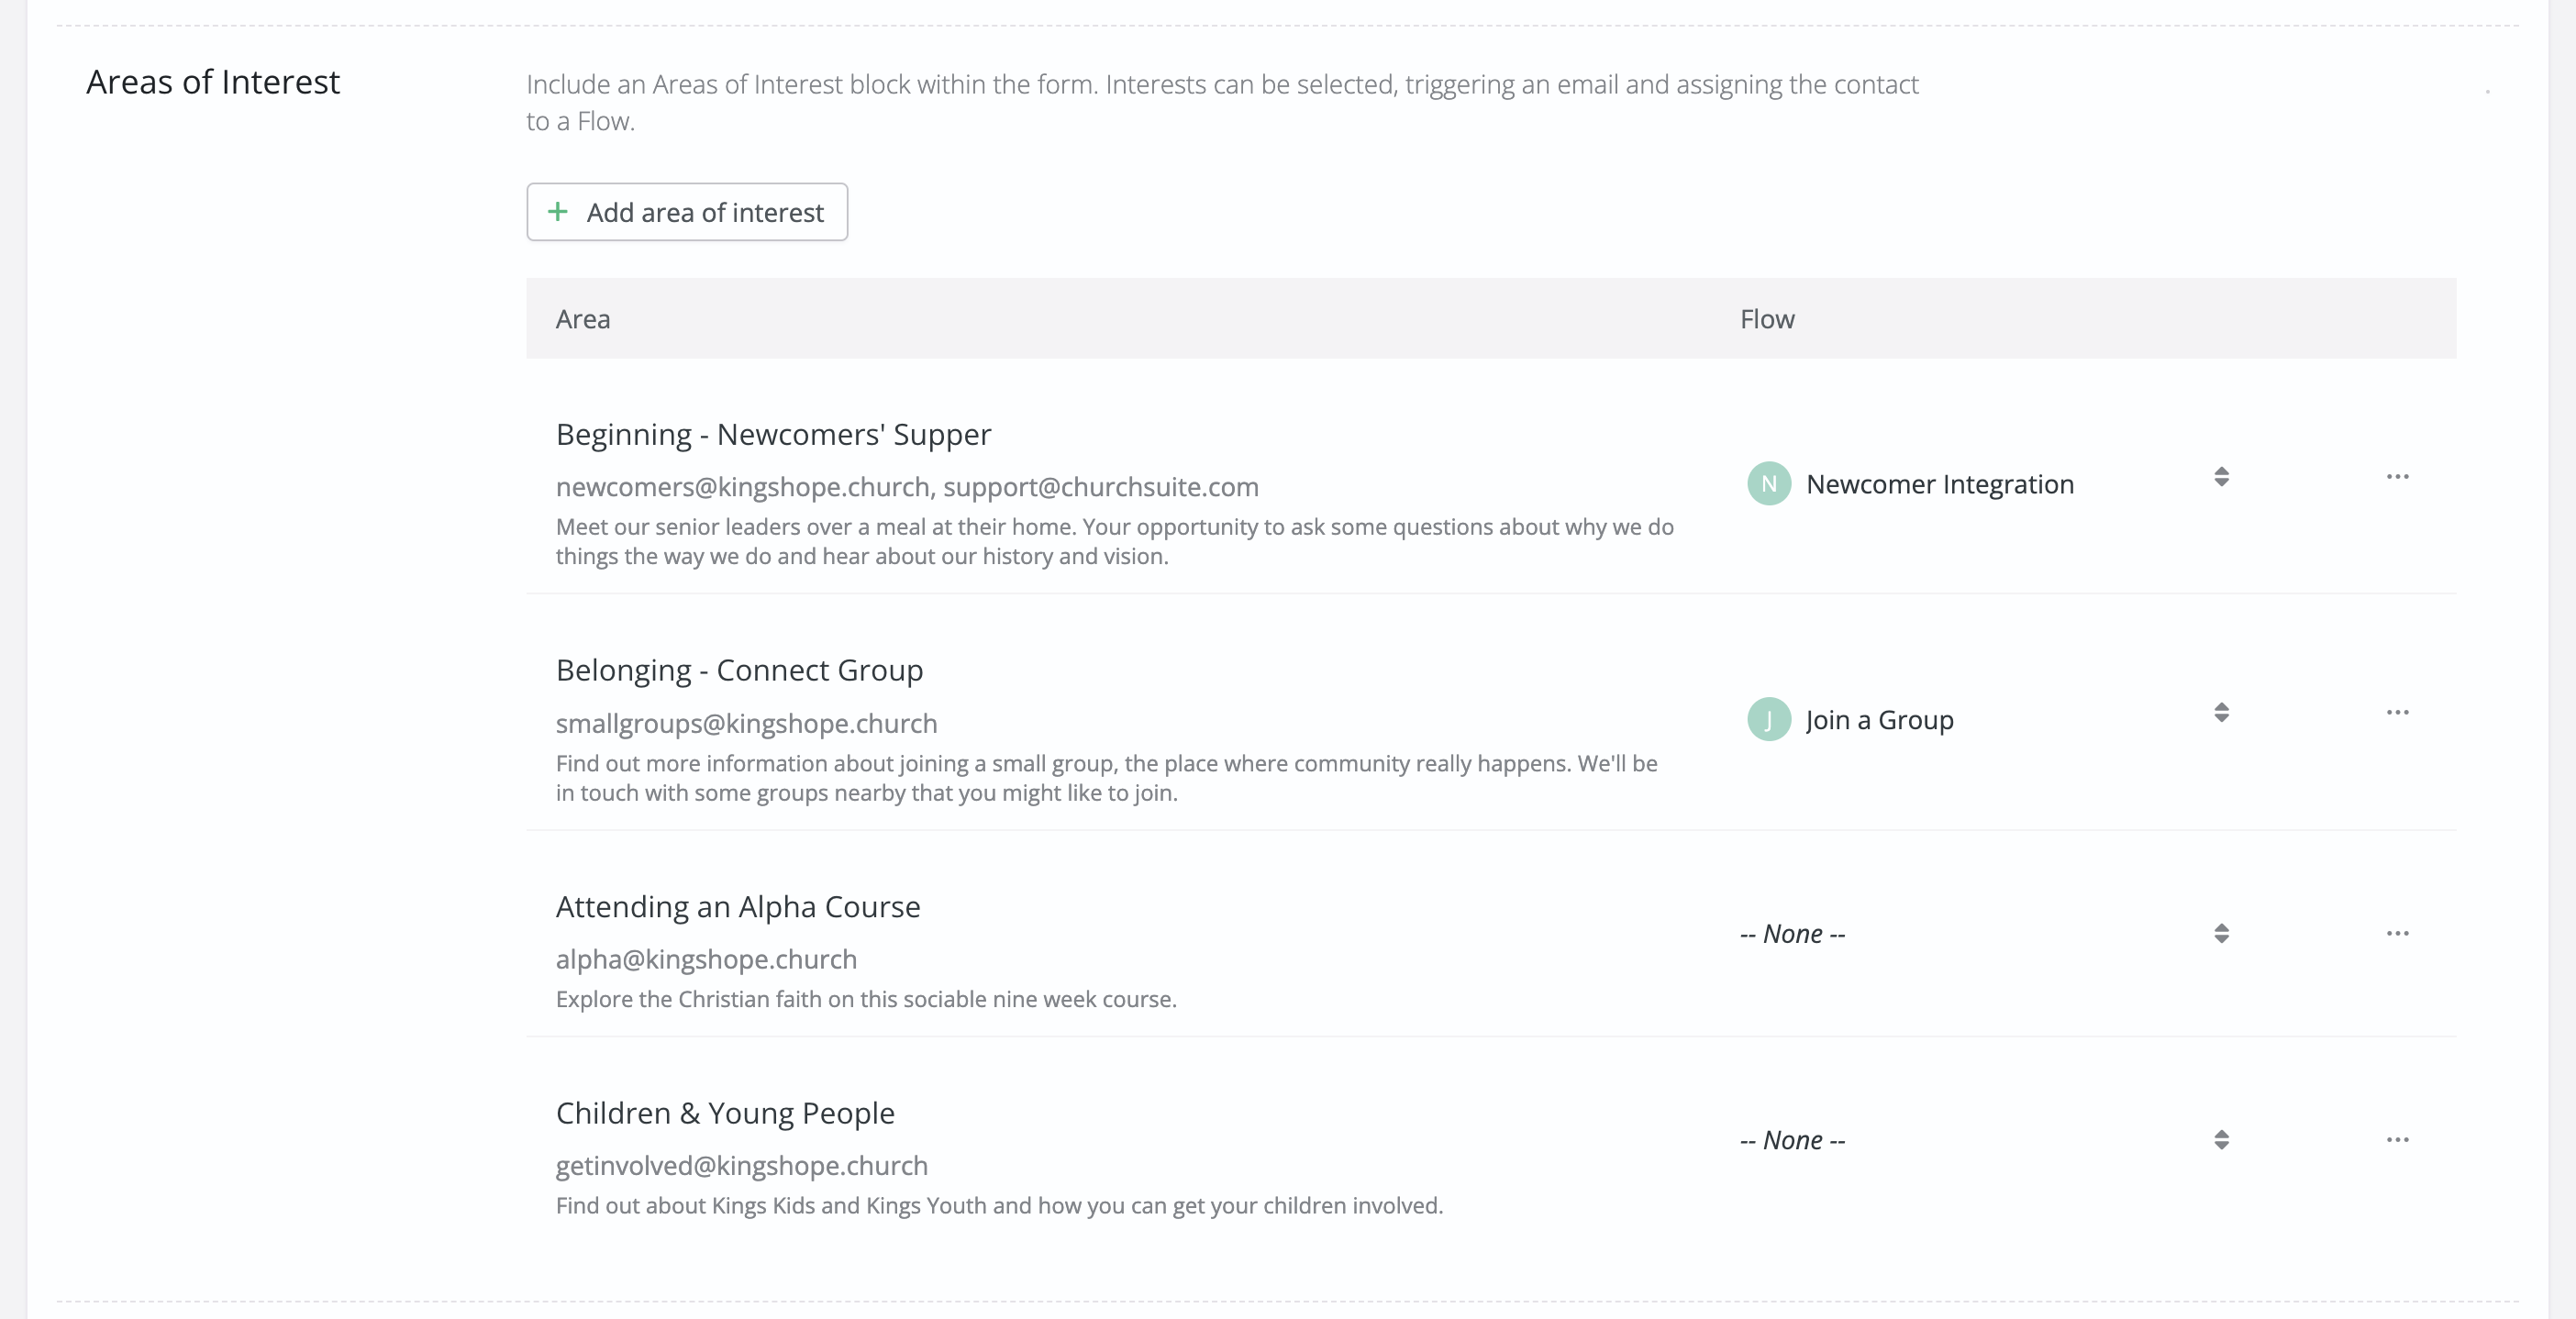
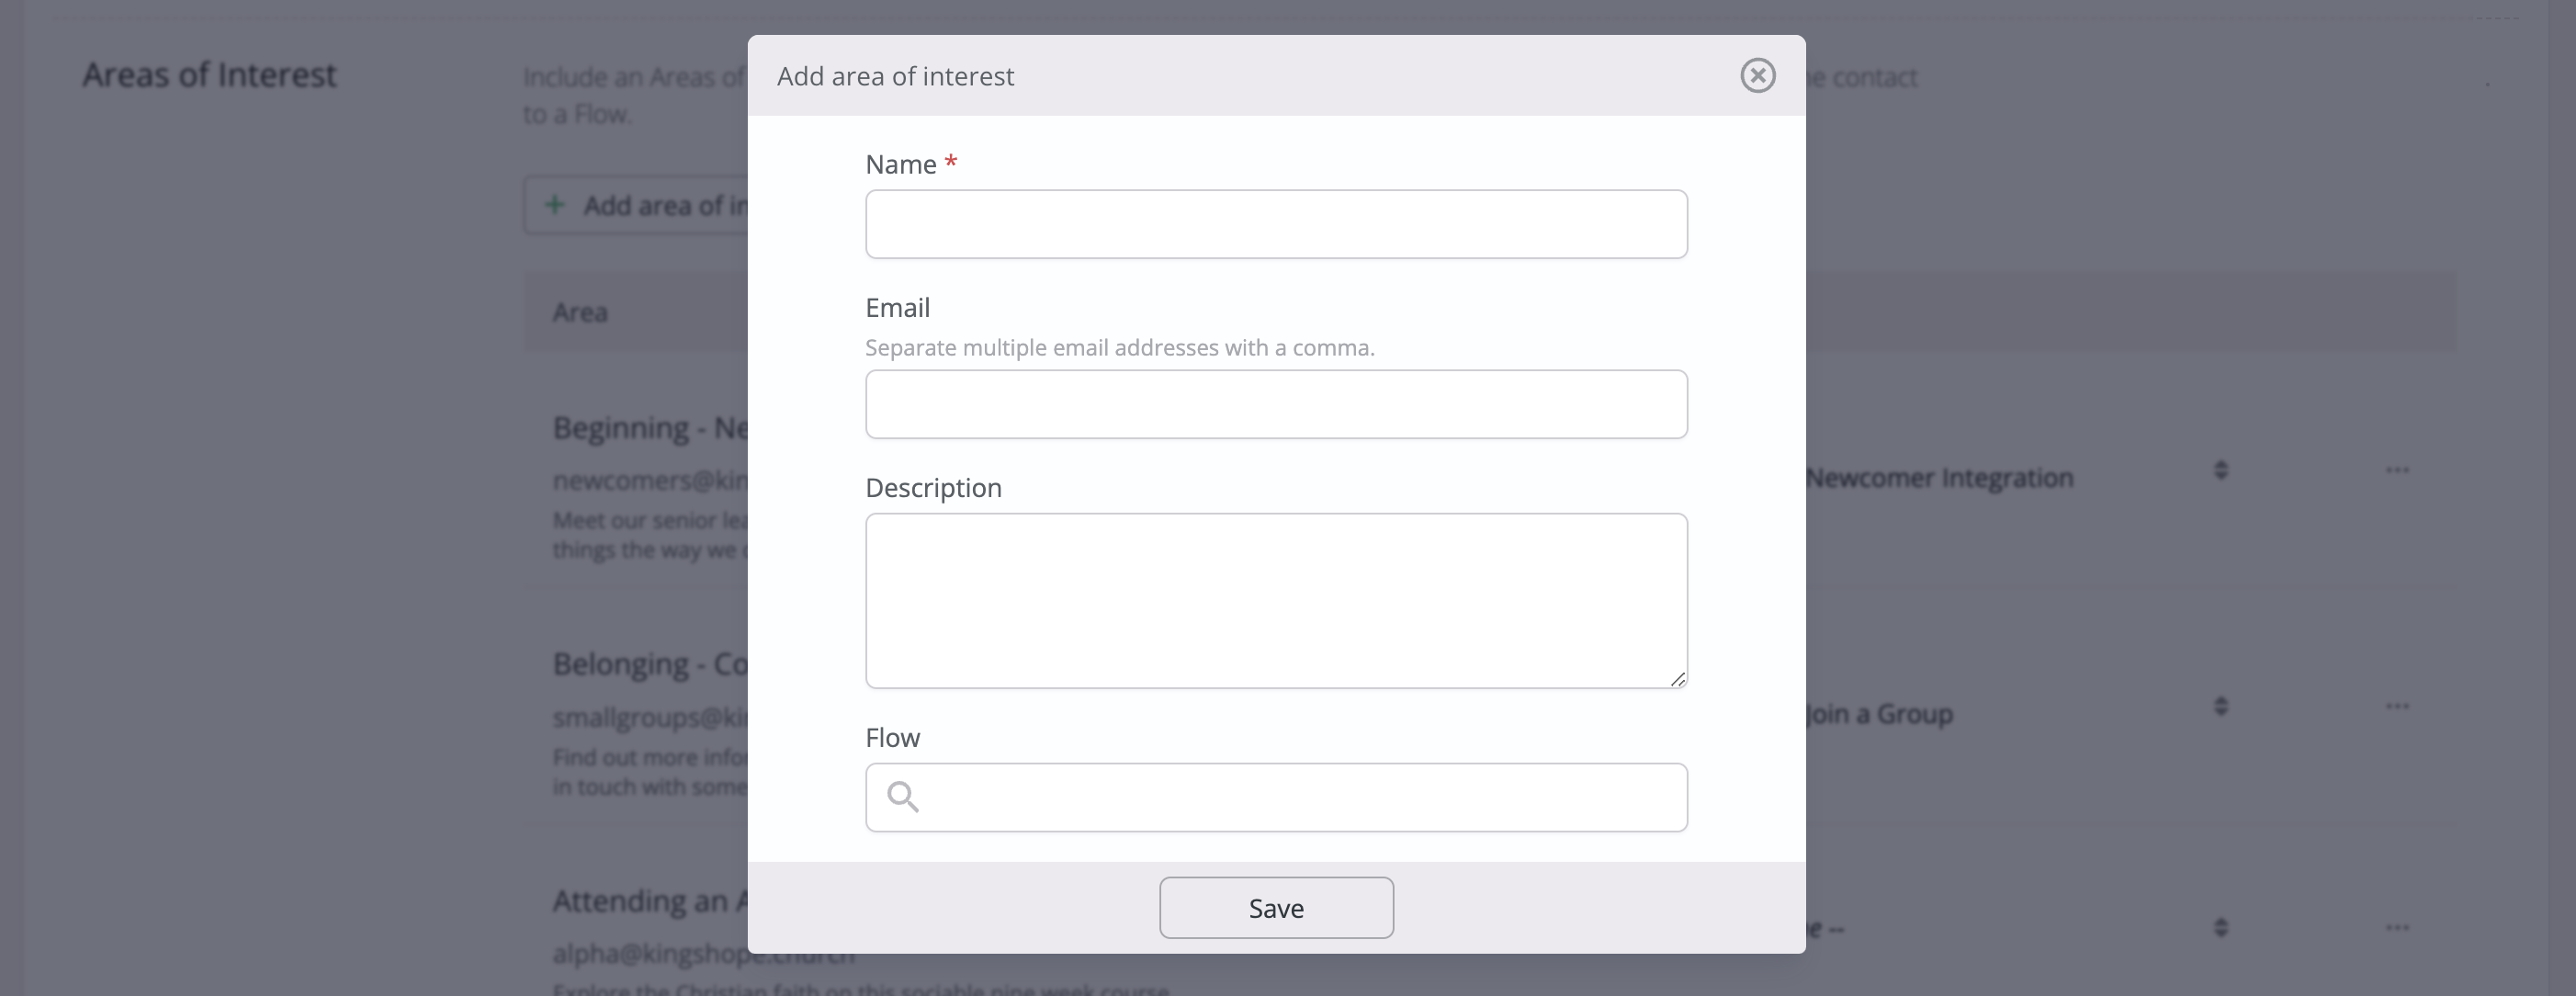
For each interest Area optionally specify an Email address that will be notified if that area is selected. Typically this might be a ministry overseer. Separate multiple email addresses with a comma. You can also optionally select a Flow related to each area - those selecting that area of interest will be added to that Flow when they submit the form - ideal where follow-up is required. Remember, Flows send managers helpful notifications when things become due. Use the Order controls on the left to get the list ordered, perhaps with the most important or common interests first.
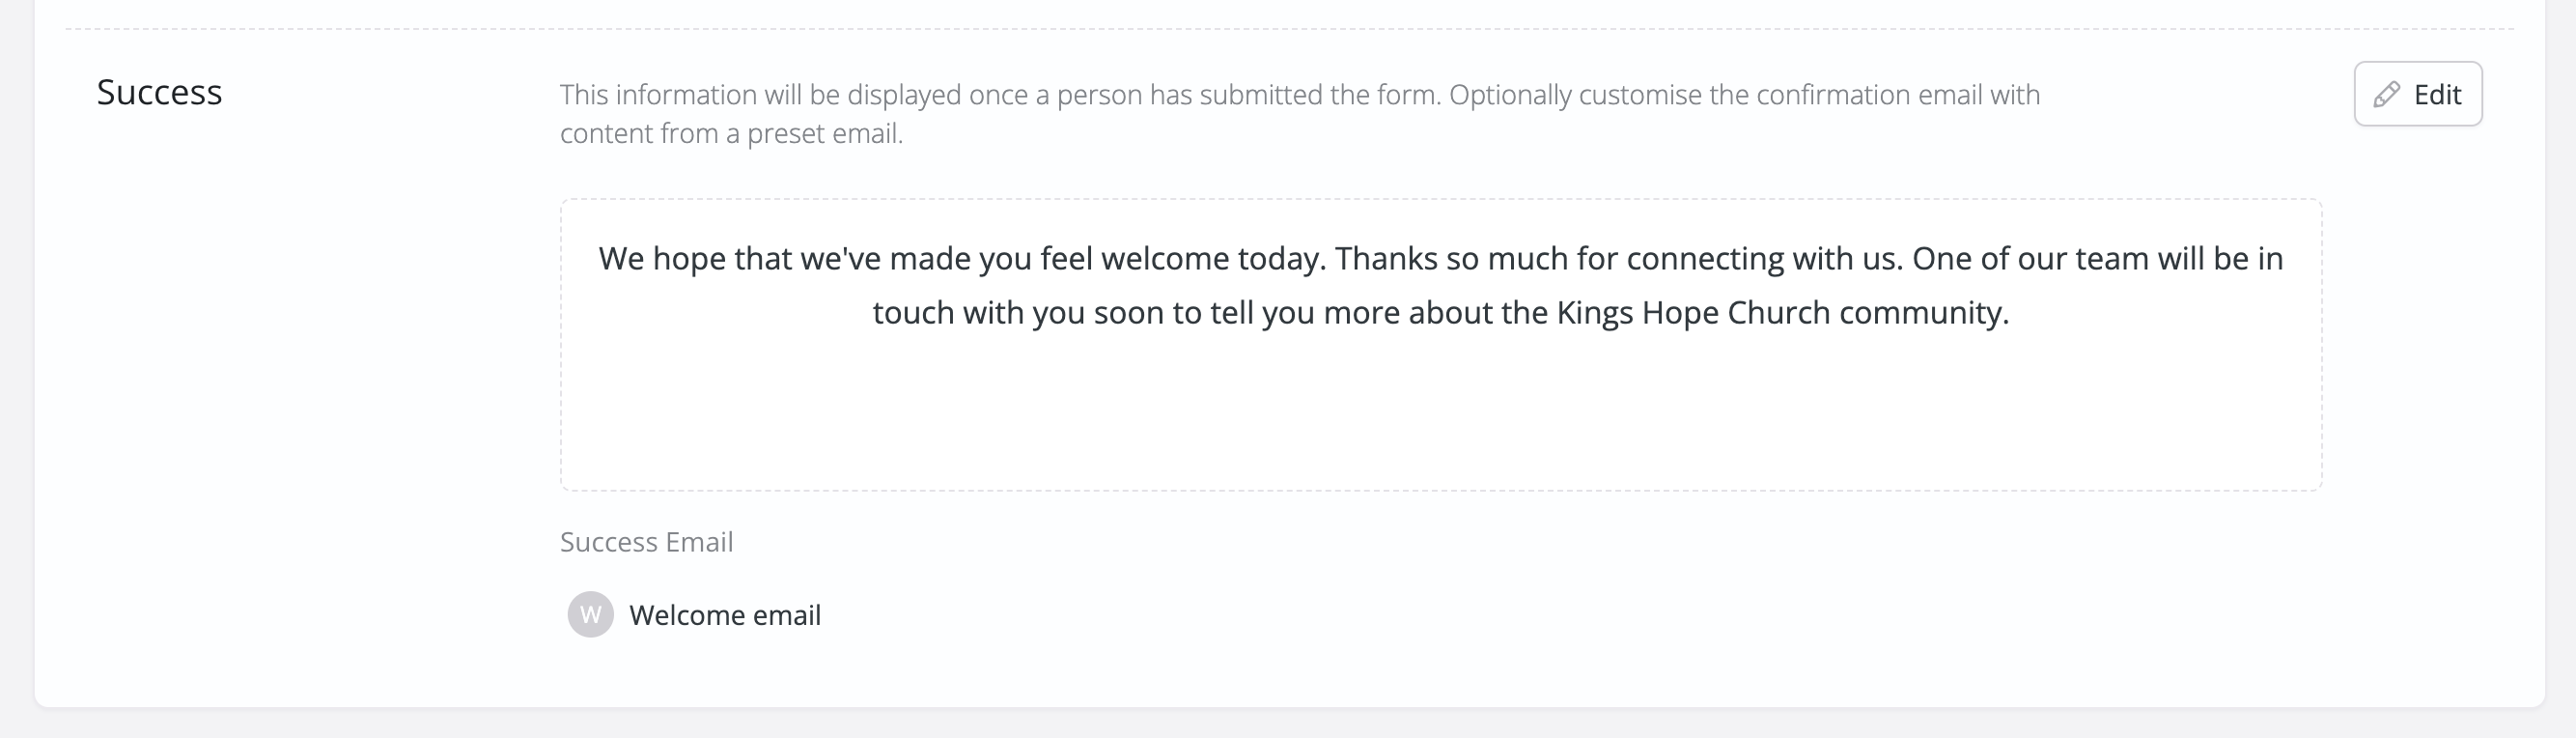
Finally, optionally add a Success Message that displays on the screen when someone has submitted the form. You can also select to send a Preset Success Email. You'll need to have created the Preset email first, then you can select it from the drop-down list. Don't overlook the importance of the Success Email - it's your first opportunity to respond to a newcomer and extend a warm welcome after having submitted their details. Perhaps explain what's going to happen next in terms of follow-up.
Note that ChurchSuite always sends a success confirmation email confirming all the details submitted on the form, logged against the new contact's Communication log providing you with a historic record of the personal data submitted and the state of the form at the time of their response. If you select a Preset Success Email, the 'system' confirmation content will be appended to the end of your preset Success Email.
You should now preview the finished My Details form in Connect and make further adjustments if necessary. You may find it useful to submit a test response using your email address so that you can visualise the newcomer user experience. See the related support article What is Connect? for how to access ChurchSuite Connect and the My Details form.
Customising the child fields on the form
After you've completed the Connect Options for the Address Book, head into the Children module's settings and customise the Connect Options for children. These options broadly follow the same settings for contacts but will apply to any children's details submitted using the Add child option on the My Details form.

Choose the child Fields to be shown on the form for children and whether any fields are required.
Thinking about how you might follow up with new children or their parents/carers, the next section enables you to assign new children to Tags, Key dates and Flows. For example, you might assign a "First Connected" or "Ongoing Consent" key date to each newcomer child at the start of their connection journey. You may have a newcomer Flow through which you take new people through a series of steps in a welcome or integration process.

What happens when a newcomer submits the form?
This is a great question and you should know the answer so that you can engage your internal newcomer processes accordingly. Here's what happens: -
- A new contact is added to the Active section of the Address Book.
- Any spouse/partner specified in the form is also added to the Active section of the Address Book and the couple will be linked according to their marital status. The spouse/partner will share all the contact information of the main contact (except name, email, telephone, mobile and DOB, which is unique to each contact).
- Any children added as part of the submission will be added to the Active section of the Children module and linked to their parent/carer contacts in the Address Book.
- Key Dates and Tags will be assigned according to the Connect Options (and also to any spouse/partner and children added).
- Notification emails will be sent to the designated 'Notifications' email address set in the Connect Options and to all ministry overseer email addresses in respect of Areas of Interest. New contacts and children are also added to Flows as set in the Connect Options (and also any spouse/partner and children added).
- A Note is added against the new contact that their details were added through ChurchSuite Connect (and against any spouse/partner and children added). The note will include areas of interest selected.

- A "success" email is sent to the new contact. This is logged in the Communication log as a historic record of permission to store personal data.
- After the success message is displayed on the screen the form can be cycled ready for the next person to use the form. It is not possible to go back in a browser to view the previously submitted form details.
Duplicate contacts
When new contact details are submitted through the My Details form, ChurchSuite alerts you to any potential duplicate contacts or children already in the respective modules. When reviewing newly-added contacts or children you may see an information message like the example below. You then have the option to check and, if necessary, Merge the duplicate or Ignore them if they are not duplicates. A duplicate is detected where there is an exact match in the person's First Name and Last Name. There's also a Duplicated Contacts and Duplicated Children report in the respective modules that show all potential duplicates within that module.
