Working with rotas in My ChurchSuite
While rota members can easily manage their serving commitments in My ChurchSuite, designated Ministry Overseers have full rota-management functionality, meaning they don't need User access to the Rotas module to create and manage their rotas. If you're a rota member, check out the My ChurchSuite User Guide in the related support articles. However, if you're a rota overseer, read on!
In this article
Adding a rota
Adding teams, team members and roles
Enabling rota sign up
Publishing and distributing a rota
Adding people directly to a rota
Assigning roles
Processing accept/decline responses
Removing people from a rota
Adding notes to highlight special rota dates
Adding dates to a rota
Removing dates from a rota
Adding a Rota
To add a new rota, head to My Rotas, click on the Rotas tab and tap Add rota.

On the Add Rota pop-up, select the Ministry – only ministries that you oversee are listed.

Select the Service to which the rota should be linked (if applicable) and set the rota Date range. While it is possible to extend an existing rota by adding single or multiple dates (explained in this article) ChurchSuite supports the process of creating new follow-on rotas. In this way, you can work on a draft follow-on rota for the next season while the existing published rota is running, without the follow-on rota being visible until you're ready to publish it.

Next, set the Days that rota members will serve and their serving Times. You can minimise false rota clashes by setting accurate serving times that reflect when rota members actually serve. For example, if the worship team are expected to arrive at 9am for a 10:30am Sunday service, set the serving times to run from 9am and link the rota to the 10:30am service.

Next, set the rota Team Rotation (explained in the next section). Depending on the rotation selected, related rotation options may be shown:
- For Serve 13, which requires at least four weekly teams (or five teams if you have a designated week 5 team) you'll have the option to select the Teams to Rotate.
- For Simple Rotation you'll have the option to select the Repeat Rota, Teams to Rotate, the Start Team and the Serving Pattern.
- For Ad Hoc, there is no team rotation but you can set the Repeat Rota.
Which Team Rotation?
Not every ministry needs teams - a ministry may be one team representing a pool of volunteers or a ministry may have many teams perhaps representing weekly teams and a reserves team. Additionally, a team may comprise one person or multiple people - in the context of creating a rota, teams are about the 'rotation' of people.
- Ad Hoc: If the ministry doesn't follow any regular, rotating serving pattern, select AdHoc. New rotas will be a grid of empty dates and you'll manually assign people or teams to each date on an ad hoc basis, perhaps based on availability.
- Simple Rotation: Create any number of teams and have them follow a simple rotation pattern. For example, if a team serves every 3 weeks, create three teams; if a team serves every 6 weeks, create six teams. With Simple Rotation, specify which 'Teams to Rotate', the 'Start Team' for the rotation and the 'Serving Pattern' for each team. It's also possible to exclude teams from the rotation, for example, a Reserves team.
- Serve 13: Four weekly teams serve once per month, e.g. Team 1 on the first week, Team 2 on the second week, etc. On months with five weeks, the extra week can be covered once a year by each weekly team in simple rotation – during a year each team will typically serve 13 times. It's also possible to use Serve 13 with five teams, with Team 5 being assigned to each fifth week month during the year.
Note the option to disable Clashes for a rota - perhaps for rotas that serve part-way through a service and will therefore always clash with other rotas e.g. the 'communion' or 'readings' rotas. See the related support article for further information about managing clashes. You are also able to enable or disable the Accept/Decline functionality for the rota. If enabled, rota members will be able to accept or decline their requested rota dates, giving you greater clarity about those serving and where the gaps are that still need filling. You can also enable or disable Expiry Reminders; if enabled, Ministry overseers will receive email reminders when the rota is close to expiring.

Finally, choose whether to Allow members to sign up for future dates on the rota.

Tap Save to add the new rota. For Ad Hoc, an empty grid of rota dates is produced ready for you to populate on an ad hoc basis. For Simple Rotation and Serve 13, the rotas are automatically populated with the ministry's Teams, Members and Roles in the appropriate rotation. The rota is created with a Draft status and is only visible to you and other ministry overseers. See later in this article for further information on publishing and distributing a rota.

For Ad Hoc rotas, you may wish to change the order of the rota from viewing in Name order to viewing by Role order. To do this, tap Actions then Edit Rota, then head to the Order by dropdown and select Role, then Save.


Adding teams, team members and roles
Before looking further at rotas, let's take a moment to look in more detail at the Teams and Roles sections.

From the Teams tab, you can click the Actions menus to Add, Edit, Order and Delete teams as well as being able to Add or Remove [team] Members and add/edit team member roles.


You can optionally change the Order of teams, which will only affect new rotas and will not change the order or rotation for existing rotas.

You can add new volunteers to any team - contacts or children - by clicking Actions then Add member at the top of each Team.

On the Add member pop-up, Search and select a person to add to the team and optionally assign their Roles. Where there are existing rotas, you can Update existing rotas, which will add the new team members to all future dates on the selected rotas where their team is currently set to serve, or you may choose to untick and not update rotas - perhaps if their team addition relates to new rotas you create in the future.

You can Add and Edit roles of team members by clicking the action menu (3 dots) alongside the person's name. Role changes made here won't update roles currently assigned on existing rotas but they will apply for new rotas added in the future and when adding the person ad hoc to dates on existing rotas.
Enabling rota sign up
A great feature of ChurchSuite's rota functionality is the ability to create rotas that ministry members can sign up for based on their availability. Rota sign-up is ideal for growing team numbers, filling rota gaps or publishing an empty or partially-completed rota to invite team members to sign-up and populate.
You can set a sign-up capacity for all future dates on a rota or just for certain dates – perhaps where you know in advance that you'll need extra people serving for a special event or service. Once the sign-up capacity for a rota date has been reached, no further sign-ups to that date are possible. Rota sign-up can be enabled on a rota-by-rota basis, giving you the flexibility to choose the rota-recruitment method that works best for your ministry. Rota sign-up can also be disabled at any time, which will prevent further sign-up.
Sign Up status and the status of other optional features is distinguished in the rota profile. Click Edit rota to make changes to a rota's settings, including enabling or disabling rota Sign up.

Once rota Sign up is enabled and the rota is published, ministry members viewing their rota can click + Sign Up for any rota dates they are not already serving and where there is available capacity.
Once signed up, rota members are unable to cancel their sign-up but they can Organise a swap, Add Unavailability or, if 'rota accept/decline' is enabled for the rota, they can Decline a previously-accepted sign-up to a rota date.
Publishing and distributing a rota
Draft status rotas are distinguished by a clear message. Click Publish rota to make the rota visible in My ChurchSuite to the rota's members.

You'll now want to let all the rota members know about the newly-published rota. Tap Actions then Send rota.


On the Send rota pop-up, select the range of rota Dates you wish to send and the Recipients to be notified. Note the recipient options to send to All members, Not responded or Not sent. Using these options you can easily re-send previously sent rotas or send to just those rota members that have not previously been sent the rota - ideal if you've made some rota changes and you just want to let the newly-added people know or if you wish to chase up those who've not yet responded to your serving requests. For rotas with Accept/Decline enabled, ChurchSuite visually distinguishes the unsent, sent and responded serving status of each rota member for each rota date. You can optionally customise the rota email Subject and Message - including using a ::first_name:: merge field for the personalisation of each email. By default, each rota email will also contain the recipient's list of serving dates and roles (the date list) but you can optionally Include the rota grid and a rota member contact details table (which respects people's individual privacy settings) in the email if you wish. When you are ready, click Send.

The rota emails are sent - one email per recipient (not one email per member per rota date). Note that rota members without an email address will persist on the rota with an unsent serving status. Those without an email address will be unable to access My ChurchSuite, so you'll likely need to follow up with those people outside of My ChurchSuite.
Adding people directly to a rota
Managing rotas is all about getting the right people in the right roles on the right dates and as such, rotas often require multiple changes over the lifetime of the rota. You can make a wide range of ad hoc changes to assigned members and their roles for any rota date without those changes affecting the underlying Teams' data. To add someone to a rota, tap Add to date or, for rotas ordered by role, you can add someone directly to a role by tapping the + next to the role name.

The Add to date pop-up opens. Either select an existing Team member or use the Search to add a person from outside of the ministry - adding ad hoc people to rota dates like this does not add them to the underlying ministry Members list, only to that rota date. However, you may prefer to make more permanent team and member changes in the Teams section and apply the change to all future rota dates. Note also that you can add entire

As mentioned, you can add people directly to roles on rota dates for rotas ordered by Role. Tap the + on the role.
A curated list of available team members who have that role assigned in the Teams section is provided. Either select from the list or use the person Search to choose someone not currently in the Teams list.

Assigning roles
Roles can be assigned or unassigned on the rota without affecting the roles assigned in the Teams section, enabling you to make ad hoc role changes on a rota date as needed. Rota members can, of course, be assigned multiple roles where necessary, which means that in Role view, the rota member will be listed on the rota date more than once, shown under each role they are assigned. To assign or change a rota member's role, select Edit roles from the member Actions next to their name. For those without any roles, the action is labelled Add role.


On the Add role or Edit roles pop-up, select roles as appropriate and save the changes to complete the process and update the rota. Unsent rota reminders will show the updated role assignments.

Processing accept/decline responses
For rotas with Accept/Decline enabled, rota members can Accept and Decline their assigned serving dates - either using their personal Rota Page (a Rota Page link is included in their 'Send rota' emails) or from their My Rotas section of My ChurchSuite. However, a ministry overseer can also Accept or Decline on behalf of any rota member, which may be helpful for rota members without an email address who have verbally indicated their serving responses for you to process.
From the member Actions next to a person's name on the rota select Accept or Decline as appropriate. Where a response has been previously made, only the inverse response action is shown. Accept and Decline actions are not surfaced where a person has added Unavailability or when the rota has a Draft status.


The current serving status of each person and date is shown on all rota views. Let's explore the serving statuses that you may see on your rota (see also the screenshot underneath this list).
- Pending [unsent] - the rota has not yet been sent for that person/date - distinguished un-styled with no icon
- Sent - the rota has been previously sent for that person/date - distinguished italicised with a yellow question mark icon to indicate you're awaiting a response
- Accepted - distinguished un-styled with a green tick icon
- Declined - distinguished in red strikethrough styling and a red cross icon - hover over the person's name to see any decline comment they may have optionally added
- Unavailability - distinguished in red strikethrough styling with a red cross icon - hover over the person's name to see any unavailability comment they may have optionally added
- Clash - where a person is serving on other rotas on the same date/time - styled in red font and distinguished with the serving status icons above - hover over the person's name to see details of the clashing rotas
- Child - distinguished with a child icon in front of the rota member name

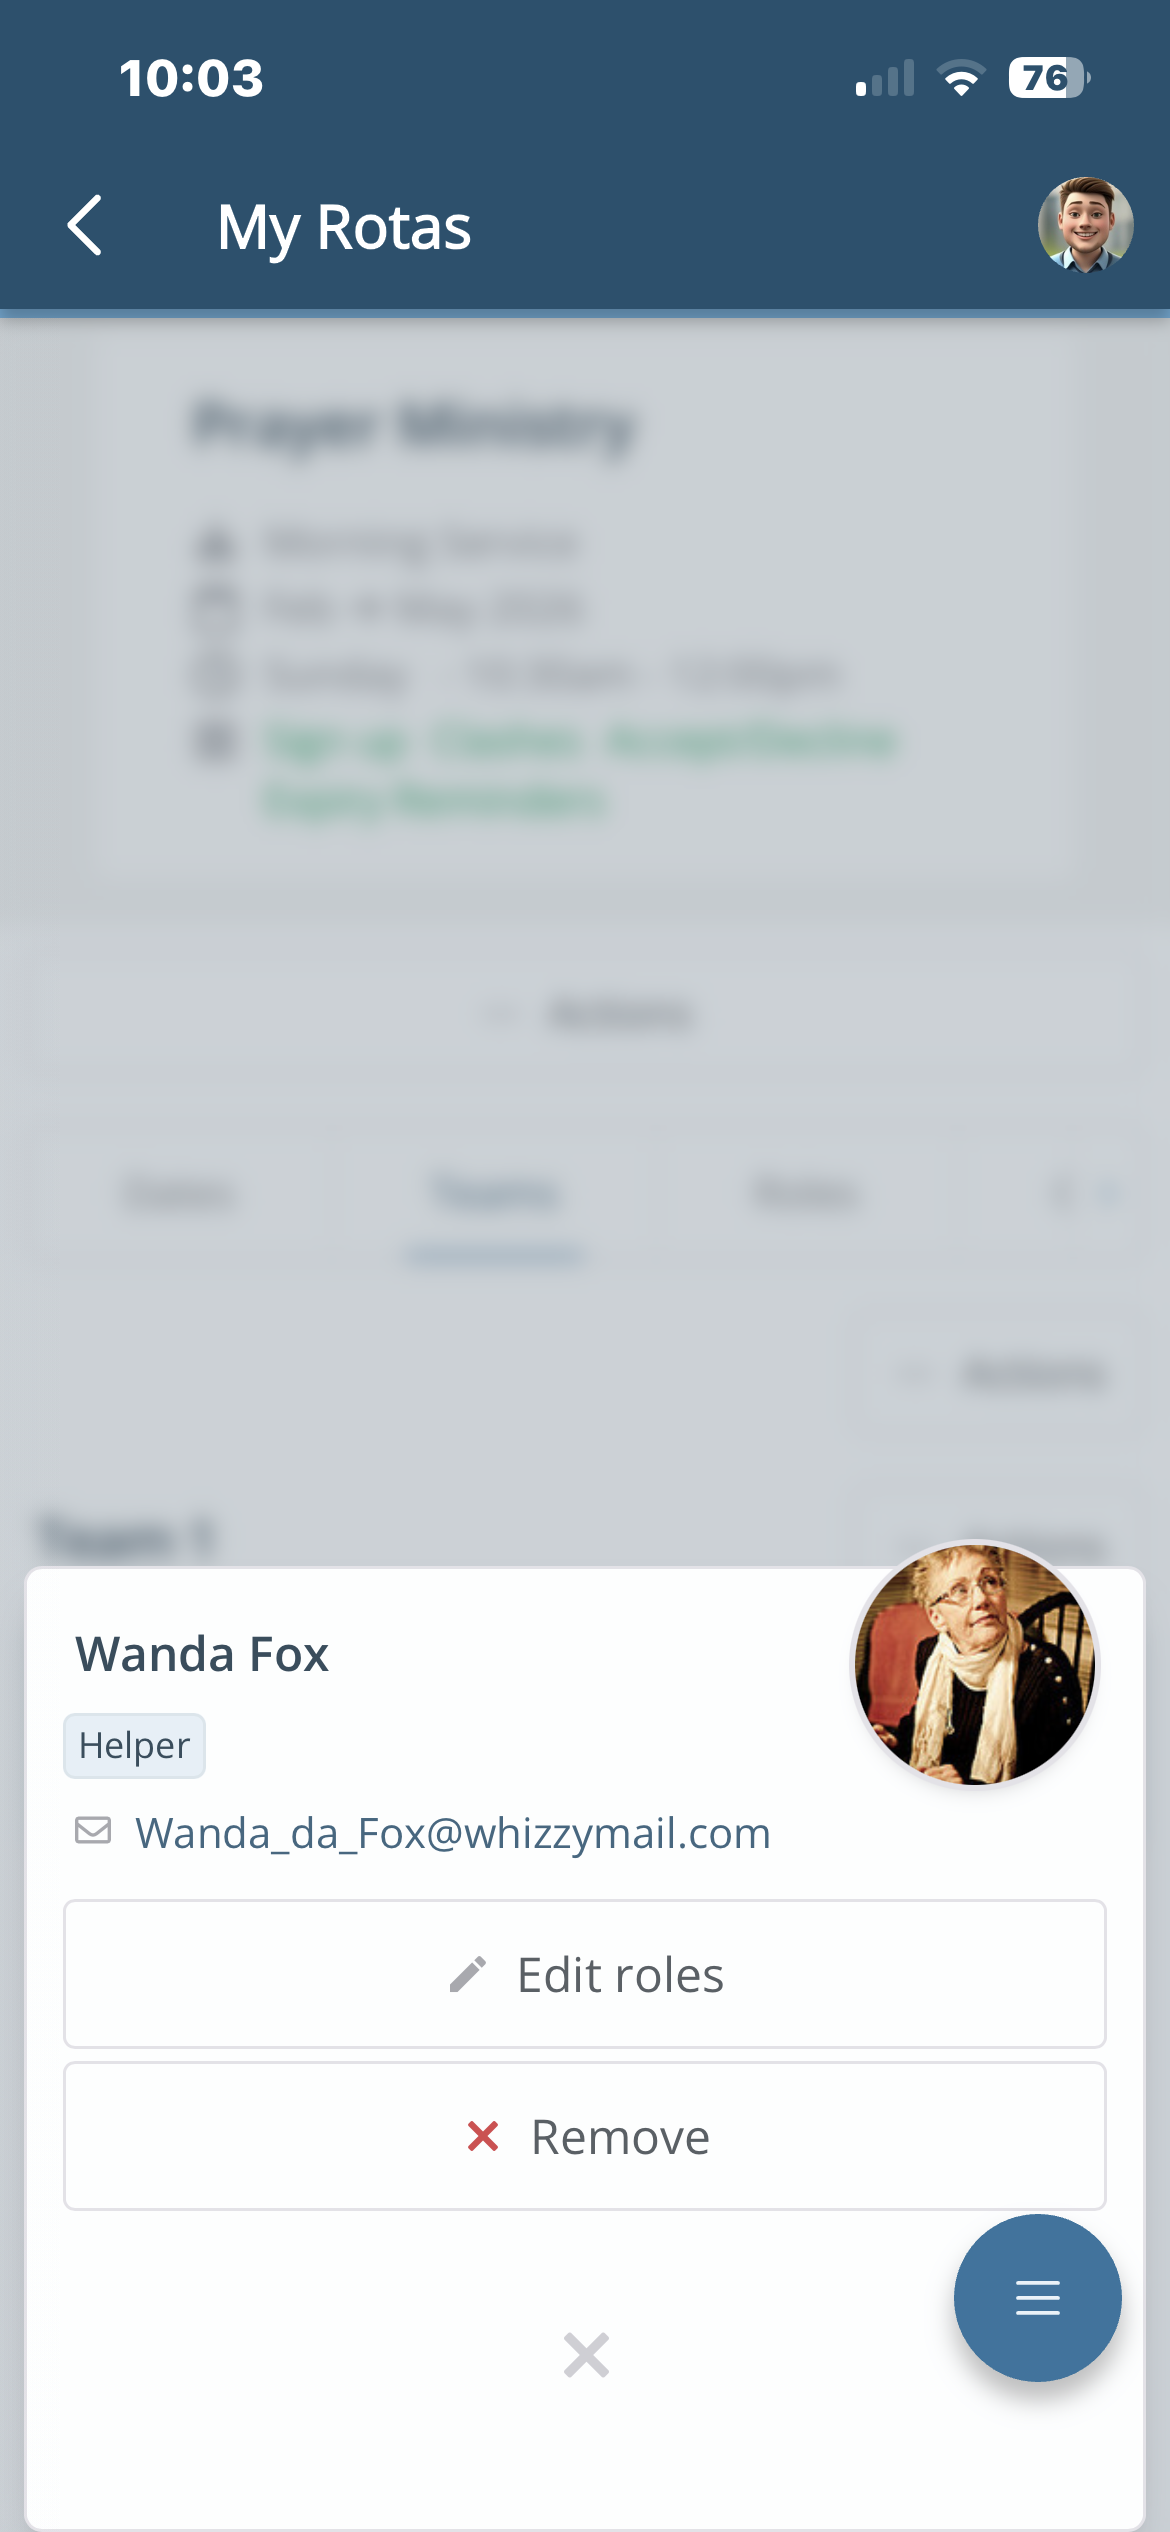
Removing people from a rota
To remove a person from a rota date, tap the member Actions (3 dots) next to their name. You can Swap member - to search/select a different person - or you can select Remove.

When choosing to Remove the person, the Remove member pop-up opens. In addition to Removing from [the selected] date, you can optionally remove the rota member from All future dates on the same rota and Remove from the linked ministry entirely (which will remove them from all Teams). Click Remove to apply the changes.

Adding notes to highlight special rota dates
Special occasions, like Baptism services, can often catch people out on rotas – extra visitors may mean additional team members are needed or additional tasks will need covering when people are serving. Rota notes are rota-specific, allowing you to add a note to any rota date (which is also shown in the All Rotas view and included in rota reminder emails). To add a rota note, select Edit date from the Date Actions (top-right corner).


On the Edit date pop-up, type your note or message in the Notes field. You can add multi-line notes (with line breaks) and even include emojis or short URL links if you wish. Click Save Changes when finished.

The note is added to the rota date and will show on all rota views in My ChurchSuite and the admin-facing ChurchSuite Rotas module.

A service leader may have added a service note to a service date in ChurchSuite - these will also show on all rotas linked to that service – service notes are shown italicised above un-styled rota notes. You can't add or edit service notes from within My ChurchSuite - service notes can only be managed by a Rotas module user in ChurchSuite.

Adding dates to a rota
You can add additional dates to a rota. Dates can be added individually - it's intended that 'follow on' rotas are created for the next season when a rota is ending, rather than endlessly extending existing rotas. As an overseer you will receive rota expiry reminders in the weeks leading up to the final dates of a rota, prompting you that a new 'follow on' rota will soon be needed. However, to add a date to a rota - perhaps for a special event - click Add Date at the top of the rota page.


On the Add date pop-up, enter the Date and Start Time and any optional rota Notes. If rota sign-up is enabled, set the Maximum sign-ups for the date being added and click Add Date to save the changes.

The new date is added - empty - ready for you to assign people.

Removing dates from a rota
Removing dates from a rota will remove all rota members assigned to that date. You have two options...
You can either clear the rota date, which will remove all members for that date and leave the date in place on the rota (empty of people); or you can remove the date entirely. Before deleting a date it may be helpful to consider what your rota members may expect to see when viewing the rota. A deleted (missing) date may be confusing but an empty date with a suitable rota Note added may be clearer. From the Date Actions, select Clear date or Delete date as appropriate. You'll be asked to confirm the change.

