Using brands
In this article
Managing brands
Branding events
Branding forms
Branding funds
Branding bookings
Branding plan pages
Introduction
Your ChurchSuite account has a Default brand. The default brand's colour, logo, emblem, email font and email footer are used to style My ChurchSuite, My Consent, Connect, Donate and Embed and are sported on branded emails and branded pages and forms like event and booking pages. You can also add Custom brands that can then be assigned to event categories, forms, funds, booking types and plans linked to events so that those respective pages, forms and communications sport the custom brand colour, logo, emblem, email font and email footer, overriding the default brand.
Managing brands
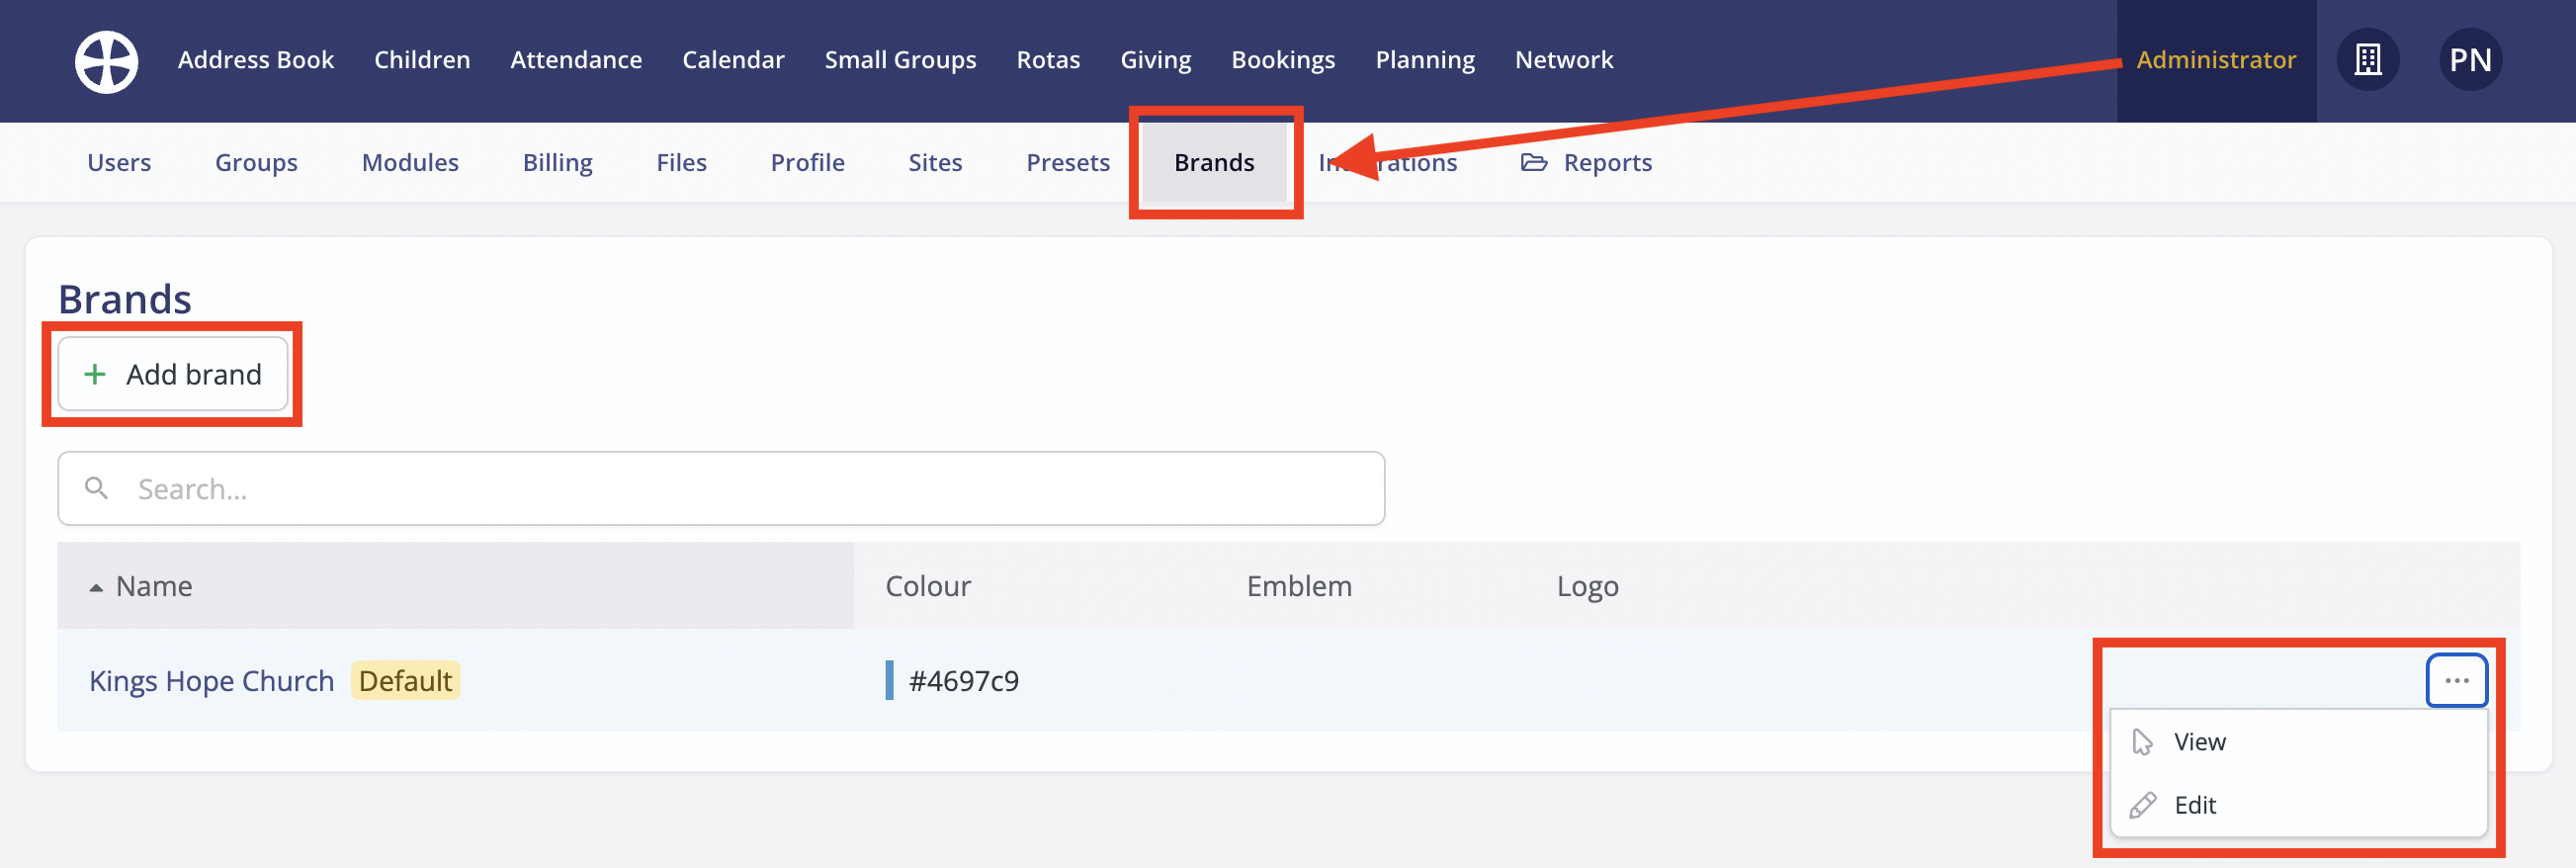
Brands are managed in the Brands section of the Administrator area. From here you can Edit to make changes to the default brand and any custom brands previously added, add custom brands by clicking Add brand, or select View to upload an Emblem and Logo for a brand.
When adding a custom brand, begin by giving the brand a suitable Name and choosing a Colour. You can replace the suggested hexadecimal colour code, perhaps choosing one from your organisation's colour palette or style guide, or choosing a colour that matches your website colour scheme. Use tools like Adobe Kuler to find the correct hexadecimal code for your preferred colour. Finally, choose a preferred email-safe Branded Email Font and optionally add a Branded Email Footer which is appended to the bottom of branded emails. An email footer might include your organisation's contact details, address, website link, and company/charity number - use the HTML Editor tools to style the footer content. Click to Save the changes.

Email-safe fonts
While you may have a licence to use a particular font for your organisation's branding and website, those receiving your emails will be unlikely to have your licensed font installed on their devices, meaning that your branded emails will not display as intended. Choosing from the list of email-safe fonts provided means that you'll be using a font that is installed on all devices and browsers and common to most email applications, meaning that branded emails will render correctly for all your recipients.
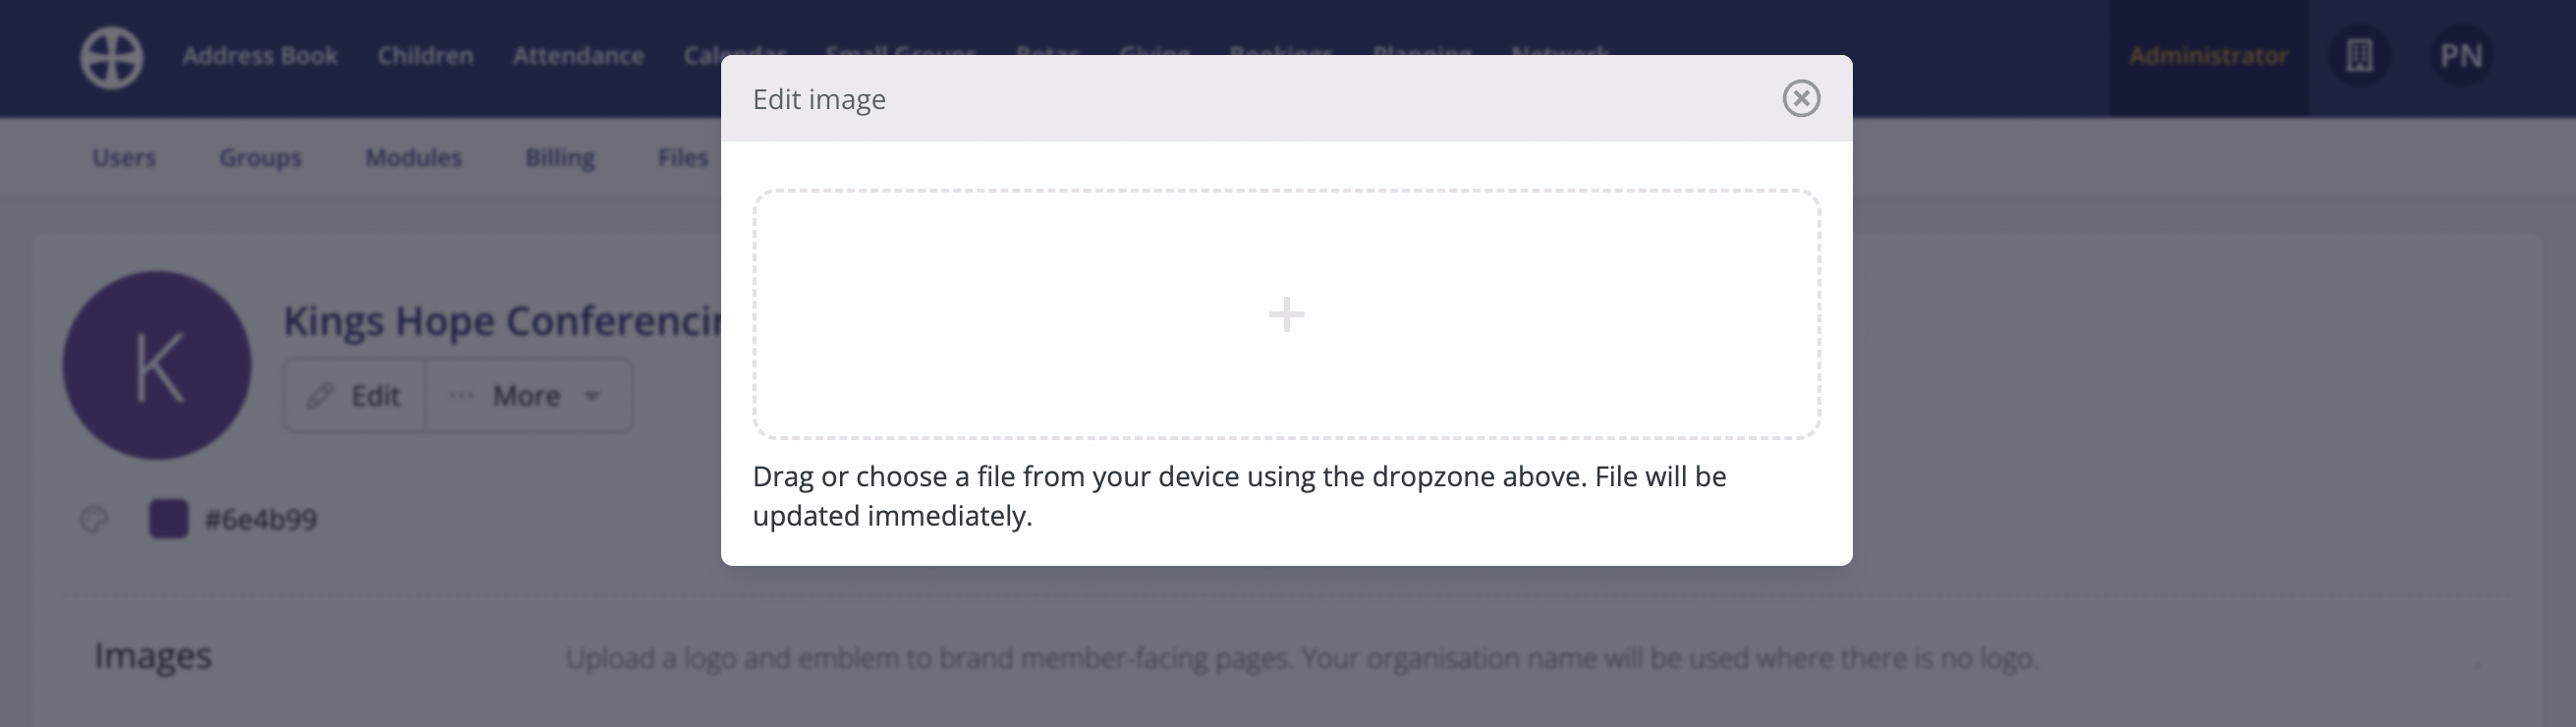
From the brand View, you can upload suitably prepared Logo and Emblem Images and see a likeness of the branded email footer. To add or change a Logo or Emblem, click the respective Logo or Emblem image placeholder to reveal the Edit action.
 On the Edit image pop-up, drag or choose a file from your device into the dropzone. The file is updated immediately. Images should be in JPG/PNG format, and to avoid stretching or clipping, be precisely 1000x200 pixels for a Logo and 200x200 pixels for an Emblem. In the absence of a Logo image, your organisation's Name will be used for all branded pages, forms and branded header emails. The Emblem is used in the footer of branded emails.
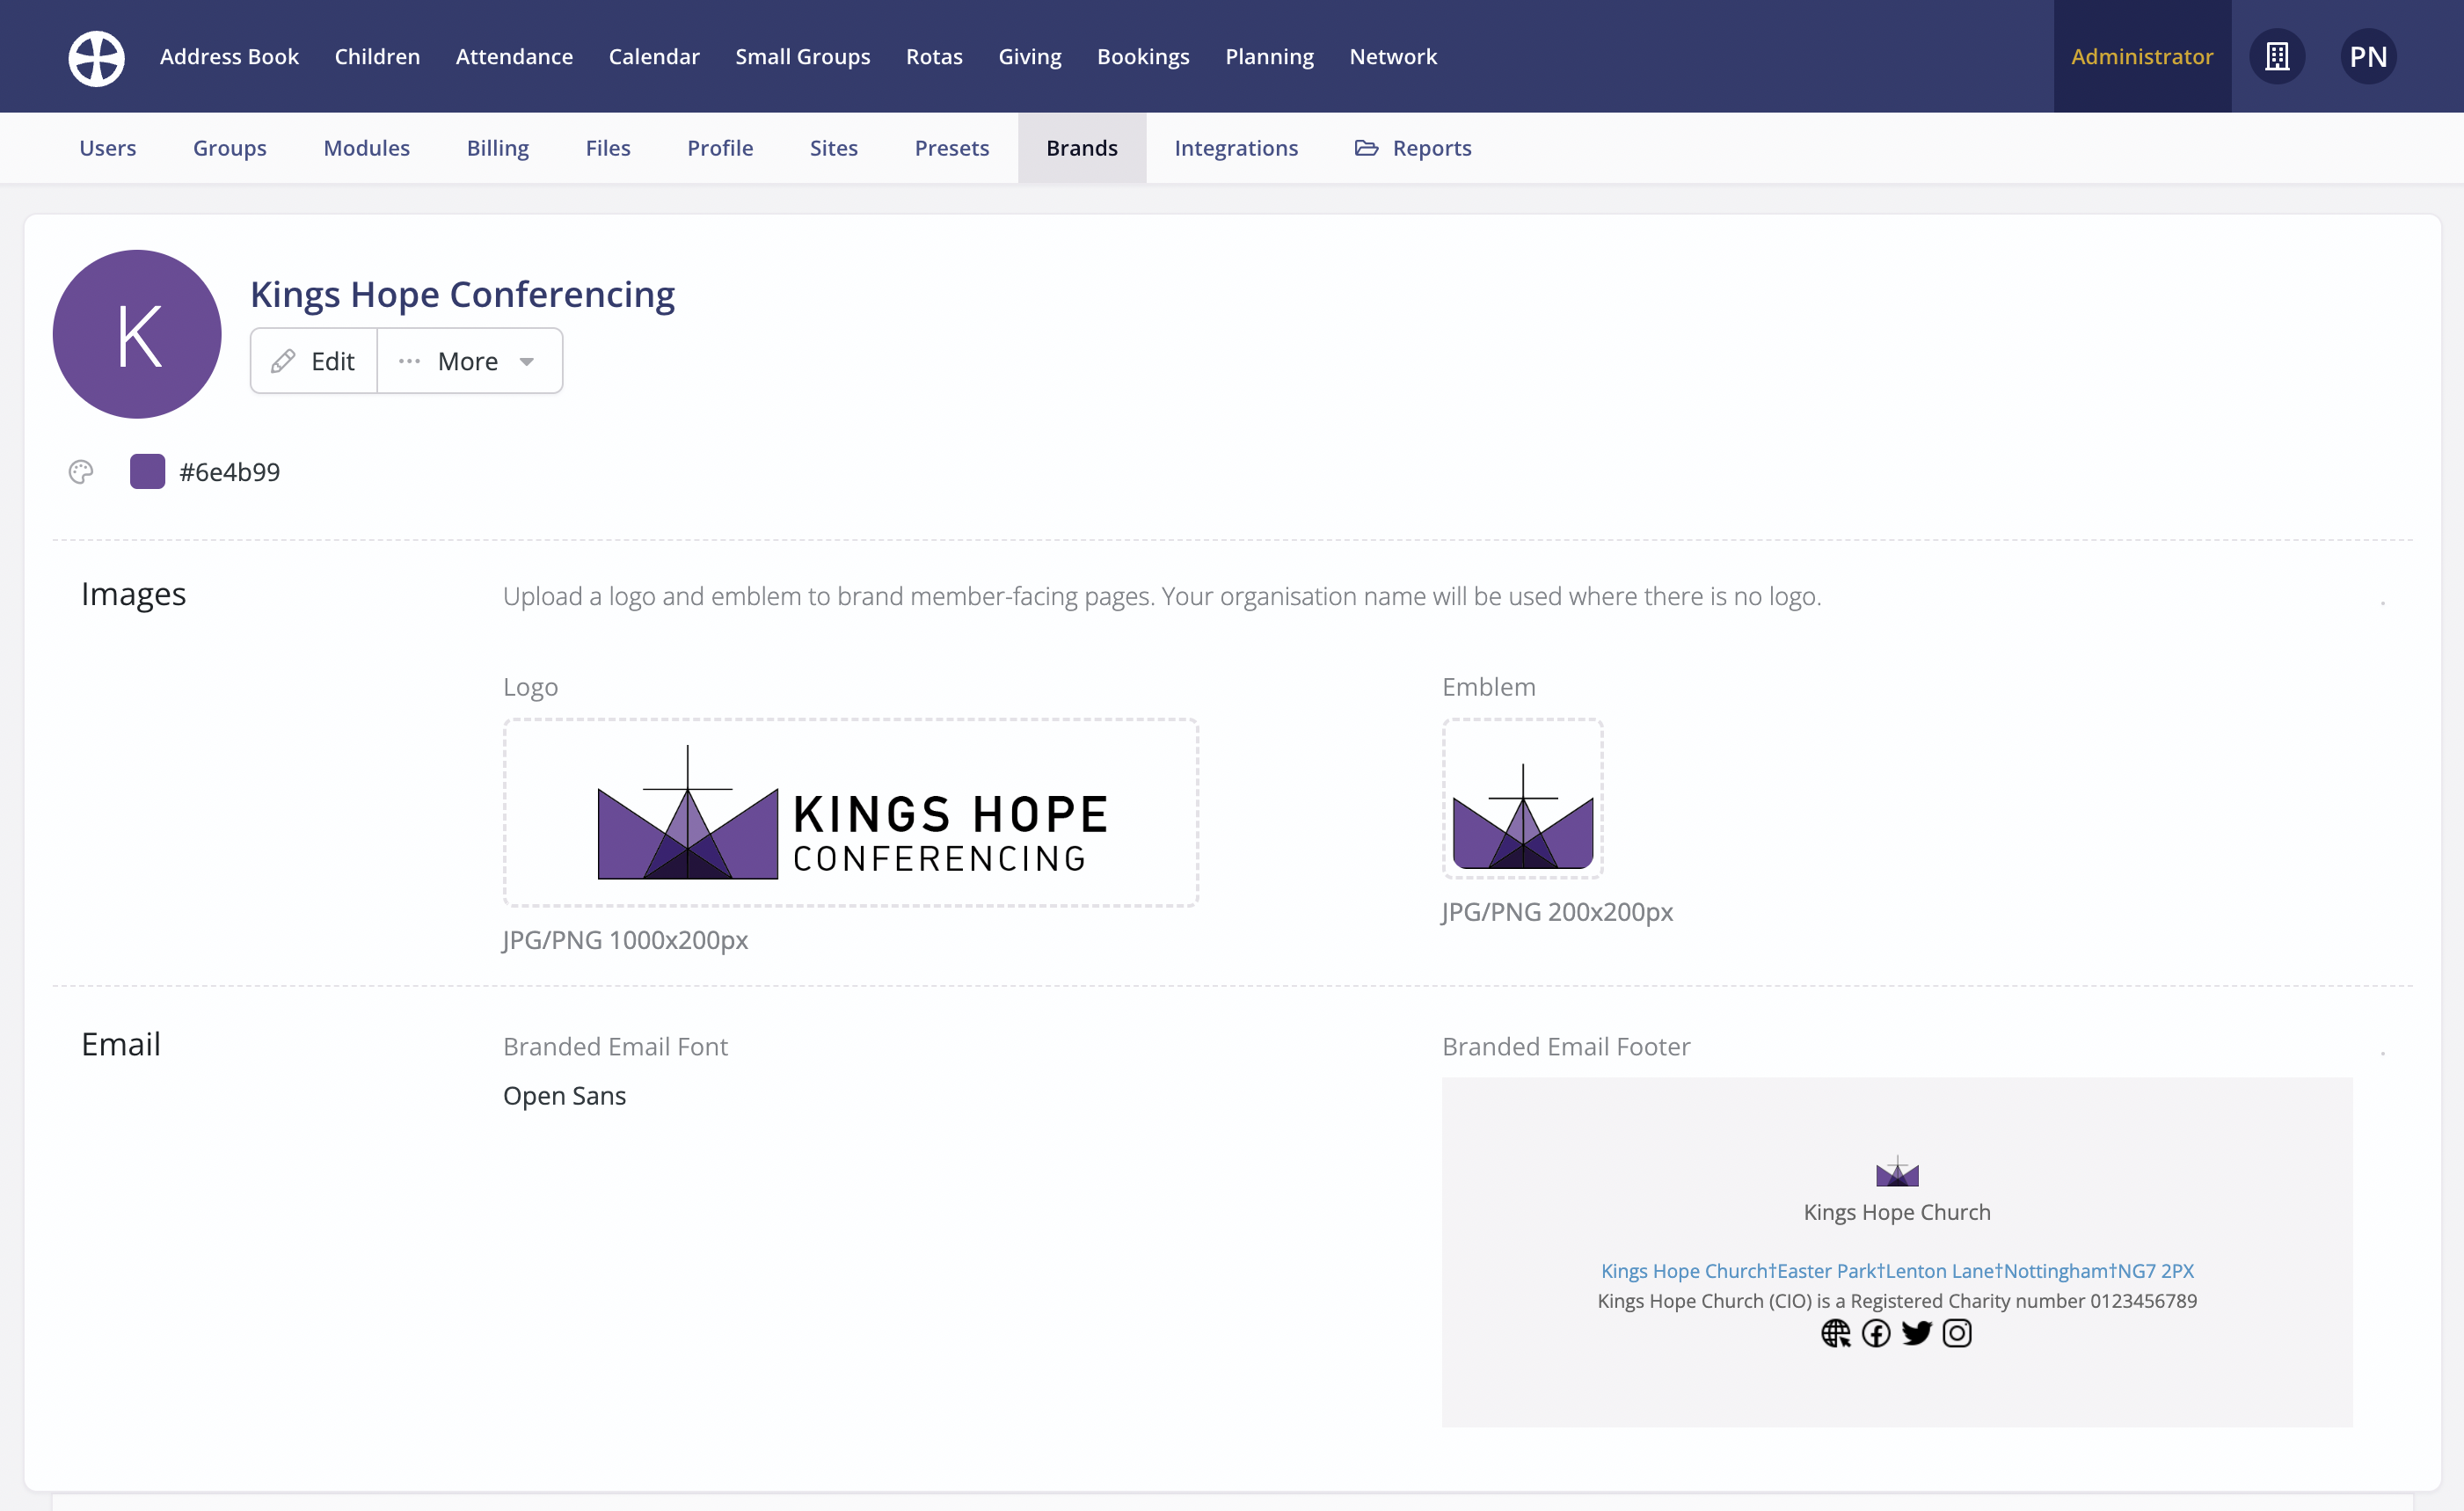
The brand View shows the uploaded Logo and Emblem images and an updated likeness of the Branded Email Footer.
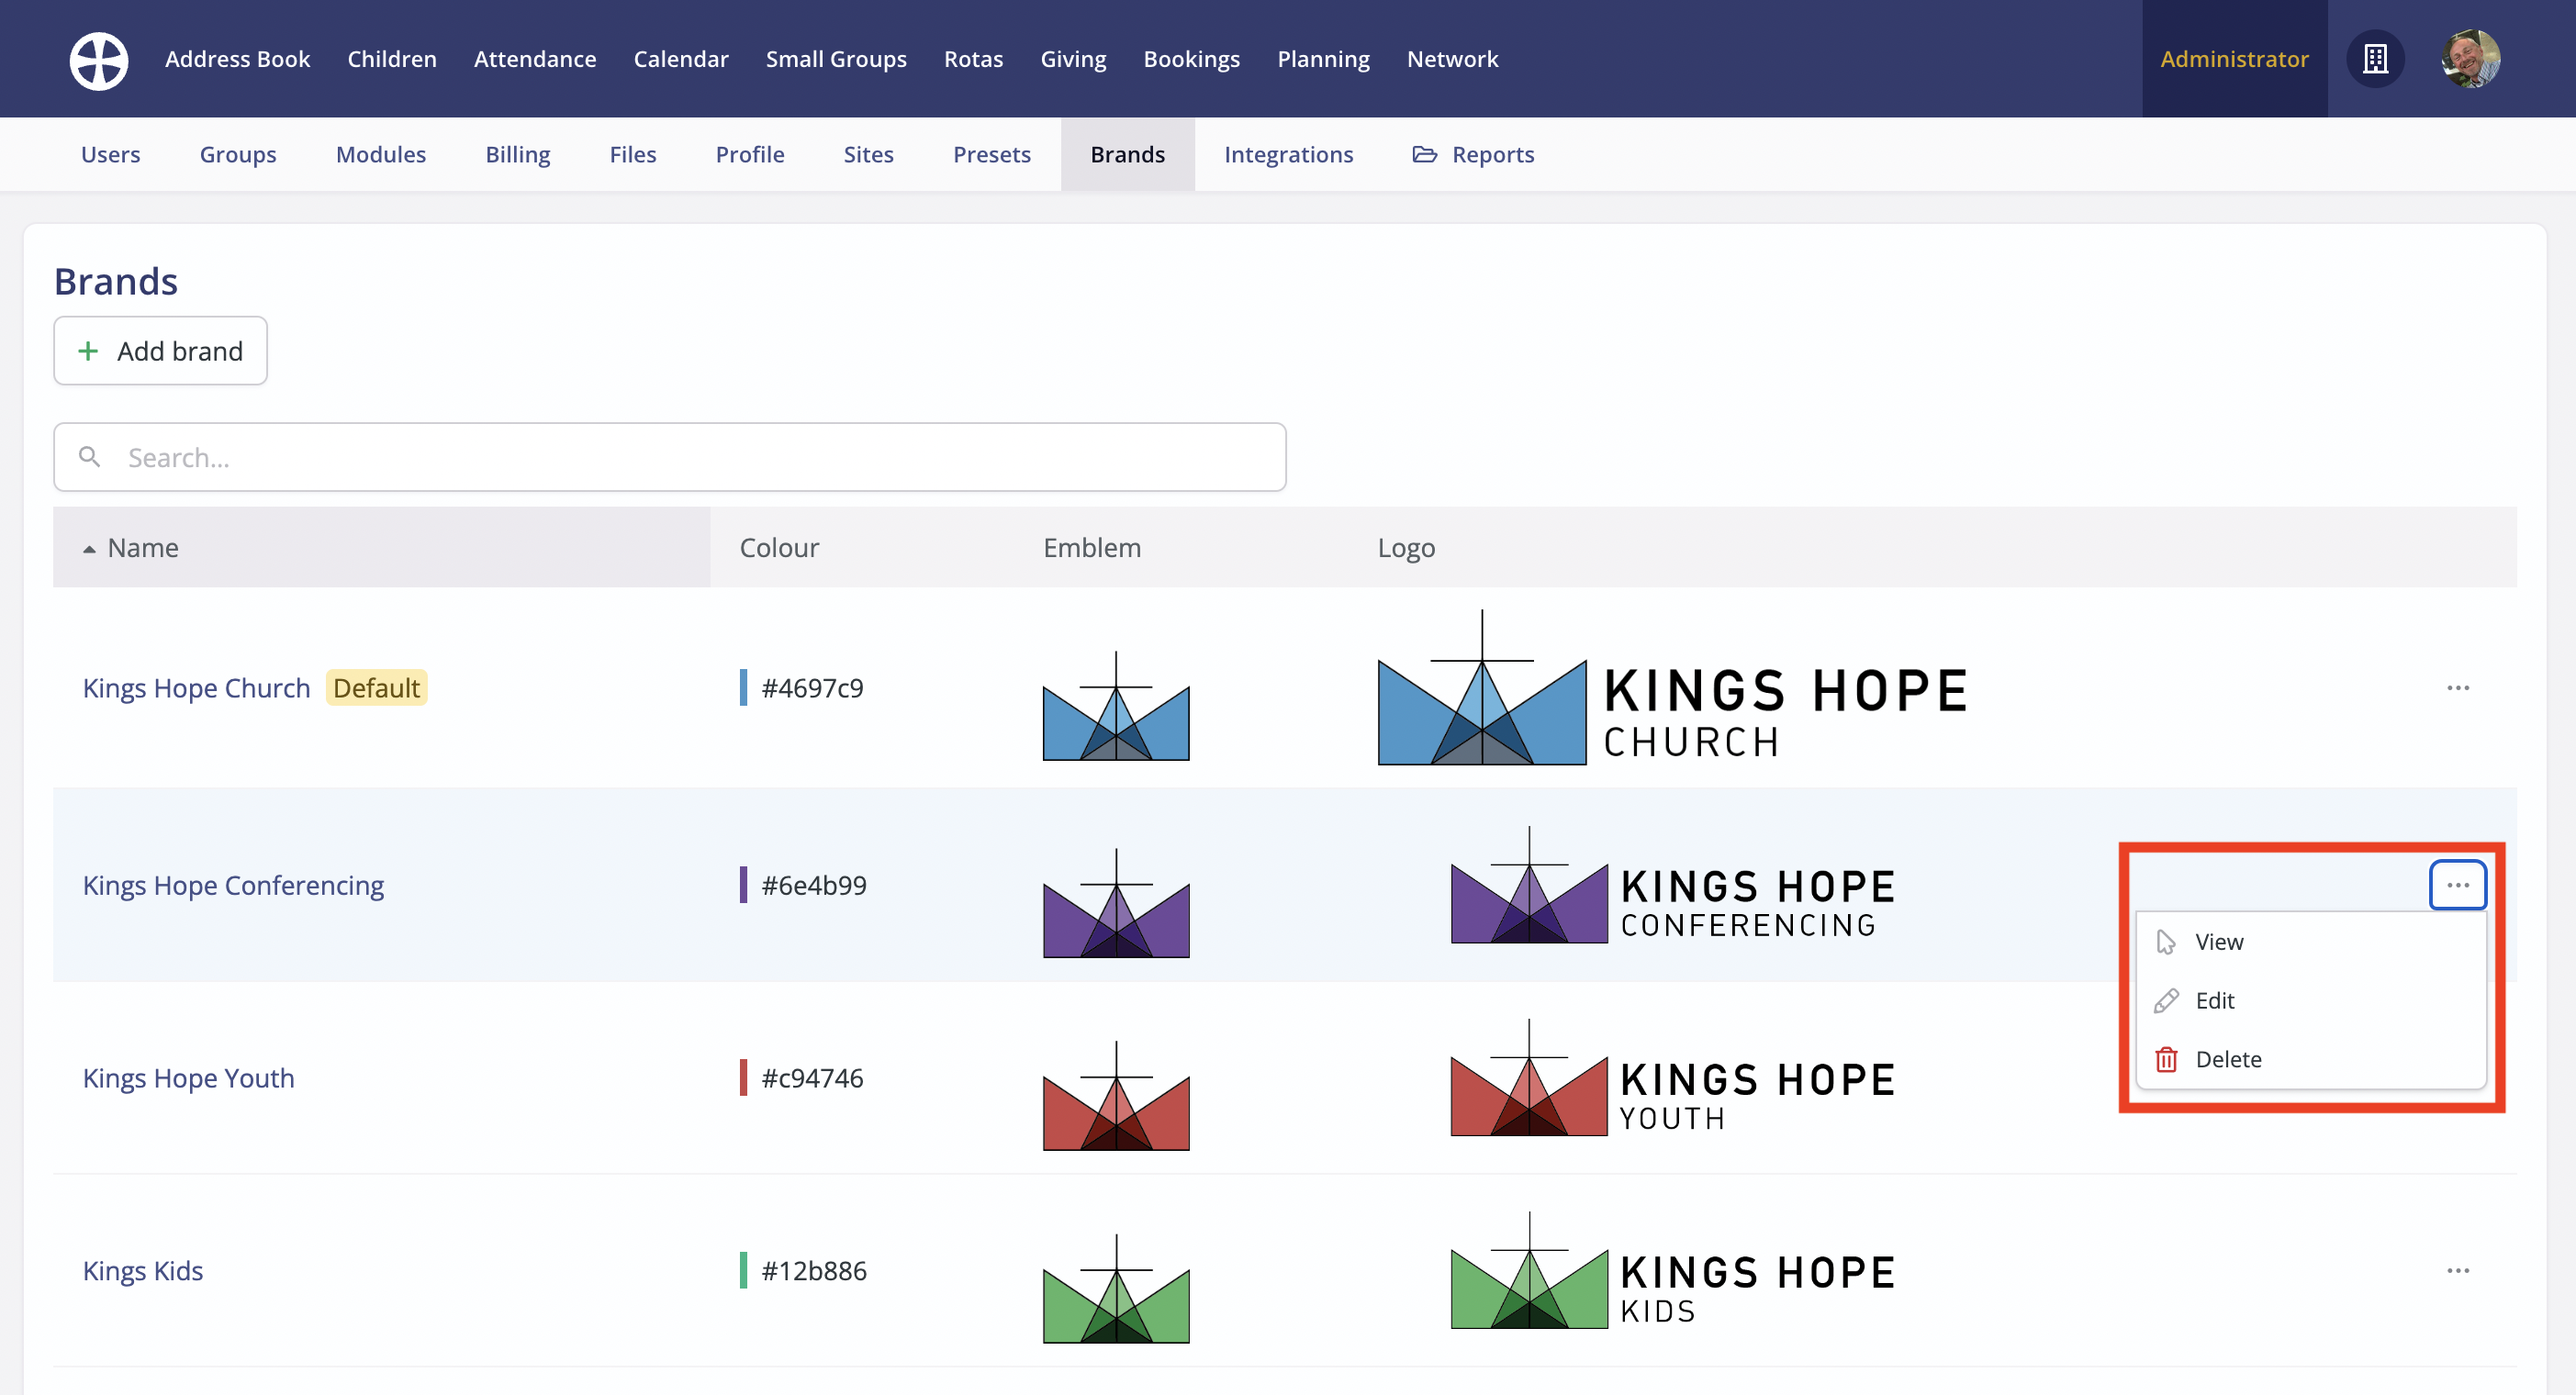
Returning to the Brands section, added brands are shown - continue adding custom brands as desired. Note the brand Actions to View, Edit and Delete a brand. You cannot delete the default brand.
You can preview newly added Brands from any email composer pop-up. Compose a brief message, or select a Preset Email. From the Template selector, choose the Branded Slimline and Branded Header version for a brand and click Preview Email to see the results.

Branding events
By assigning a custom brand to event Categories in the Calendar module, all event pages, event check-in, event invitations, and sign-up confirmation emails sport the event category brand. In this way, for example, you might brand your Children's ministry events differently from your Youth ministry events.
Begin by following the instructions in the previous section to add custom brands in the Brands section of the Administrator area. Next, navigate to the Categories section of the Calendar module and select Edit for the category you wish to assign a Brand.

On the Edit category pop-up, choose the appropriate custom Brand from the drop-down list.

Save the changes. Now, all events assigned to that Category will sport that Brand on the public-facing event page - you can use the Go to event page action on the event "View" page to preview a public-facing event page. Event check-in and branded event communications will also sport the event Category Brand.

Branding forms
By assigning a custom brand to an Address Book or Children module form, the public-facing form page, form invitations, and submission confirmation emails sport that brand. In this way, for example, you might brand your Children's ministry forms differently from your Youth ministry forms.
Begin by following the instructions earlier in this article to add custom brands in the Brands section of the Administrator area. Next, navigate to the Forms section of the Address Book or Children module and select Edit for the form you wish to assign a Brand.

On the Edit form pop-up (or Add form pop-up), choose the appropriate custom Brand from the drop-down list.

Save the changes. You can use the Go to form action on the form "View" page to preview a public-facing form page. Form invitations and branded submissions confirmation emails will also sport the assigned form Brand.

Branding funds
By assigning a custom brand to Funds in the Giving module, the public-facing fund pages sport that brand. In this way, for example, you might brand your Food Bank fund with its distinct ministry branding. Similarly, a Building Project fund could be branded to match the branding used in your project promotional material and communications. Assigning a custom brand to a Fund has the effect of re-branding Donate for just that fund, overriding your organisation's default brand logo and colour style throughout the user experience, including the donation confirmation email when a donation is made through a fund page.
Begin by following the instructions earlier in this article to add custom brands in the Brands section of the Administrator area. Next, navigate to the Funds section of the Giving module and select Edit for the fund you wish to assign a Brand.

On the Edit fund pop-up, select the appropriate Brand from the drop-down list and Save the changes.

To view the newly-branded fund page - and to obtain the fund page URL, perhaps to share in your communications or link to your website - navigate to the Fund "View" and click Go to fund page.

The custom-branded fund page is displayed...

Branding bookings
By assigning a custom brand to booking Types in the Bookings module, customer-facing booking pages and booking emails sport that brand. In this way, you might brand your external/commercial booking Types with different branding to your internal booking types.
Begin by following the instructions earlier in this article to add custom brands in the Brands section of the Administrator area. Next, navigate to the Types section of the Bookings module and select Edit for the type you wish to assign a Brand.

On the Edit type pop-up, select the appropriate Brand from the drop-down list and Save your changes.

Now all bookings for that Type will sport that Brand on the customer-facing Booking Page.

Branding plan pages
Where a custom brand has been assigned to an event Category (Calendar module) or booking Type (Bookings module) - explained in the earlier sections of this article - the member-facing plan page and plan emails for any plans linked to an event in that Category, or linked to a booking of that Type, will sport that Brand. Similarly, all branded emails for the Plan will sport the Brand.
Begin by following the instructions above to add custom brands in the Brands section of the Administrator area; then follow the instructions above to assign that Brand to the appropriate booking Type or event Category.
Next, navigate to the Plans section of the Planning module and select to View a plan that is linked to an event in a branded category or a plan linked to a booking with a branded type. Ensure the Plan is Published and click Go to plan page...

Now all plans linked to that booking Type or event Category will sport that Brand on the member-facing Plan Page.
