Embed a newcomer My Details form on your website
Your ChurchSuite Address Book includes a customisable newcomer/visitor My Details form that can easily be embedded into your church or organisation's website. Newcomers, individuals and families can submit their contact details and select areas of interest, with submitted details added directly into the Address Book and Children module, with helpful optional ministry overseer notifications.
In this article
Overview of the My Details form
Configuring the My Details form
What happens when details are submitted?
Managing newcomers added to the pending section
What happens when under 18s submit their details?
Overview of the My Details form

The My Details form can be embedded on your website to collect the details of newcomers - either before, after or during their visit. As the My Details form will be on a public-facing website, anti-spam measures are used to minimise spam submissions to your active Address Book, with new contacts and children added to the Pending section of the respective Address Book and Children modules.
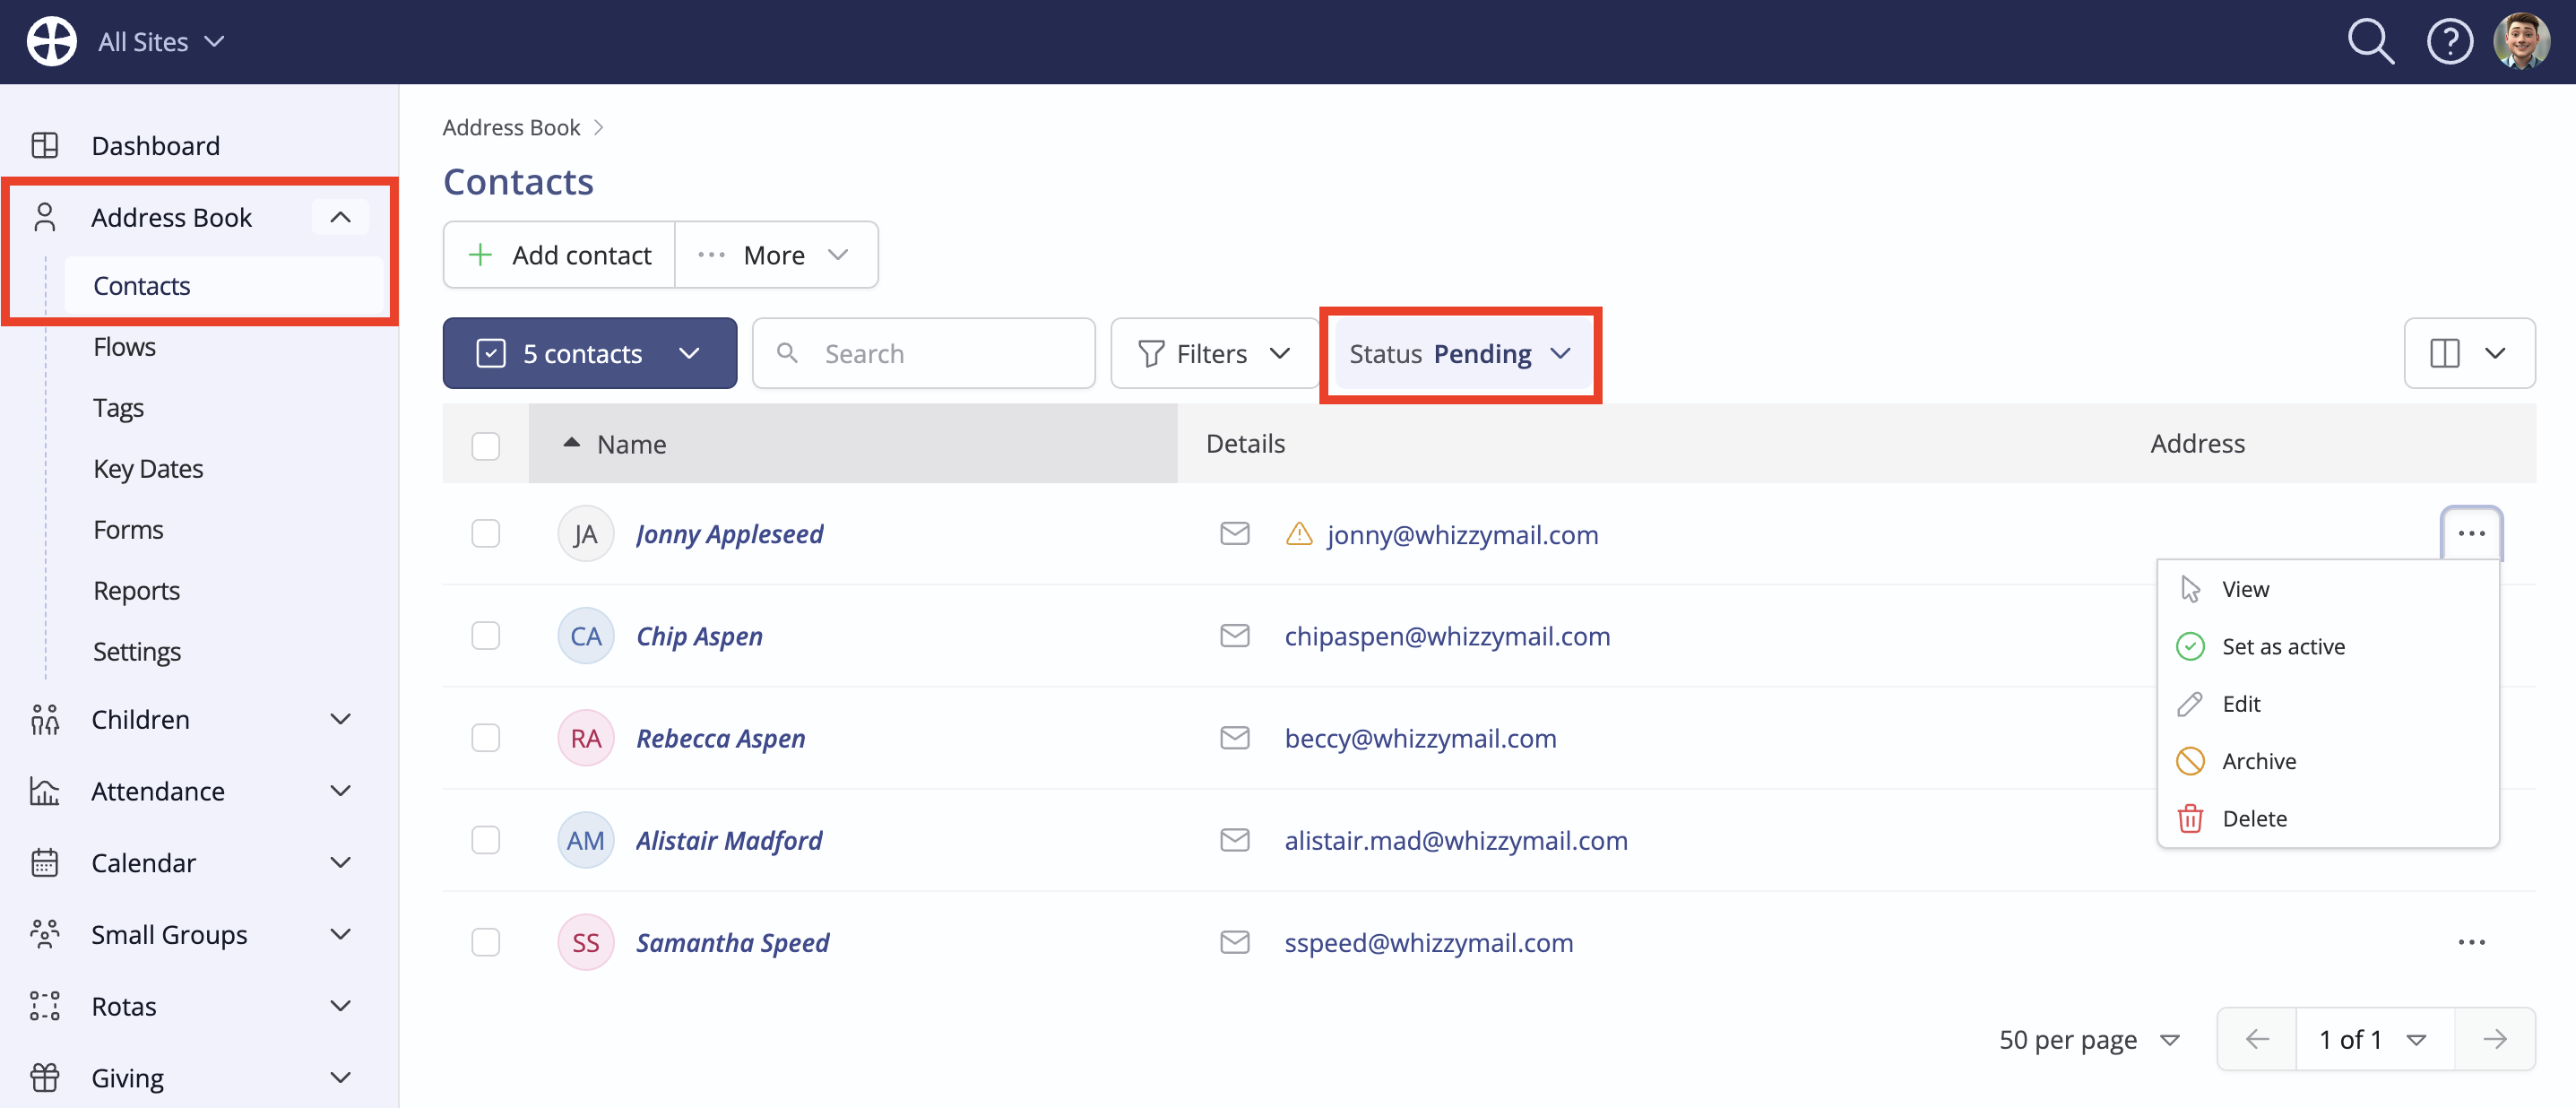
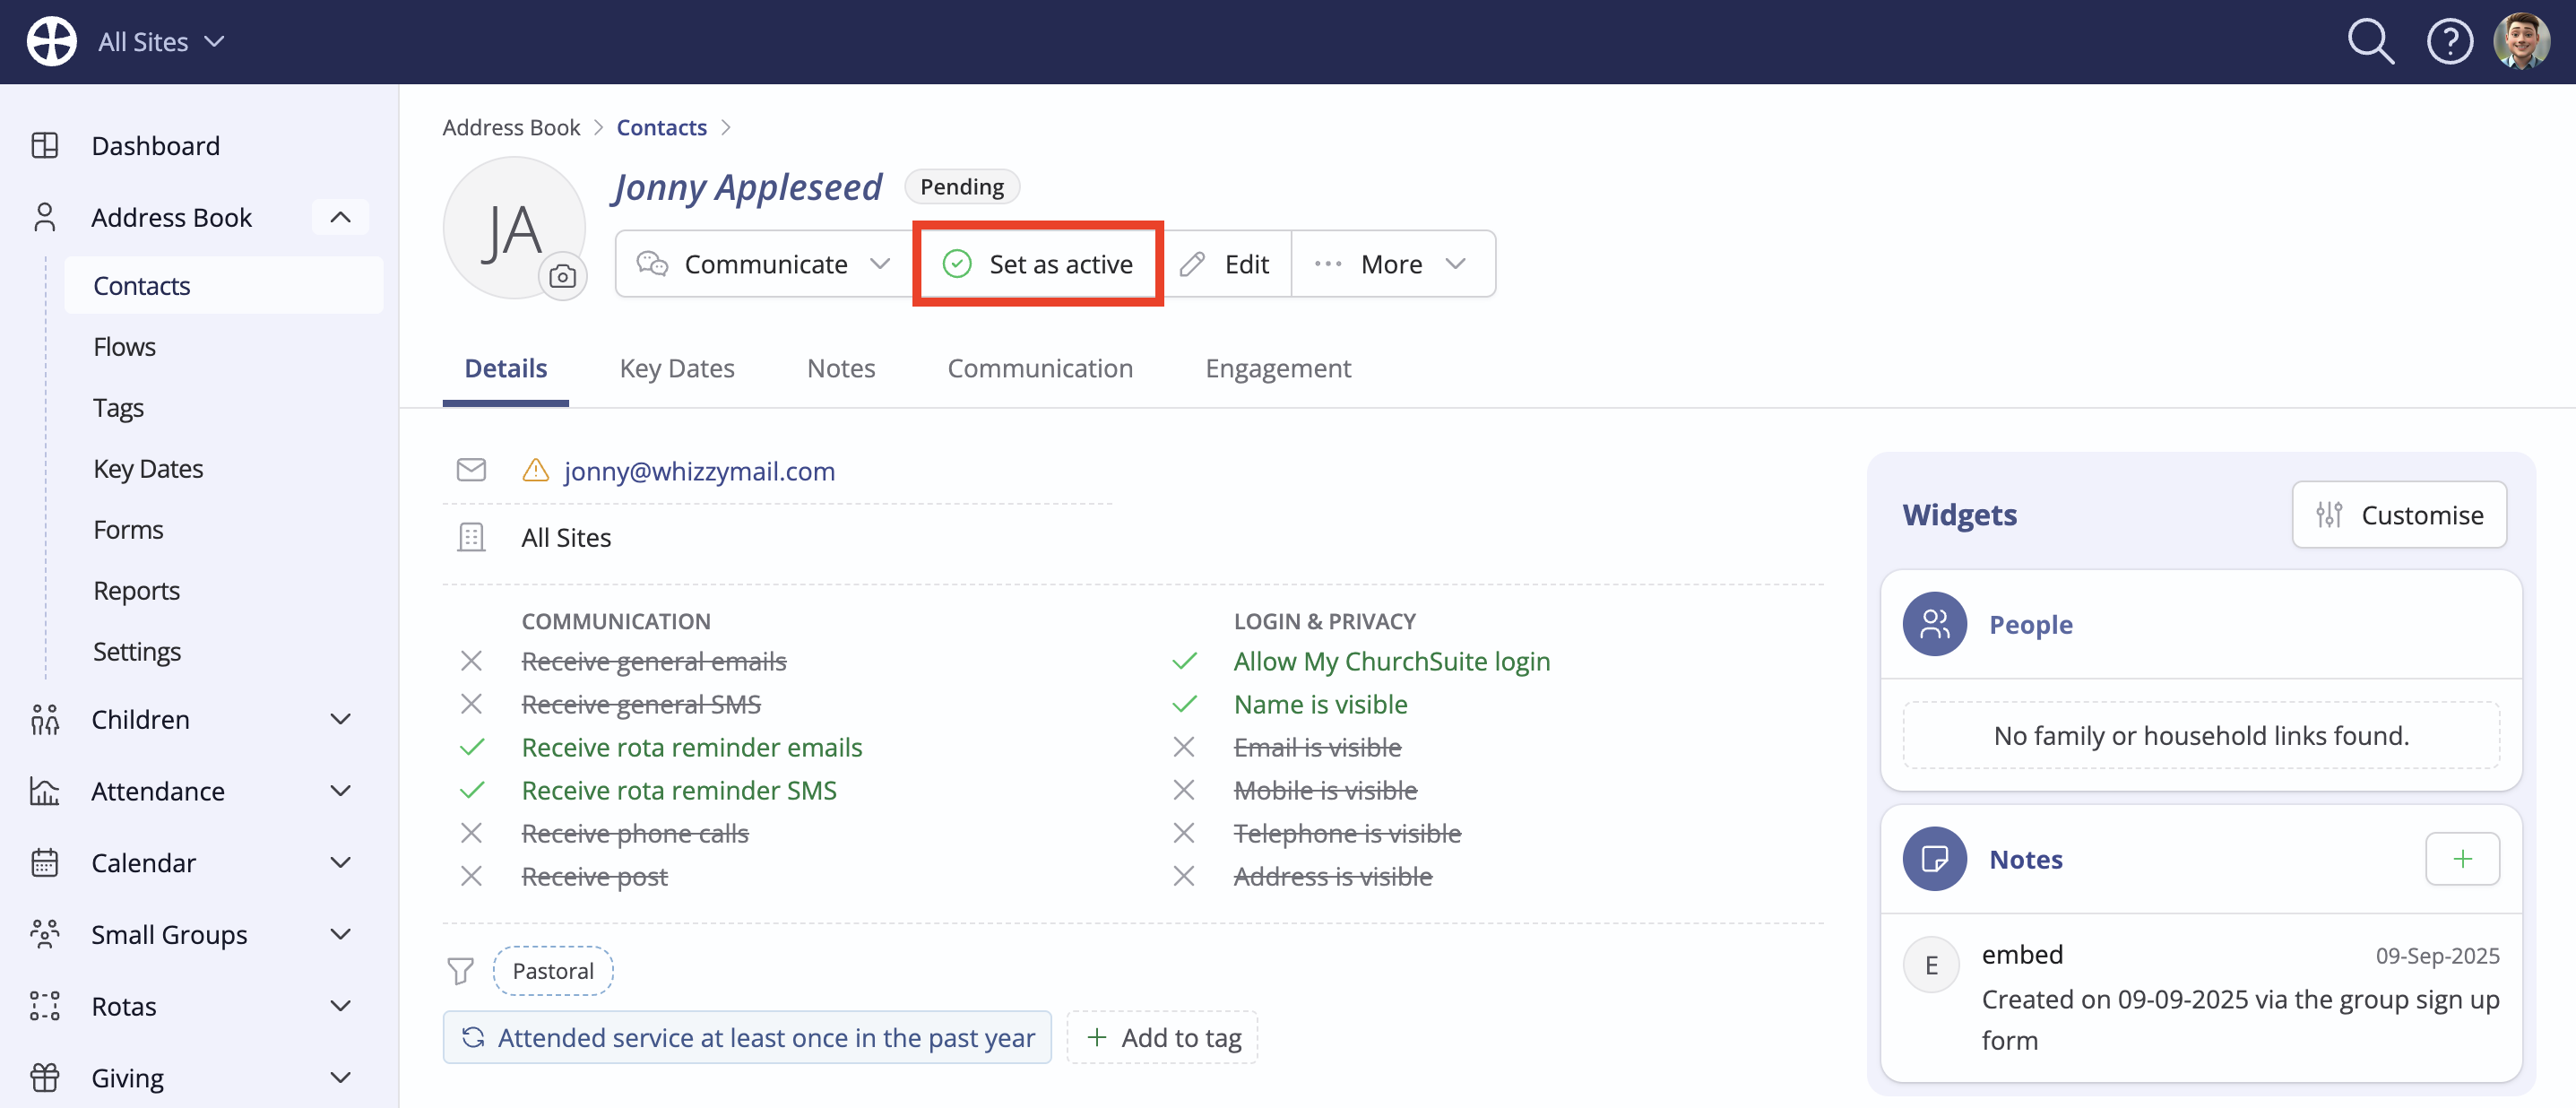
Once reviewed, new contacts and children can be Set as Active, which moves them into the Active section of the module, where you can then begin to incorporate them into your various newcomer integration processes. Only contacts in the Active section of the Address Book are counted when calculating your monthly ChurchSuite subscription.
The embeddable My Details form can be customised and styled for your website. The form supports multi-site, so newcomers can be assigned to their chosen site when submitting the form. A simple list of embed options gives you complete control over which fields and areas of interest are shown on the form, which fields are 'required' and what happens to newly-added contacts and children when a response is submitted - perhaps adding Notes, assigning to Tags, Key Dates and Flows, and triggering helpful overseer notifications and a success confirmation email back to the respondent. The functionality enables newcomers to optionally submit details for their spouse/partner and children in a single form, with ChurchSuite linking the whole family in your underlying modules.
Configuring the My Details form
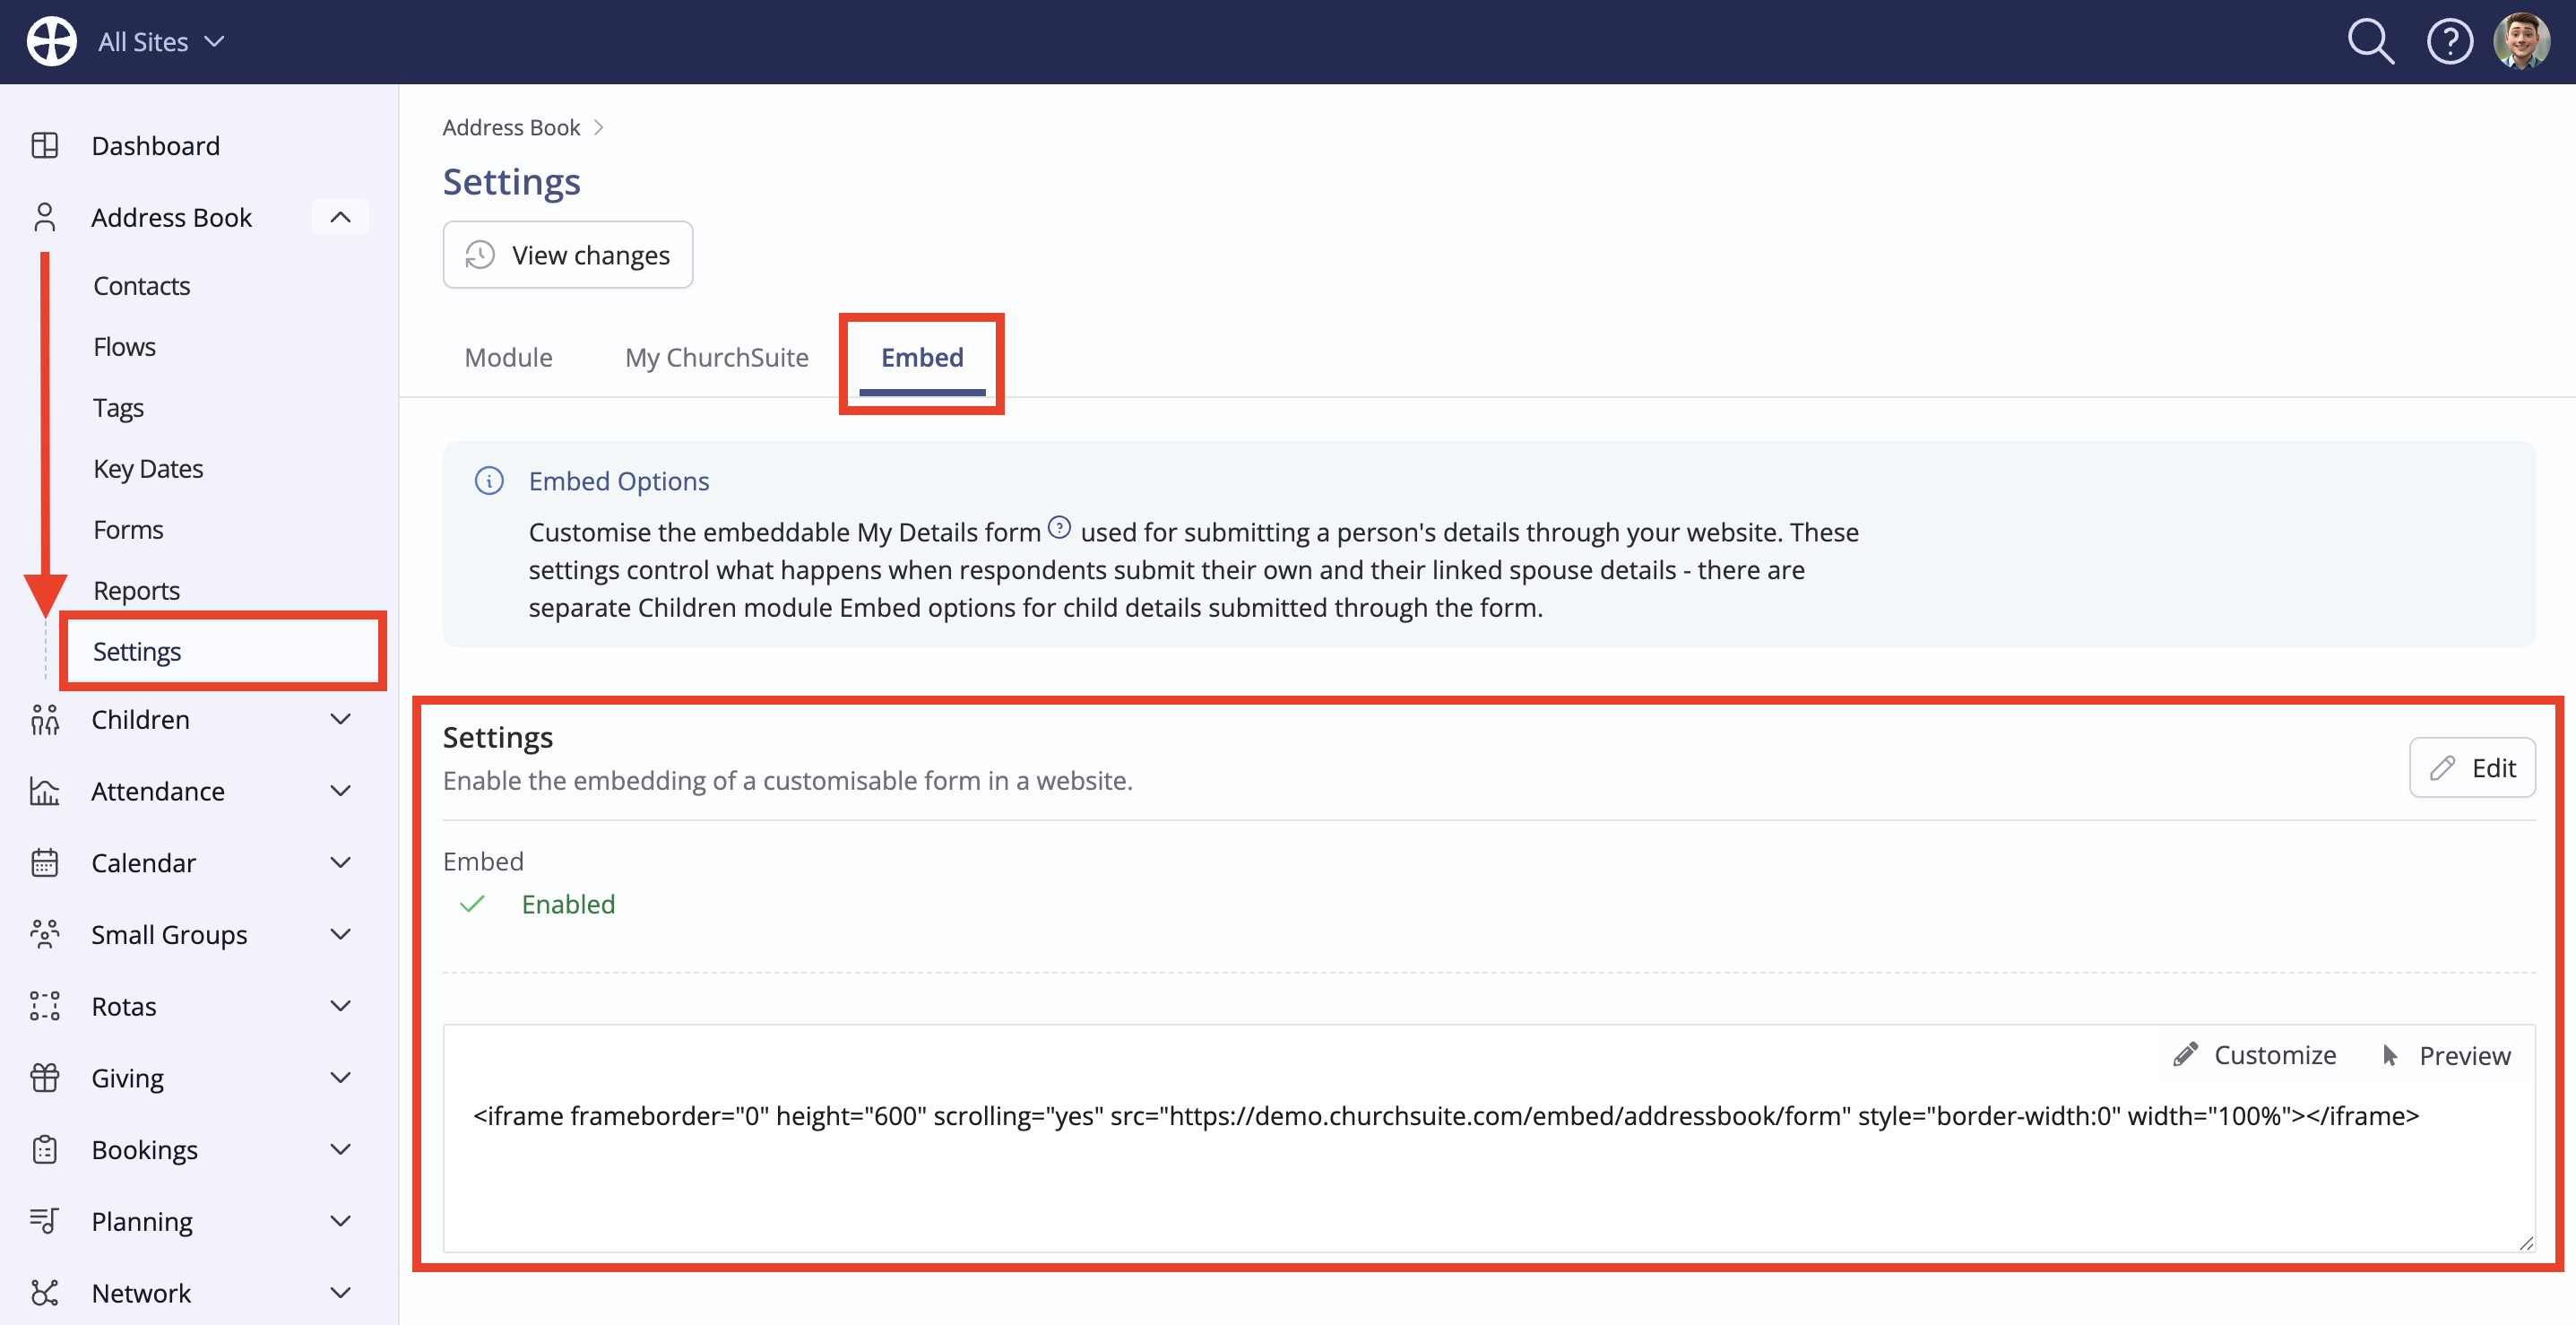
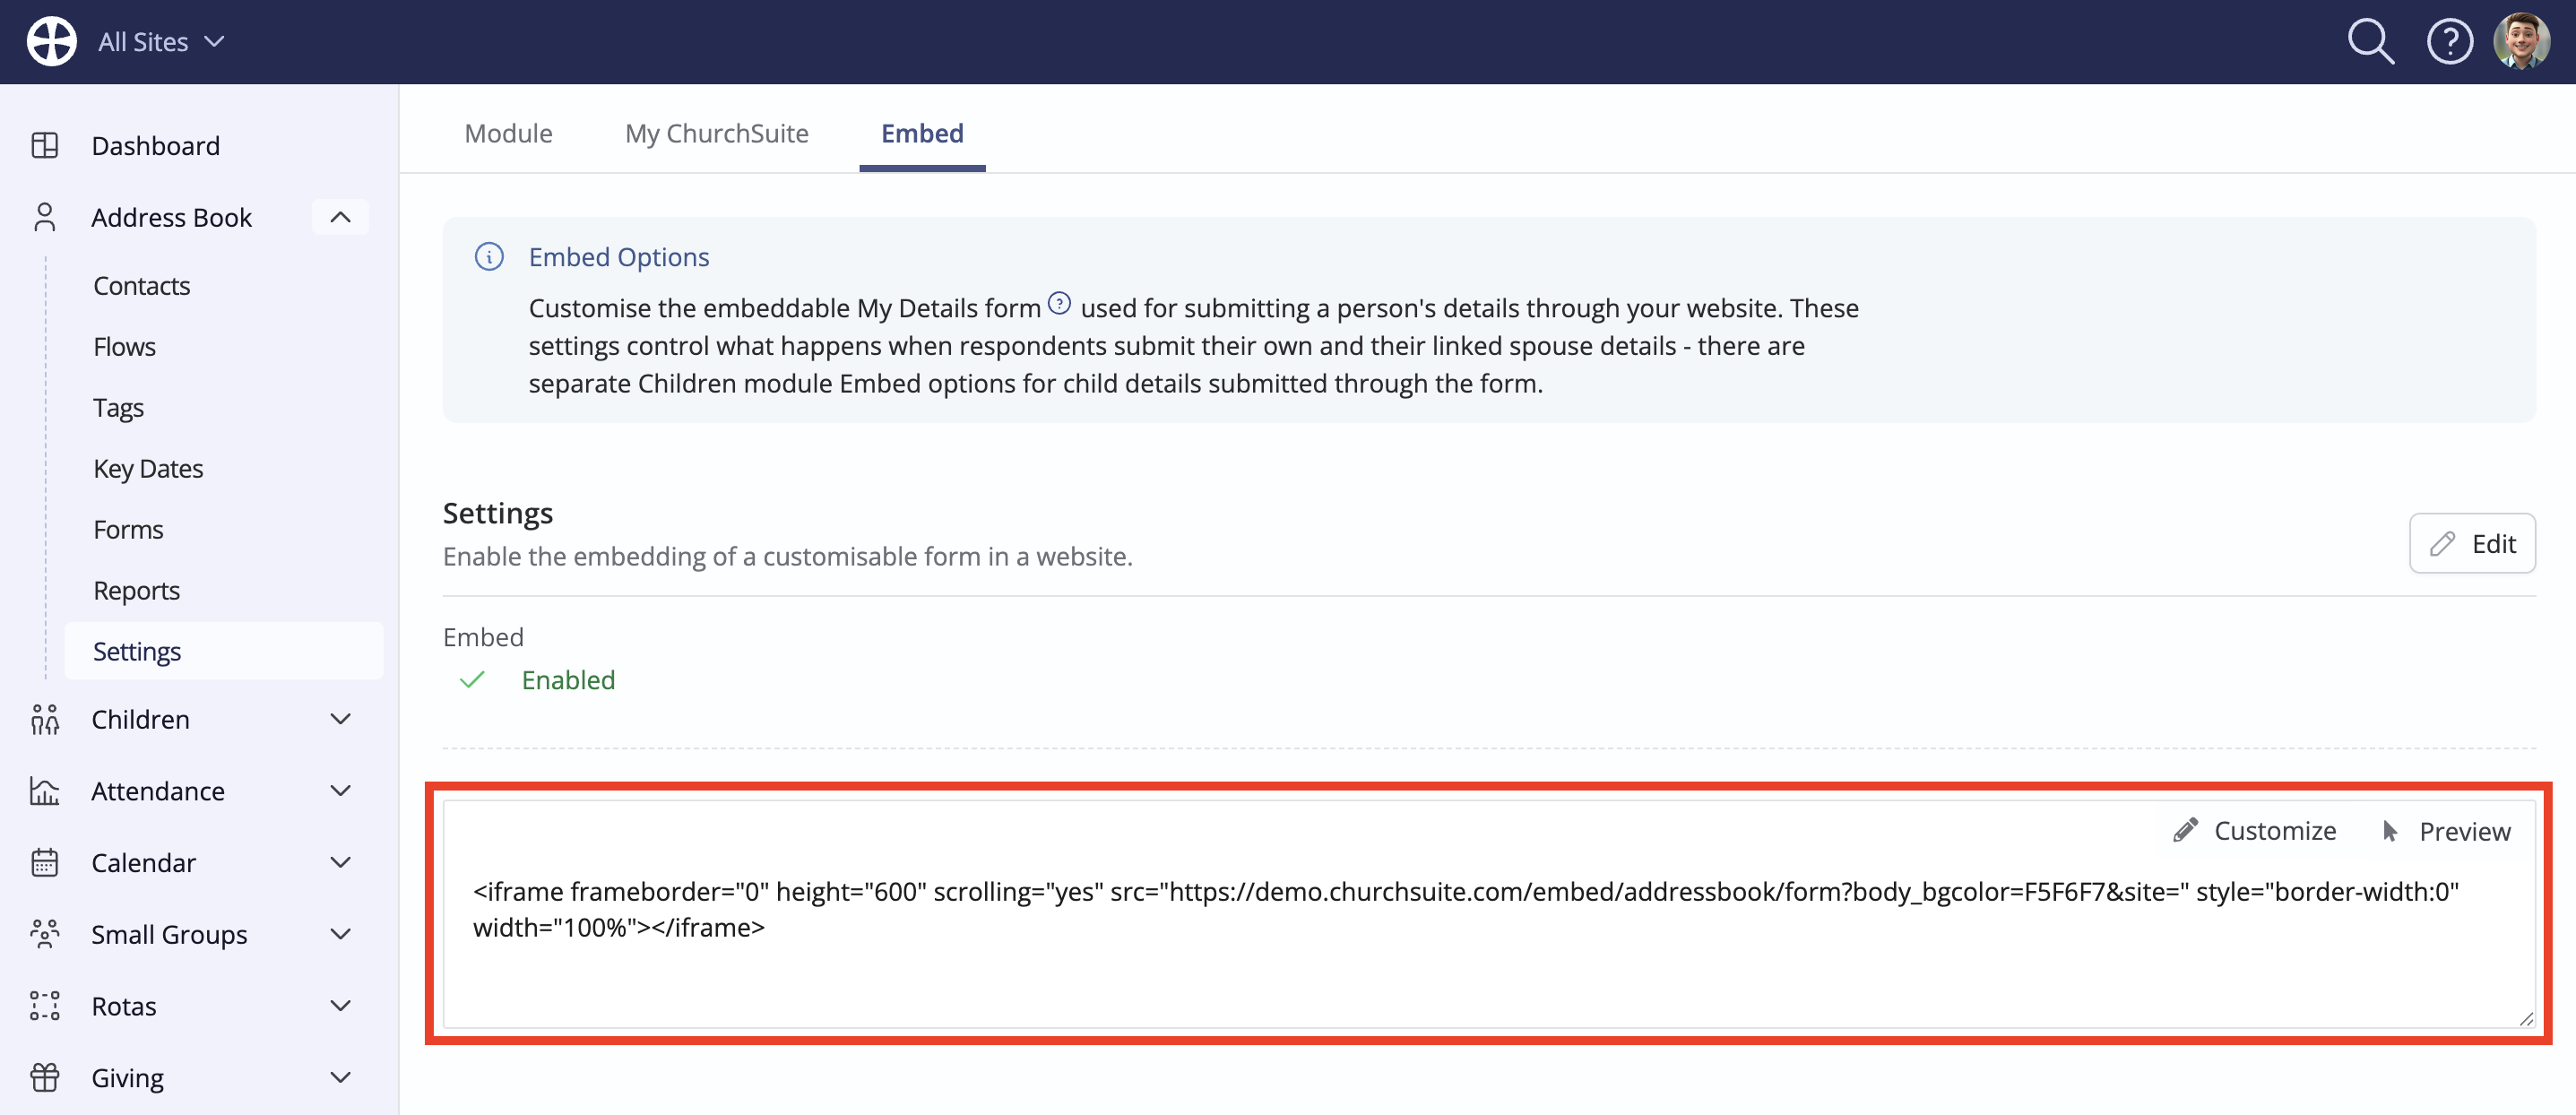
The My Details form is configured in the Address Book module's settings and is accessed via the cog-wheels icon in the top-right corner of the module. From the Address Book module settings, select the Embed Options tab. Child-related Embed Options are located in the Children module (explained later in this section).
Begin by enabling the form embedding - click Edit to make changes. The default HTML code for the form is shown, with the option to Preview the form at any time and to further Customise the HTML Embed code. It's this line of generated HTML code that you'll later copy from ChurchSuite and paste into the source code or embed block section of the appropriate page on your website.
Select Customise to open the Embed options pop-up. For multi-site customers, the Add to site option determines which site new contacts are added to. Select one site to always add new contacts to that site. Select none to give new people a choice of all your sites or select multiple sites to give new people a choice of just those selected sites. This option is helpful if your various Sites have their own website or newcomer web page - you can customise and generate site-specific embed code. Where a site selector is displayed on the My Details form, newcomers can choose their site from a Sites list. Finally, optionally set a preferred background Colour Styling for the form and click Done when finished.
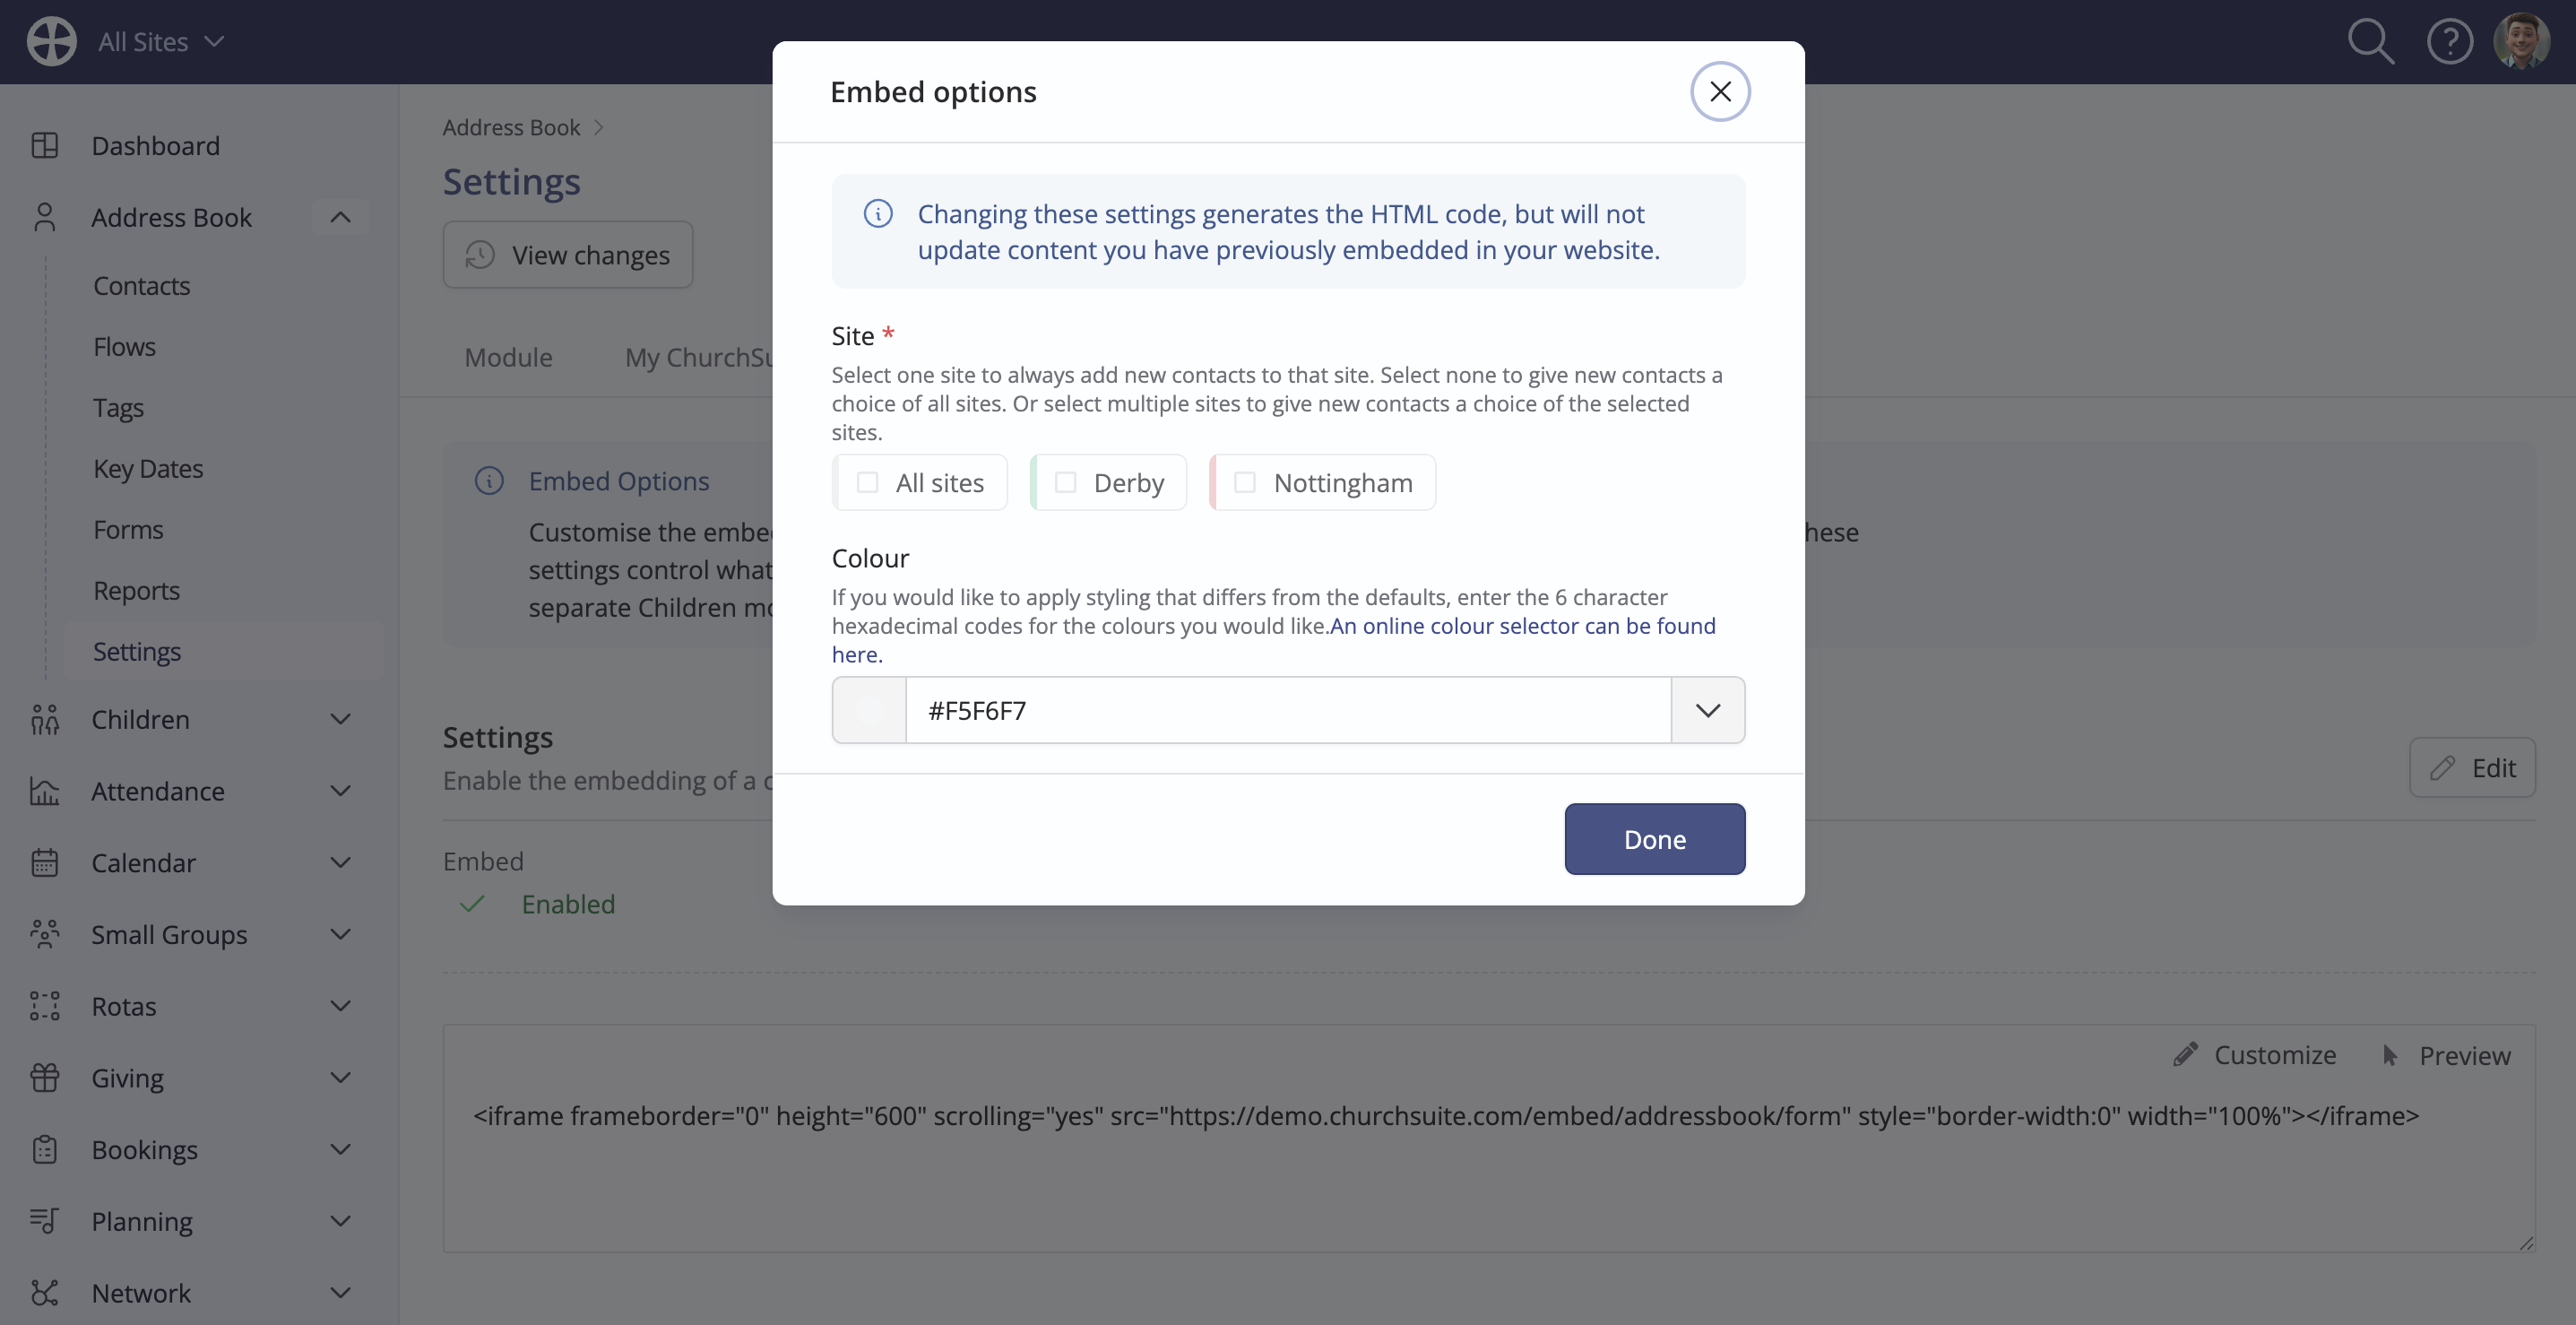
Changes made within the above Embed options pop-up will generate updated HTML code, which must be copied and pasted into the source code or embed block section of the appropriate page on your website. The generated HTML code will revert to default if you move away from the module settings, so be sure to save any customised HTML code first, perhaps pasting it to a temporary text document until it's ready to be added to your website.
Having pasted the HTML code to your website, you can customise the form content using the Embed Options explained below. Changes made to the following settings do not require updated HTML code to be re-applied to your website but note that these settings apply to all embedded My Details forms.
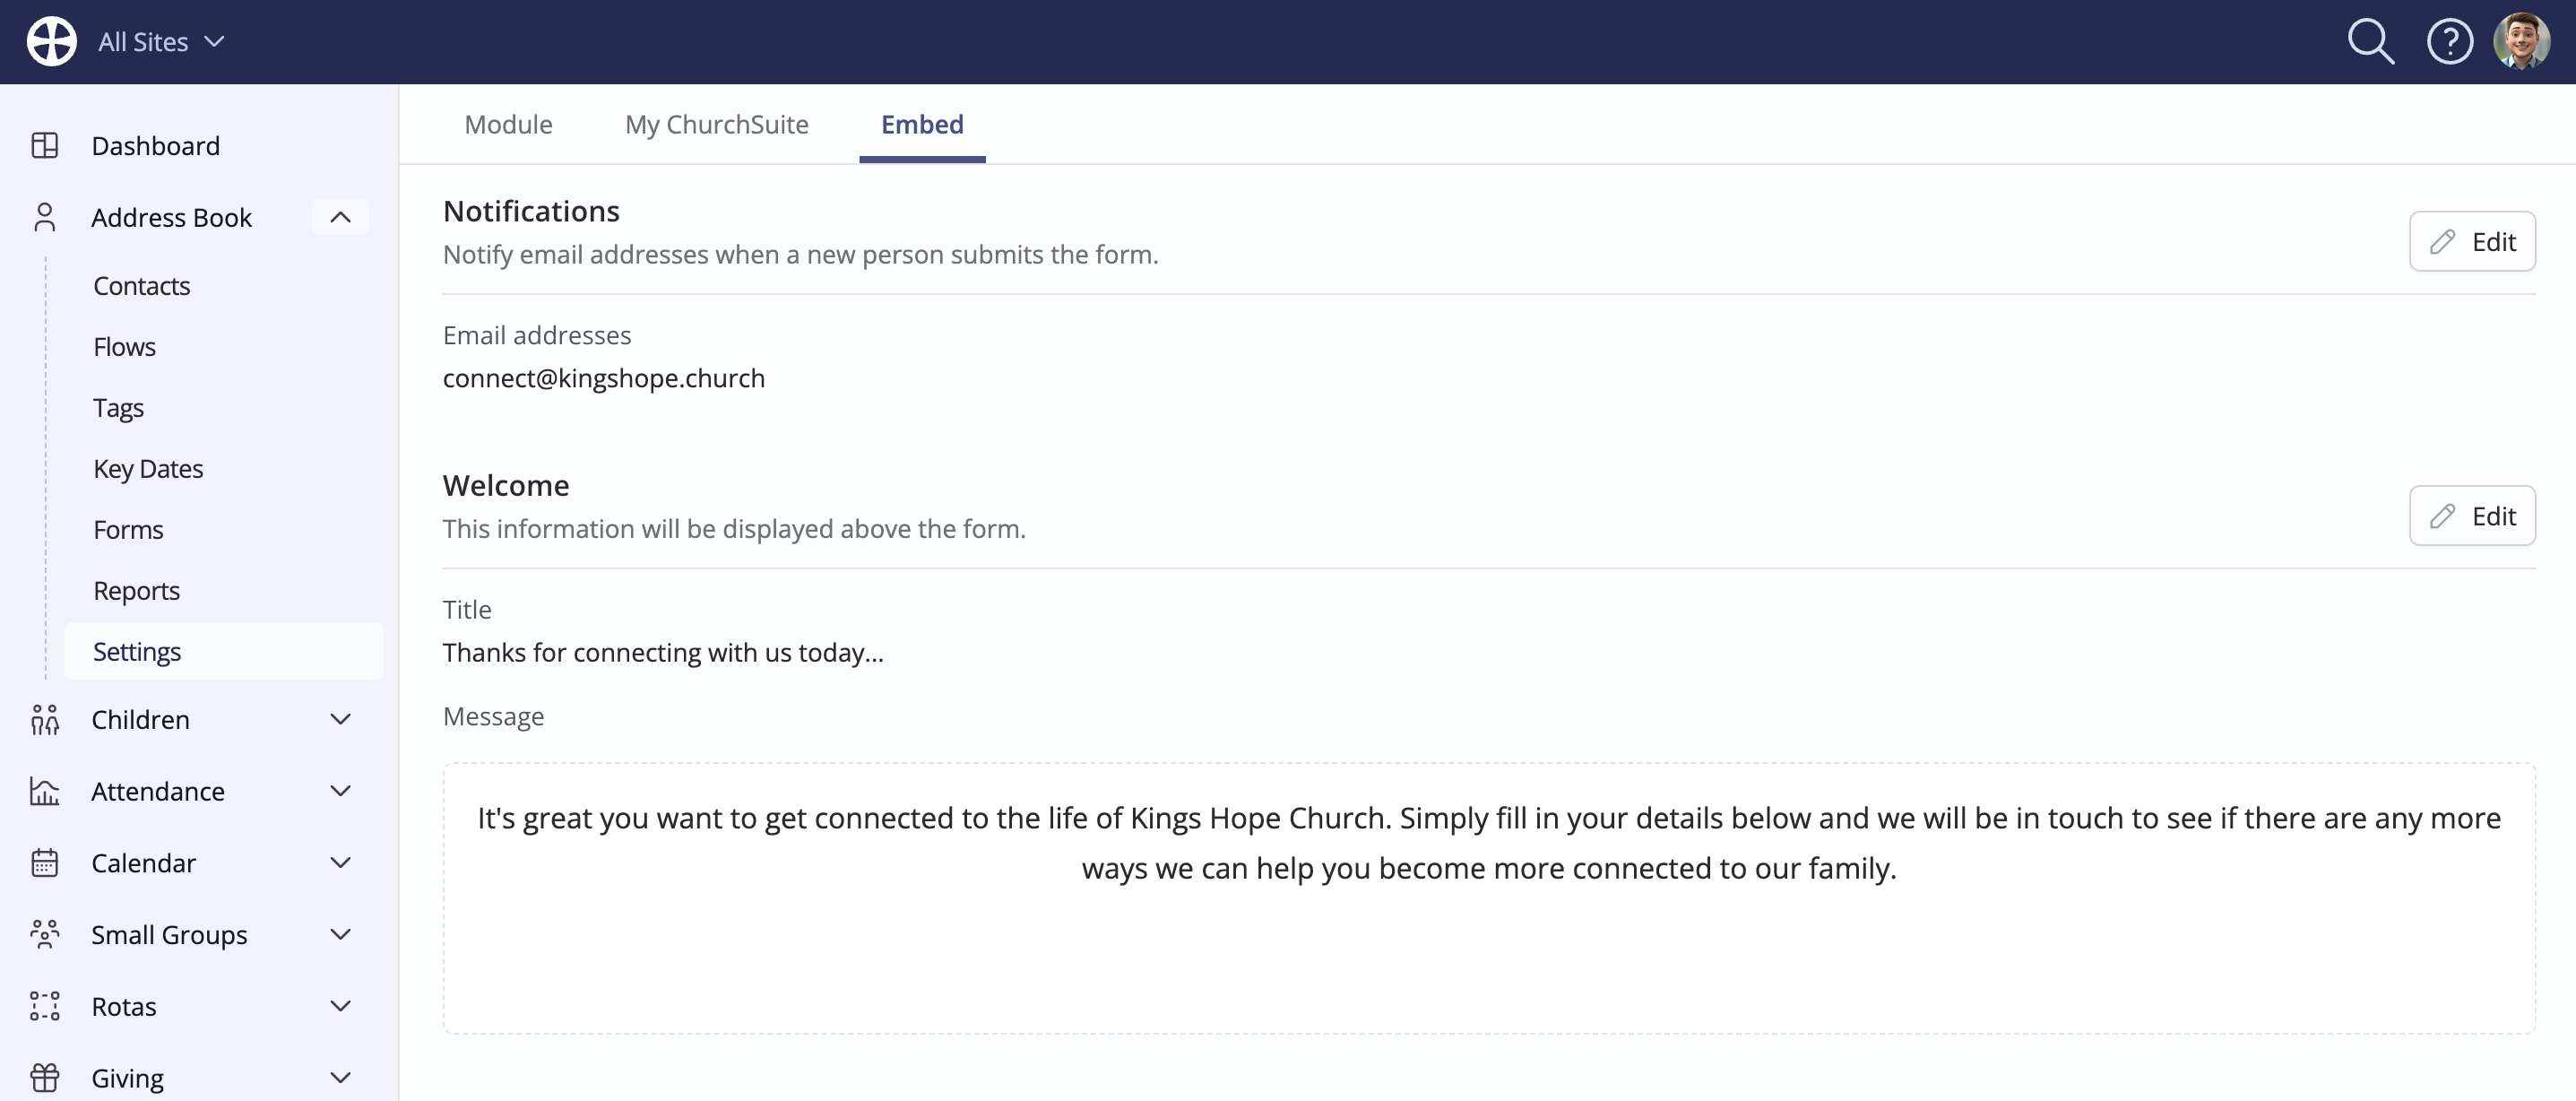
Working methodically down the list of options, begin by specifying the email address of one or more people who should receive Notifications when a newcomer submits the form. Separate multiple email addresses with a comma. You can further customise the appearance of the form by adding a Title and Welcome Message, which are displayed at the top of the form. Click Edit to make changes.
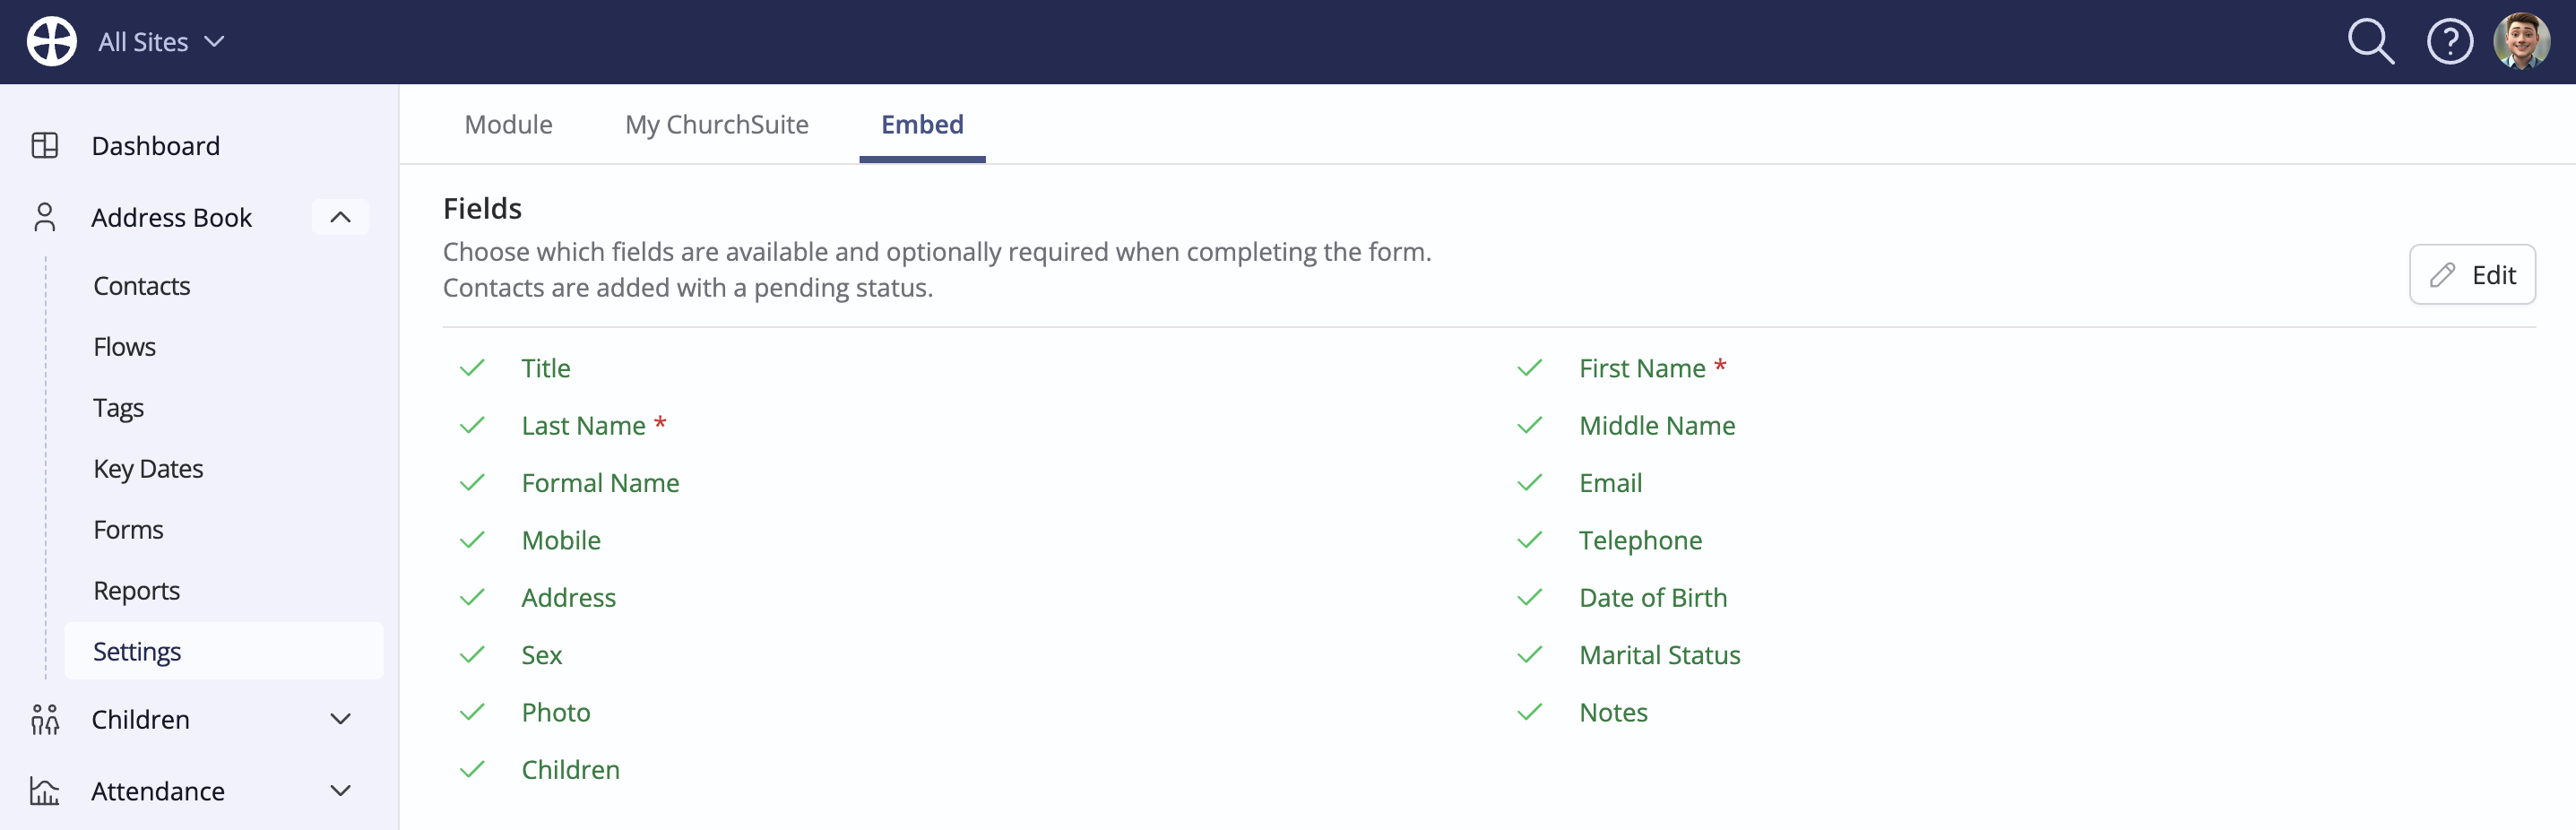
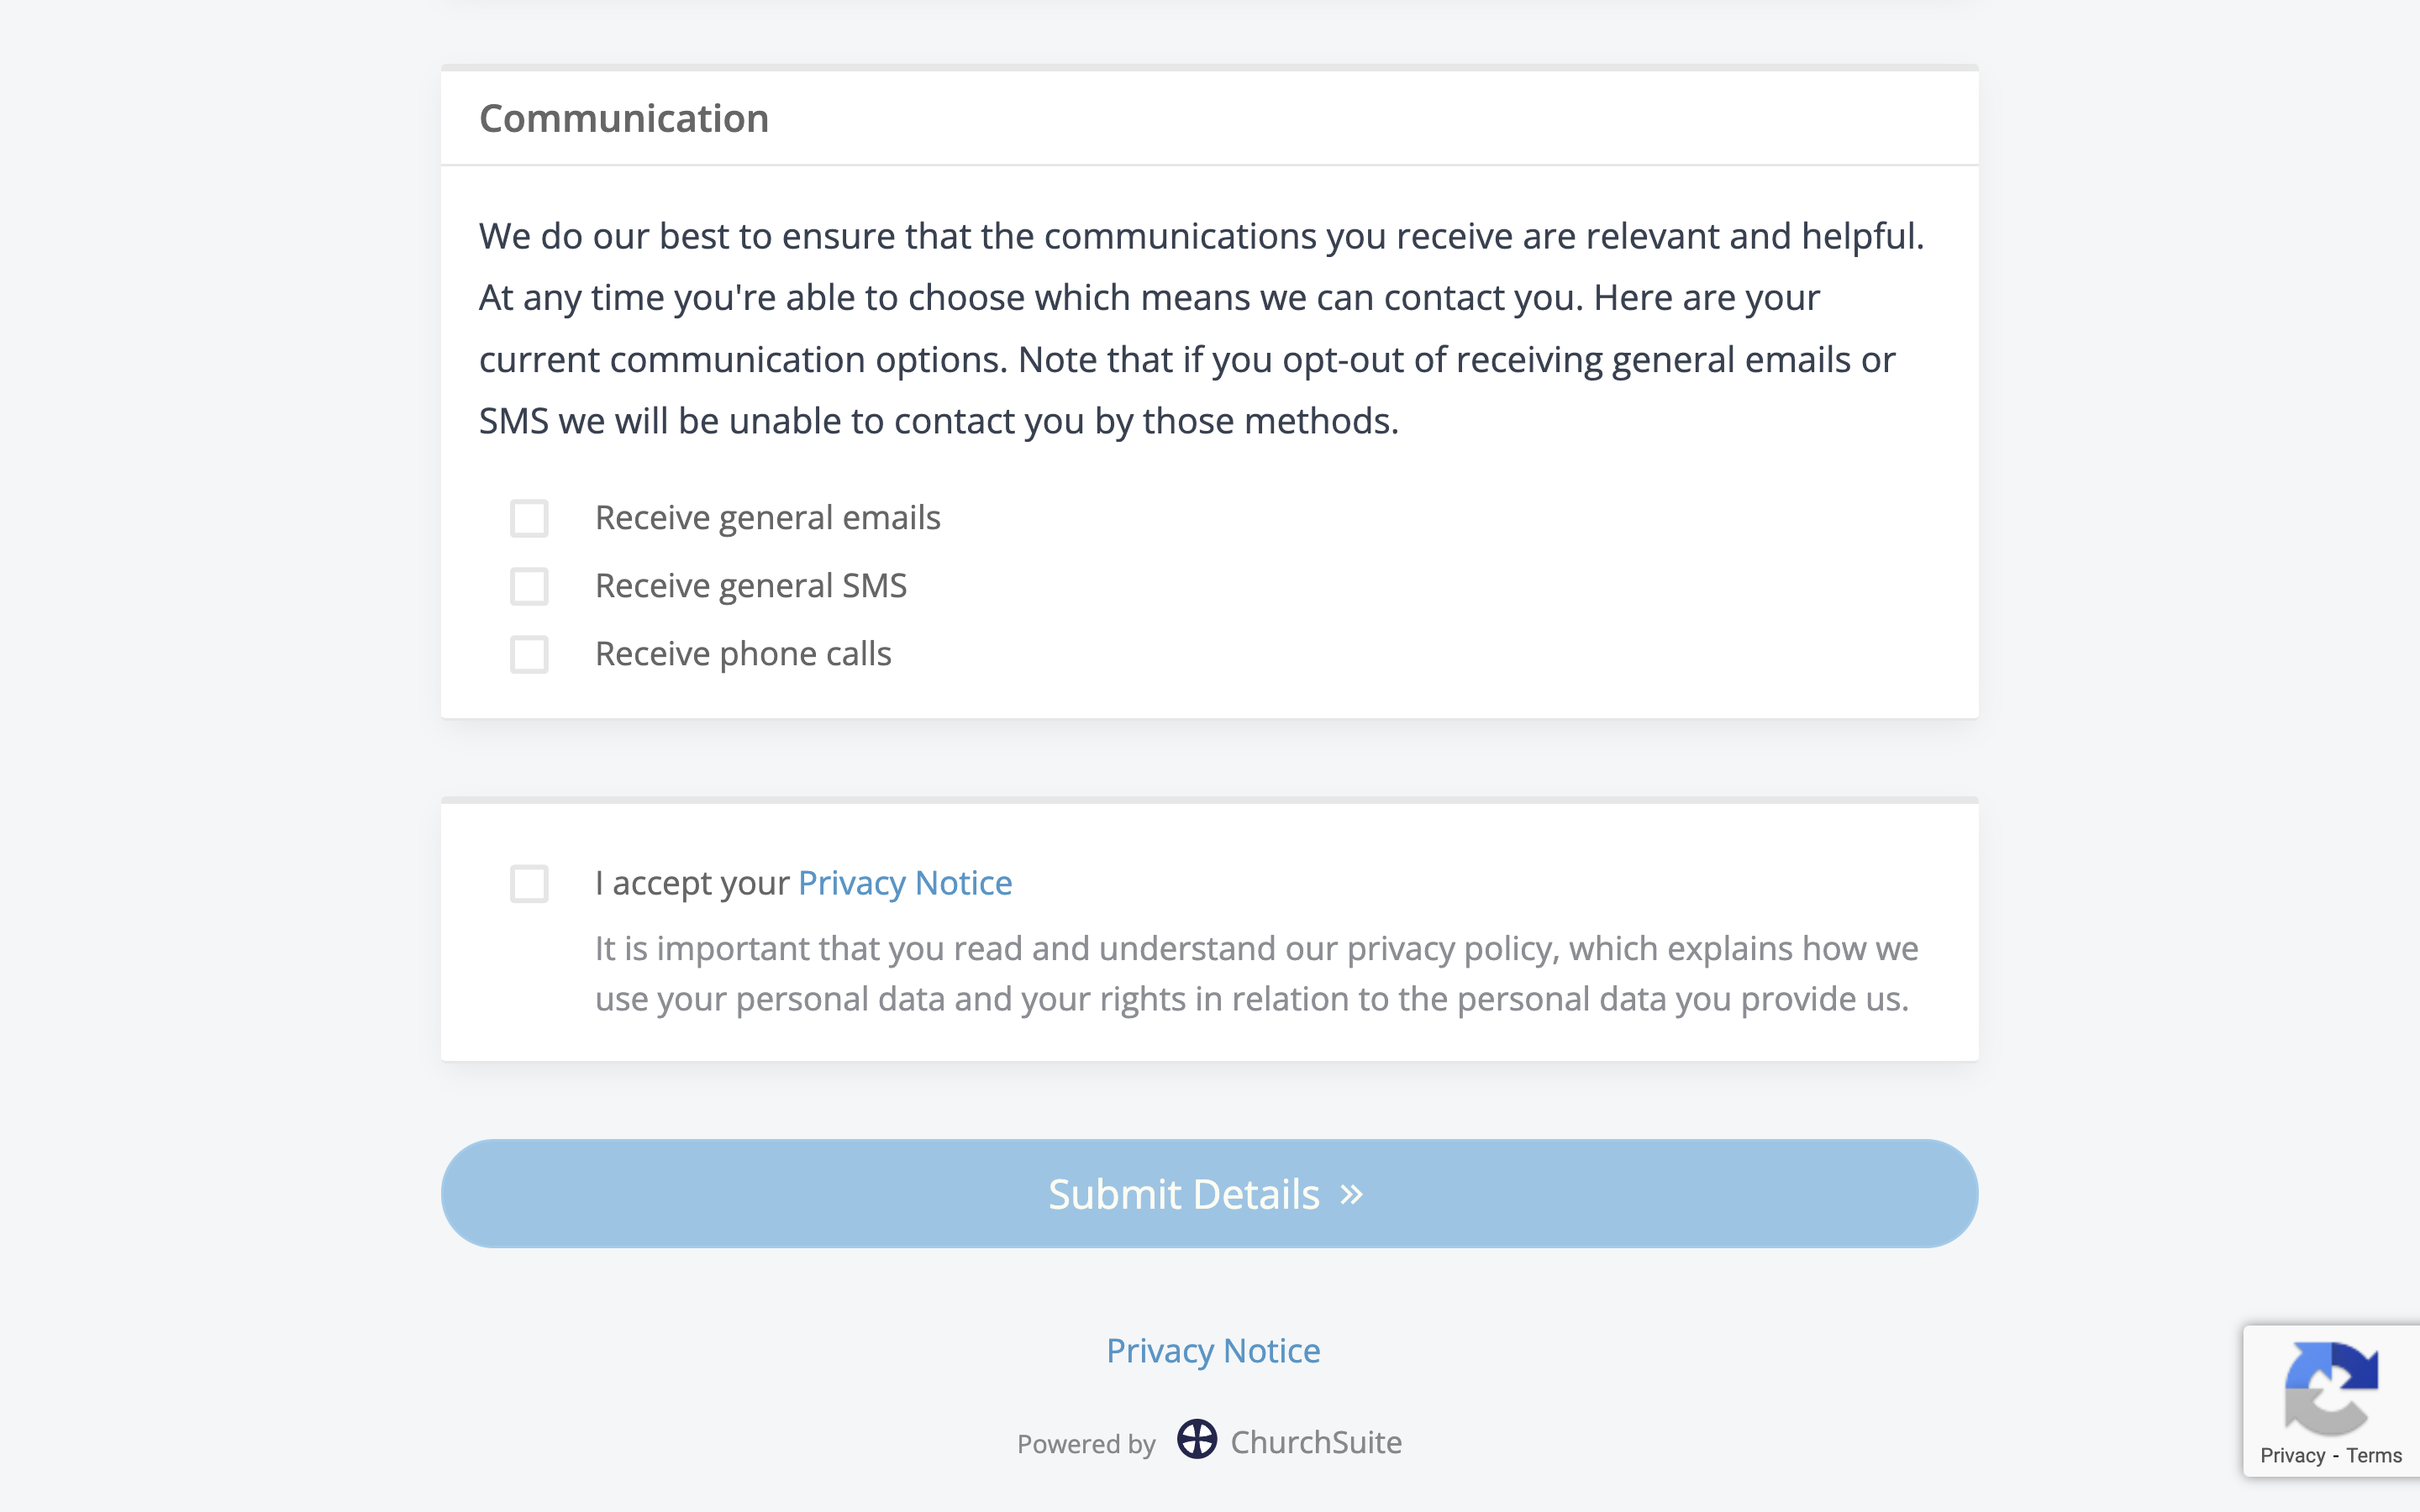
The Fields settings determine which standard and optional fields are shown on the form and whether certain fields will be required. Click Edit to make changes. You can also surface custom fields on the form. See the related Custom Fields support article for further information. Note also the option to allow new contacts to add their Children. This option is only available to customers who subscribe to the Children module on their ChurchSuite account. If enabled, an Add child button is shown on the form, enabling newcomers to submit their children's details as well as their own details.
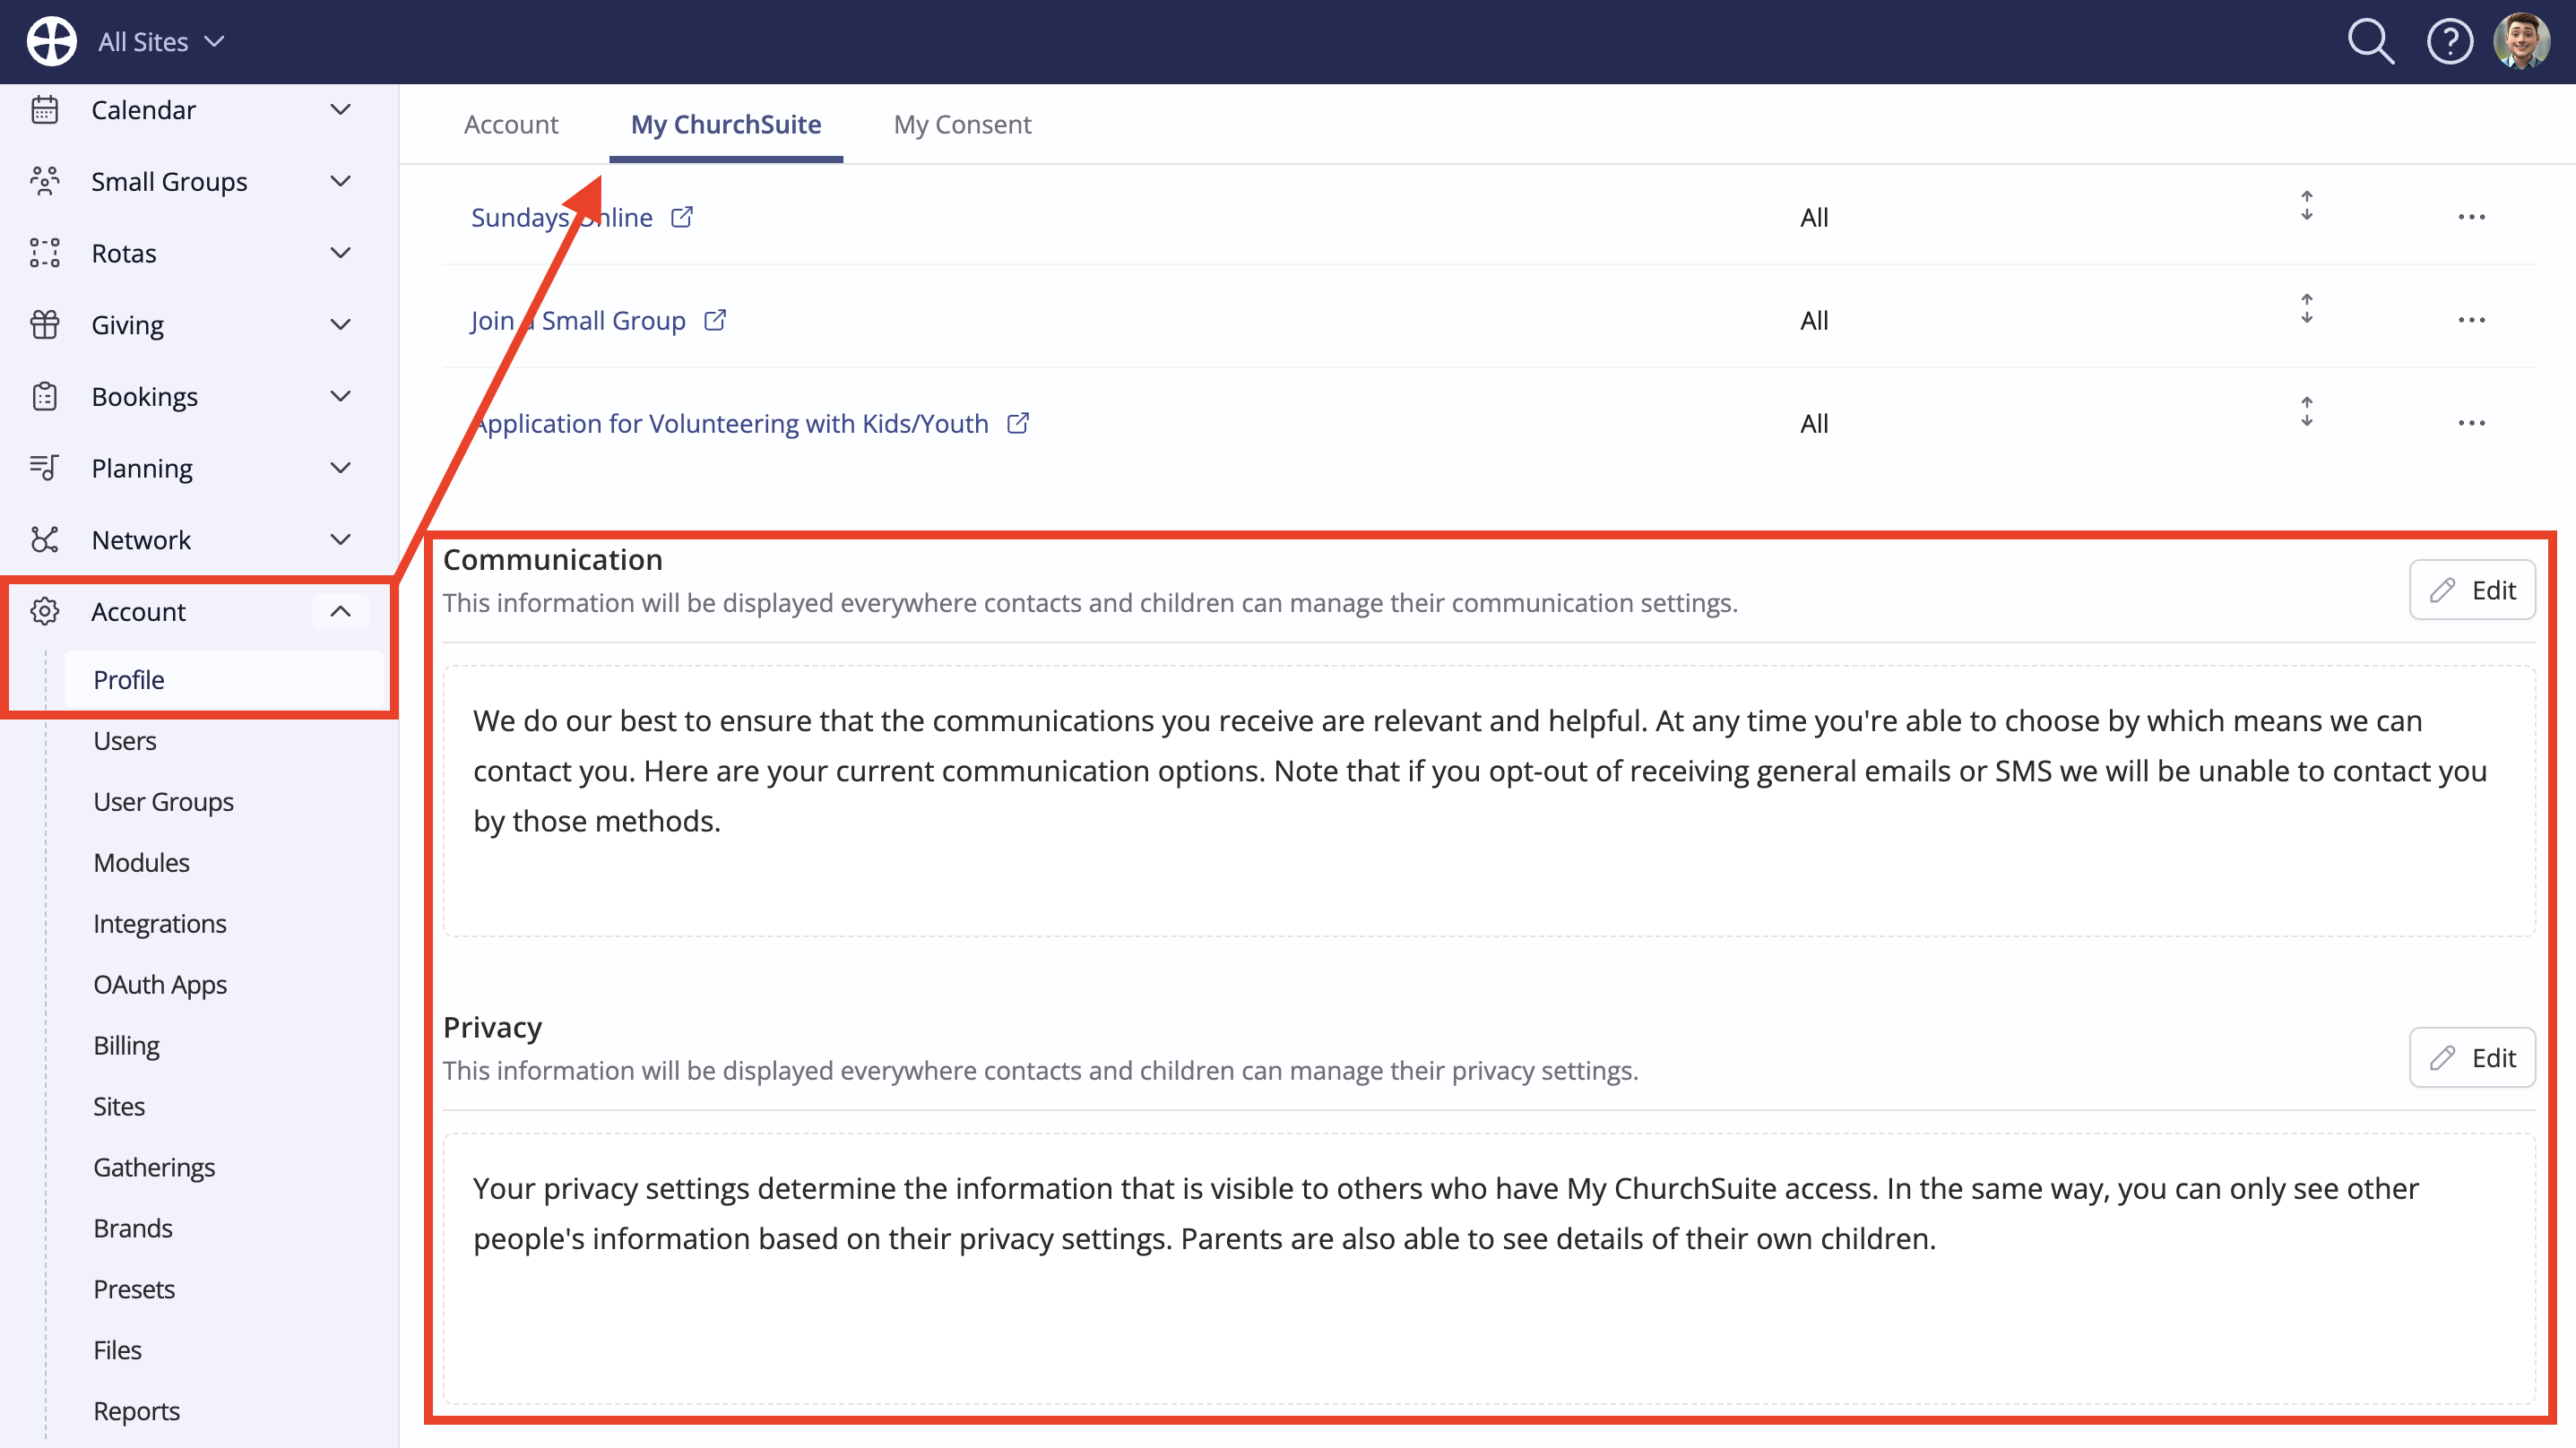
To customise the Communication and Privacy information, head to the Profile section of your Account Settings and click on the My ChurchSuite Options tab. Scroll to the relevant Communication and Privacy sections—click Edit to make changes. The same messages are shown for contacts, parents/carers and children, so you should use language and terminology that is clear and easy for your audience to understand what their communication and privacy settings mean. It's worth bearing in mind that this messaging appears on the My Details form, as well as the My Consent form and My Details area of My ChurchSuite.
Customising children's fields on the form
Later, after completing the Embed Options in the Address Book module, head into the Children module's settings and customise the Embed Options for children and young people. Just like contacts, these settings control the standard and optional Fields shown in the Add child part of the My Details form. Click Edit to make changes.
As for new contacts added through the My Details form, you can also specify whether new children added through the My Details form are assigned to Children module Tags and Flows and whether Children module Key Dates are assigned.
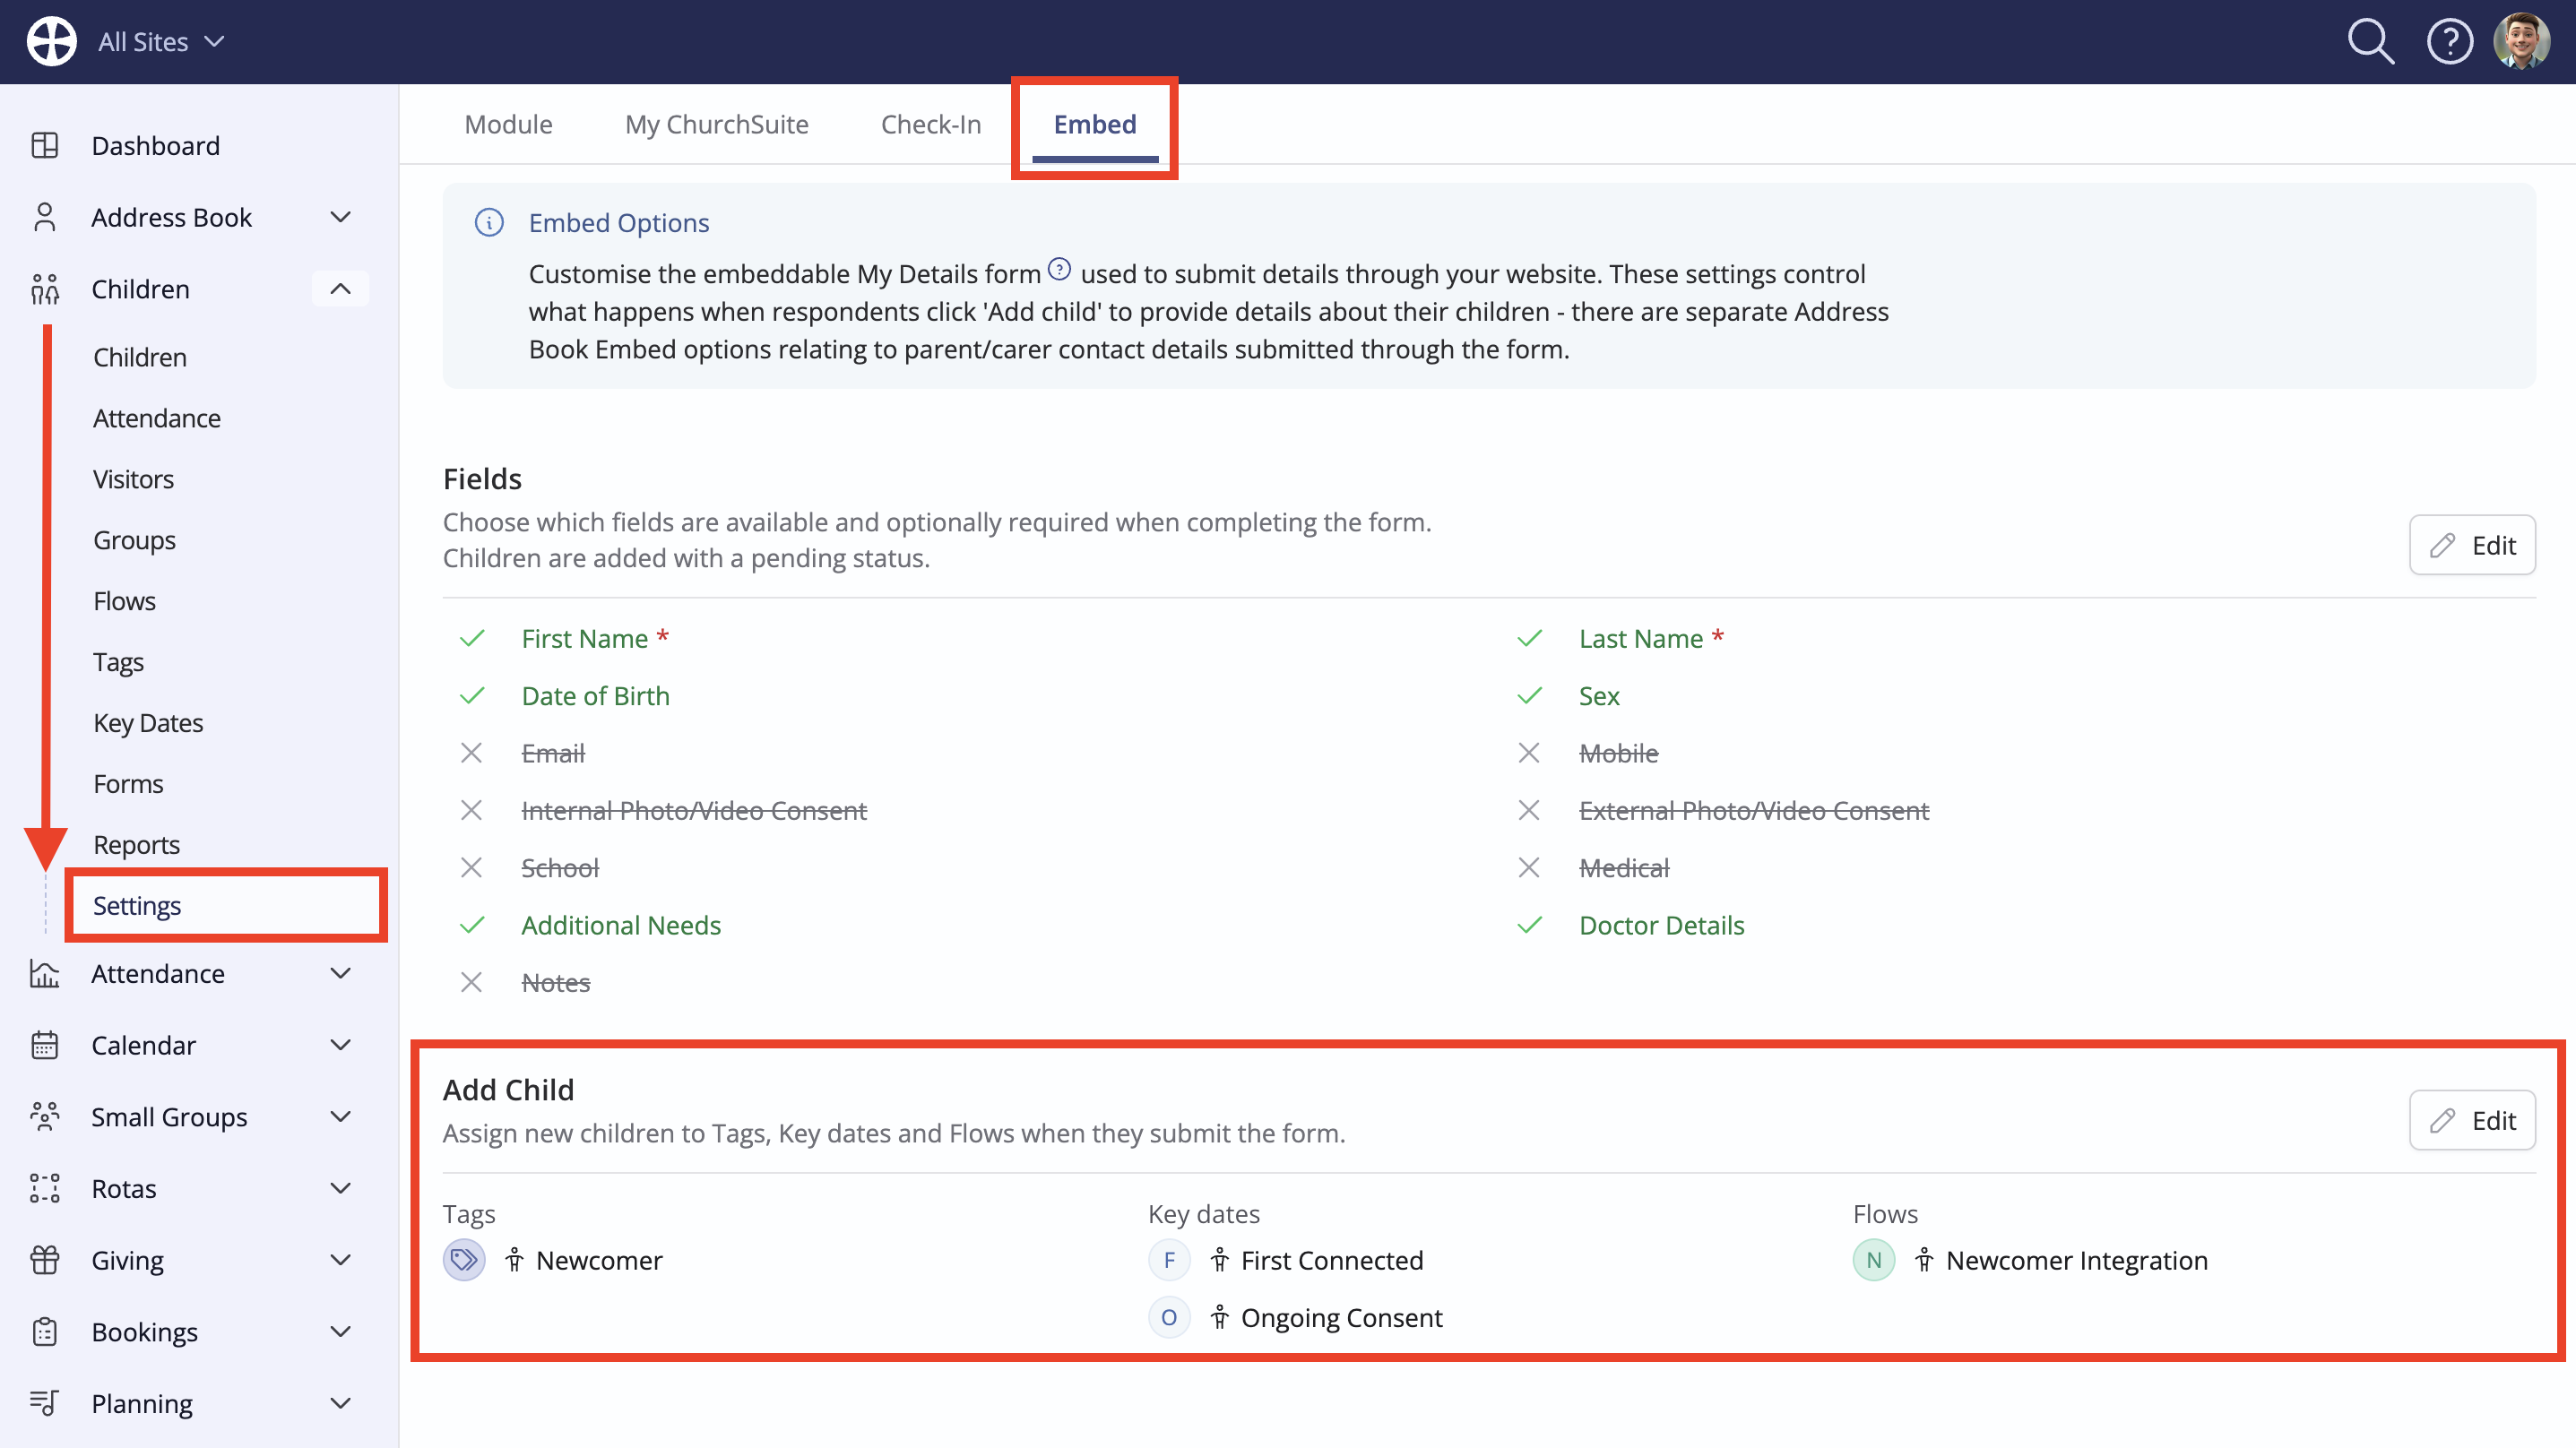
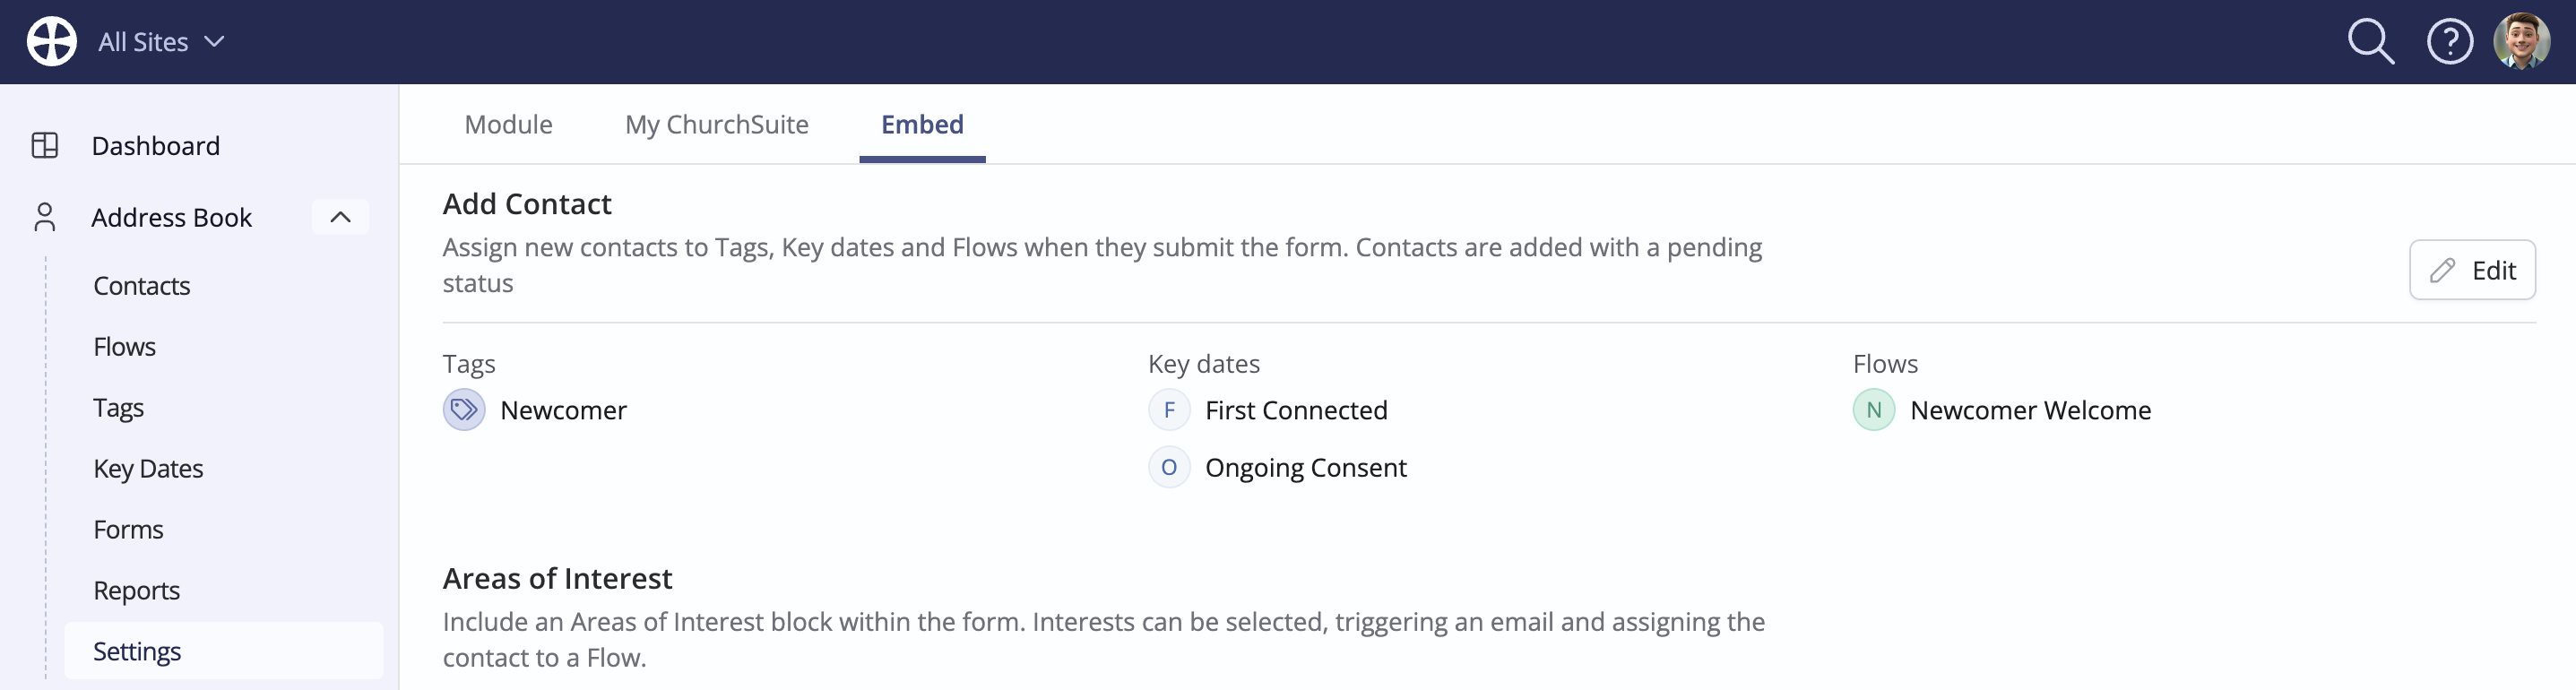
All new contacts submitted through the My Details form are added to the Pending section of the Address Book module. You can also specify whether to add new contacts to Flows, add them to Tags or assign Key dates. This is a great opportunity to ensure newcomers are added directly into your welcome and integration processes from the outset - perhaps into a Newcomer Integration Flow. Click Edit to make changes.
Next, add Areas of Interest - click Edit to make changes. This section is optional but is great for engaging newcomers to consider their "next steps" with your church/organisation. We suggest keeping the list of areas and descriptions short, to save website visitors from endlessly scrolling through every area of ministry or service you provide! Perhaps consider "next steps" rather than "all steps".
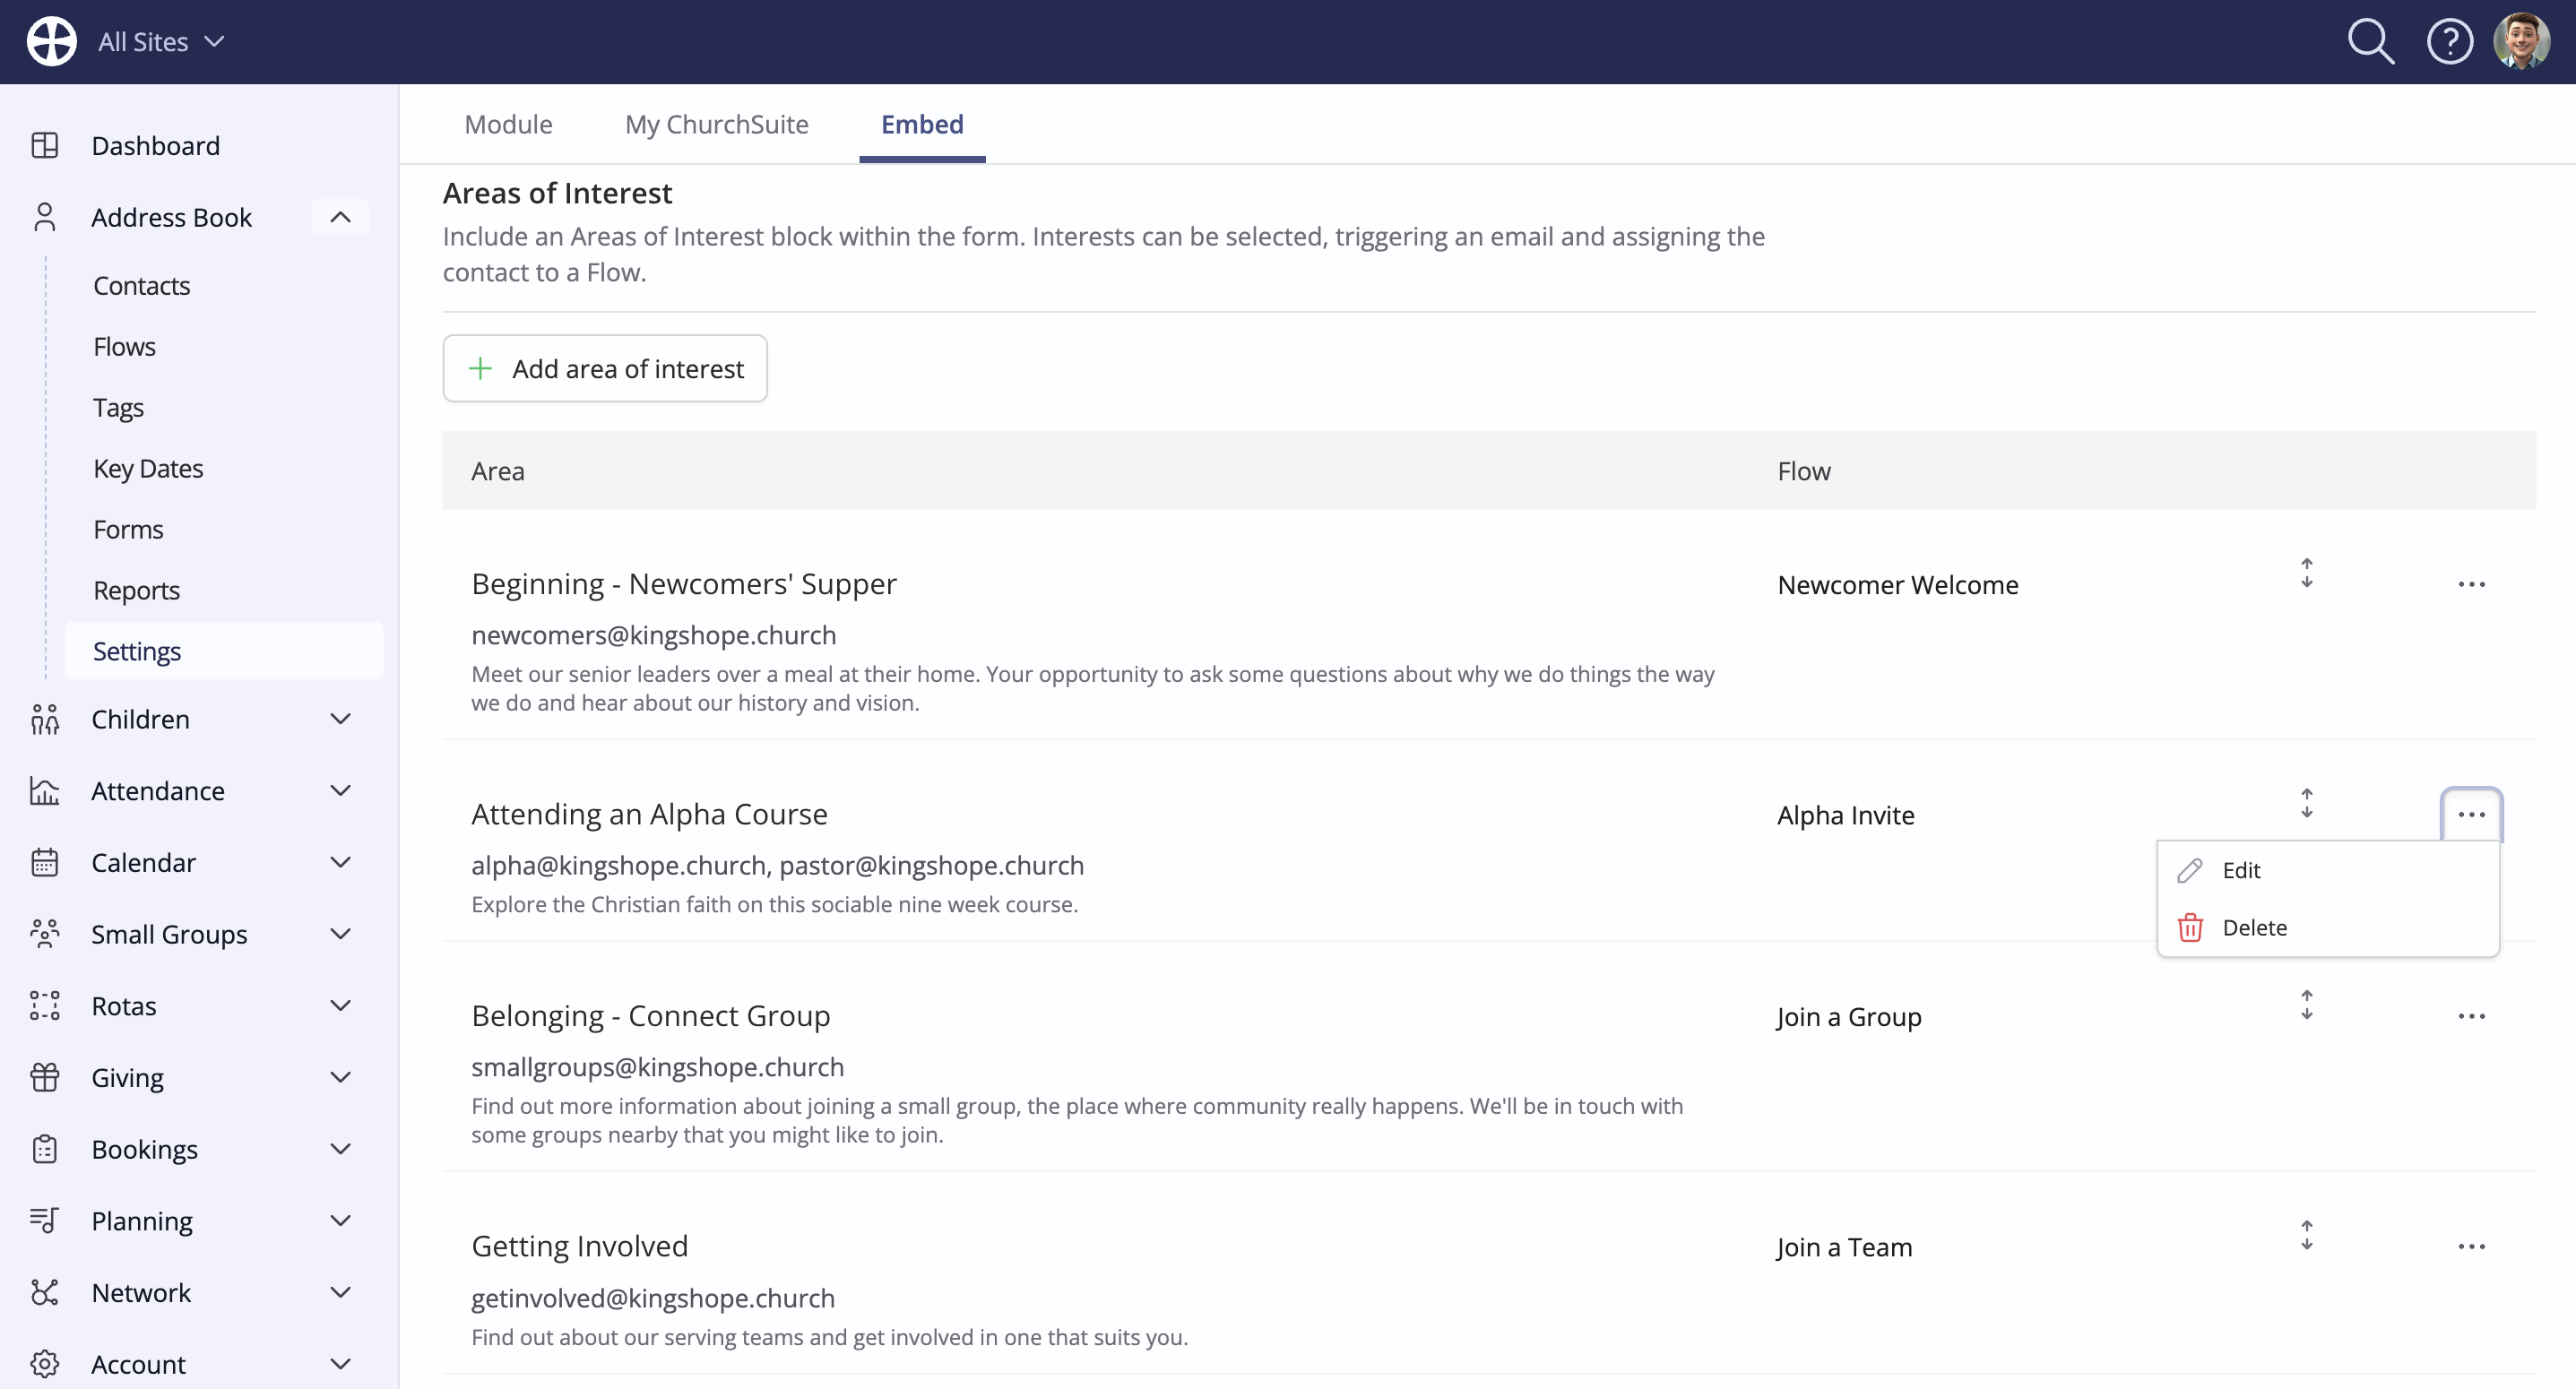
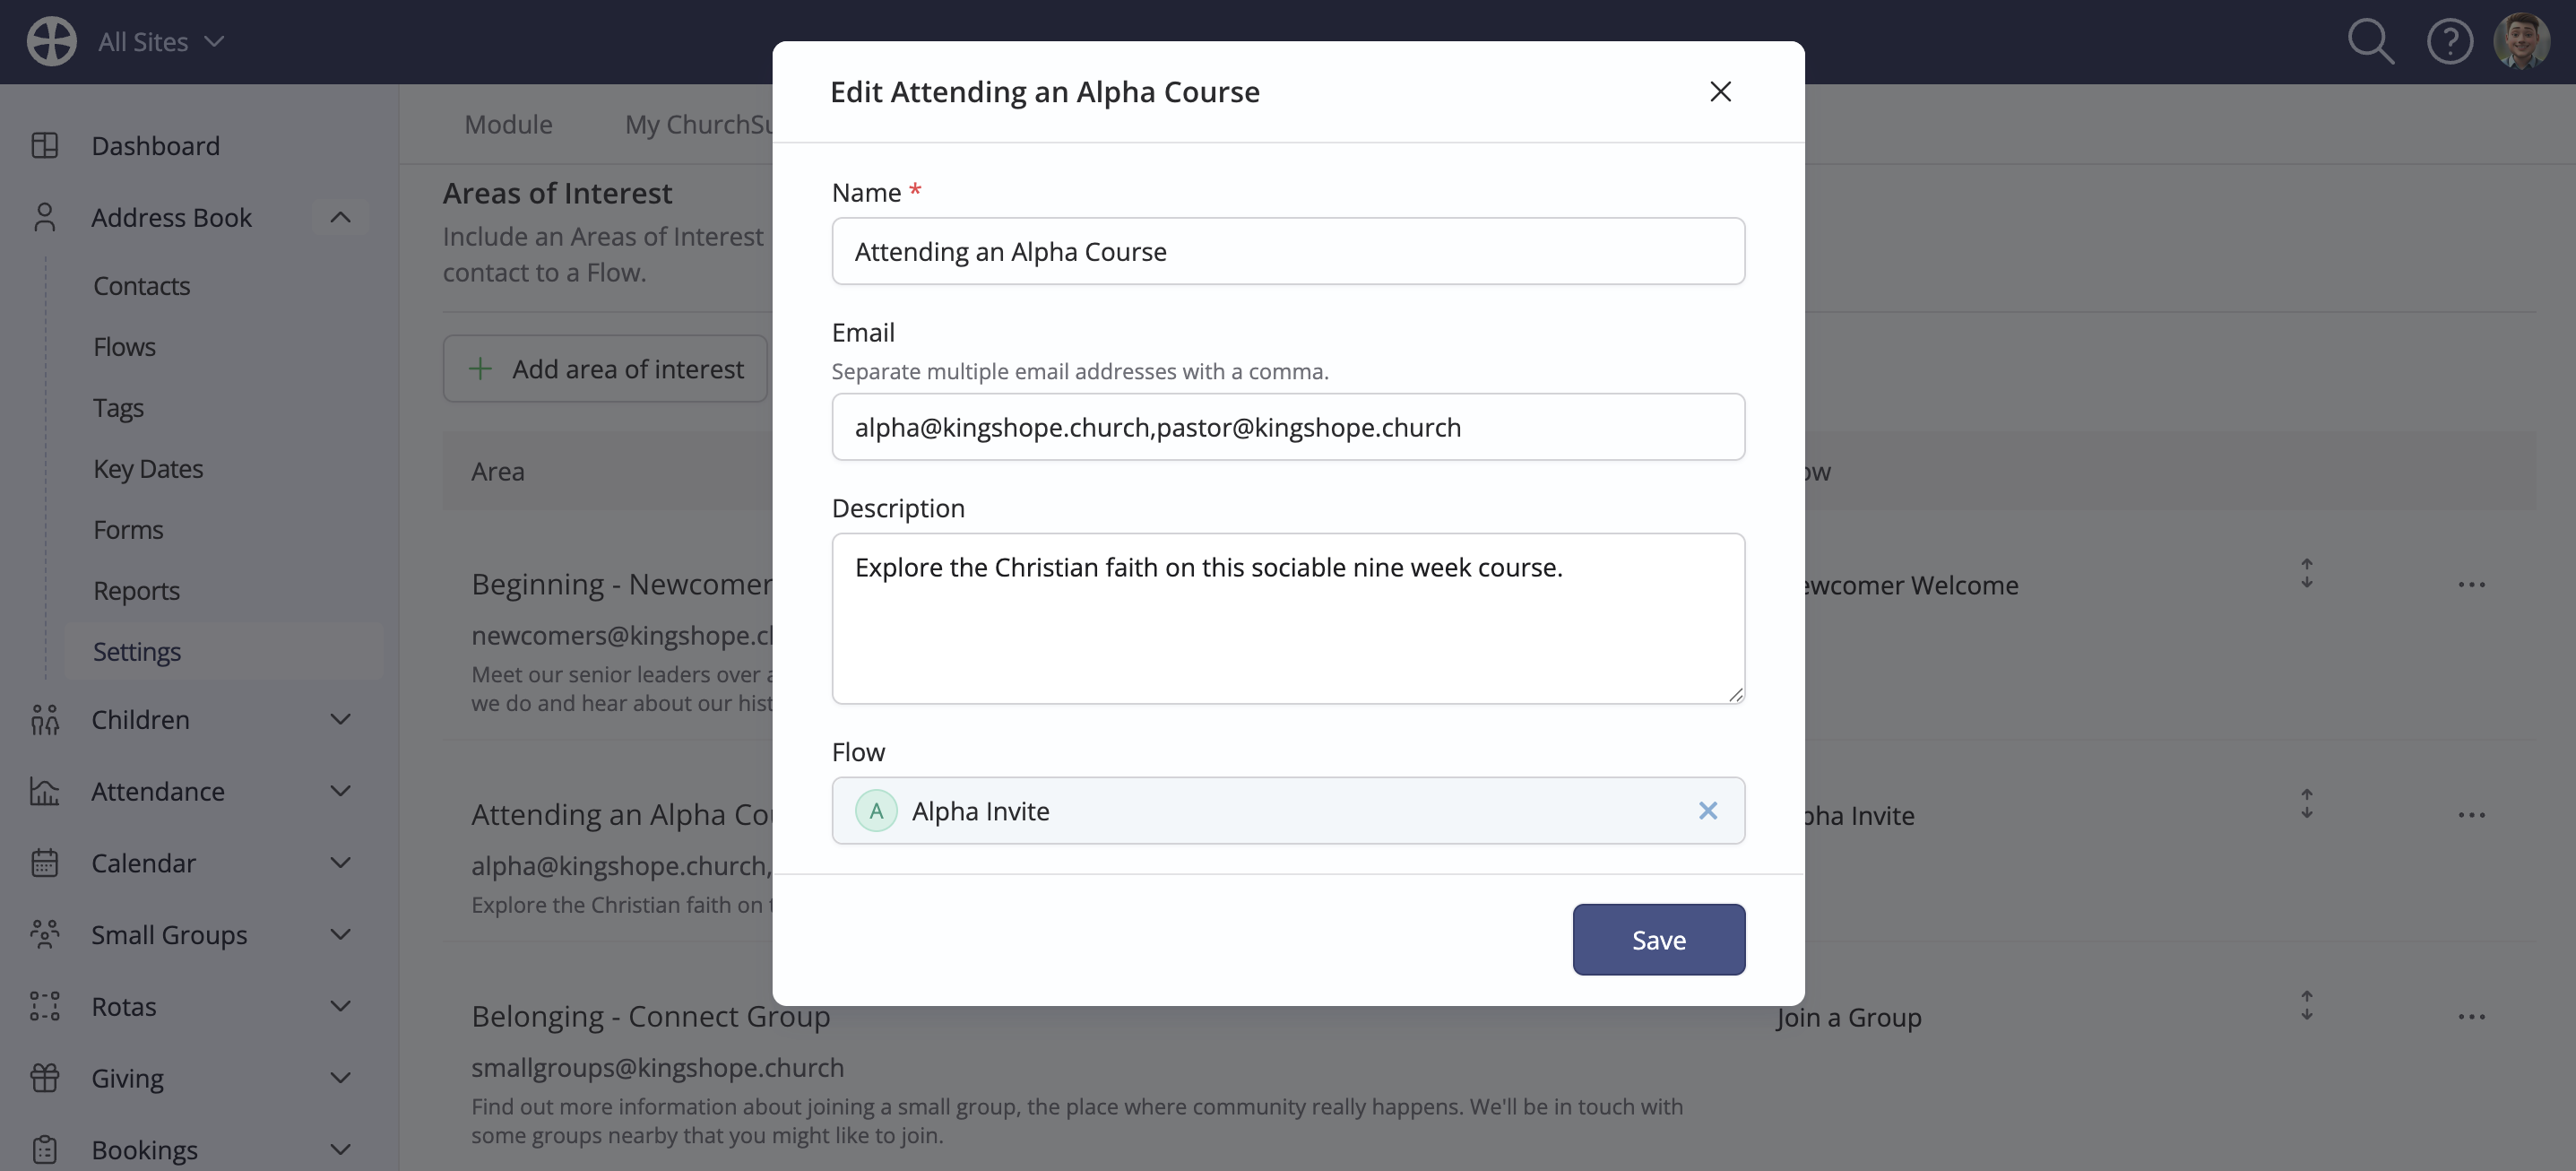
When adding Areas of Interest, optionally add an Email address of the ministry overseer for that area and/or select an optional Flow into which new contacts should be added if they select that area of interest on the form. You can add multiple ministry overseer Email addresses by separating them with a comma. Use the Order controls to change the order of interest areas on the form.
Finally, optionally customise the Success Message shown onscreen after someone submits their details. You can also send a Preset Success Email. You'll need to create the Preset email before you can select it from the drop-down list. Don't overlook the importance of this Success Email - it's a great early opportunity to engage with newcomers and extend an immediate warm welcome when they submit their details - perhaps explaining what will happen next regarding follow-up.
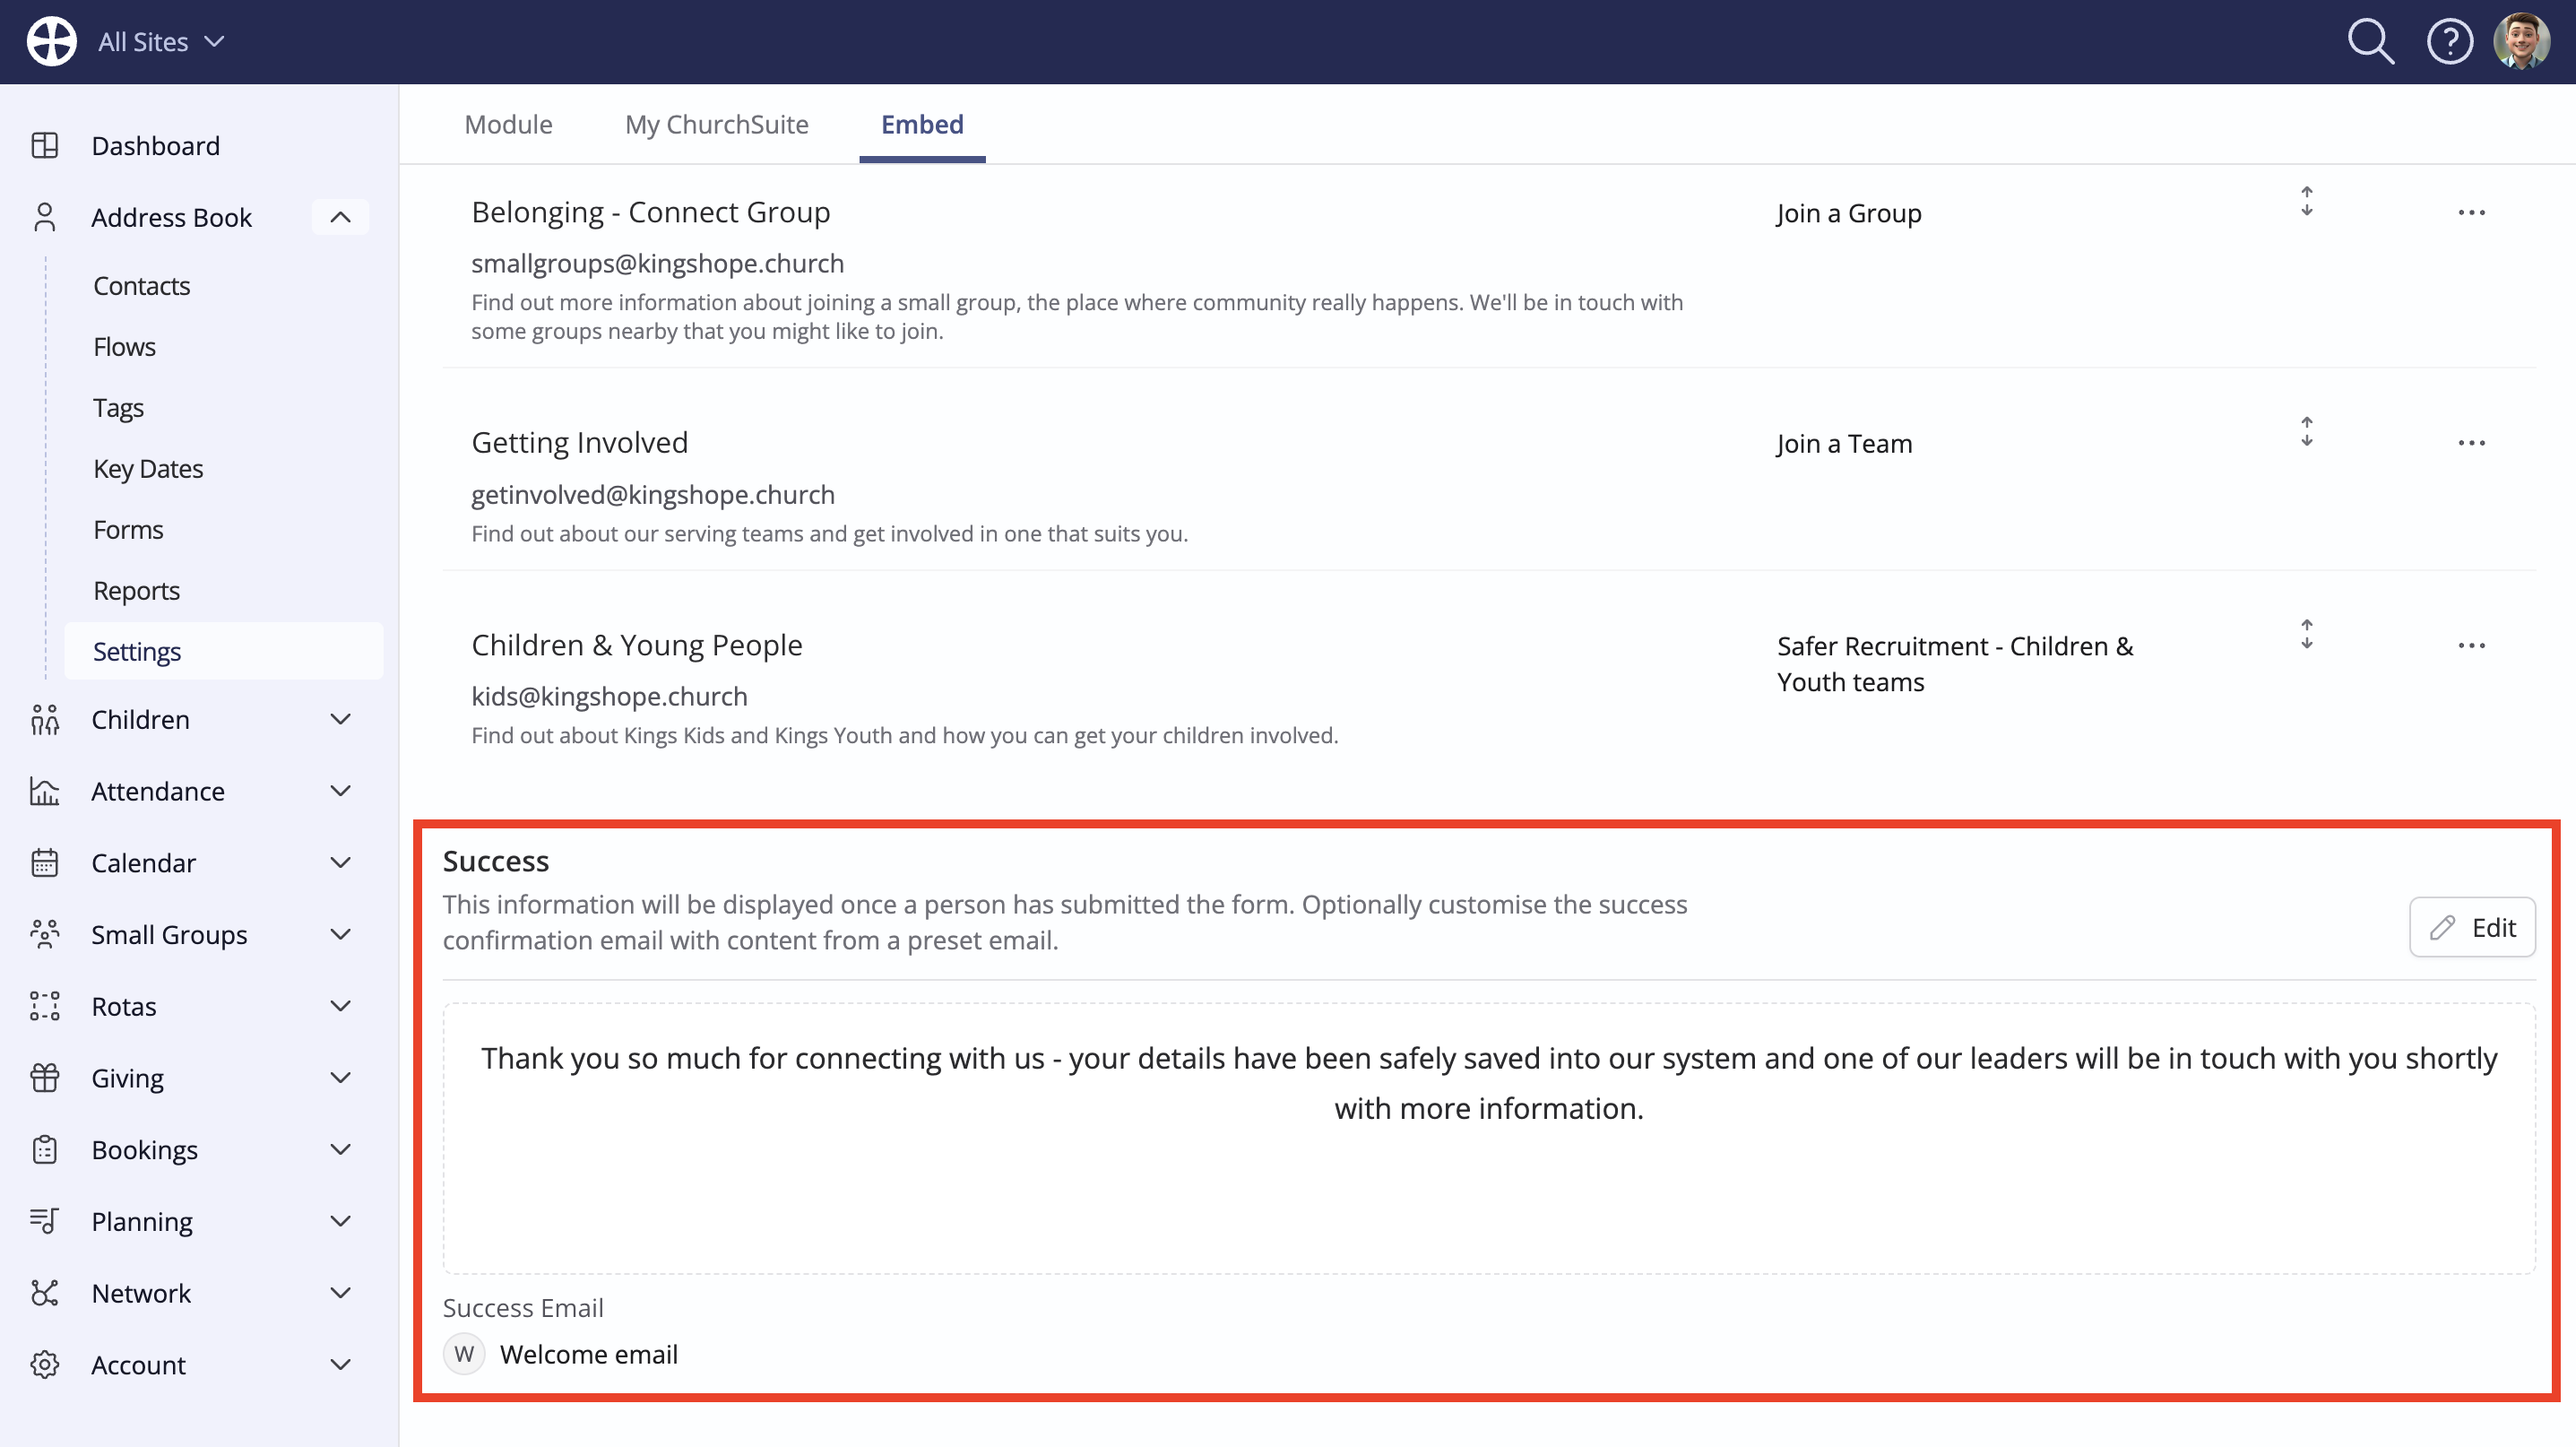
Note that a successful submission confirmation email is always sent when a new contact submits data through any ChurchSuite form. The confirmation email summarises all the personal data that was submitted and is sent from the Data Protection contact listed on your account. The sent email is logged in the person's Communication log as a historical record of the data they first submitted. If a Success Email is specified, the same summary of personal data is appended to the end of your preset Success Email.
You can view the finished form on your website or click Preview at the top of the Embed Options tab. Note that selecting Preview will open the form in a new browser tab. Your organisation's logo surfaces at the top of the preview page for illustration purposes only - the actual embedded form will not include the logo, as your web page will already be suitably branded.
What happens when newcomers submit their details?
This is a great question and you should know the answer so that you can engage your newcomer processes accordingly. Here's what happens...
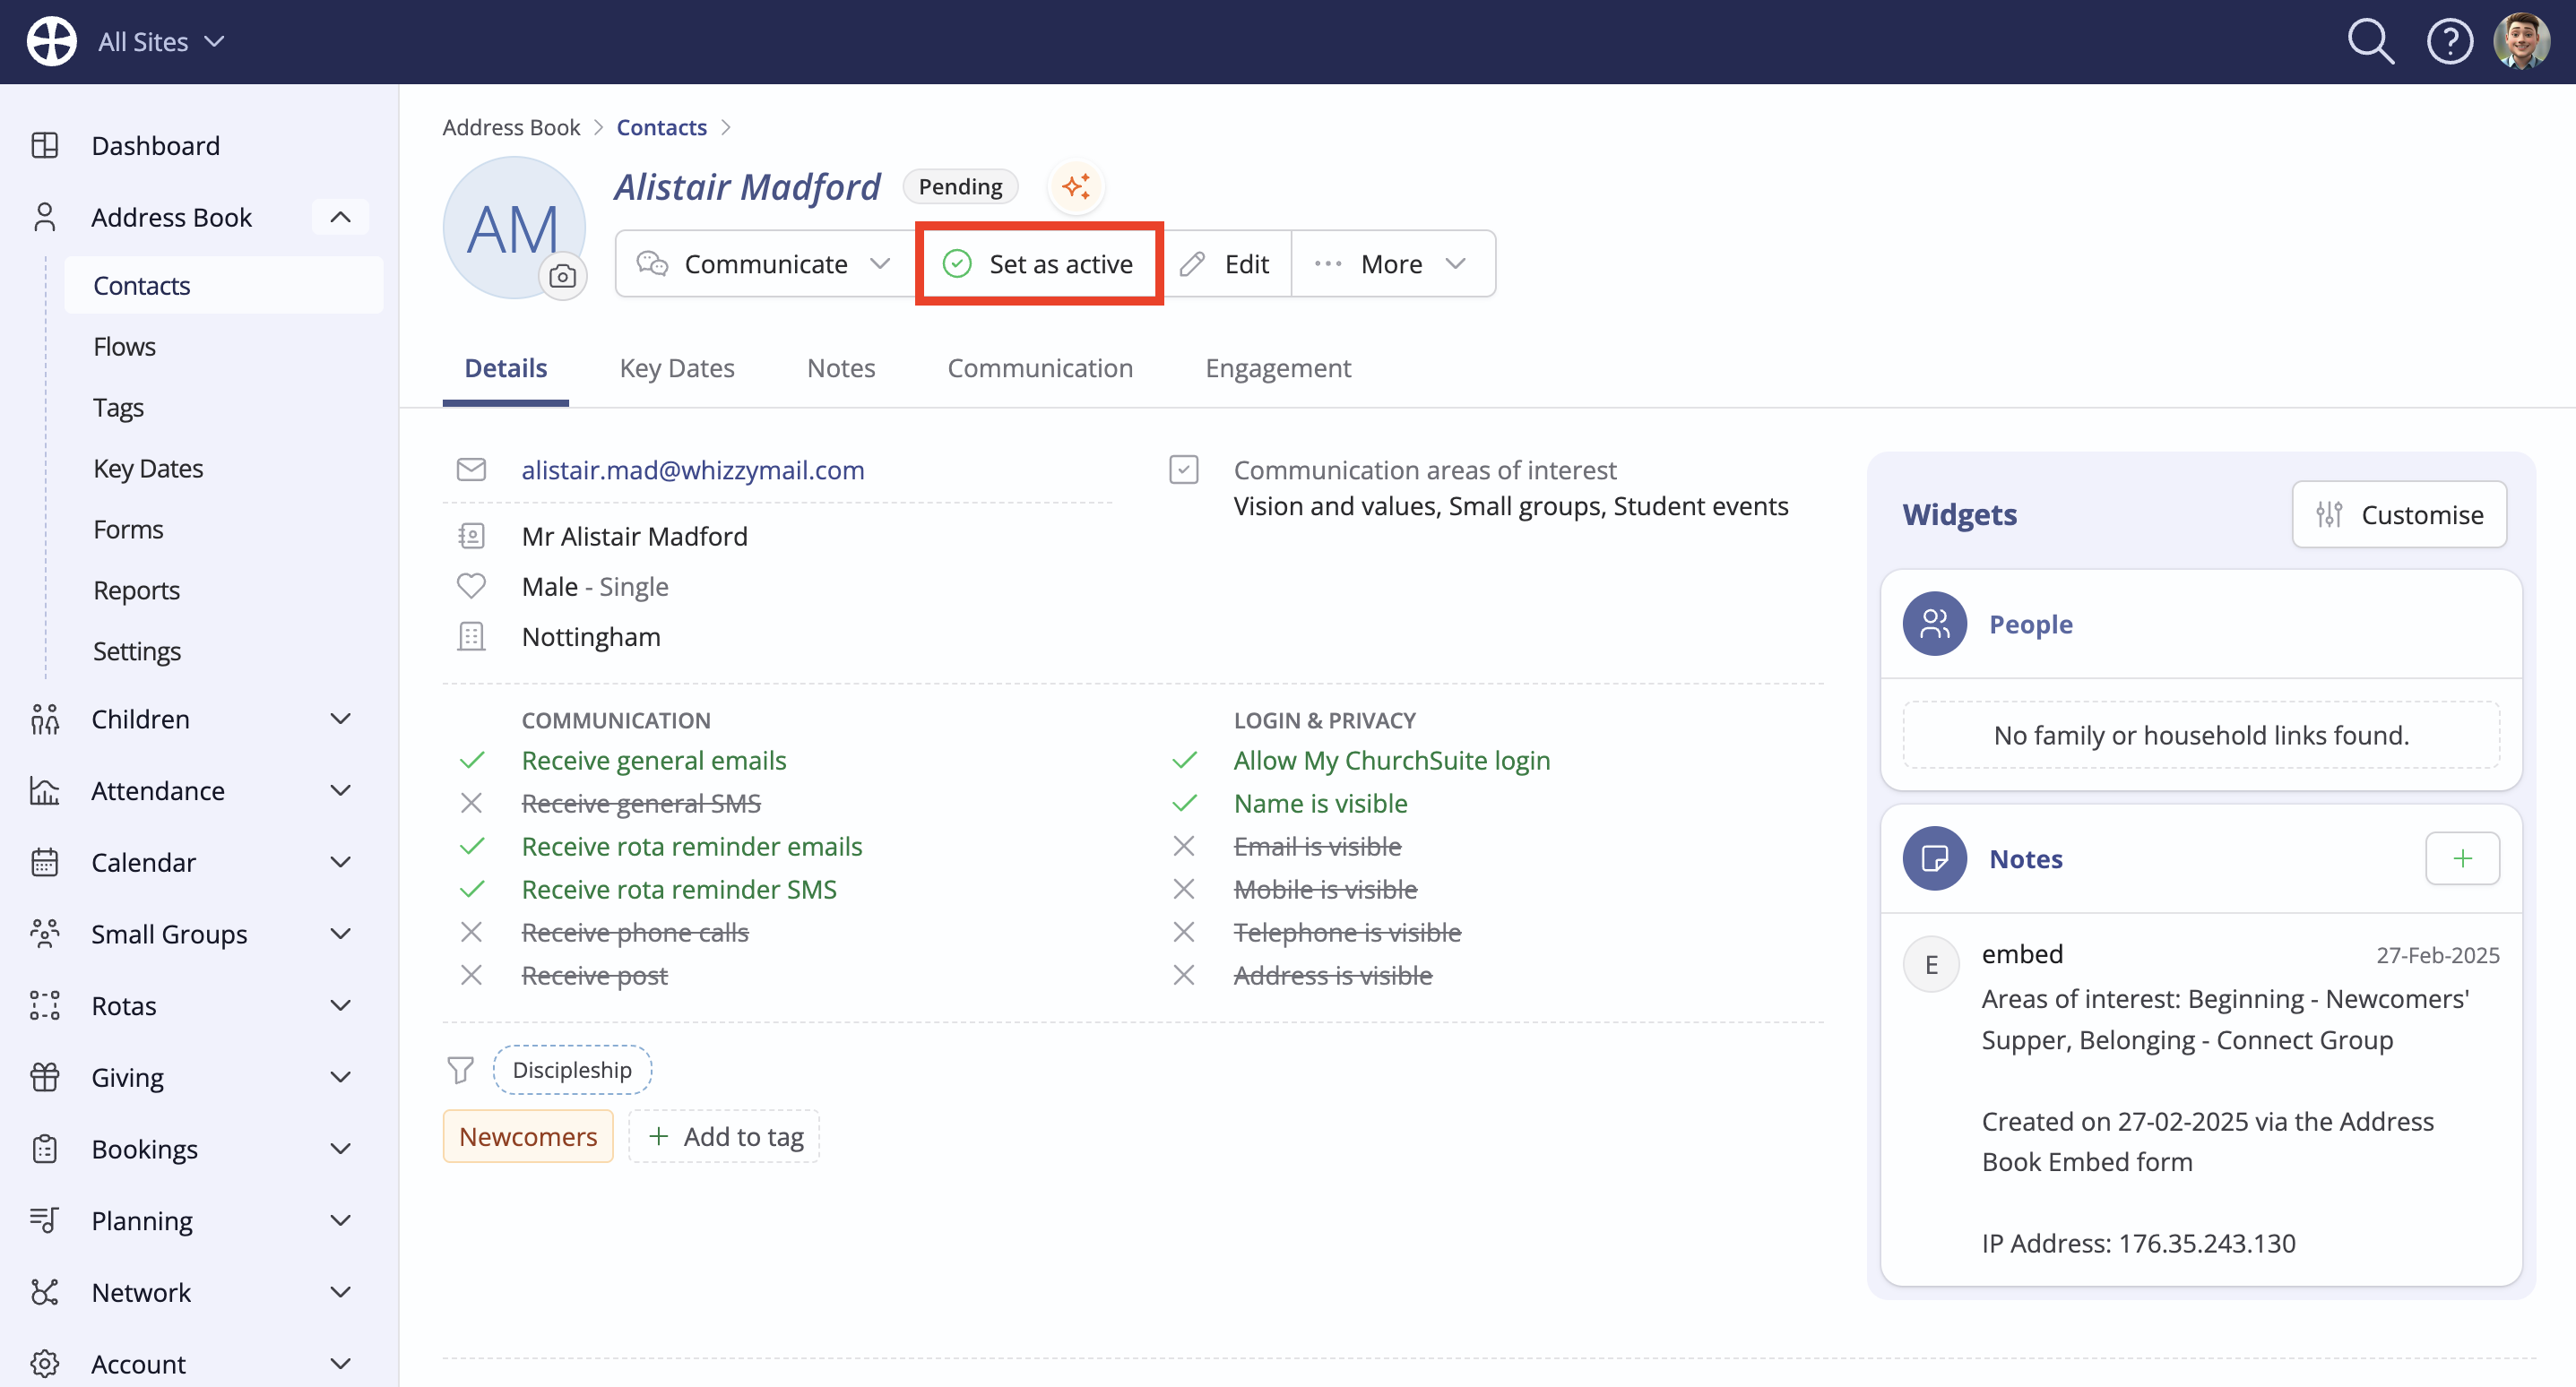
- A new contact is added to the Pending section of the Address Book.
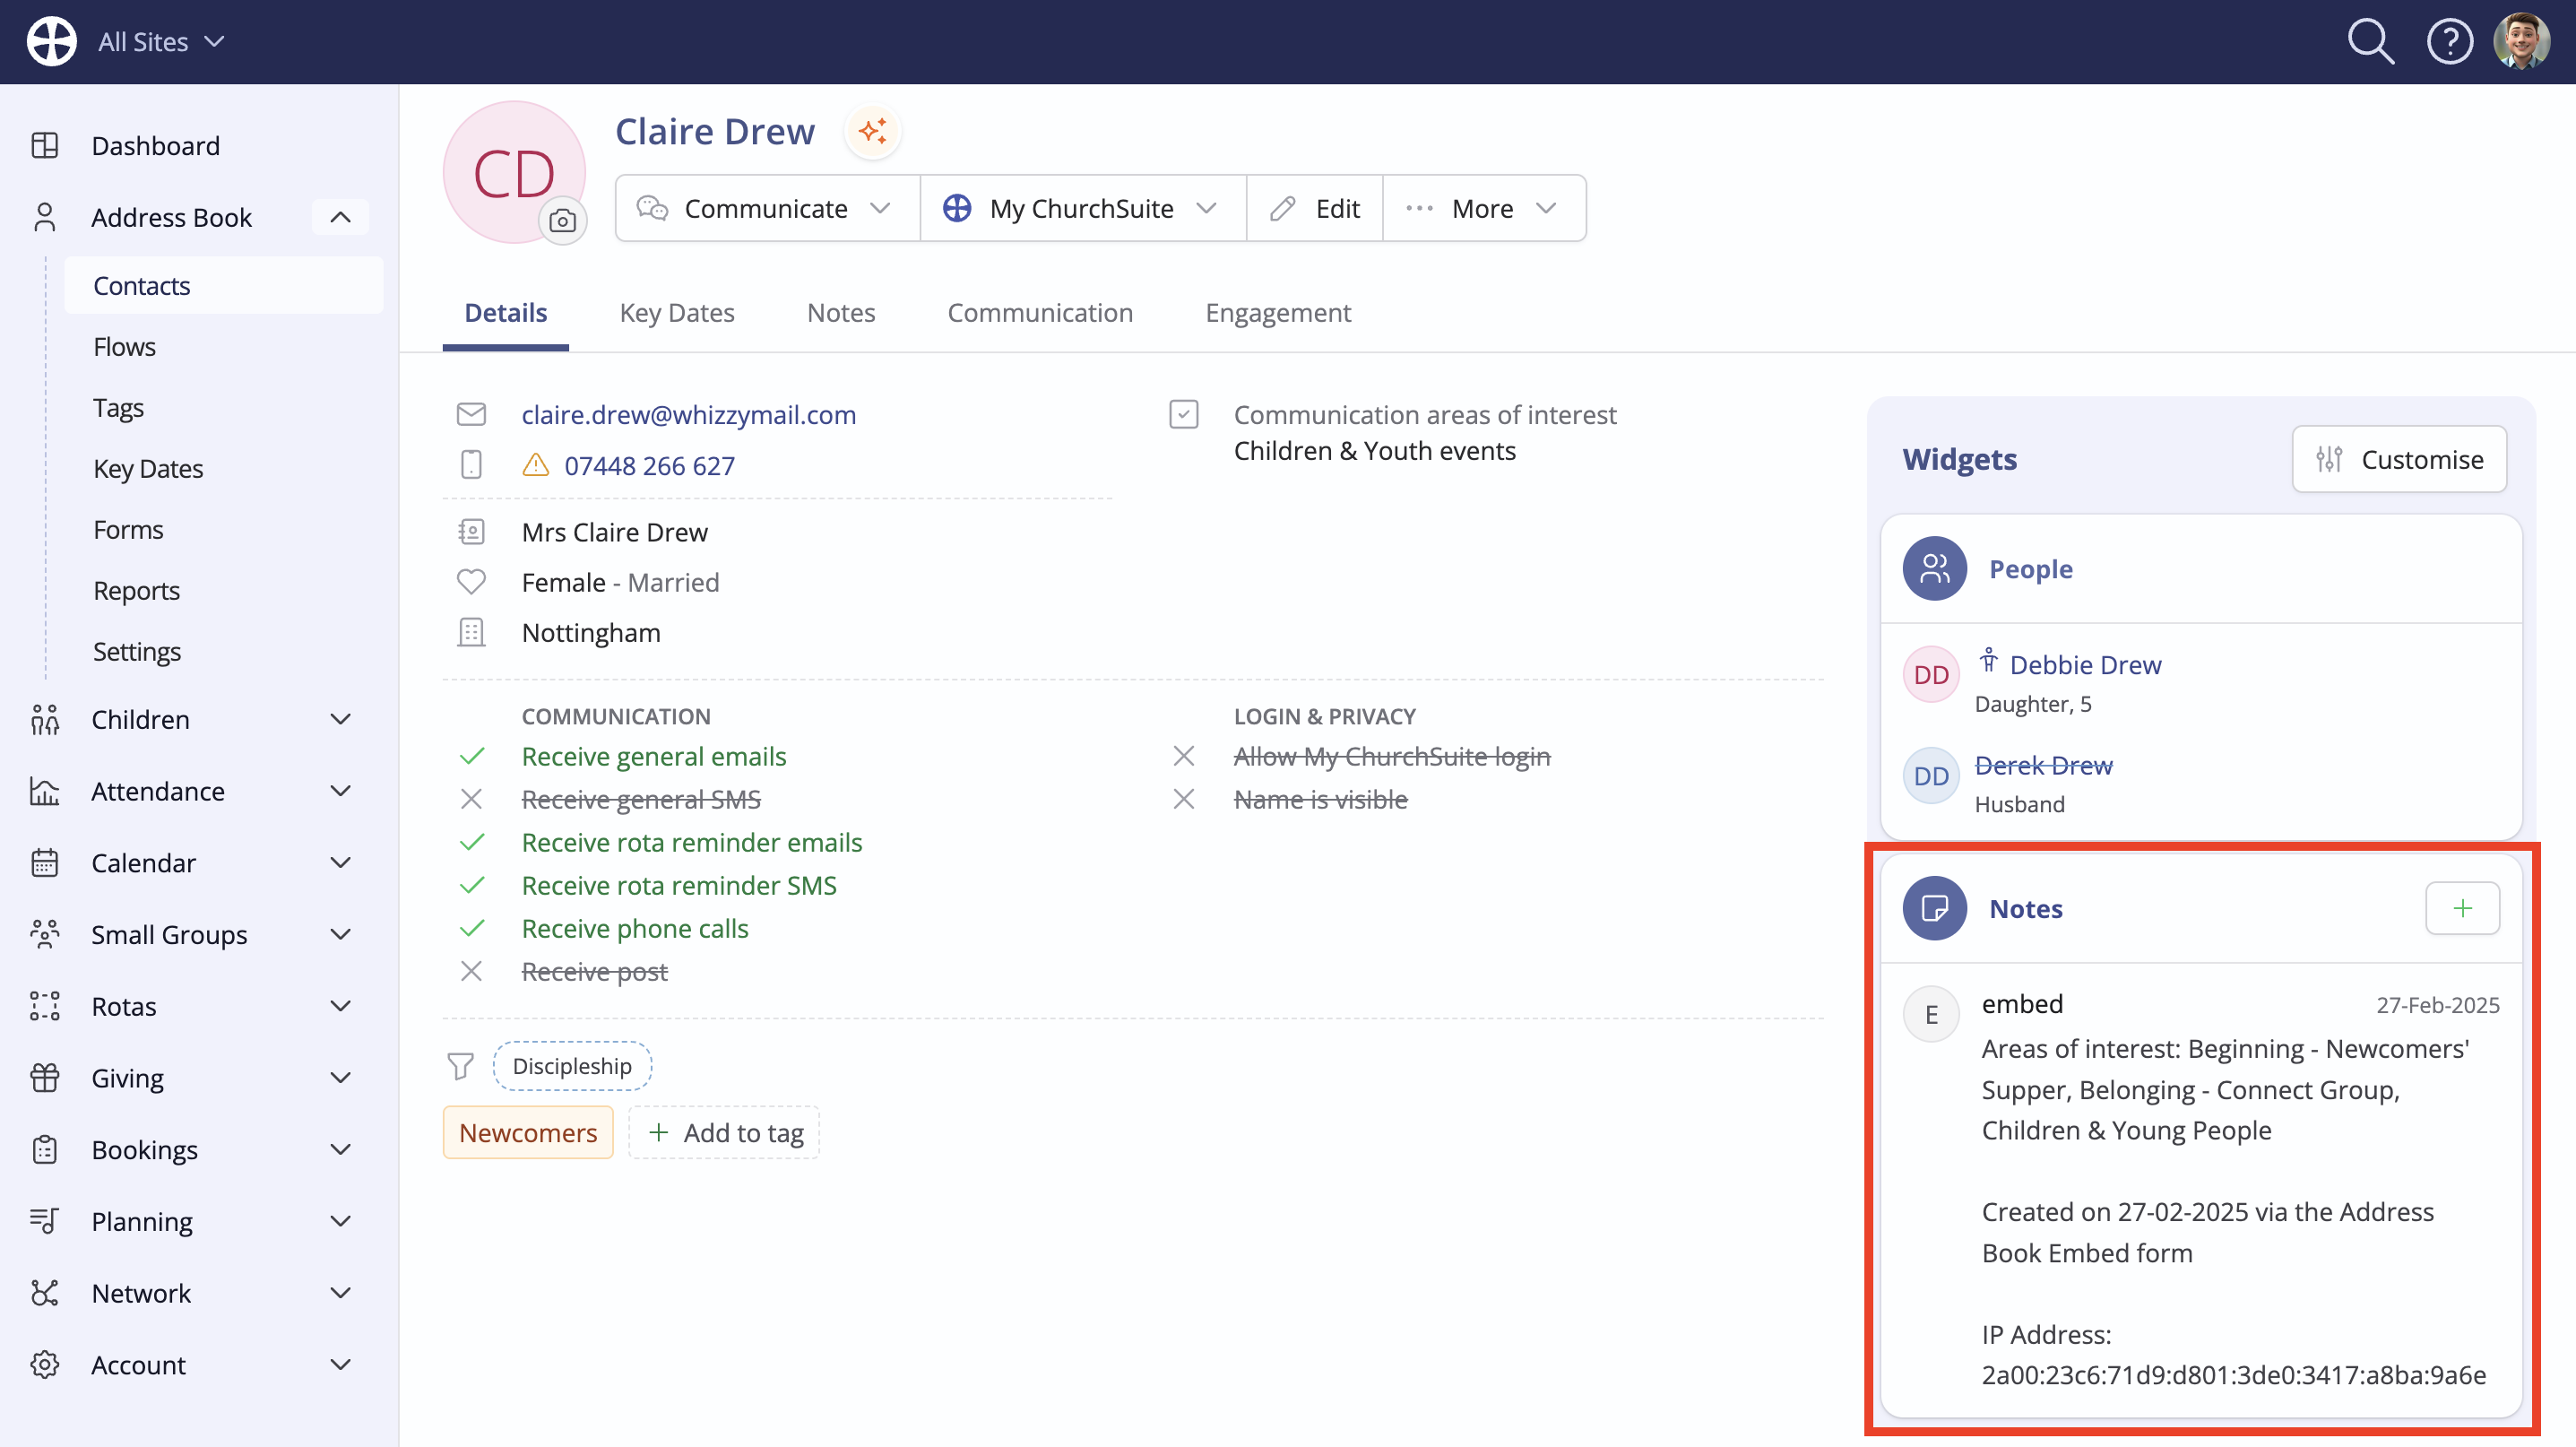
- Any spouse/partner specified on the form is also added to the Pending section of the Address Book and the couple is linked. The spouse/partner will share all the contact information of the main contact (except email, telephone, mobile and DOB). The linked spouse/partner will show in the People area of their profile pages.
- Any children added as part of the submission will be added to the Pending section of the Children module and be linked to their parents/carers. The child will show in the parent/carer contact's profile page People area and the child profile page Parents/carers area will show the linked parents/carers.
- Address Book Key Dates and Tags are assigned to the new contacts as set in the Embed Options (and also to any spouse/partner added)
- Children module Tags and Key Dates are added for children added to the Children module as set in the Embed Options for that module.
- The new contact will also be added to Address Book Flows as specified in the Embed Options (and any spouse/partner). New children are assigned to the Children module Flows as specified in the module's Embed Options.
- Notification emails are sent to the email addresses specified in the Embed Options Notifications settings, including to any ministry overseer email addresses specified for Areas of Interest.
- A Note is added against the contact that their details were added through the Address Book Embed form. If any areas of interest were selected, these are noted too.
- A success Confirmation email is sent to the primary contact detailing the personal data that was submitted on the form. If a Preset success email has been set, this will be sent instead, with the personal data confirmation appended to the end of the email. This email is logged in the primary contact's Communication log.
Managing newcomers added to the Pending section
When people submit their details using the embeddable My Details form, ChurchSuite uses reCAPTCHA 'robot' checking to minimise the risk of spam submissions to the Address Book and Children module. This may require the submitter to tick to confirm they are not internet bots! They may also be asked to answer a picture question e.g. "click all the boxes in the picture that contain cars" - which in so doing, confirms they're not an internet bot!
To protect your active Address Book (and in turn your monthly billing pricing tier), all new contacts are first added to the Pending section, requiring a permitted module User to review their details and Set as Active (or archive or delete them). Pending contacts are unable to participate in any wider ChurchSuite functionality until they have been set active.
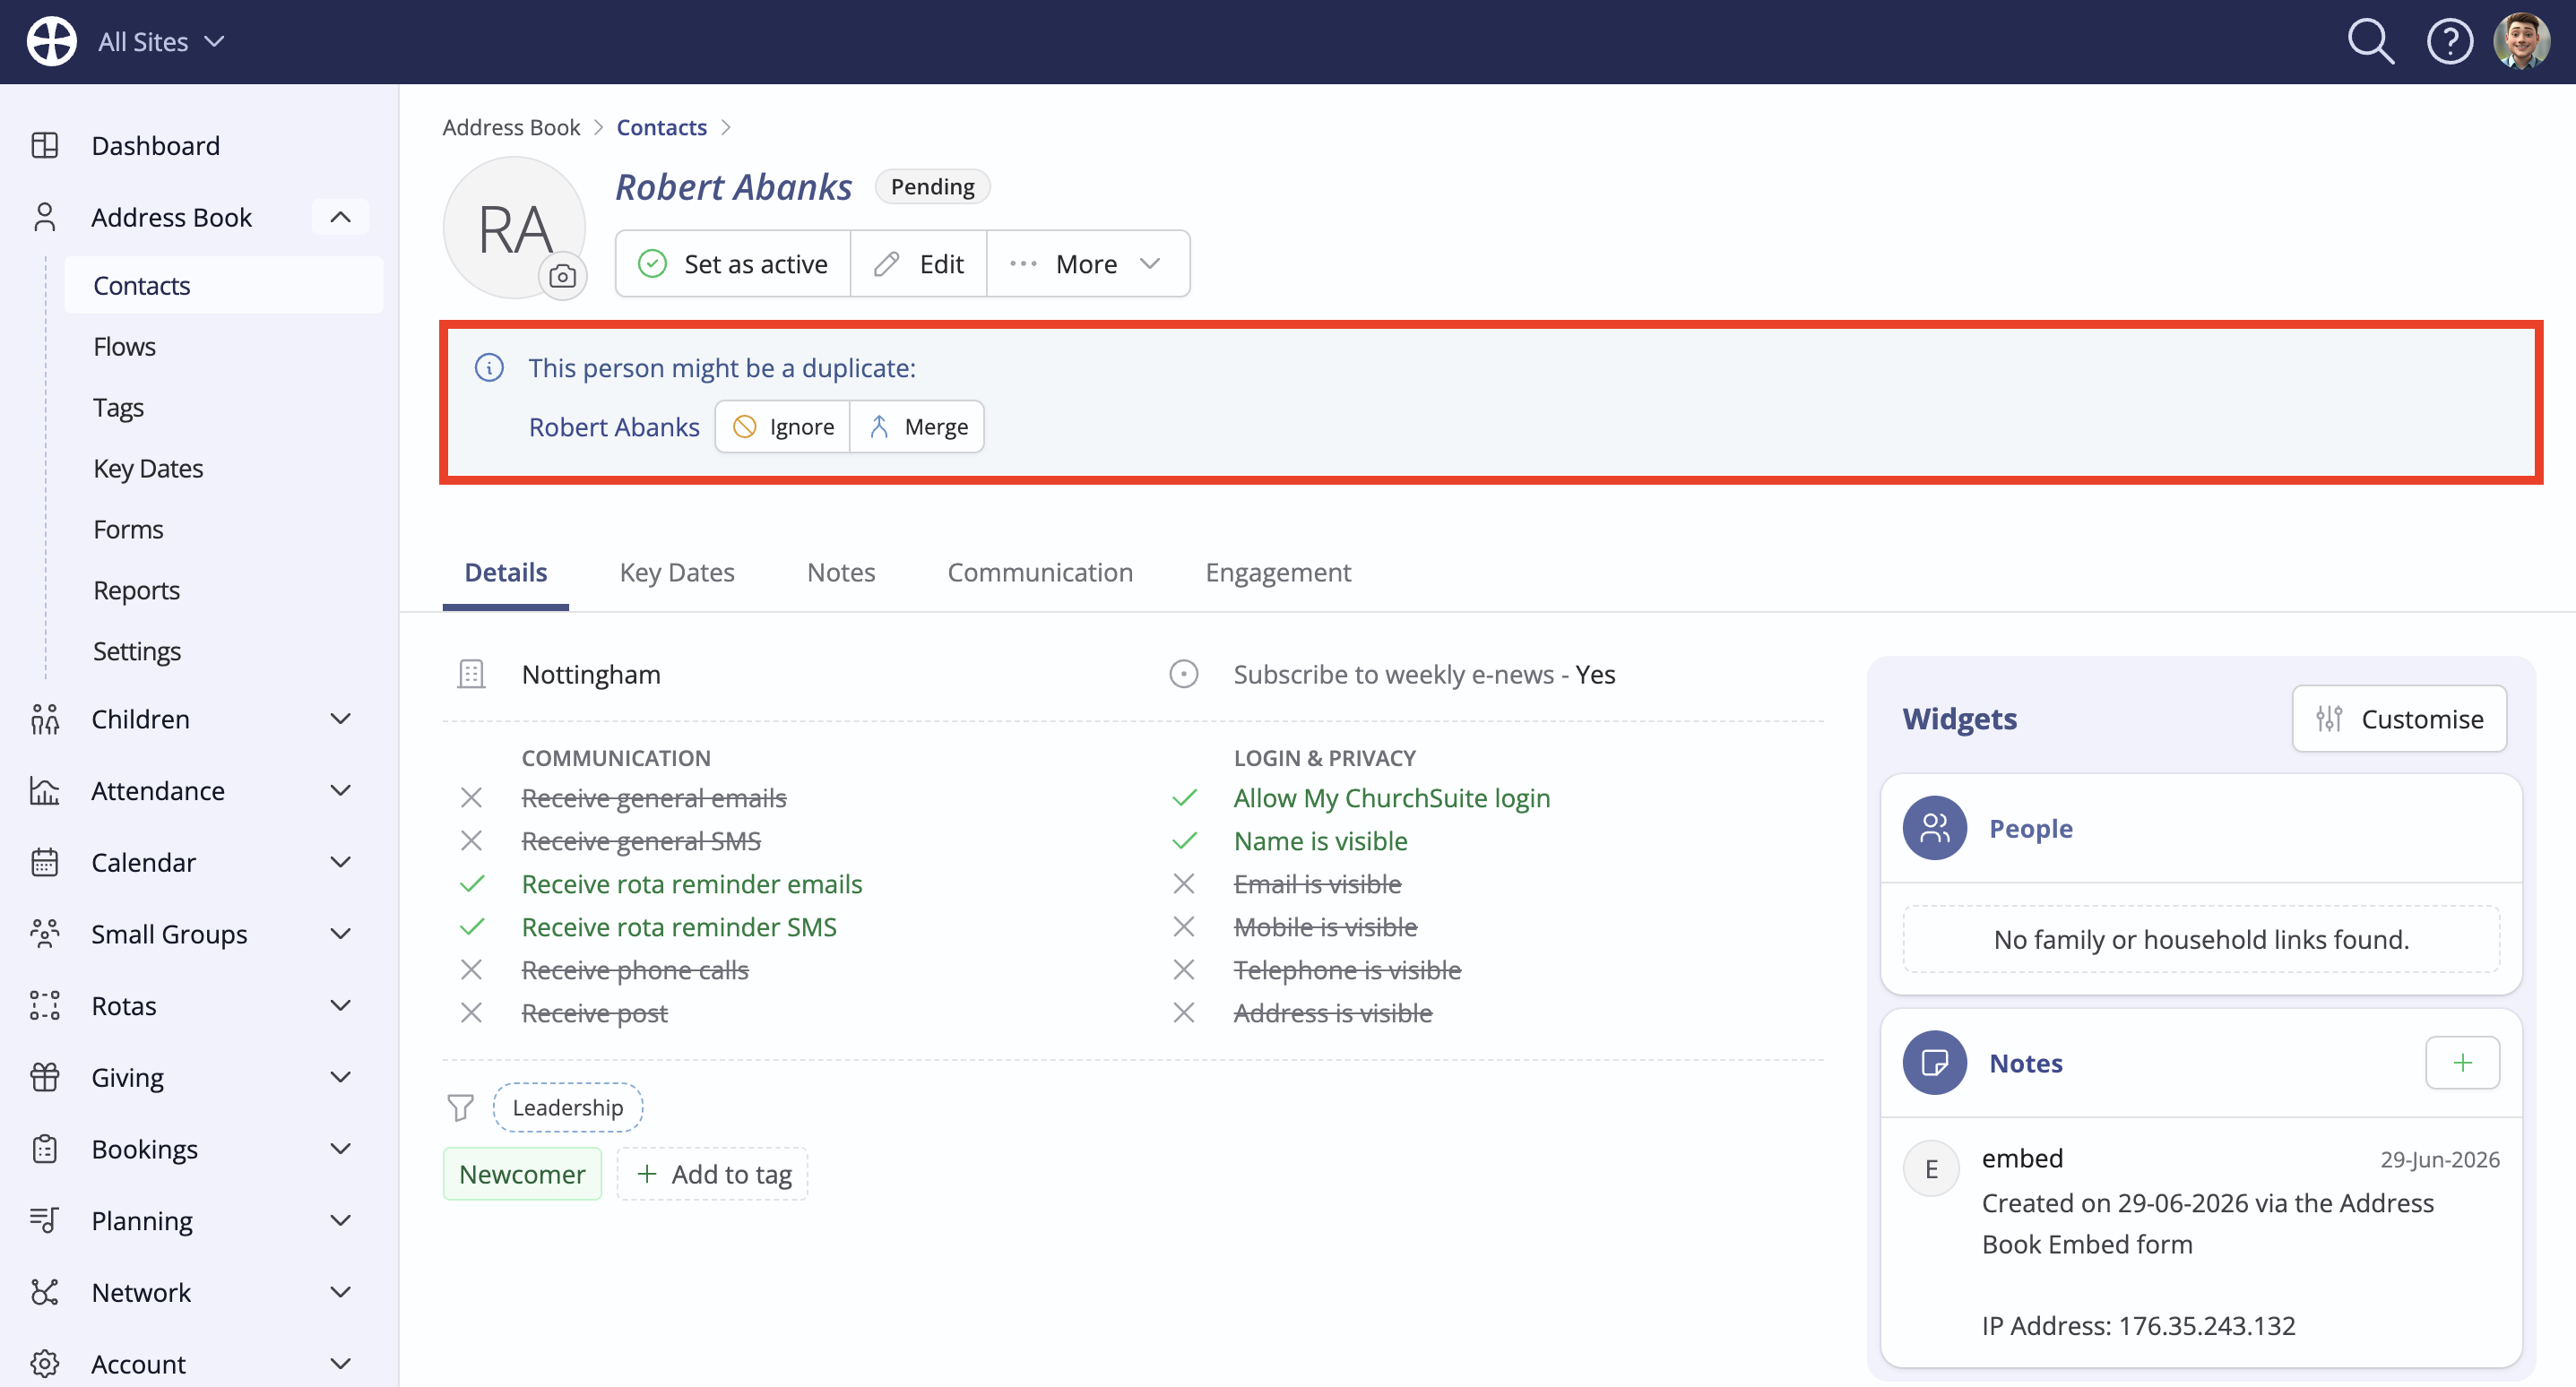
Duplicate contacts
When newcomer details are submitted through the embeddable My Details form, ChurchSuite alerts you to any potential duplicates in your Address Book, though not at the point of submission. When reviewing a newly added Pending status contact, you may see an information message alerting you that This person might be a duplicate. You then have the option to check this and either Ignore the duplicate or Merge the duplicate contacts.
What happens when under 18s submit their details?
Ordinarily, all new contacts are created in the adult Address Book module when a newcomer submits their contact details and areas of interest. However, if the Date of Birth field is present on the form and an under-18 completes that field, ChurchSuite will correctly add the new child to the Pending section of the Children module. Where a date of birth is specified, only those aged 13+ will be able to submit their details. Children below this age are prevented from submitting a form.
Additionally, where a date of birth is specified on the form and when an under 18 (but aged 13+) completes the form, certain fields will be hidden - marital status, "Add spouse", "Add student details", "add child", job, employer and Address Book custom fields - as these fields and options do not apply to the Children module.
When an under 18 submits their details and areas of interest, Tags, Key Dates and Notes are all recorded against the child's profile in the Children module. A success email is sent too and all notifications are sent as per the Embed Options.
Note: In this context, children are not added to the Children module's Flows, even if specified in the Embed module settings - only new children added through the Add child part of the form are added to the Children module Flows.
Top Tip! Safeguarding
Data Protection and Safeguarding: Under-18s present an interesting issue for churches and charitable organisations when they submit their details via a website. In submitting their details, you may have little or no connection with consenting parents/carers. We strongly encourage you to consider carefully how you will follow up with new under-18s as they connect with your church or organisation. Give thought to your data protection and safeguarding processes as they are added to your database. Perhaps a helpful consideration is, "How might a parent/carer feel about you holding their under-18 child's details on your database?" We hope this advice is useful and helpful.