Smart tags
In this article
What are tags?
What are smart tags?
Adding a smart tag
Adding conditions
Working with regular expressions
What are tags?
Tags are one of the most commonly used and versatile features in ChurchSuite. They enable you to group or categorise people within a growing database of Address Book contacts, Children module children and young people, Giving module givers and Bookings module customers. Tags enable you to direct communications and filter reports just for specific groupings of people.
Your ChurchSuite database of contacts, children, givers, and booking customers will likely contain people from various contexts with varying levels of engagement with your church, charity, or ministry. Tags help you categorise those people and stay organised! For example, you could use tags to group together your "Members" or those who are "Parents/carers", those "In small groups" or those you consider "Leaders".
Tags are module-specific. A tag can't comprise contacts, children, givers and customers. This would require four tags, one for each module. Tag names must be unique within a module, but a tag name in one module can be used in another. Tags are a feature of your admin-facing ChurchSuite modules only and are not seen in the member-facing My ChurchSuite. You can optionally restrict tag visibility - only permitted users will see restricted tags in ChurchSuite. People can be assigned to multiple tags. Tags persist when a person is archived. While a tag View only shows active people, those who have been archived will appear on the tag View if they are later set active again.
There are two types of tags: Fixed Tags and Smart Tags. Fixed Tags are a fixed list of people that remain unchanged over time unless the list is changed by a User. Smart Tags are based on conditions, with the tagged people reflecting a list of those who meet the tag's conditions. With Fixed Tags, a User manually adds or removes people from the Tag. With Smart Tags, the list of tagged people constantly updates as people's data changes in relation to the tag conditions.
We've produced a separate support article for Fixed Tags. In the remainder of this article, we will focus on Smart Tags in the Address Book; however, the same smart tag principles and functionality also exist in the Children and Giving modules.
What are smart tags?
With Smart Tags, we've reimagined the way organisations want to interrogate and ask questions of their data, to get the most up-to-date answers for just those who precisely meet the conditions of the tag. Smart Tags can also look at data from across multiple modules, allowing you to build highly bespoke queries about people across multiple modules.
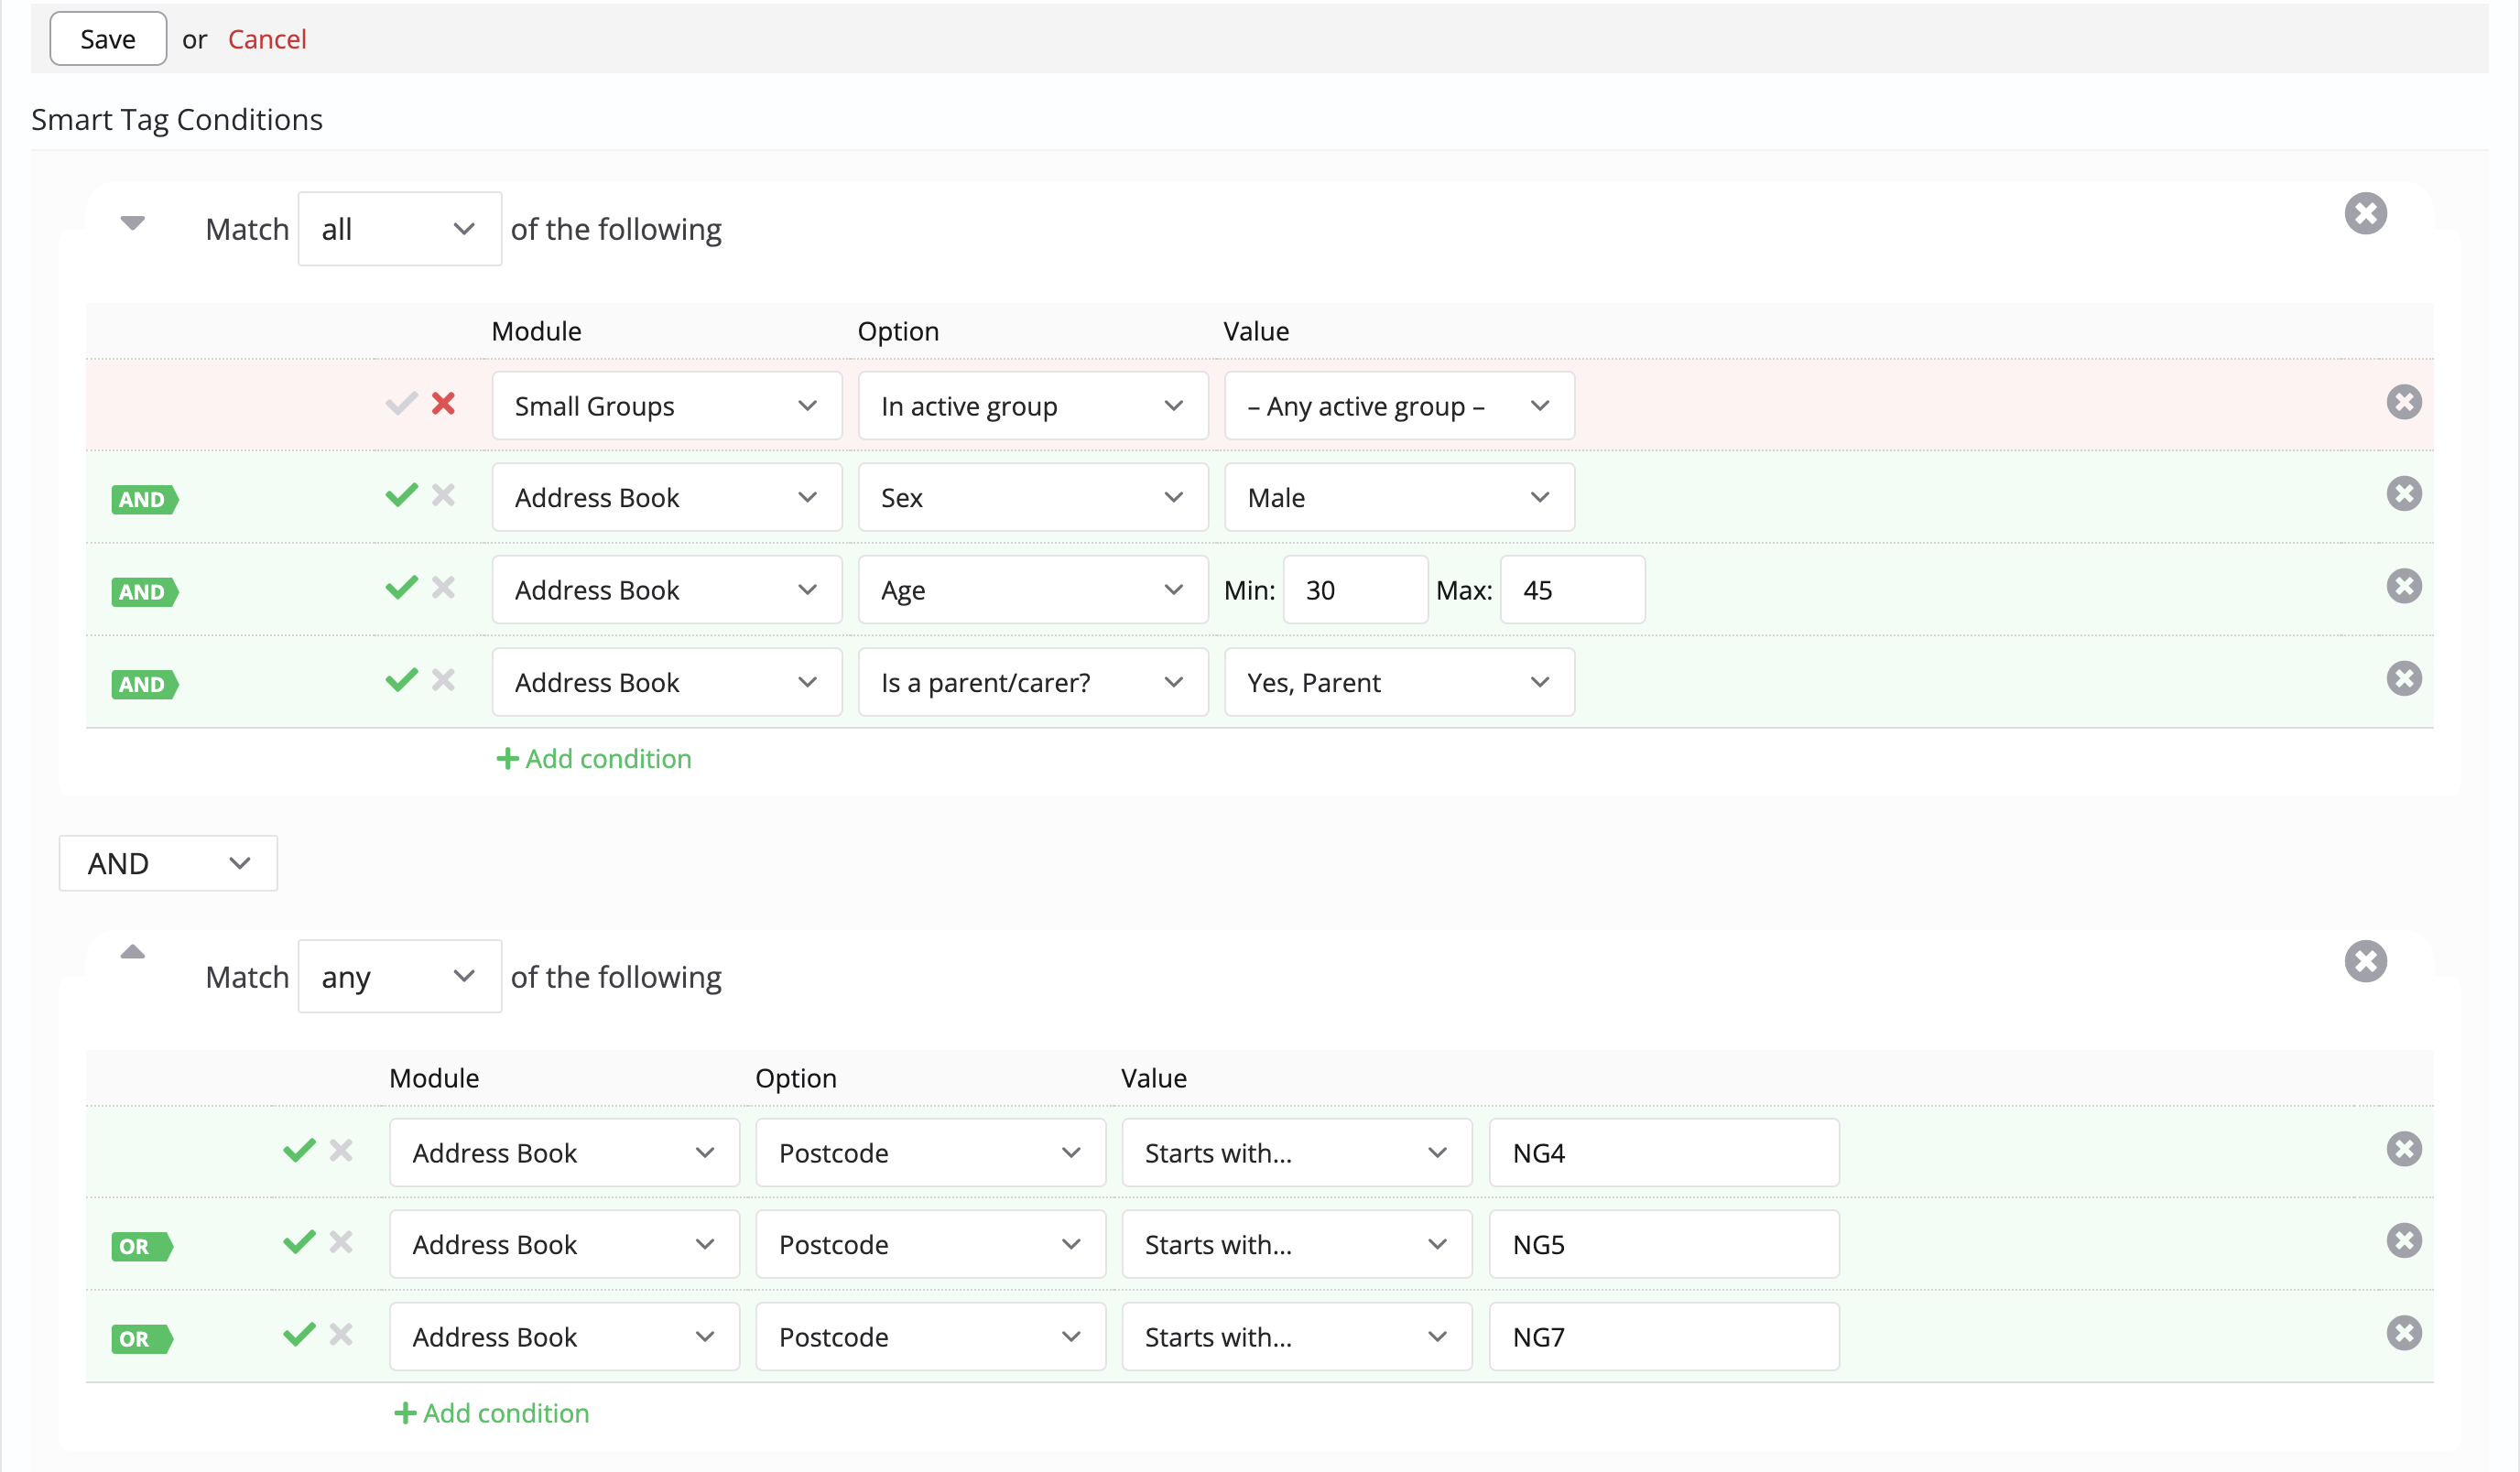
For example, you're organising a men's event and need a list of all the fathers aged between 30 and 45 who are not currently members of any small group but who all live in a certain geographic postcode area. It's simple with Smart Tags.
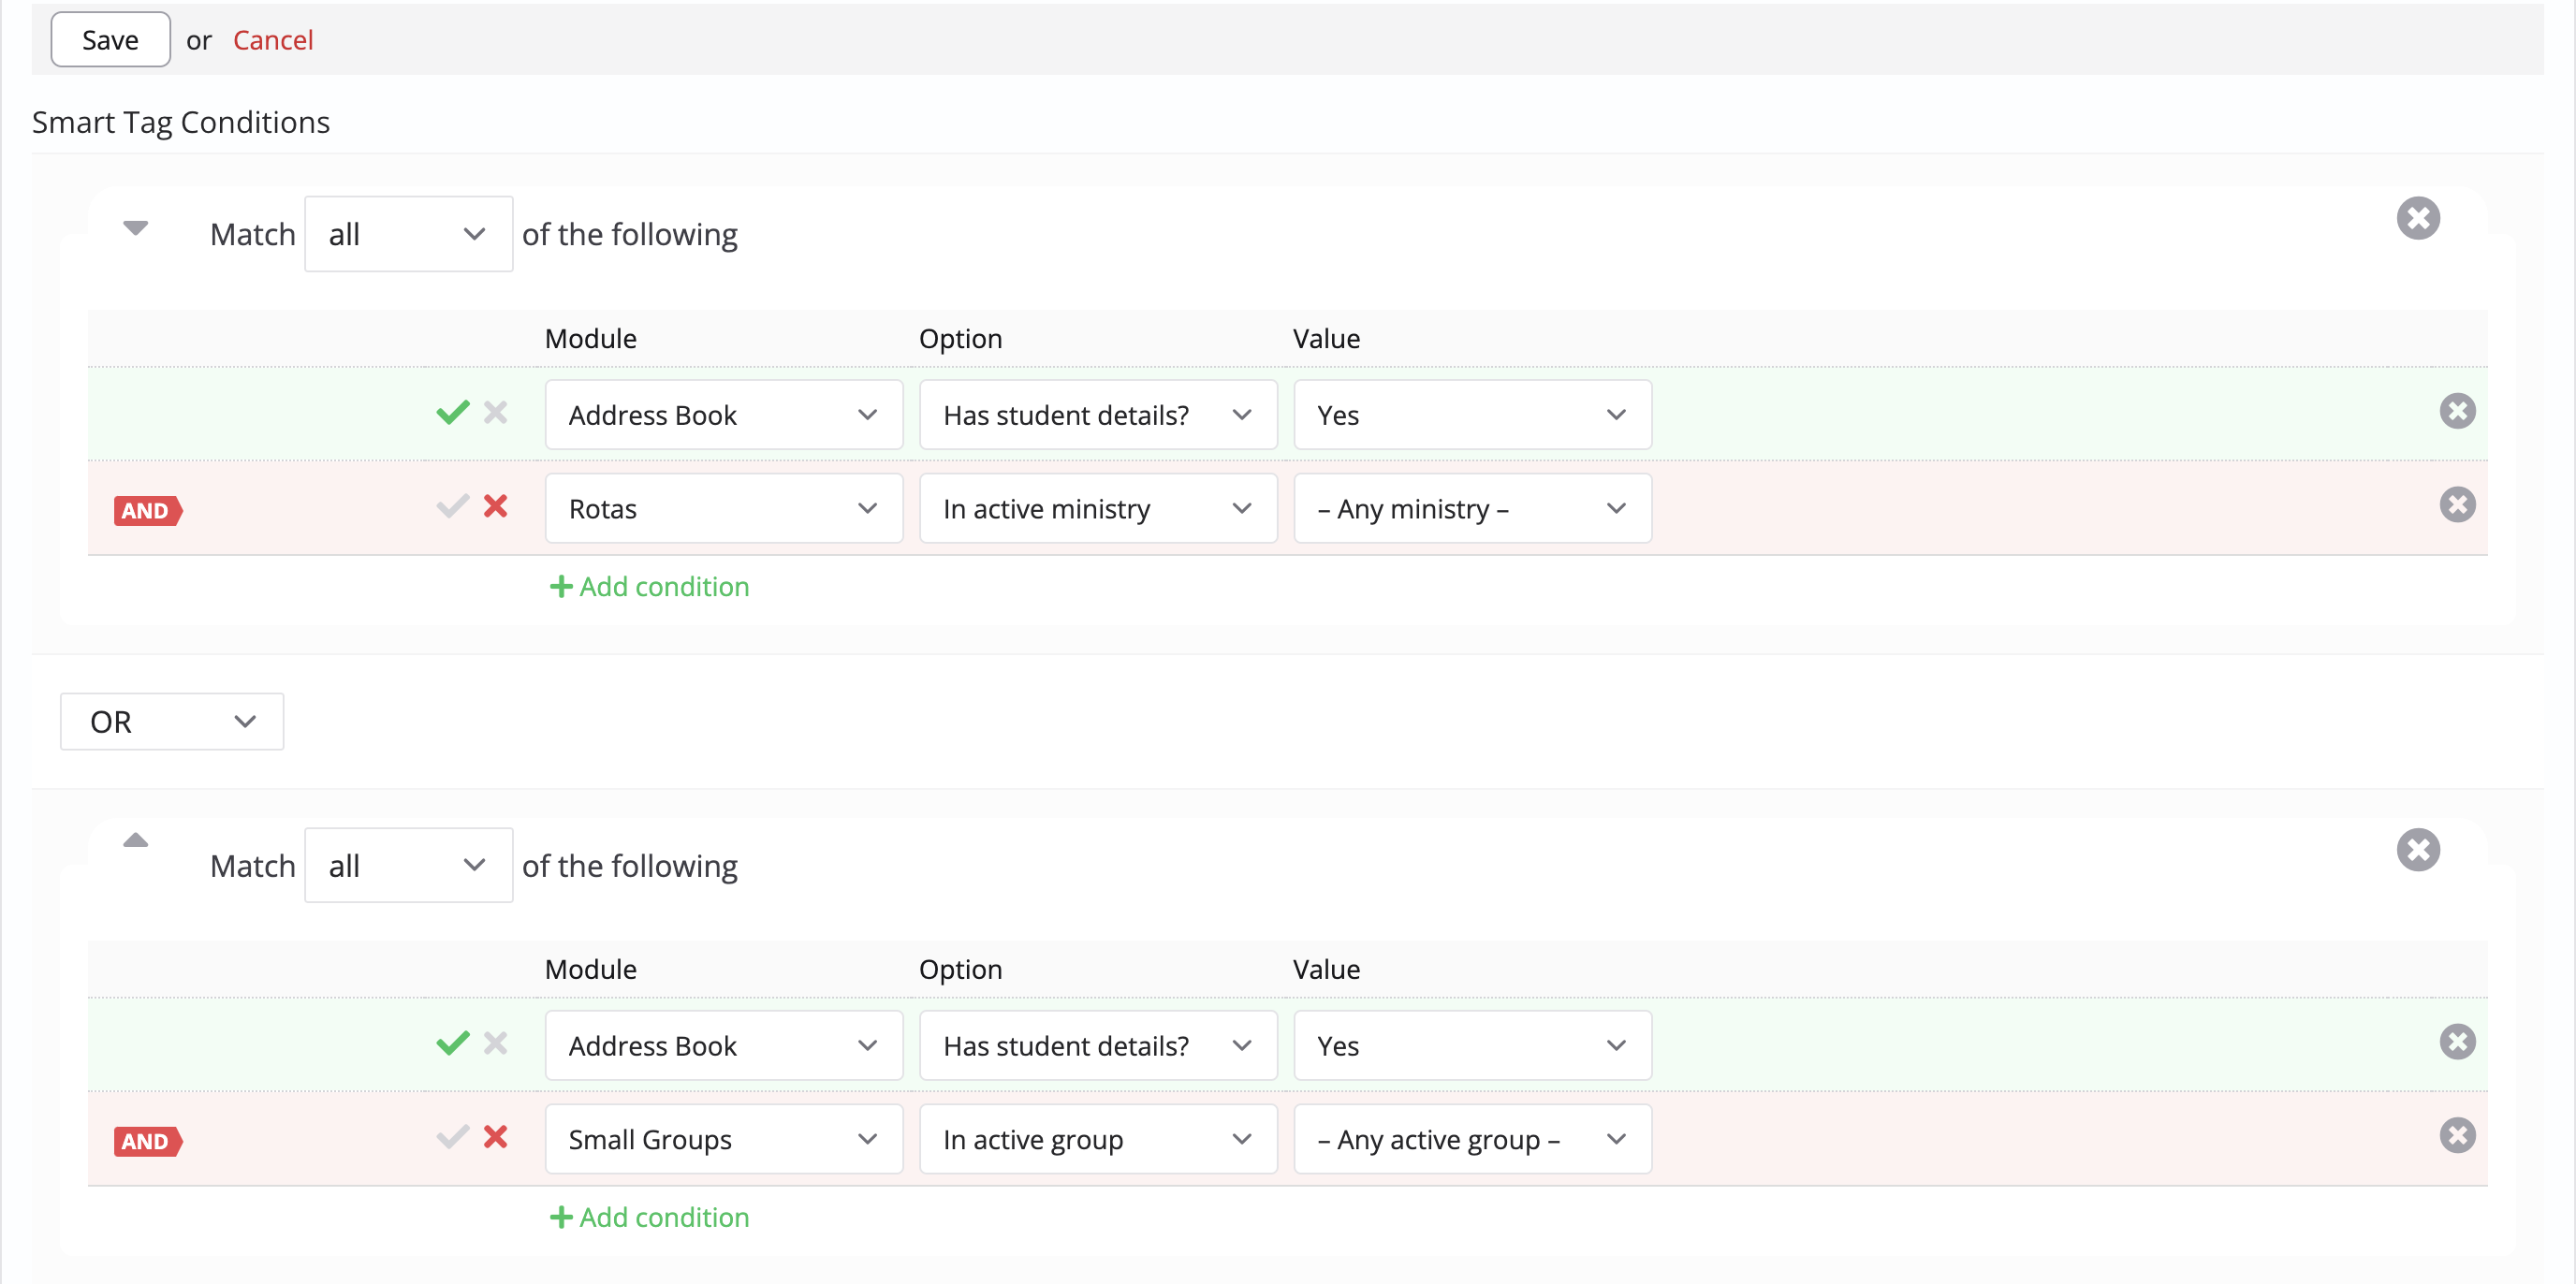
Want to strengthen student integration by seeing a list of students who are either not yet in a small group or not serving? Again, this is simple with Smart Tags! Once a student begins to serve on a team, they'll no longer be returned in the Tag results because they have ceased to satisfy the Tag conditions.
When do smart tags update, and how often?
Smart Tags are dynamically updated whenever the underlying data affecting any of the Tag conditions changes (e.g., a new Key Date added, a change in marital status, someone joining a small group, etc.) and again every night to account for changes in age. Smart tags are refreshed when a specific Smart Tag is viewed, and if the Tag conditions are edited and the page is saved. A smart tag should never be more than 60 seconds out of date!
Avoiding infinite loops
Recursion detection ensures you never find yourself in an infinite loop with Smart Tags. If a Smart Tag references another Smart Tag that references the original Smart Tag, we will display an error message, and the Tag being saved will not appear in the results.
Smart tag dependencies
Be cautious when deleting tags, key dates, flows, groups, and ministries that may be dependent conditions in your Smart Tags. Deleting a dependent condition will break the Smart Tag and produce unexpected results with the remaining conditions. This is especially important when Smart Tags are used in module settings and integrations to restrict the visibility of certain features.
Smart tag examples
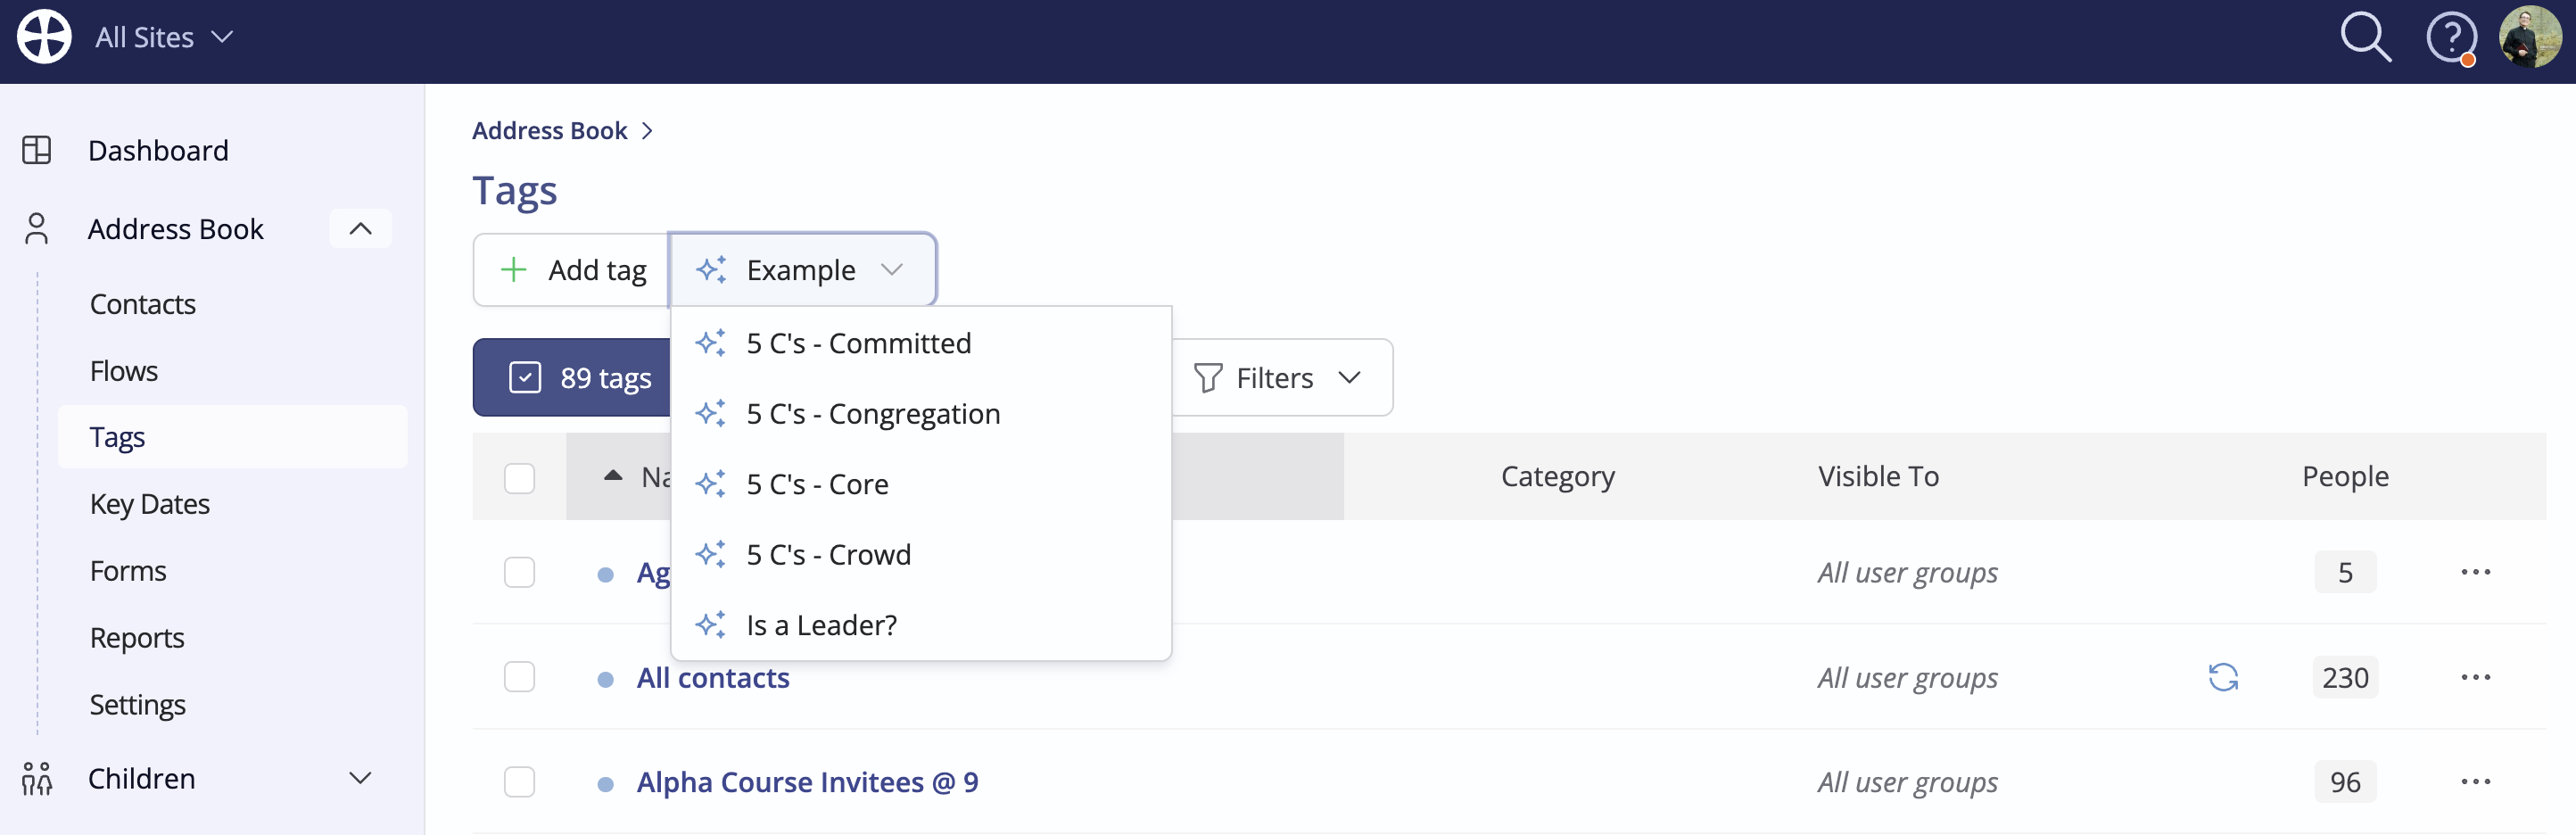
We've provided several smart tag examples that you can select to install on your account. These may be helpful for visualising how conditions and batches work.
Top Tip! How do I remove someone from a smart tag?
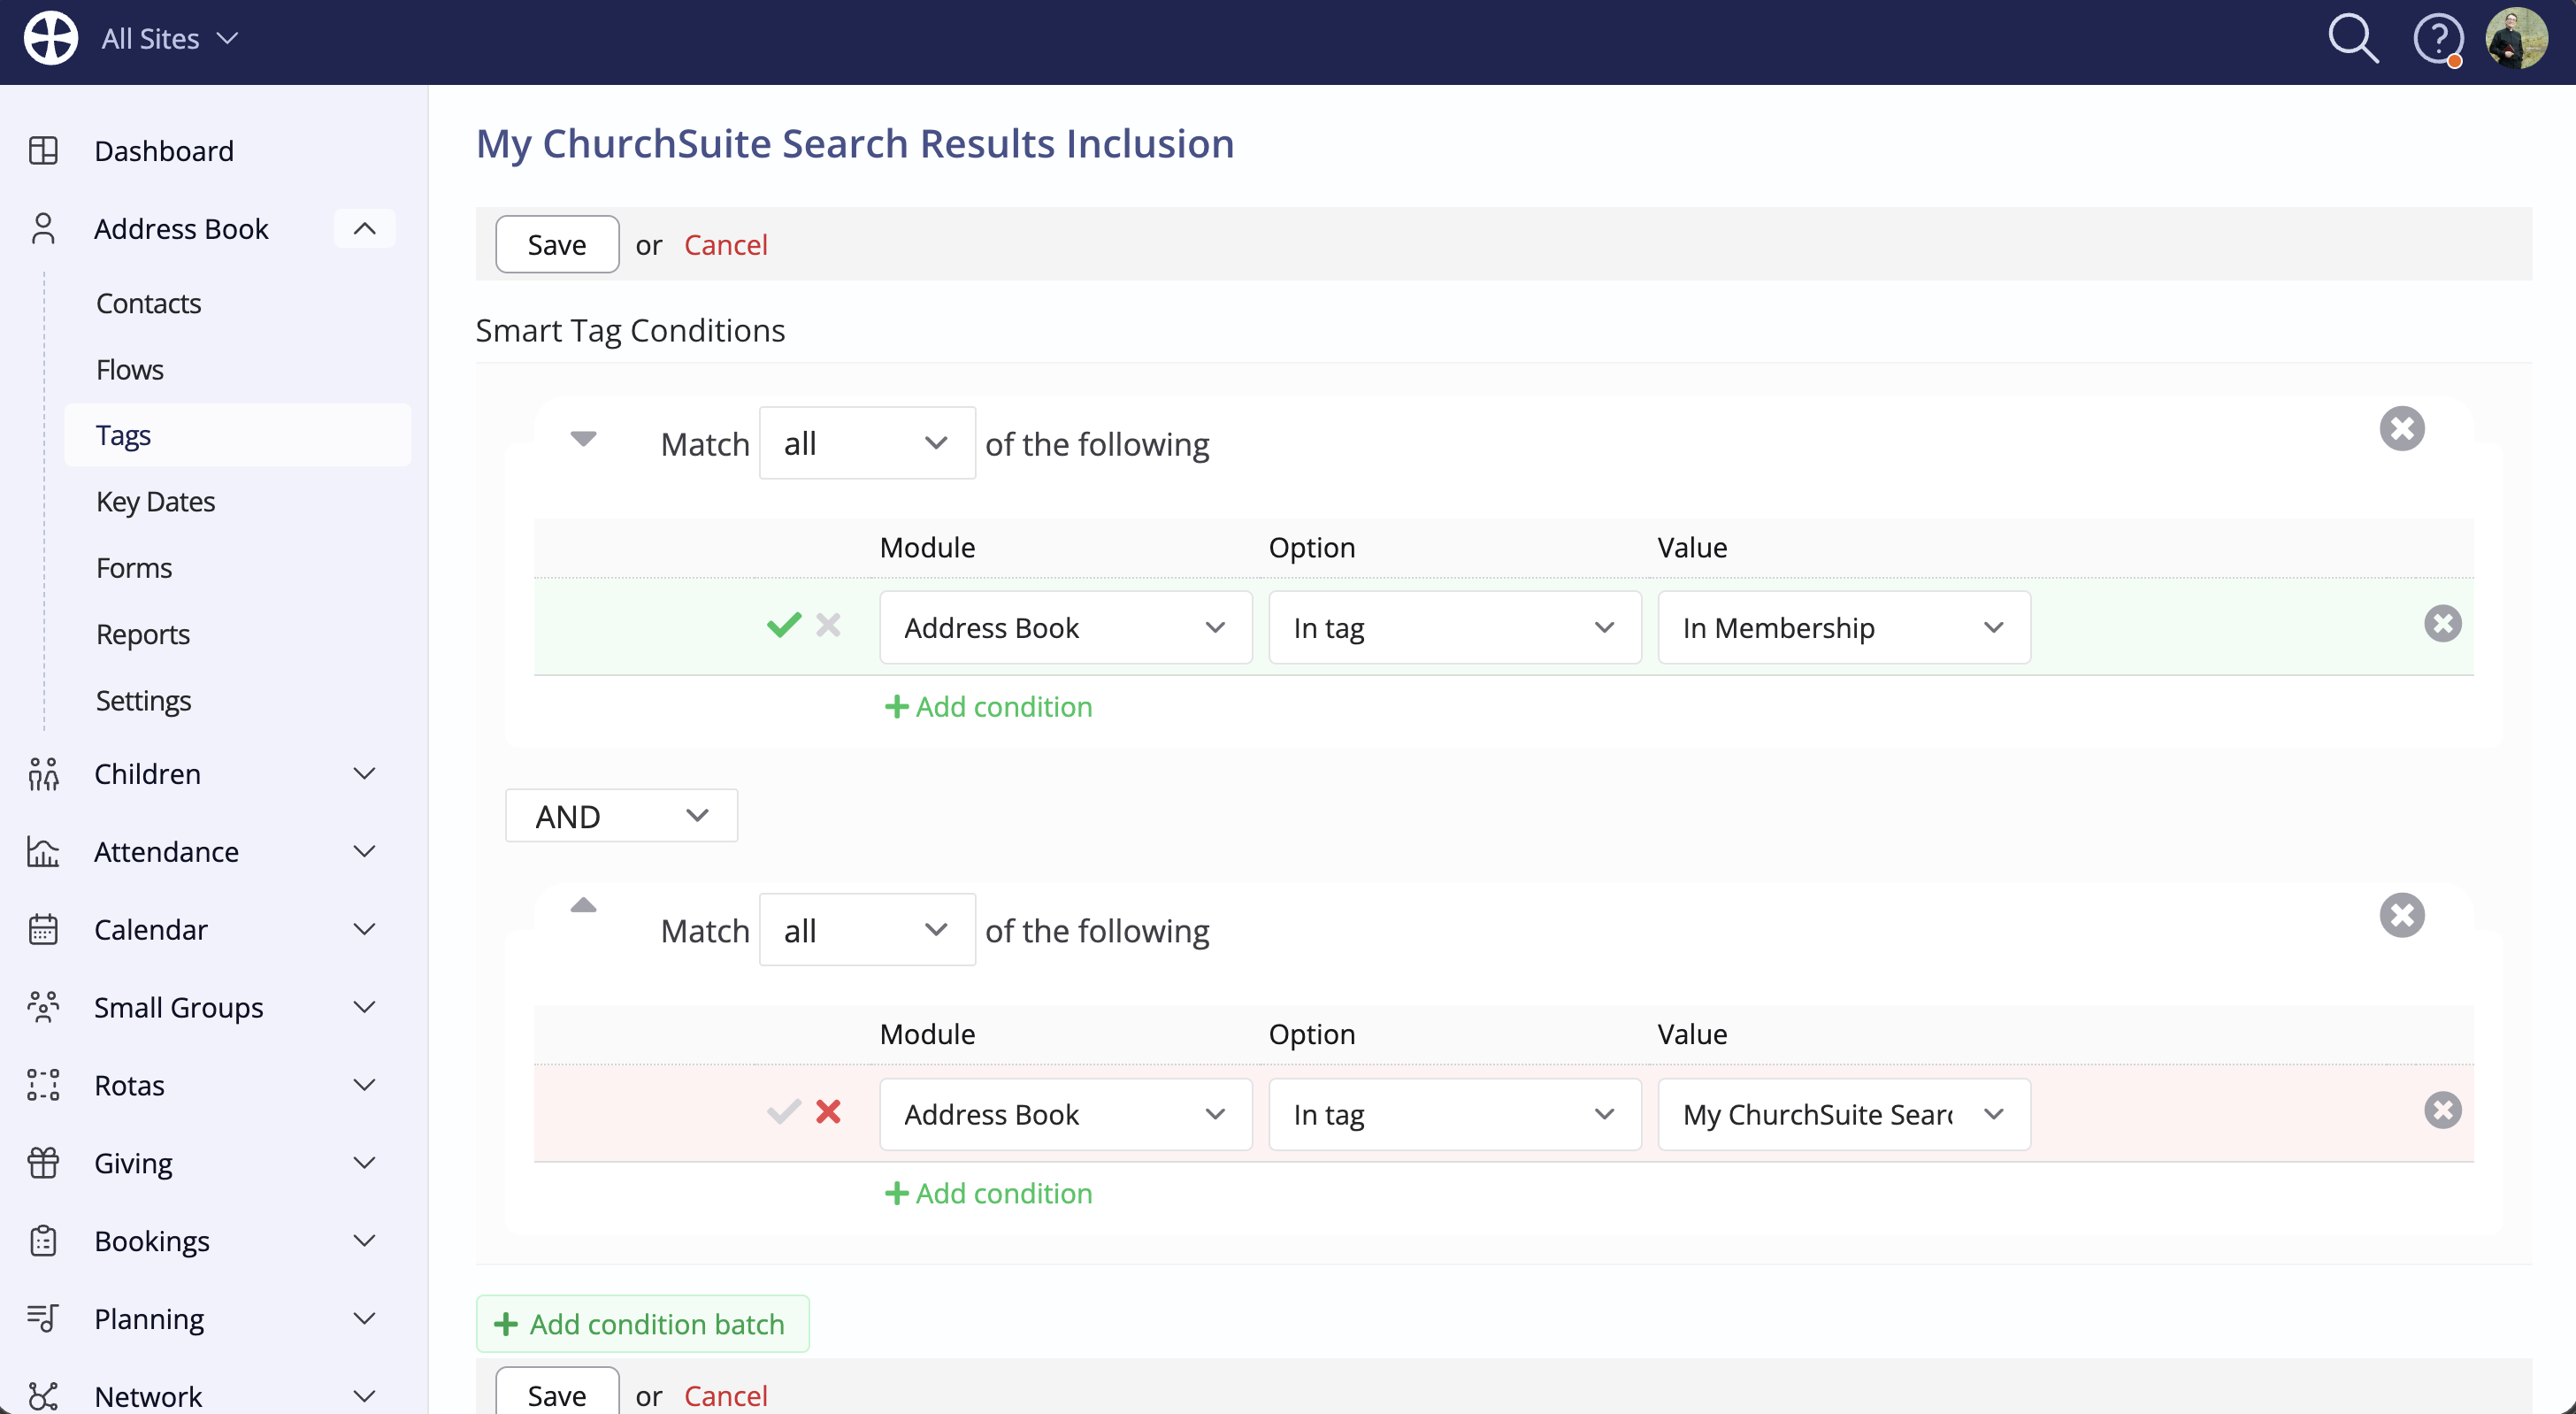
A smart tag comprises people whose data matches the conditions you have defined for the tag. It's therefore not possible to remove someone from a smart tag. However, you can modify the tag conditions to handle the exclusion. In the following example, the smart tag Conditions match people in the Membership tag, but a further condition has been added to exclude people in a specified Fixed tag.

Looking at this more closely, notice how the exclusion [Fixed] tag has been added as a condition batch. Anyone who is in Membership AND the exclusion tag will no longer be tagged by this smart tag.
Adding a smart tag
Smart Tags functionality is available in the Address Book, Children, and Giving modules. The principles of creating a Smart Tag are identical in all three modules. In this article, we will demonstrate this within the Address Book.
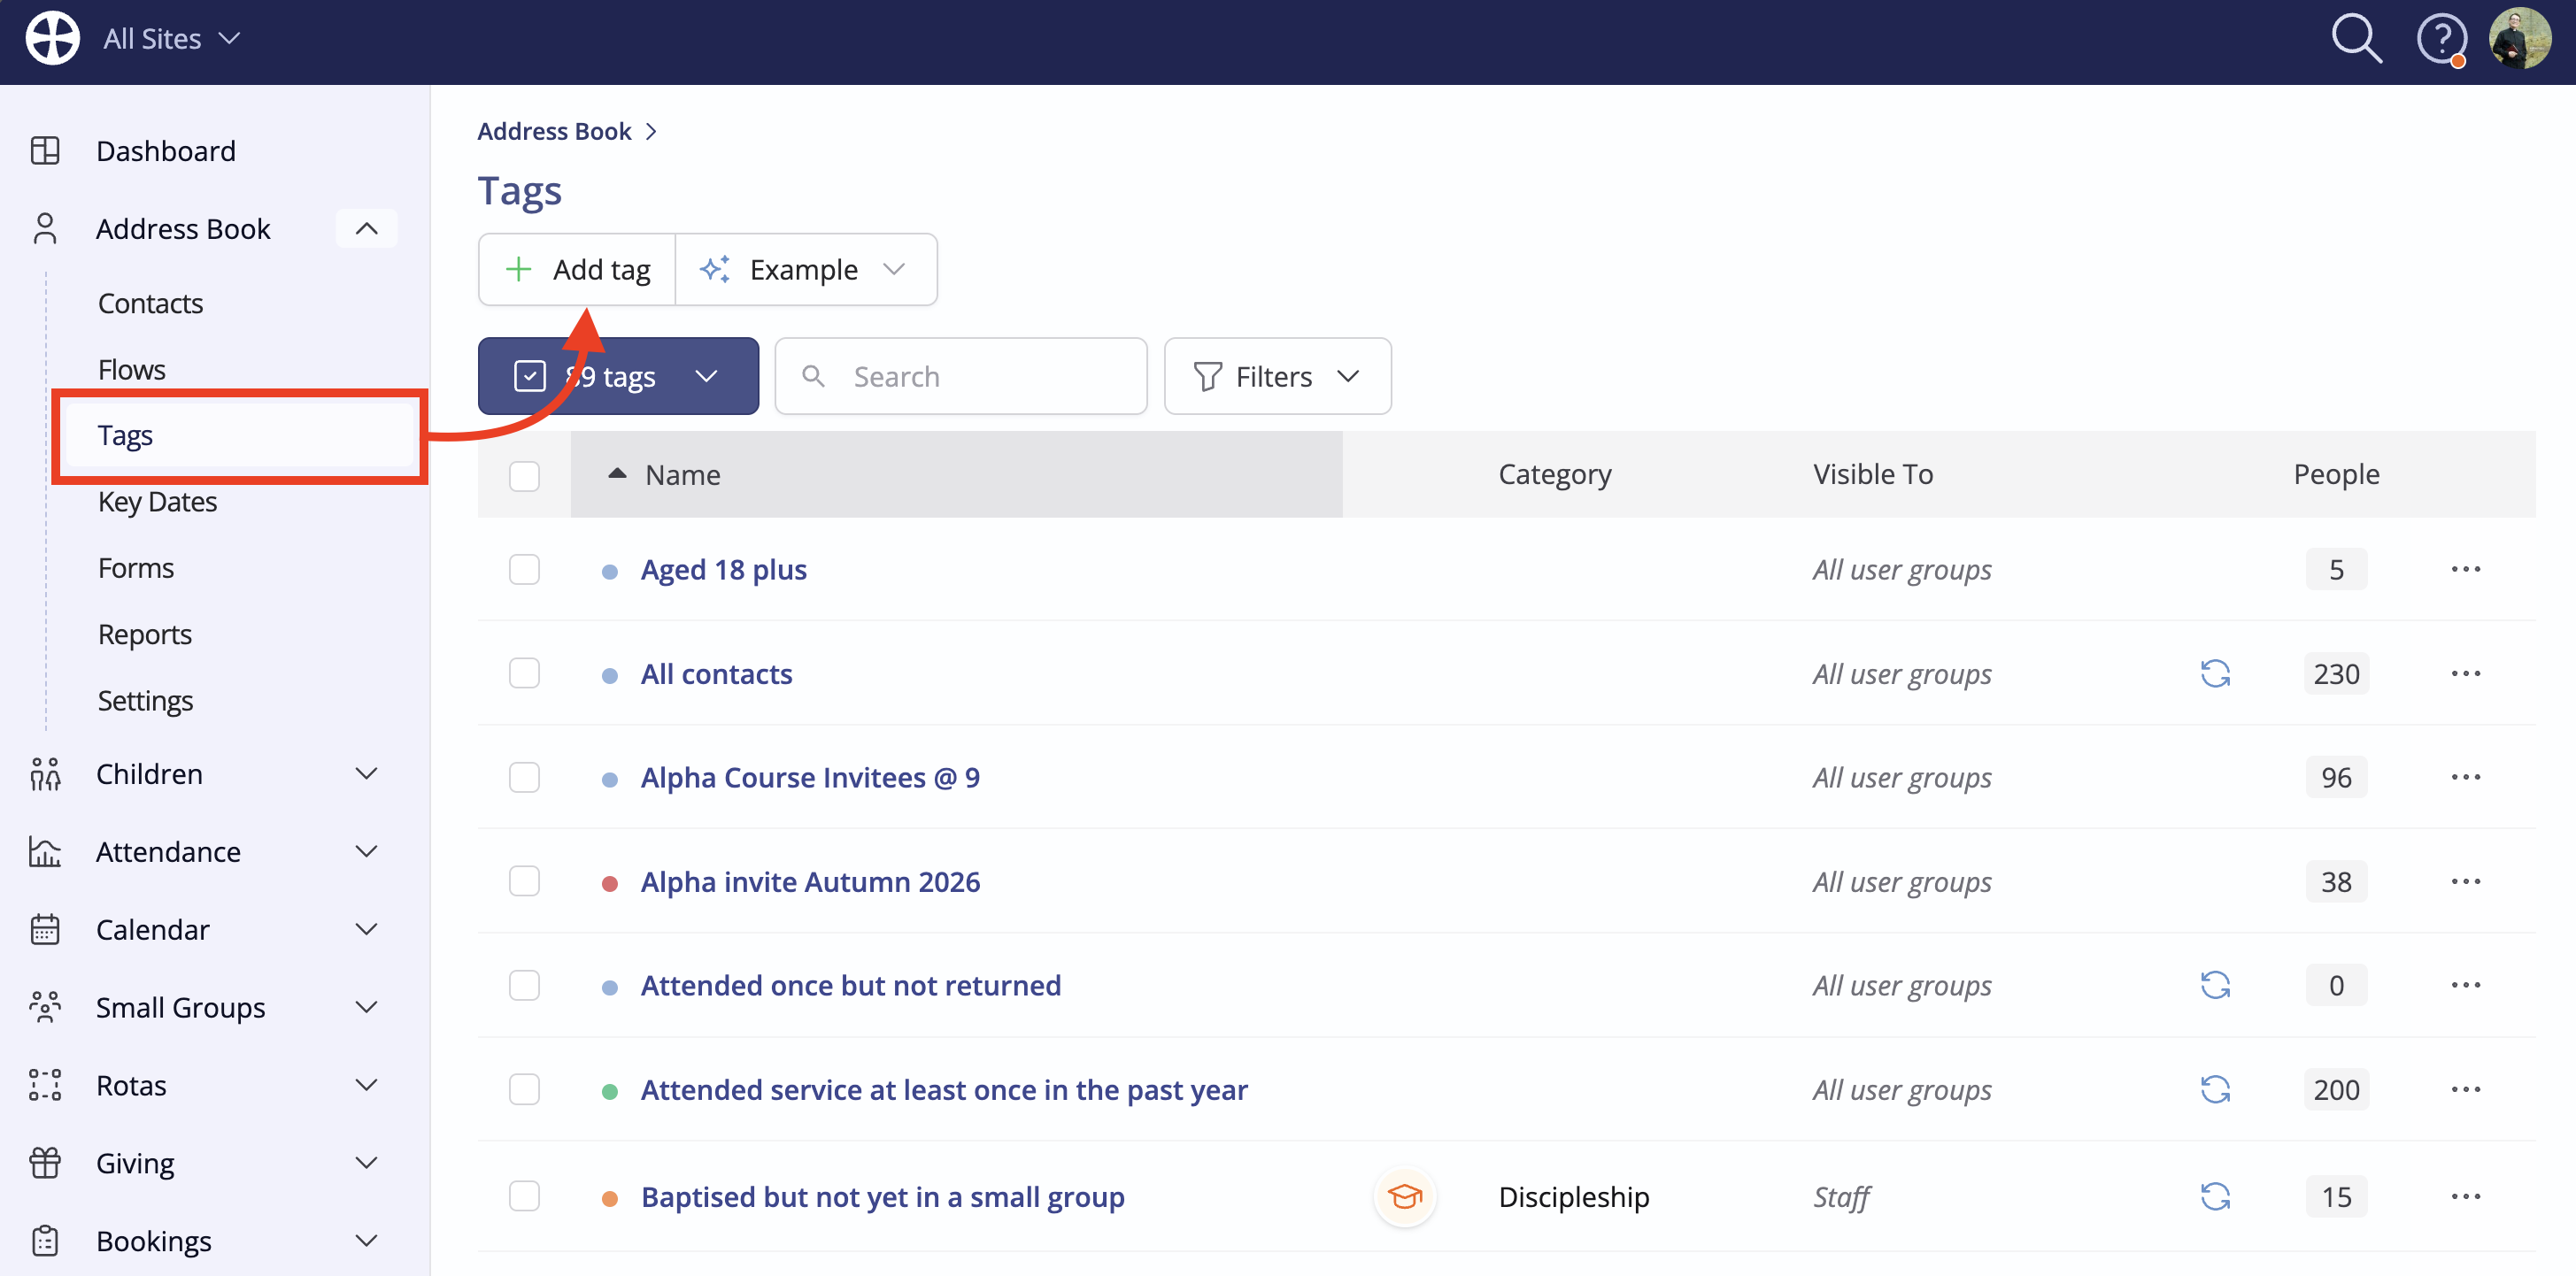
Head into the Tags section of the module and click Add tag:
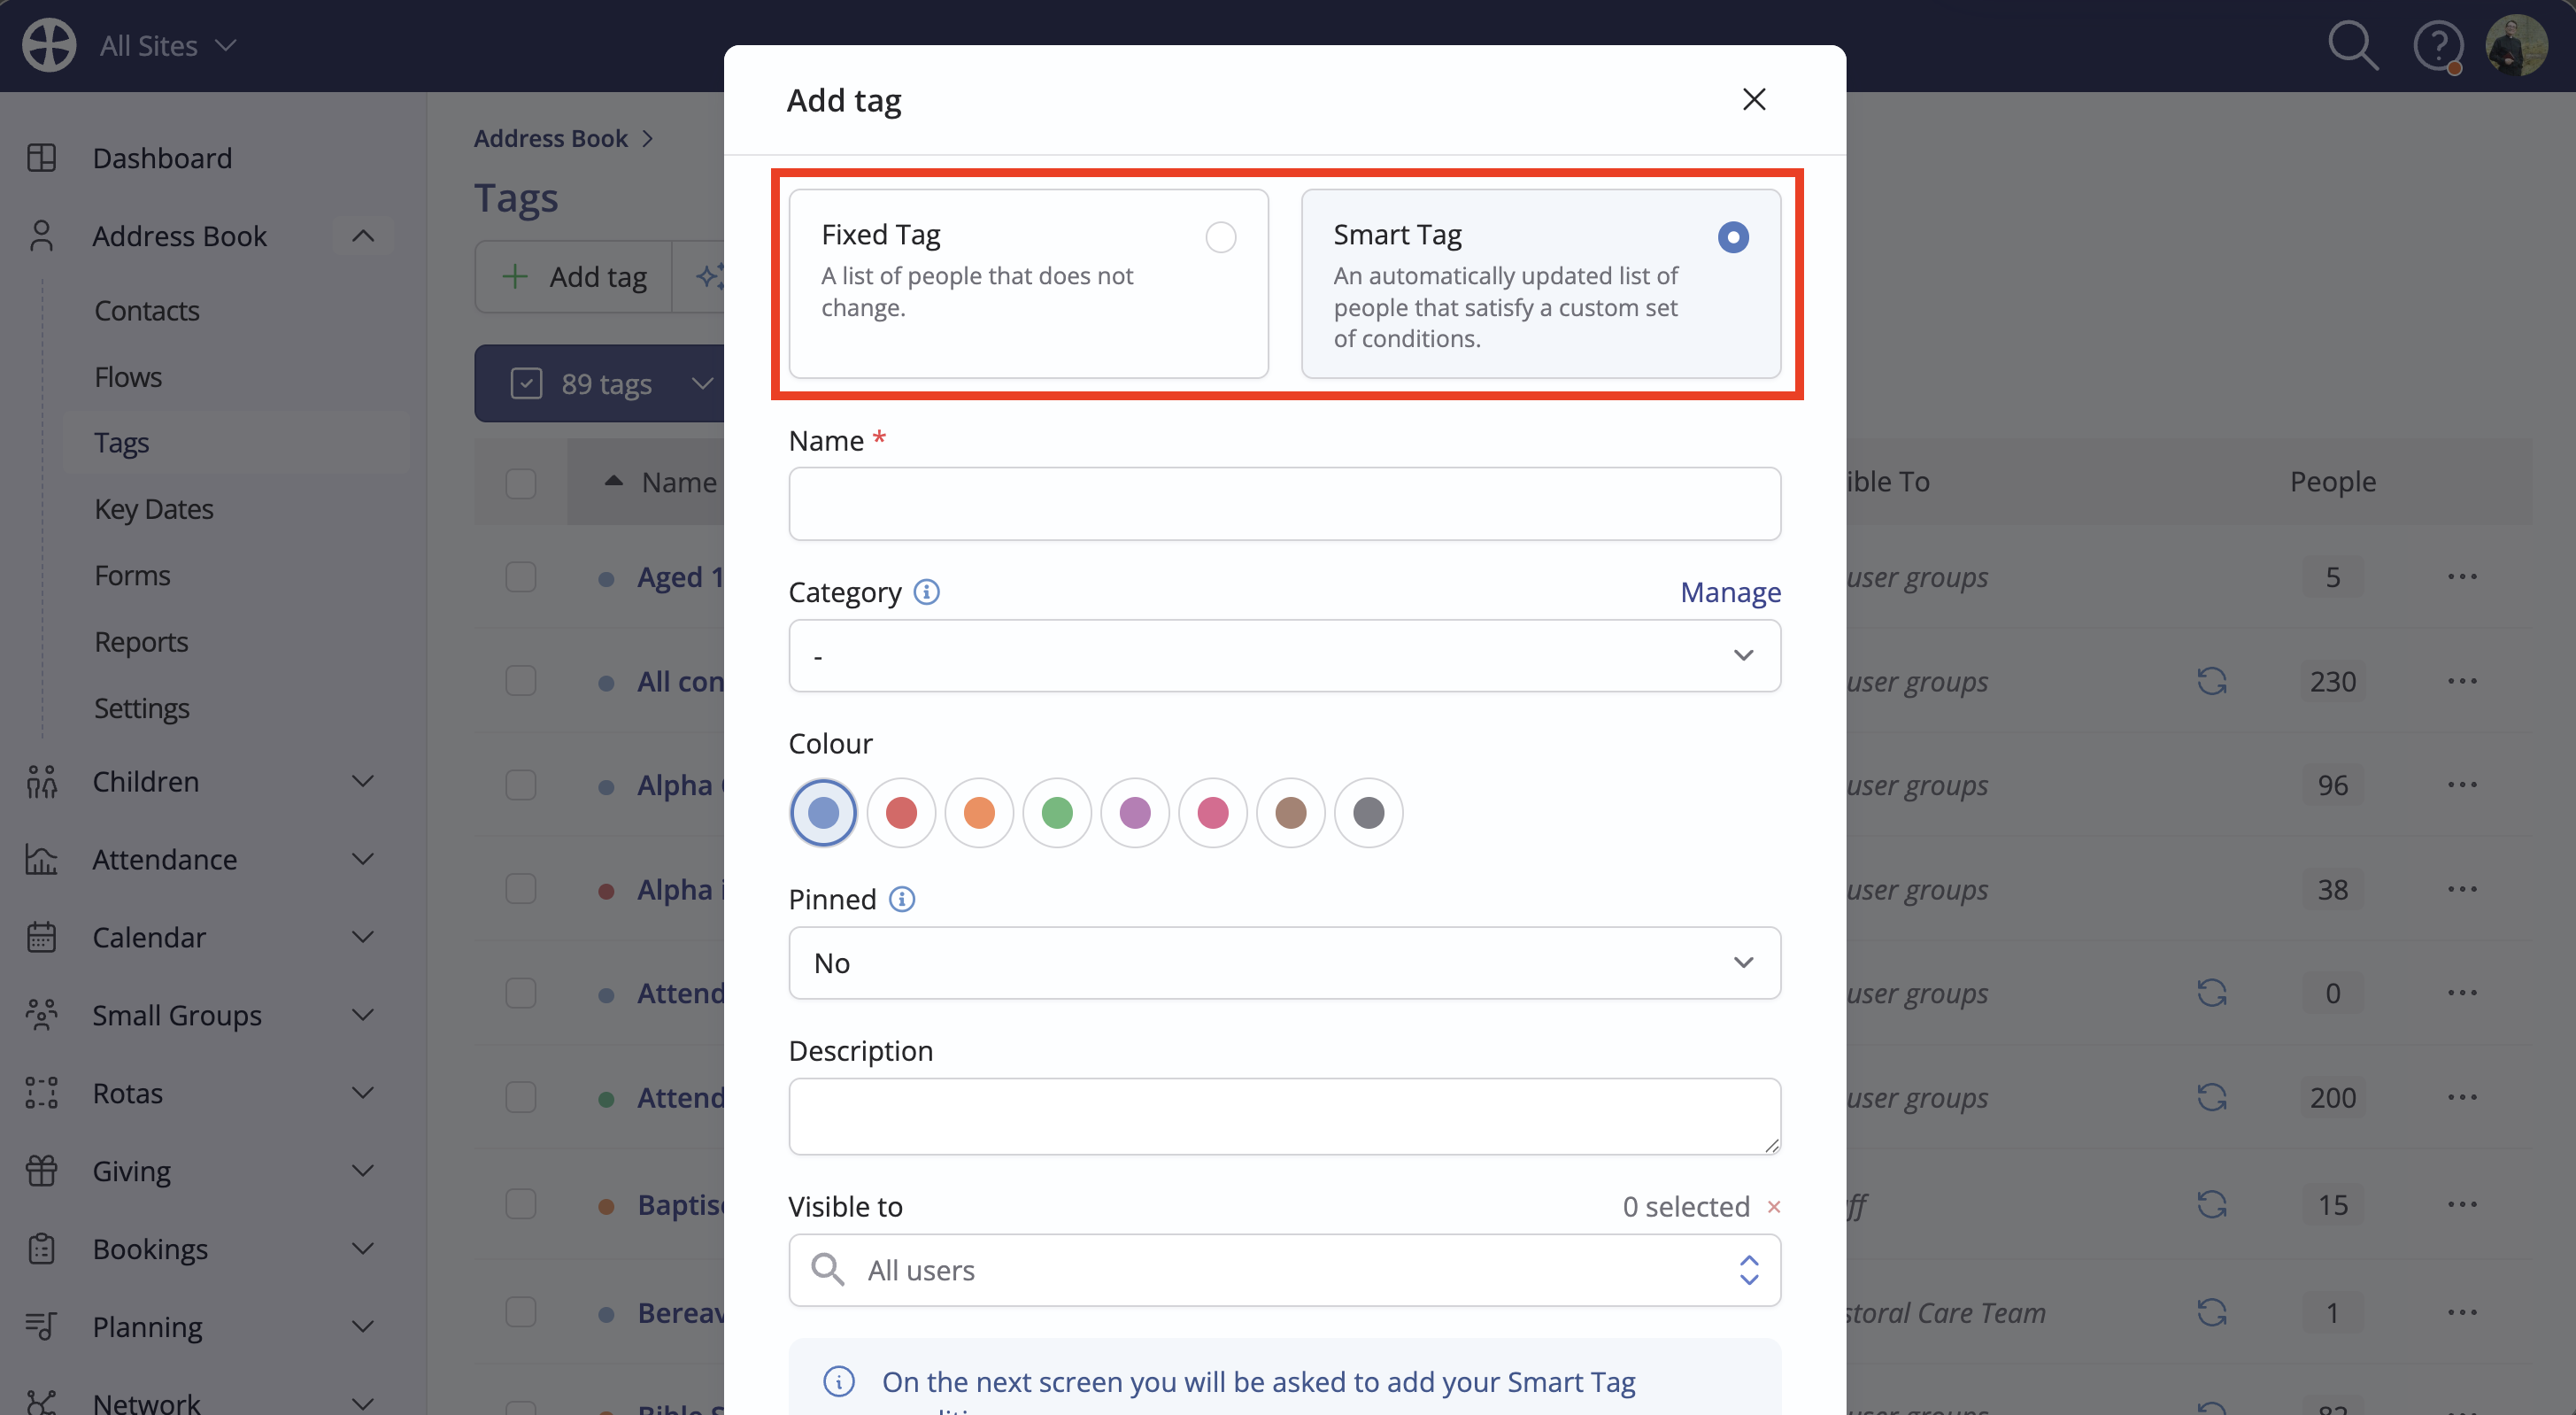
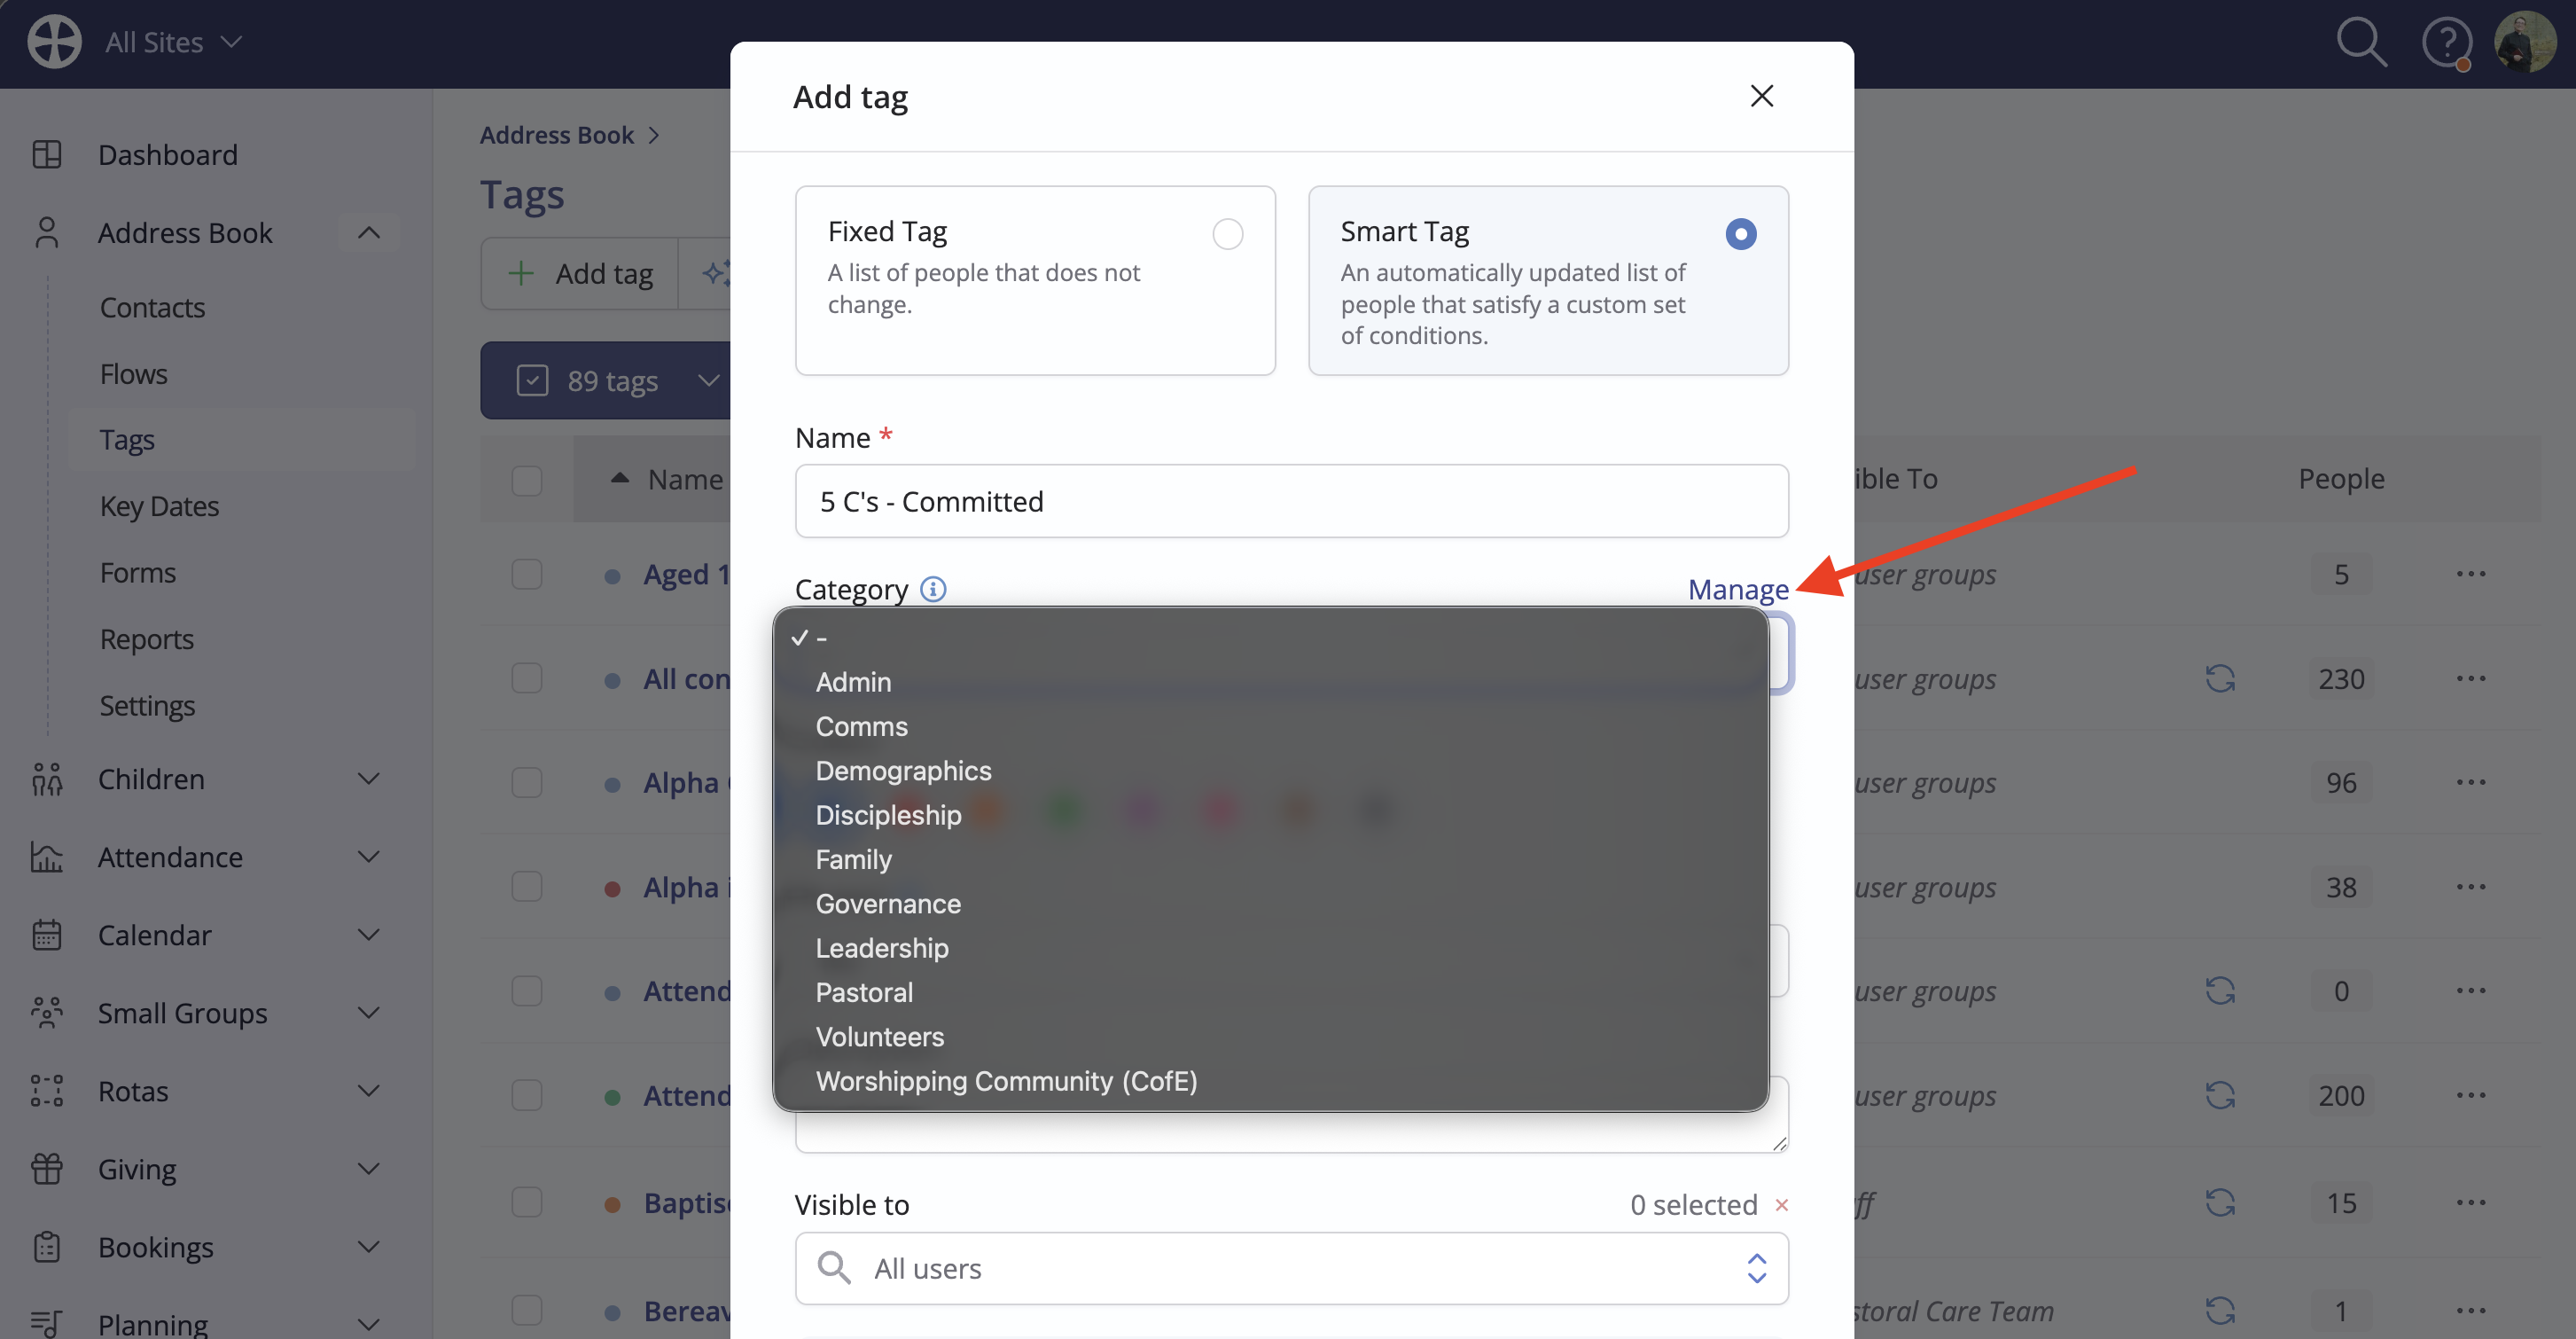
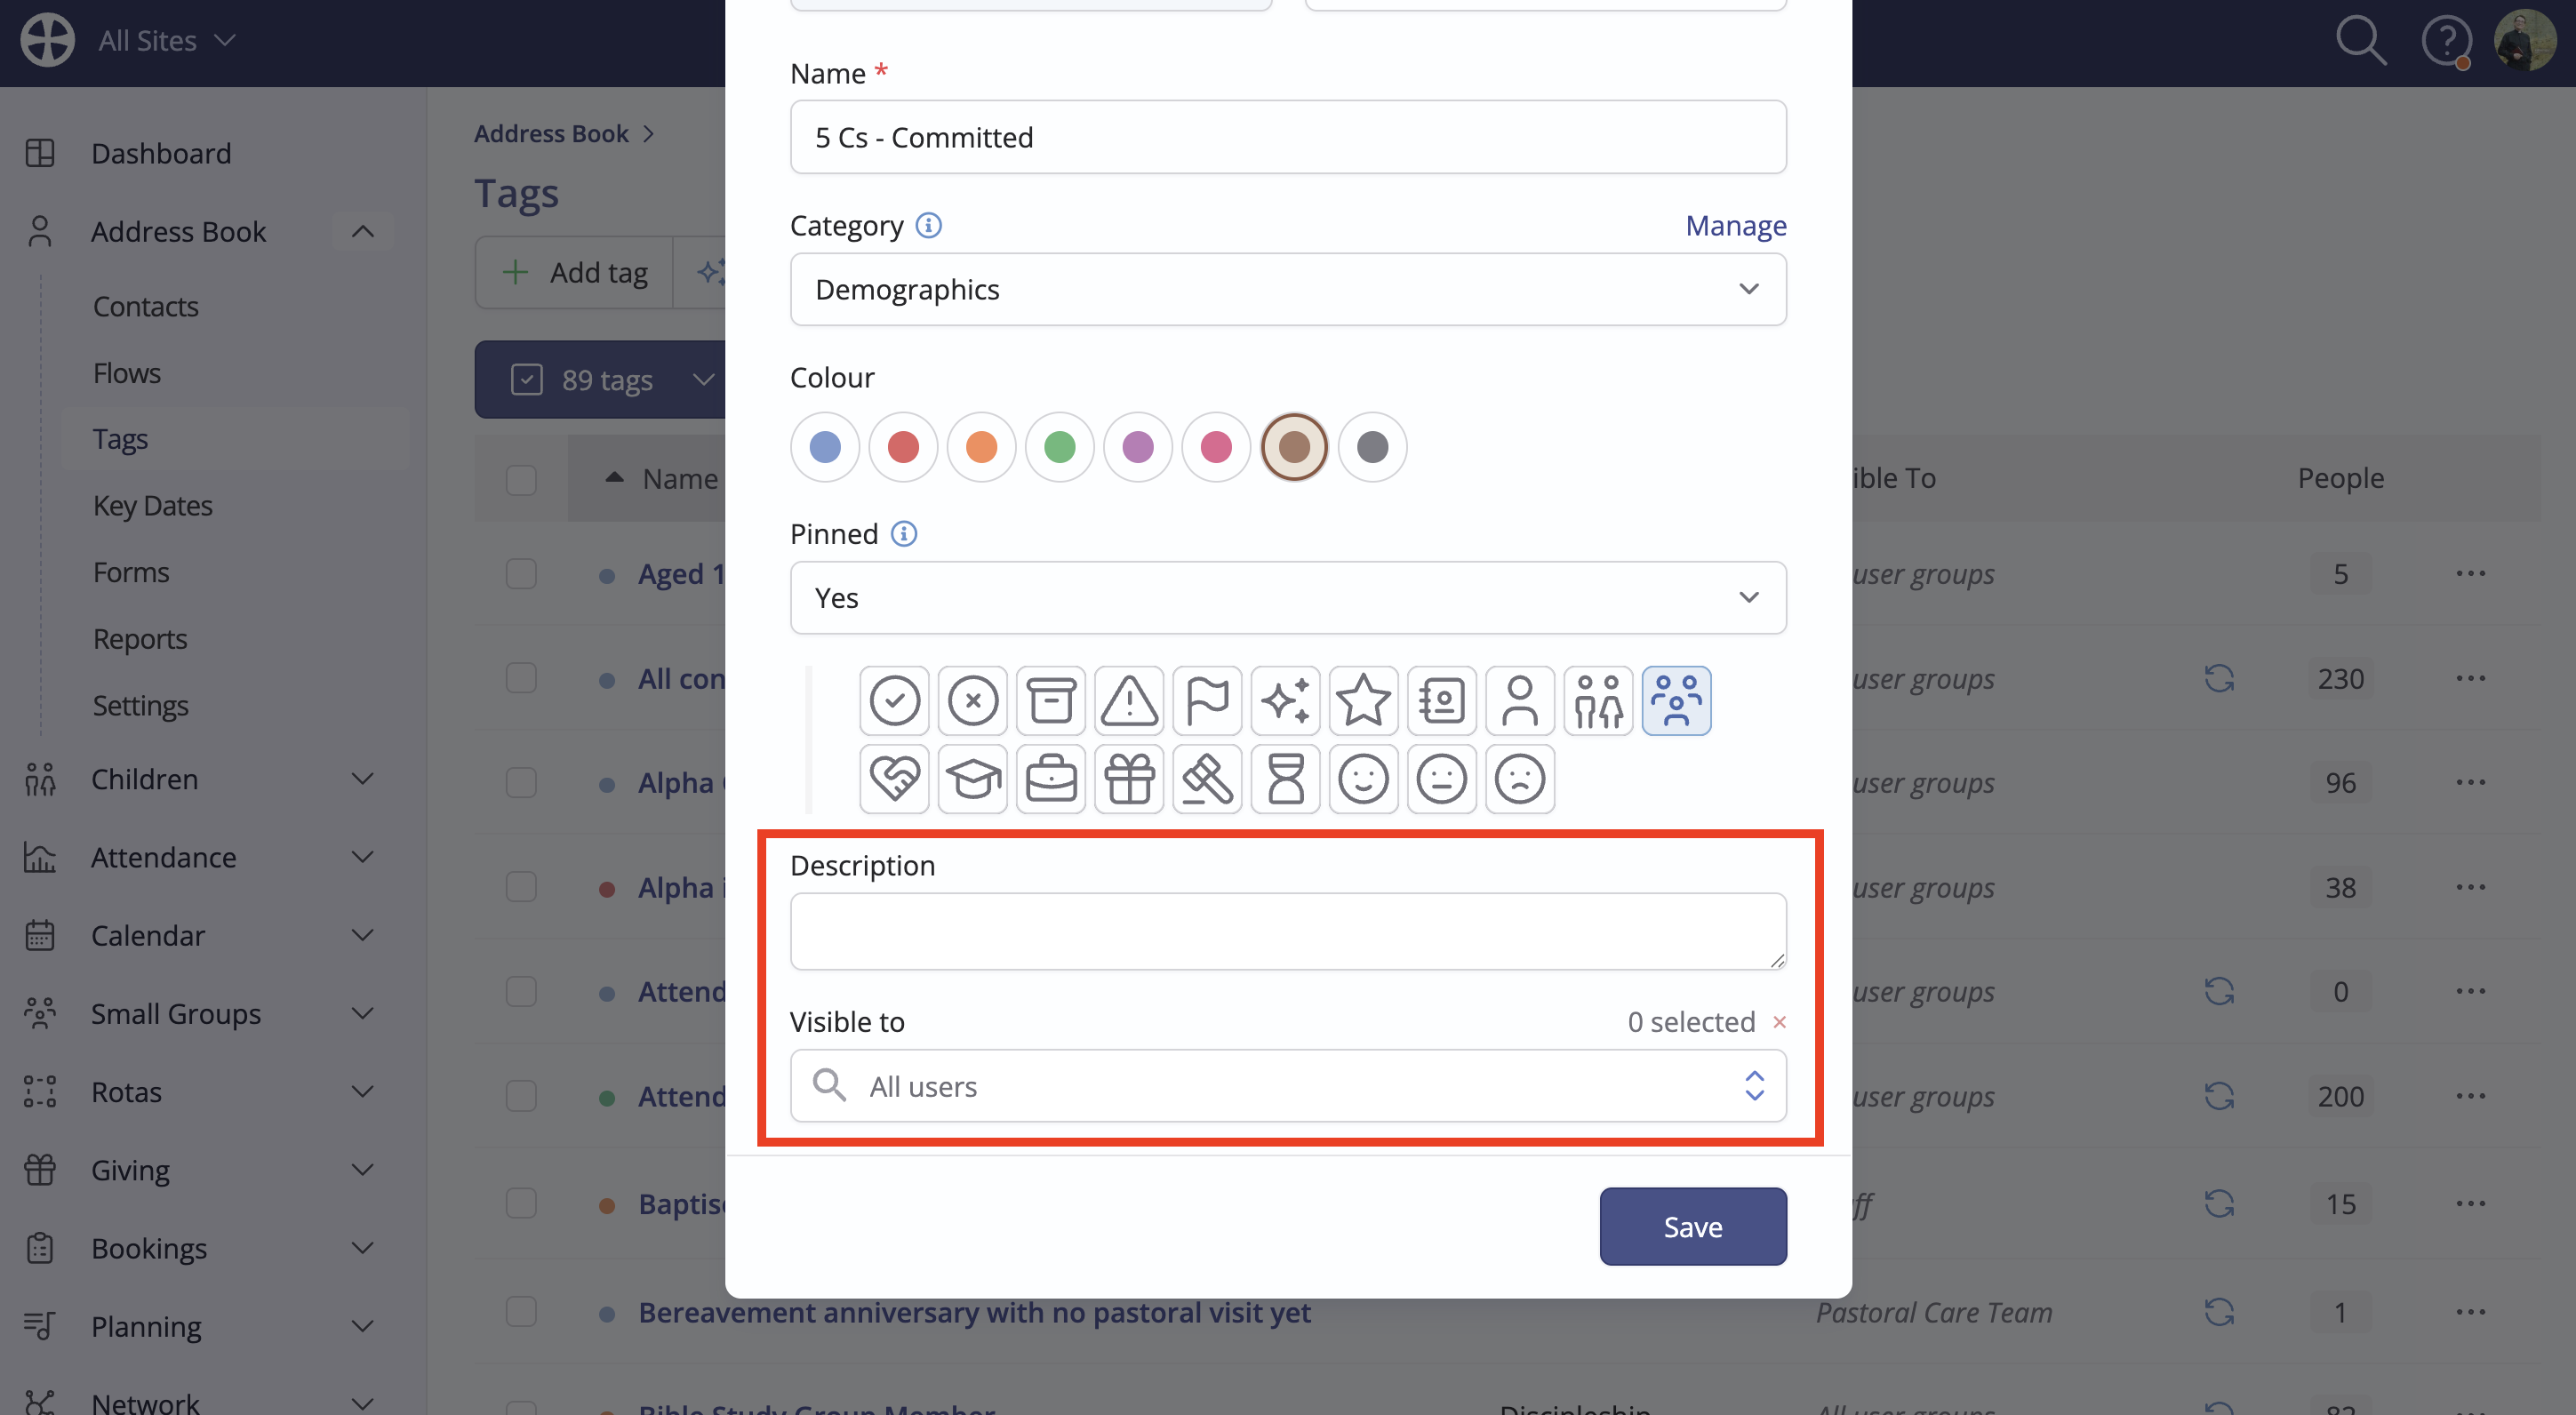
On the Add tag pop-up, select Smart Tag. Give the tag a suitable Name and optionally choose a Category. Categories are an optional way to organise tags, which enable filtering in searches, reports and when viewing a person. To add a new category or manage existing ones, click Manage:
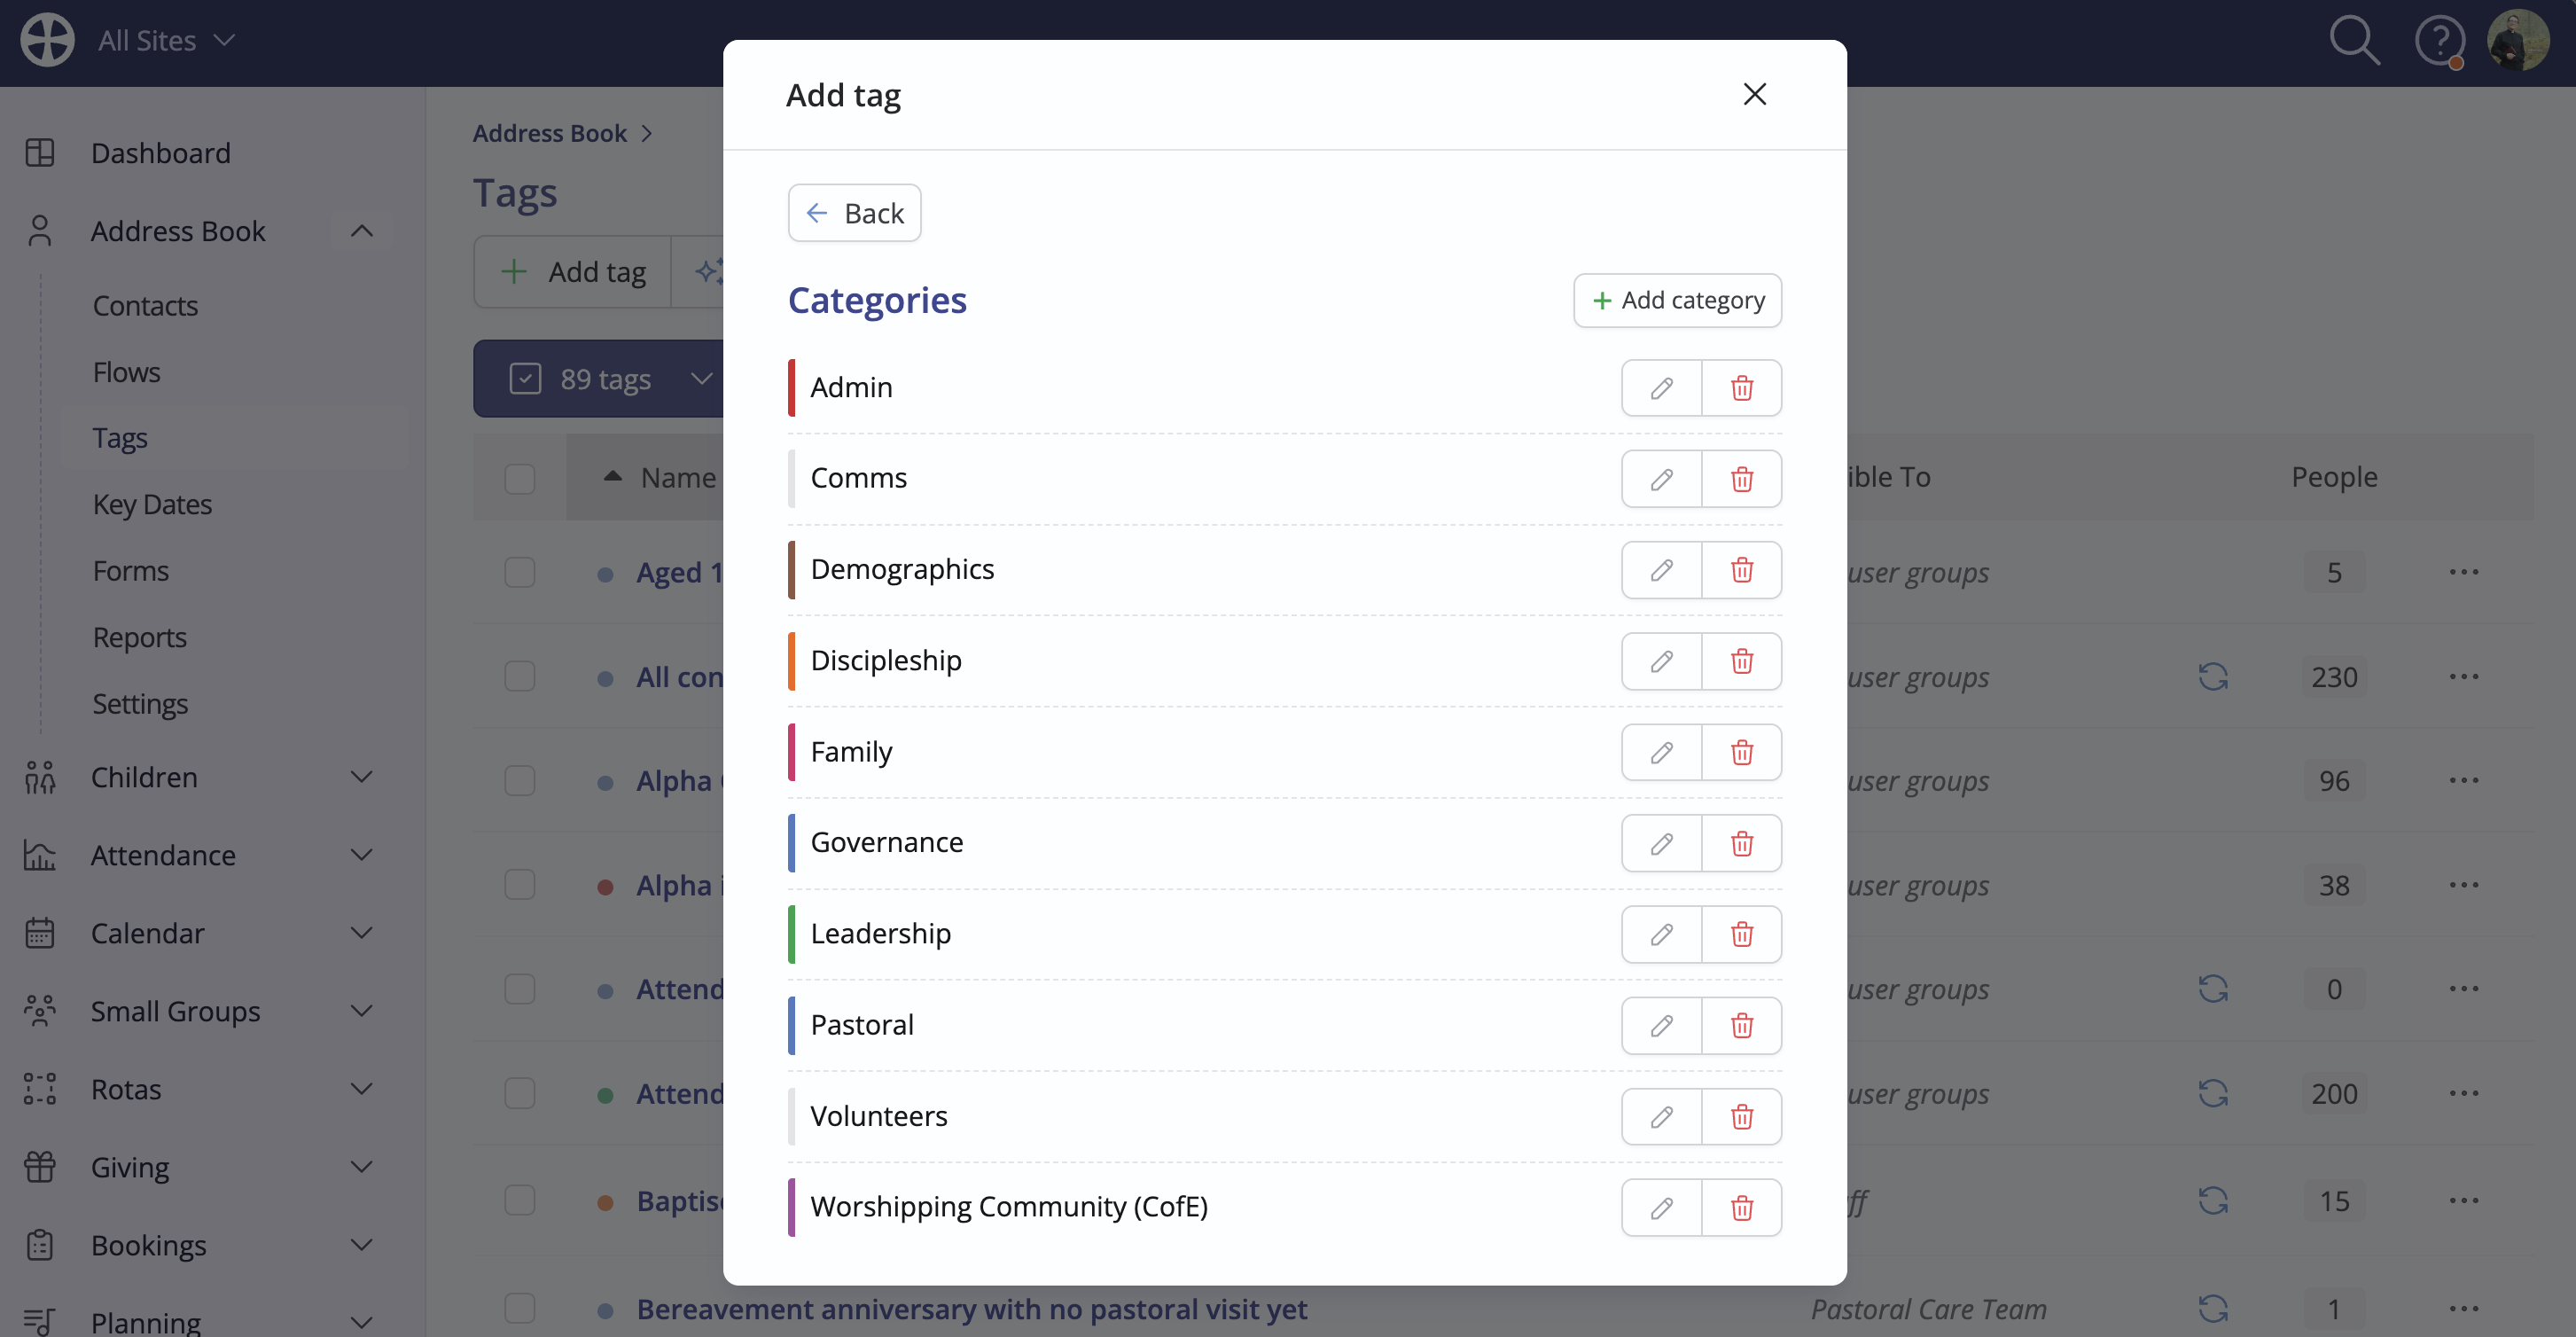
On the Manage Categories pop-up, click to Add category (and assign a category colour) or click the pencil icon to Edit an existing category. Deleting a category does not delete any tags; it simply sets the affected tags as uncategorised. Click Back to return to the previous Add tag pop-up.
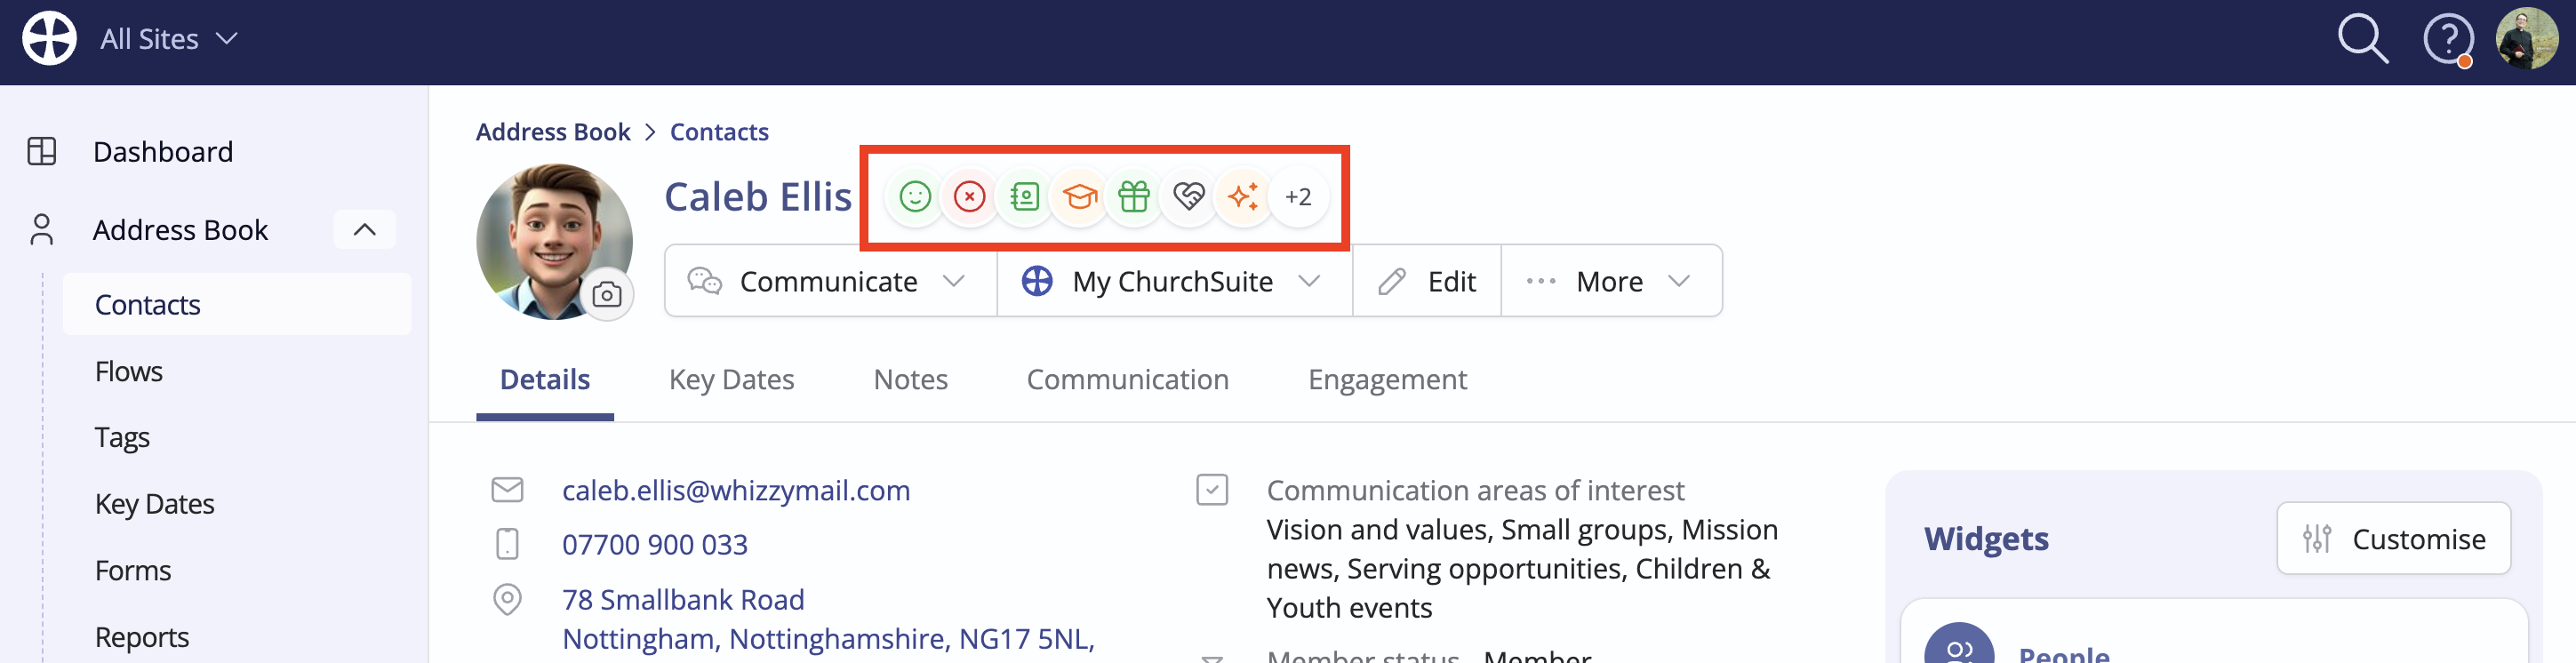
The tag colour defaults to the category colour, or you can choose a different Colour. You can optionally pin an important tag. Pinned tags provide a quick way to view your most important tags at a glance; they are displayed at the top of the page when viewing a person's profile. Choose a pinned tag icon.

Here's an example of pinned tags on a person's profile - the tag-coloured icons shown next to the person's name:
Optionally, add a Description to help module Users understand the tag's purpose. By default, tags are visible to all module Users, but you can restrict their visibility - see the related support article for further information on Restricting visibility and access to user groups. Once you're satisfied, click Next to add the tag Conditions, which are explained in the next section.
Adding conditions
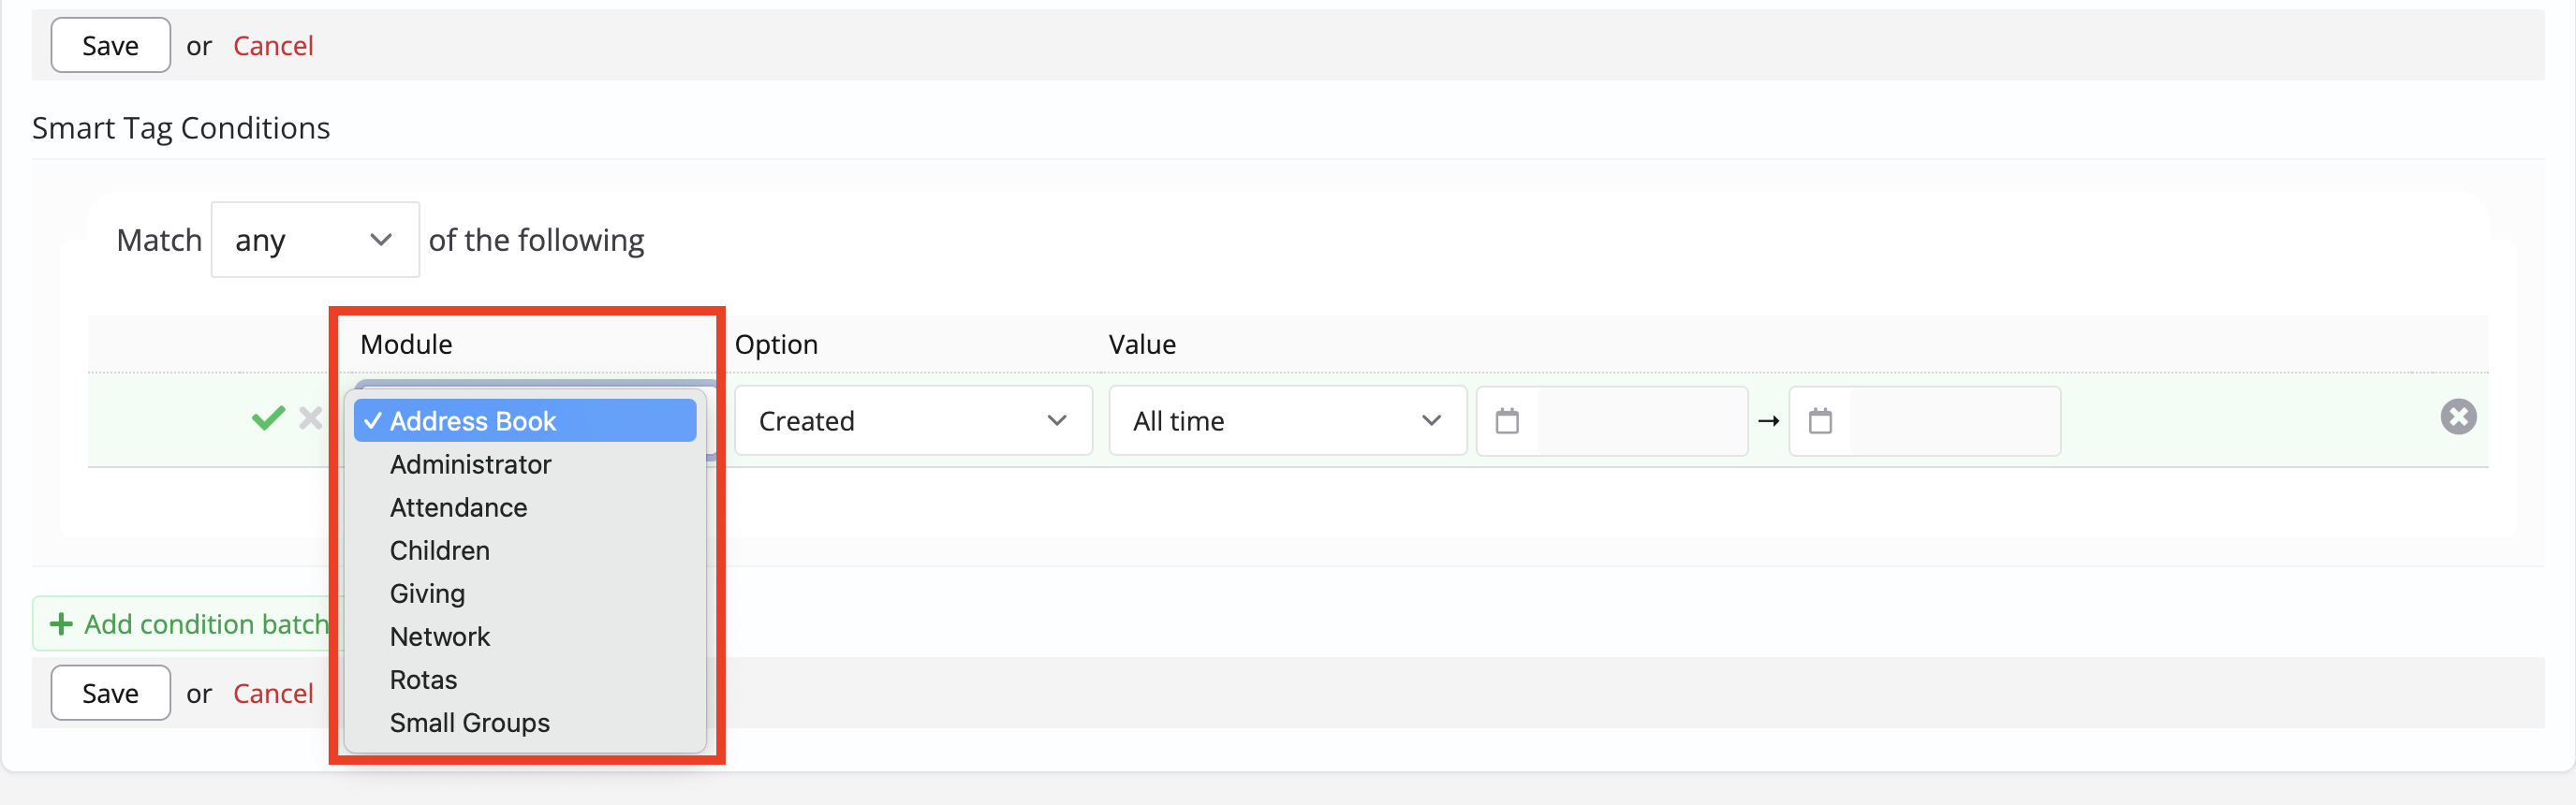
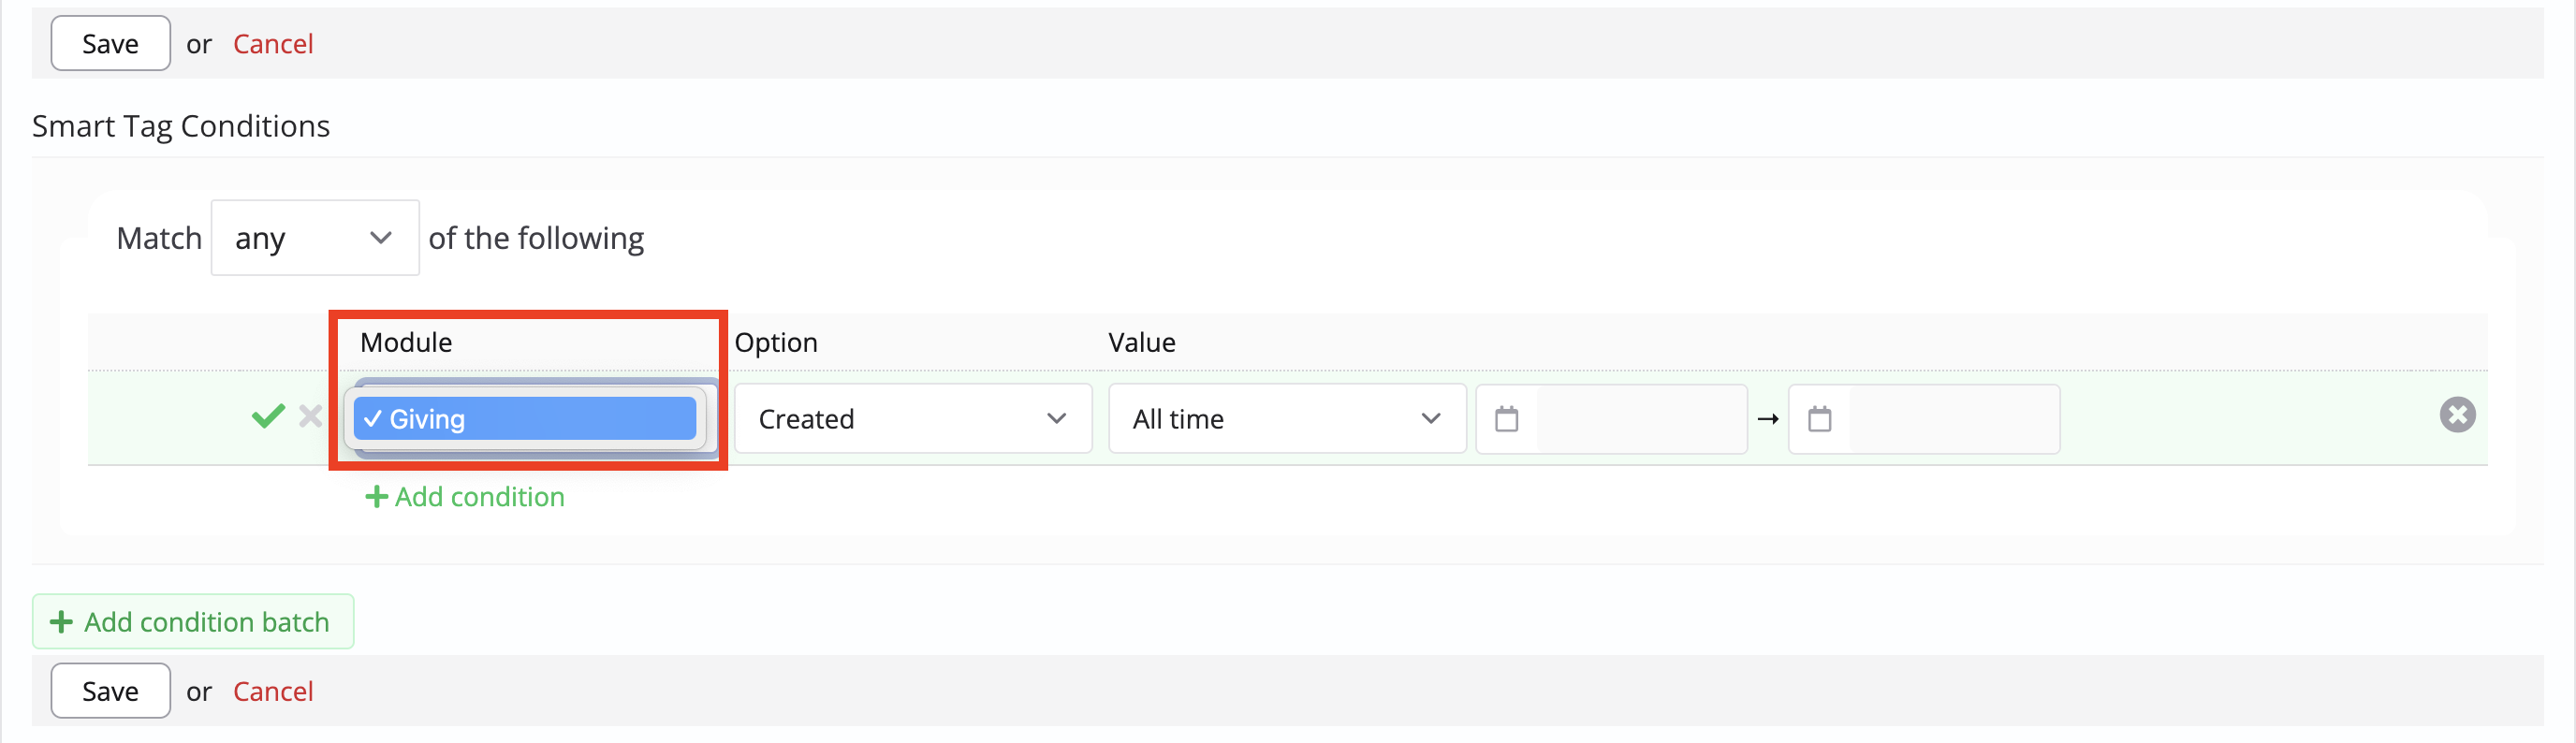
Conditions are the building blocks of Smart Tags. They determine how people are matched and returned in the tag results. A smart tag must always have at least one condition, but you can build more elaborate smart tags by adding multiple conditions if you wish. For each condition, you will select the condition Module, Option, and Value.
Smart tags in the Address Book return Address Book contacts in the results. In this module, you can add conditions based on a contact's data in the Address Book and other modules (see the Module selector shown below):
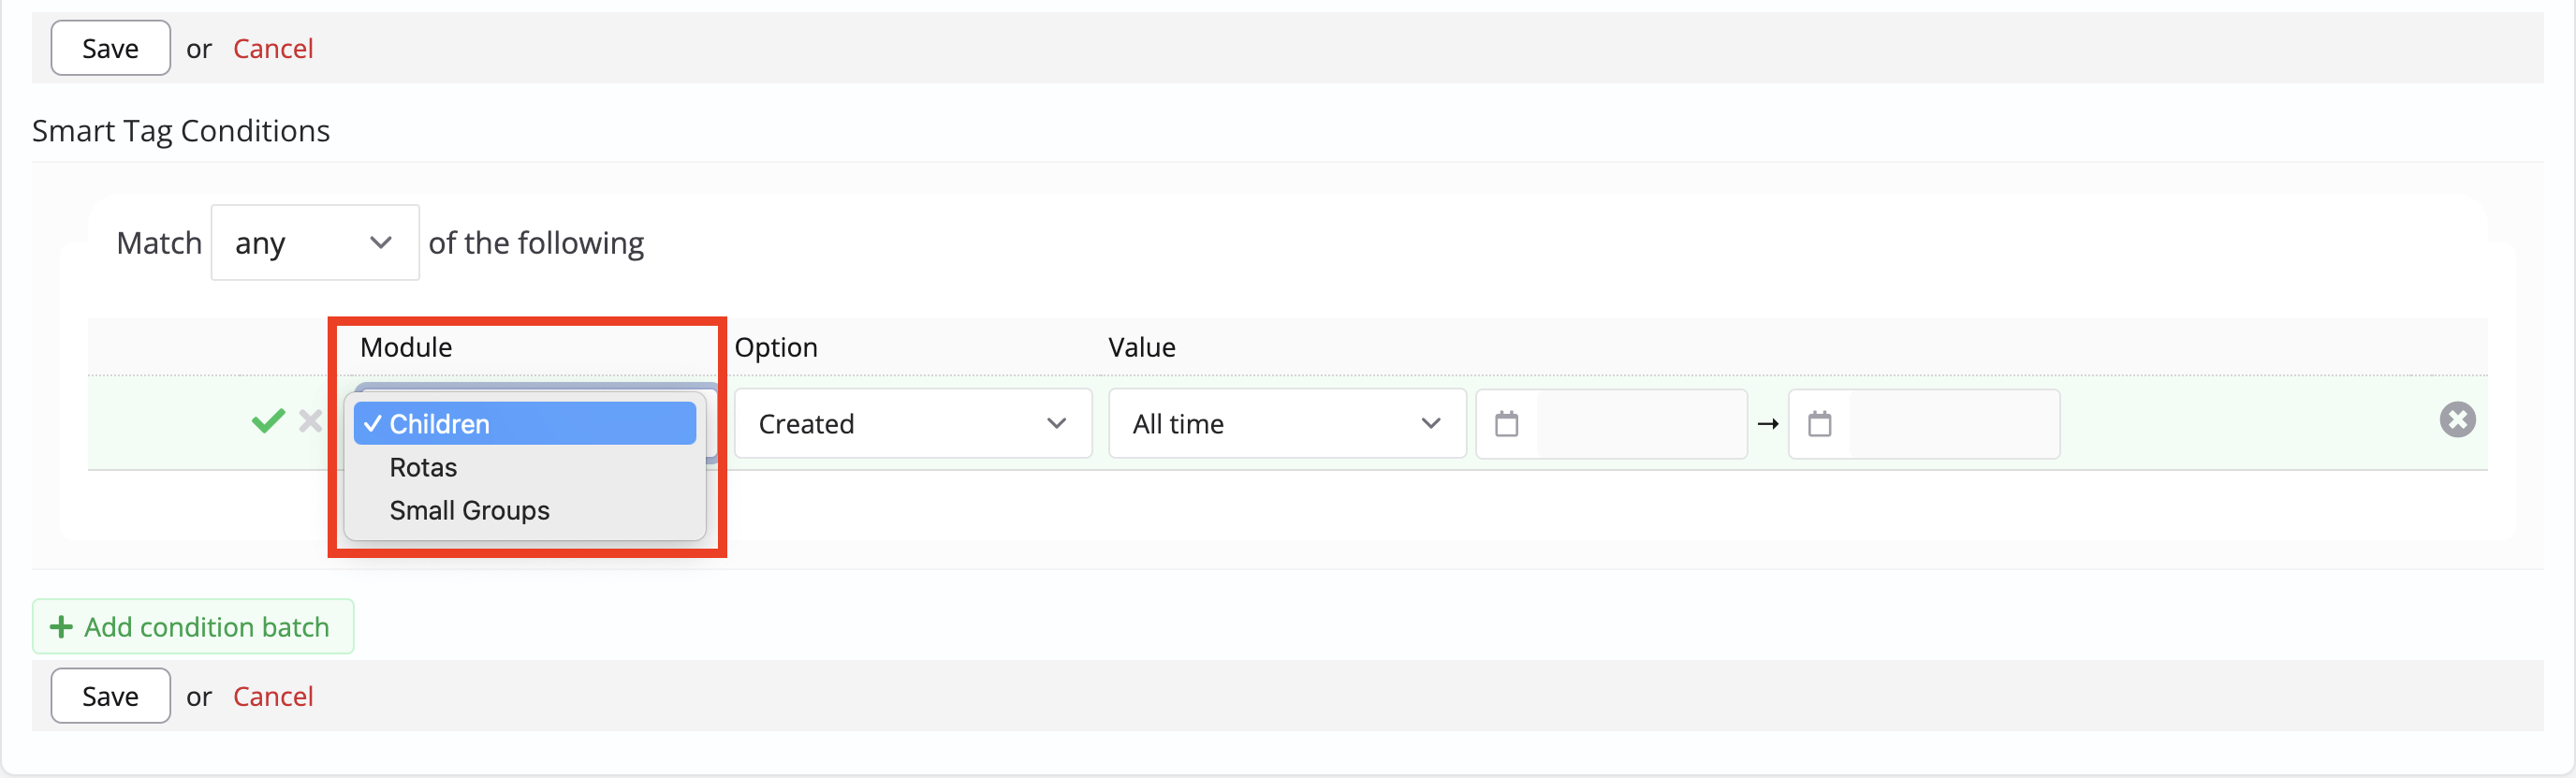
Smart tags in the Children module return children in the results. In this module, you can add conditions based on a child's data in the Children module and other modules (see the Module selector shown below):
Smart tags in the Giving module return givers in the results, including both those in the Address Book and those not in the Address Book. In this module, you can add conditions based on a giver's data in the Giving module only (see the Module selector shown below):
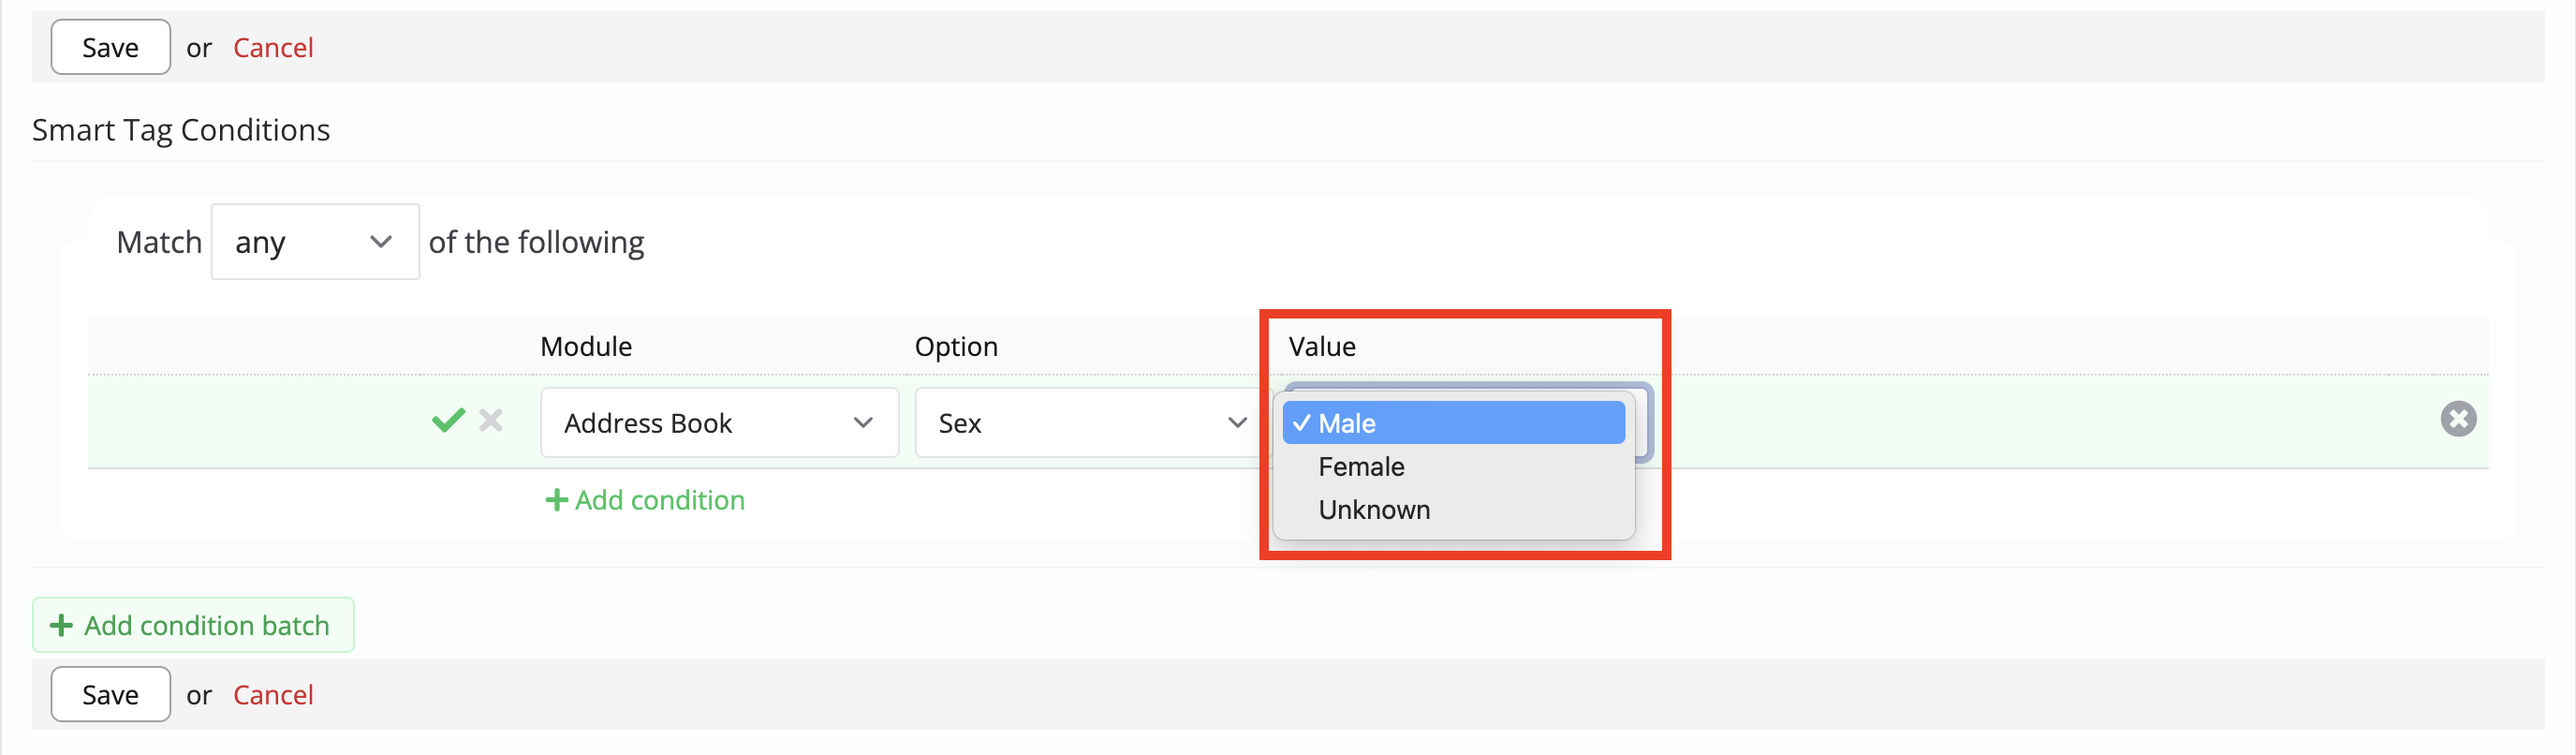
In all three modules, each condition's Module has a range of Options to choose from - the options are the various fields of data within that module that you can query. For example, for a smart tag in the Address Book, the conditions for the Address Book Module include options for fields such as a contact's sex, age, and postcode. Additionally, you can query a contact's Tags, Key Dates, Custom Fields, and their communication options and privacy settings.

The Option selected determines the Values you can query. For example, for the 'Sex' option, you can query values for Male, Female or Unknown; for 'Is a Parent/Carer?', you can query values for Yes or No and so on.
Top Tip!
When adding a Smart Tag, the Country Option requires a country code Value specified in ISO-3166 format. A list of countries and their corresponding ISO-3166 code can be found here.
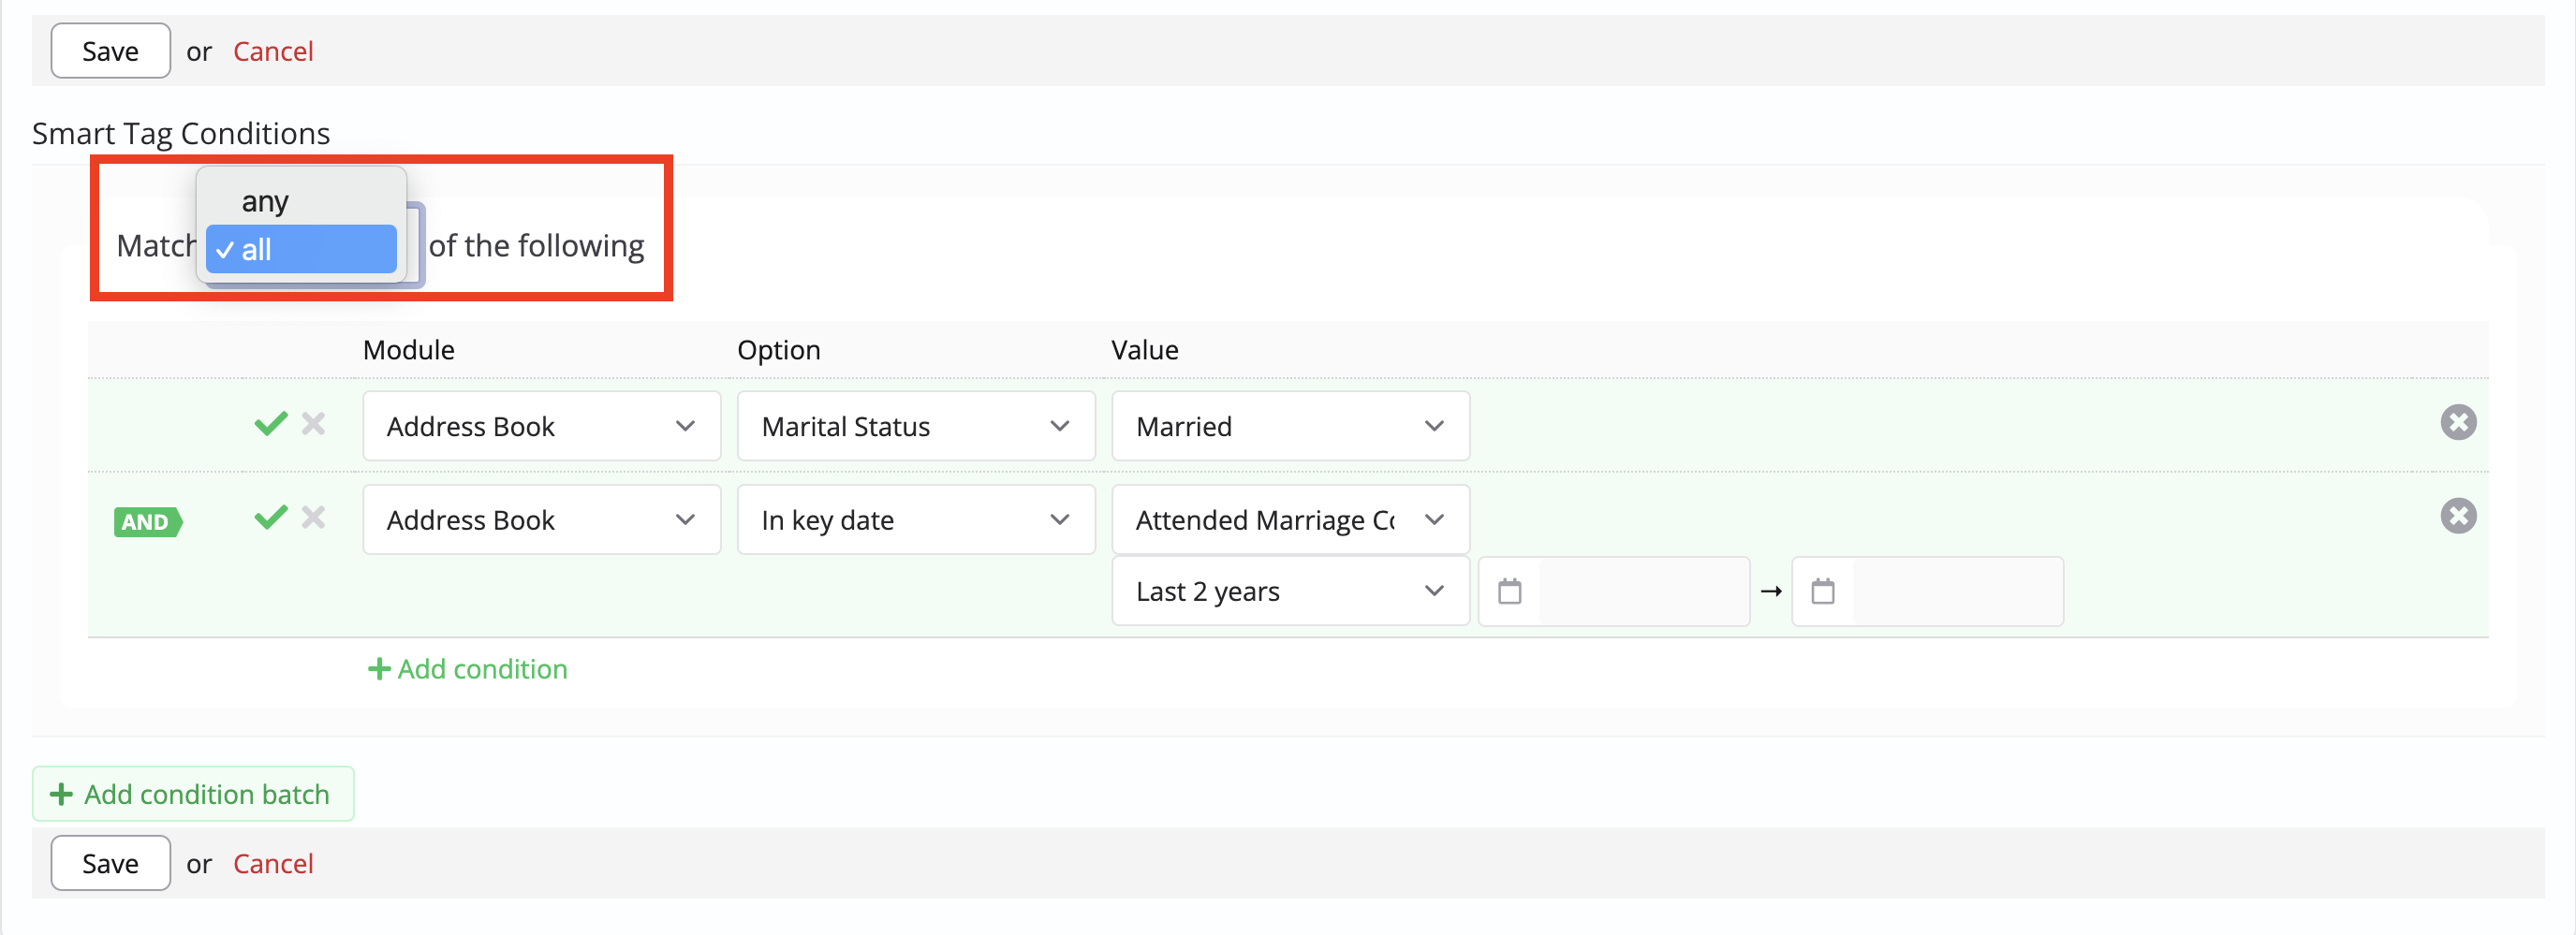
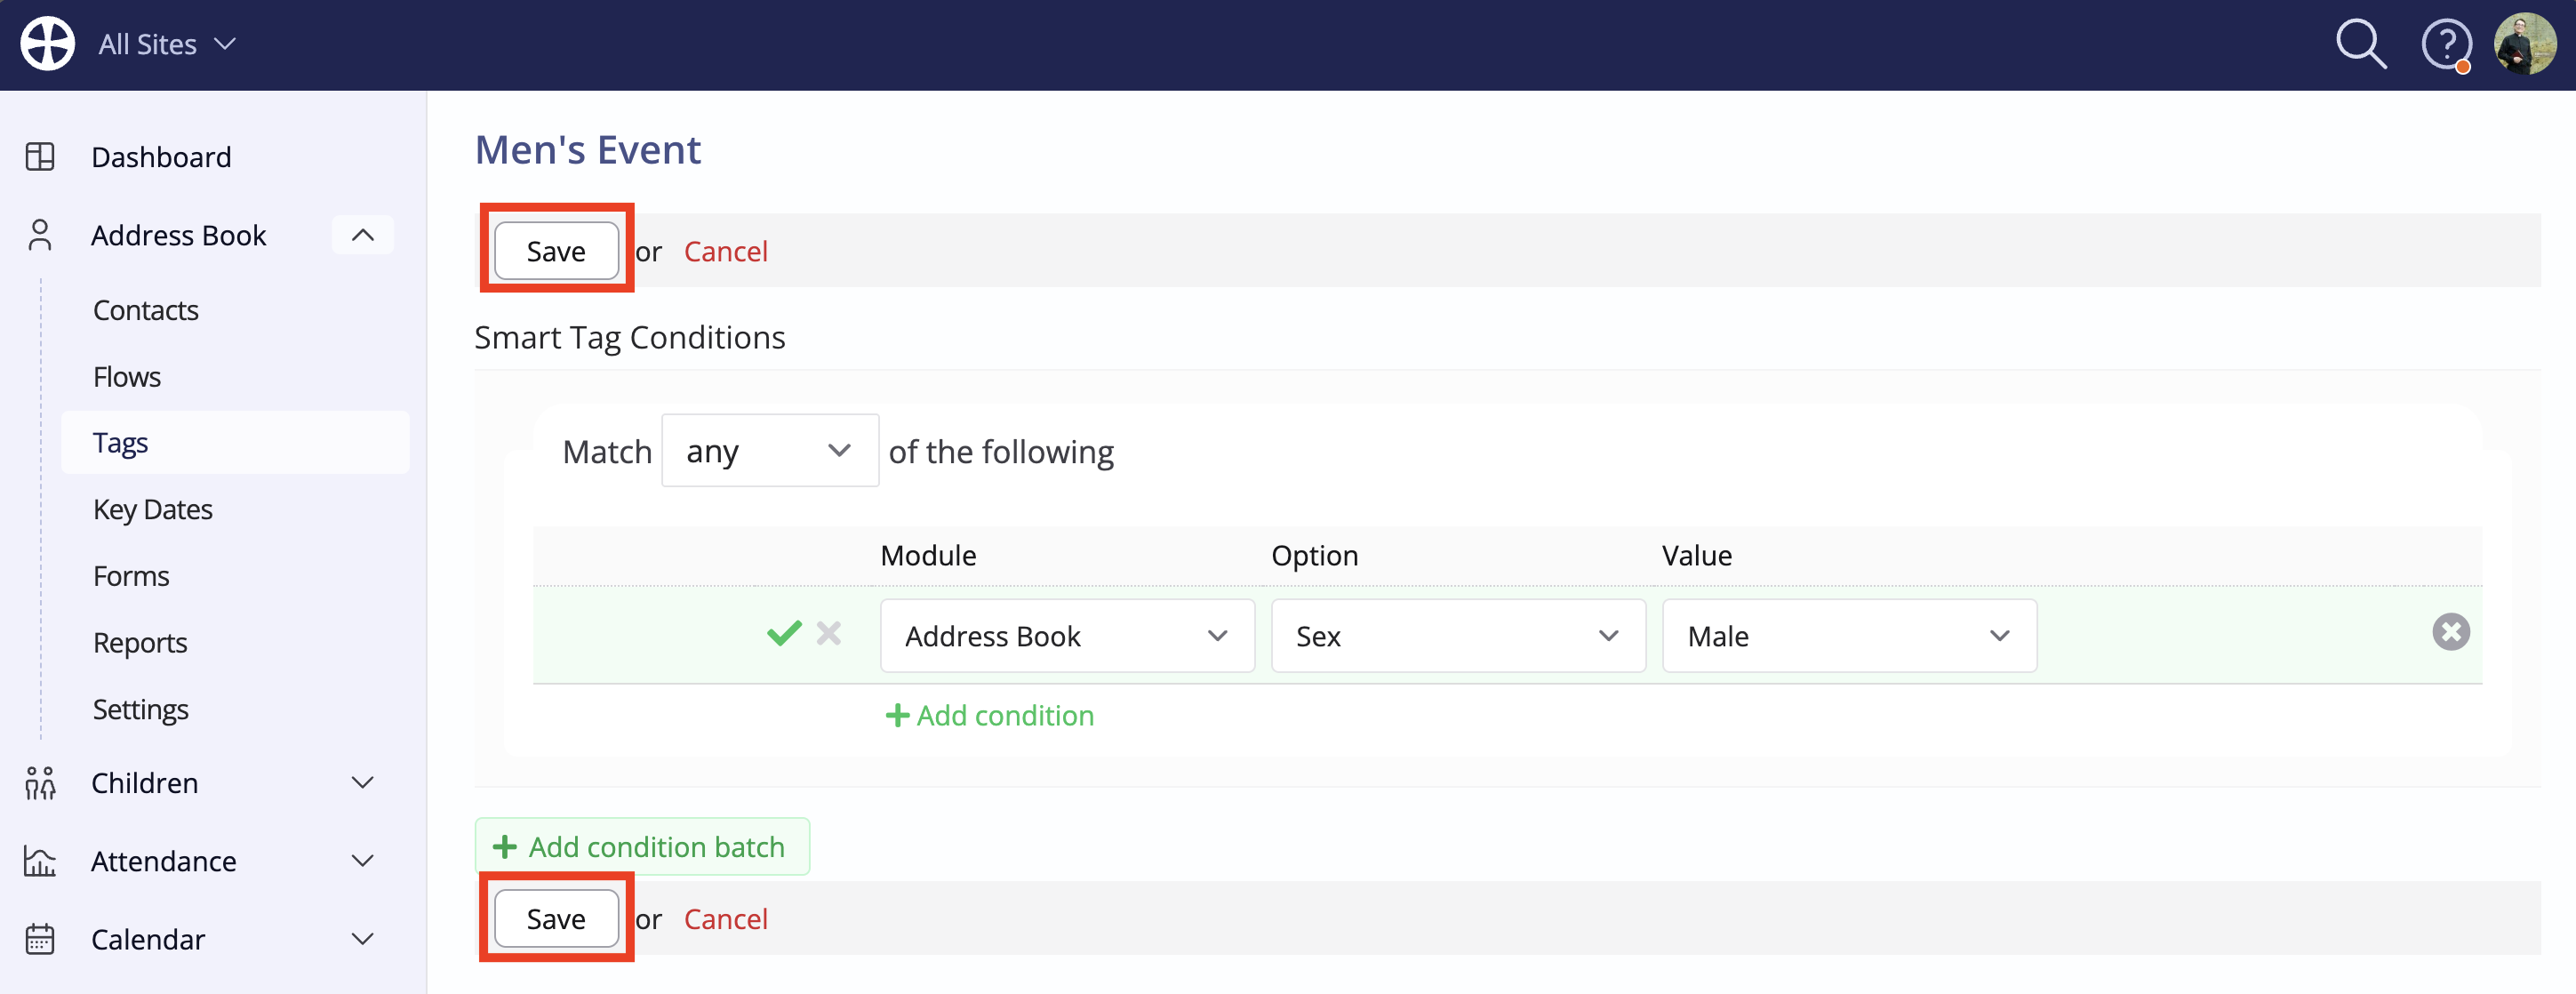
When adding multiple conditions, notice the option to Match 'any' or 'all' of the following - enabling you to select whether the tag results are to match people who meet any one of the conditions (a wide results list) or all of the conditions (a much narrower, specific list). In this next example, the tag conditions match contacts who are married AND have an 'Attended Marriage Course' key date dated within the last 24 months. This means the tag matches all of the conditions rather than any one of them, which would likely be a longer list.
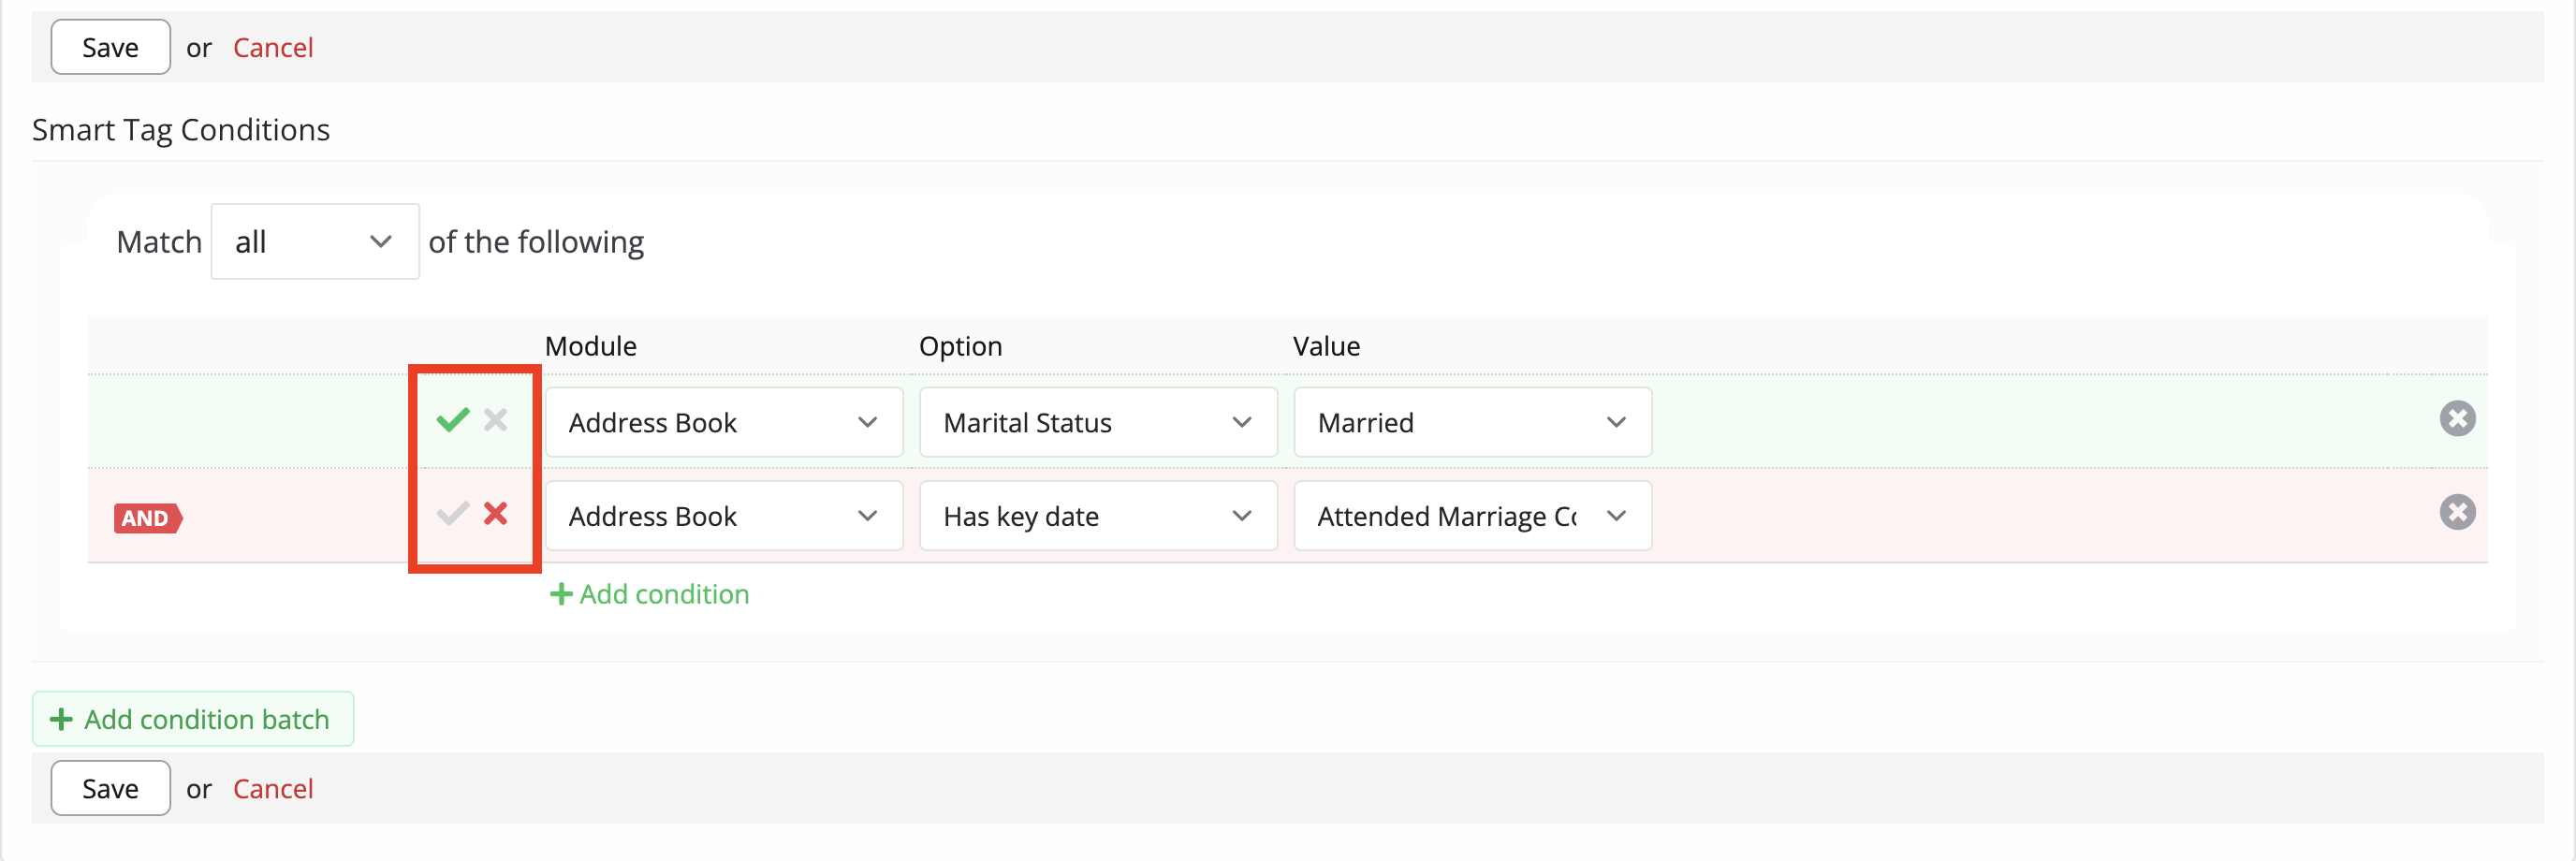
You can invert any condition to include people who do not match the specified condition. Change the green tick to a red cross. Smart tags can contain combinations of inclusive and inverted conditions. For example, the following conditions match all married Address Book contacts AND anyone who does NOT have an 'Attended marriage course' key date.
In the previous example, the tag matched based on two conditions together into a single batch. However, it's also possible to add multiple condition batches to a tag and set whether the tag should return results, including people who match any of the batches or all of the batches, resulting in a much more specific group. Click Add condition batch to begin a new batch. For example, the following 'engagement' smart tag looks for individuals who are serving, giving, or in a small group and returns a list of people who meet any two of these criteria. The first condition batch matches those who are in an active ministry in the Rotas module AND an active small group. The second condition batch matches those who are in an active ministry in the Rotas module AND have given in the last six months. The third condition batch matches the final combination: those who have given in the last six months AND are in an active small group. Notice how you can specify the relationship between batches using AND or OR. In this example, we are matching based on those meeting the conditions of the first batch OR the second batch. Had we selected AND, the resulting list of matching contacts would be a much more exclusive list, i.e. those who match both batch 1 AND batch 2.
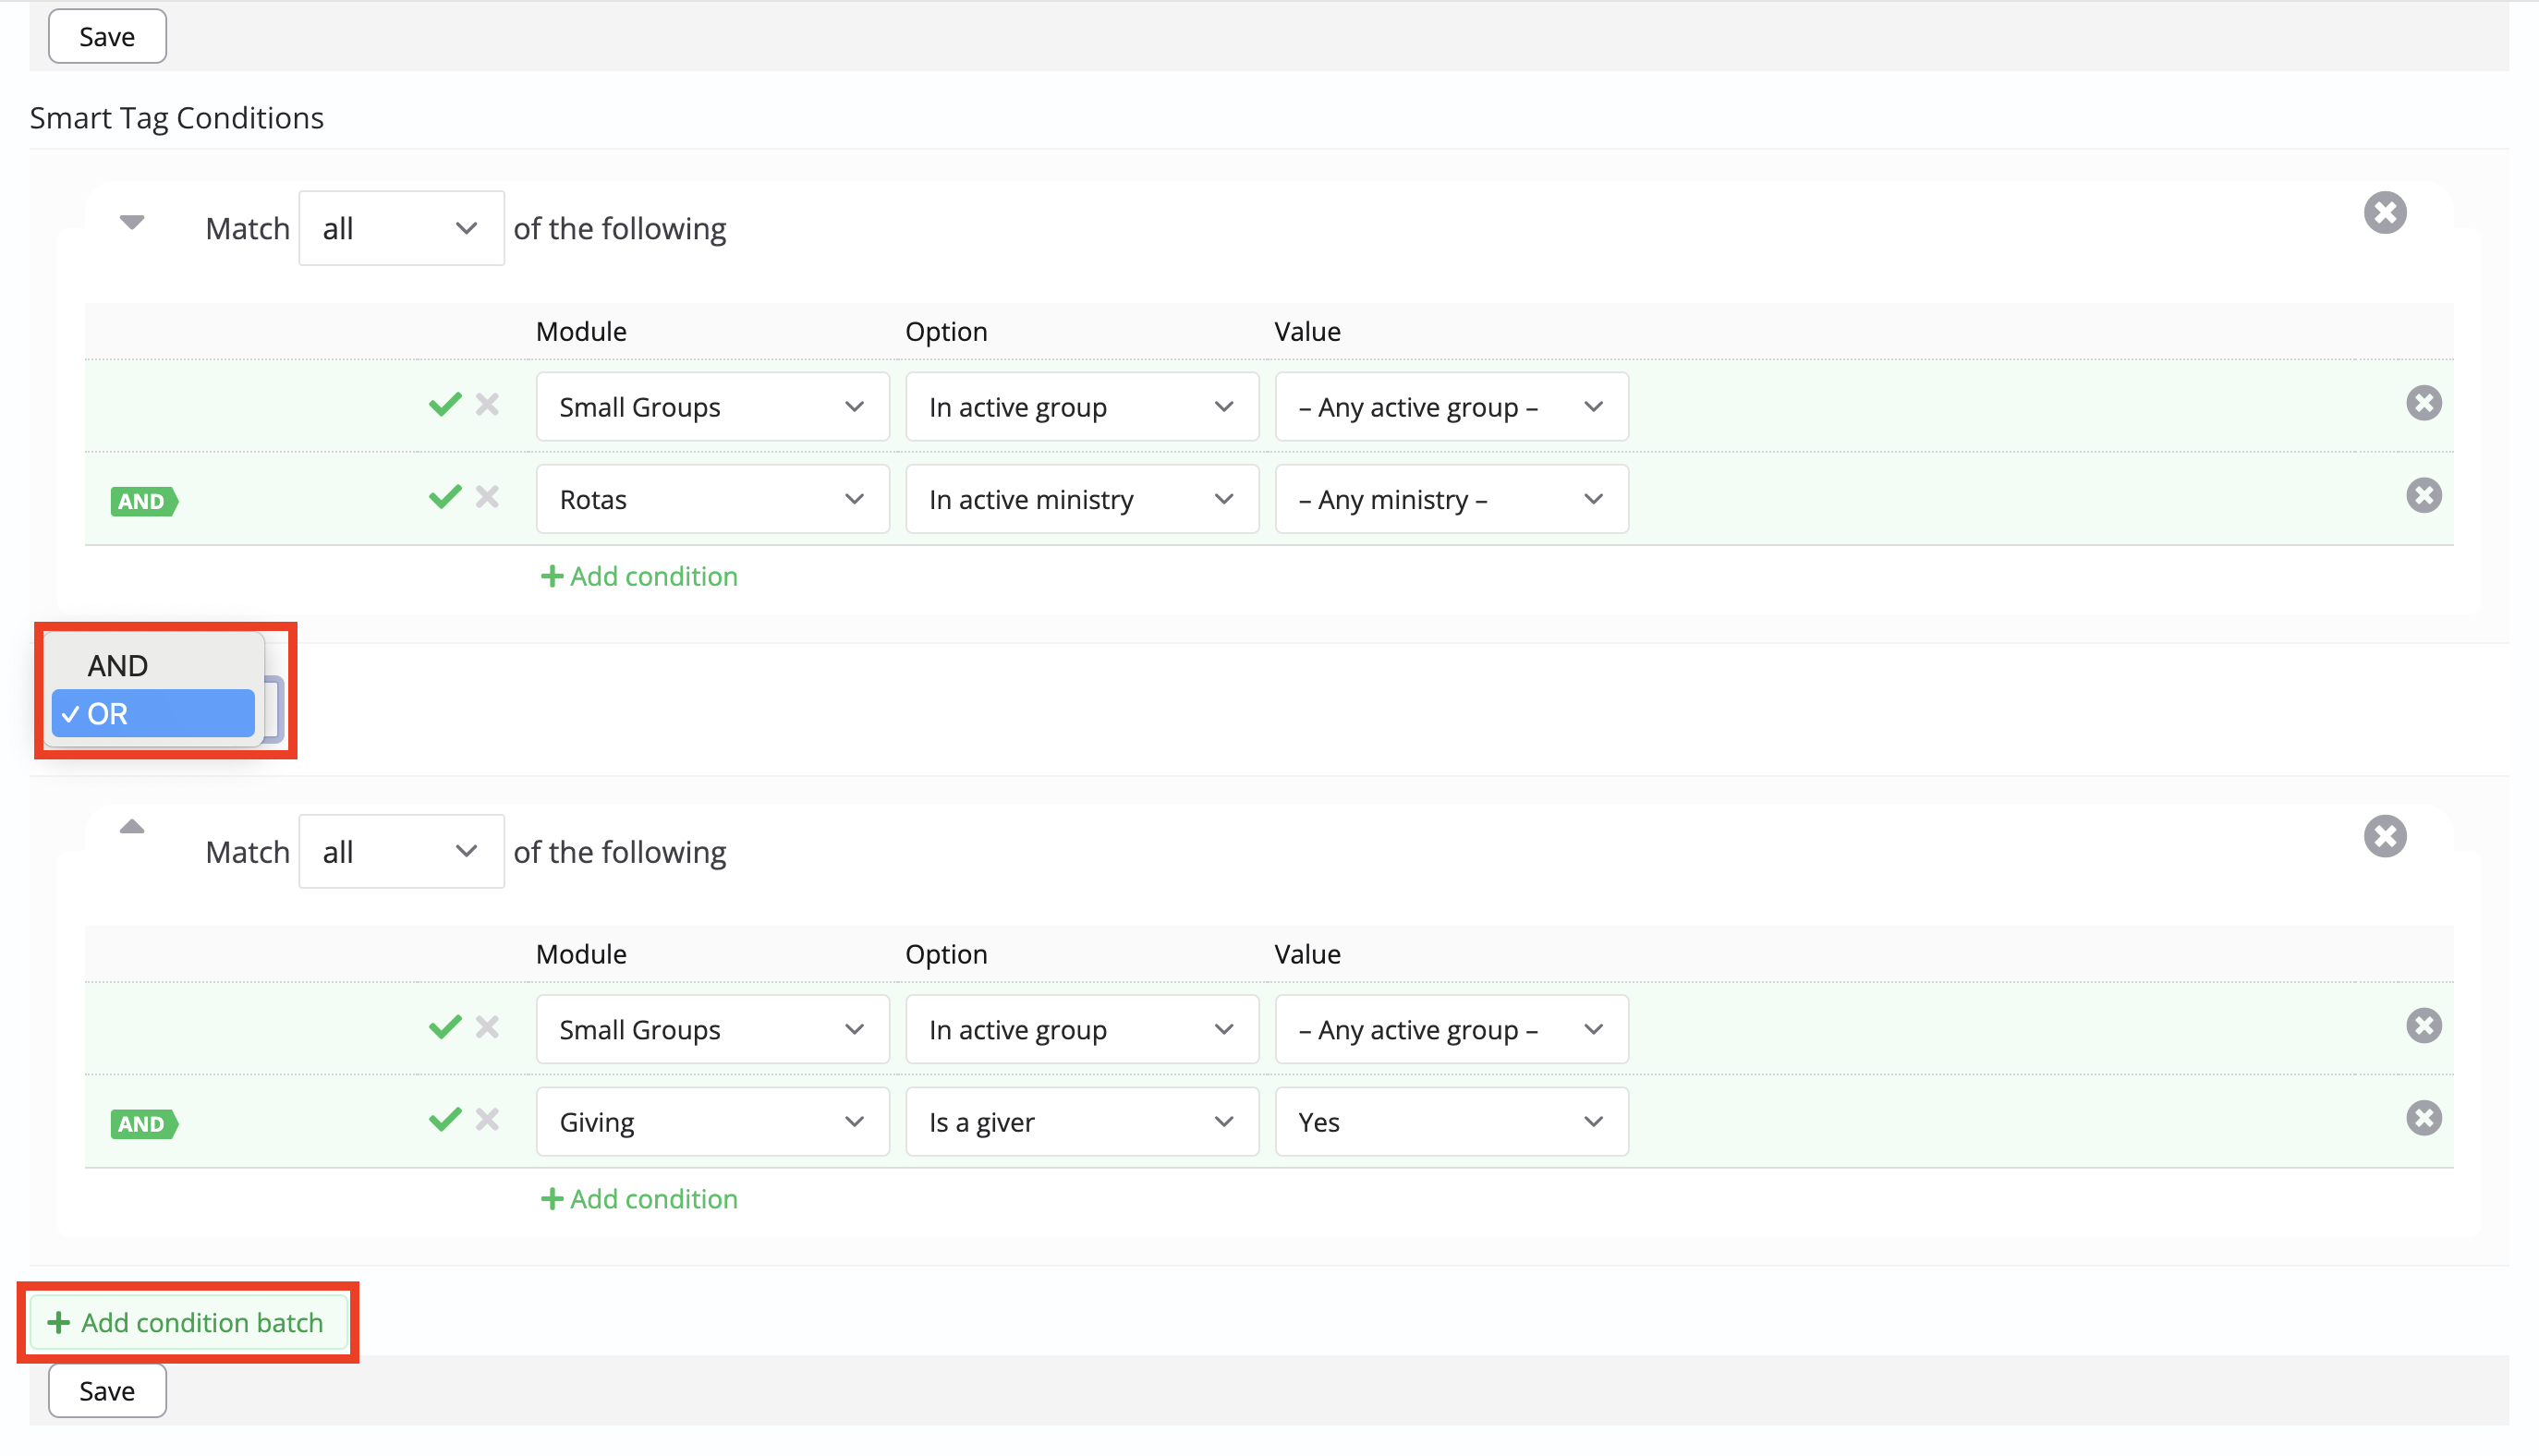
When working with condition batches, notice how you can reorder batches using the up and down arrows located in the top left corner of each batch, or you can delete a batch by clicking the X in the top right corner of the batch.
Having added conditions, click Save to be taken to the tag View to see the results:
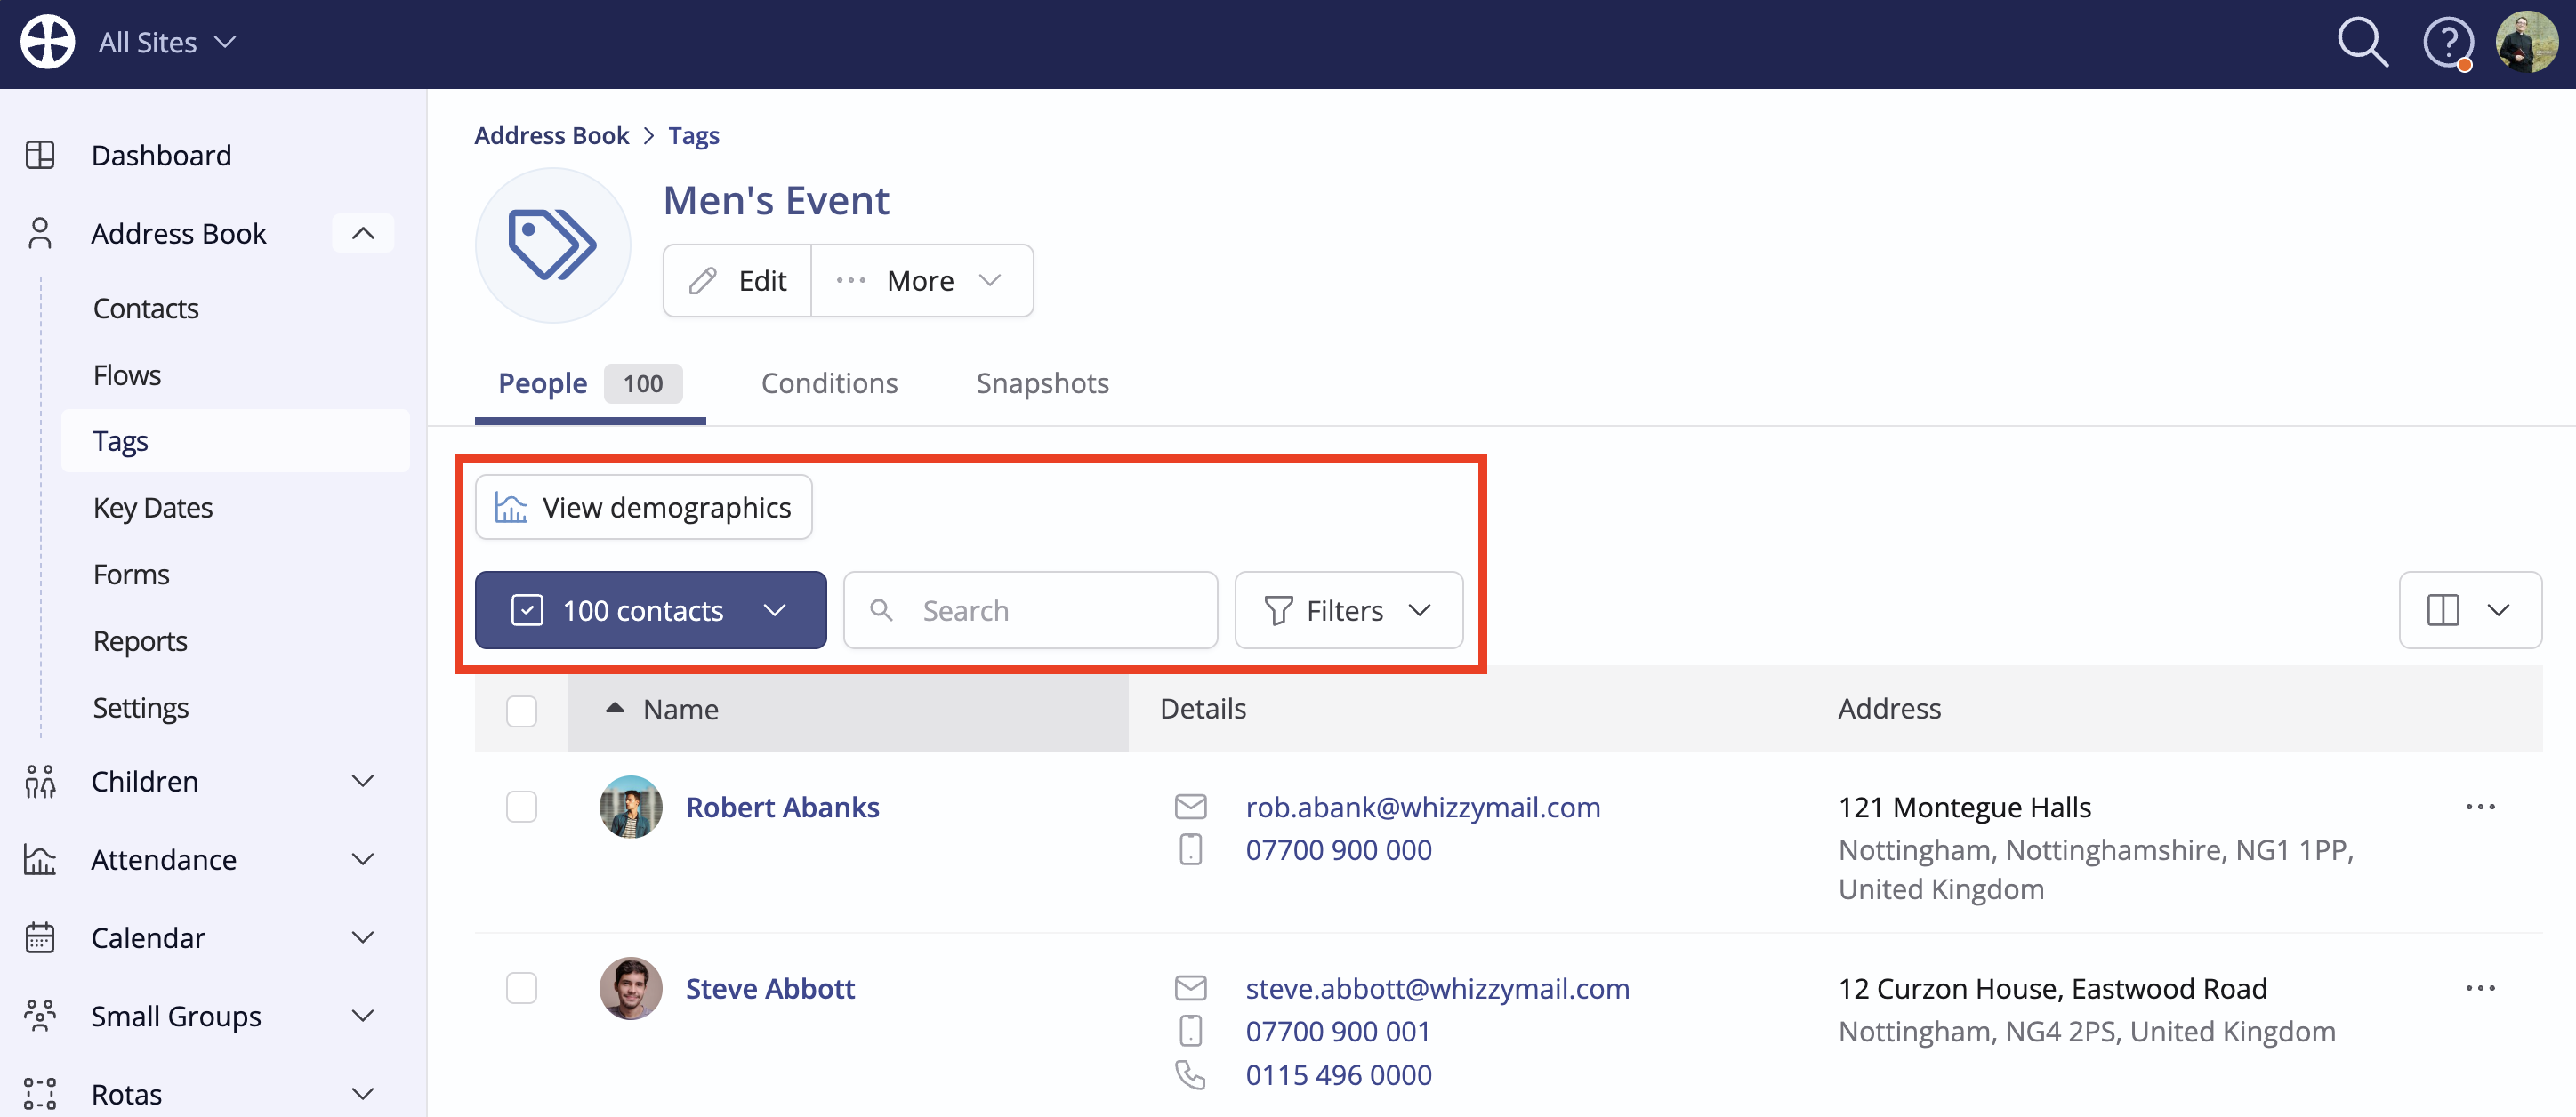
You can return to the tag View at any time from the Tags section of the module. The View is divided into three tabs: People, Conditions and Snapshots. From here, you can easily communicate with tagged people using the Bulk Actions, and the Filters can be used to further search by other Tags. You can also View demographics for those in the Tag.
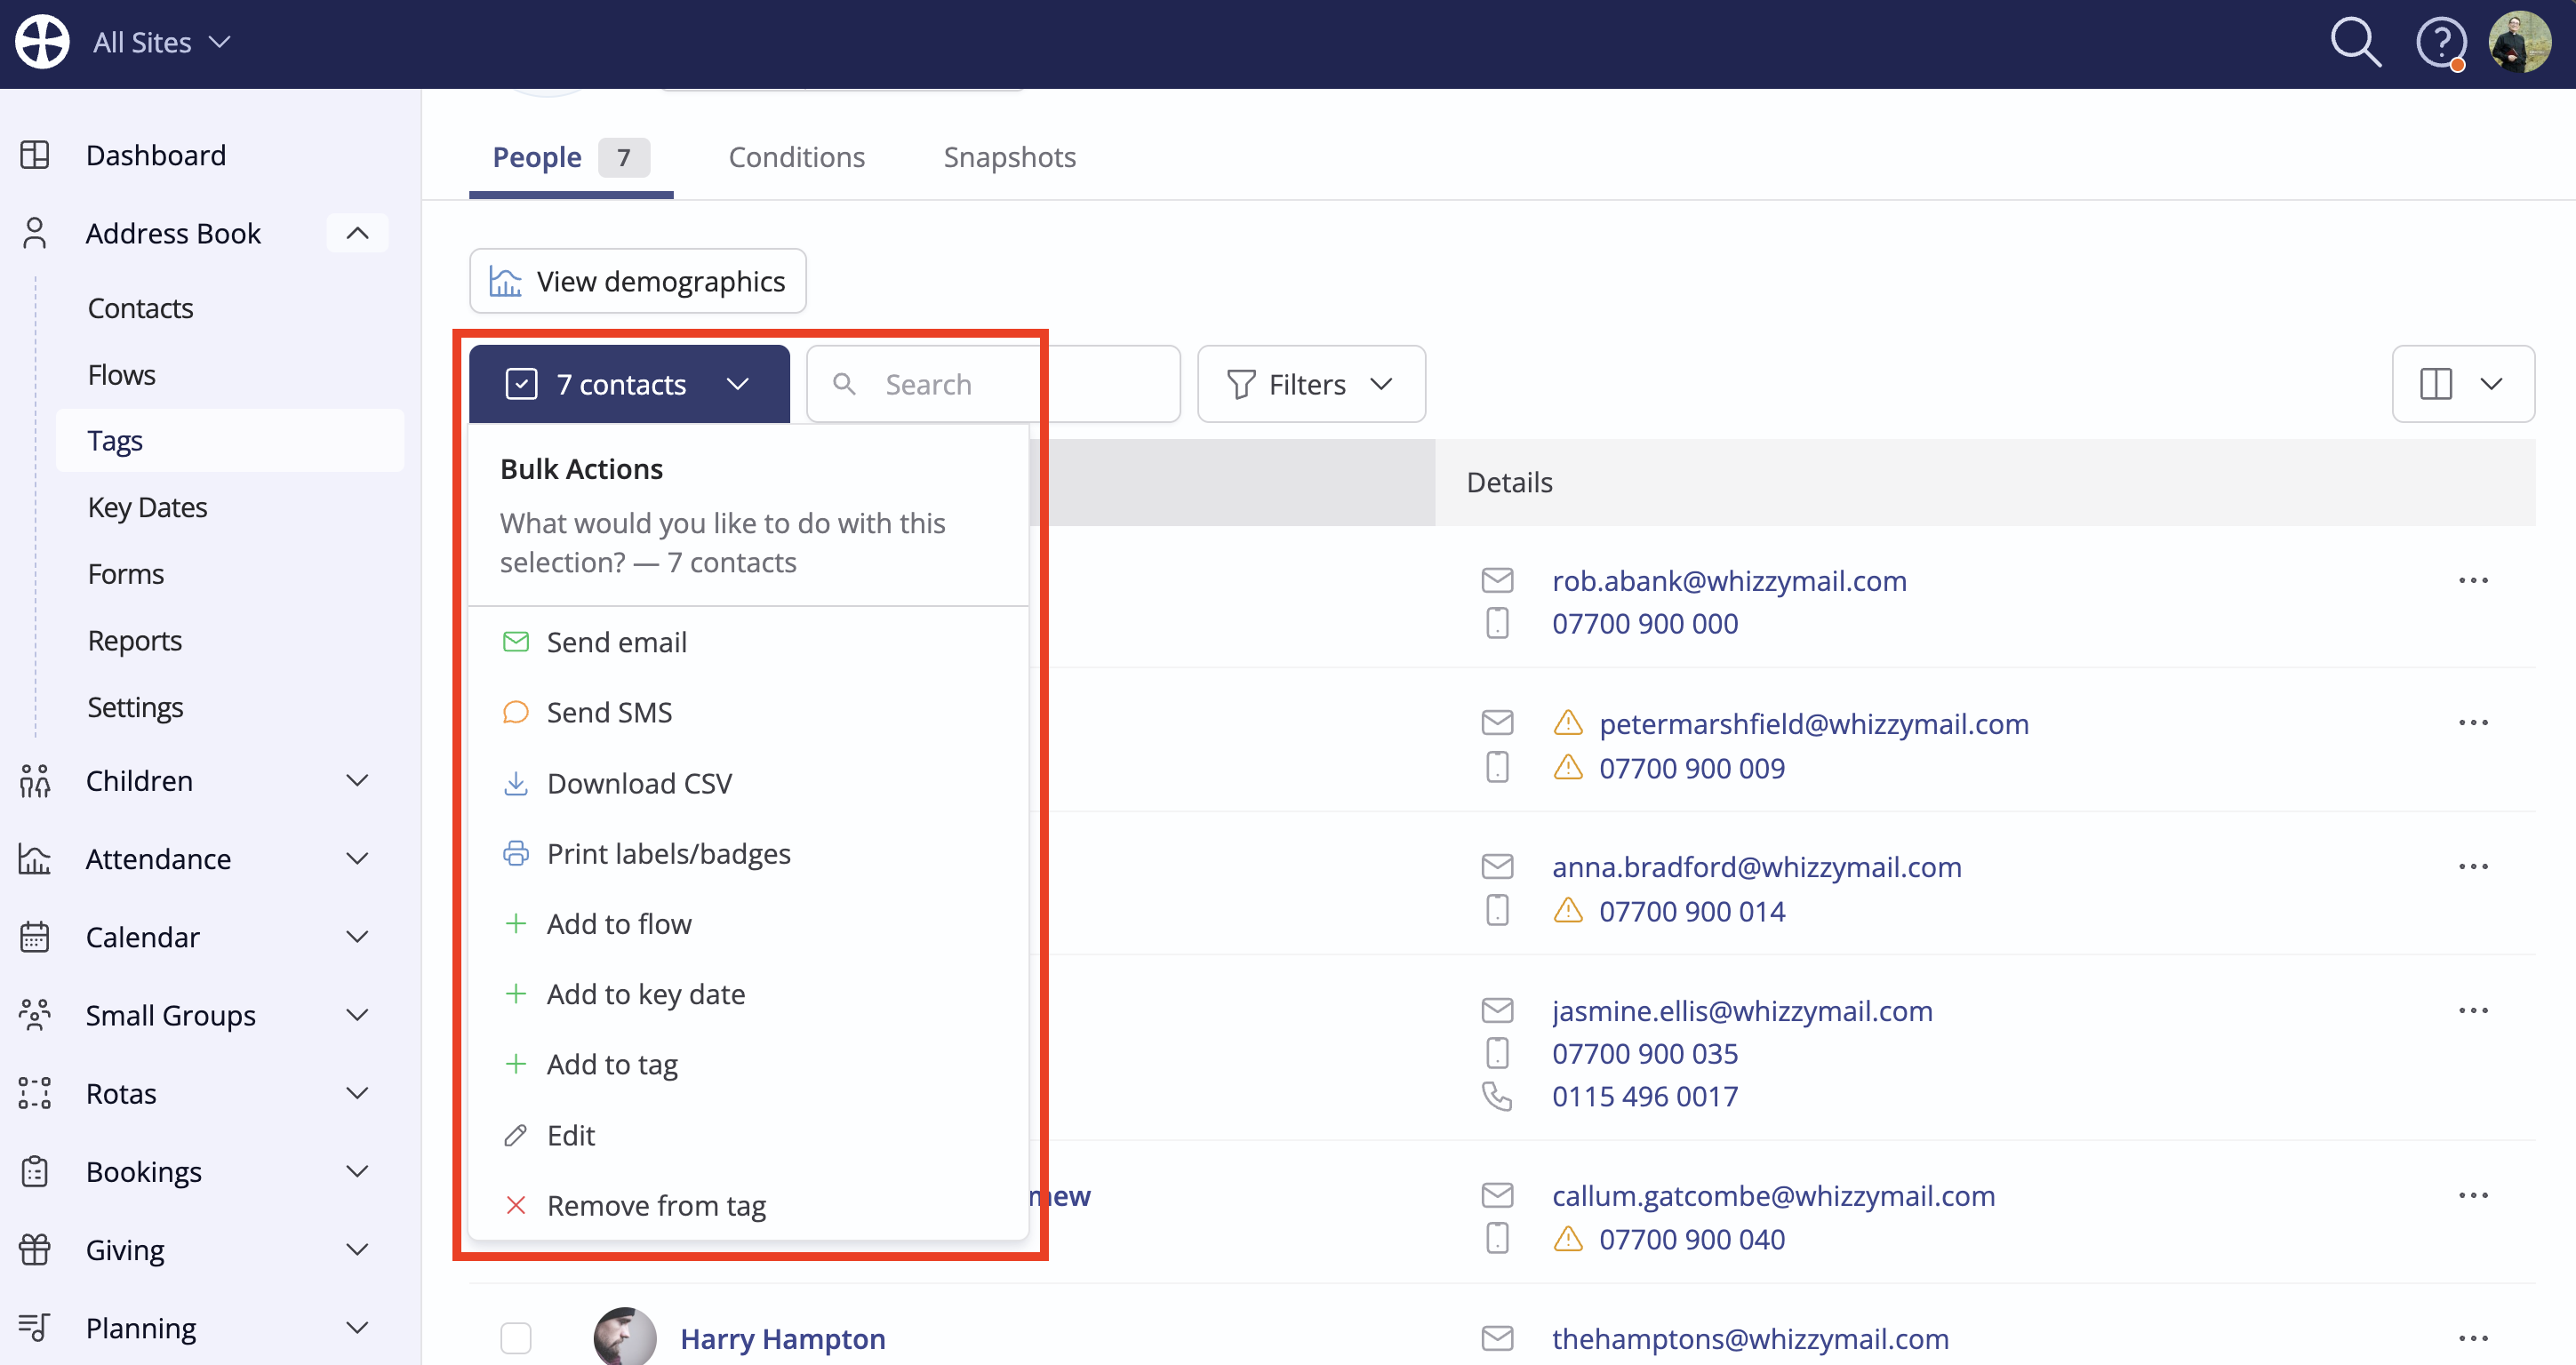
When working with groupings of people, such as Tags, notice the Add Bulk Actions to add the tagged people to a flow, key date or fixed tag.
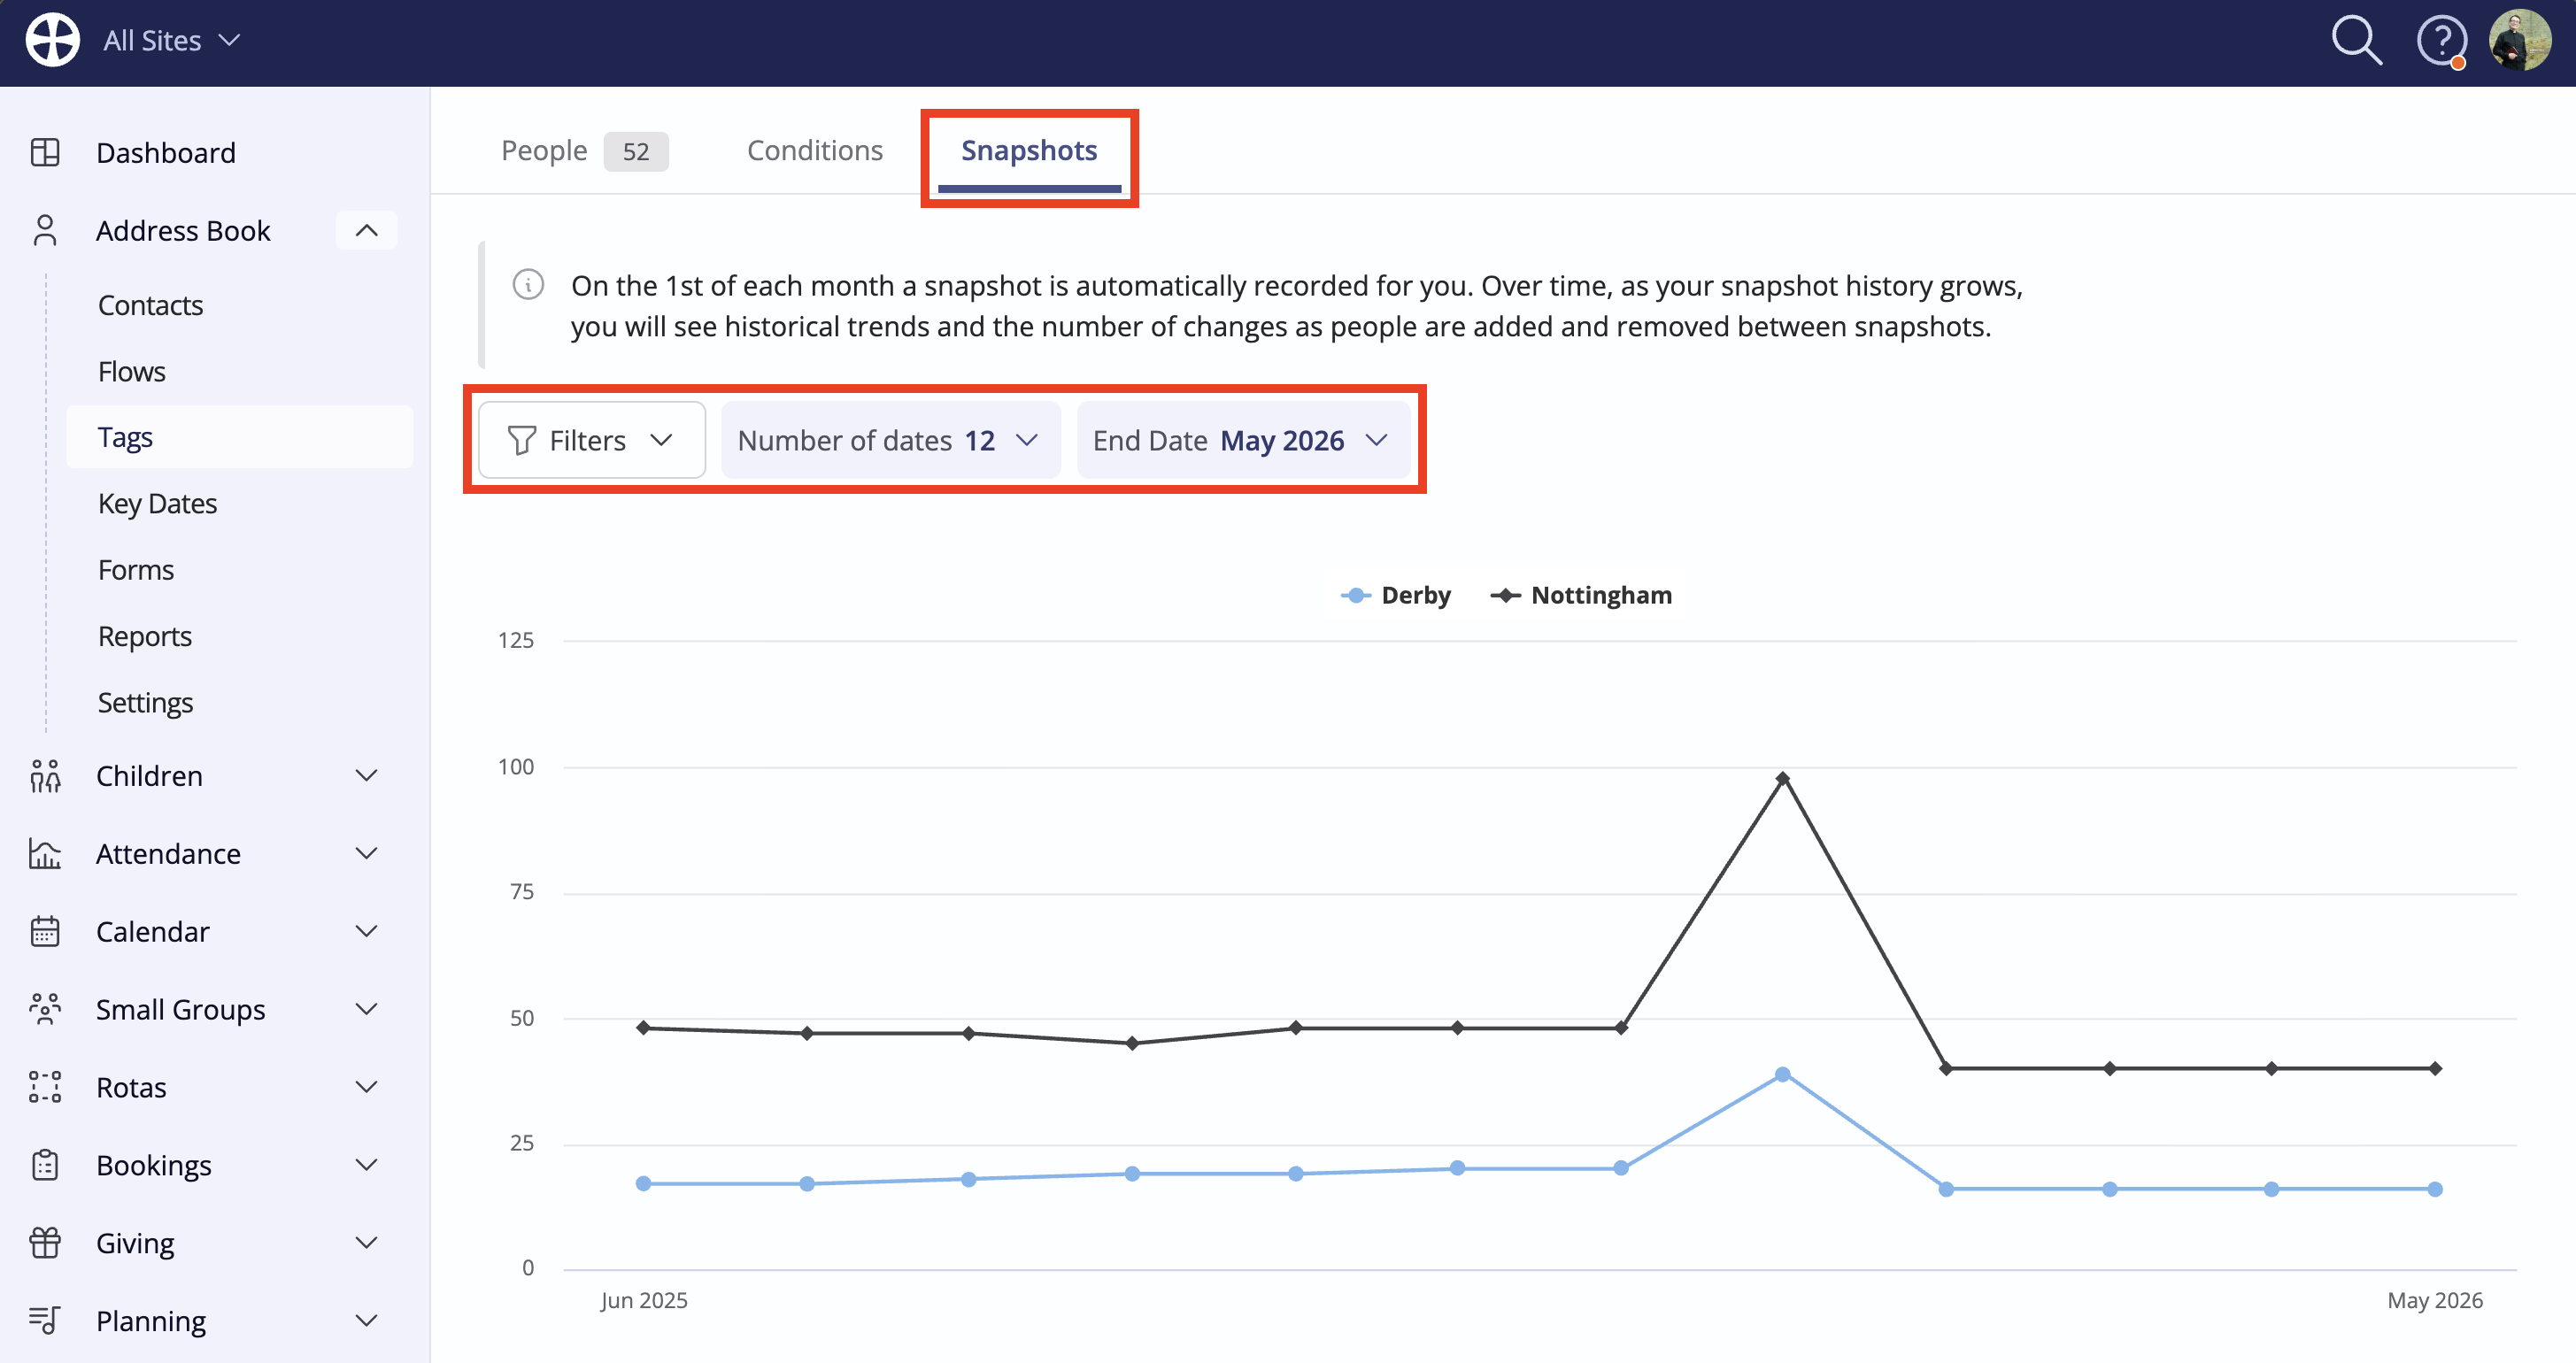
In the Snapshots tab, note that you can view a graphical representation of the changes over time of the tag membership. On the 1st of each month, a snapshot is automatically recorded for you, recording how many people were in the tag, allowing you to see trends over time. You can filter the results by the number of Dates and the Ending month/year. Multi-site customers can also filter by Site:
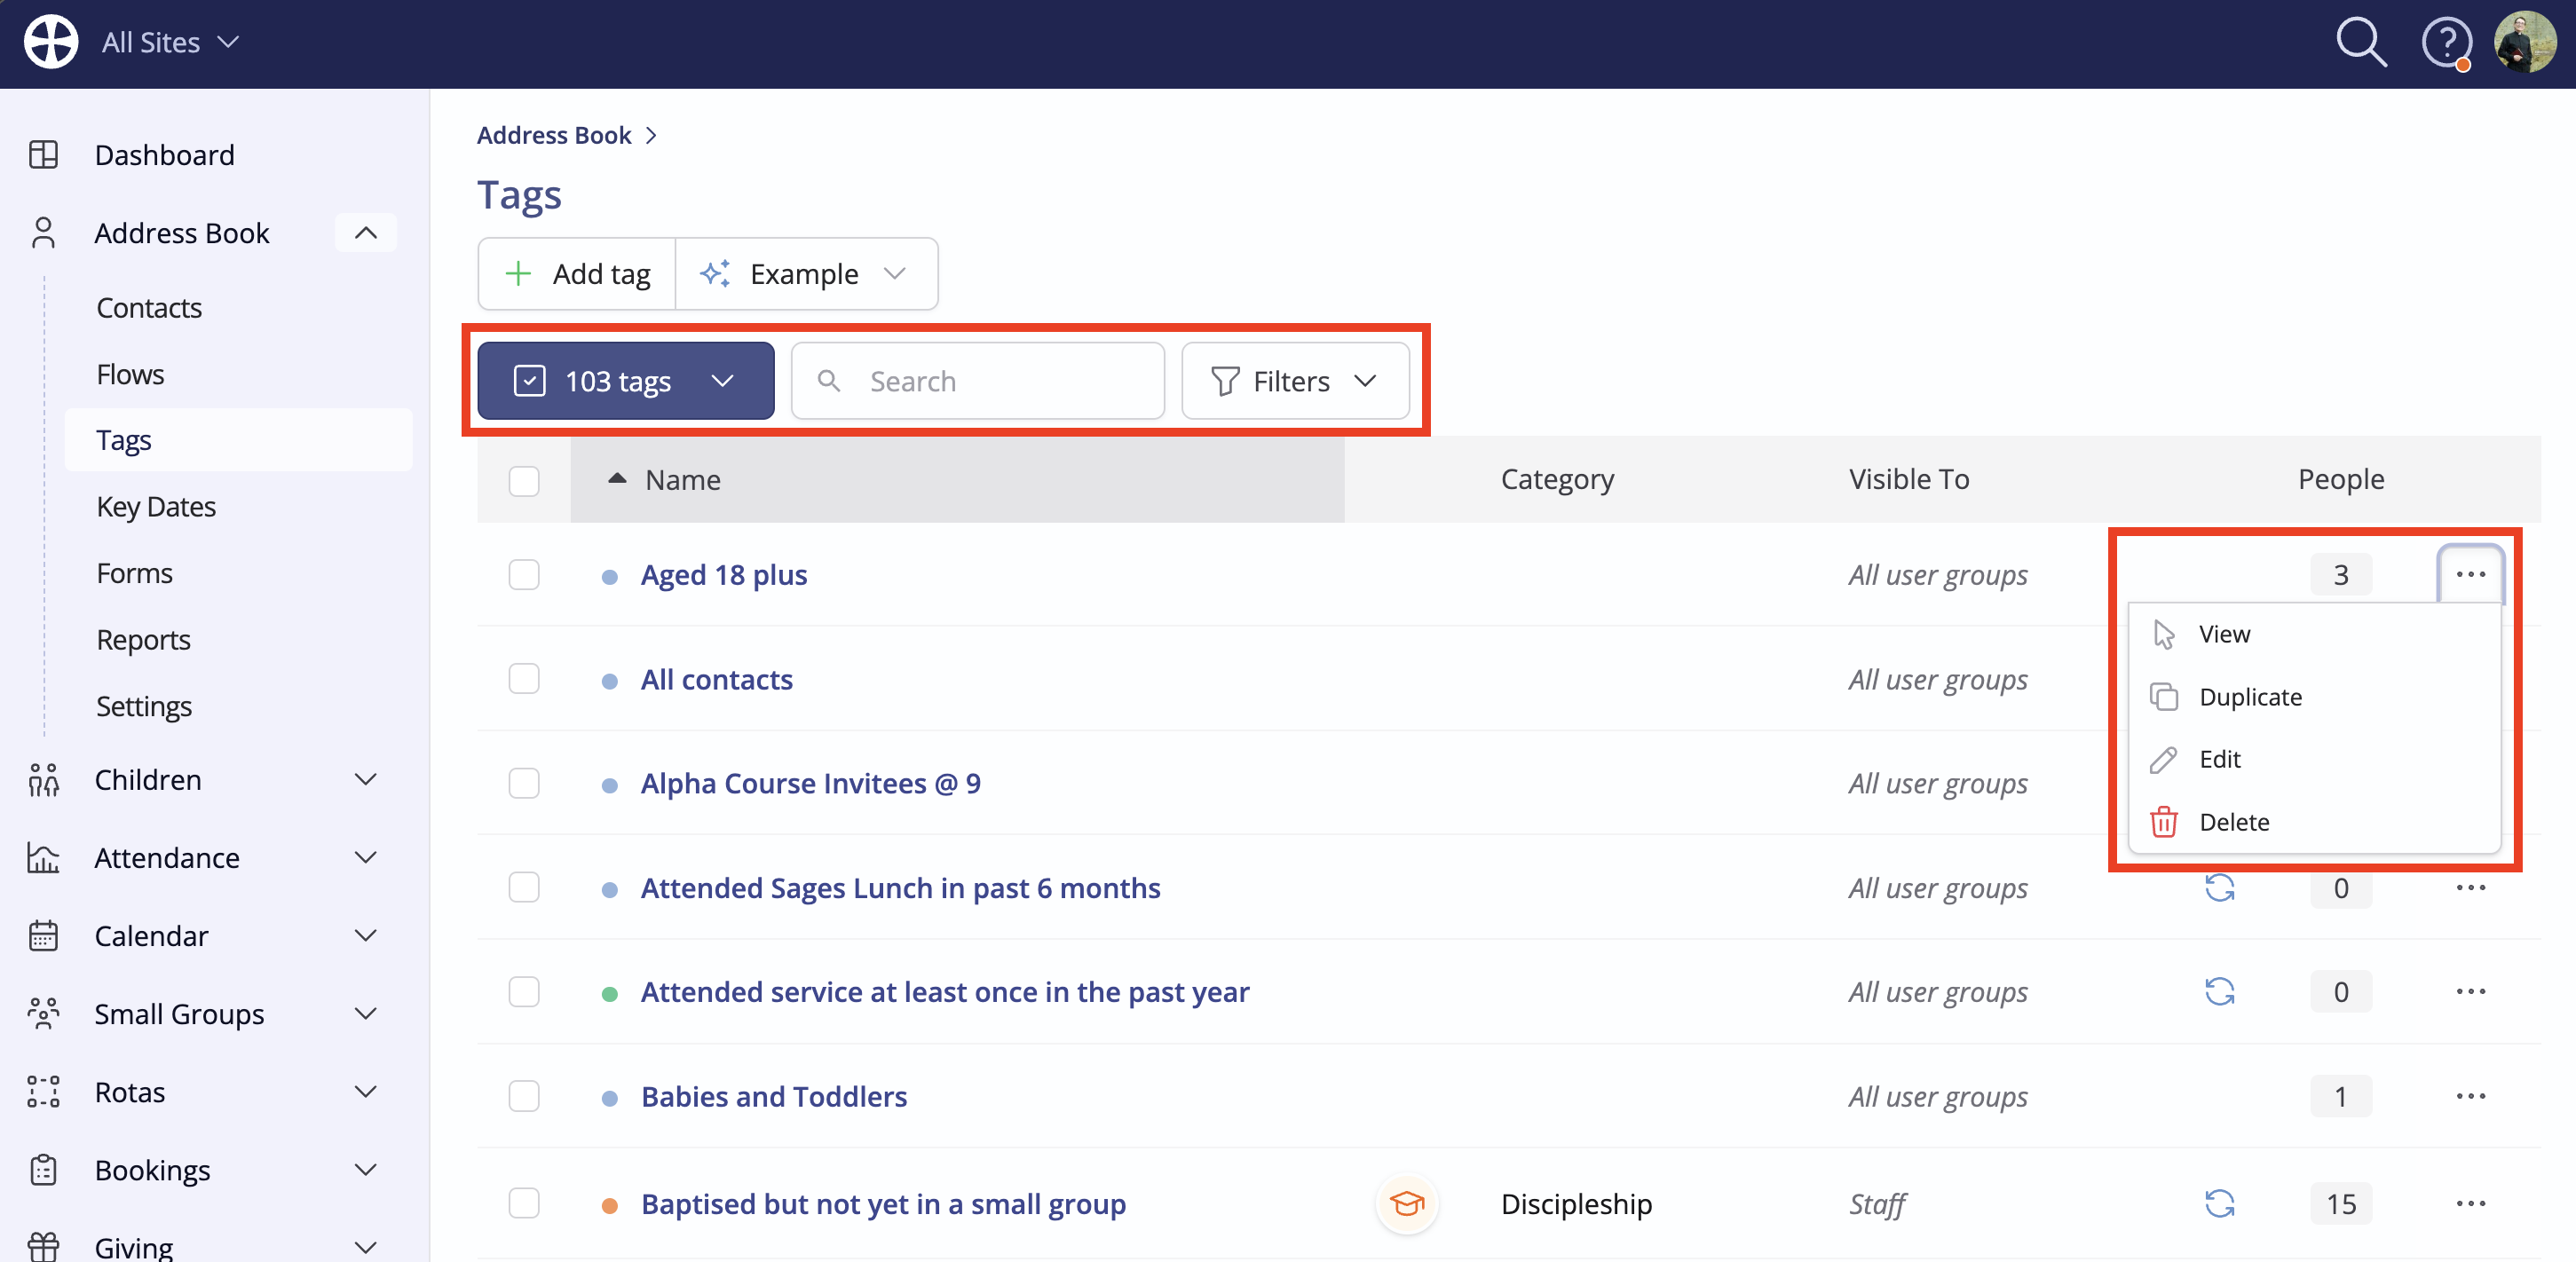
Back in the Tags section of the module, you can Search to locate a particular tag within a long list - the list filters as you type. From the tag Actions, you can View, Duplicate, Edit or Delete a tag. Bulk actions are also provided to Edit or Delete multiple selected tags.
As you can see, Smart Tags are incredibly powerful and versatile. They enable you to drill down and identify those whose data matches even the most elaborate list of conditions. Smart Tags (and Fixed Tags) are ideal for targeted communications and report filtering.
Multi-site customers
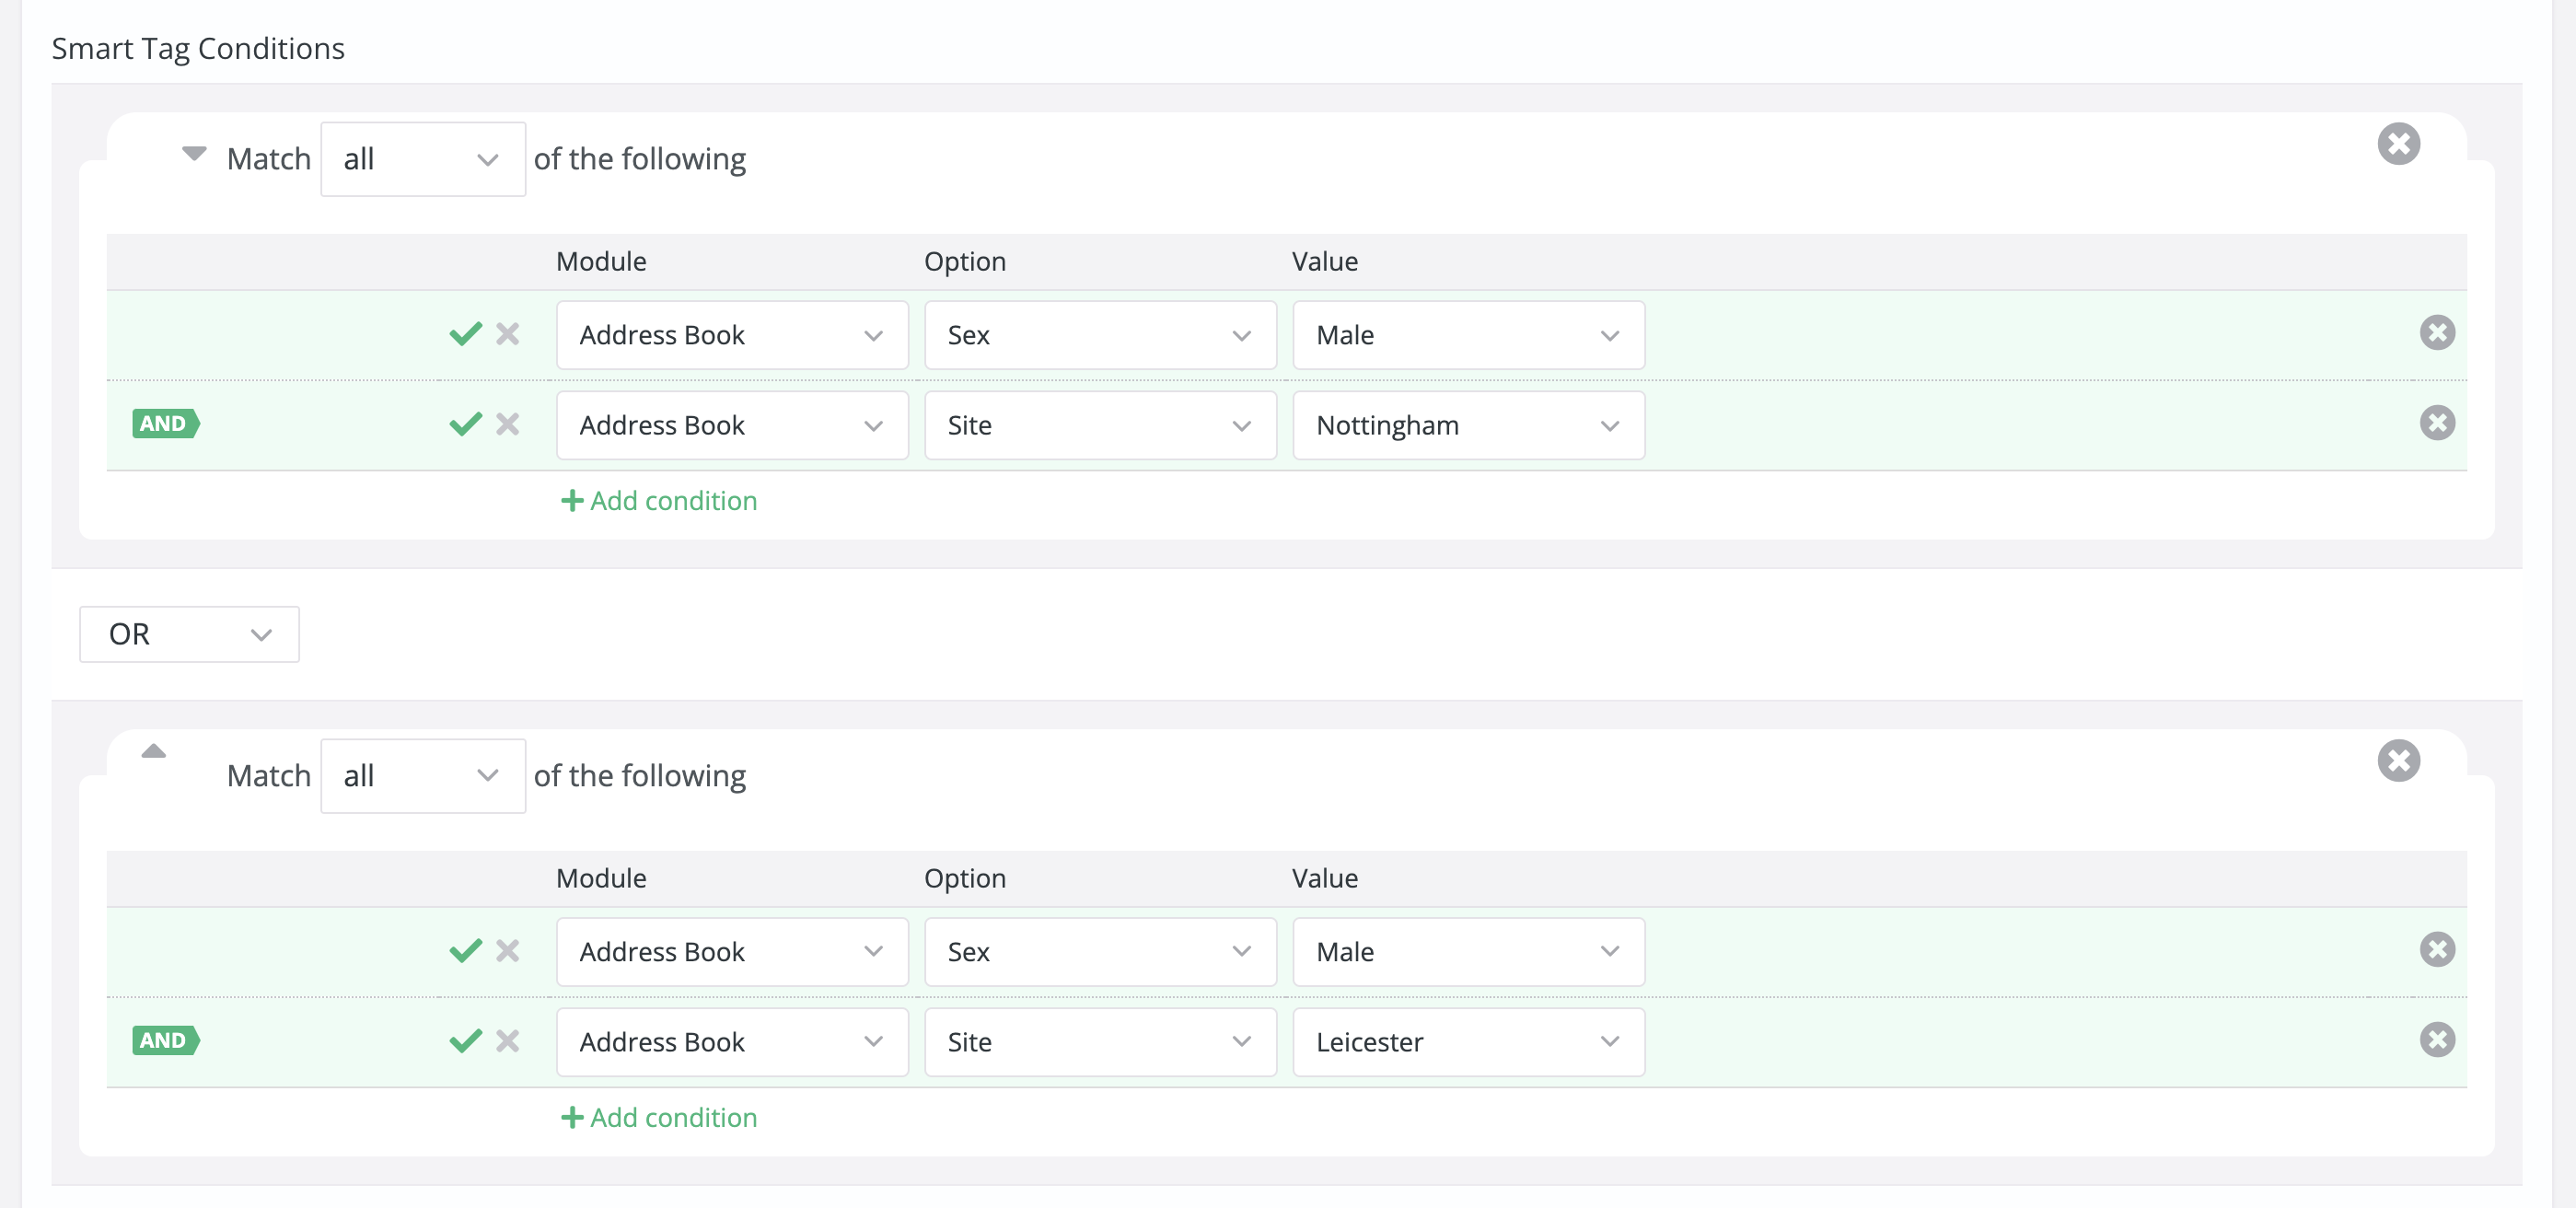
For multi-site customers, a Site condition is available. Smart tags with site conditions are not visible unless the User has site permissions for at least one of the sites referenced in the tag conditions and is viewing as All Sites or My Sites. For example, this tag has conditions to match people from the Nottingham and Leicester sites who are male.
This tag cannot be used if the User is viewing as Leicester Site only because the tag will be unable to return Nottingham Site people in the results. The tag will be hidden when the User is viewing tags for a single site. As long as the User has site permissions for the Nottingham Site or Leicester Site, the tag will be visible to them when viewing All Sites or My Sites.
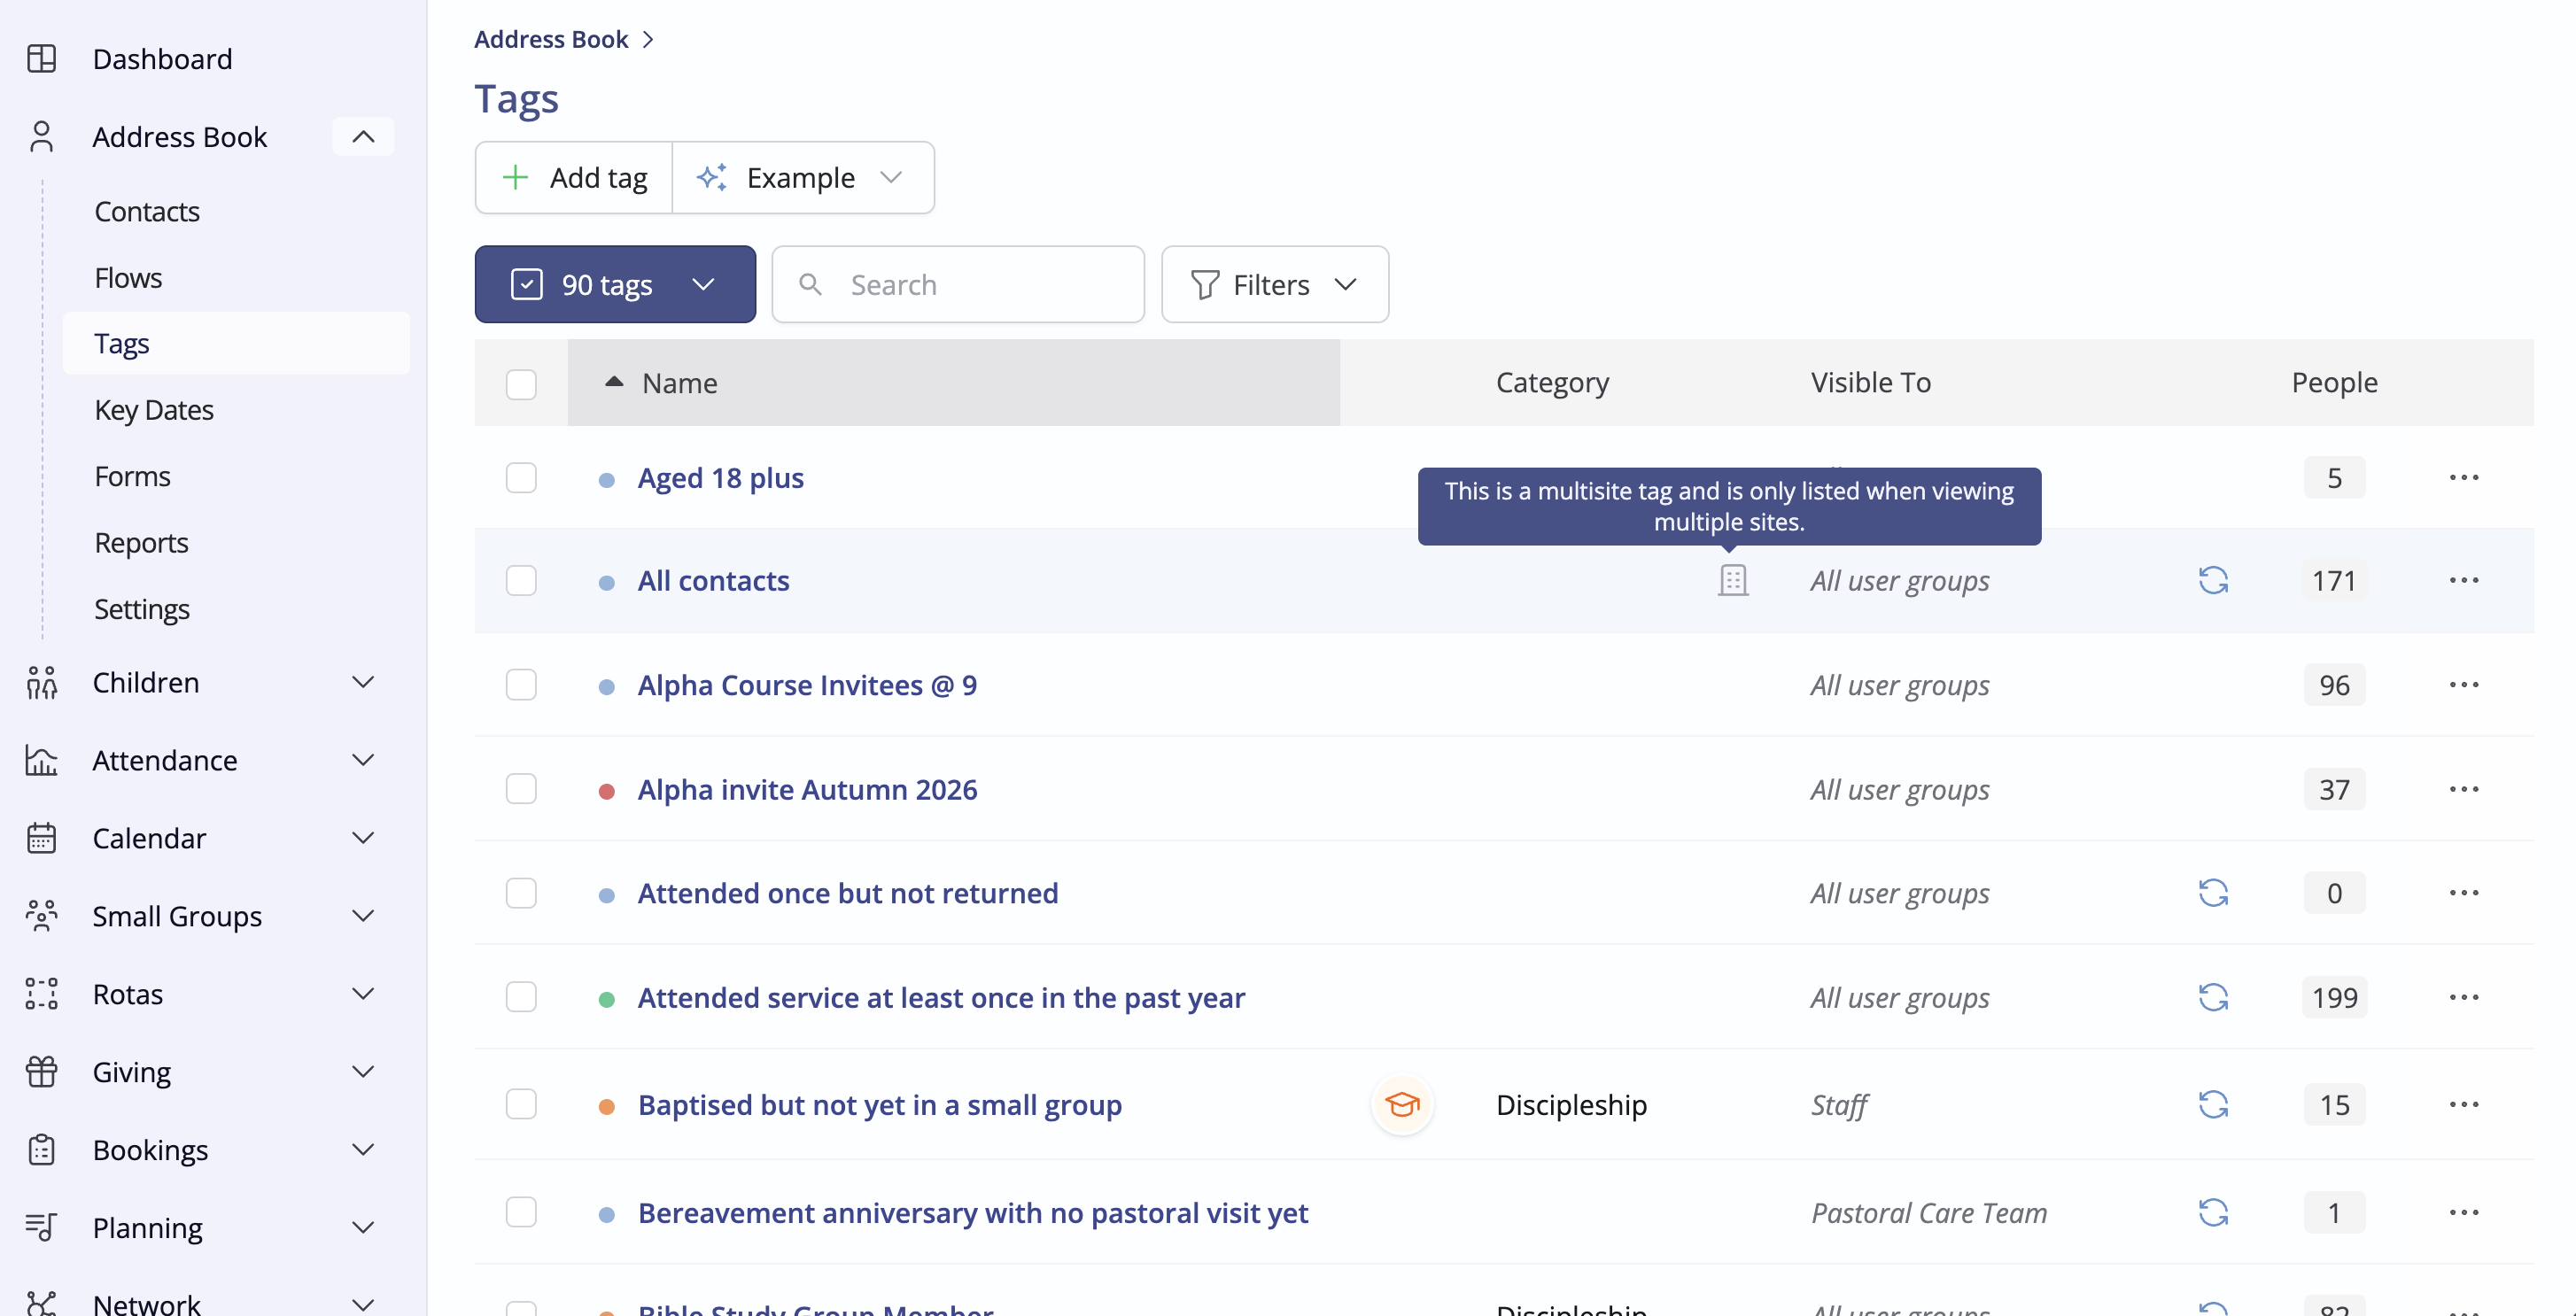
A Site icon in the Tags section of a module distinguishes multi-site tags.
Working with regular expressions
Regular Expressions (RegEx) are a form of SQL syntax that many programmers and developers will already be familiar with. In its simplest form, using simple syntax expressions, you can perform "wildcard" matches against the data in text fields in your data (including custom fields and postcode fields). We've provided four simple functions for text field Options - Is..., Contains..., Starts With... and Ends With... For each of these functions, you can enter a string value (not in quotes) that the tag condition matches.
Is... will match where the text in the field is the same as the specified value, whereas the other three conditions match less specifically. For example, for a Postcode condition, 'Is...NG7' will match any contact whose postcode is exactly 'NG7' but will not match a person whose postcode is 'NG7 6JE'; but a condition 'Starts With...NG7' returns that person in the match.
We've also provided a fifth function, Regular Expressions, for more advanced users. The Regular Expression syntax should be added as plain text and not enclosed in quotes.
For those unfamiliar with Regular Expressions, the ChurchSuite team is happy to offer guidance on the correct syntax required to match a particular search you are trying to achieve. Consider the following Regular Expression examples:
- ^B[1-9]{1}[[:space:]] will match any postcode that starts with the letter B, followed by a single digit 0-9 and then the space character - for example, B1 1AA, B3 7BB and B9 9GG would all be matched but B12 1BB would not.
- ^B1[2-4]{1}[[:space:]] will match any postcode that starts with B1, followed by a single digit 2-4 and then the space character - for example, B12, B13 or B14.
- ^B[0-9]{1,2} will match any postcode that starts with the letter B, followed by either 1 or 2 digits in the 0-9 range - for example, any postcode B1-B99.
Top Tip! Postcodes within a radius
A great use for Regular Expressions is when identifying contacts that match a full postcode within a certain radius of a central point on a map. This is achievable but requires a little more work to construct the Tag. Here's how...
Begin by using a tool like this one here, which enables you to define a central postcode point on a map and specify a radius around that point. The tool then builds a list of all matching full postcodes within that radius. Within the tool, copy and paste the comma-separated list of matching postcodes into a text editor like Microsoft Word. Using Word's "Find and Replace" feature, find and replace all commas with the "|" (pipe) character.
Next, back in ChurchSuite, click to add a new Smart Tag with a condition set as follows: -
- Module: Address Book
- Option: Postcode
- Value: Regular Expression
In the Regular Expression text box, type the word "In", followed by a space, and then copy and paste the pipe-separated list of postcodes from your text editor.

Save the Tag, and voila! - a Smart Tag that matches all contacts in your database who live within the specified radius of your specified central point using exact postcode matching.
Further third-party tools can even help you create a list of all full postcodes within a parish boundary, which can then be used to construct a smart tag of those who reside within (or outside of) the parish.