Flows
In this article
What are Flows?
Adding a Flow
Adding stages and actions
Adding and removing people from a Flow
Processing people through Flows
Bulk processing multiple people through Flows
Flow automation
Flow tracking
Archiving and deleting Flows
What are Flows?
Flows are a powerful and incredibly versatile tool designed to streamline repetitive "people-processing" tasks by breaking them down into manageable Stages. For each stage, you define the choice of preset Actions to be processed as each person becomes due. Flow stage actions can be processed manually, by a module User, or you can set them to run automatically. Helpfully, designated Managers receive timely reminder emails of Flow progress and notifications when people are due or overdue in a Flow. Flows are the perfect alternative to unwieldy spreadsheets, ensuring no one falls through the cracks of an admin process in a busy office.
Flows are a feature of all the 'people' modules - Address Book (contacts), Children (children and young people), Giving (givers) and Bookings (customers). Flows can be module-specific or set to exist across multiple modules. For example, the same "Safeguarding Checks" Flow can be shared across the Address Book and Children modules. When viewed from within the Address Book, module users can process contacts. However, when the same Flow is viewed from within the Children module, module users will see children and young people displayed. Note that some actions, like adding key dates, are not supported by all modules.
For multi-site customers, Flows exist across all sites, with the site being viewed by the User determining the people shown in the Flow. For example, a user viewing a Flow as Site A will only see people belonging to Site A. However, when viewing as 'All Sites', the User will see all people from all sites for that module.
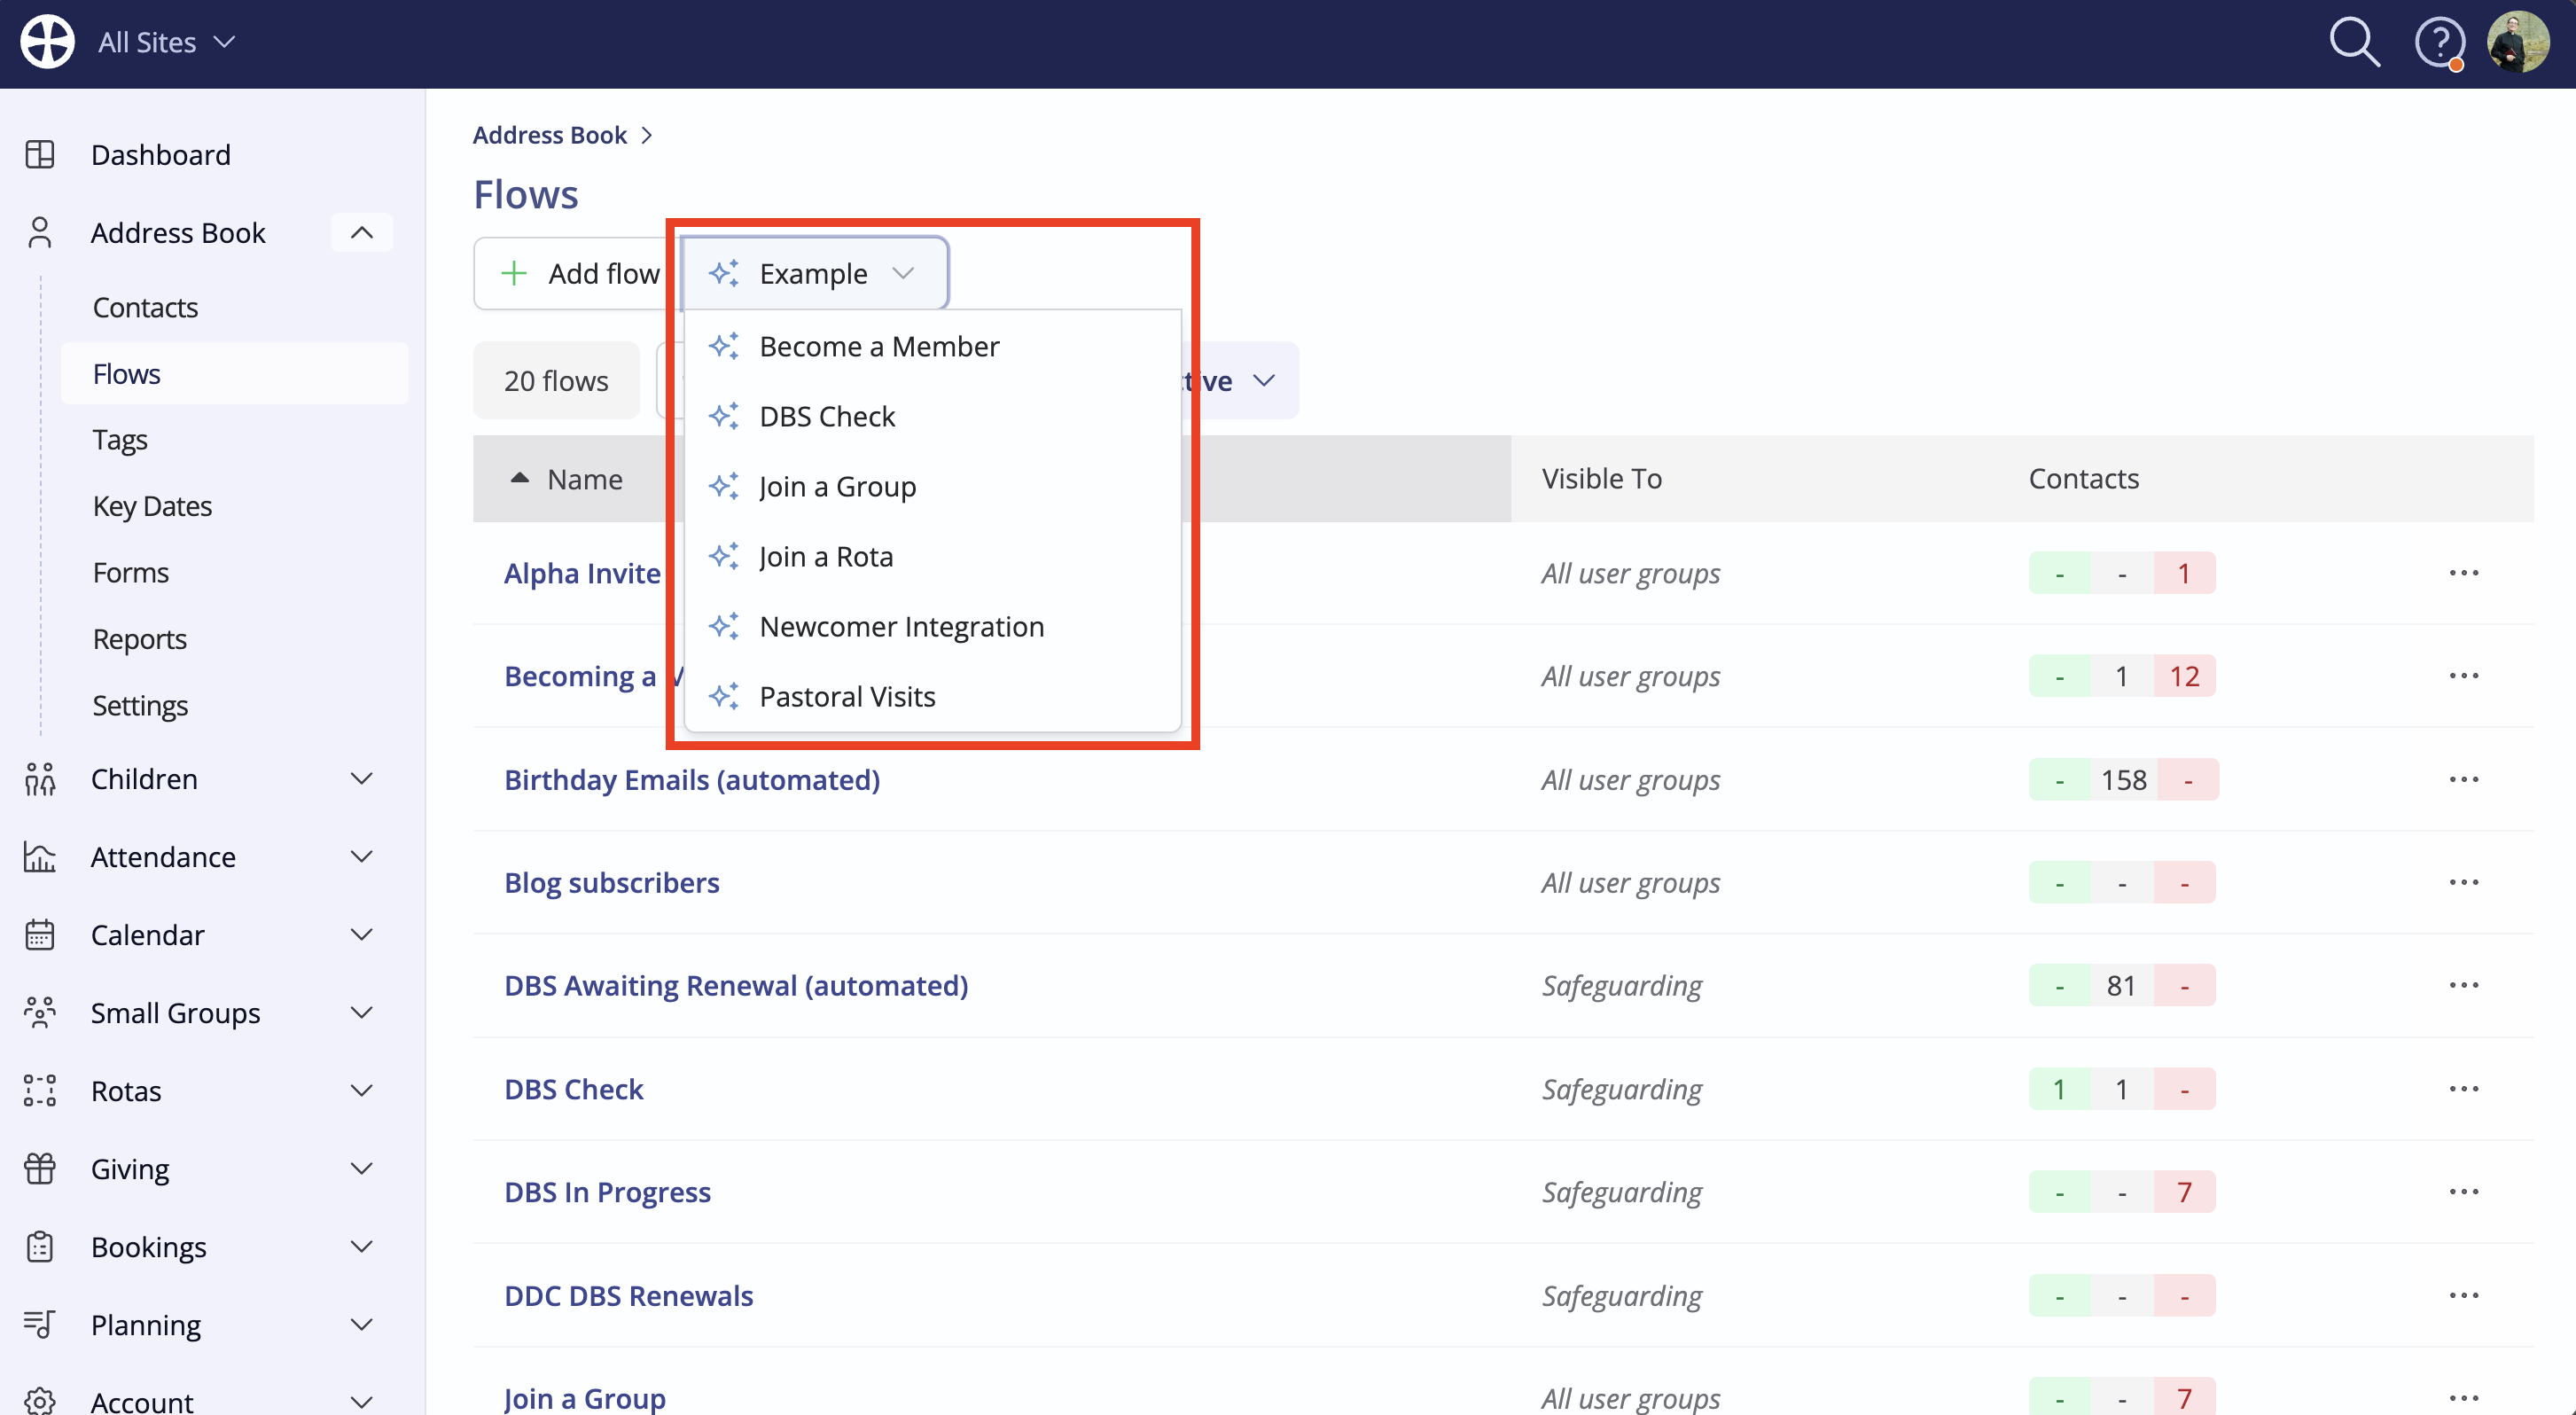
To help you get started, we provide a selection of Example Flows that you can install or read on to create your own.
In the remainder of this article, we will work within the Address Book, but the same principles apply to creating and managing Flows in the Children, Giving and Bookings modules.
Adding a Flow
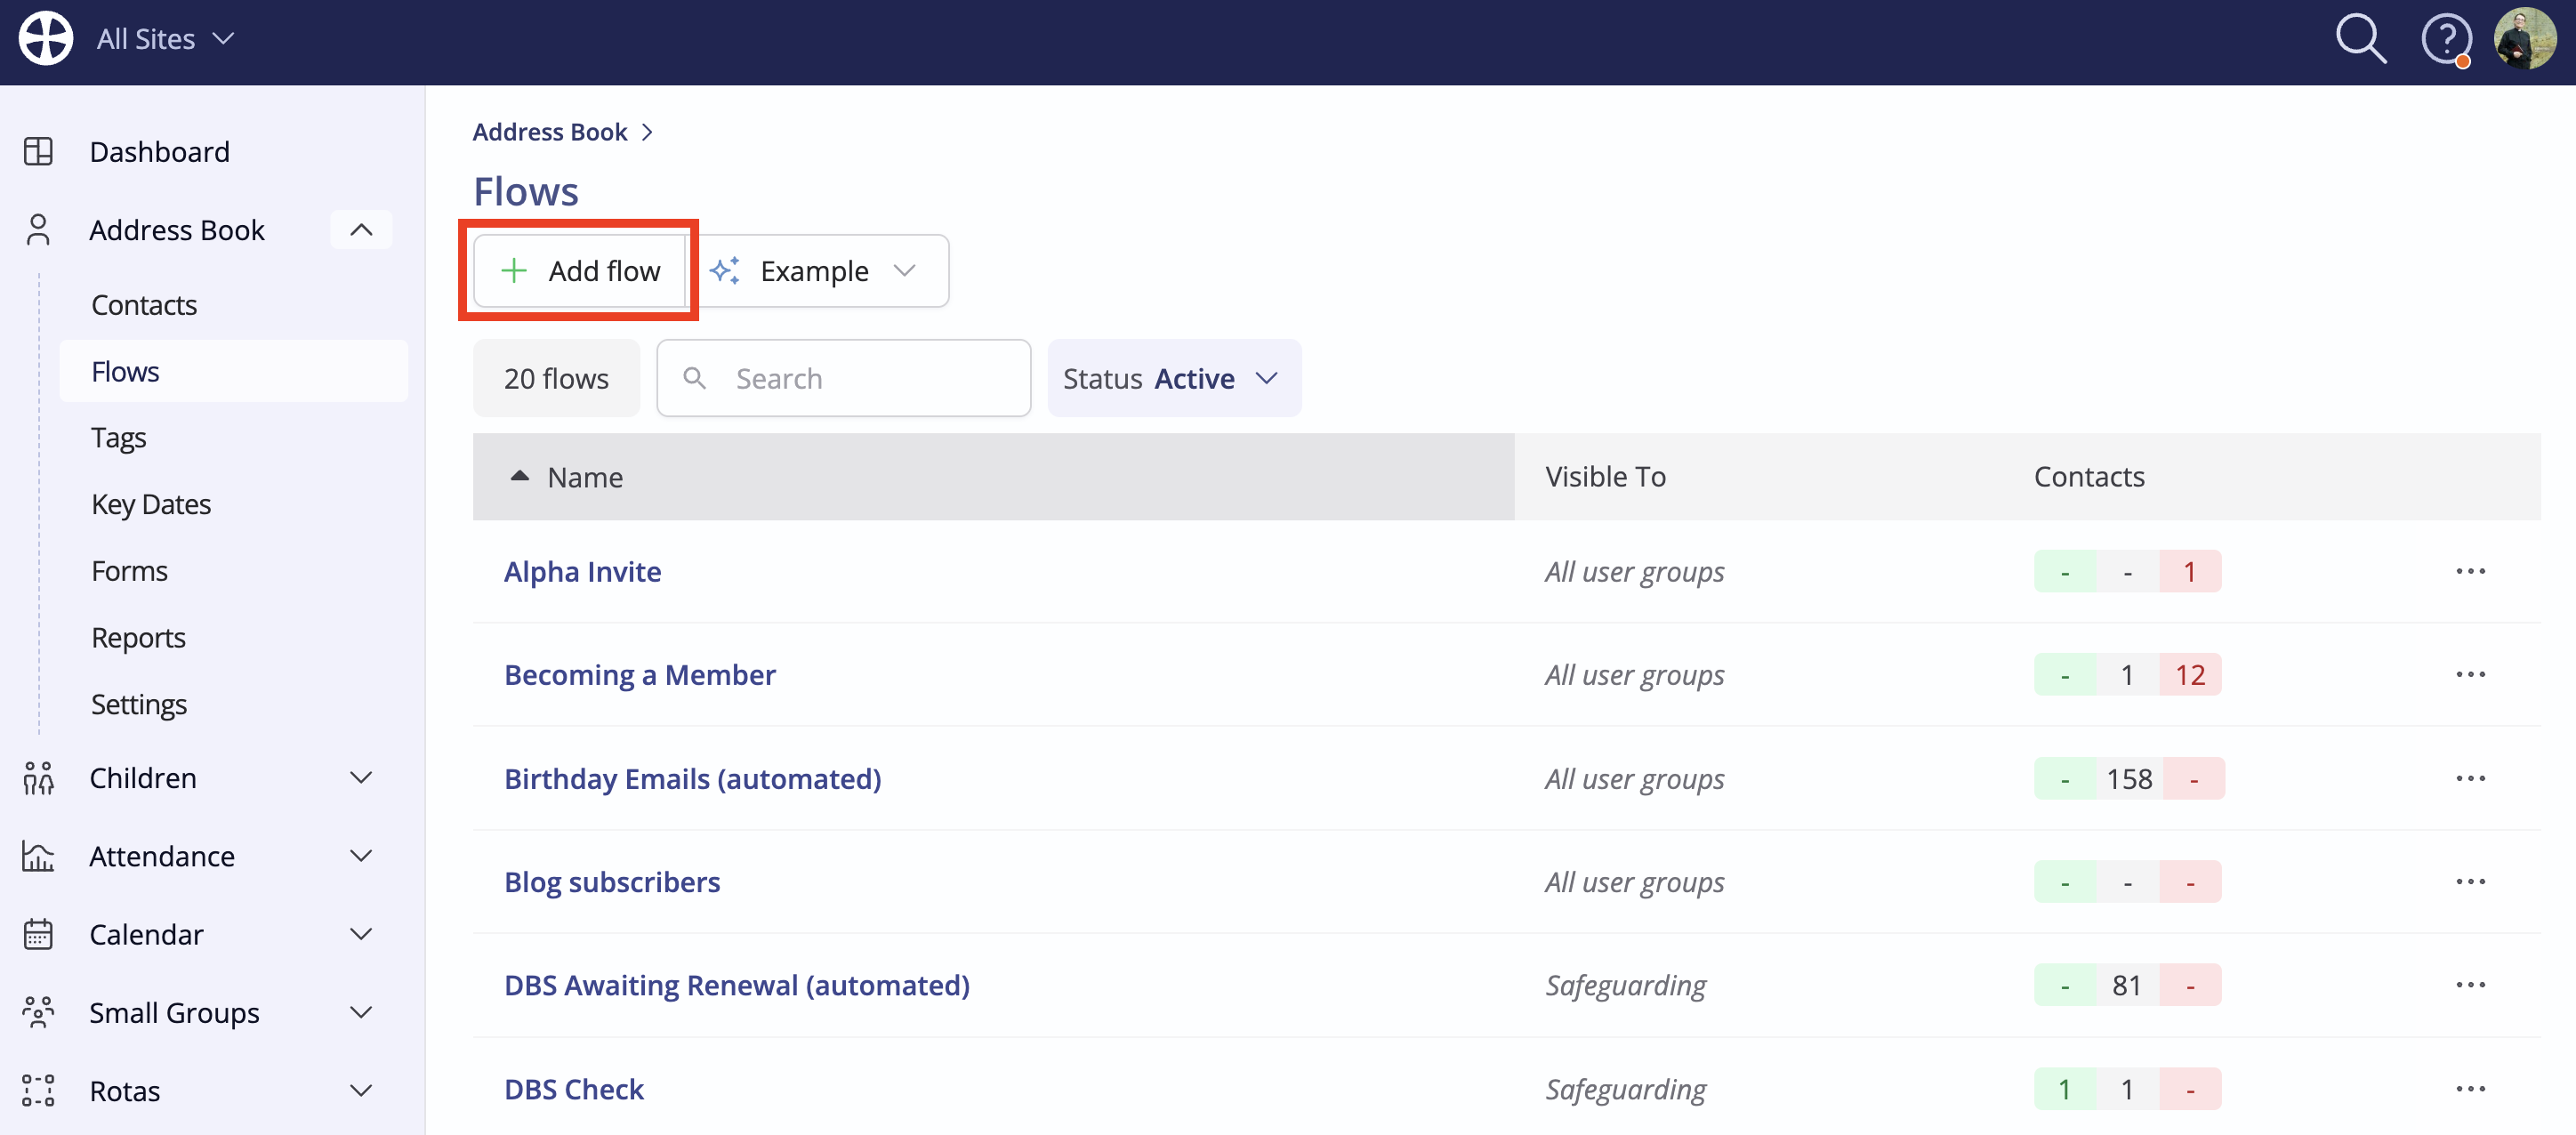
Navigate to the Flows section of the appropriate module and click Add flow.
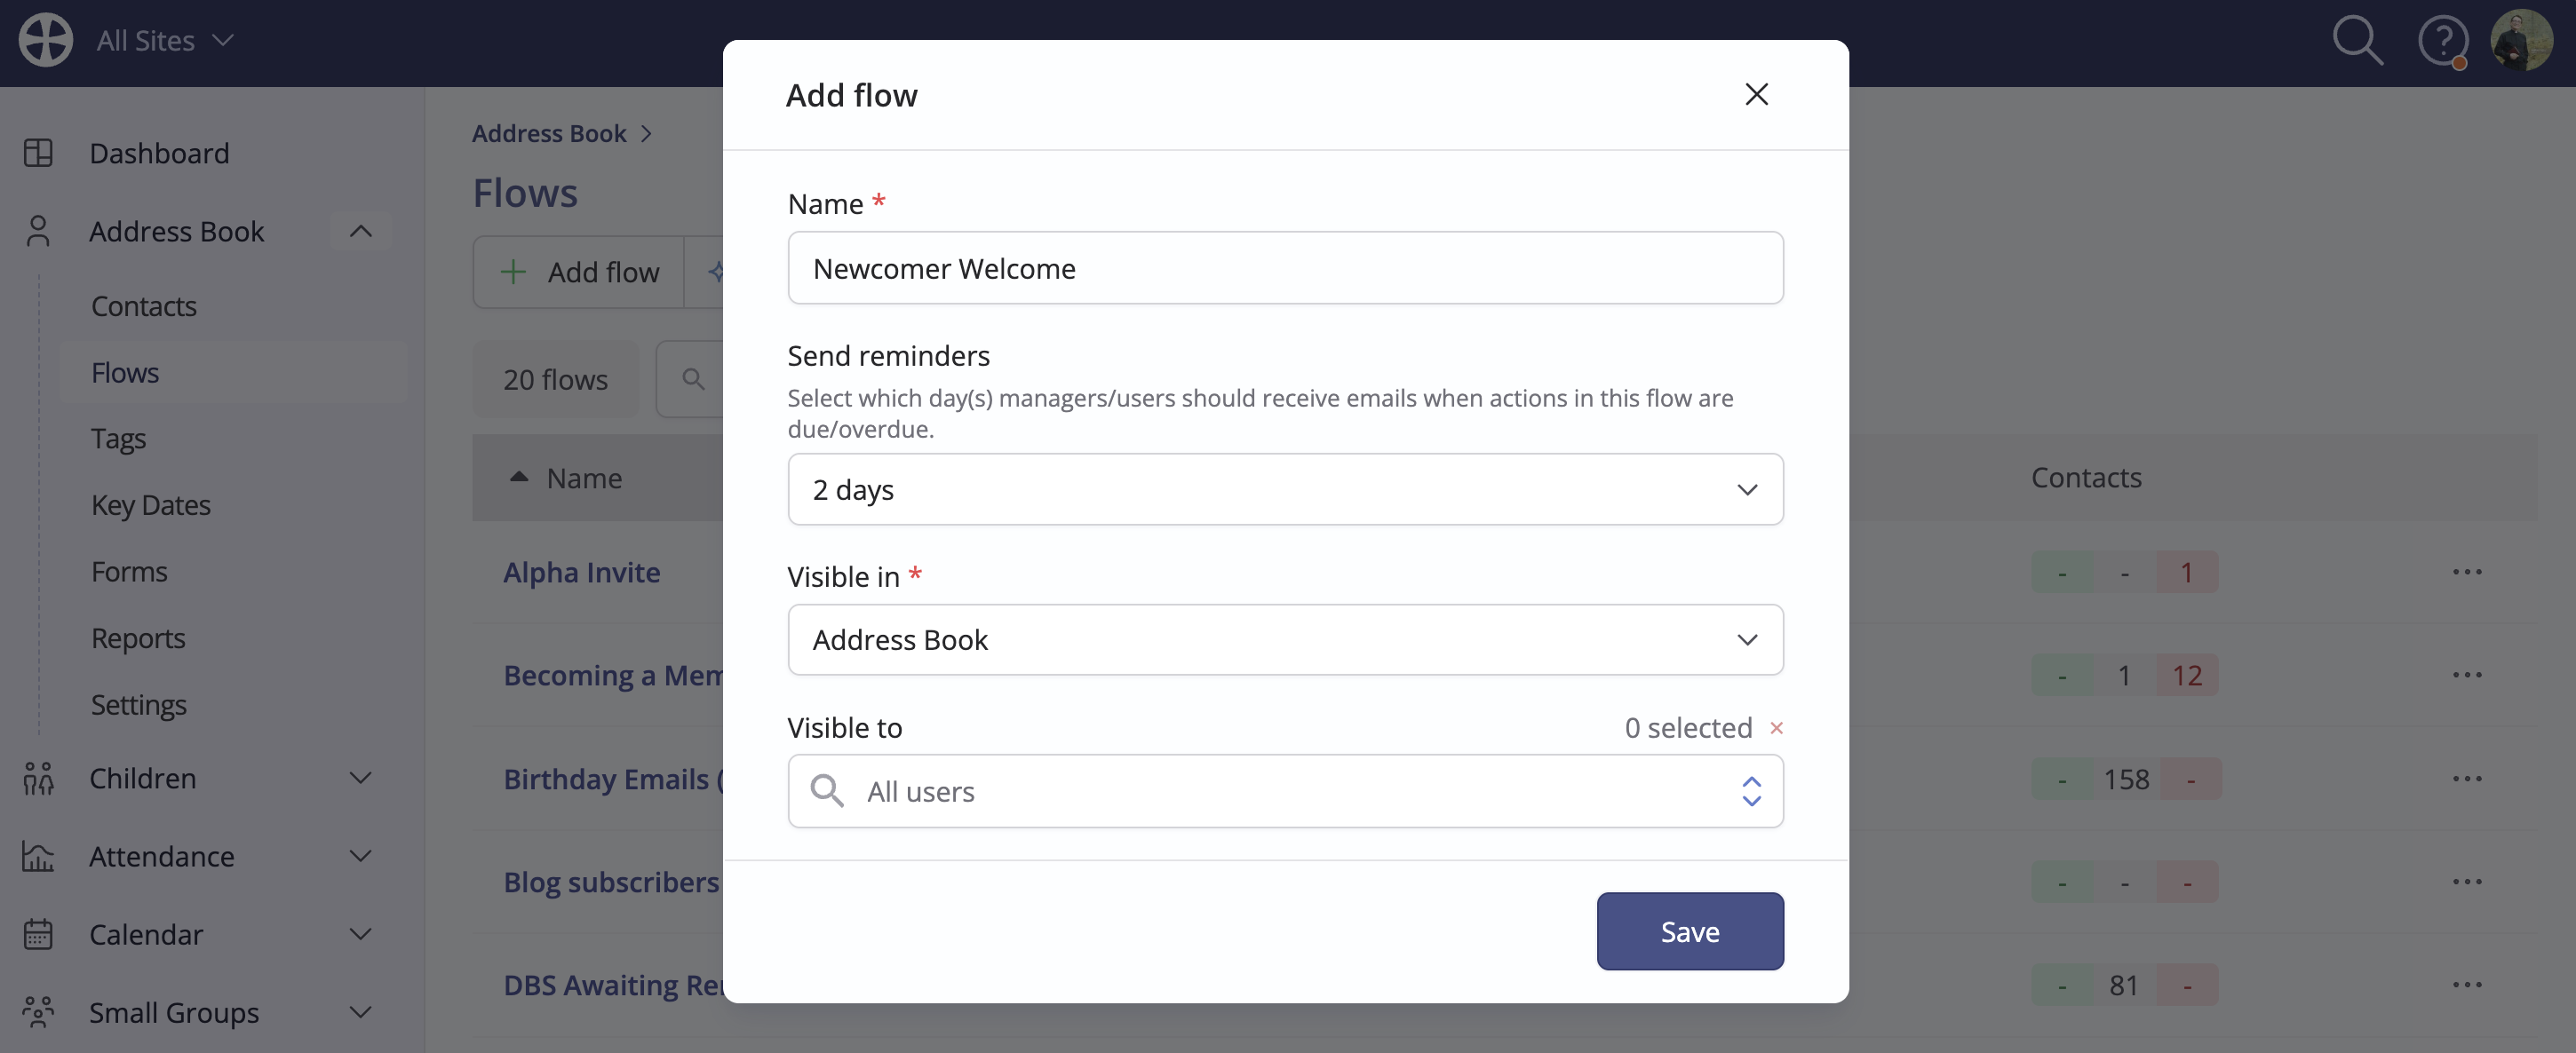
On the Add flow pop-up, give the Flow a suitable Name. The Send reminders setting allows you to choose which days of the week Managers and Assigned users receive flow reminder notifications, such as setting them to send on preferred working days or excluding weekends. Next, set the modules in which the flow is to be set Visible in. Note that Managers are module-specific, meaning you can assign different managers in each module where the flow is visible. Finally, use the Visible to setting to optionally restrict flow visibility to just yourself or selected user groups - see our related support article for further information about restricting the visibility of certain features. Click to Save the flow.
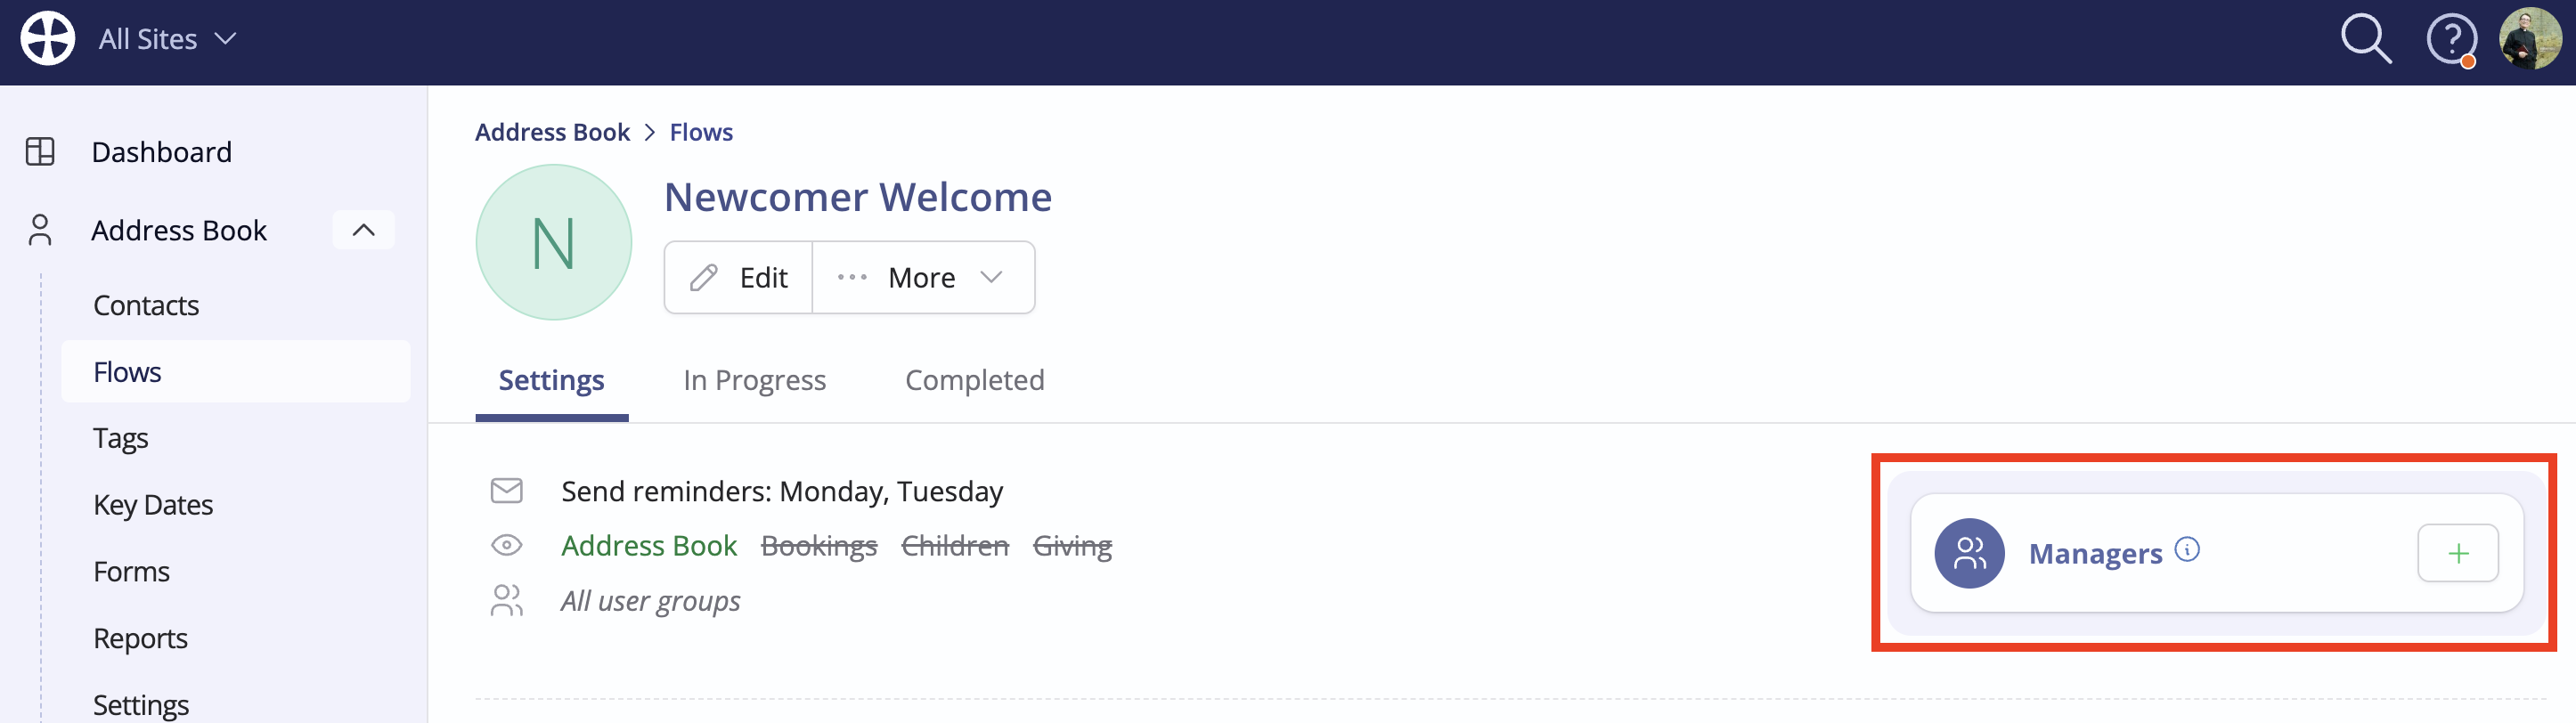
You are now taken to the new flow View, click into the Settings tab to view a summary of what you've created. Note the option to Add manager. Designated Managers will receive timely reminder notifications when people become due in the flow. Reminders are sent on the first Send reminder day after a person becomes due, at approximately 6:30 am local time. Multiple managers can be assigned.
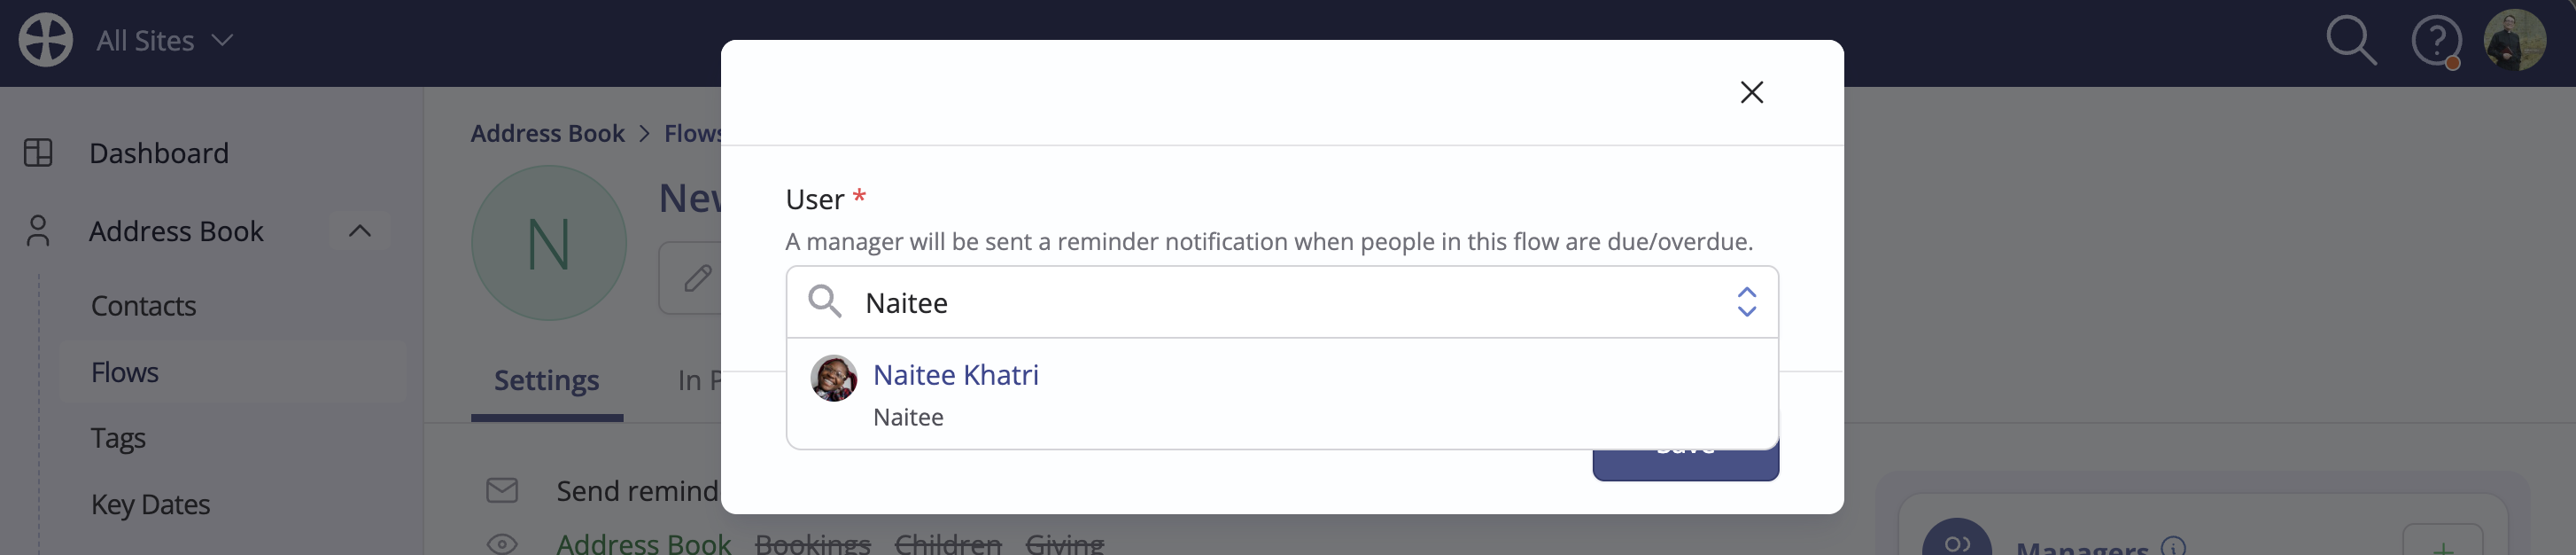
On the Add manager pop-up, search for and select the User responsible for overseeing the flow. The manager must have at least Use permissions for the module where the flow is visible.
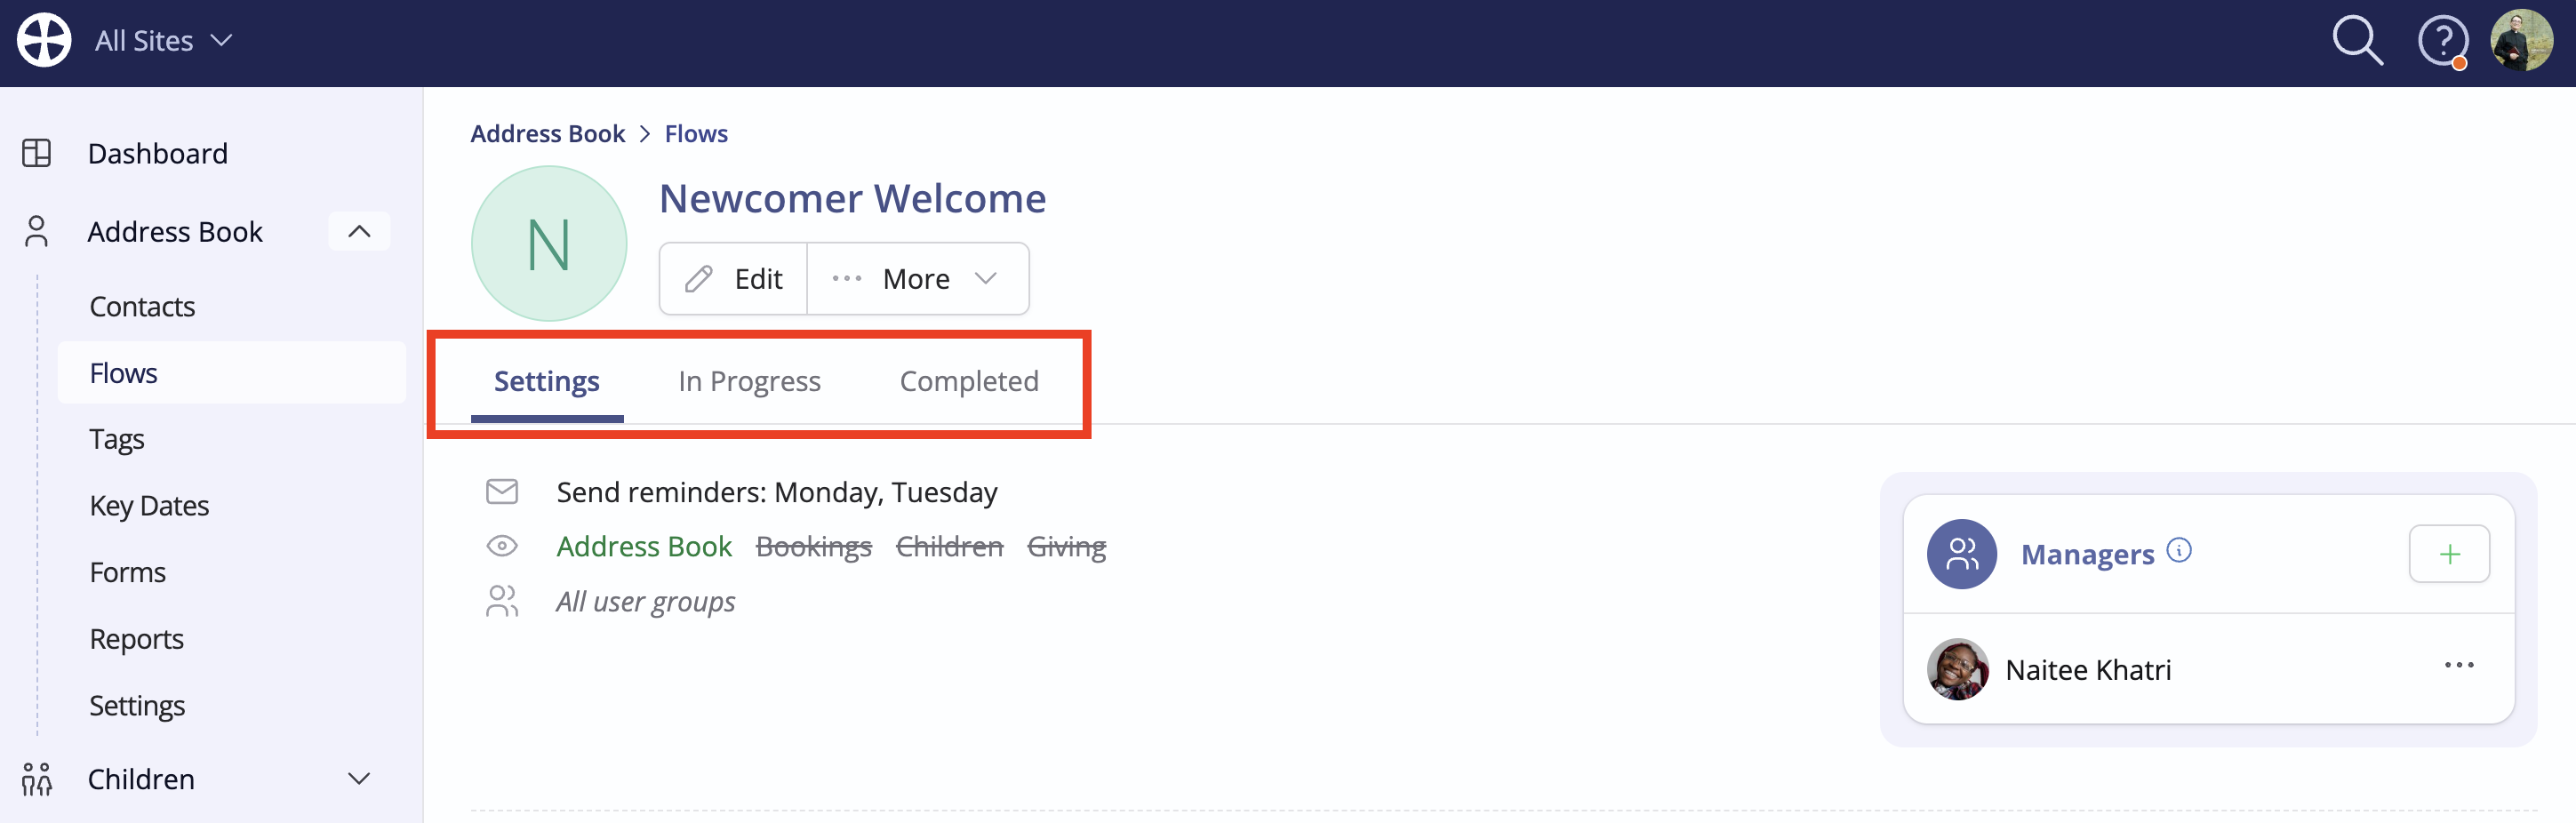
The flow View is divided into three tabs: In Progress, which displays the list of people in each stage - this will be explored later in this article; Completed, which lists all those who have been processed through the flow; and Settings, which opens by default when you first save a new flow. This is where the flow is set up, as explained in the next section.
Adding stages and actions
Introduction
Flows work by breaking down repetitive "people-processing" tasks into manageable Stages, within which preset Actions can be defined to be processed manually or automatically when people become due at each flow stage.
Building a great flow is the perfect opportunity to consider how the existing admin process runs. Before adding stages, it will be helpful to think of the flow process from beginning to end: what are the stages? What are the typical time intervals between each stage? What dependent actions typically happen at each stage of the process? Does a particular user process those actions when people become due, or could the actions for some stages be set to be processed automatically? Don't worry if you don't have all the answers - adding stages and actions will quickly bring clarity.
For example, consider an early-days newcomer welcome process. It might involve sending preset welcome information by email, followed by a welcoming telephone call, then a friendly SMS and finally, a further welcoming telephone call to check on progress. This process has four stages. For each stage, you'll add instructions and actions for Users to follow and process as the people in the flow become due. We encourage you to avoid the 'monster flow' that attempts to include too many stages in a single flow. You can minimise bottlenecks by breaking complex processes into multiple flows. While a person can only be in a flow once at any given time, they can be in multiple flows, allowing you to easily manage people's progress through multiple admin processes simultaneously.
It will be helpful to add the stages first and then add the stage-specific actions afterwards. The actions that you need to do at each stage may be relational - such as making a telephone call - and some actions will relate to the person's details in ChurchSuite, which you may wish to be processed automatically when they become due, without user intervention, or processed manually by a module User - such as adding a Key Date representing the date of a phone call, adding a Note against the person for any necessary follow-up or sending an email or SMS.
Adding stages
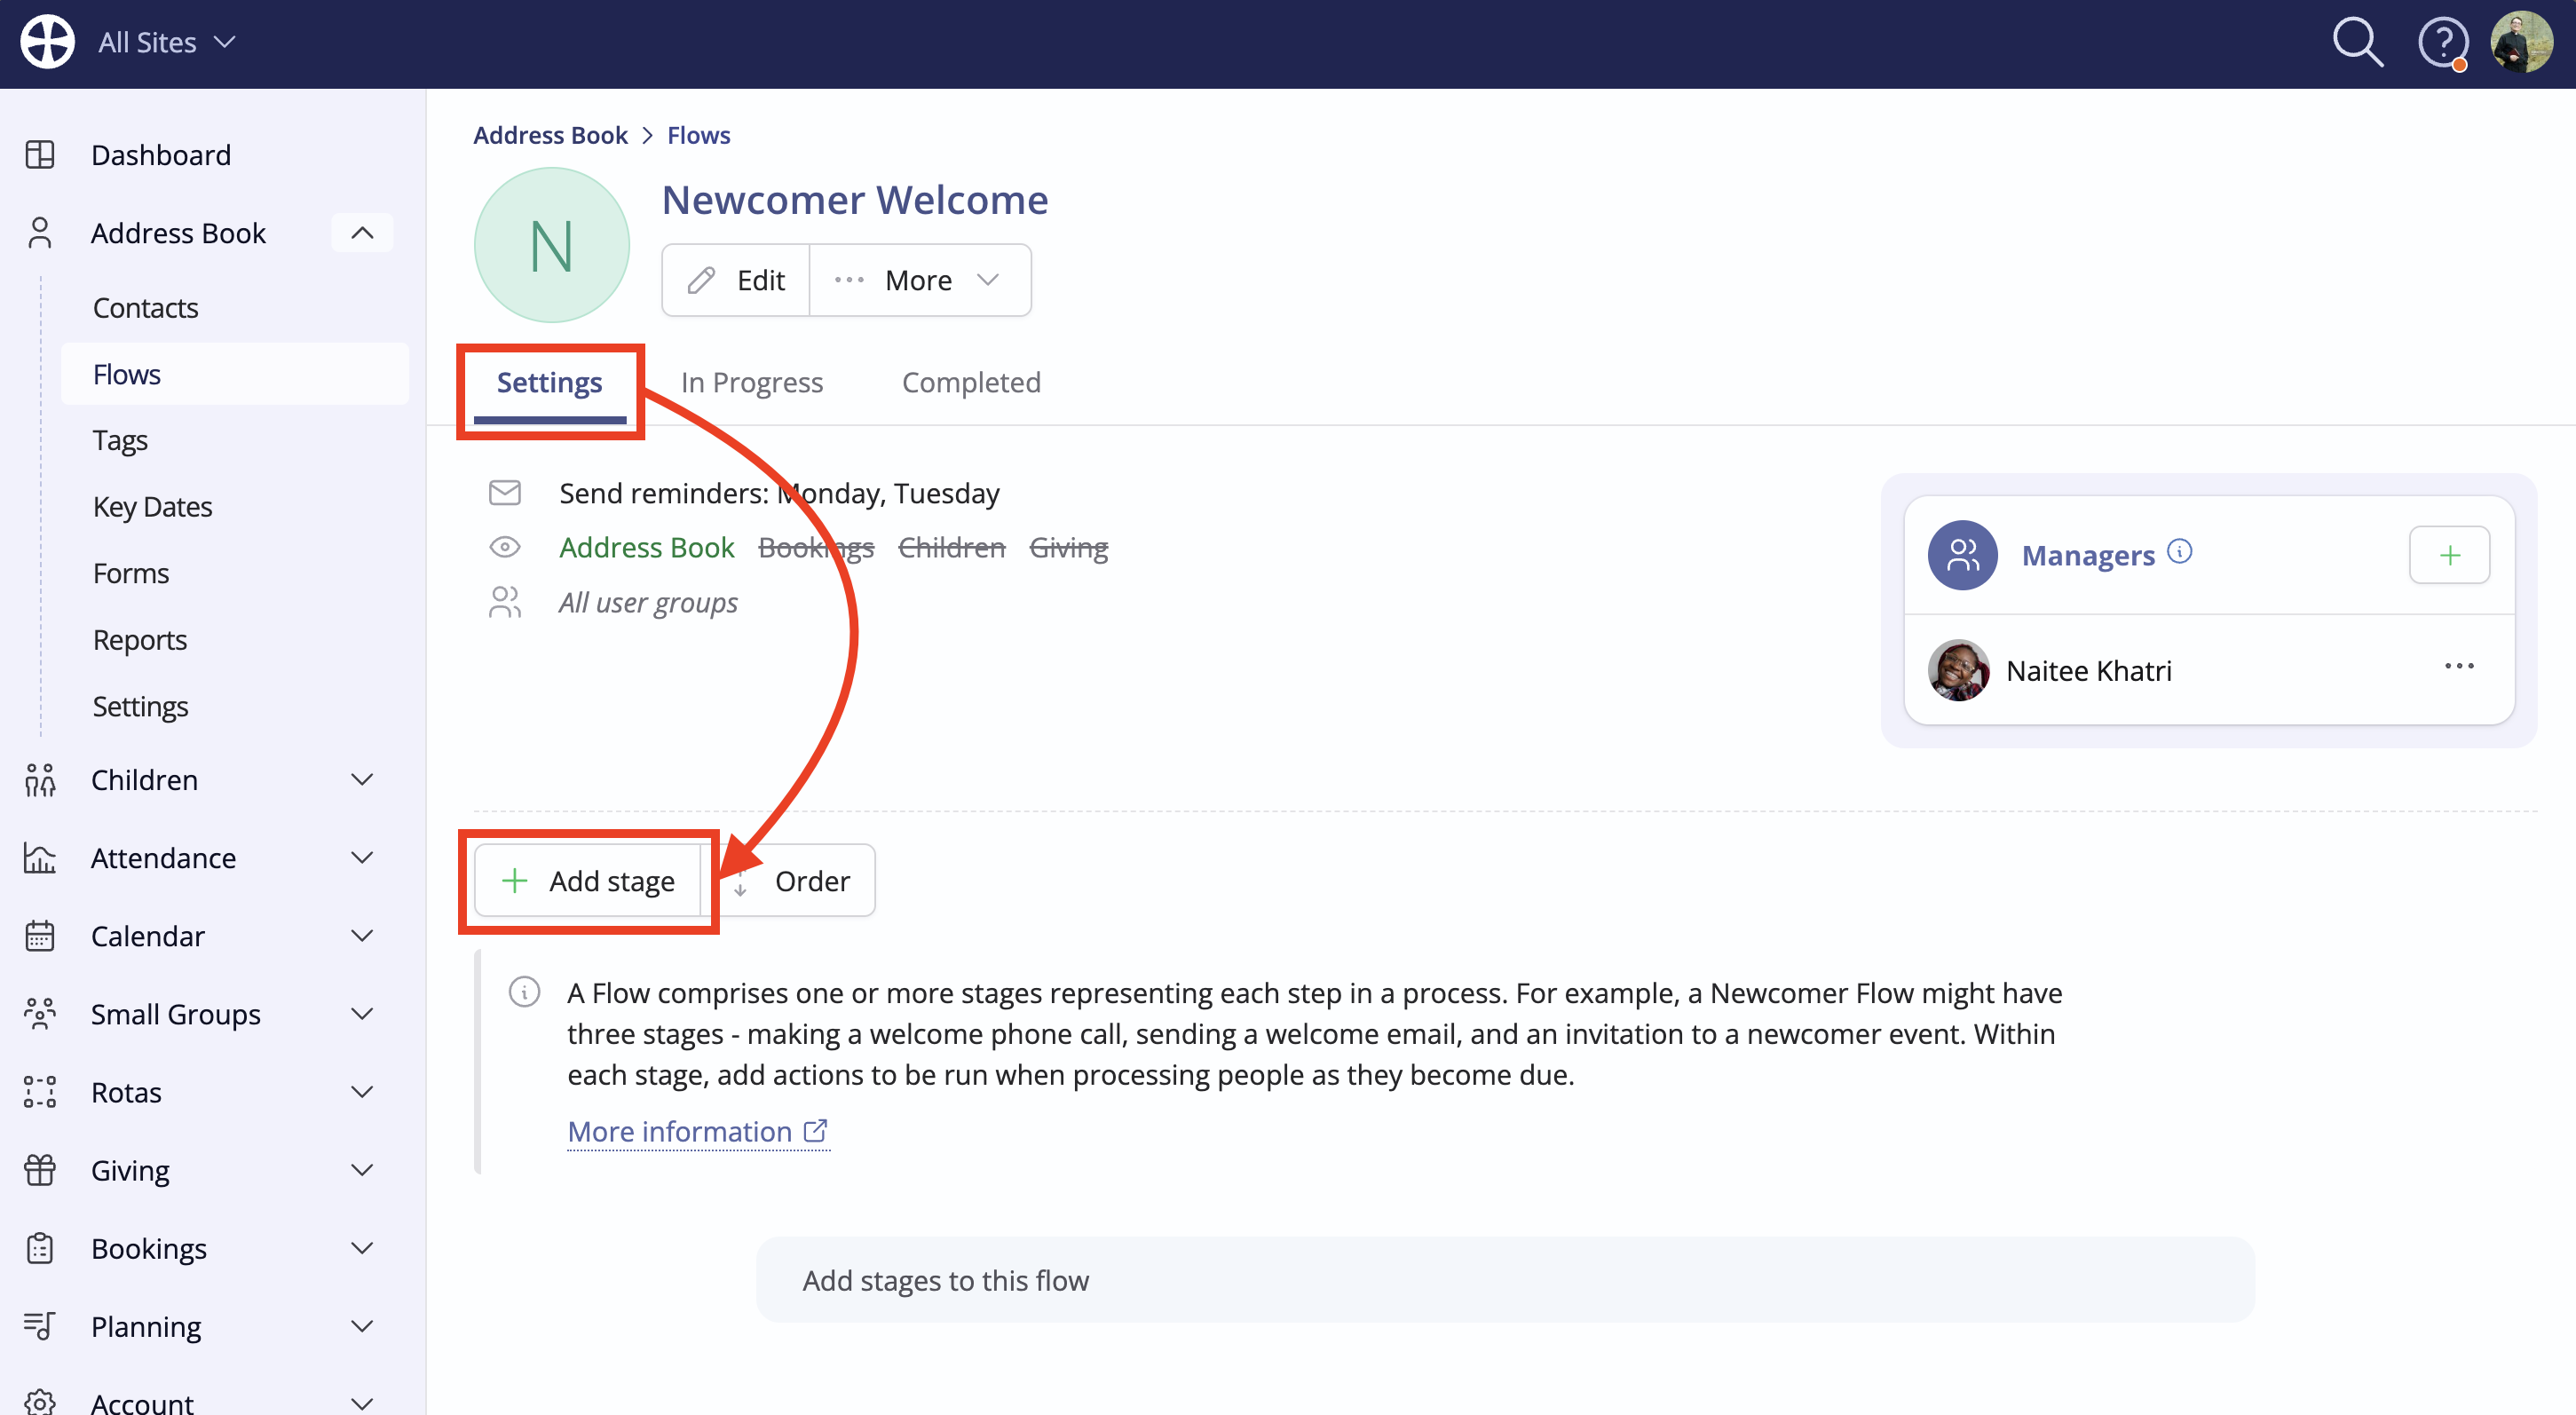
Let's begin by adding the first stage. Working on the Settings tab of the flow View, click Add stage.
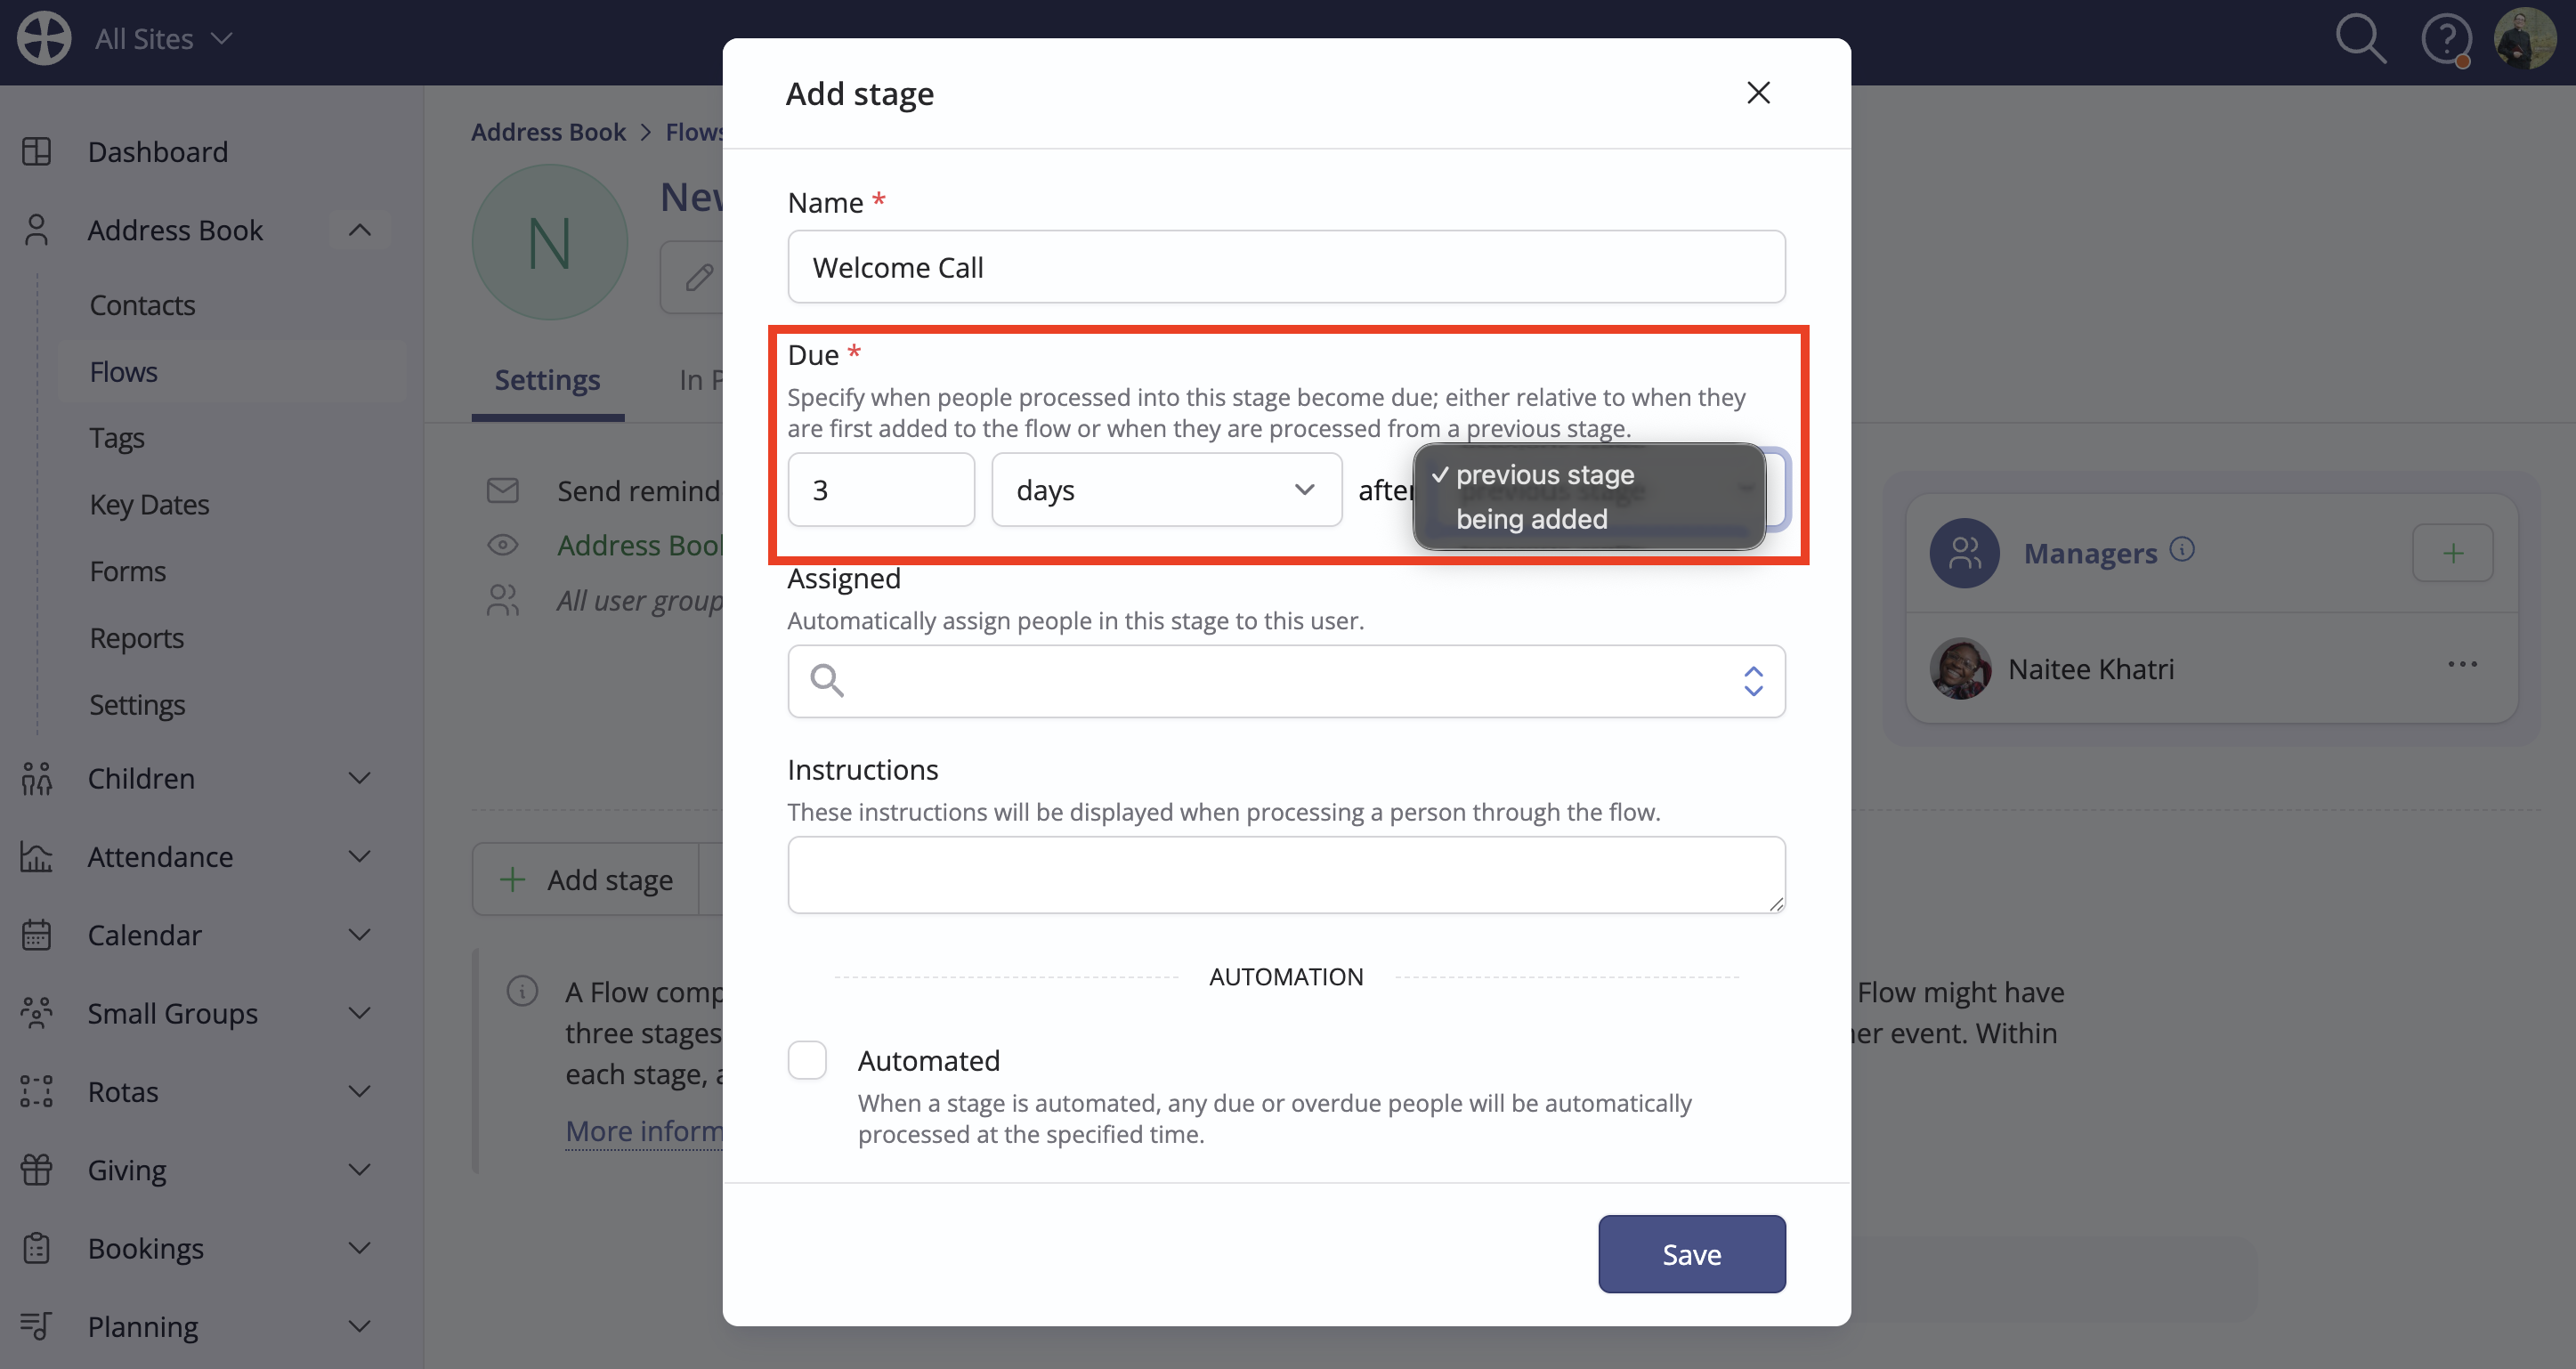
On the Add stage pop-up, enter a suitable Name. Select when actions for people added to this stage will become Due for processing, noting that this can be based on an interval relative to when people are first added to the flow or relative to when they are processed from a previous stage. As we'll see later, when processing people through a flow, Users have the option to override and change a person's next Due date if they wish to postpone stage actions to a later date. In this regard, the Due interval set here represents the 'preferred interval' before people processed into this stage become due.
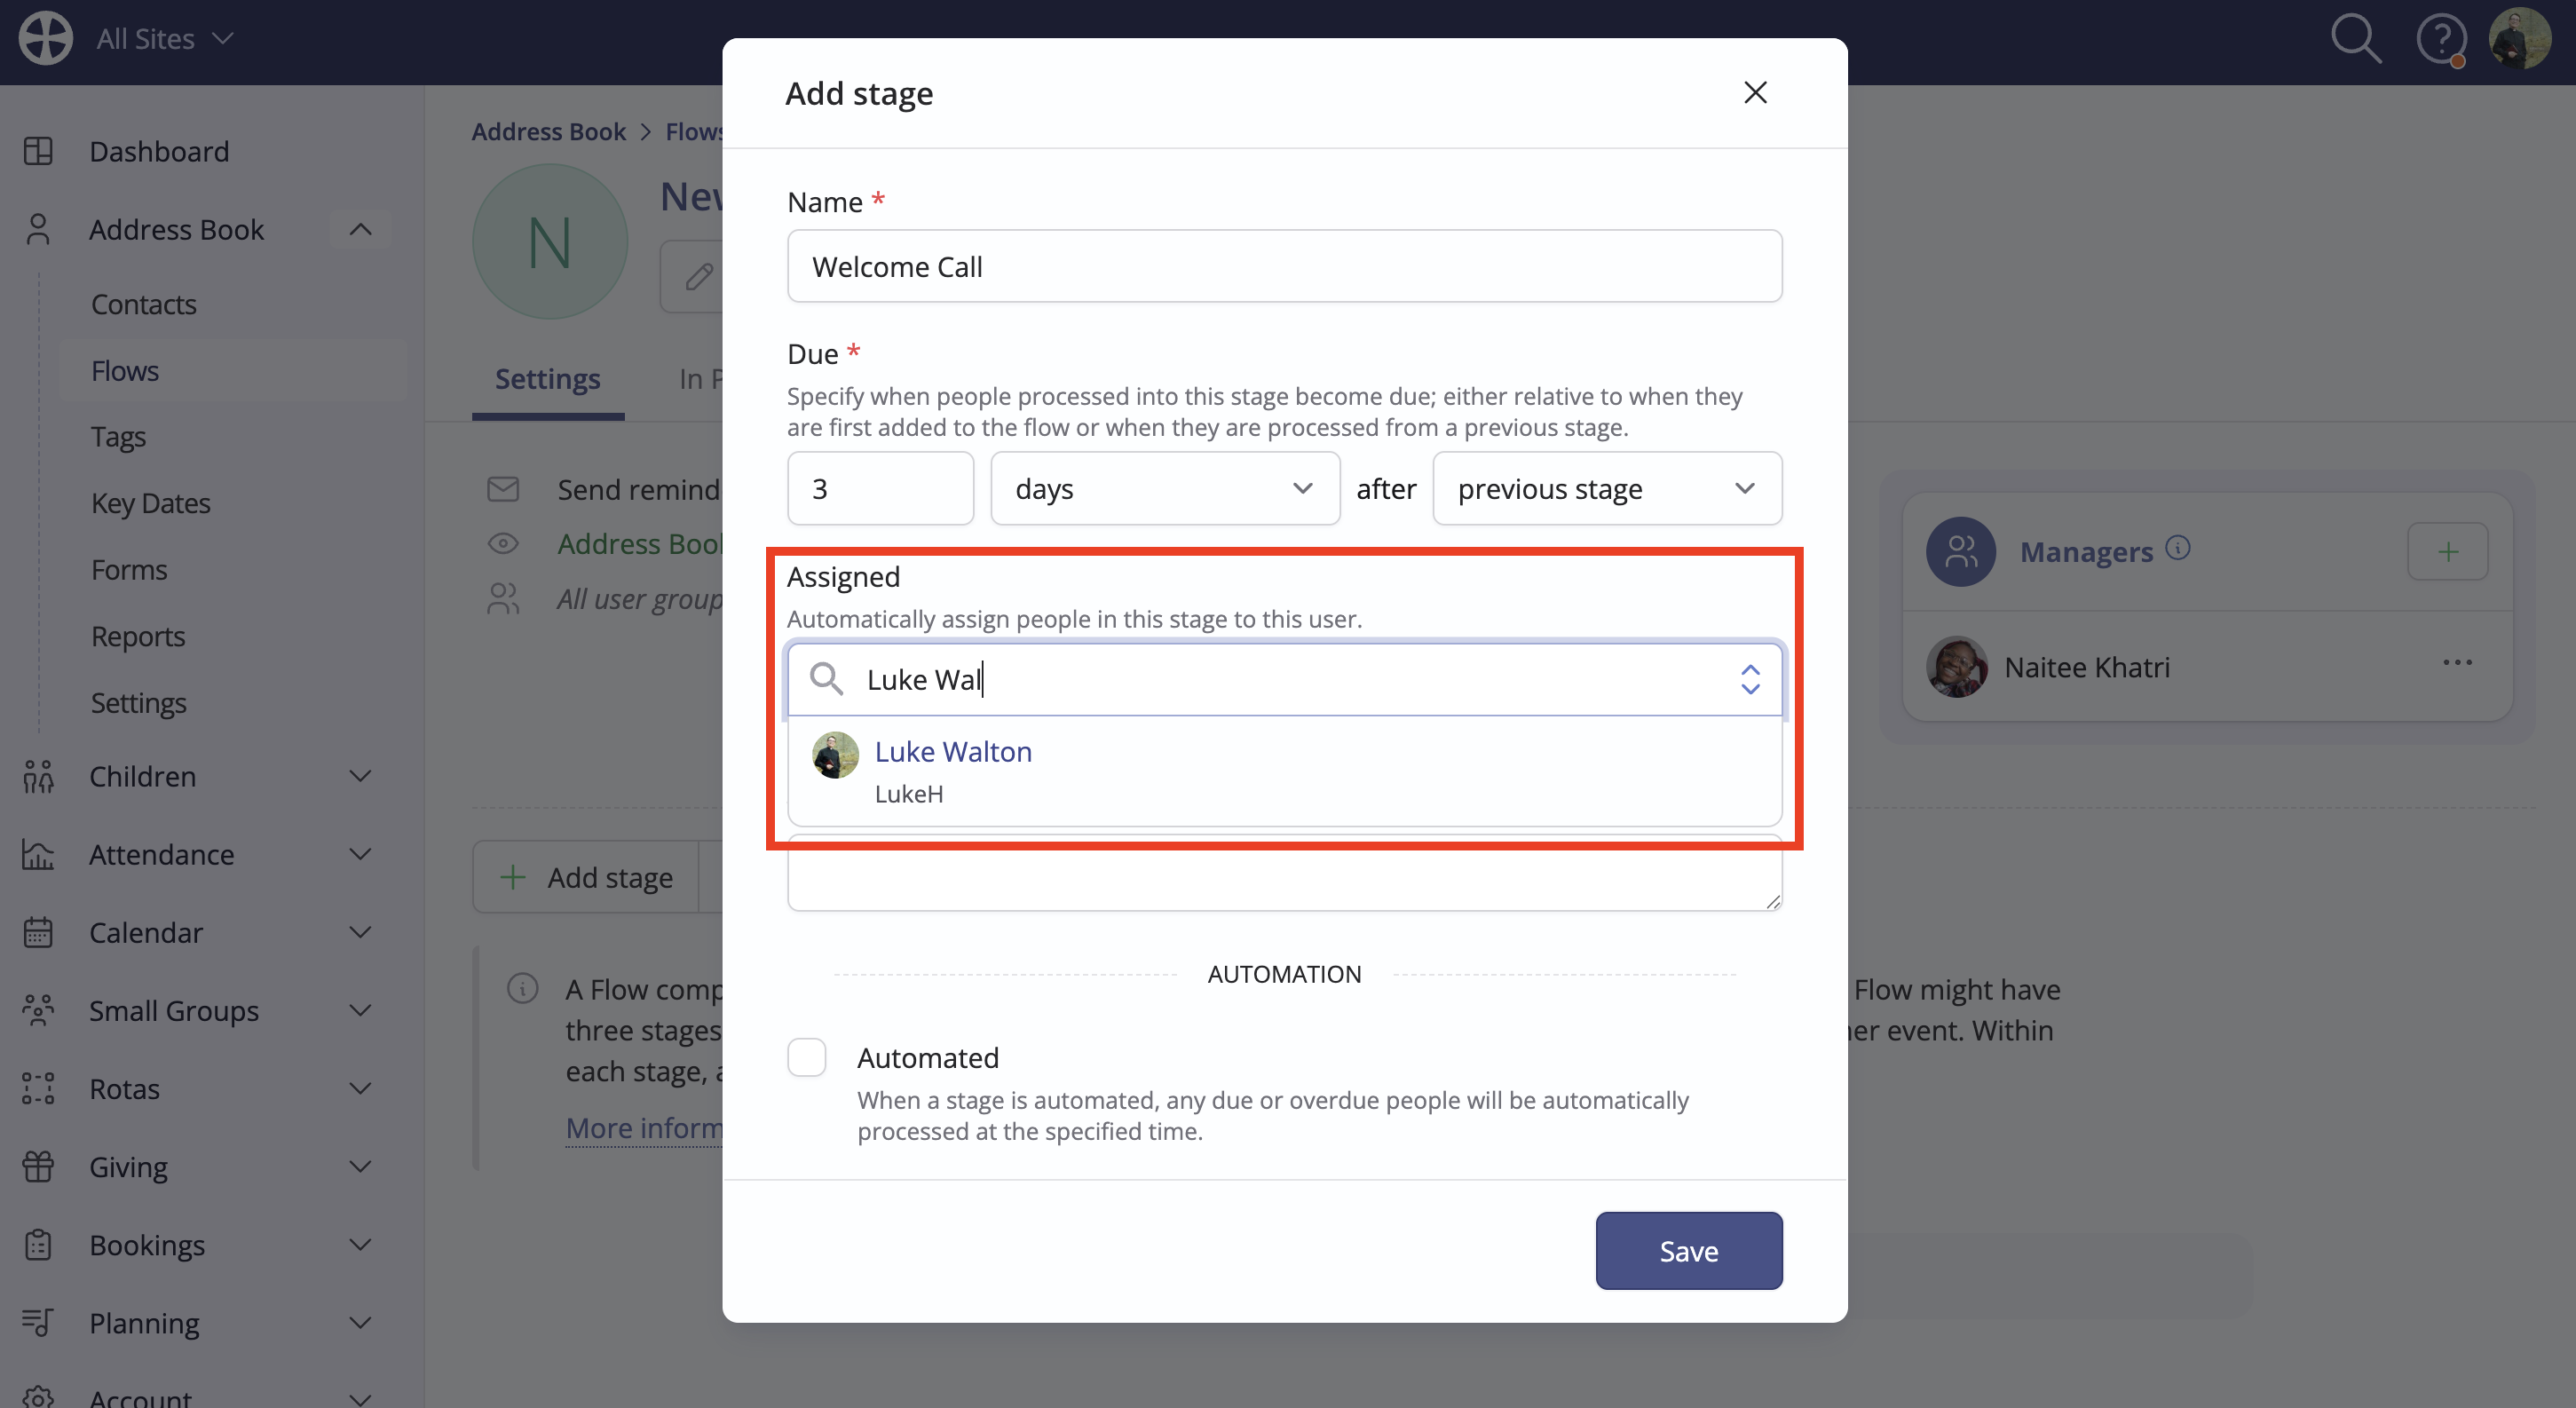
Processing people through a flow may be the sole responsibility of designated flow Managers. However, you may have particular Users who typically complete certain tasks or duties in an admin process as part of their role. For example, ID checking for a safeguarding check may be the responsibility of a particular team member. With this in mind, you can optionally assign flow stages to specific Users or leave the stages unassigned. Like flow Managers, Assigned users will also receive email reminder notifications when people in their assigned stage become due or overdue for processing. And like Managers, assigned users will continue to receive reminder notifications until either 1) the person is processed into the next stage, 2) the person is assigned (delegated) to a different user, or 3) the Due date is changed/postponed. Assigned user reminder notifications follow the same sending schedule as Manager notifications: 'due' and 'overdue' reminders are only sent on the flow's Send reminder days. Finally, for flows that are set as Visible in other modules, the Assigned user for a flow stage is module-specific, which means you can assign a different user to the same stage in those other modules if you wish.
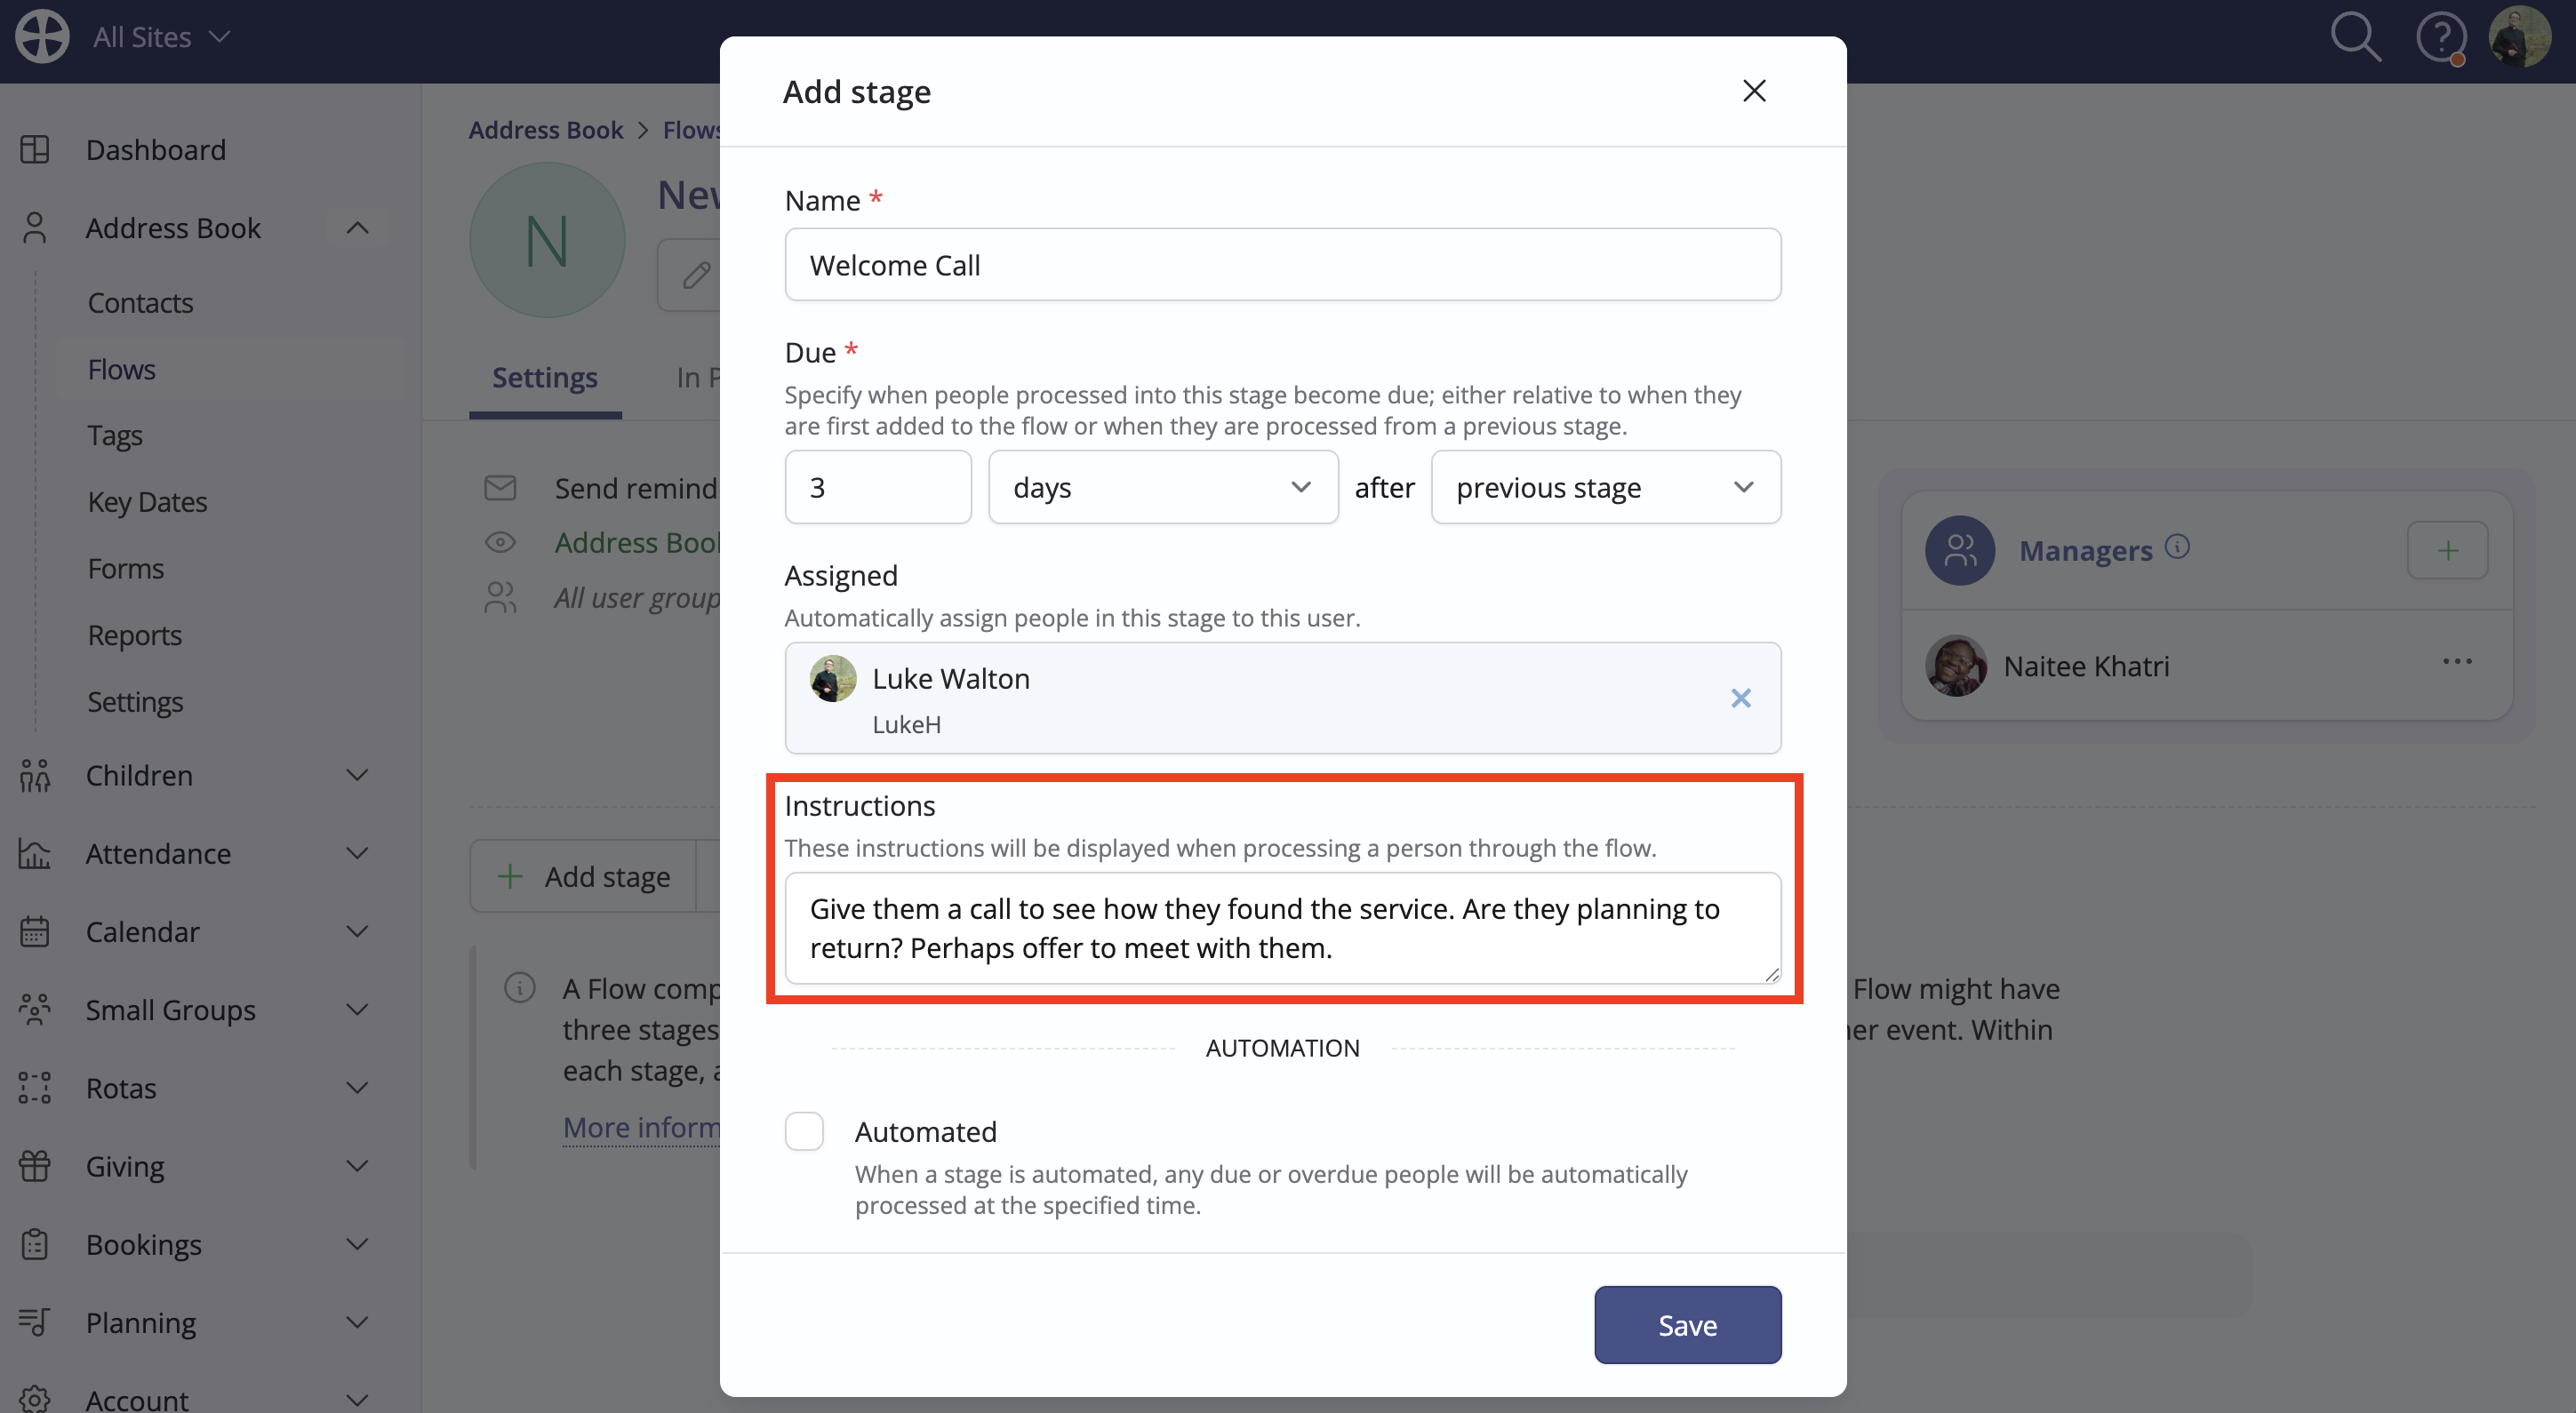
Next, you can add Instructions to remind users as to the purpose of each stage, perhaps, as in the example below, including guidance as to what they might ask as part of a phone call:
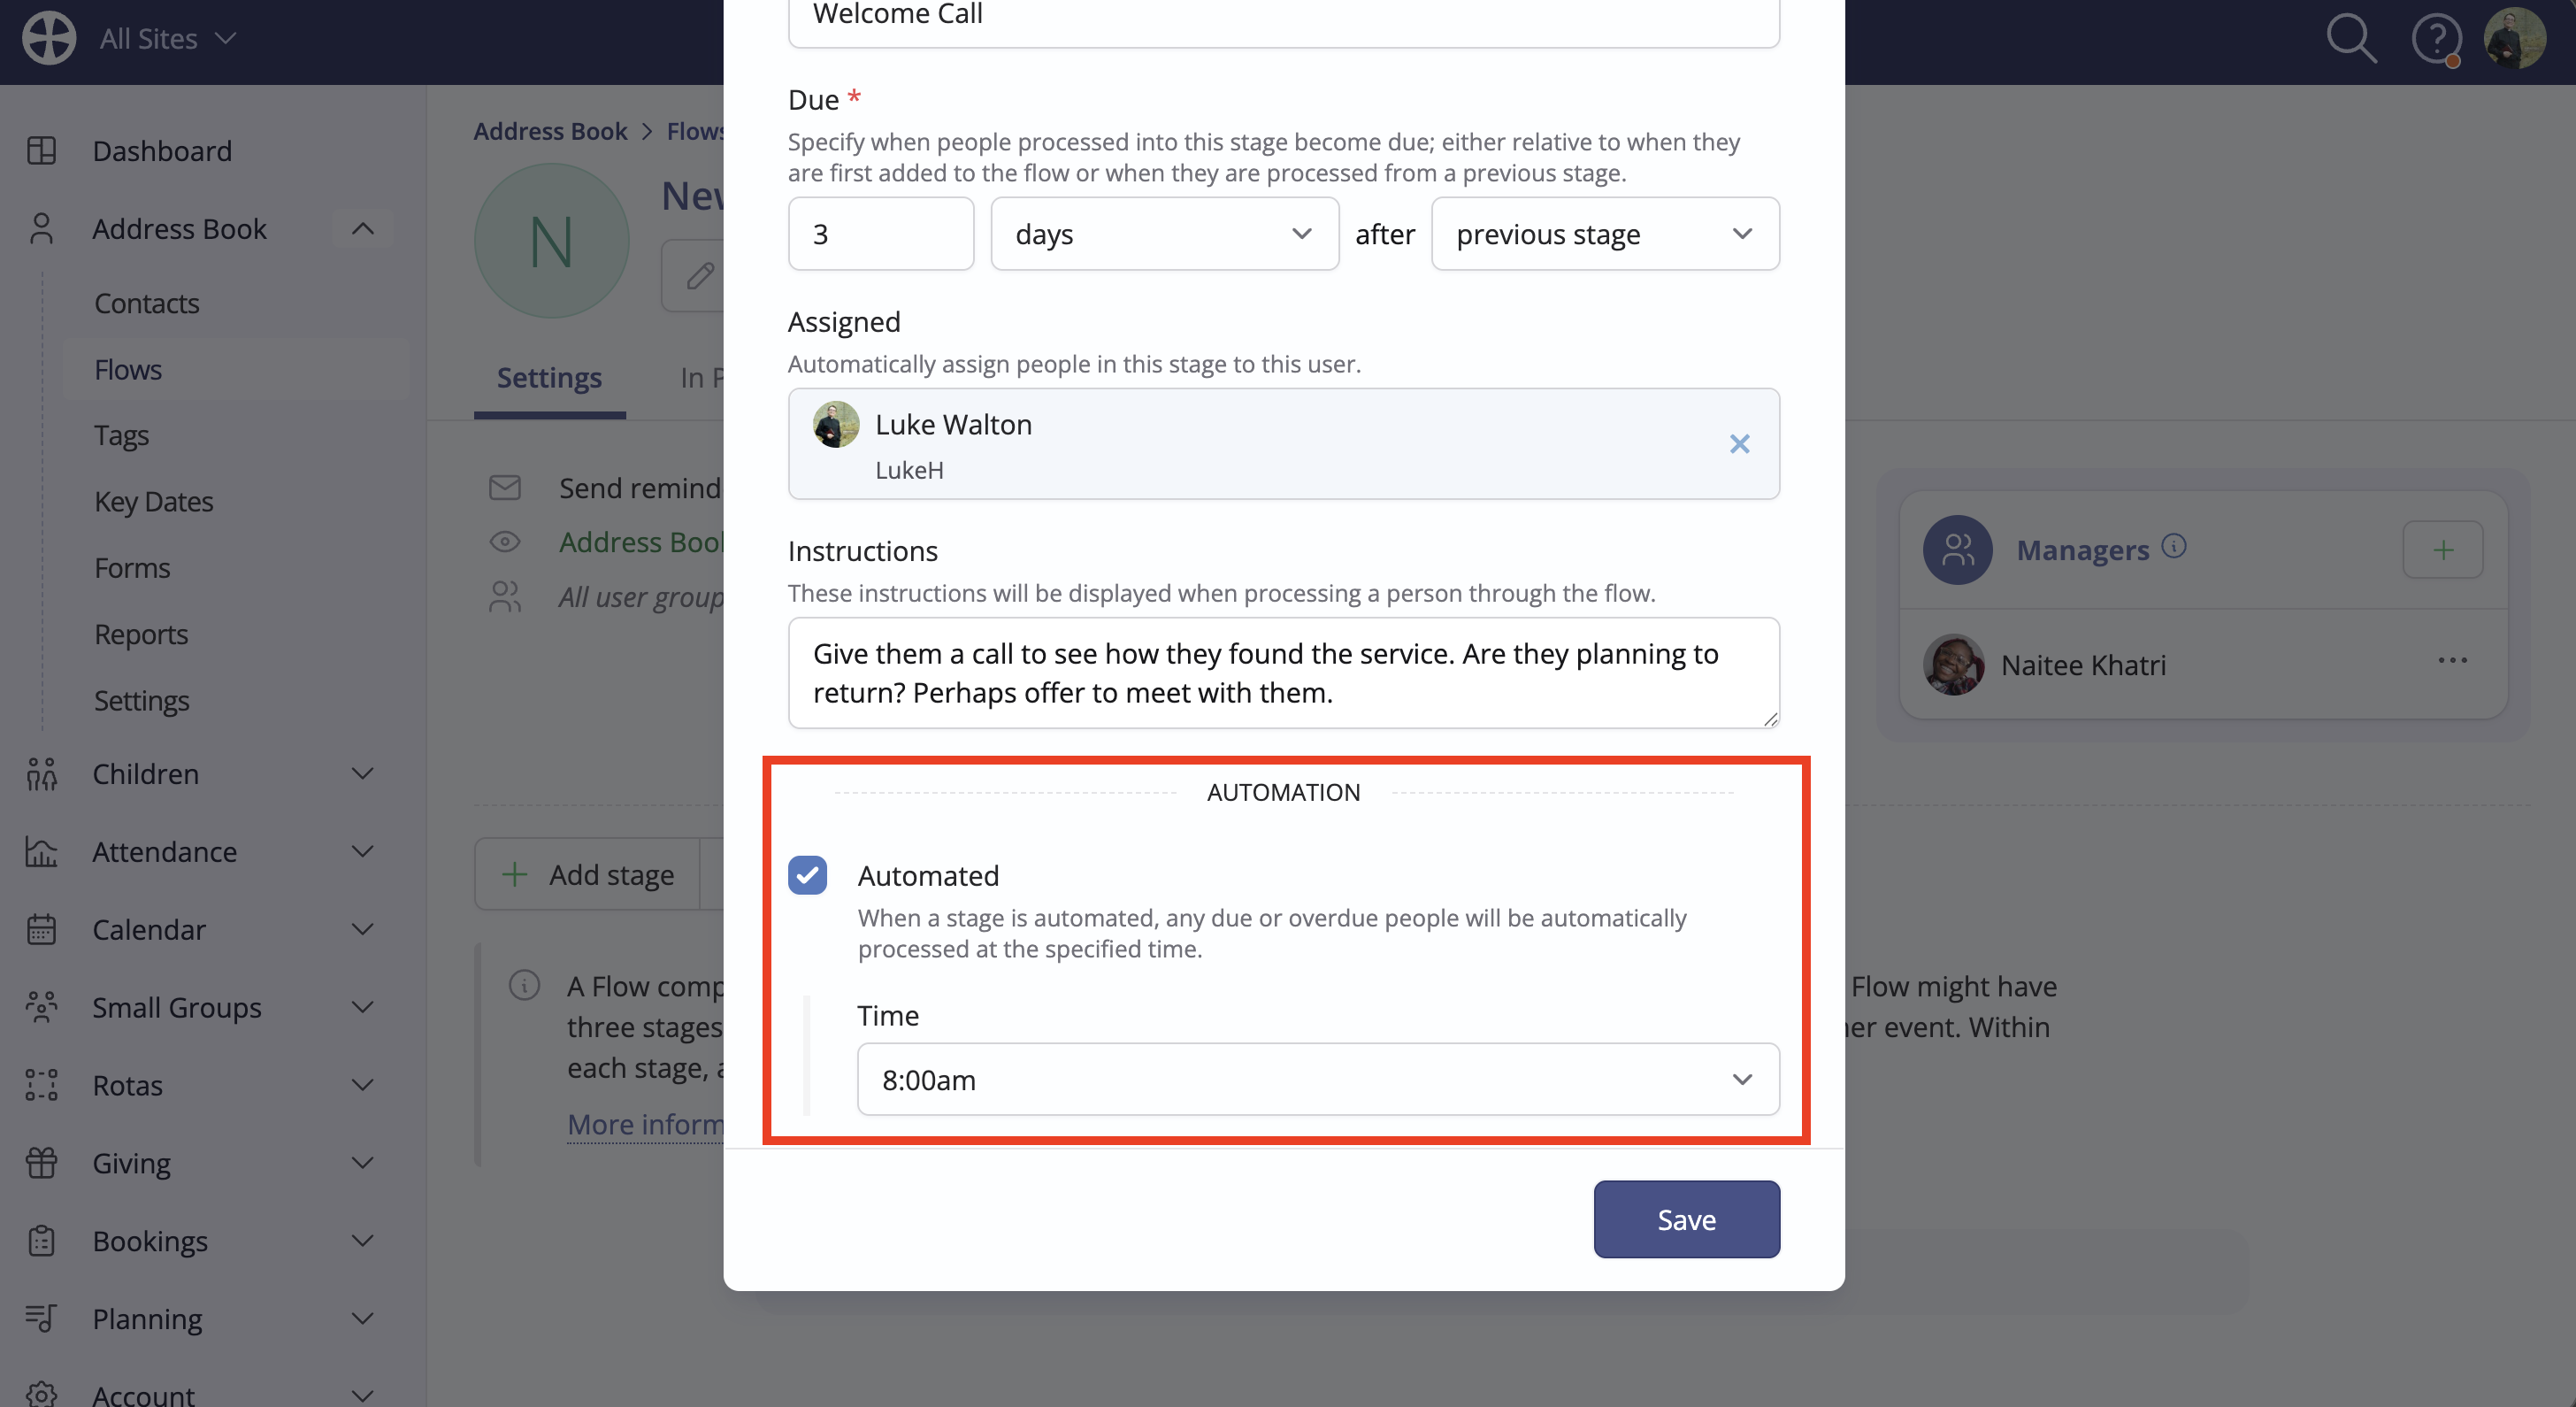
When people become due in this example stage, a module user will manually process them into the next stage. However, you can Automate a stage and set the Time when actions for due or overdue people are processed. Automated stages are ideal when the actions to be run do not require user intervention or when processing is not conditional or dependent on other processes; for example, you might automate stages where the actions relate to sending a preset email or SMS message, adding a tag or assigning a key date.
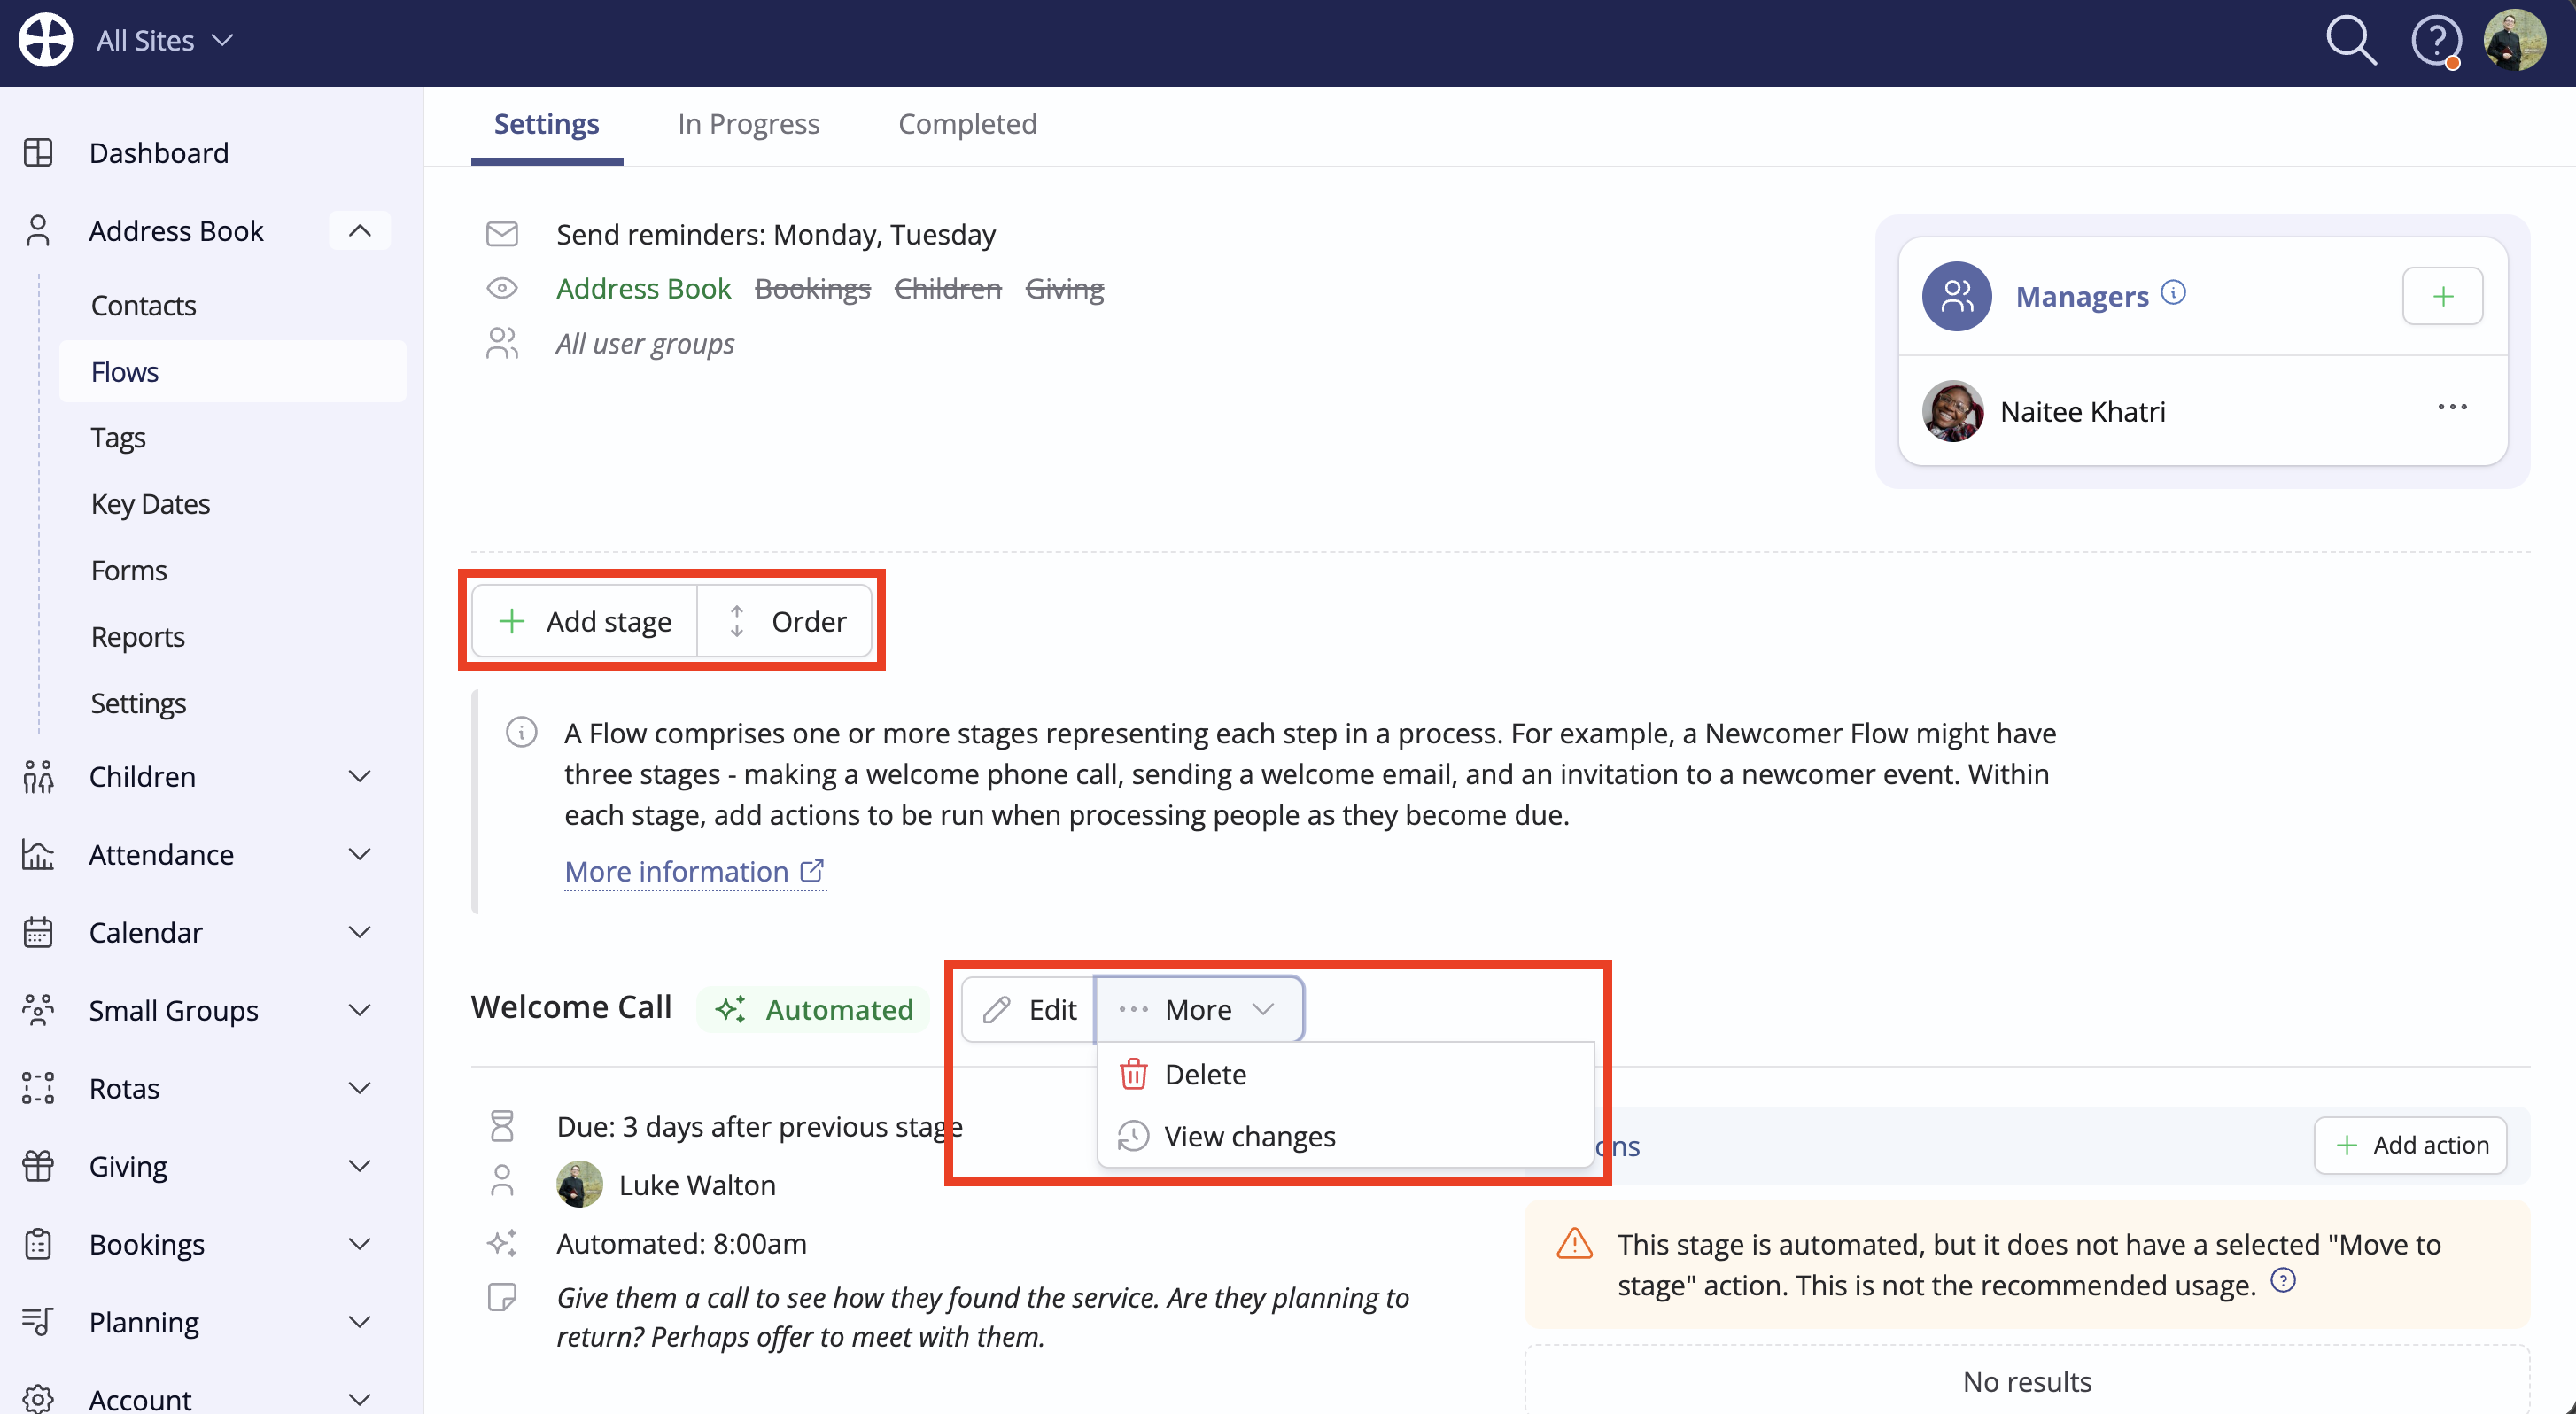
Click to Save the stage. The Settings tab updates to show the newly added stage, with each new stage added to the end of the list of Stages. You can Edit a stage should you wish to make changes. You can also change the stage Order. People will remain in a reordered stage with the same due dates they had before reordering. Remember that flows may be visible in other modules, so changes made to stages and ordering will also apply there. Stages that are no longer needed can be deleted, but you can only Delete an empty stage, which means you must first "Process" or "Remove" people from that stage (including those in that stage in other modules) before the deletion can be made.
Continue adding further stages as necessary. When you are finished, you are ready to begin adding stage actions.
Adding actions
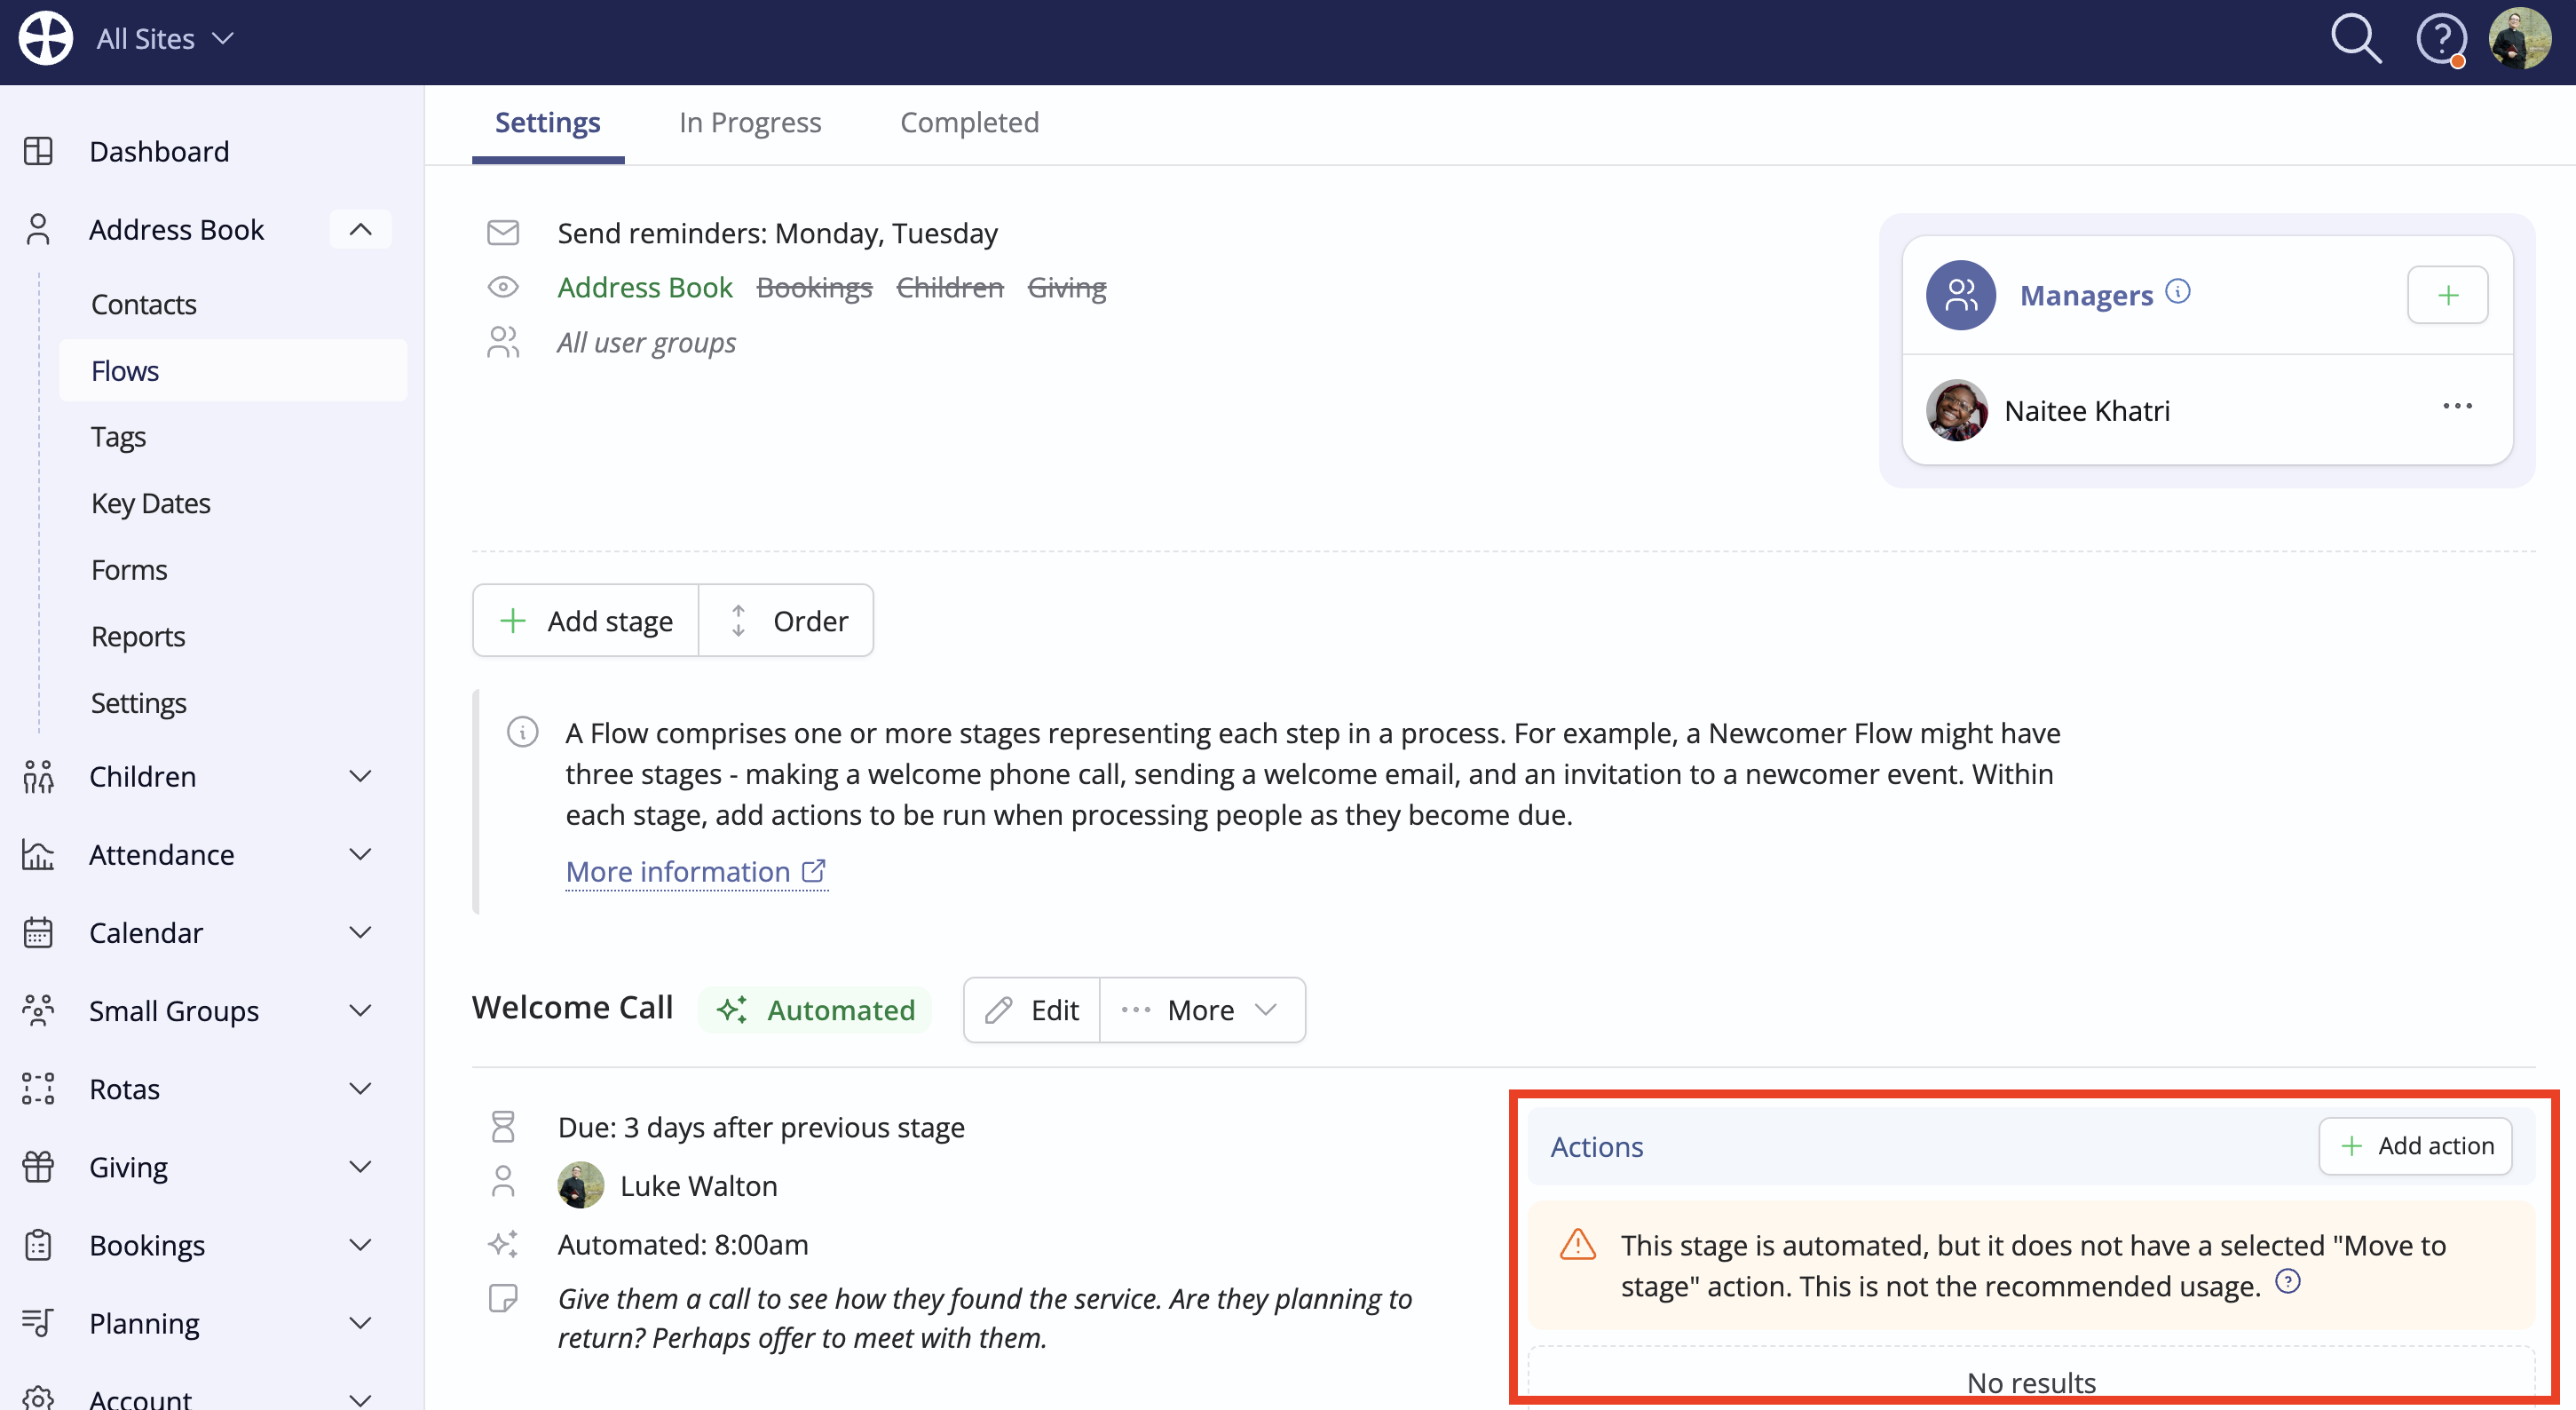
Still working on the Settings tab, and for each Stage in turn, you can now add the Actions that will be processed as people become due in that stage. Each stage must have at least one Move-to-stage action to ensure people can be processed into other stages. With this in mind, you will find it helpful to begin by first adding the Move to stage actions to each stage of the Flow. You can then add the other stage-specific actions afterwards.
Click Add action.
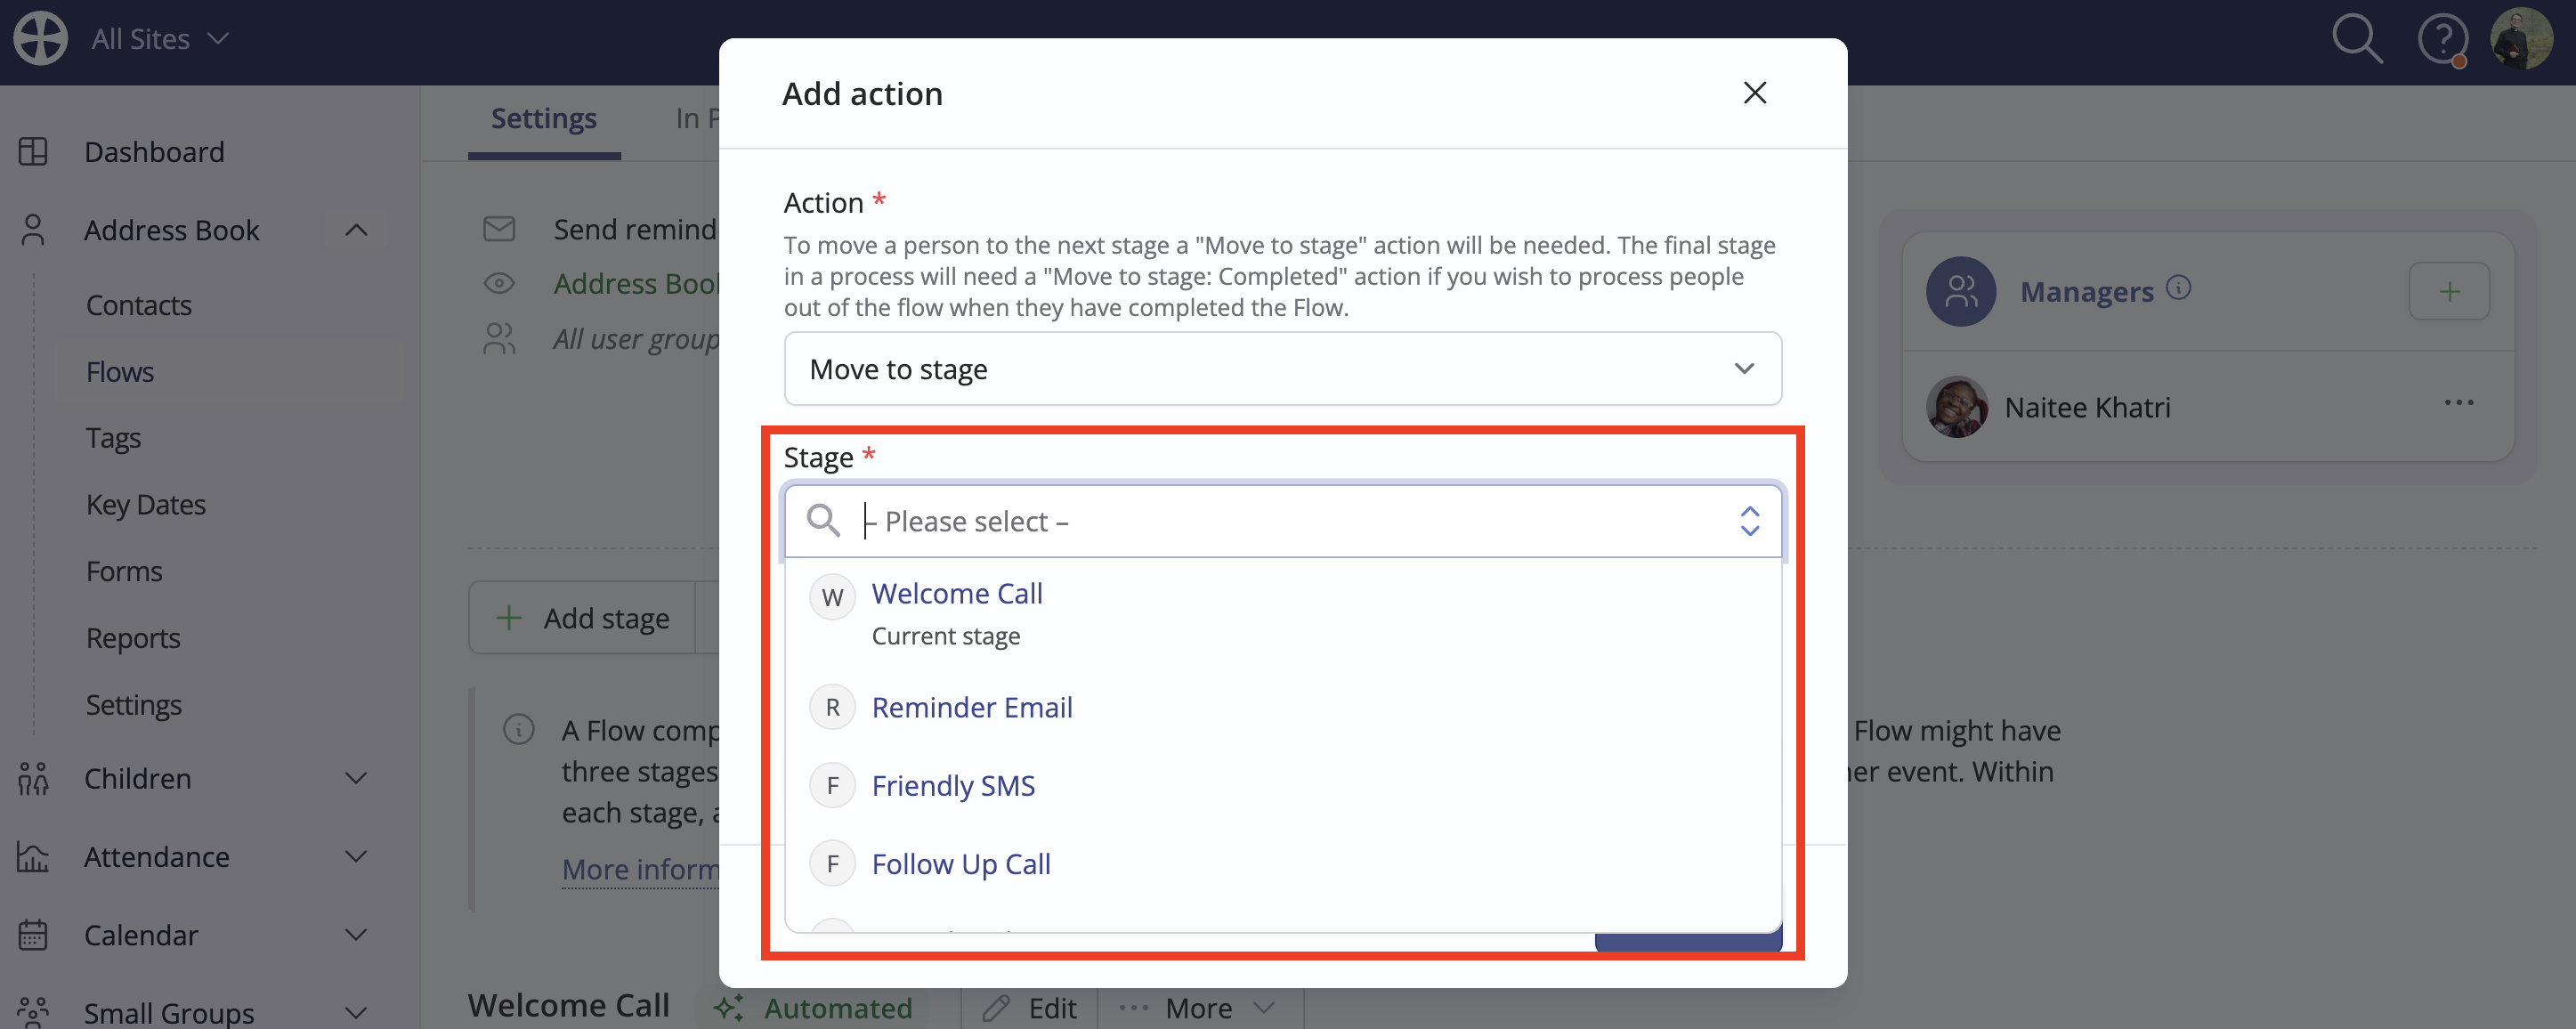
On the Add action pop-up, select the Move to stage action from the drop-down list, which then surfaces the option to choose the Stage that flow people should be moved into when they are processed. You can add multiple "Move to stage" actions to a stage if users need a choice of stages to process people into. While flows have a linear stage order, multiple "Move to stage" actions provide users with the flexibility to move people to other stages - ideal if those being processed need to skip a stage in the flow.
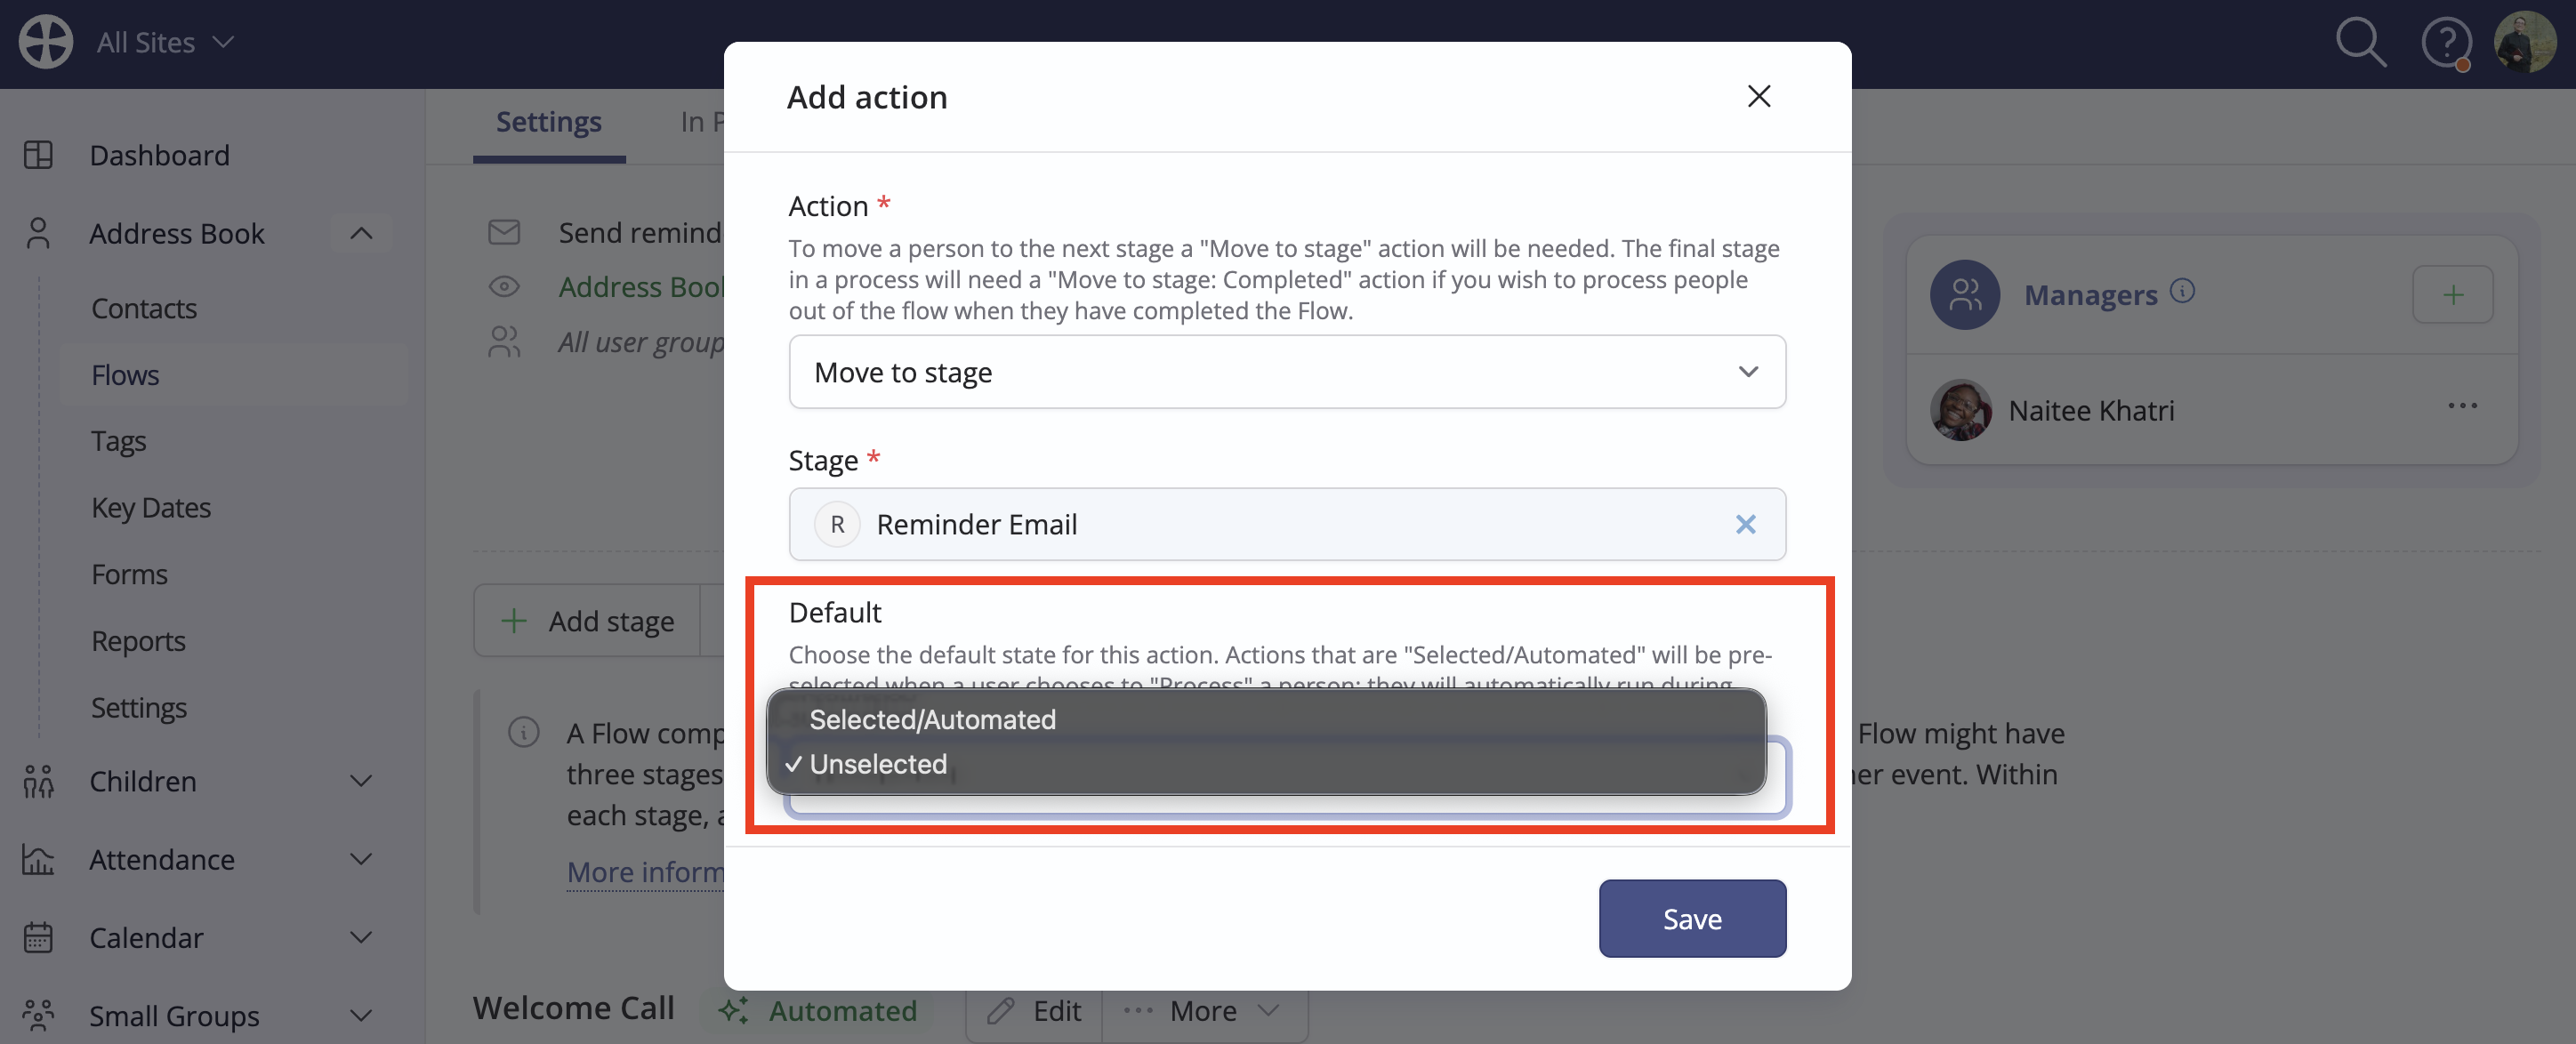
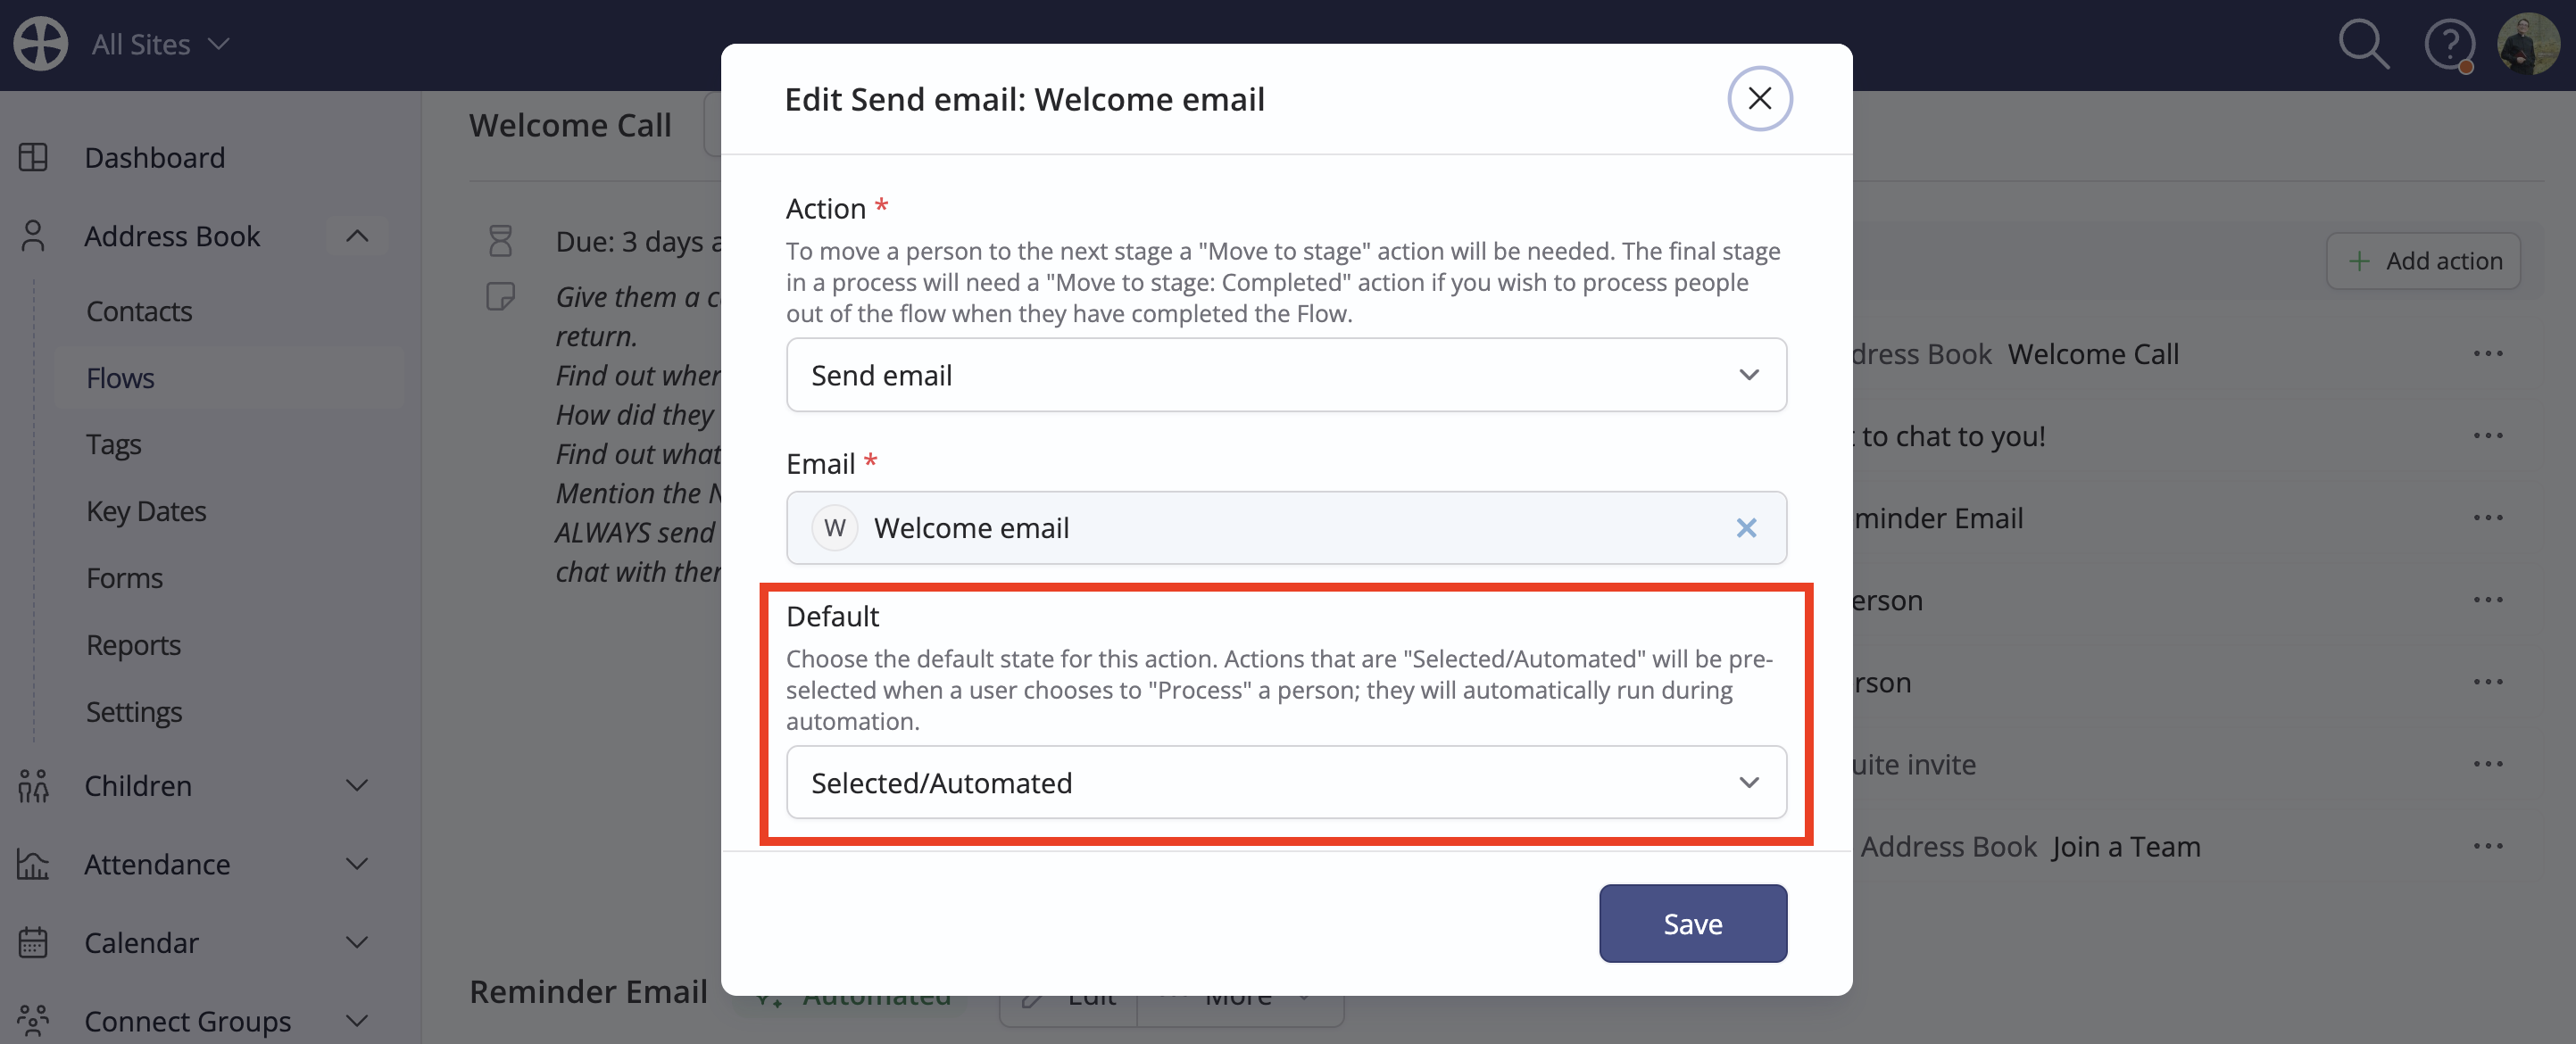
Finally, set the Default action state, which can be Selected/Automated or Unselected. For example, the most commonly processed actions could be defaulted to a Selected/Automated state. An Unselected default state is helpful for infrequent actions or when a user is required to choose the actions to process on a person-by-person basis affirmatively. We will see the default action state in more detail later in this article. For Automated stages, all Selected/Automated actions will run during the automation process, whilst those set Unselected will not be run. Therefore, for stage automation to work, the Default state of all actions in that stage should be set to Selected/Automated.
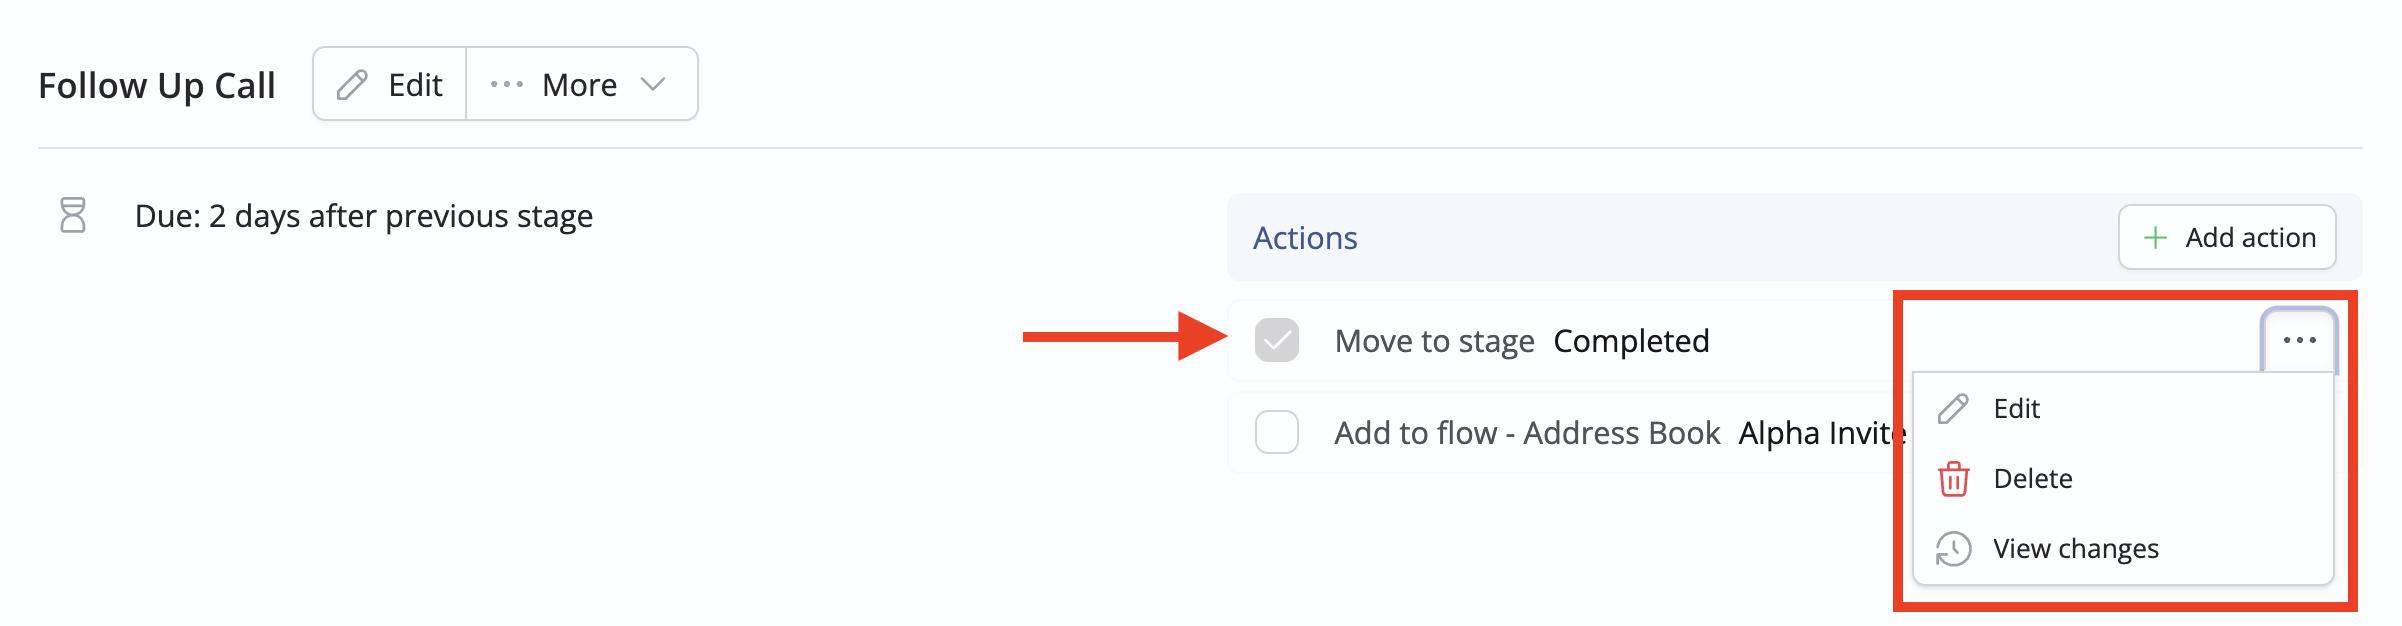
Finally, click Save. The Settings tab updates to show the newly added action. Continue adding navigation actions to each stage in the flow. Note the Actions menu to Edit or Delete an action if needed, or View Changes to see a change log. As shown in the example below, for any stage where the flow process will end, perhaps in the final stage, adding the Move to stage action with a value of Completed will enable you to process people out of the flow and complete their tracking.
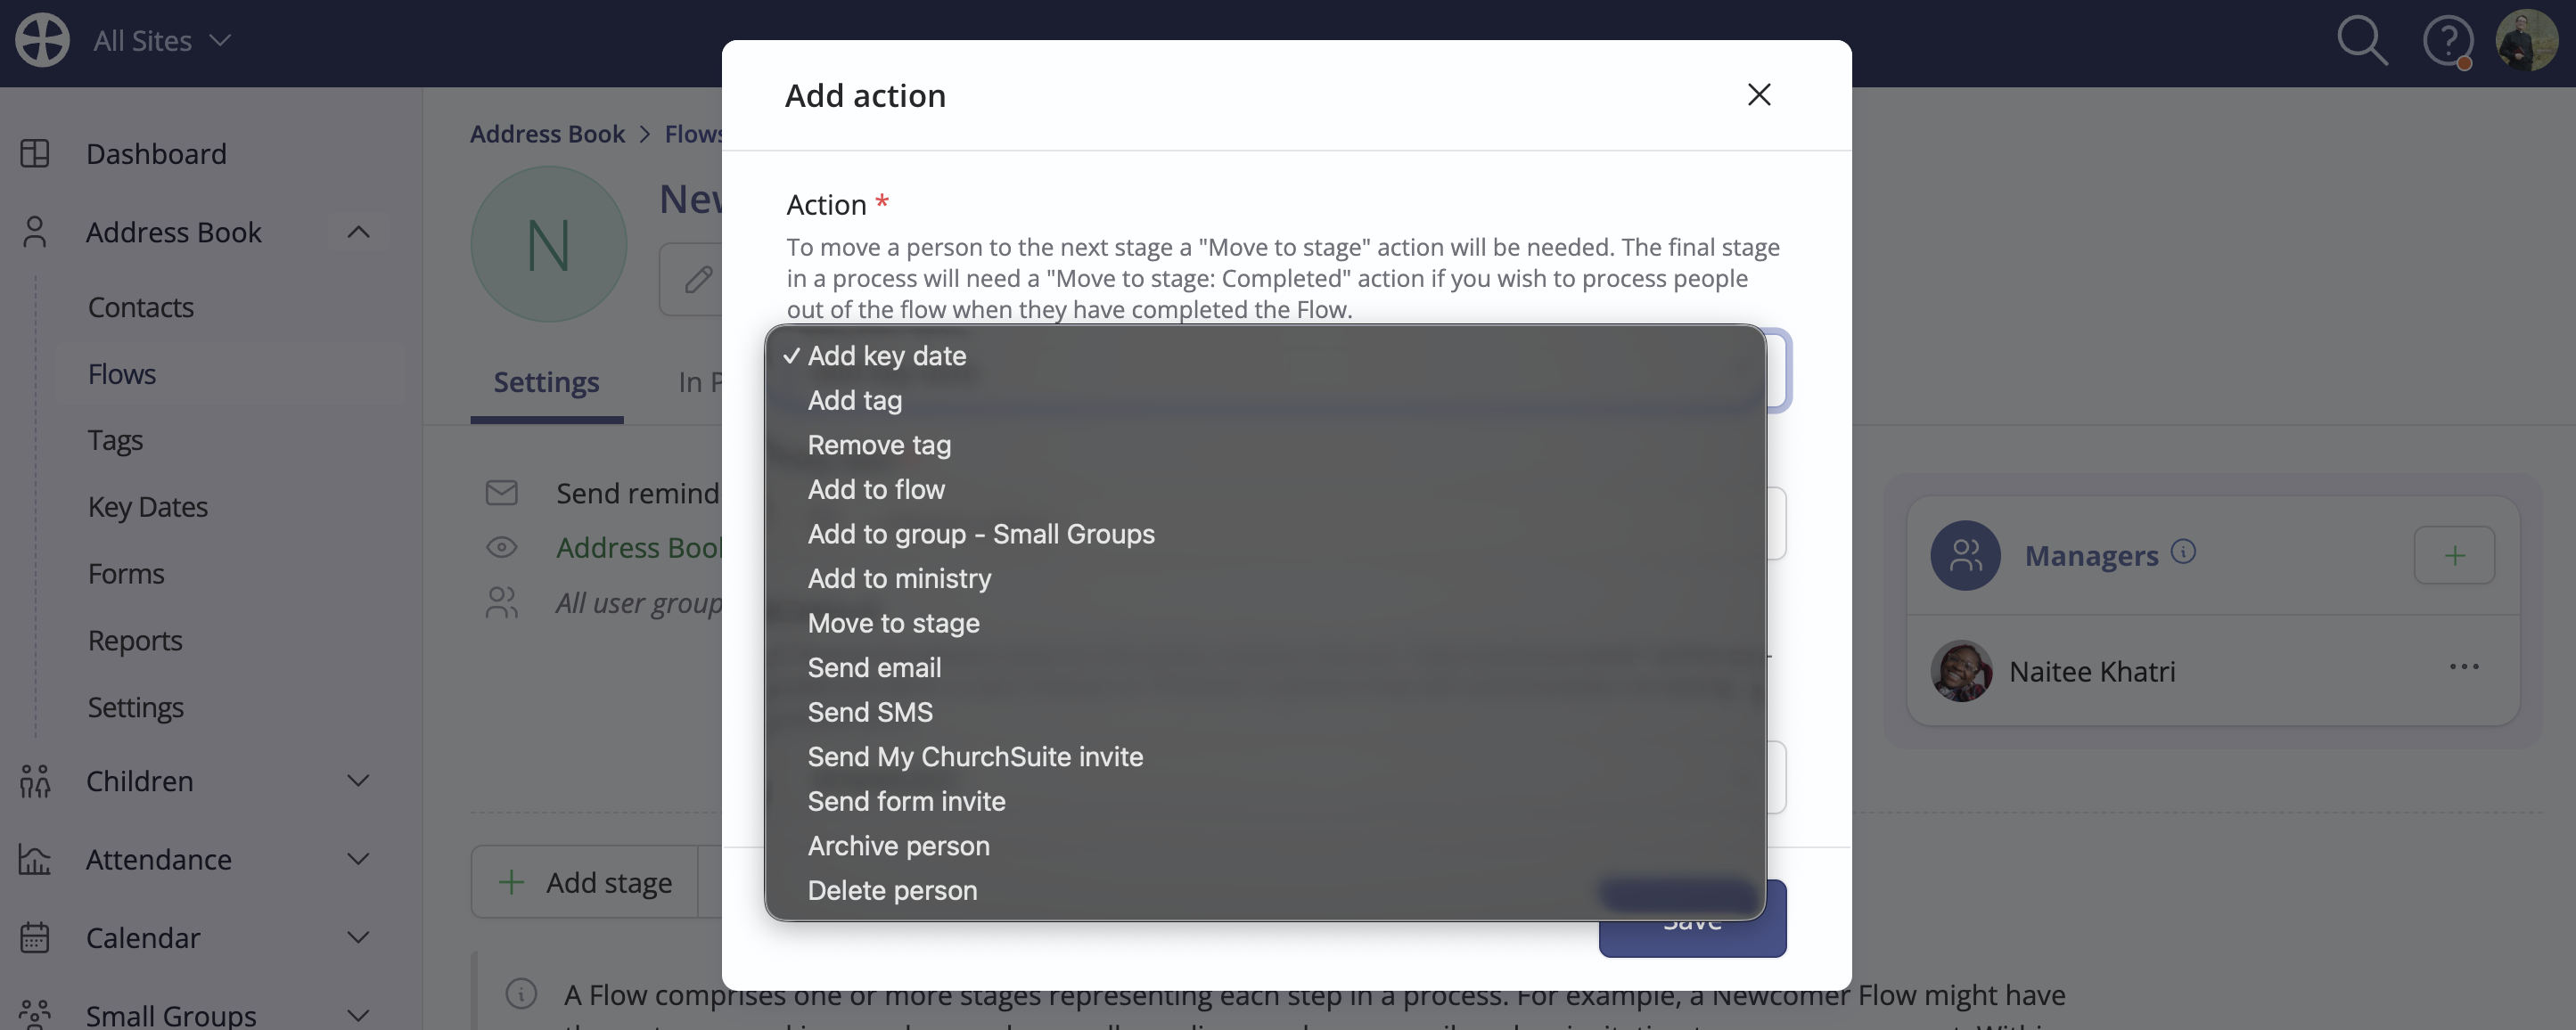
Having added "Move to stage" navigation actions, let's now consider the other stage-specific actions you might add. The actions you choose will be influenced by the stage Instructions you have added. The instructions should clearly describe what needs to happen when people become due at that stage. Working methodically through each stage, add the appropriate actions by clicking Add action. The image below shows the full Action list. Please note that not all actions are available in every module. Selecting certain actions will reveal further options for that action. For example, when selecting the Add tag action, you can choose the specific tag to be added.
Continue adding Actions to each Stage as appropriate. Note that stage actions can be ordered by dragging and dropping them into the preferred order, with commonly processed actions positioned first.
After adding actions to each stage, you're ready to test that the flow works as expected when in use, perhaps by first adding yourself to the flow and processing yourself through each stage to review the user experience. For example, you may discover a pertinent action is missing from a stage or that the order or default state of actions needs fine-tuning. As you use flows, you may want to adjust the due date interval between flow stages, especially if the anticipated timings are proving unrealistic, such as when people's busyness needs to be factored into your processes. The next sections of this article explain how to add people to Flows and process them.
Adding and removing people from a Flow
In this section, we explore how to add people to the Flow (and remove them, if necessary). The next section looks at how to process people through a Flow as tasks become due. We've made it easy to add people to Flows throughout the platform, wherever your users work with people. Let's look at some examples of where you'll see the Add to flow action available:
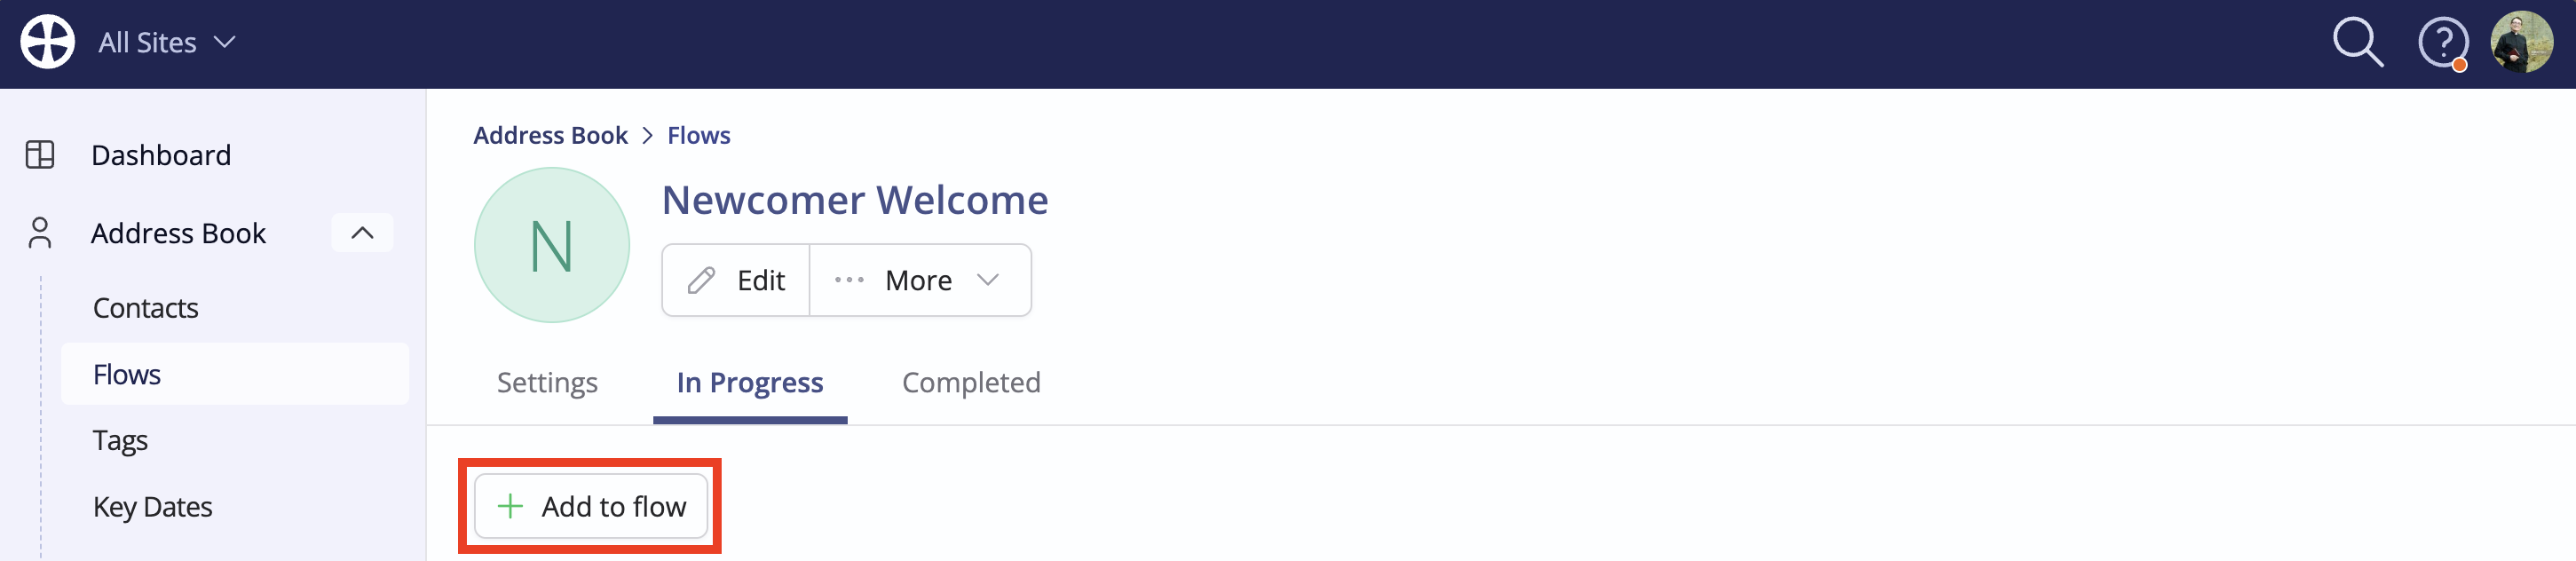
1. On the flow 'View'
An Add to flow action is shown in the In Progress tab. Note that you can't add people to archived Flows.
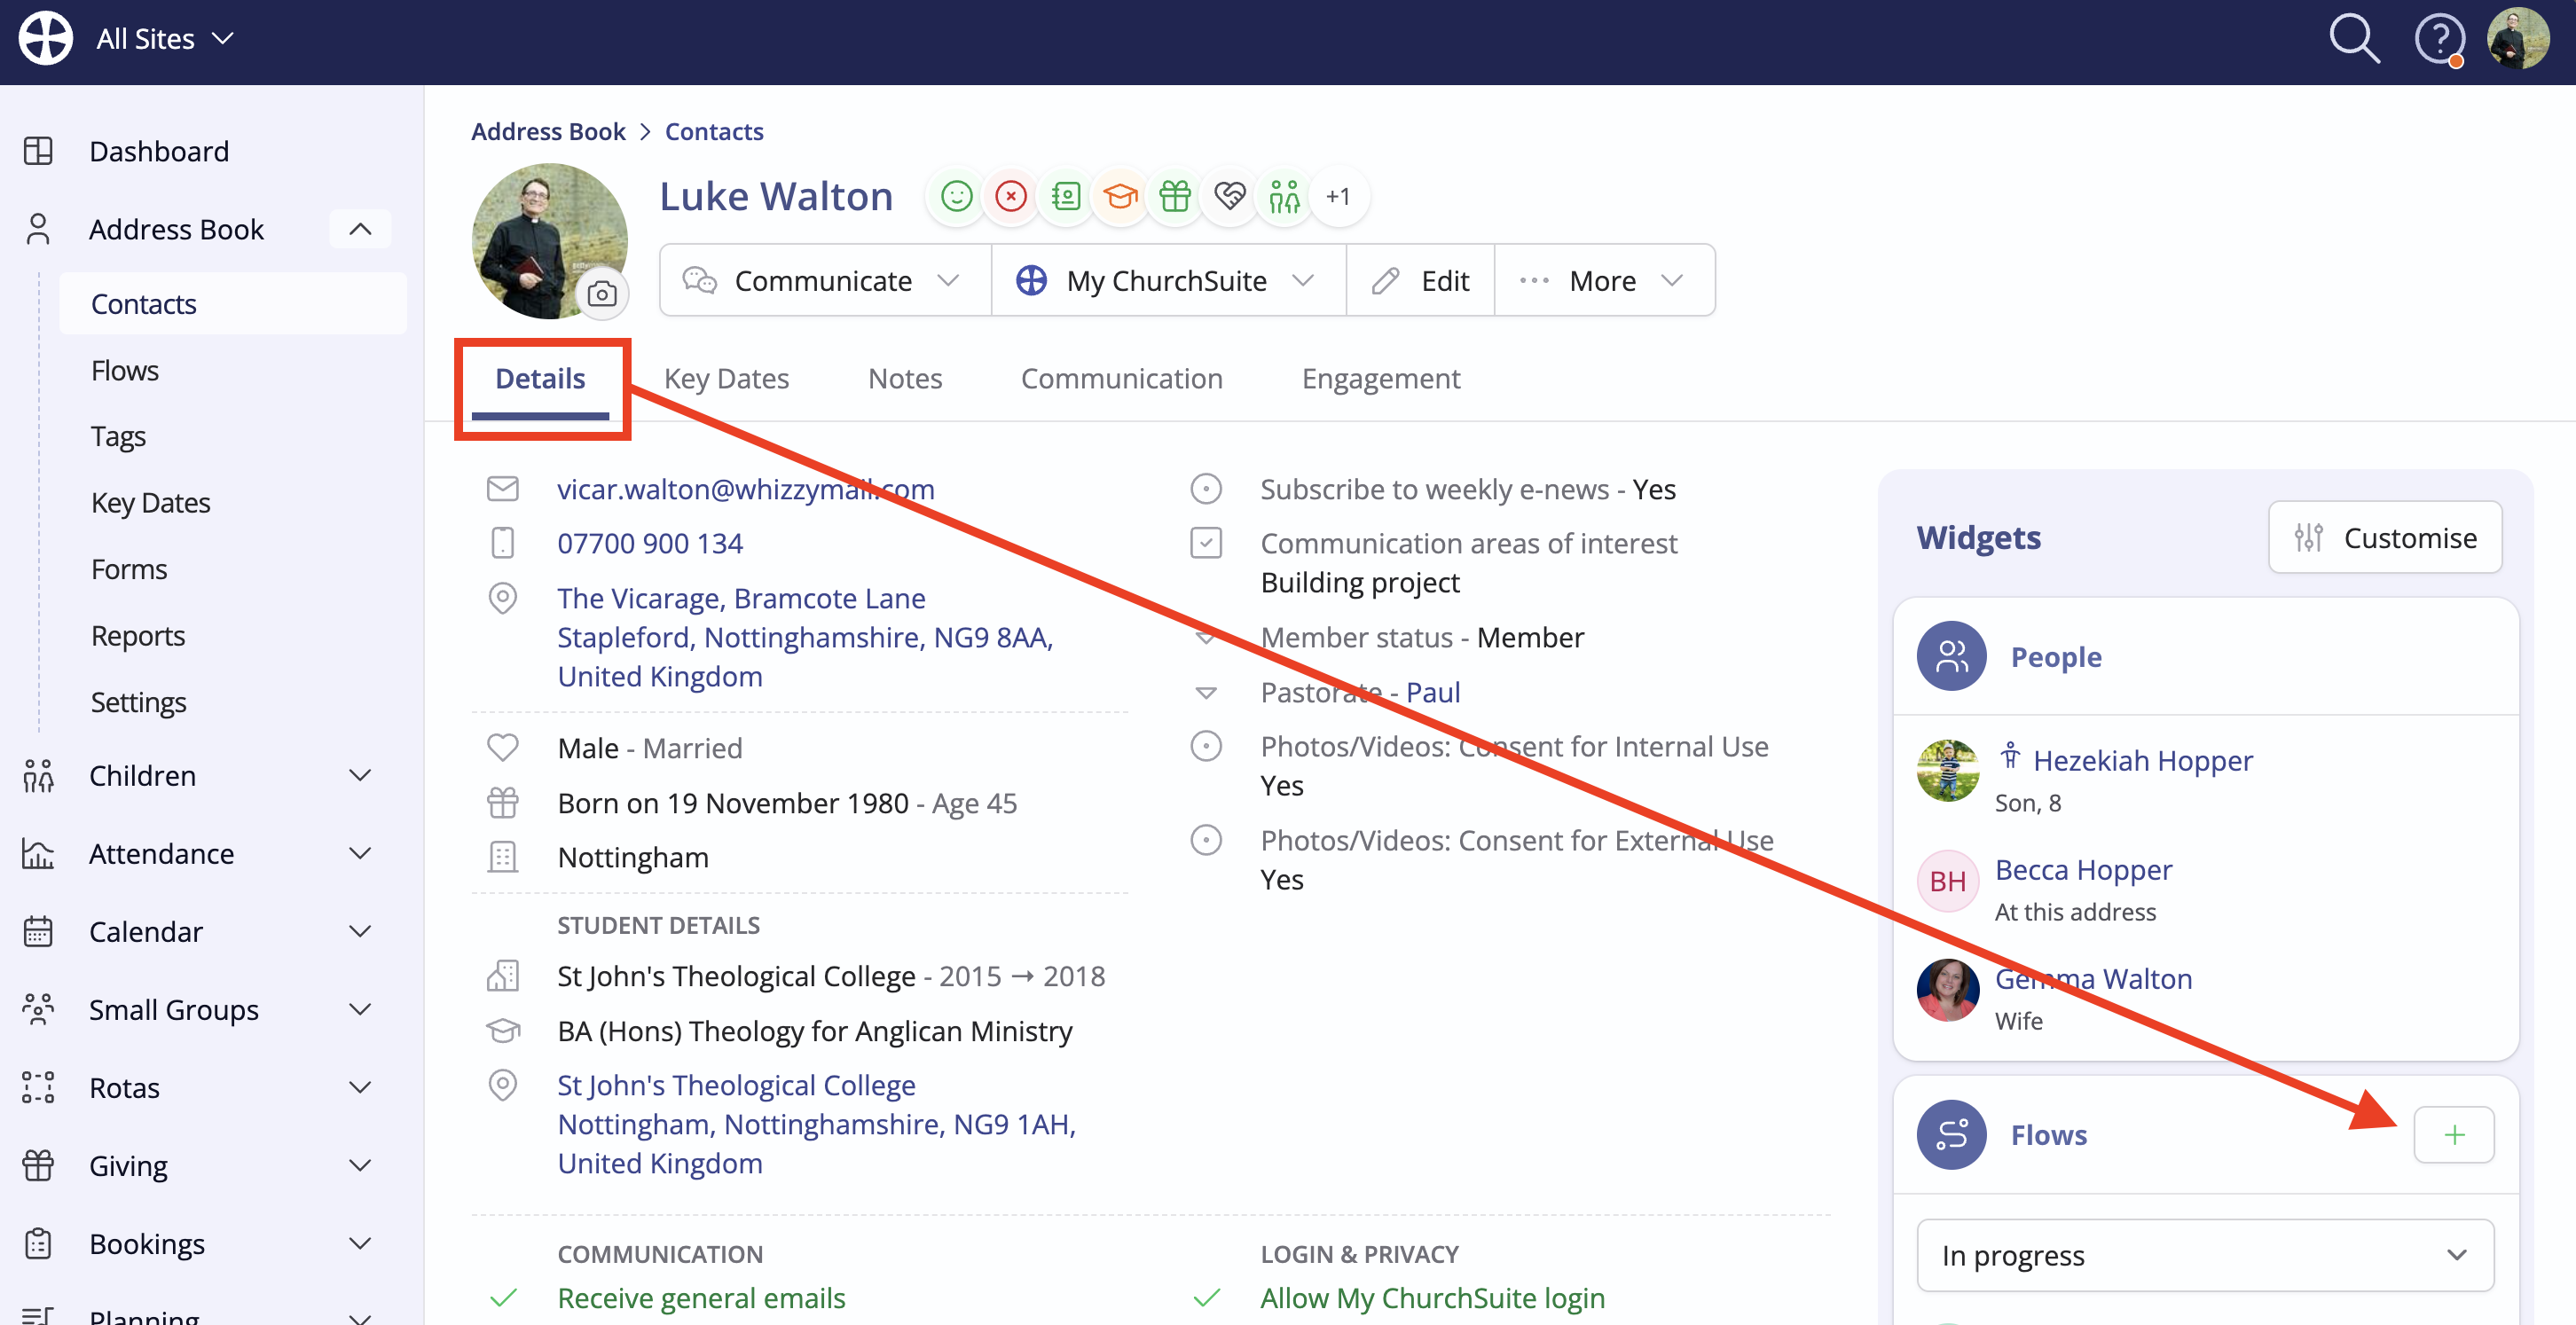
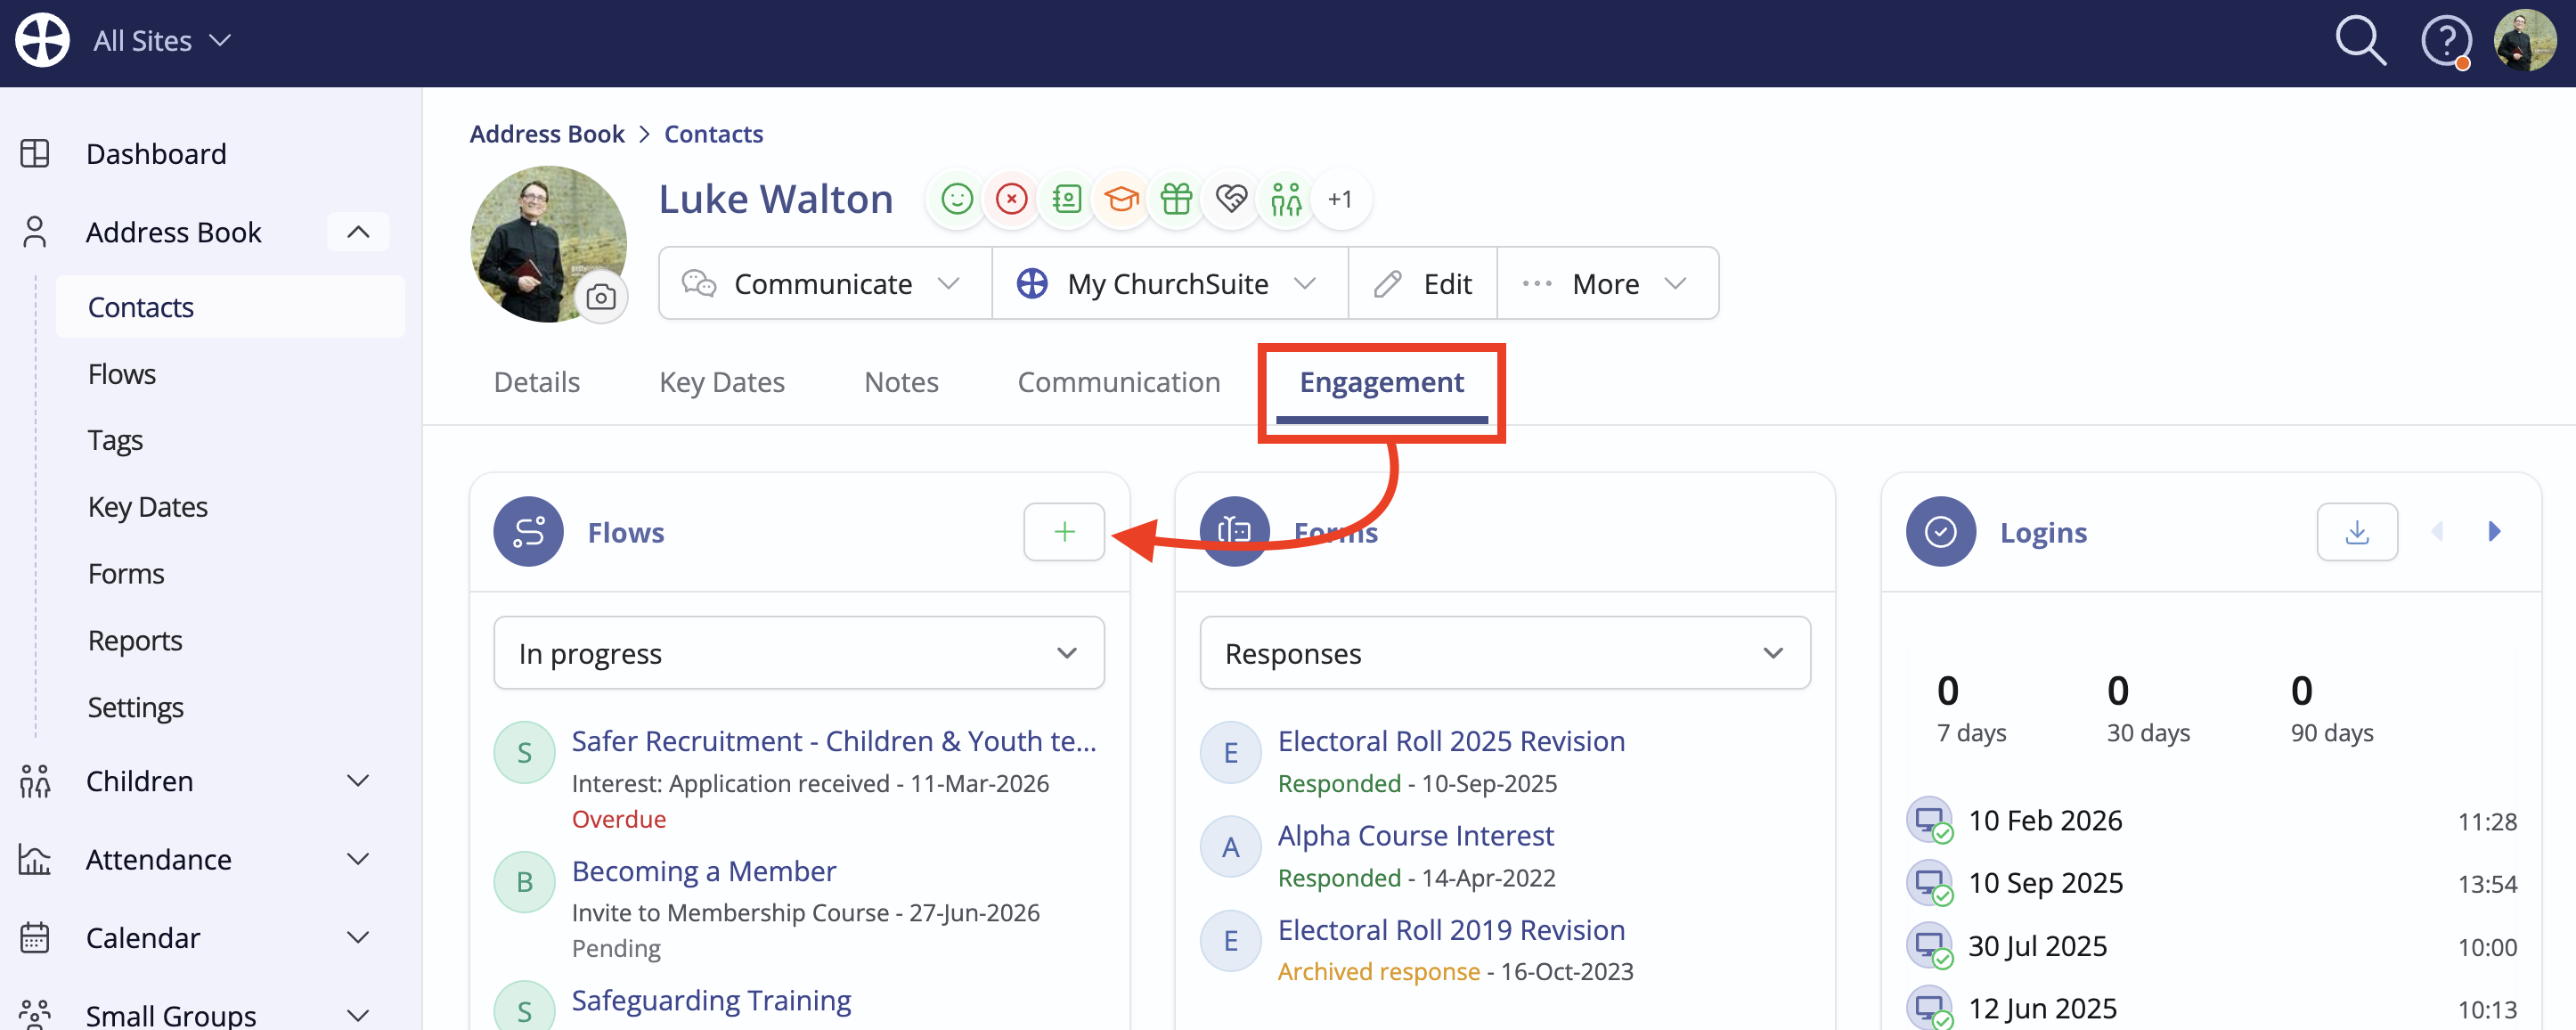
2. On people's profile pages
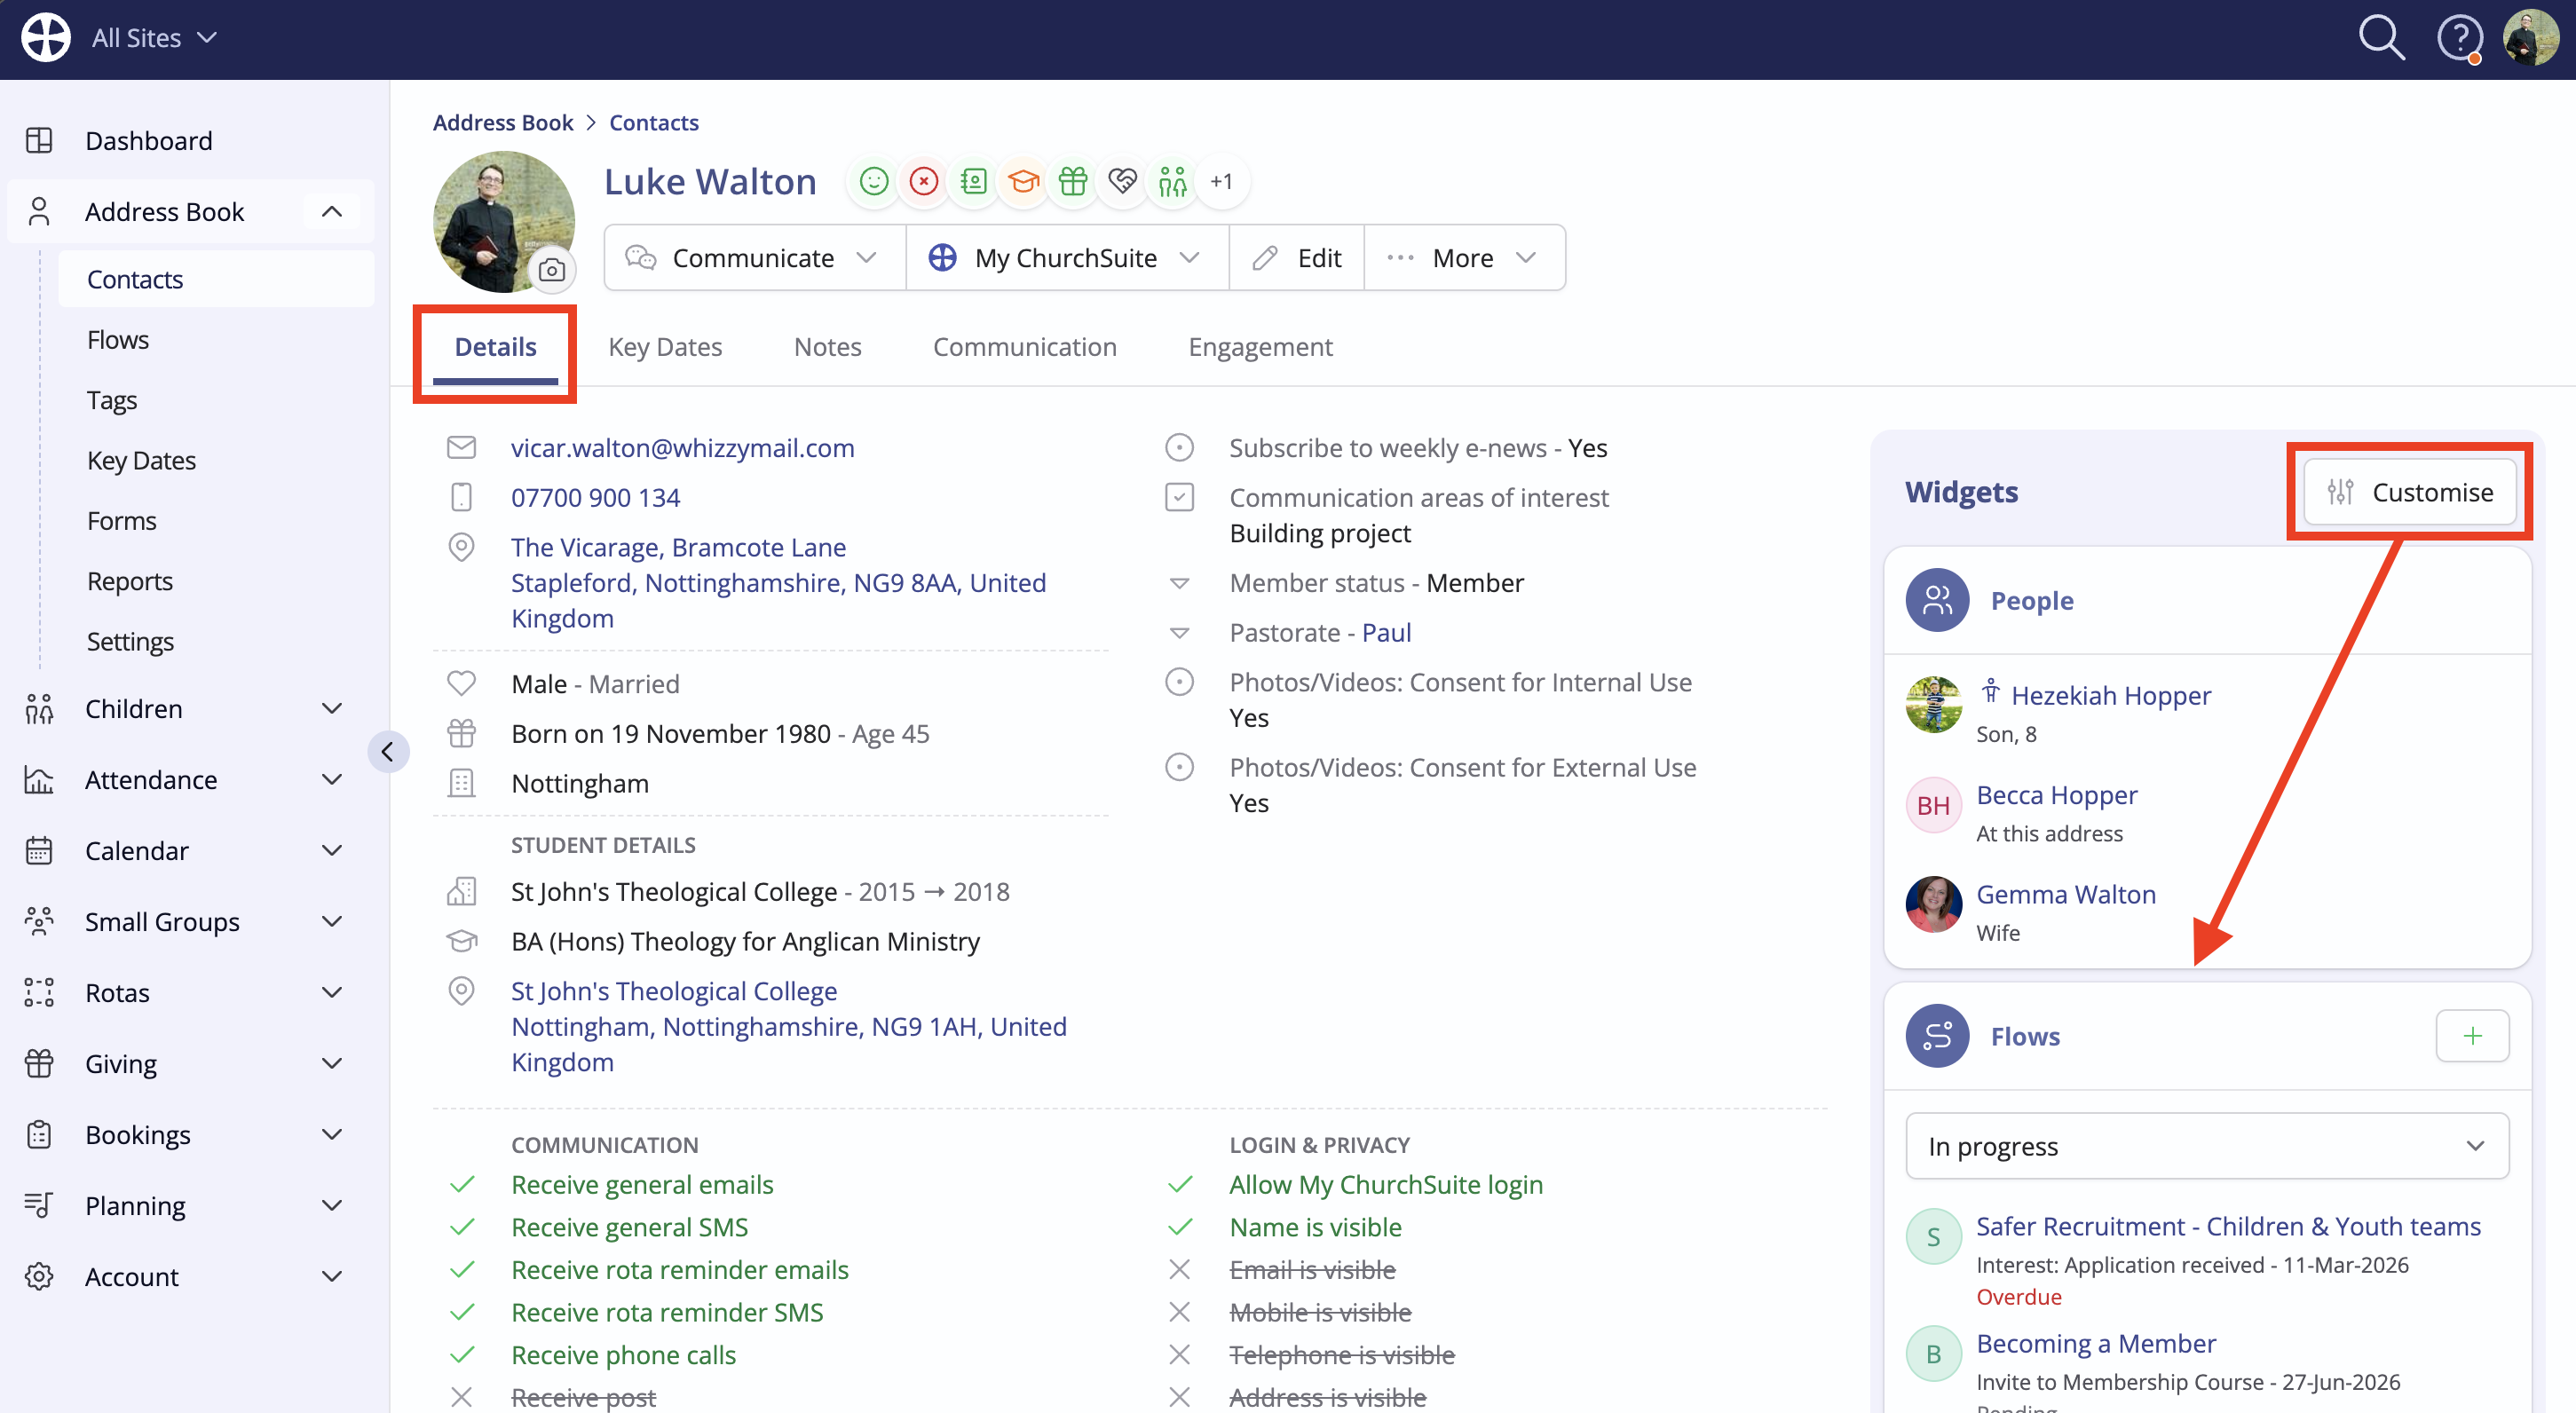
You can add people to Flows using the Flows widget on either the Details tab (where it's an optional widget) or the Engagement tab (where it's always visible), using the Add to flow action. Note that you can't add archived people to Flows.
3. On a Tag 'View'
When working within the Tags section of a module, note the Add to flow bulk action available:
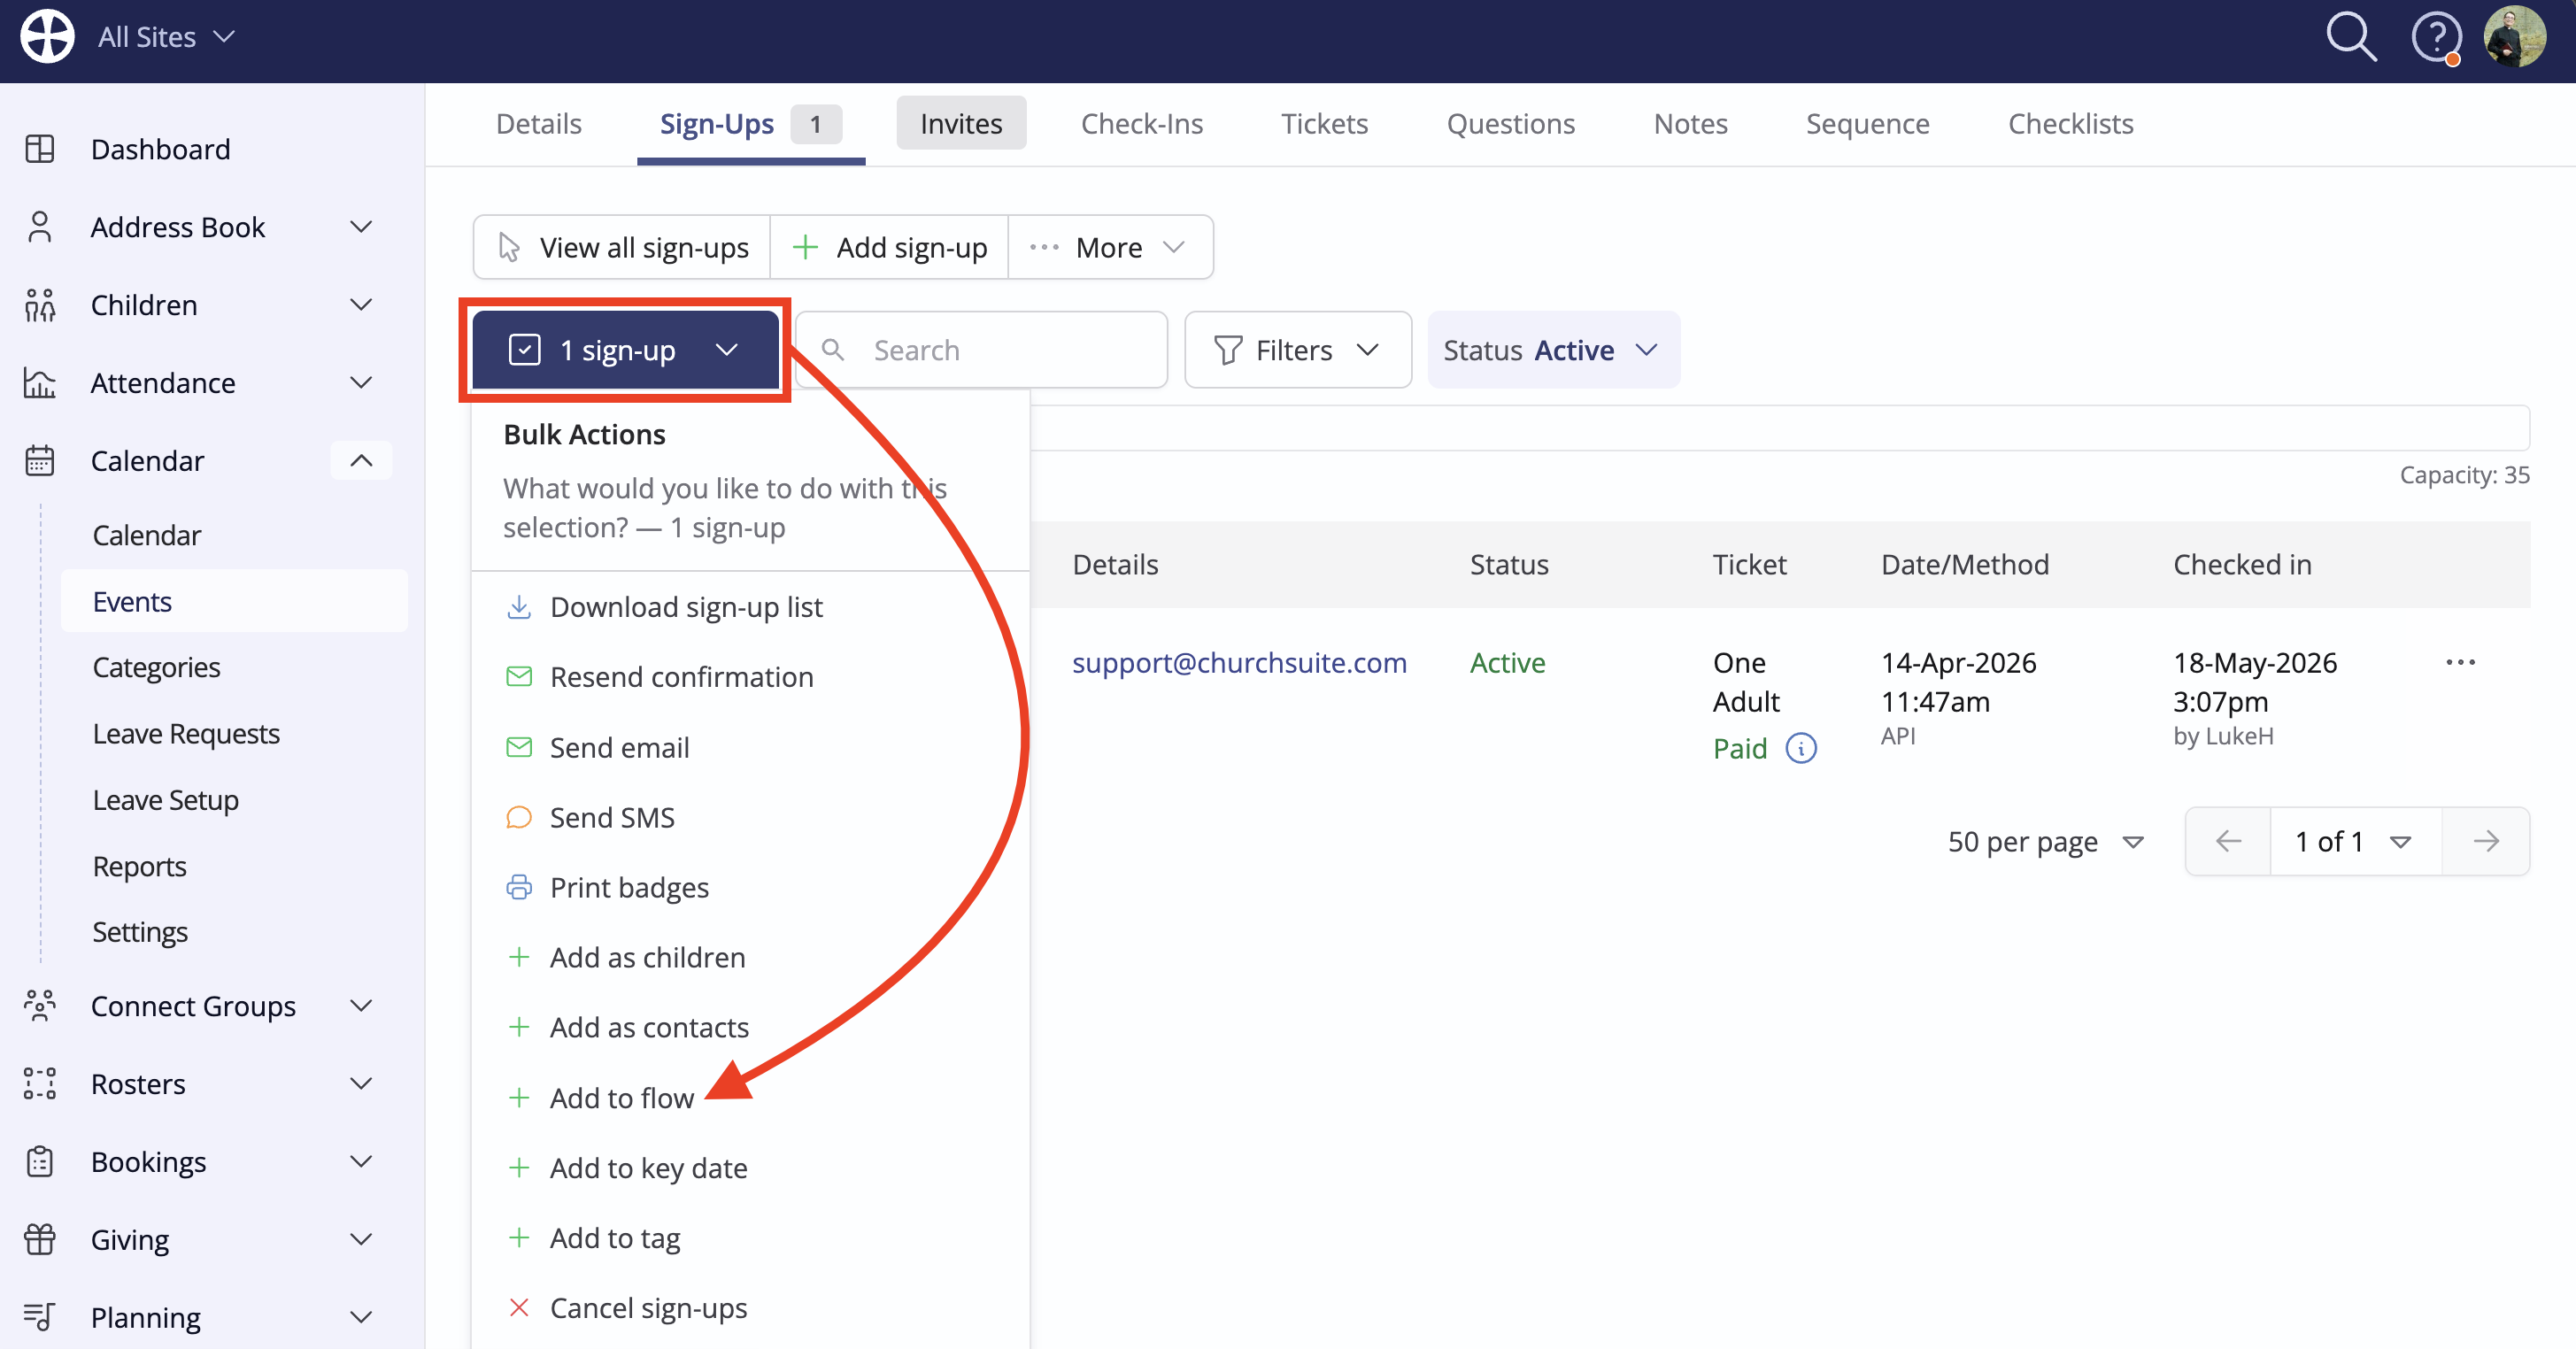
4. On an event 'View'
When viewing a list of Sign-Ups, Invites or Check-Ins on an event View in the Calendar module, the Bulk Actions feature provides an Add to flow action - you can filter the Sign-Ups, Invites, or Check-Ins to be added. Only individuals linked to their contact or child profile can be added to the flow - unlinked individuals cannot be assigned to flows.
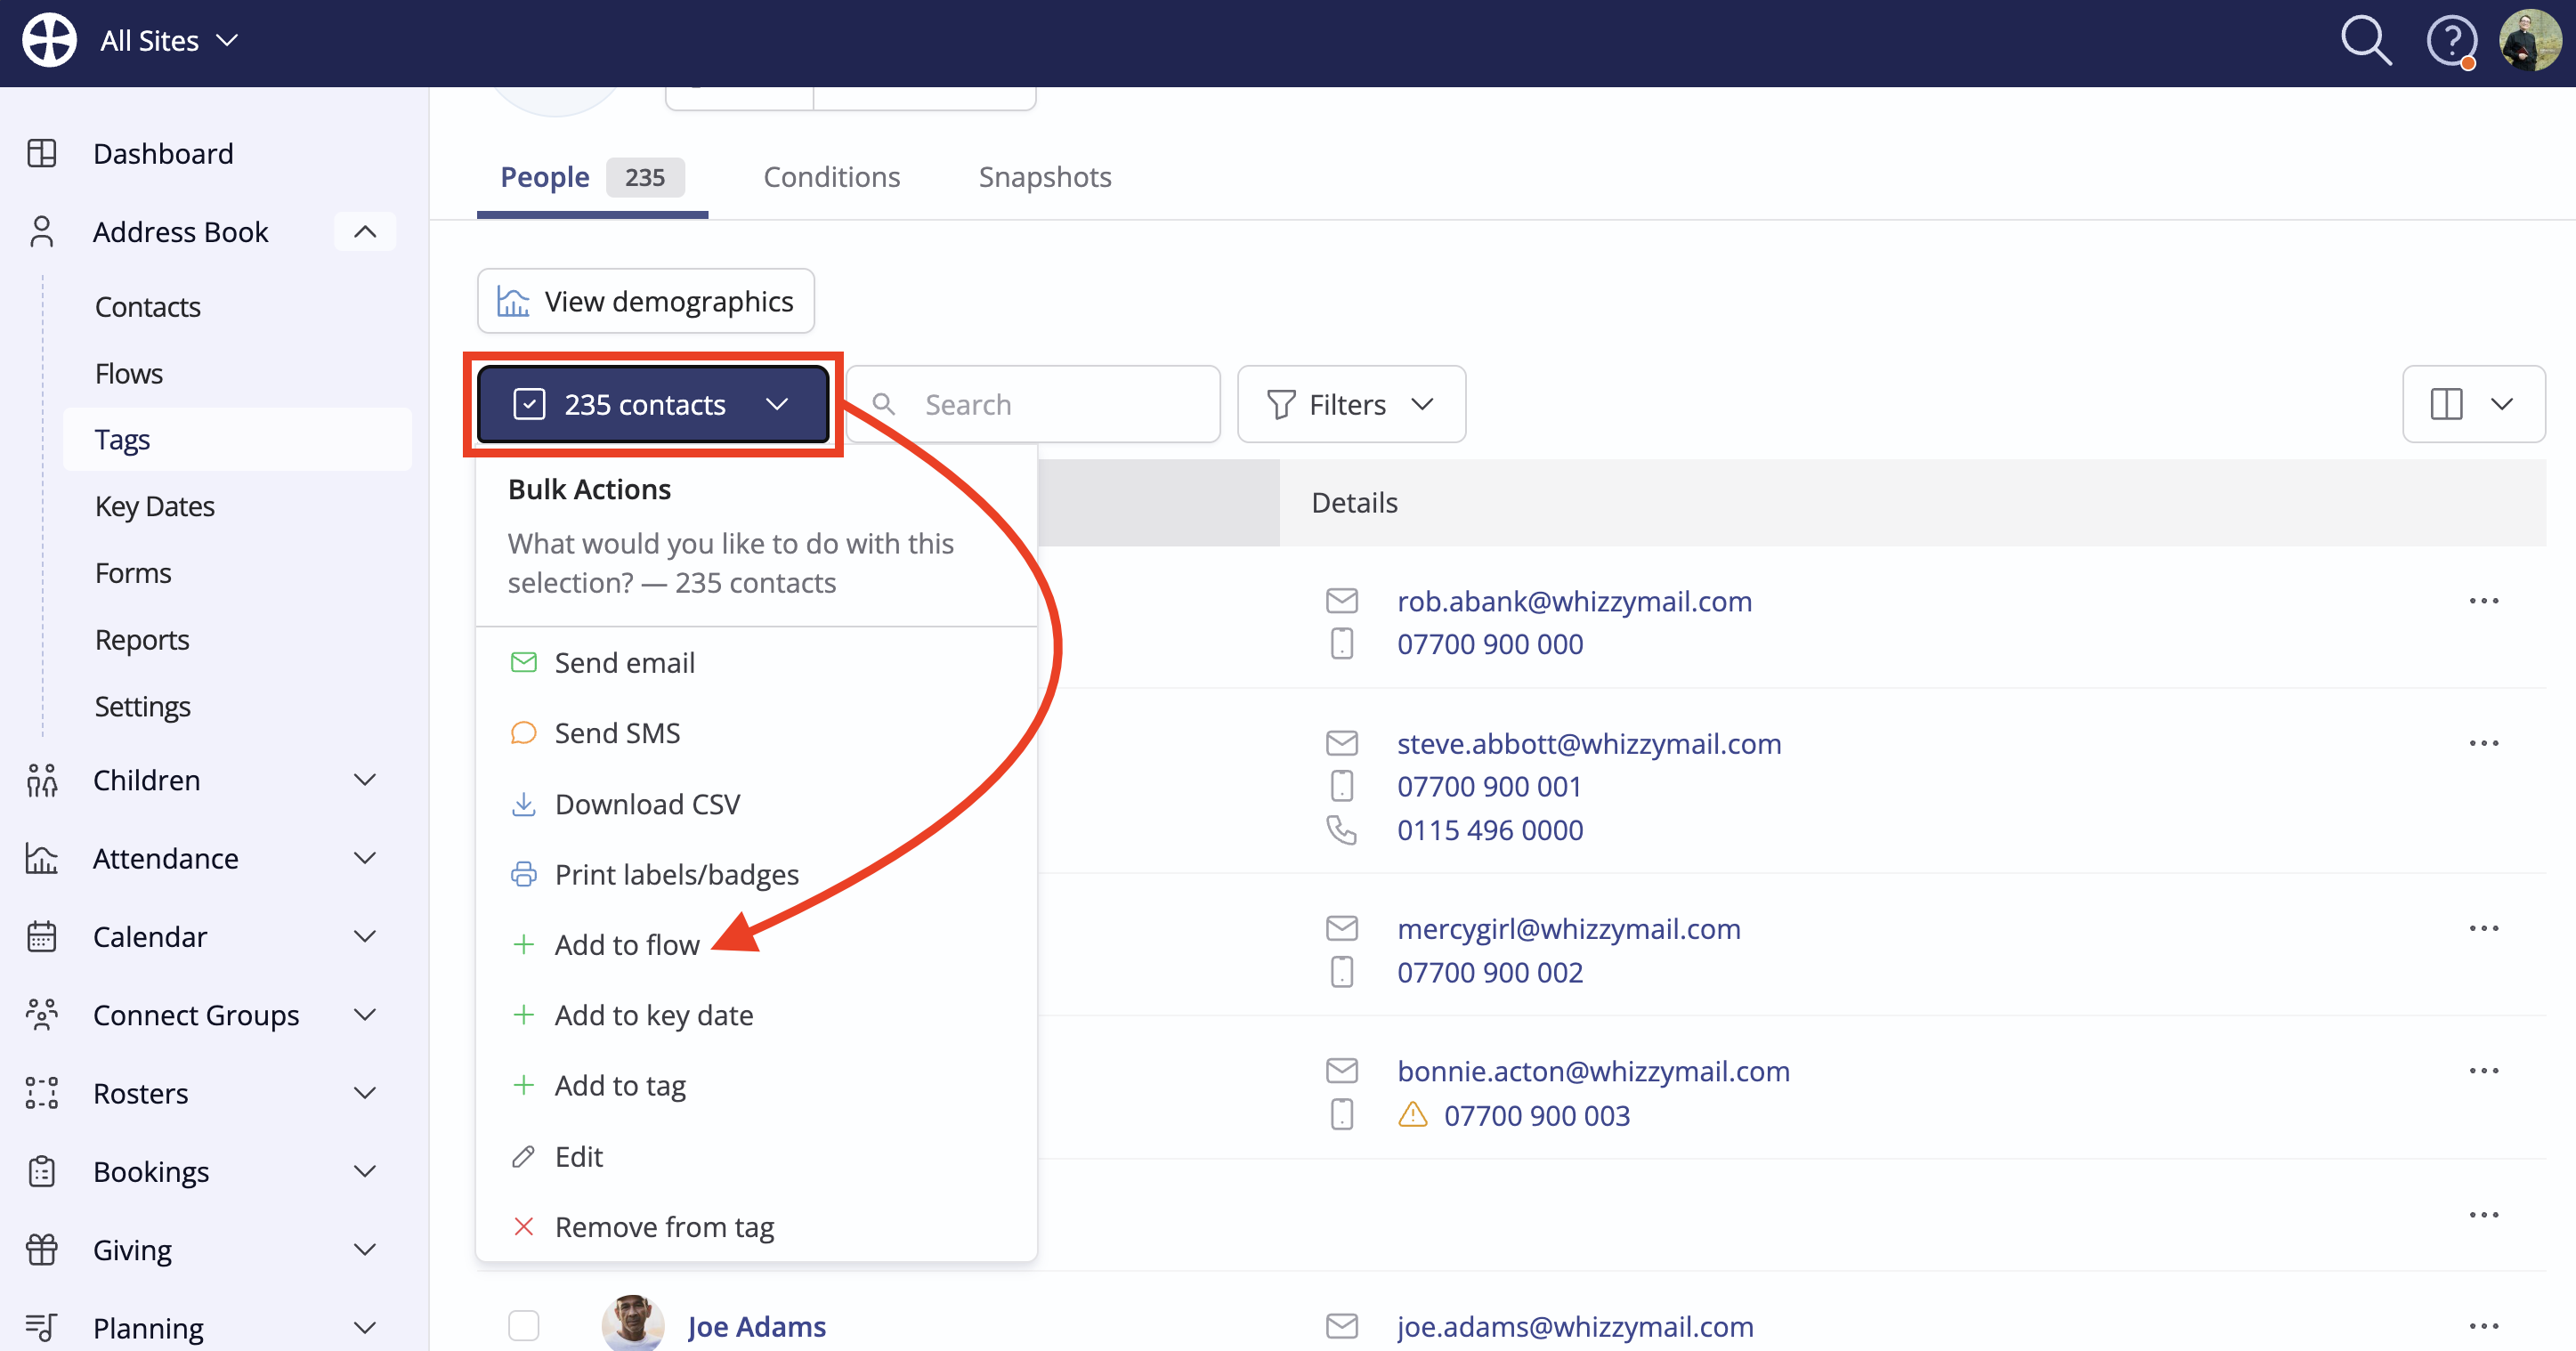
5. Bulk actions
When selecting multiple people in a list, like the Contacts section of the Address Book, note the Add to flow action to bulk-add those chosen people to a flow - in the below example, for instance, the contacts have been filtered to just those with a particular key date:

Adding people to Flows
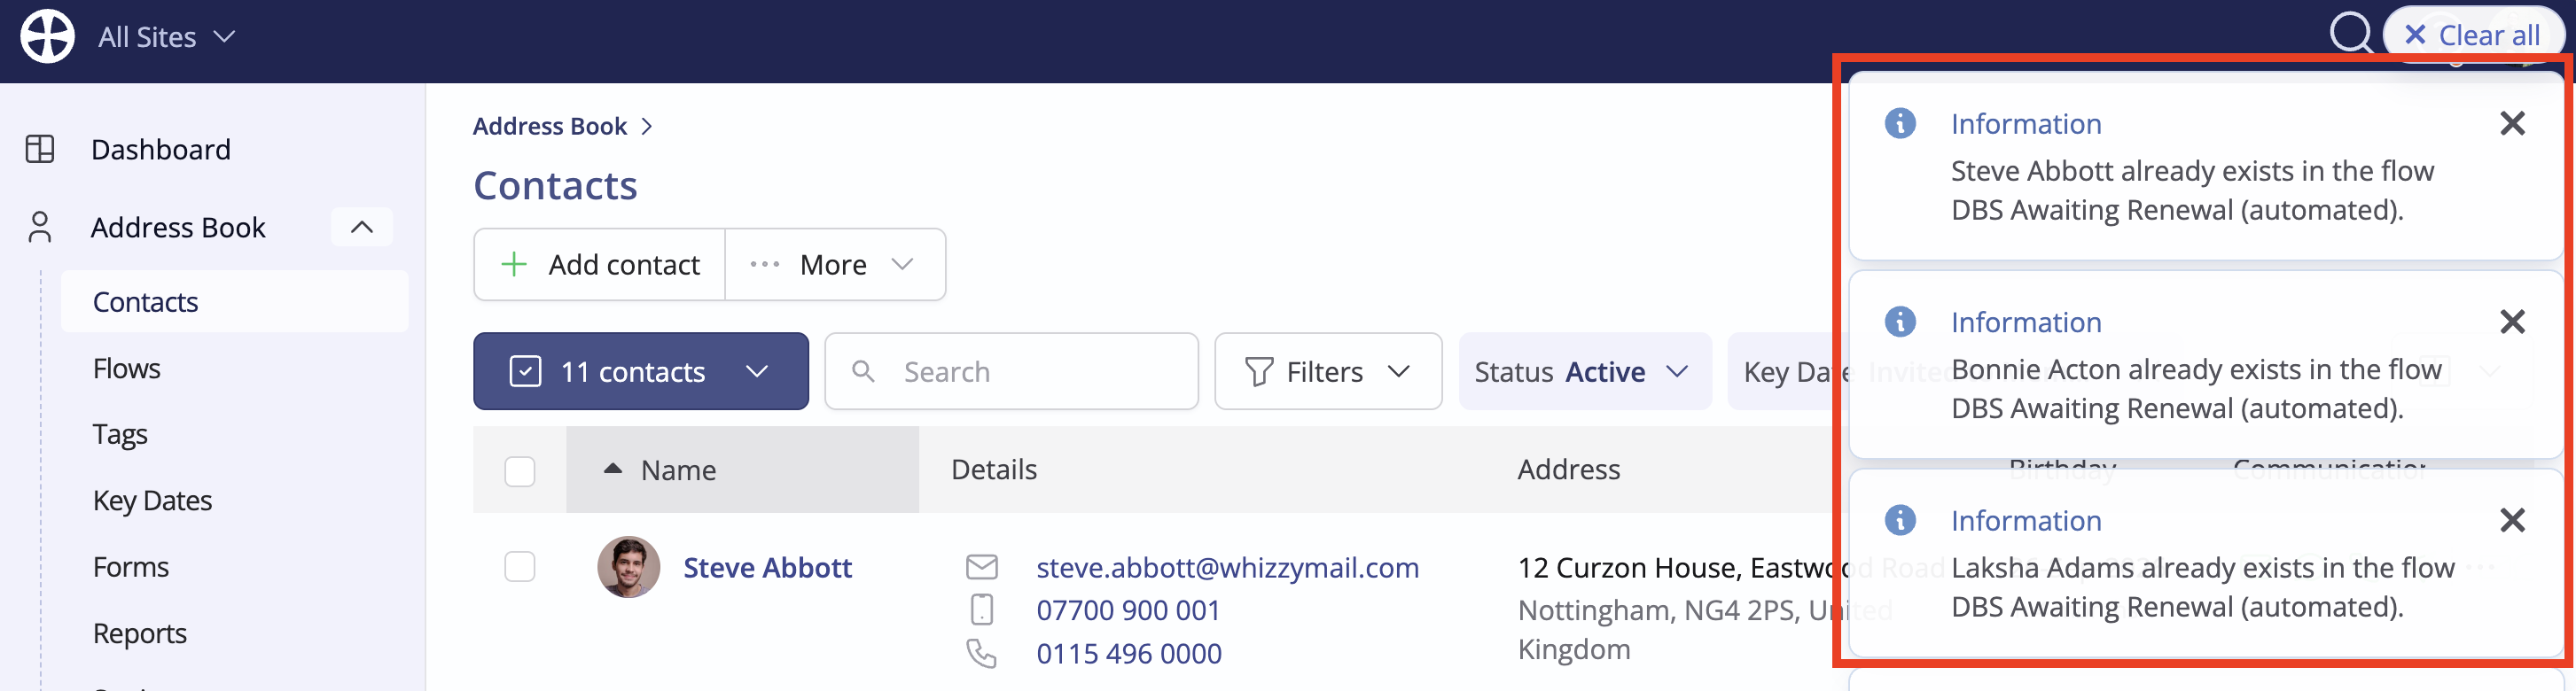
The Add to flow action - including those initiated via one of the methods described above - opens the same pop-up with options to choose the Flow and Stage to which the selected person or people are added. In some contexts, the pop-up also includes a People field that can be used to add more people.
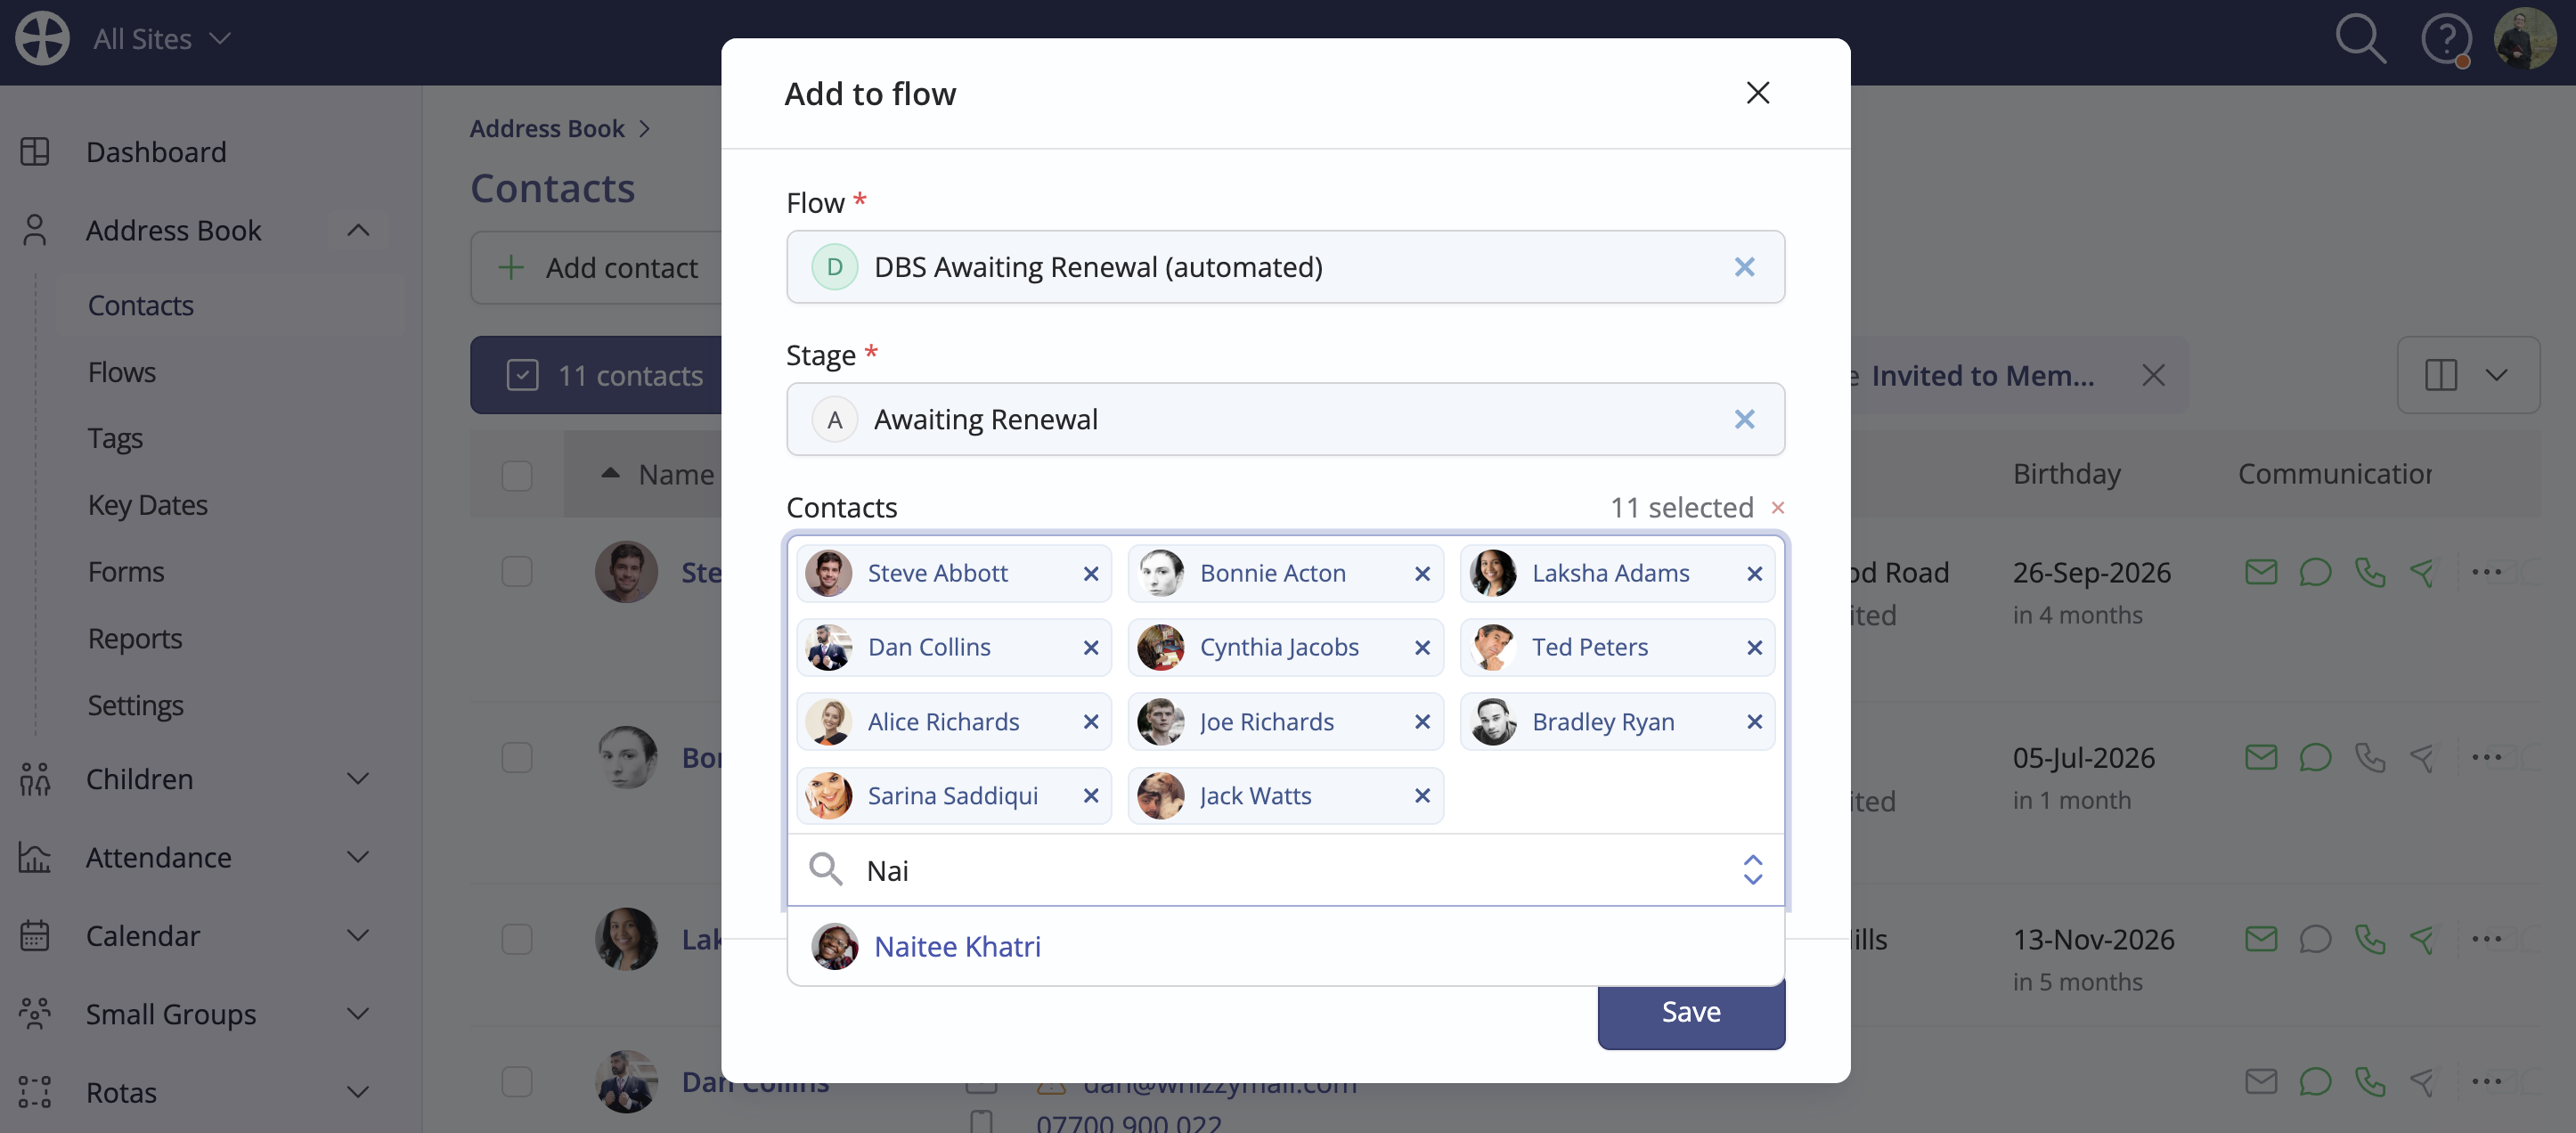
An information message alerts you if the person being added is already in the selected Flow. A person can only exist in a Flow once at a time.
Removing people from Flows
You can remove people from a flow using the Remove Action. Removing people from flows - rather than processing a Move to stage: Completed action - will delete the removed person's flow tracking data, rather than completing their tracking for that flow.
Processing people through Flows
Introduction
As we begin this section, remember that Flows are a feature of your admin-facing ChurchSuite modules. Only a module User can process people and manage flows. Flows are not accessible in the member-facing My ChurchSuite, and those with My ChurchSuite will be unaware of which flows they may be in.
Flow manager and assigned stage reminder notifications are sent to the user's email address, not their linked contact email address. Therefore, sent notification emails are recorded in the user's communication log, not their Address Book profile log.
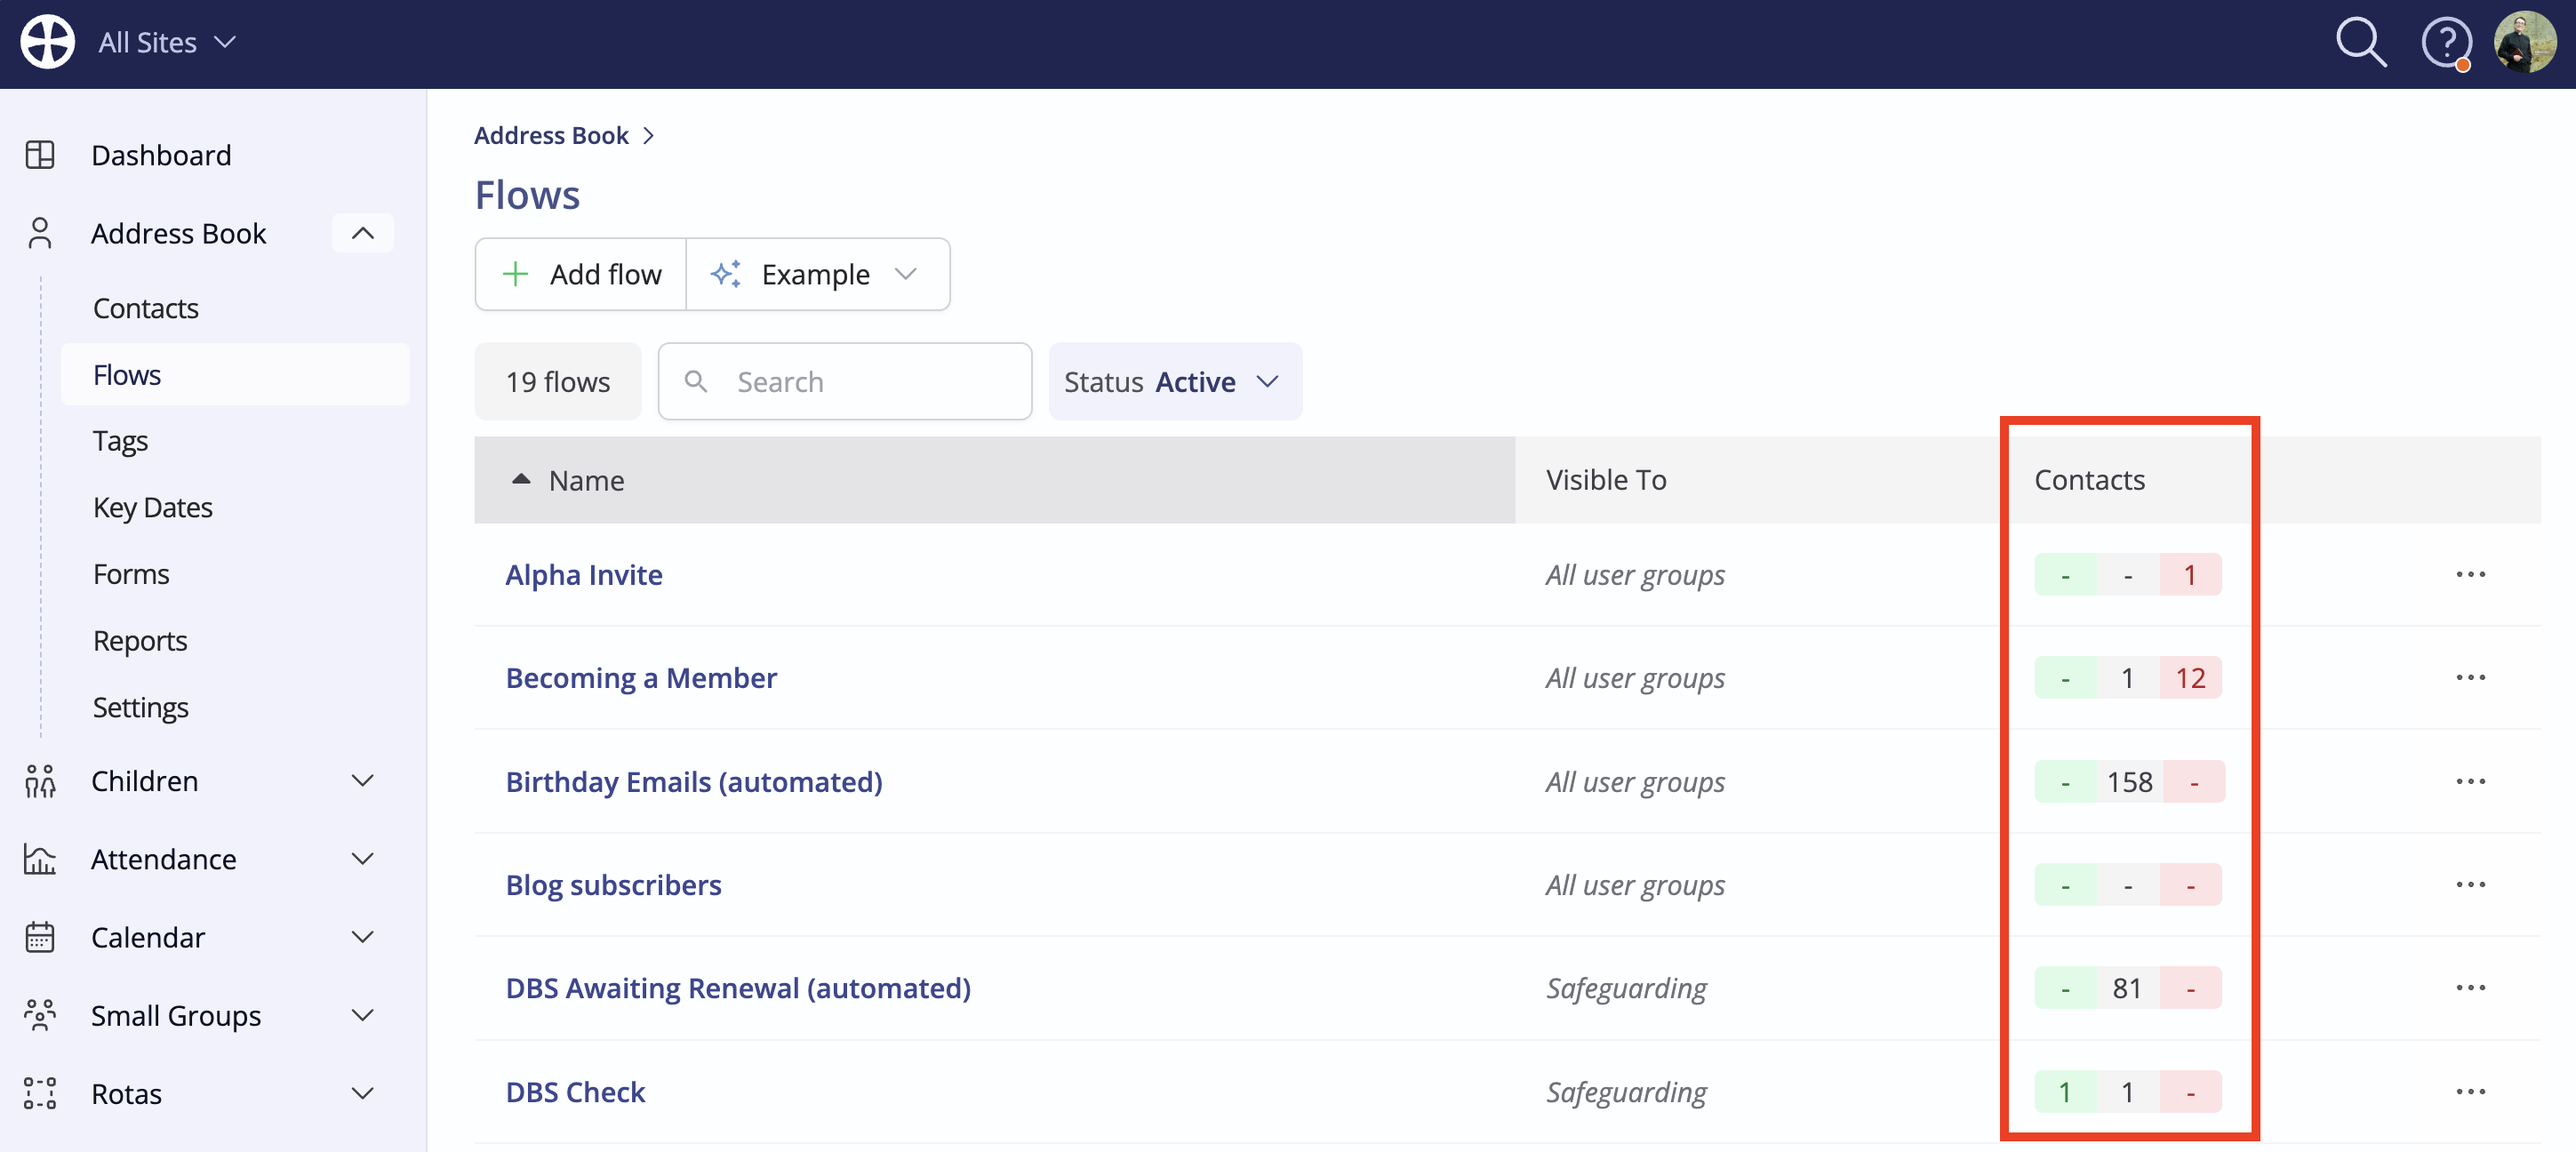
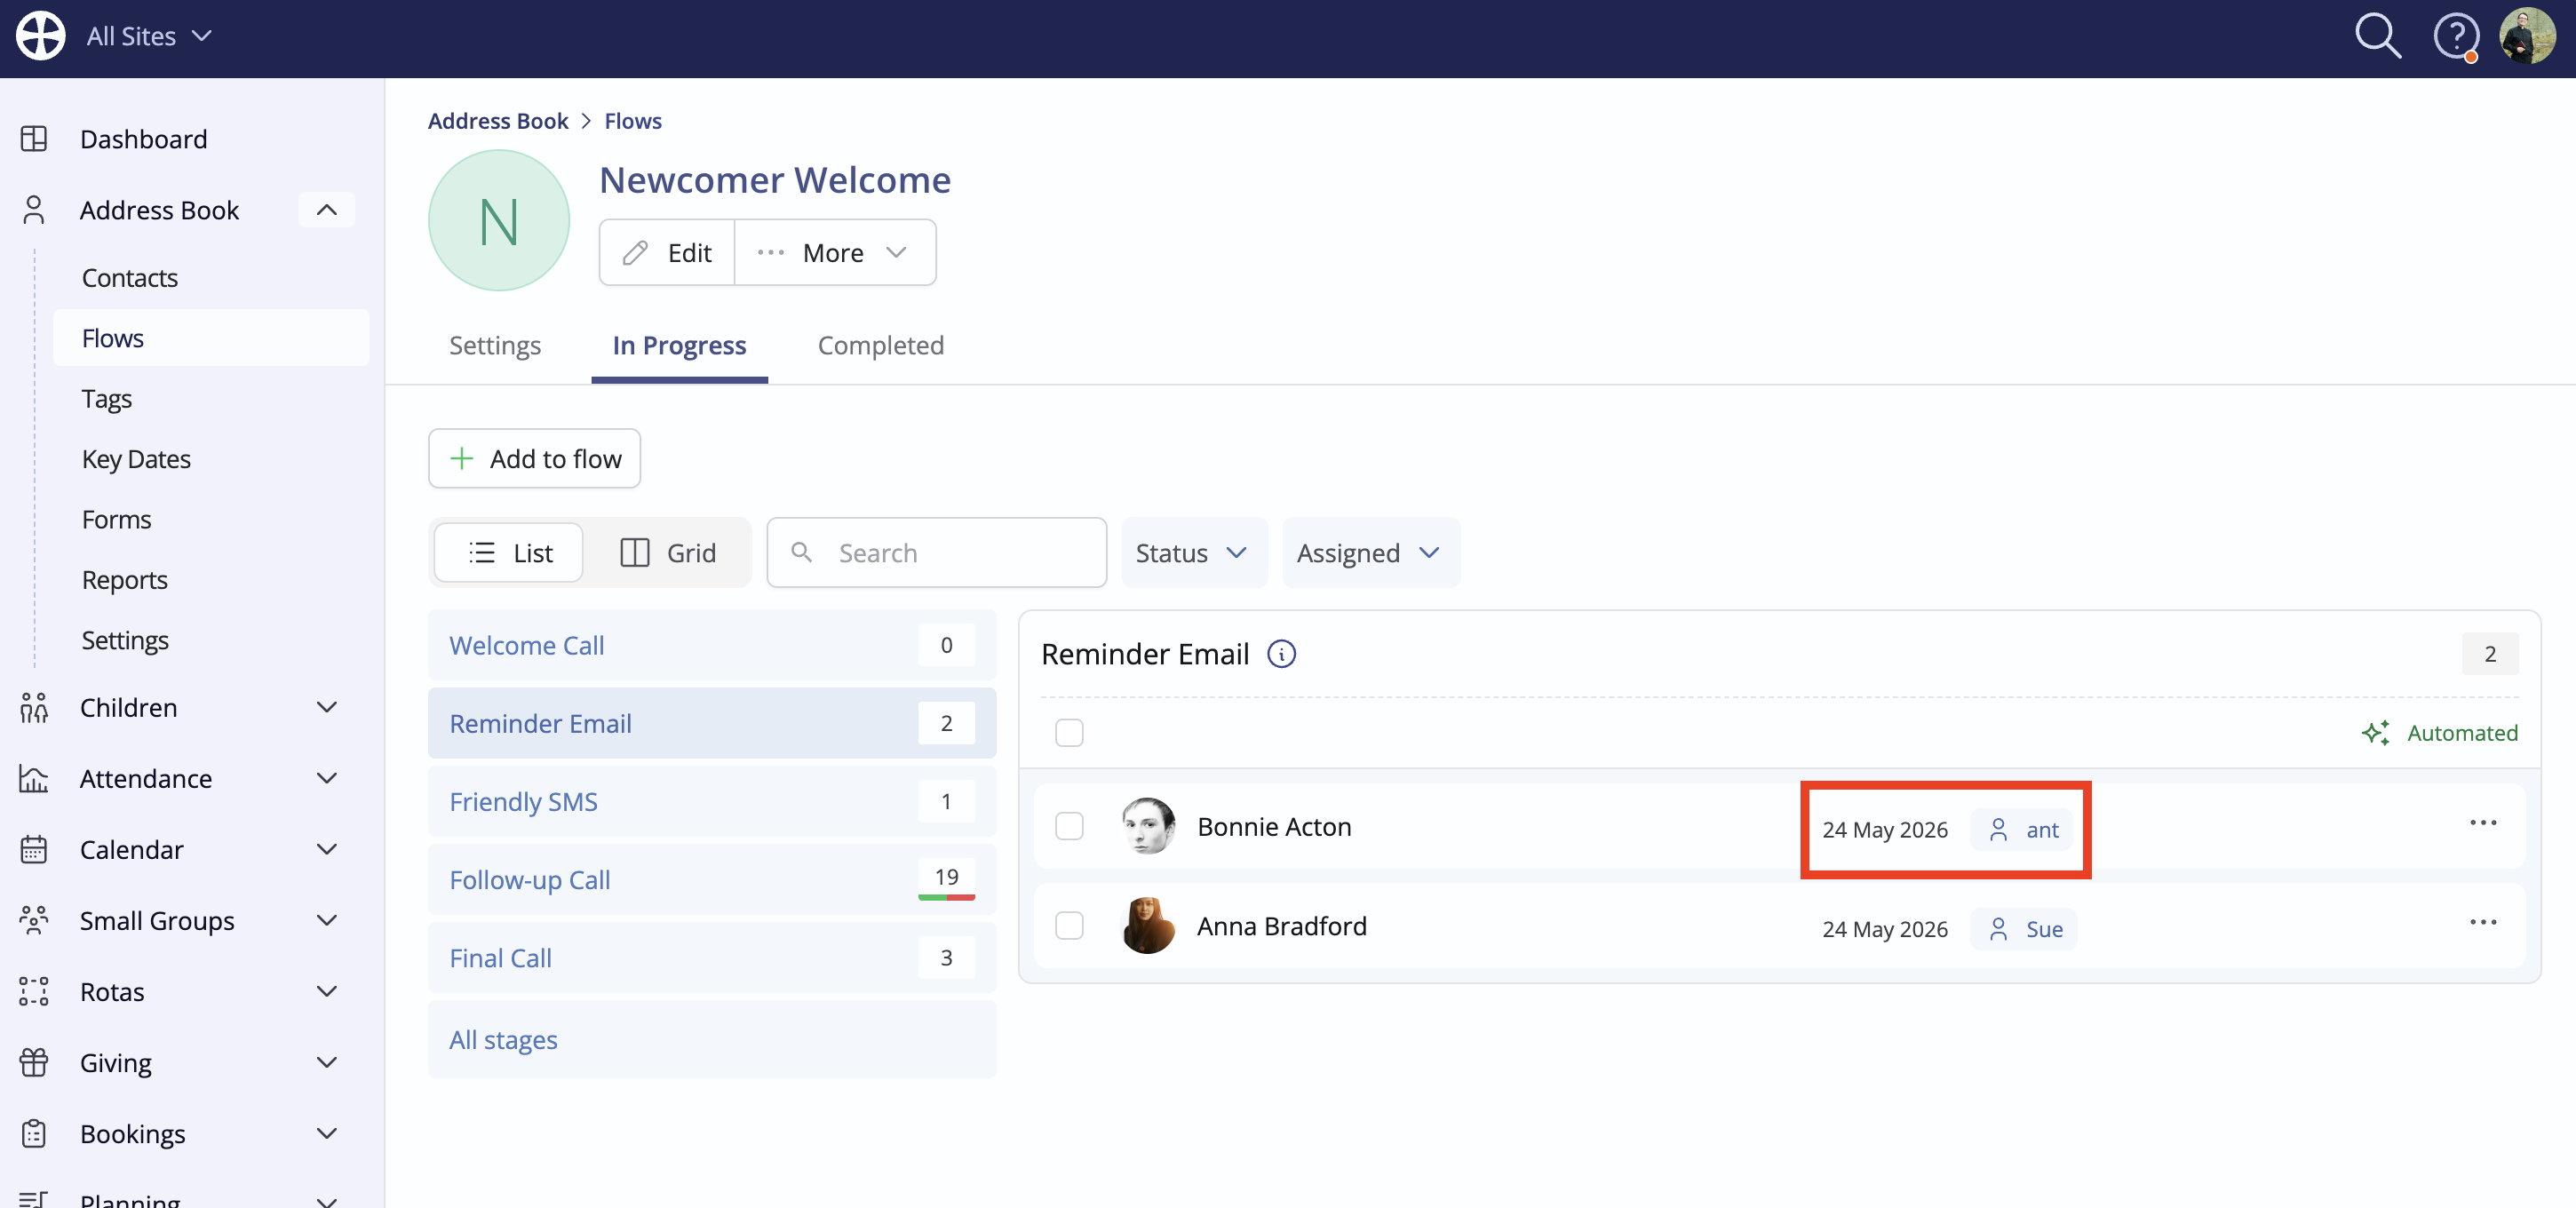
When viewing the Flows section of a module, users see an overview of the status of people in each Flow, showing the number of those who are pending (grey), due (green), or overdue (red) for processing. Clicking on a coloured status pill opens the Flow filtered for that status. Clicking on the Flow Name opens the Flow unfiltered.
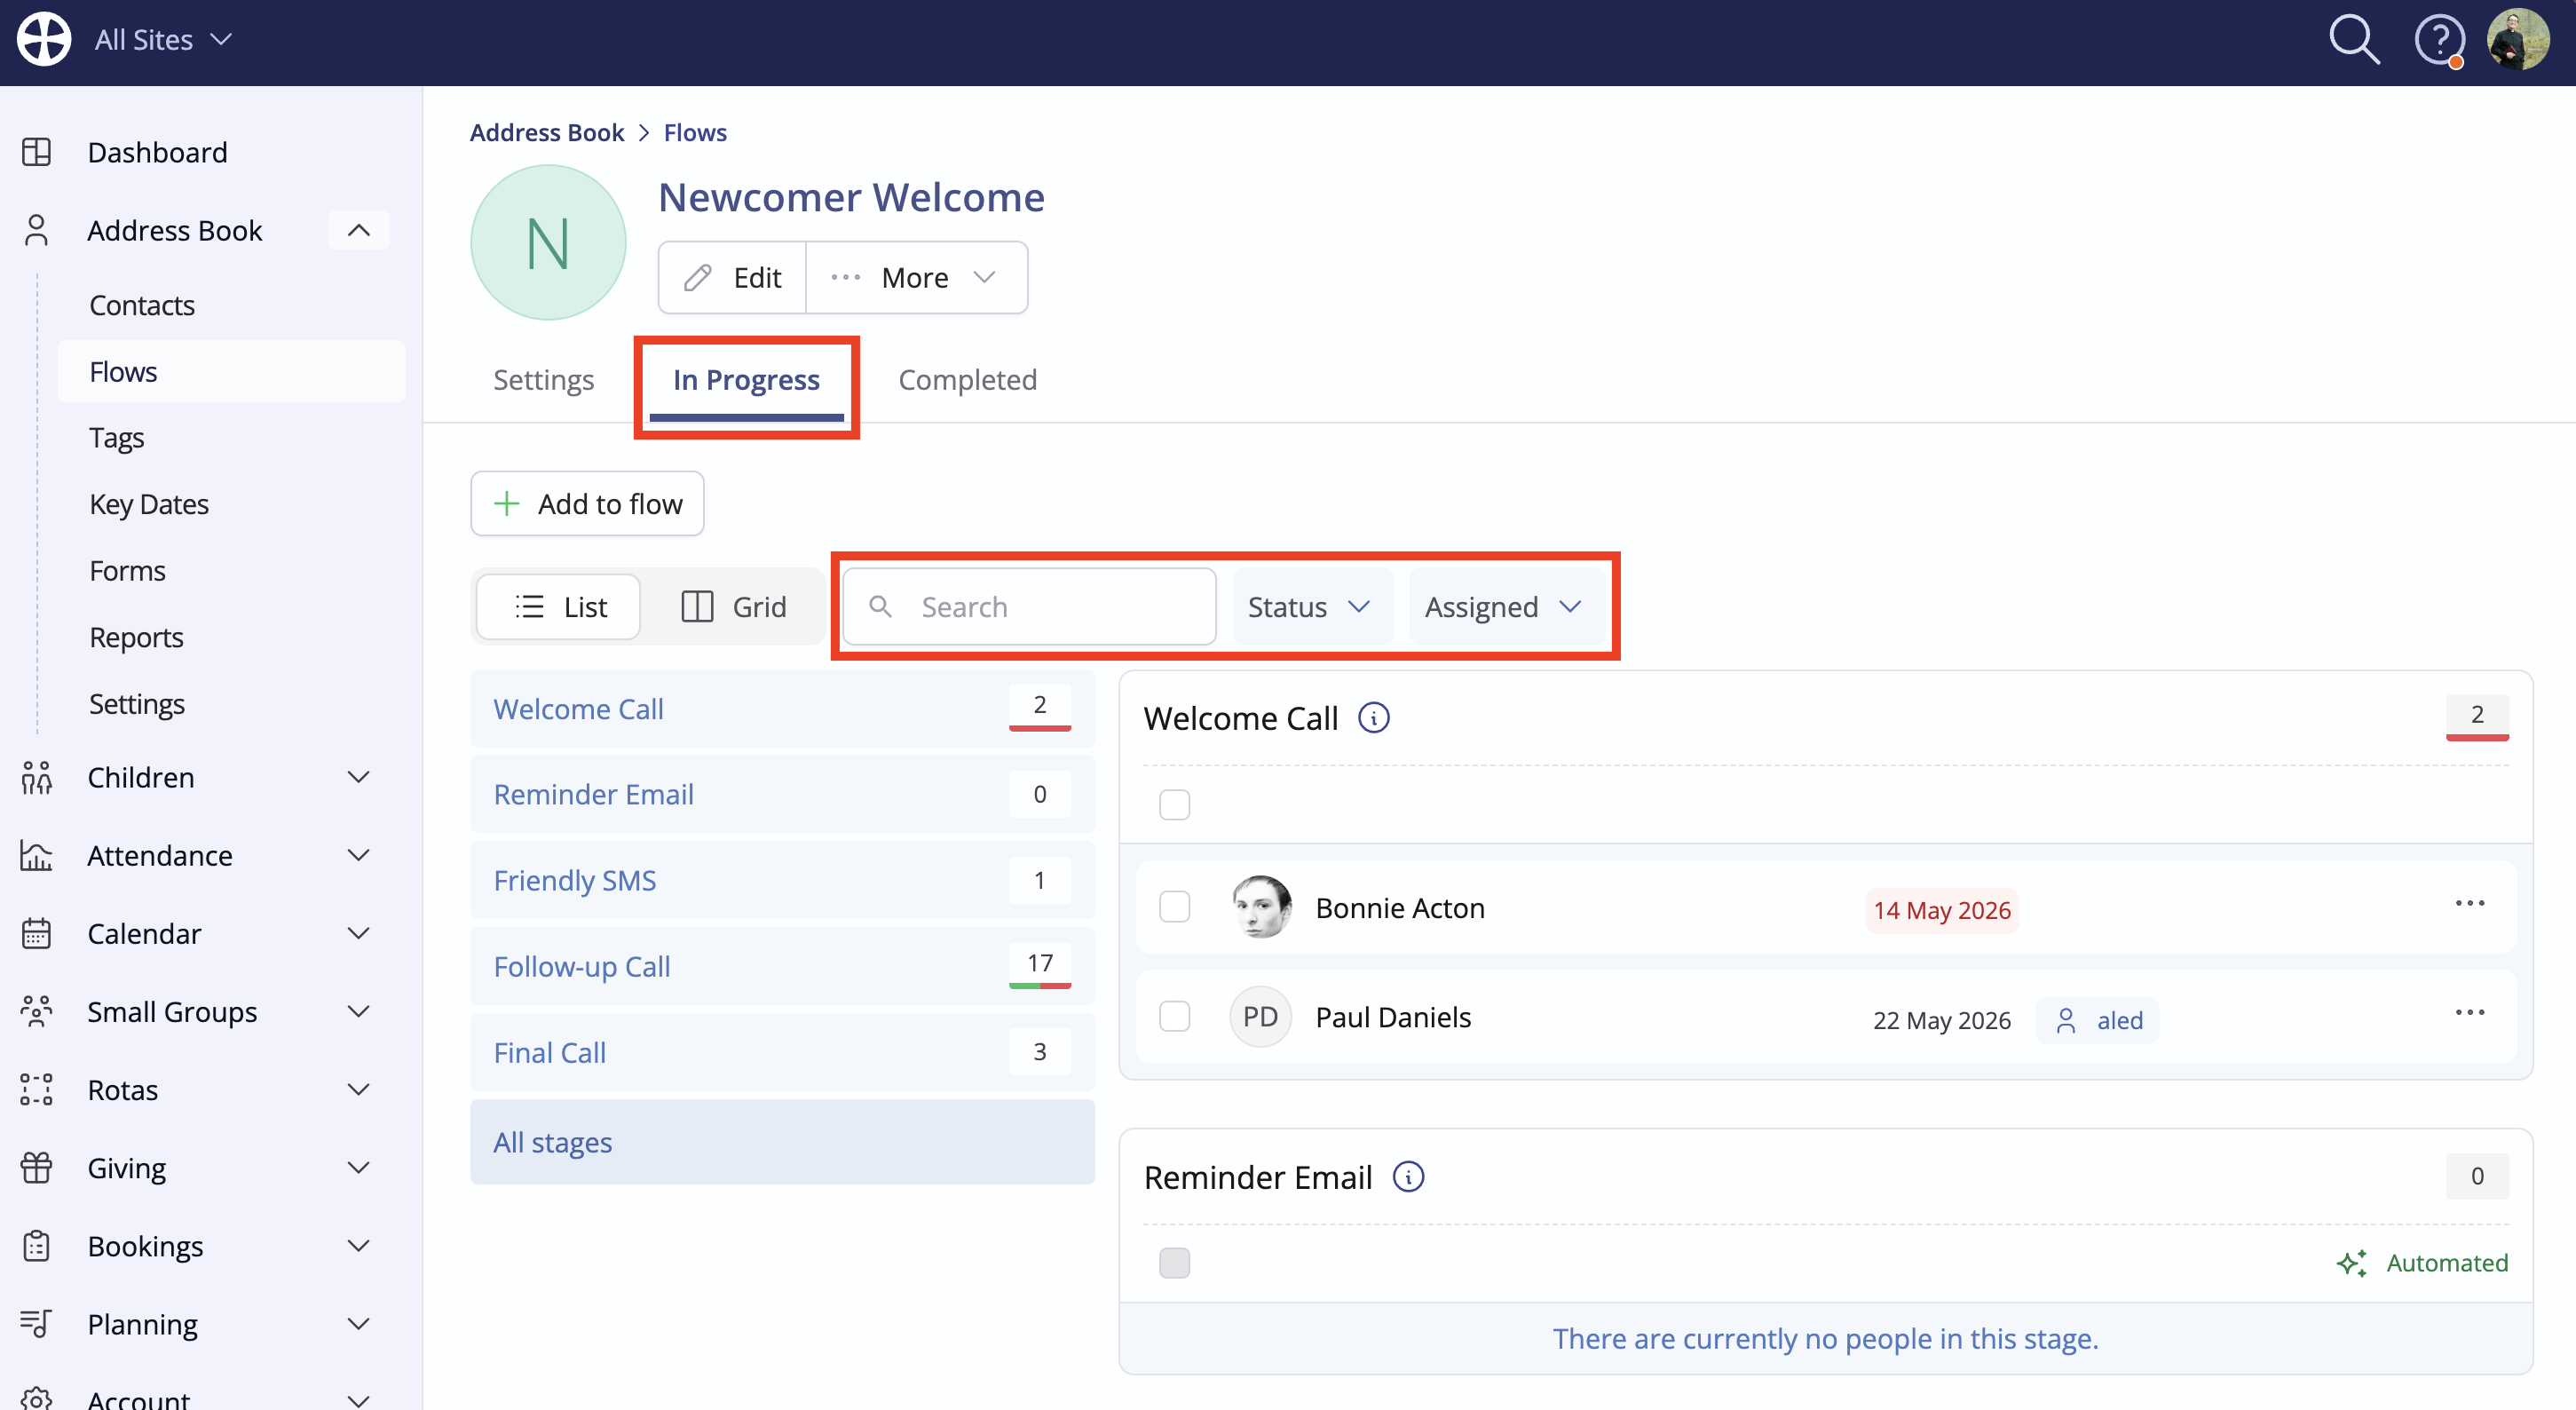
From the flow 'View', the In Progress tab shows the same status summary and a list of people in each stage. Clicking on a stage name in the summary list will bring the people in that stage into focus, and clicking on a coloured status pill filters the list of people in that stage with that status - pending (grey), due (green) or overdue (red). Note also the Status and StatusAssigned filters at the top of the list and the Search bar, which can be used to locate individuals within a long list, who may be at any stage in the flow - the Search auto-filters as you type.
Each person's Due date is shown. Any 'Pending' status individuals - shown italicised and representing new people added via a web-embedded form - must first be Set as active (by clicking on their name in the flow) before they can be further processed. In the same way, as each person becomes due, click their name to open a pop-up that allows you to review the actions to be processed and process them.
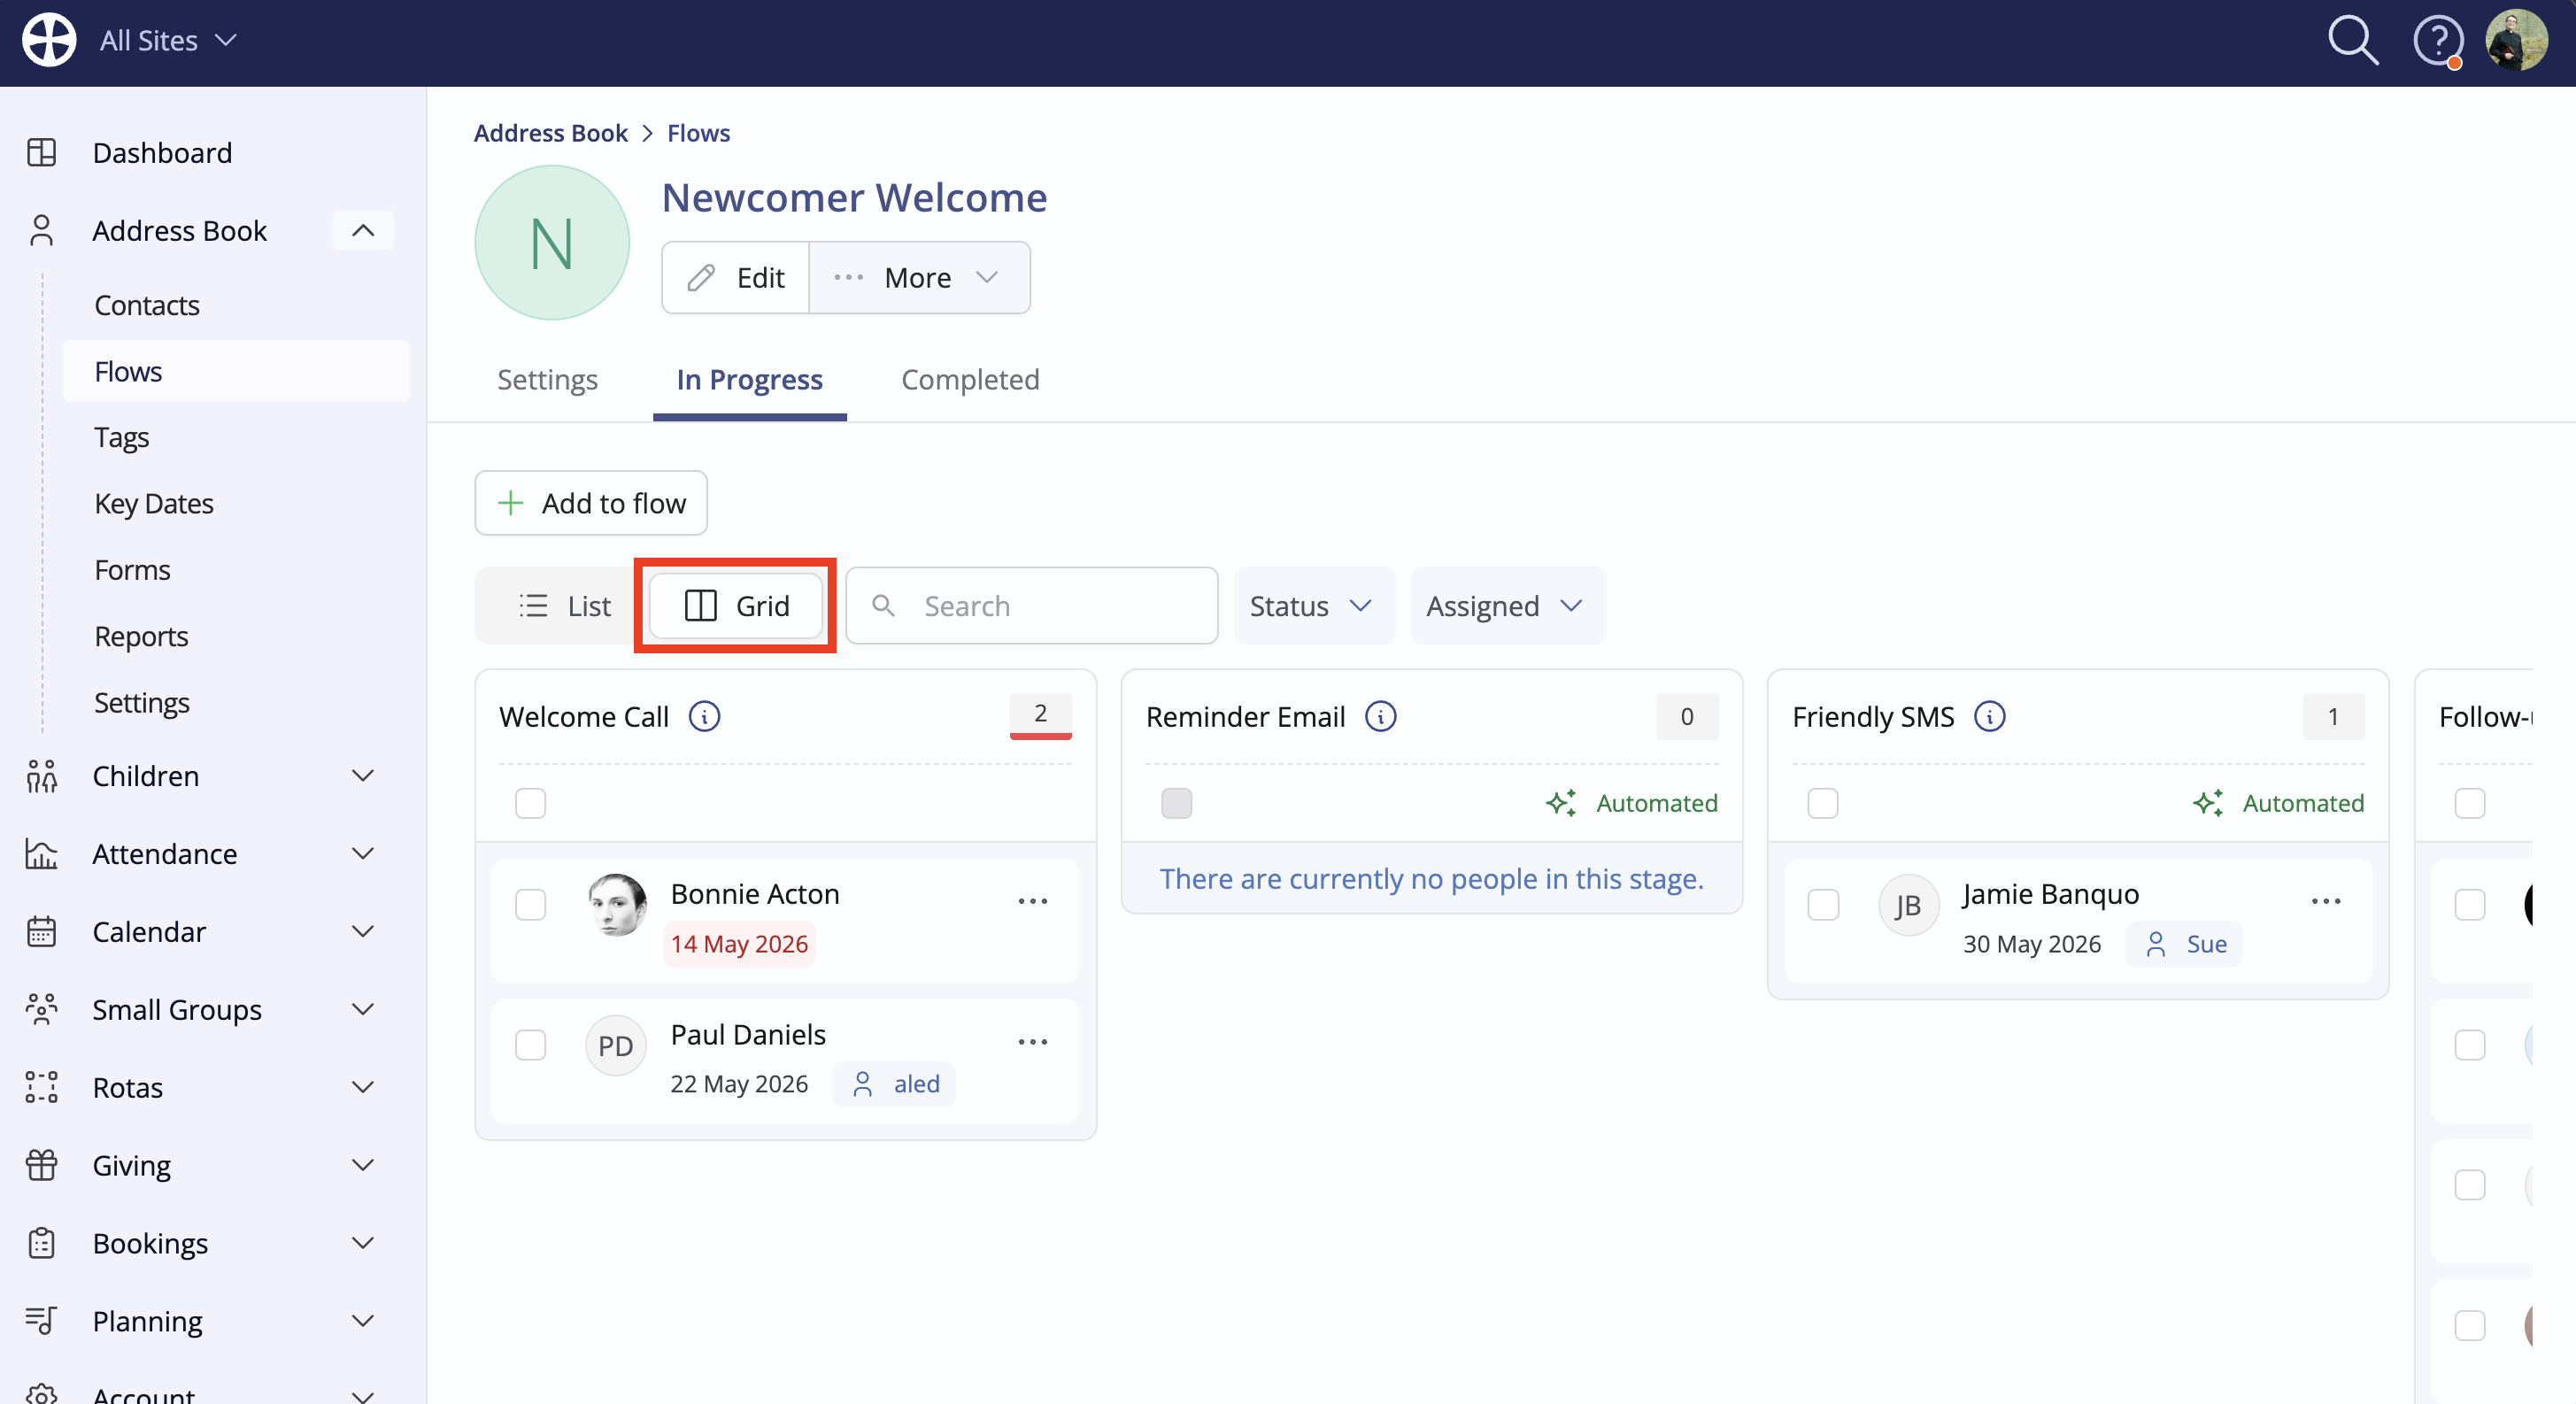
Top tip! Kanban style views...
For users who would prefer to see flows in a Kanban-style board, click Grid to switch the view...
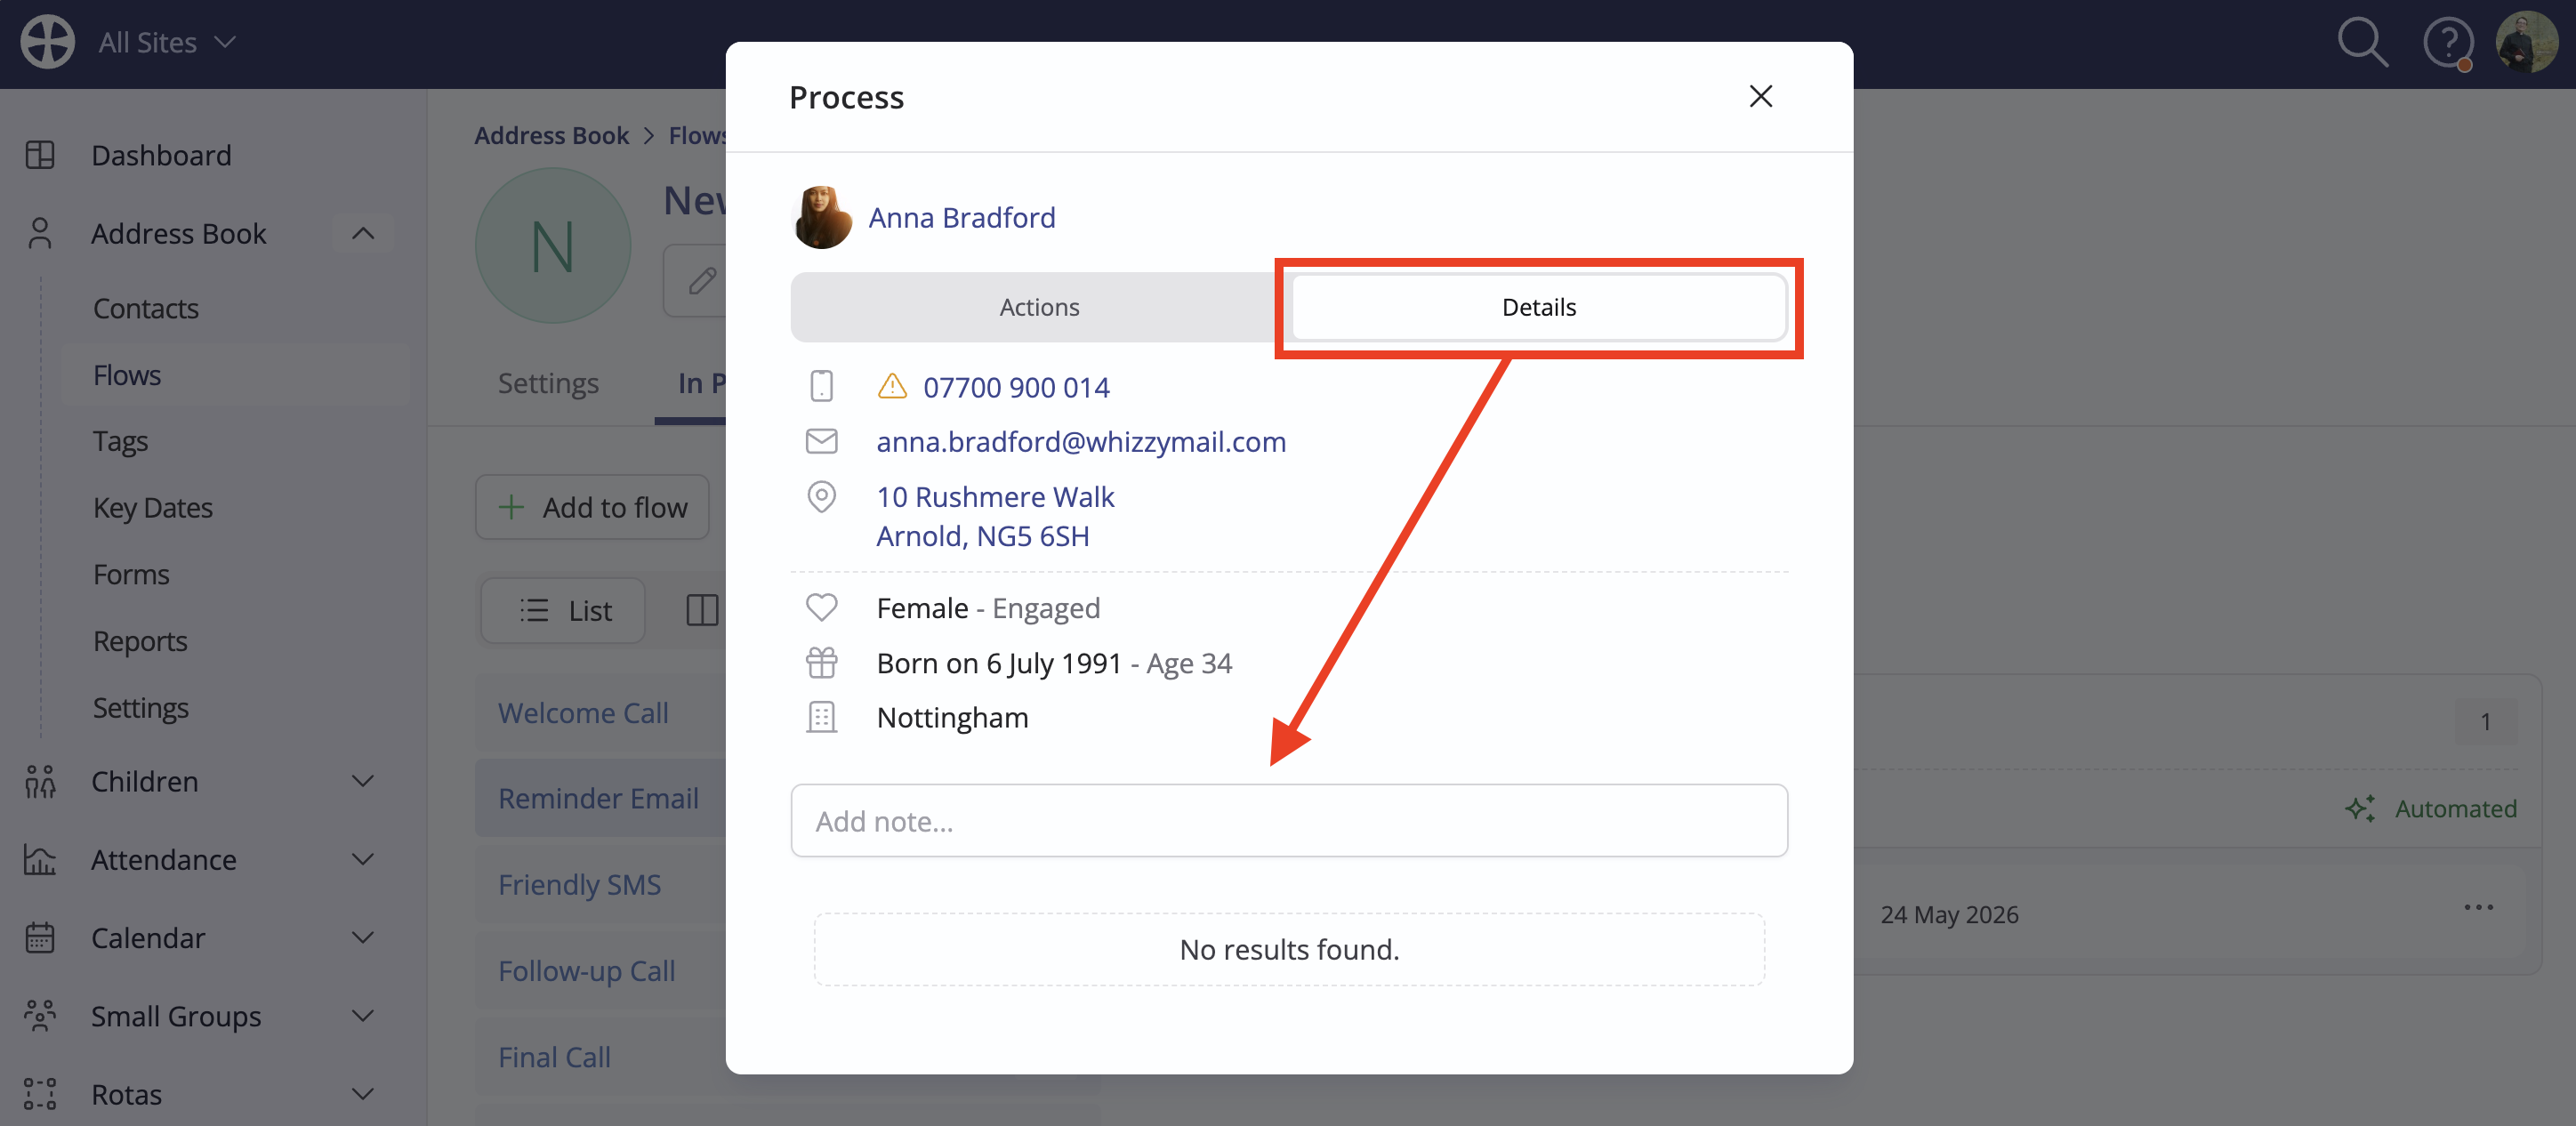
Processing people
The Process pop-up is divided into two tabs. The Details tab shows basic contact details and the notes history. Users can also add Notes, which are ideal for recording details of telephone conversations and follow-up that may be needed. Notes are added with the same visibility restriction as that of the flow, so if the flow visibility is restricted to the "Welcome Team" user group, any notes added here are also restricted to the "Welcome Team"; however, the note Visible to can be optionally changed before it is saved.
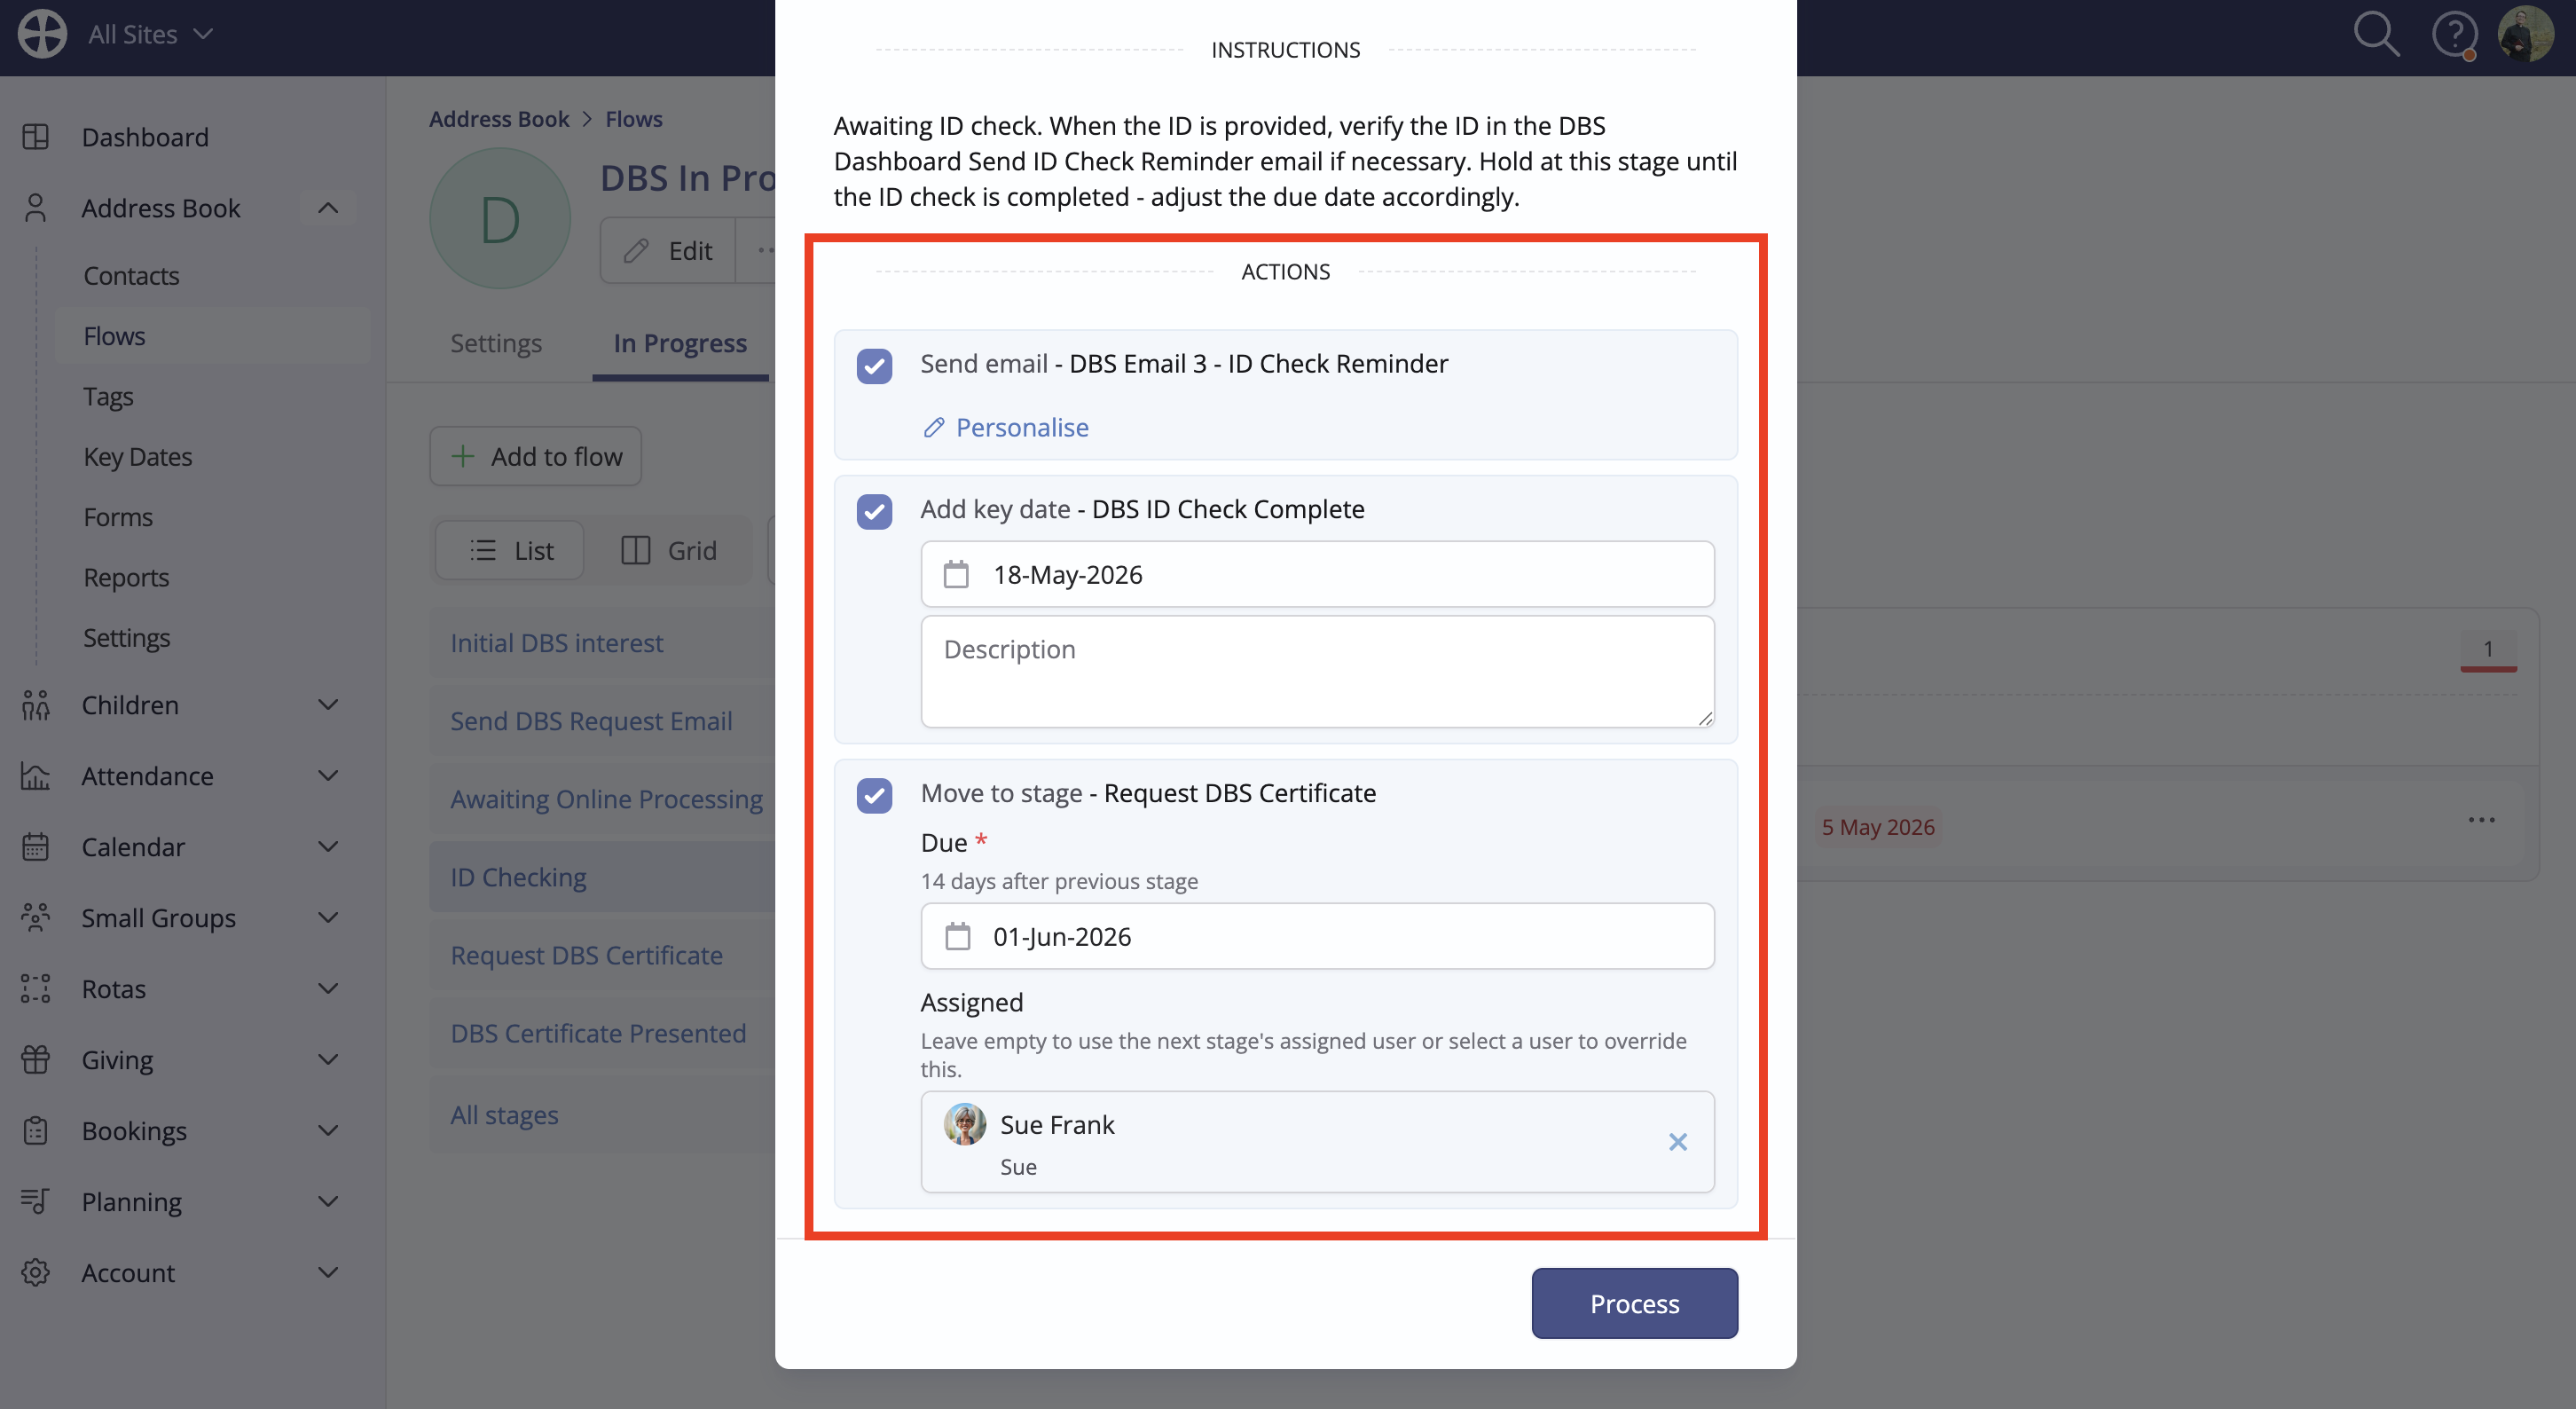
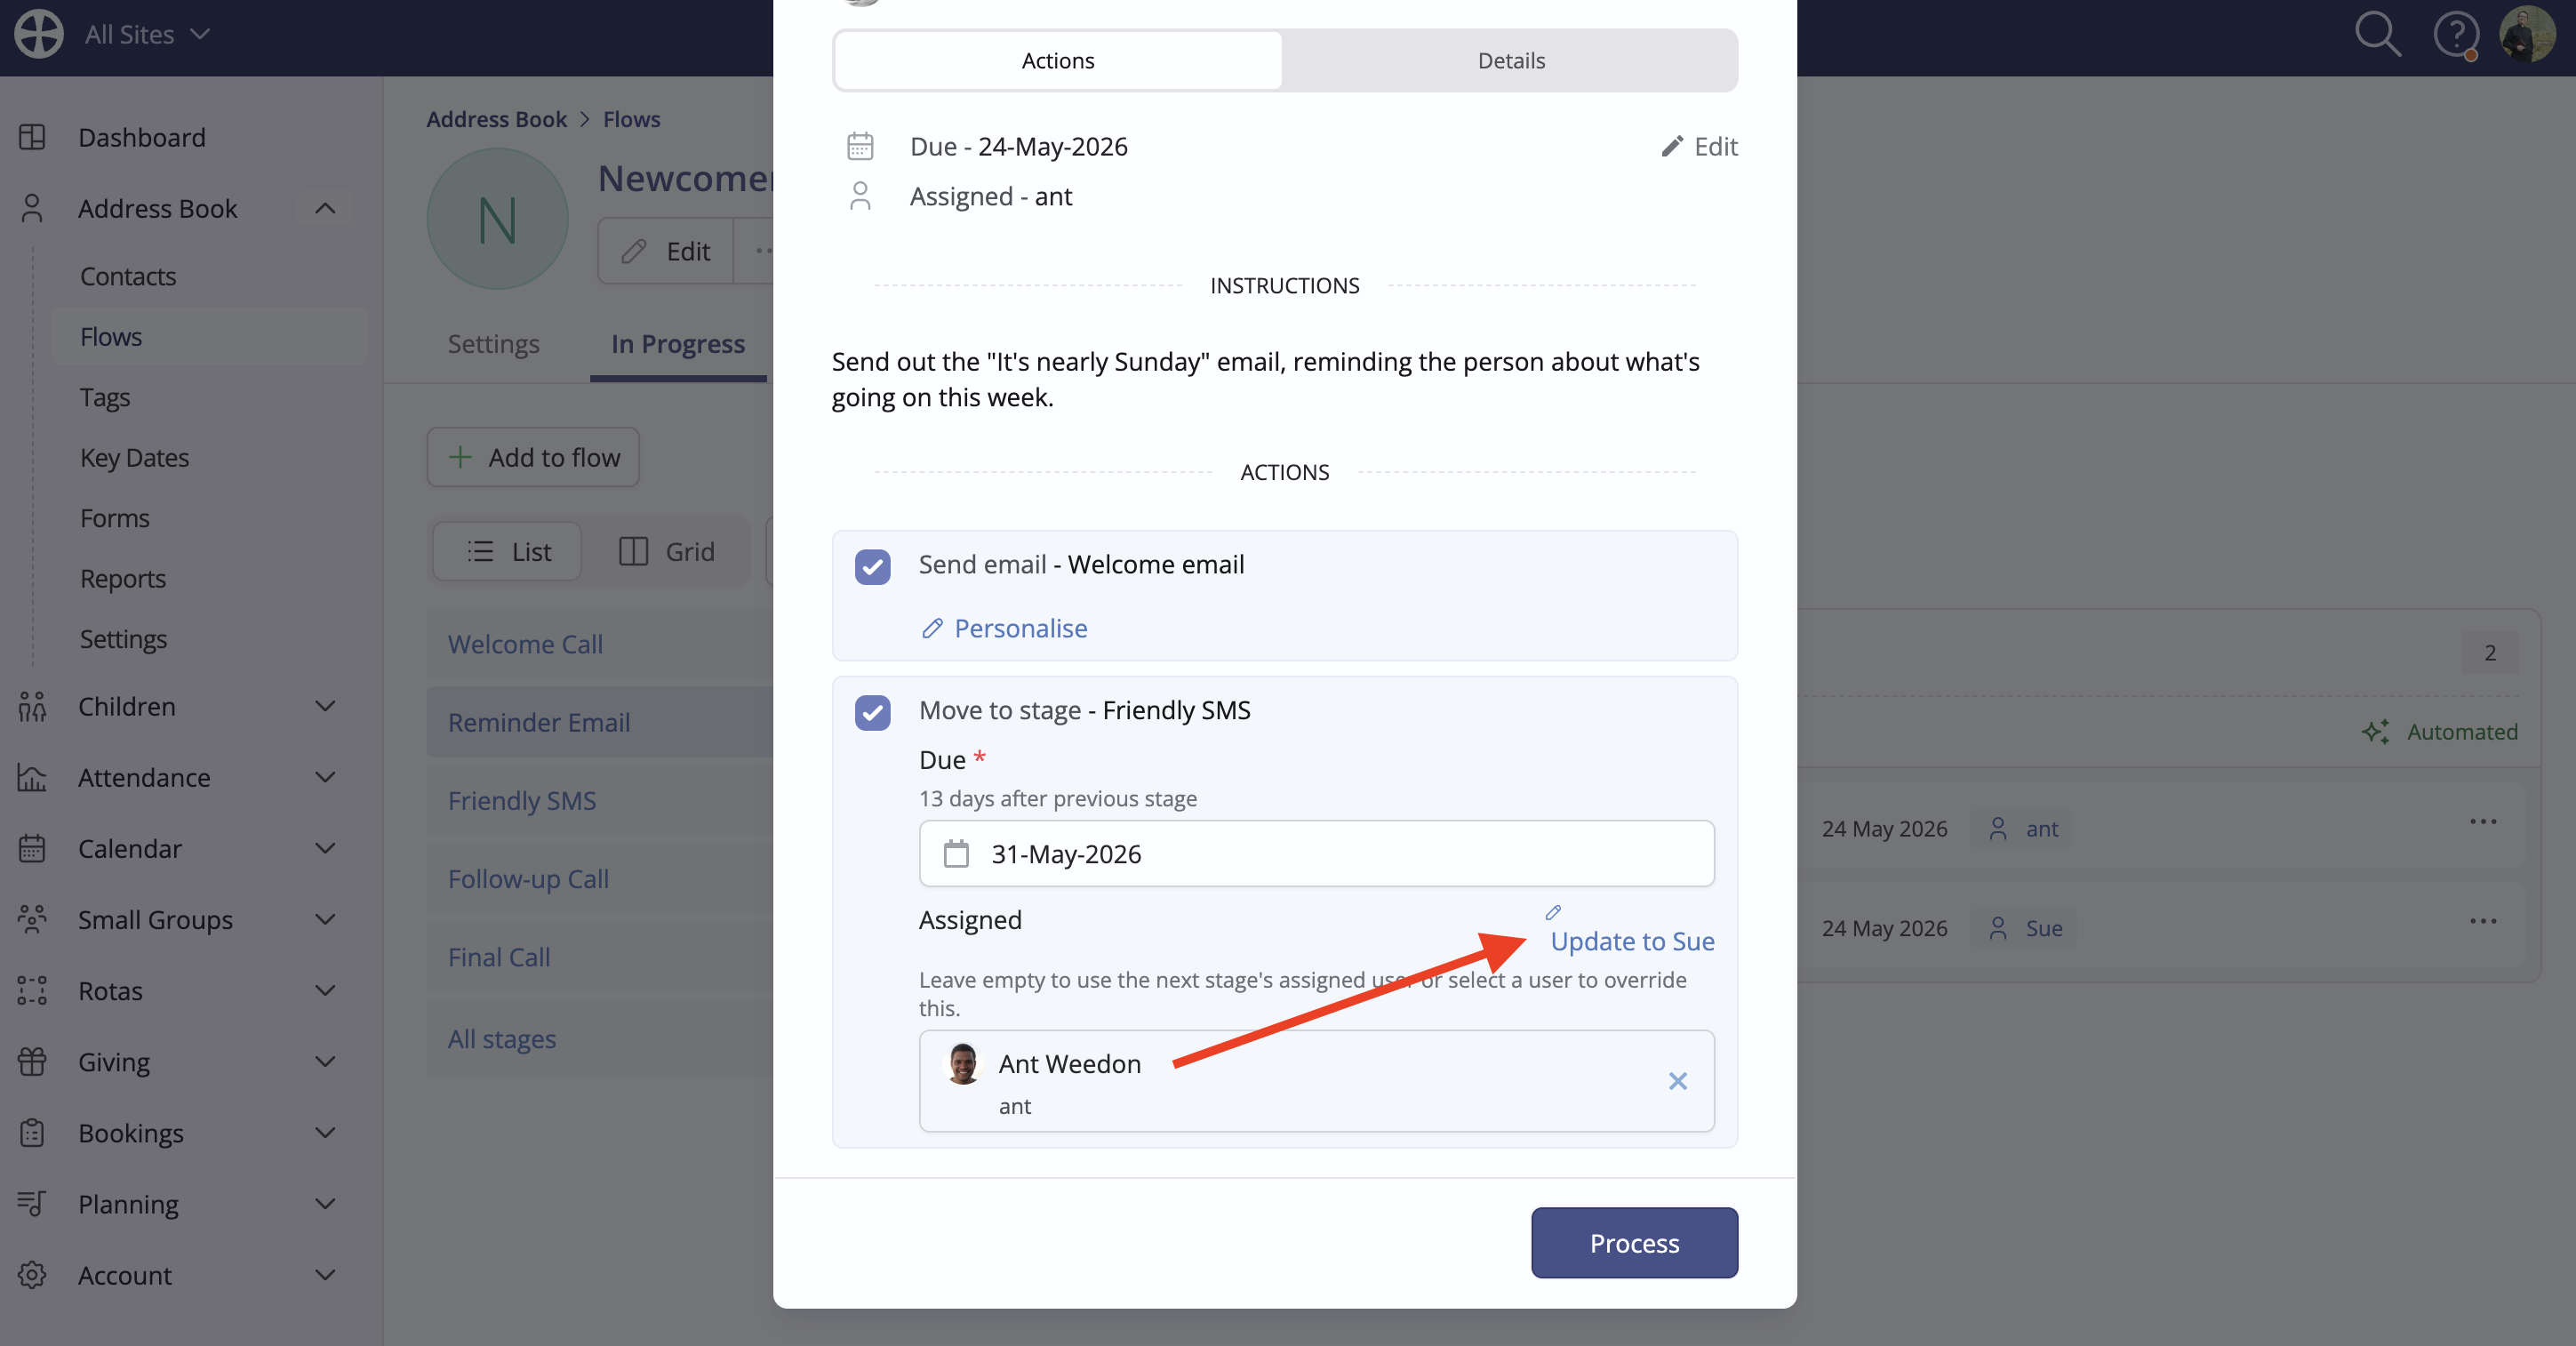
The Actions tab (the default tab) displays the Due date and any Assigned user. Click Edit to make changes, perhaps to postpone the person's actions or delegate them to another user. The tab also shows the stage Instructions and the list of Actions available for that stage. Only the selected actions are processed when the Process button is clicked.
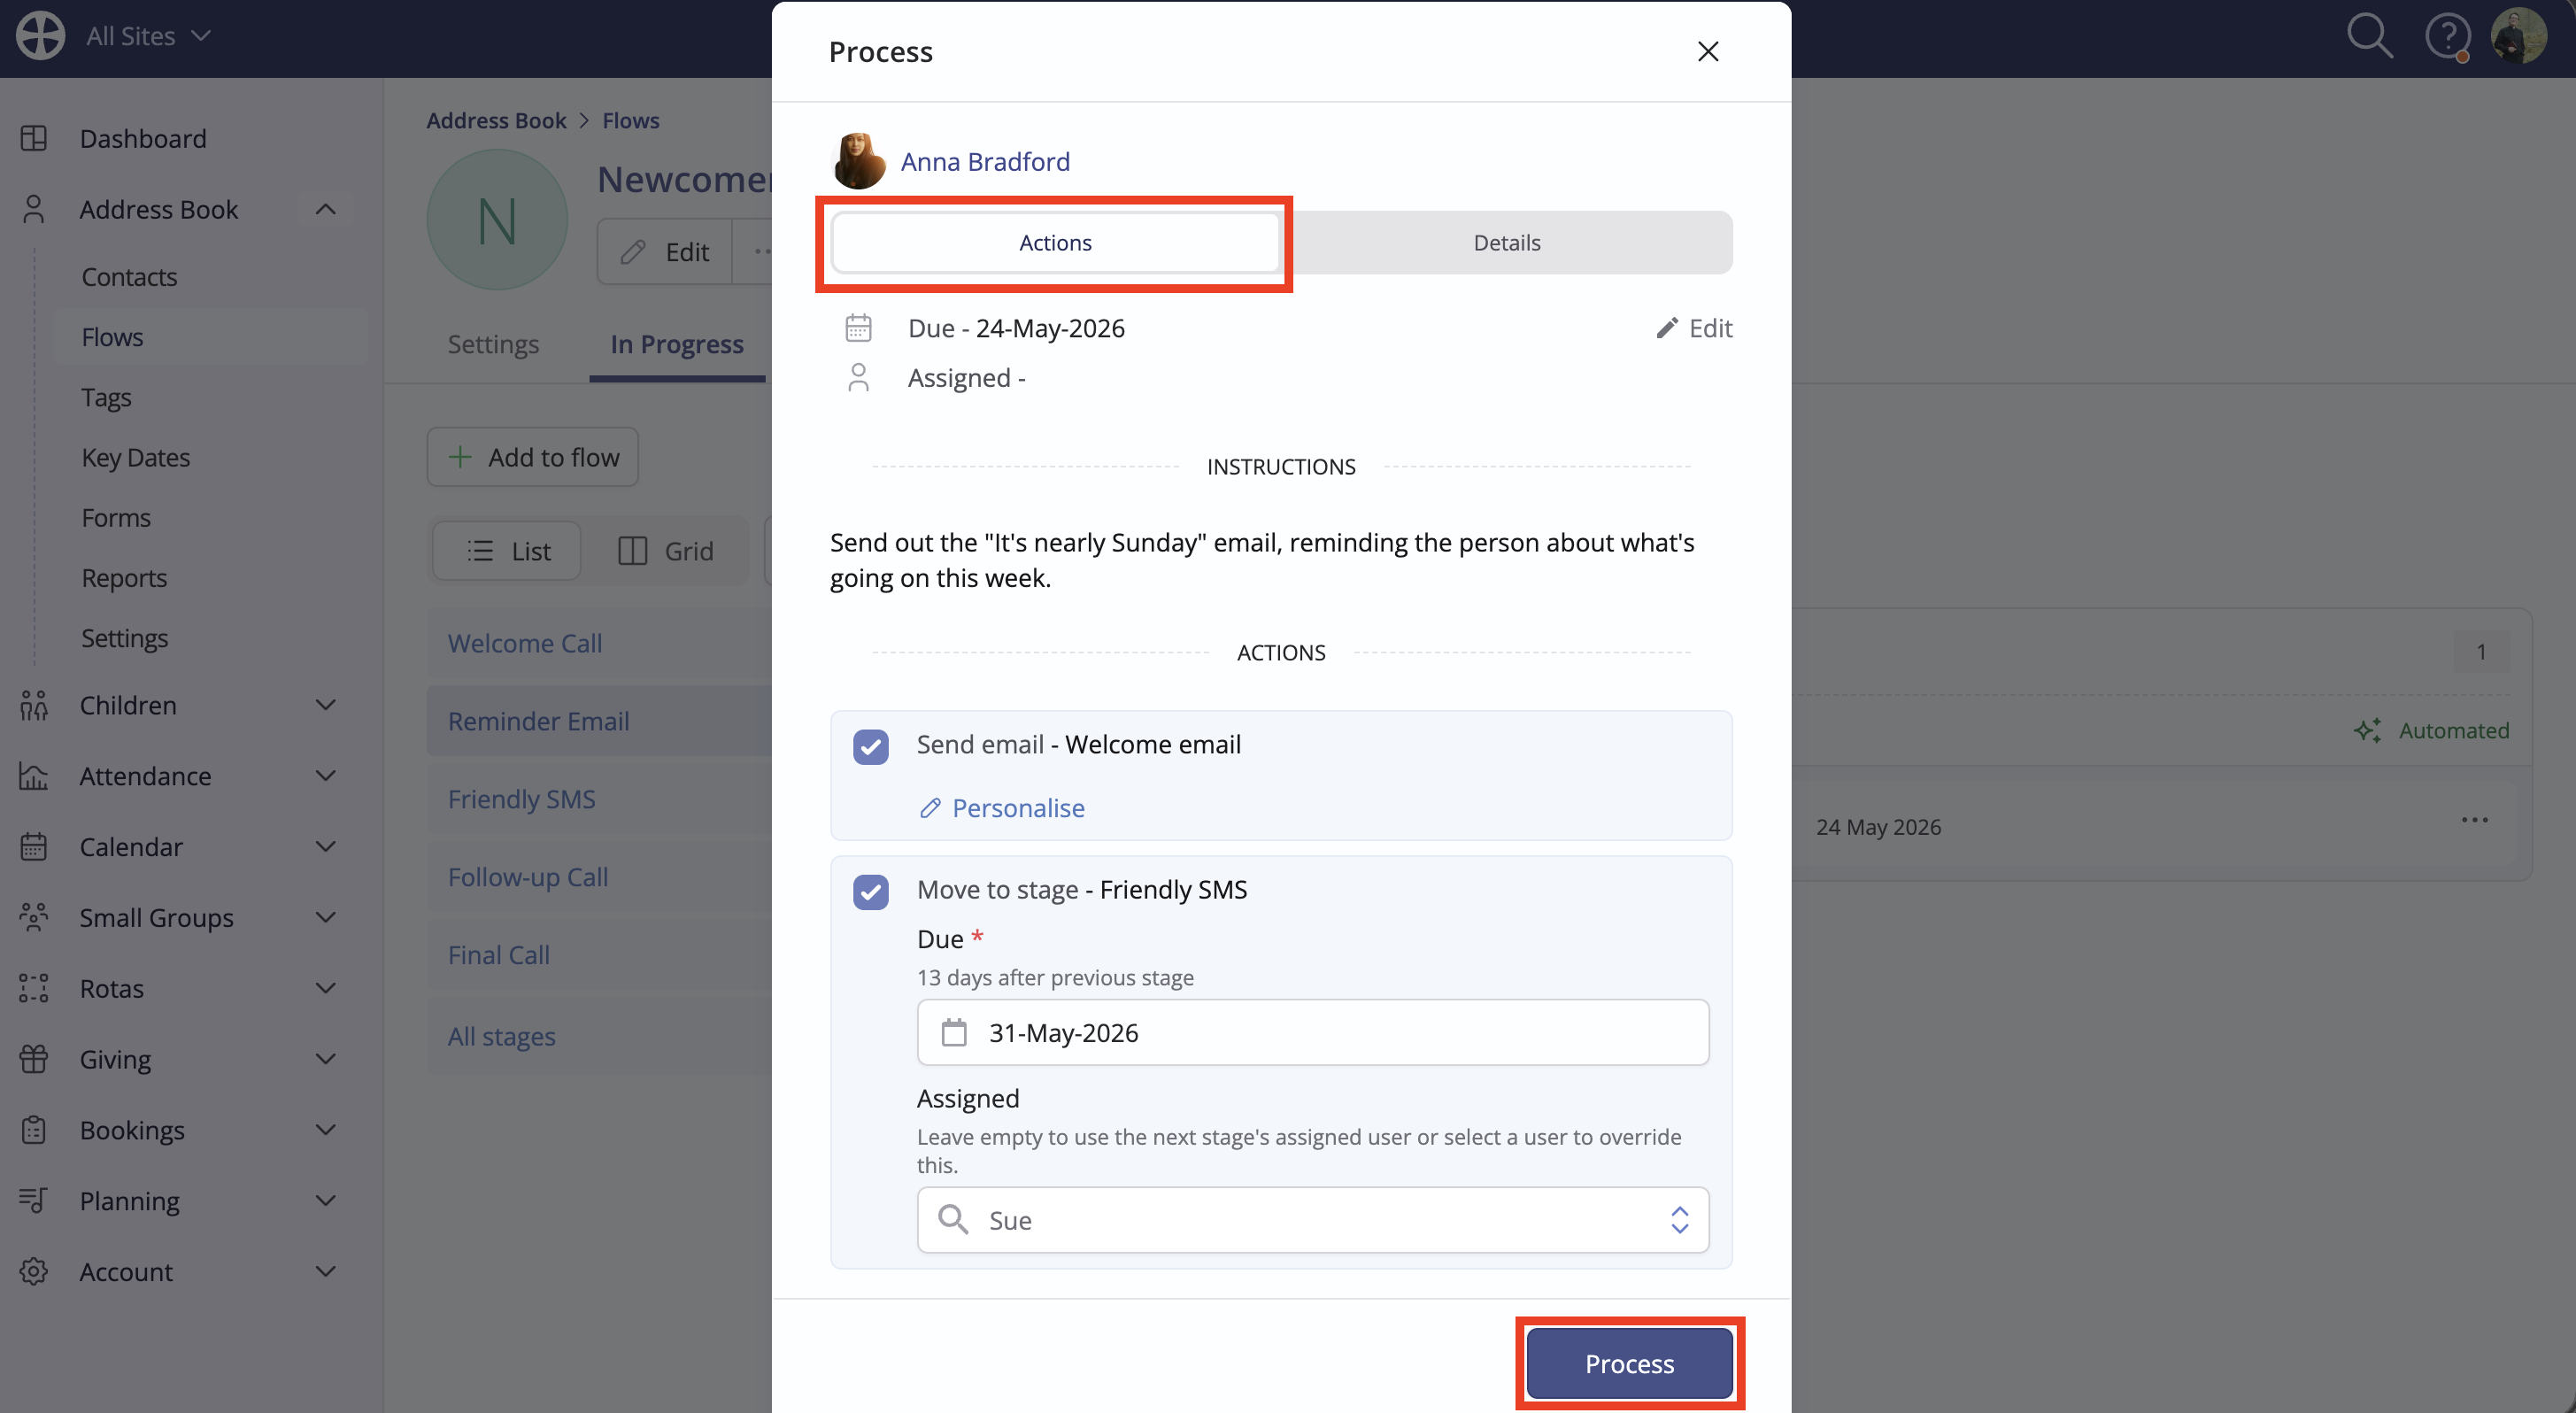
As illustrated in the example below, a person is only processed into the next stage if a "Move to stage" action has been selected, which also surfaces further options to override the due date and the assigned user for that next stage. Other actions may also reveal additional fields when selected. For example, the "Add key date" action has additional fields to pick the key date and enter an optional key date description. The "Send email" action includes a helpful option to further Personalise the selected message before it is sent.
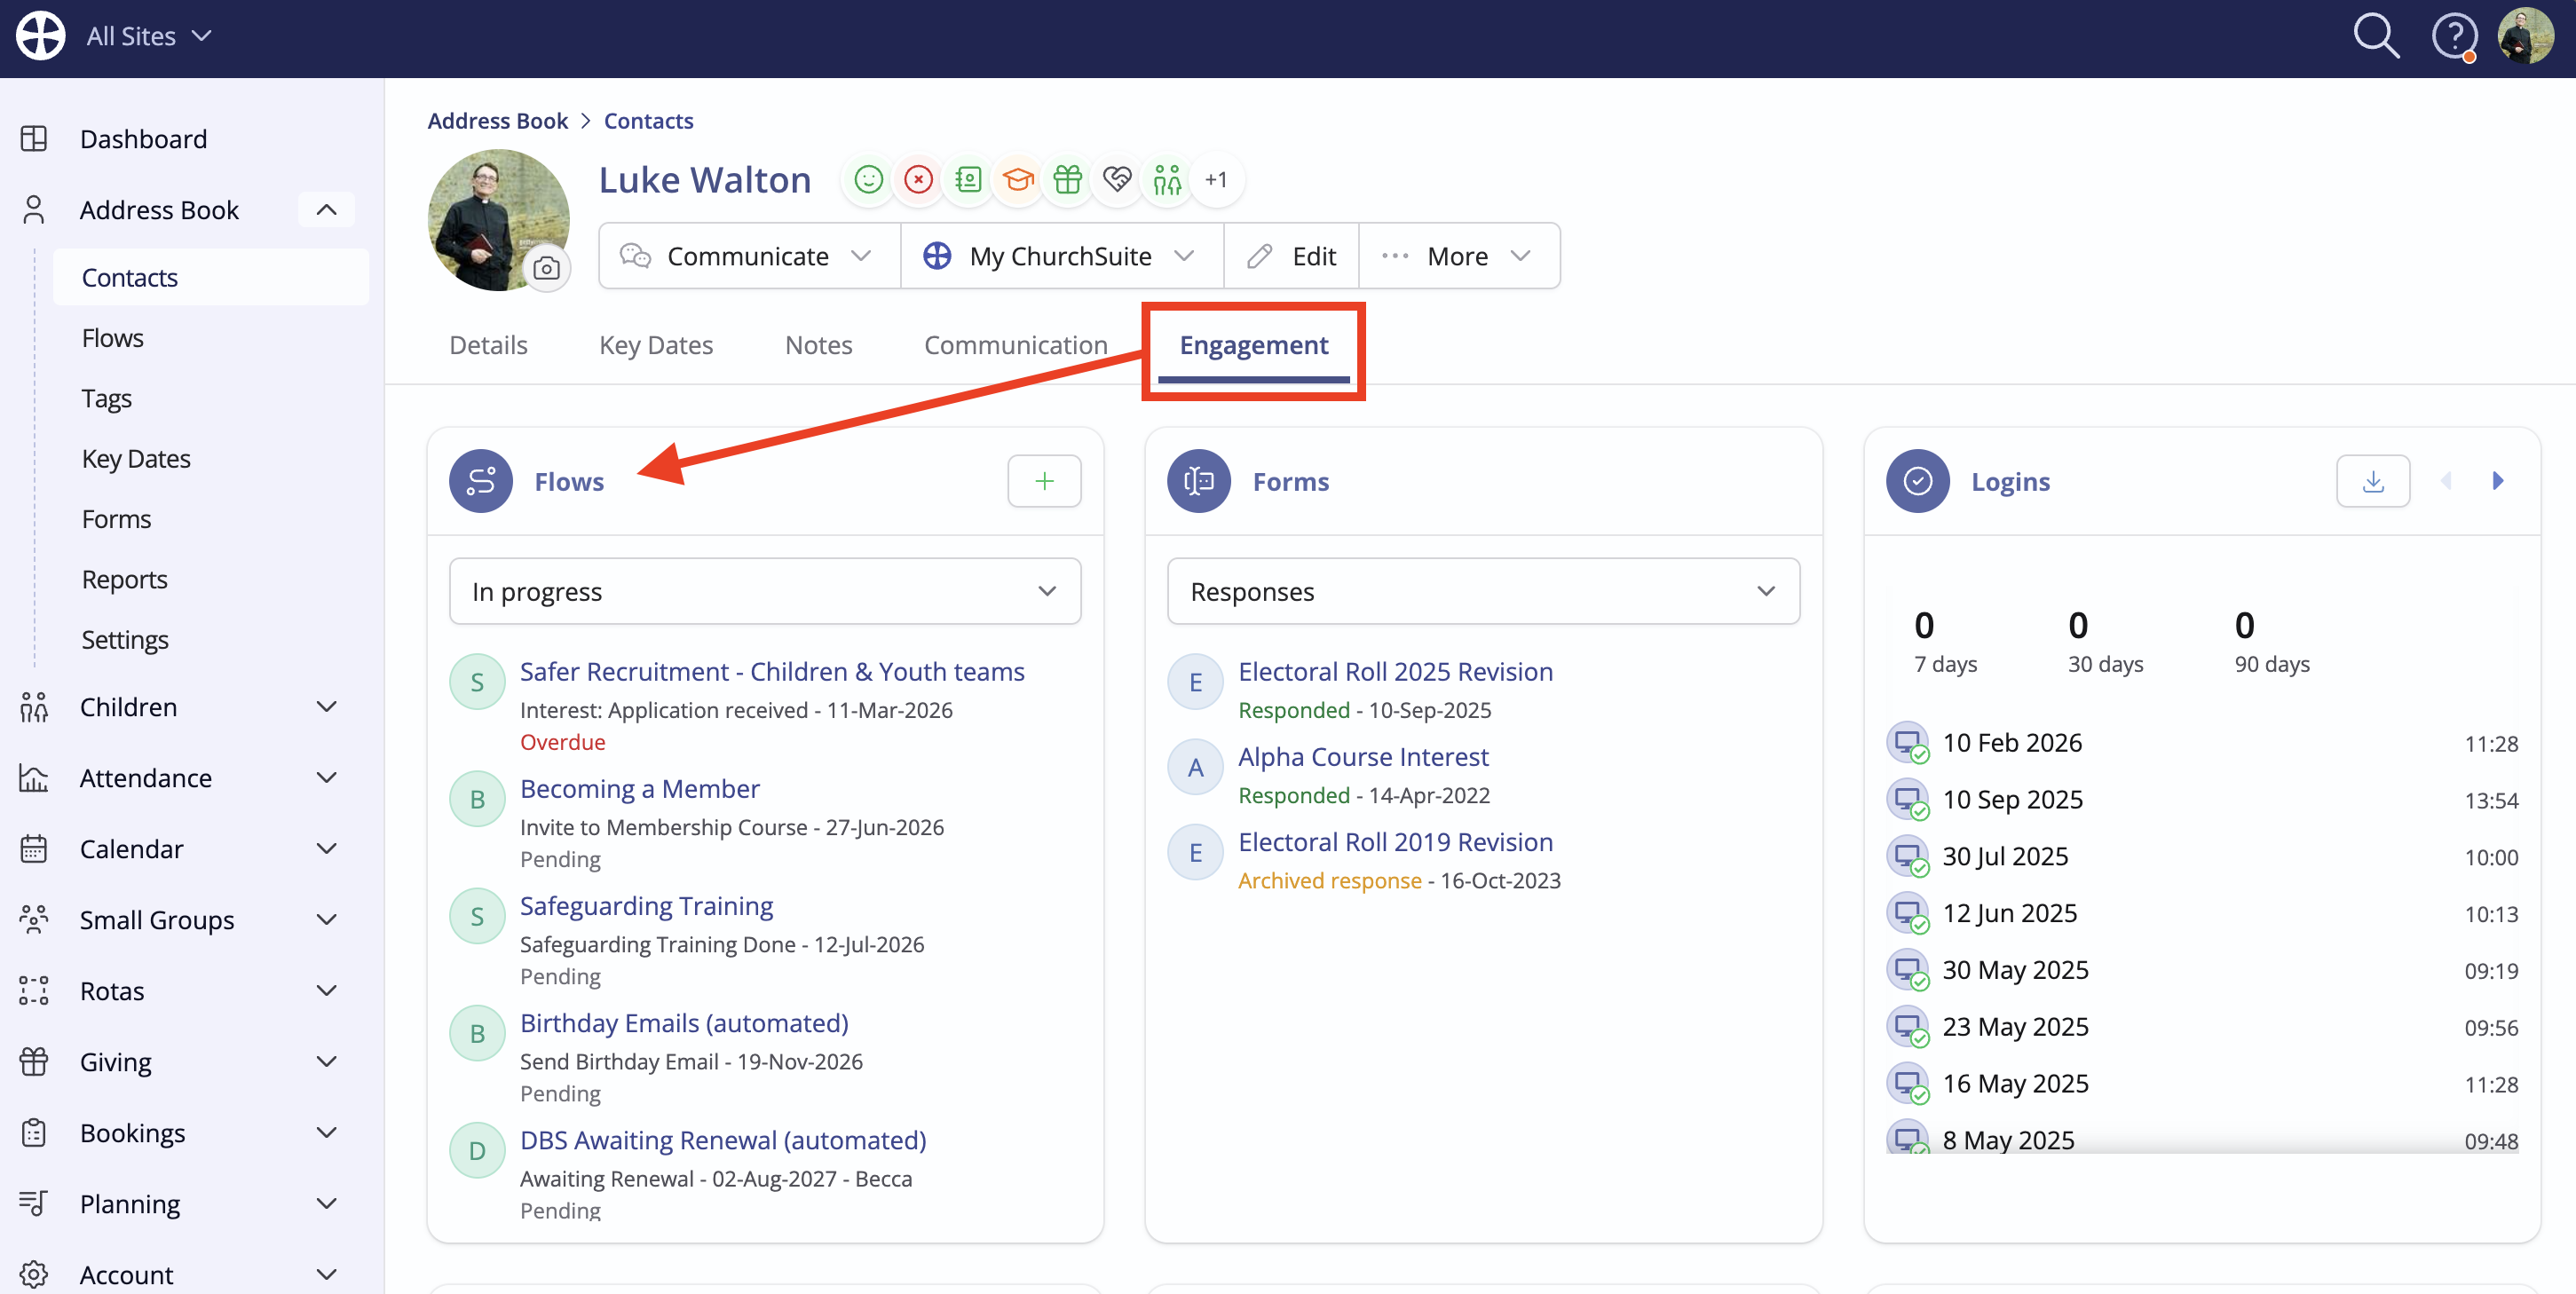
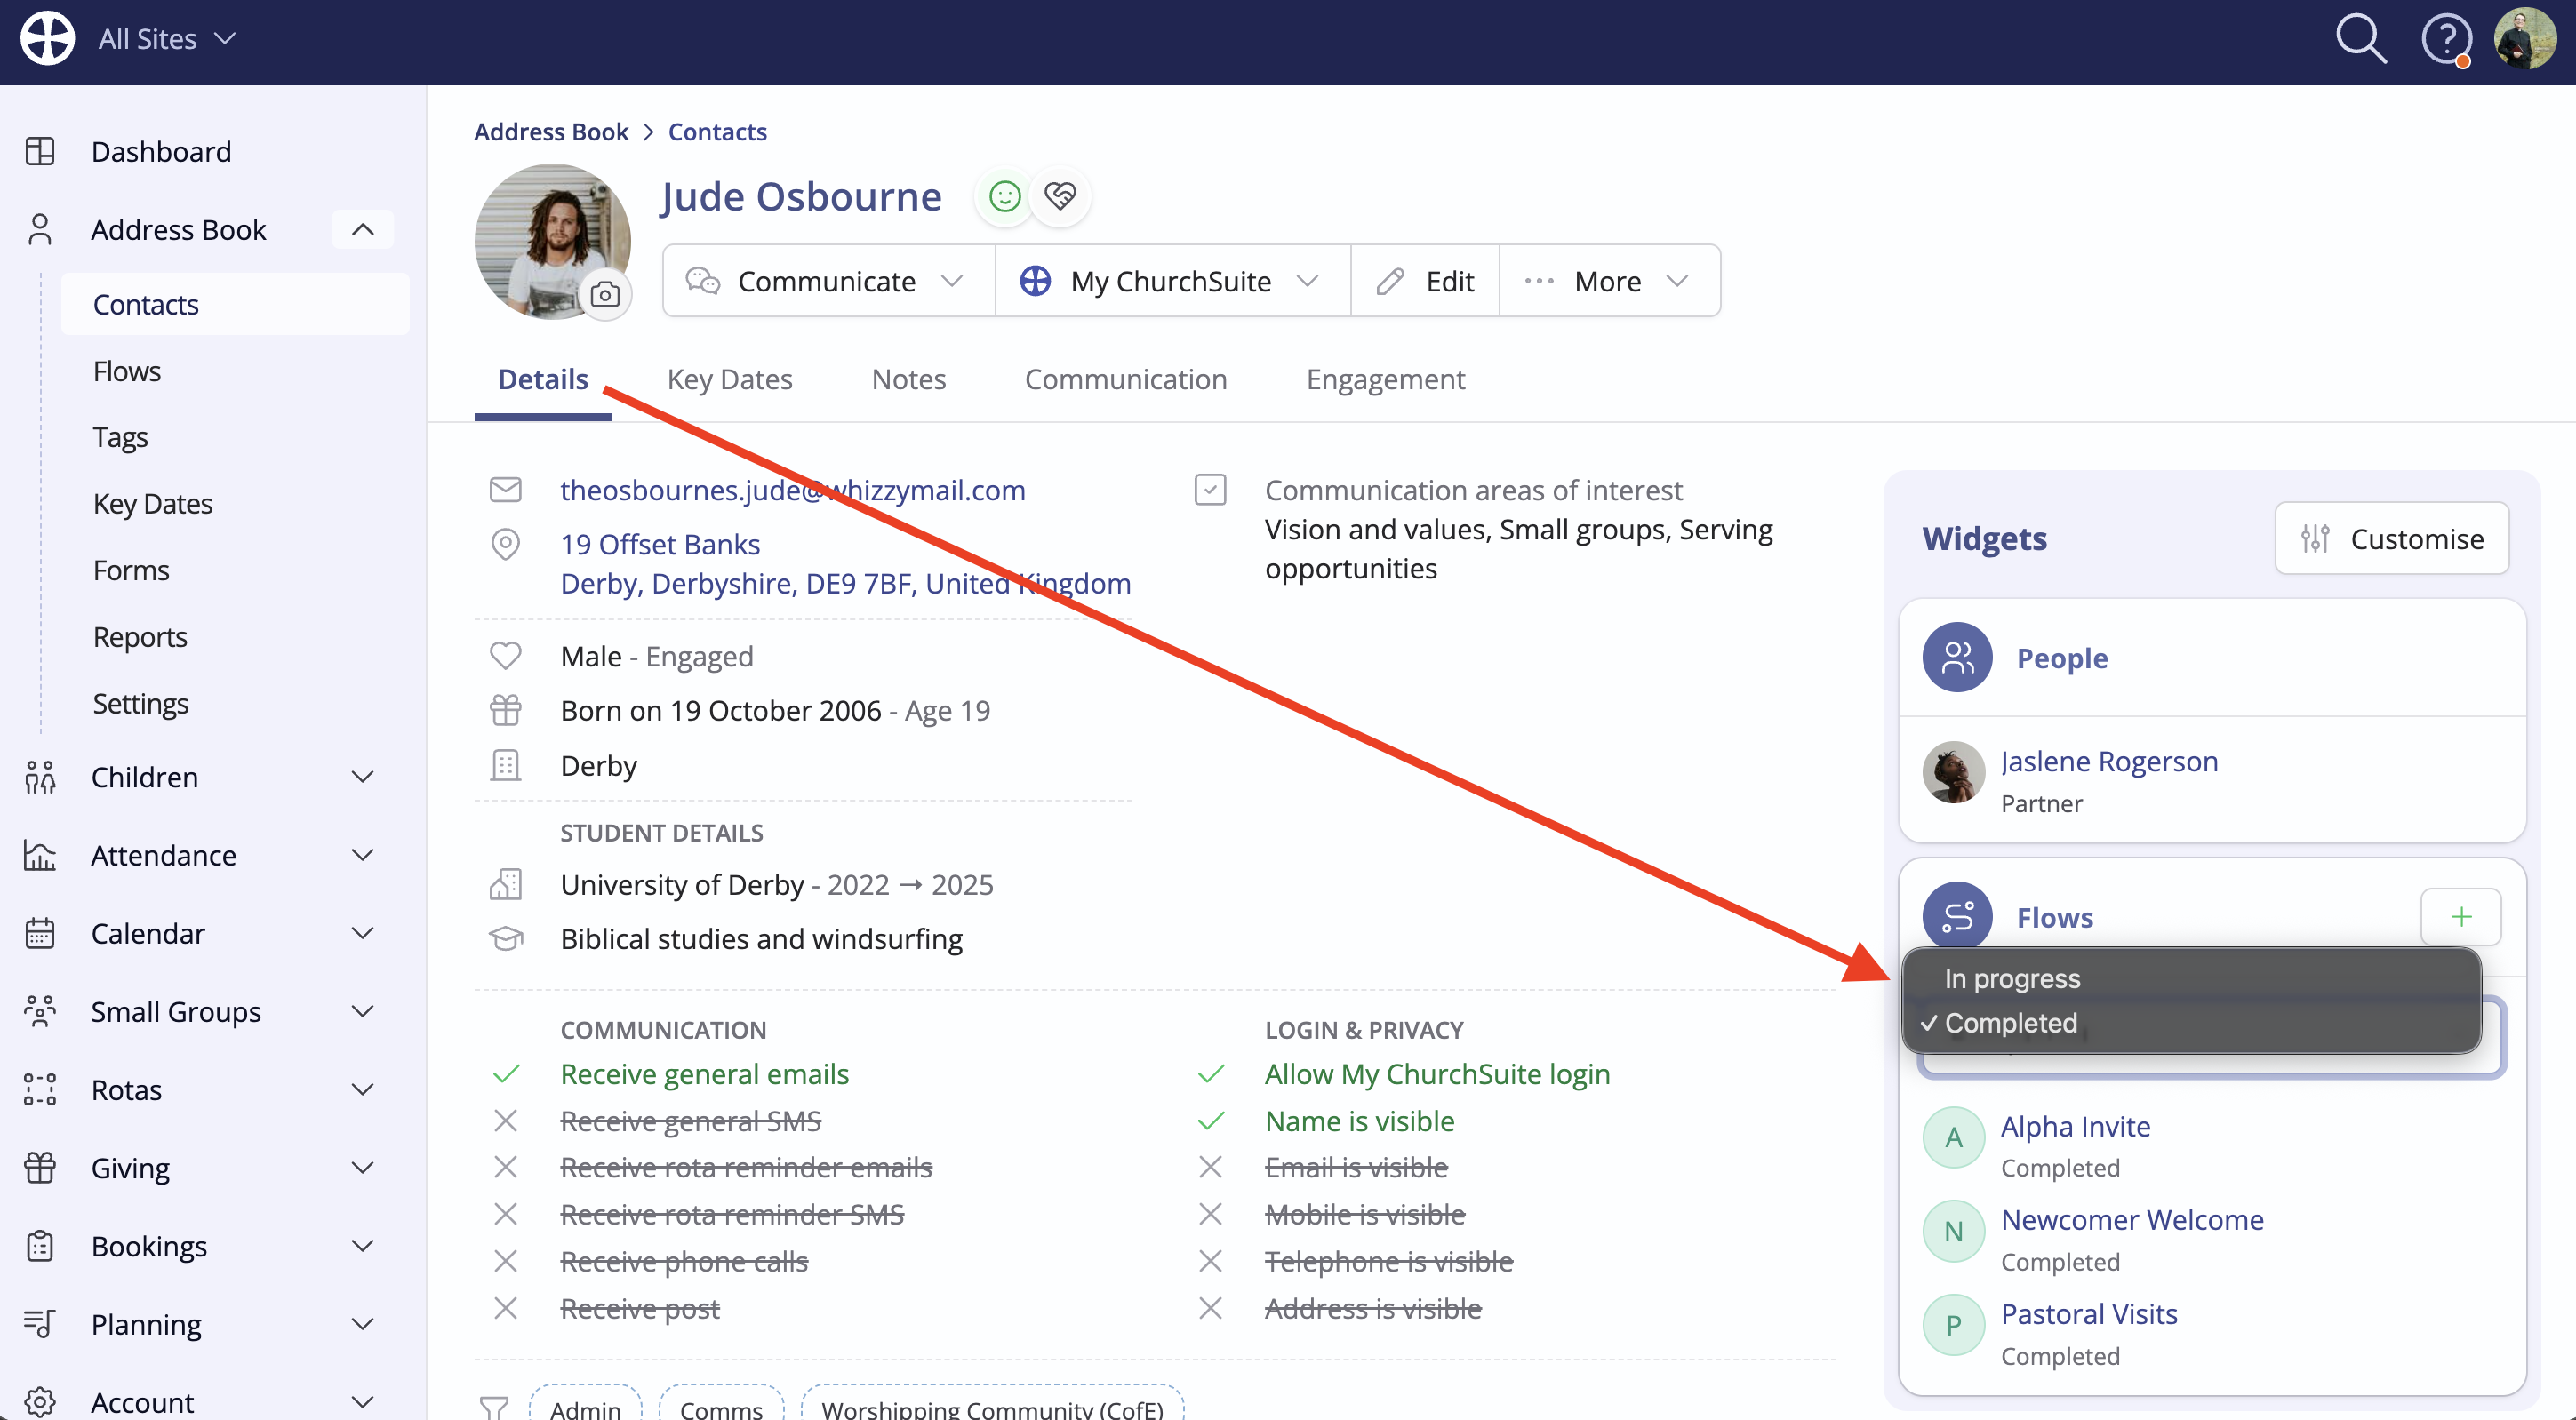
When managing those in flows, each person's current flow activity is shown on their profile page. Clicking through to the person's Engagement tab shows any Flows the person is currently in, the flow stage, the due date and the status within the stage. Optionally, you're also able to customise the widgets available on the Details tab to include Flows. Clicking on a flow name from a person's profile opens that flow to view and launches the Process pop-up for that person.
Assigned users - intended functionality
When people are added to a flow or processed into a stage where an Assigned user has been specified in the flow stage settings, that user is assigned by default. In the example below, Paul Daniels has been added to the Welcome Call stage of the Flow, which is assigned to user Aled in the Flow's settings. Graham will remain assigned to LukeH throughout the Flow until a new user is assigned by a subsequent flow stage setting or the assignment is removed.

However, it is also possible to override a stage-assigned user (or assign a user when no default assigned user is specified). A manual change to a person's Assigned user takes priority over those defined in the flow stage settings. This flexibility has many uses. For example, you may have a welcome flow where newcomers are added to the flow with no user assigned, but are later manually assigned to a particular pastor or welcome caller. Each newcomer remains assigned to that manually assigned user throughout the flow unless a different user is assigned at a later stage in the flow. Similarly, when a manually assigned user is unassigned without an alternative user being assigned, that person will resume being assigned to the users specified in the flow stage settings as they are processed from stage to stage.
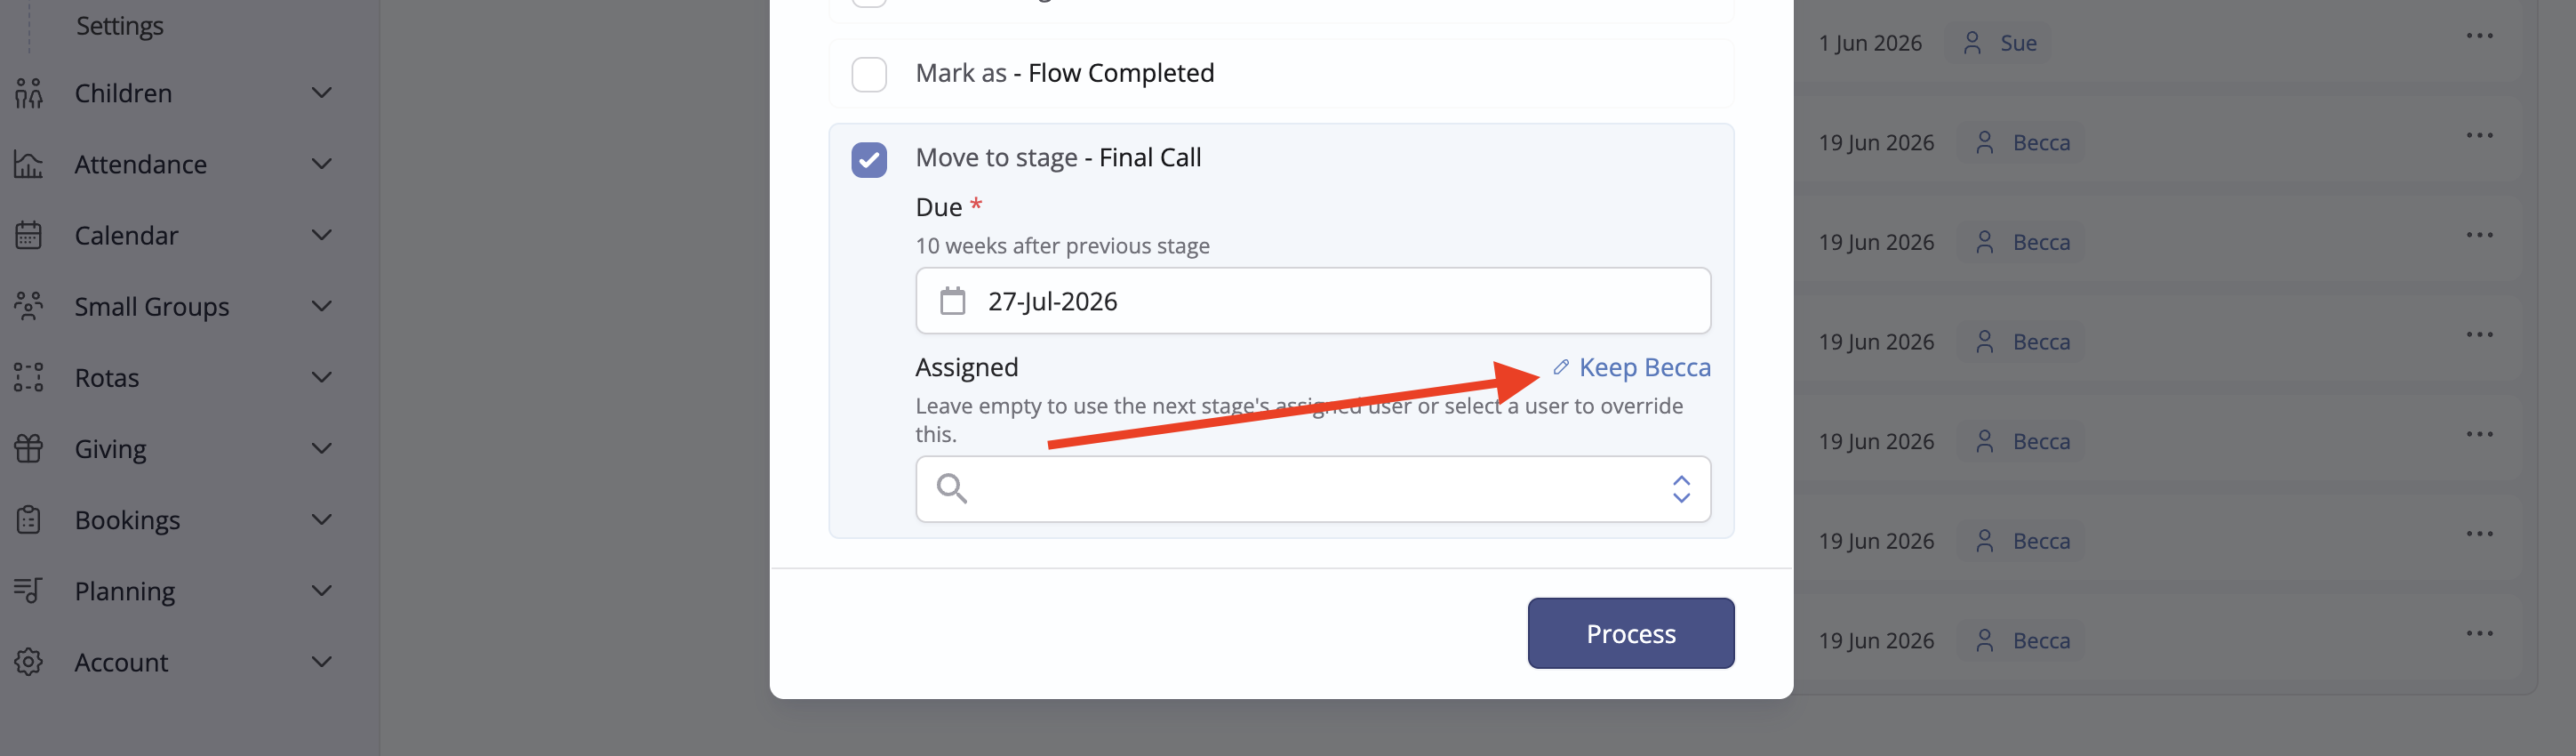
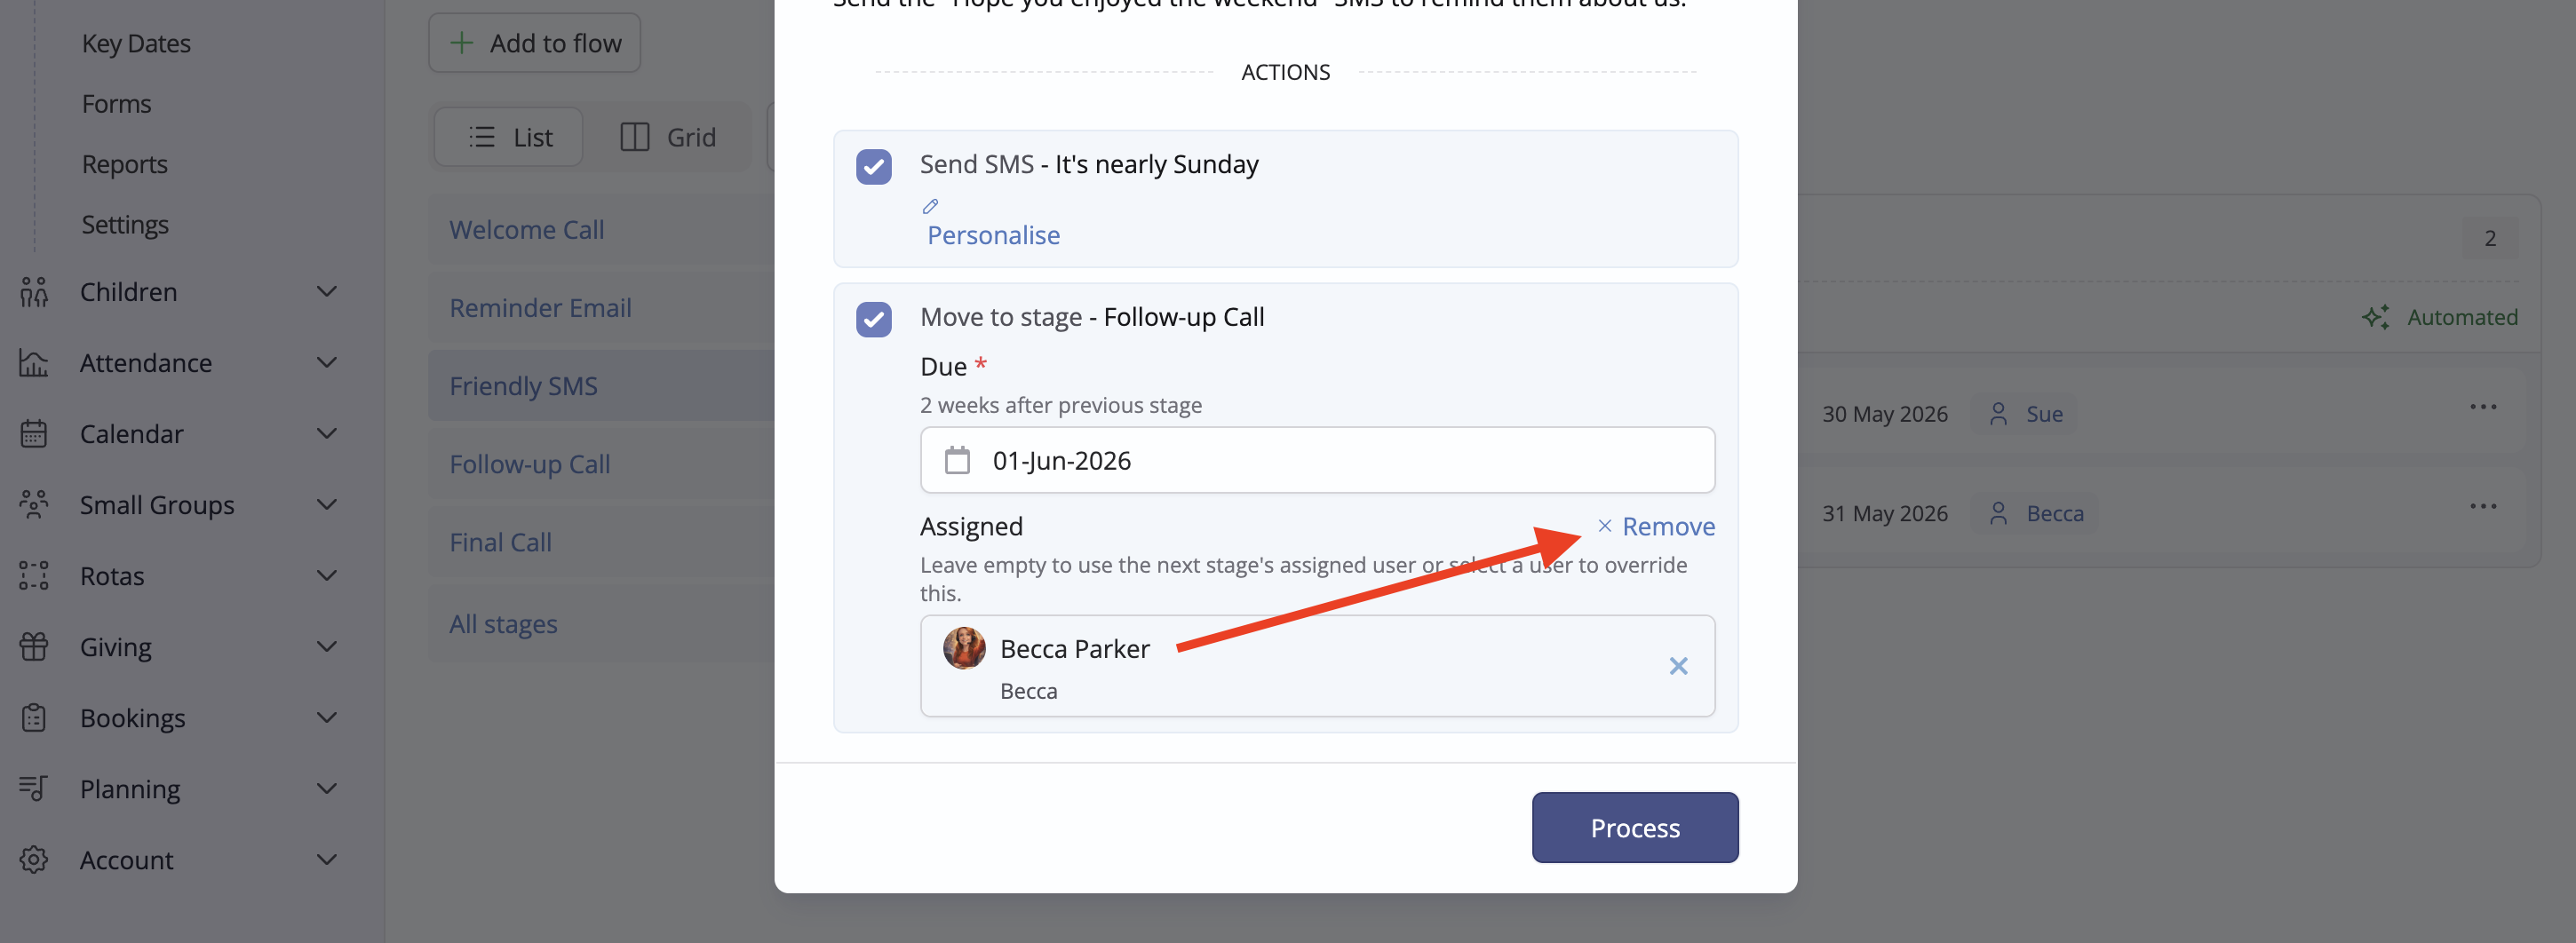
To manually assign a user when processing a person through a flow, search and select an Assigned user for the Move to stage action that will be processed. A hint is shown when the current stage-assigned user differs from the assigned user setting for the next stage - click to Keep the previous assignment, optionally search and select another user entirely or leave empty to revert to using the next stage's assigned user:
Where a user has been manually assigned previously, you can optionally Update the assignment to match the default assigned user for the next stage:
Where a user has been manually assigned previously, and the next stage has no stage-assigned user, you can retain the previously assigned user (the default) or Remove the manually assigned user:
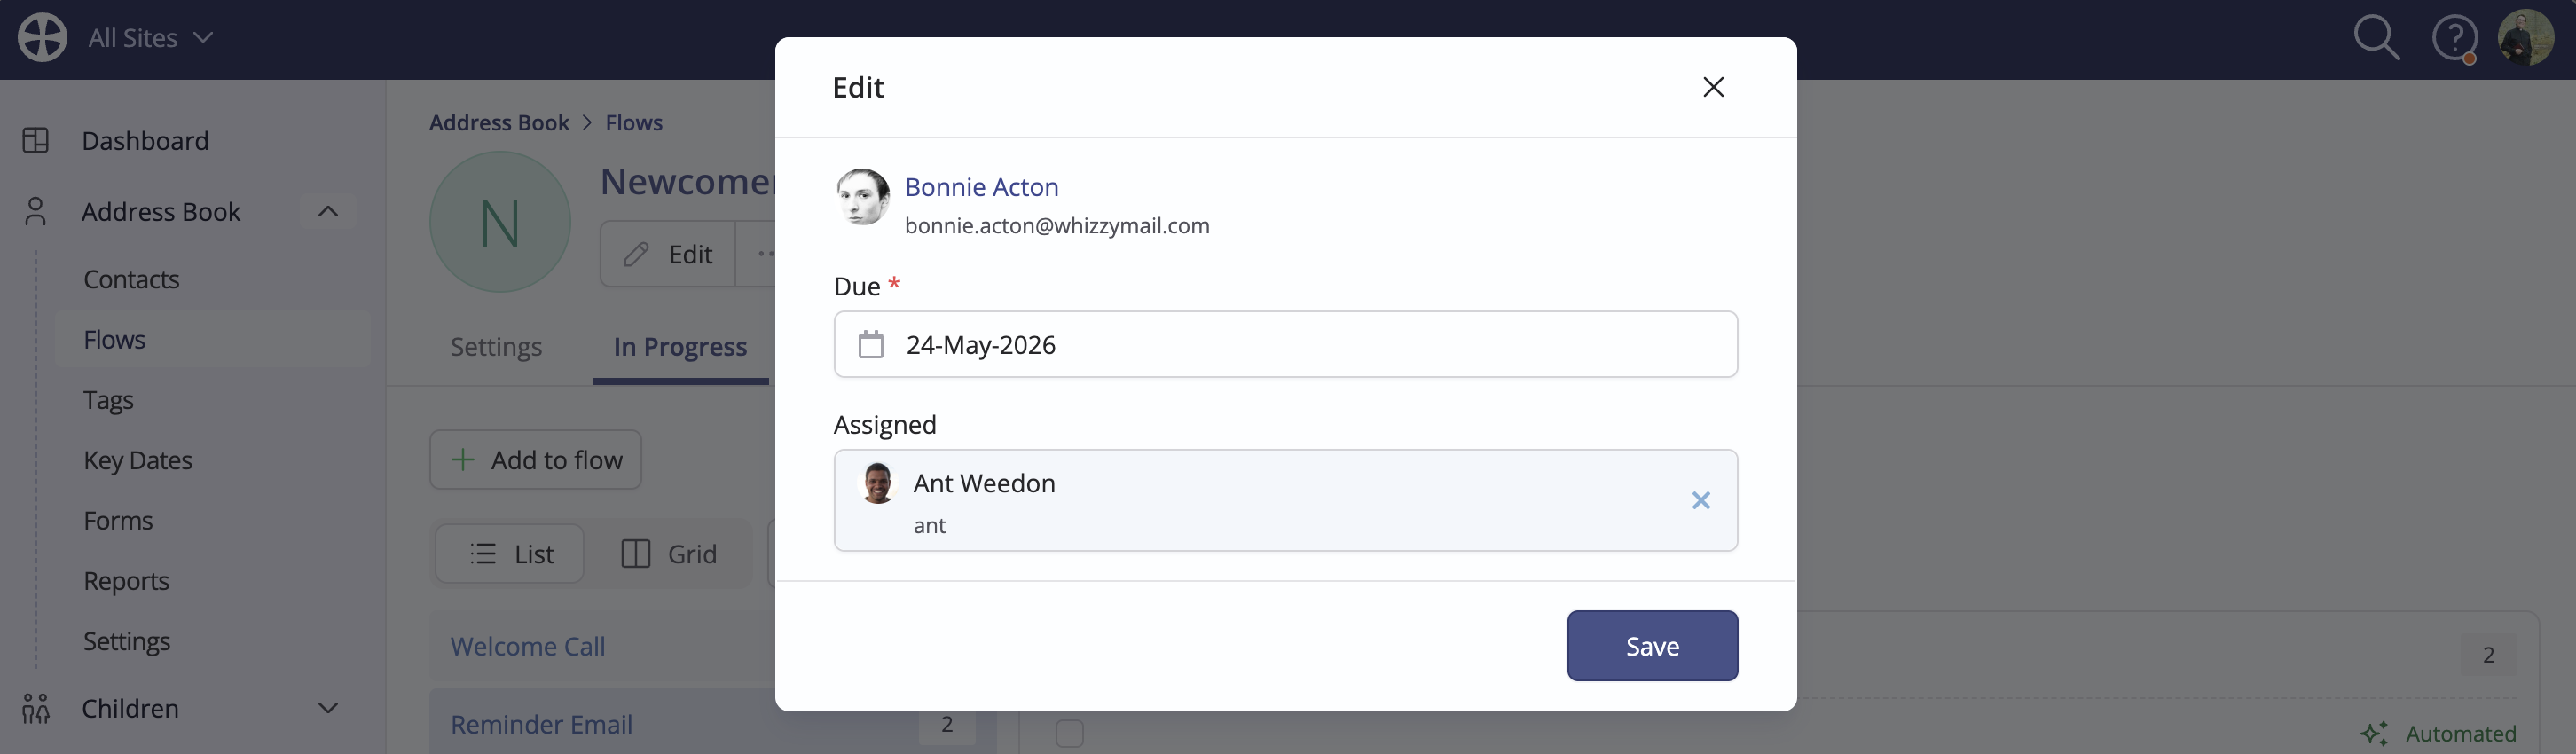
To make changes to a person's Assigned user or Due date without processing actions, click Edit:
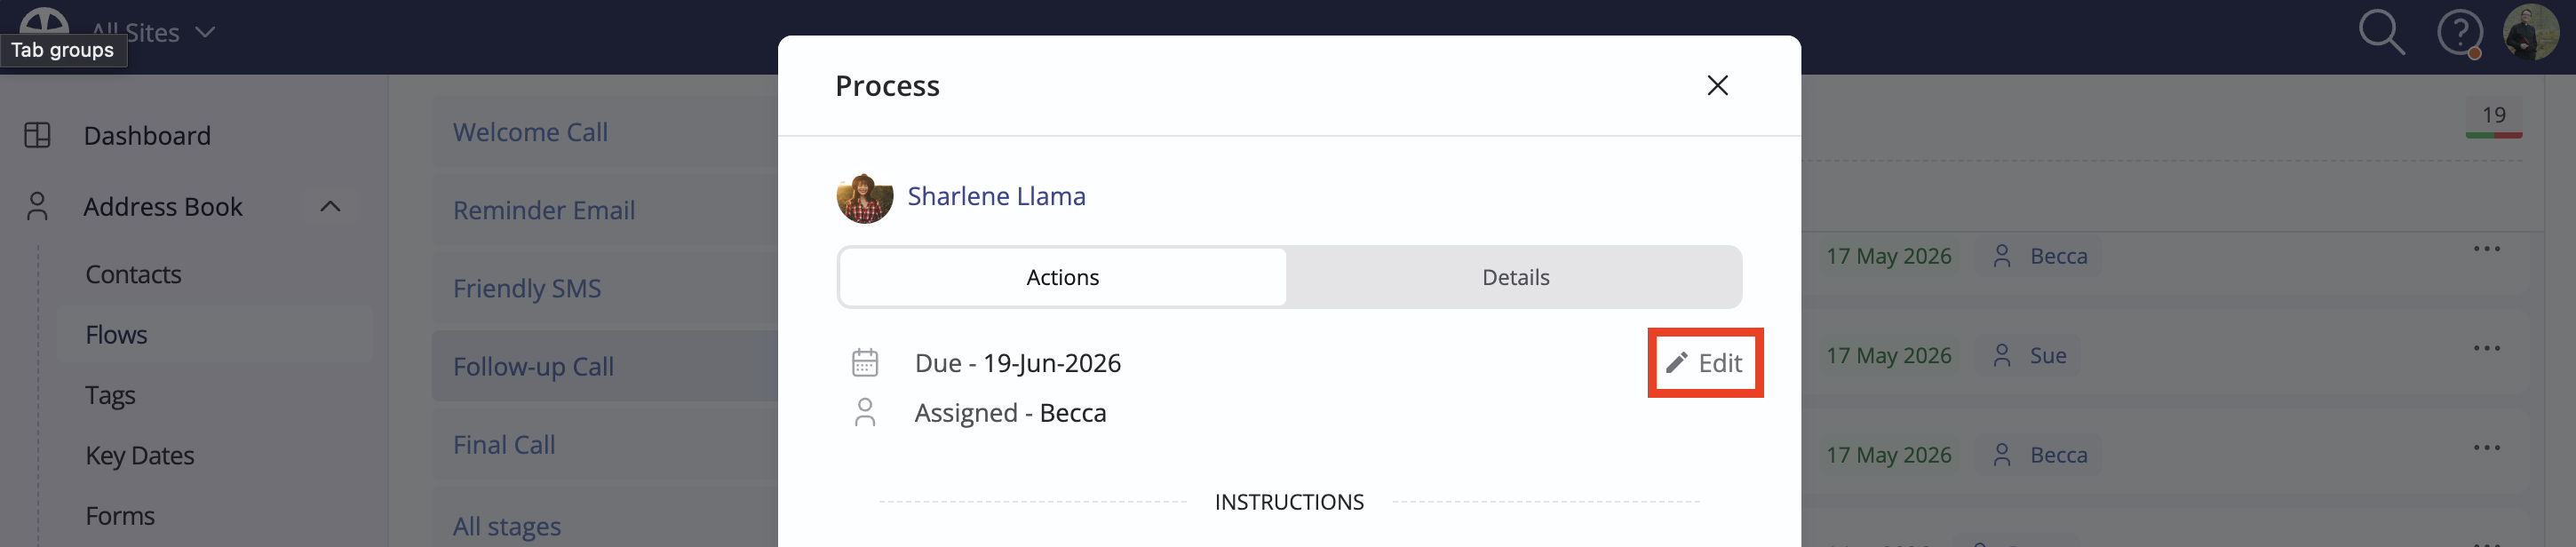
To change a person's assigned user or due date, click either the current assigned user or due date.
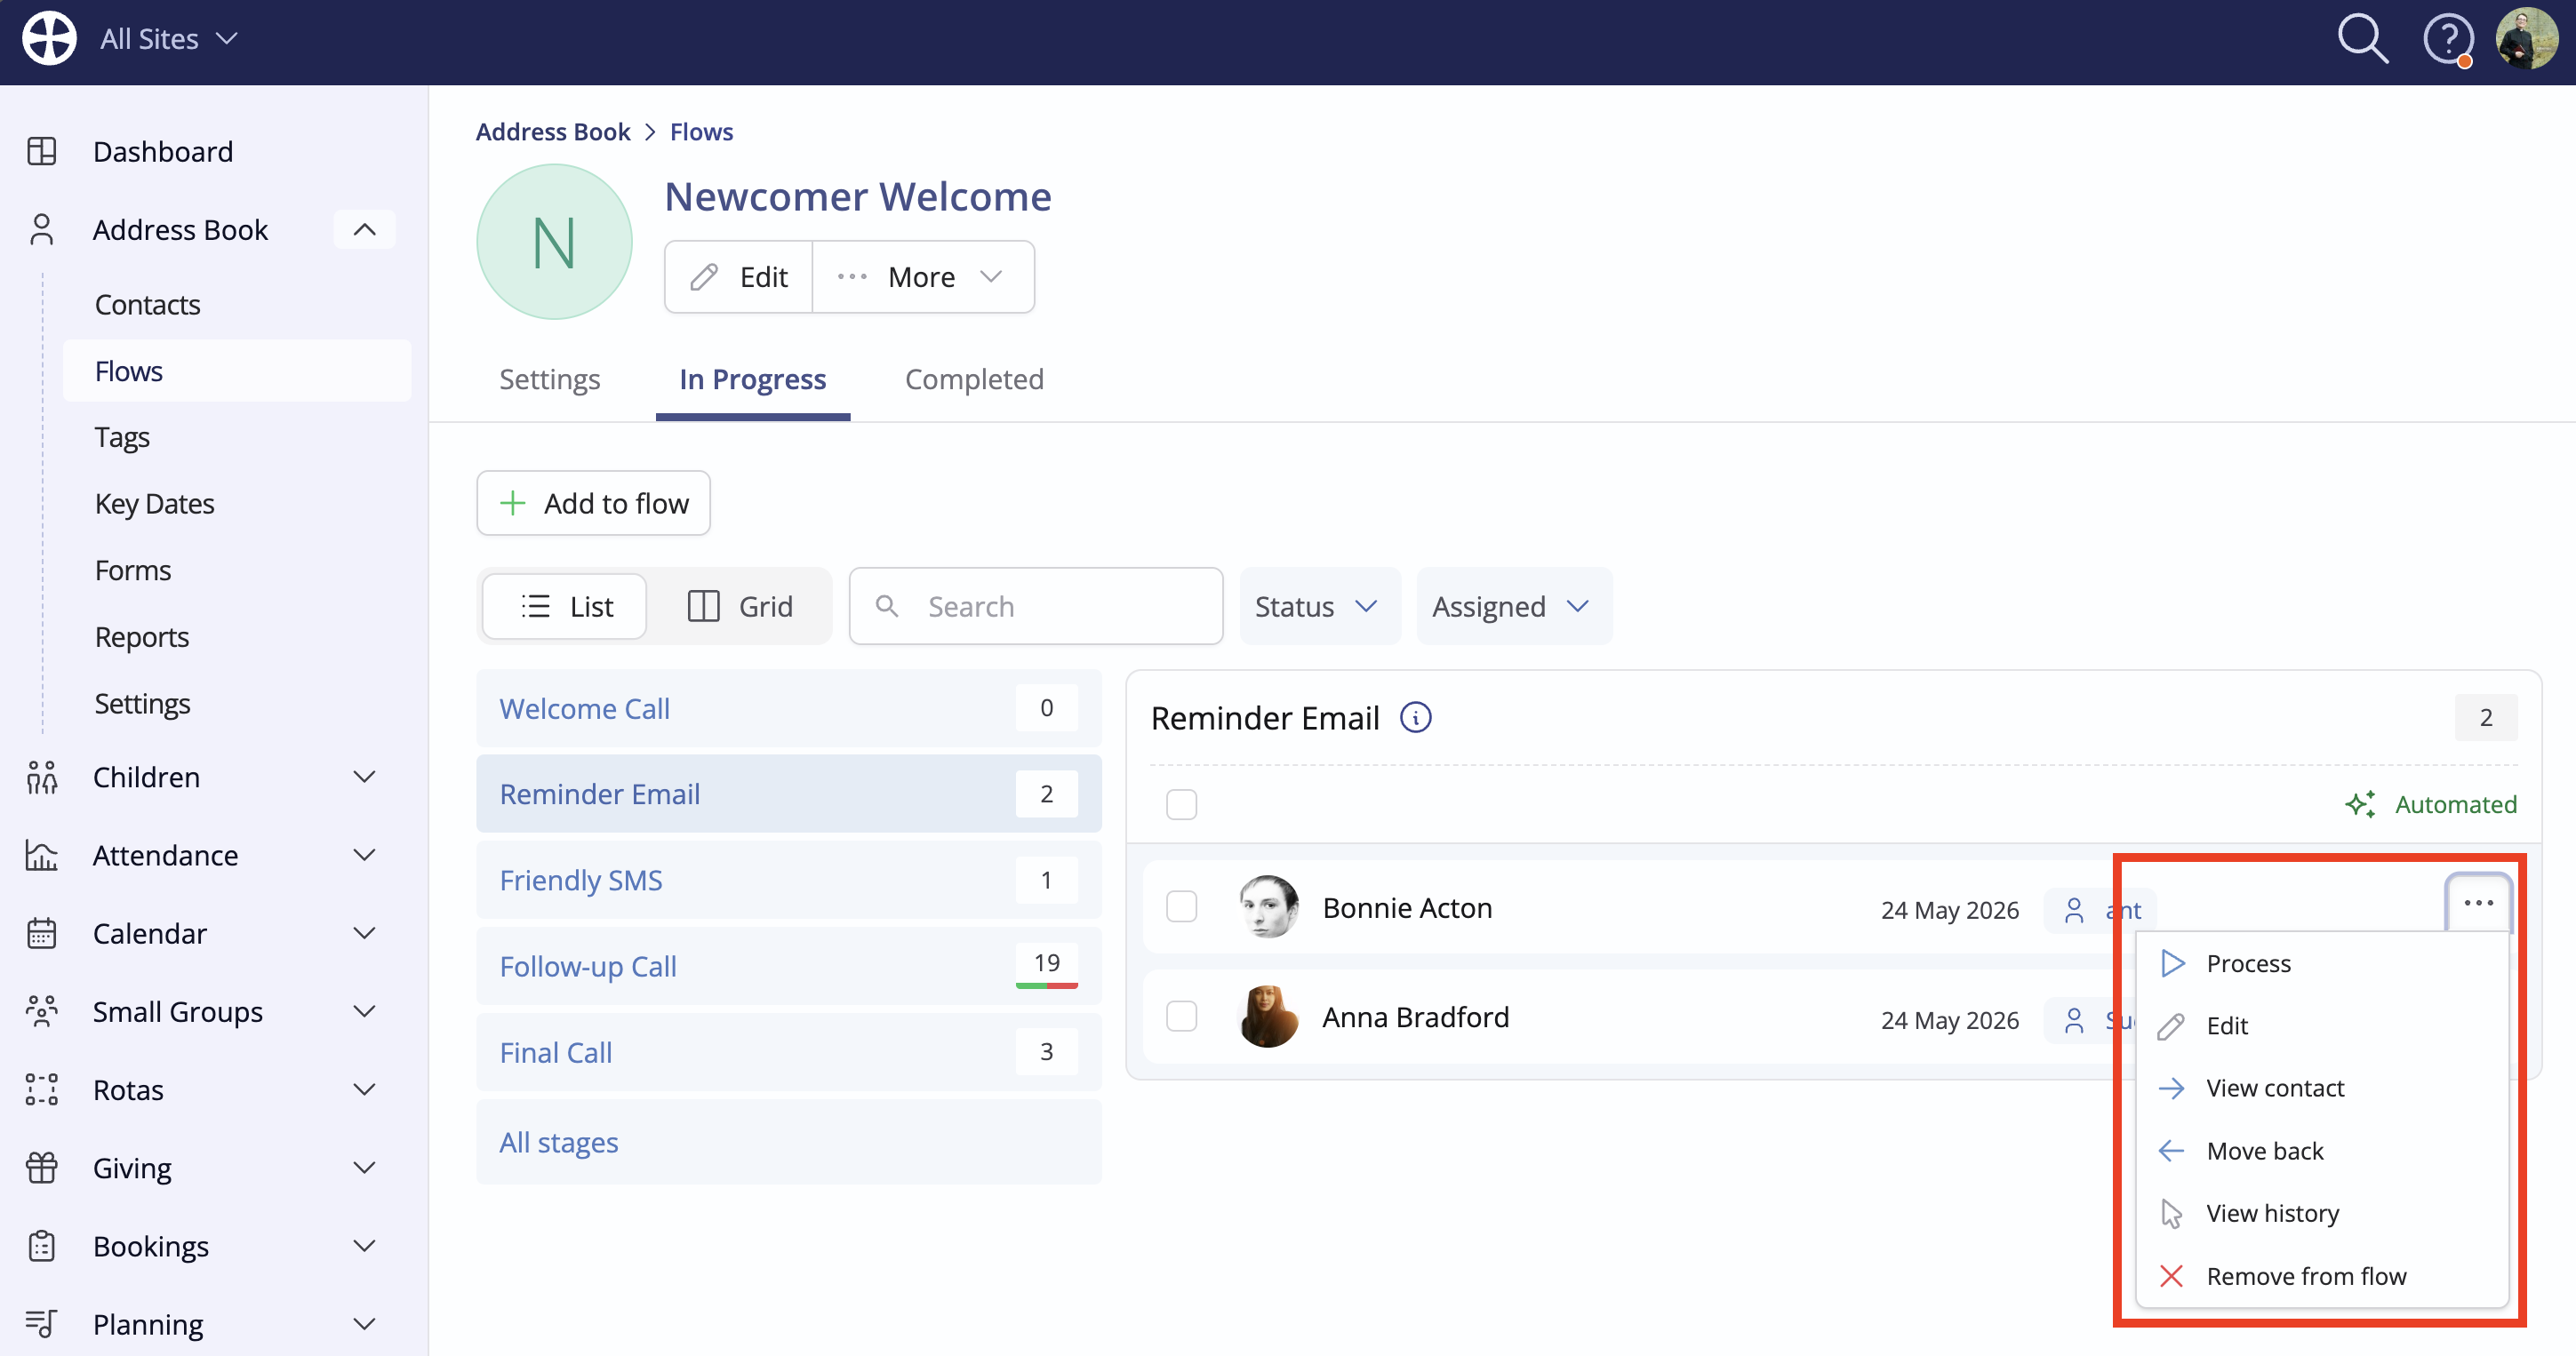
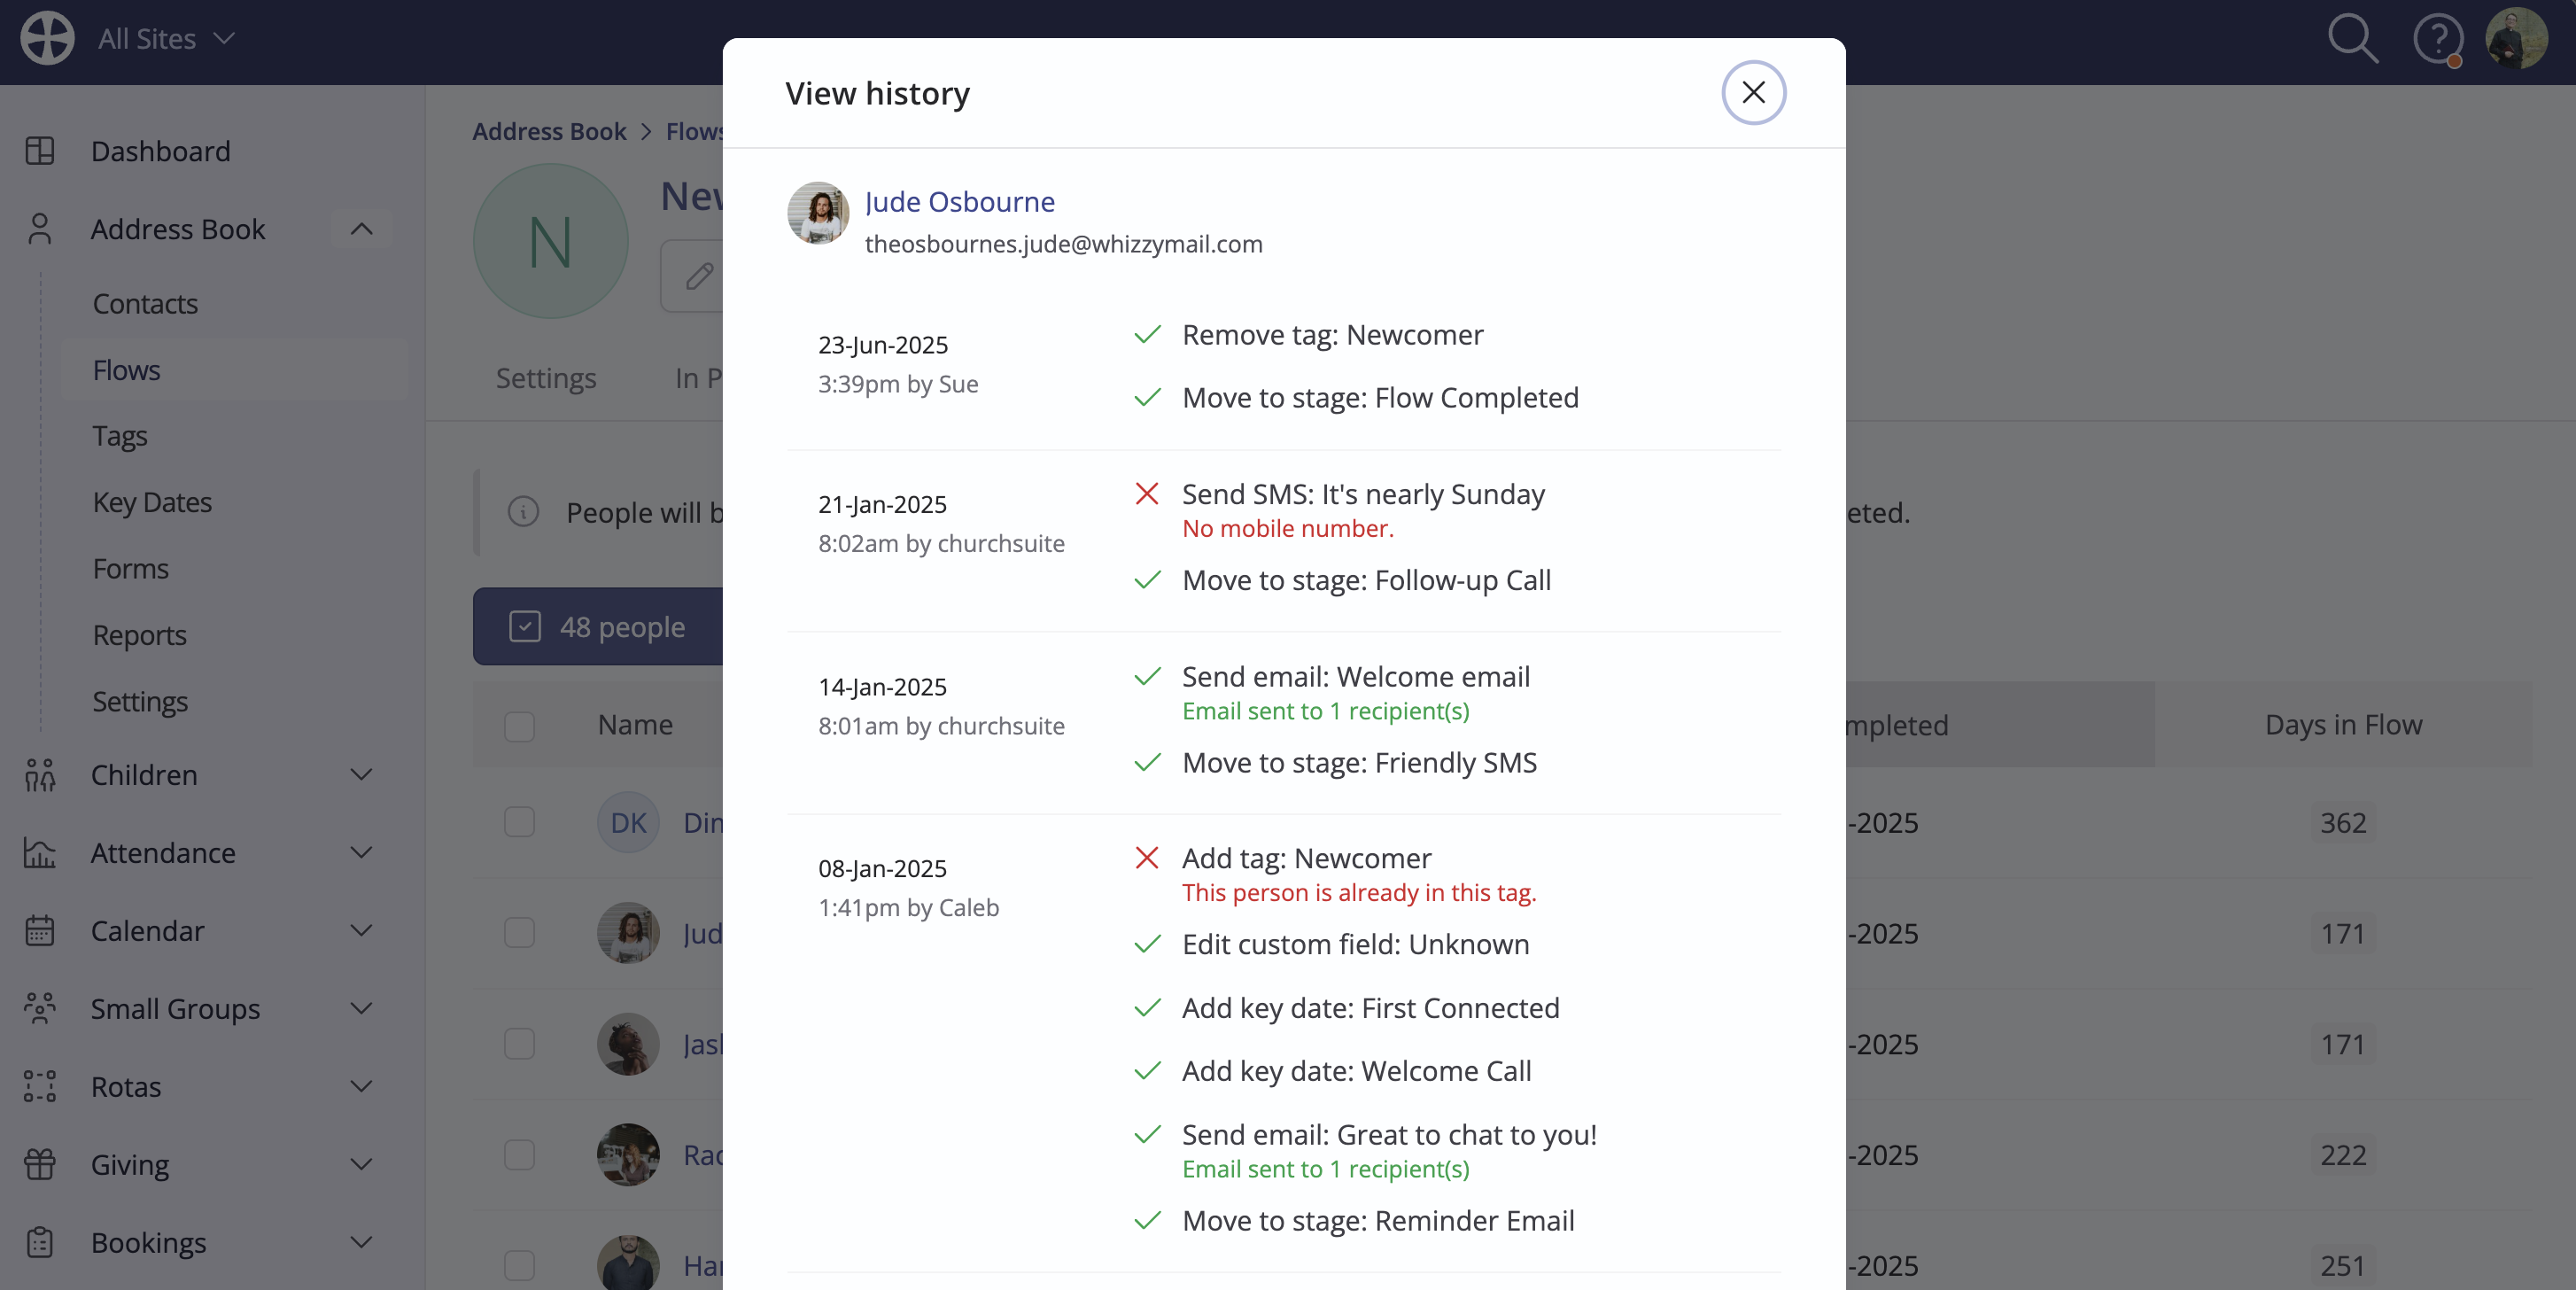
Finally, in this section, you can view each person's flow tracking using their View history action:
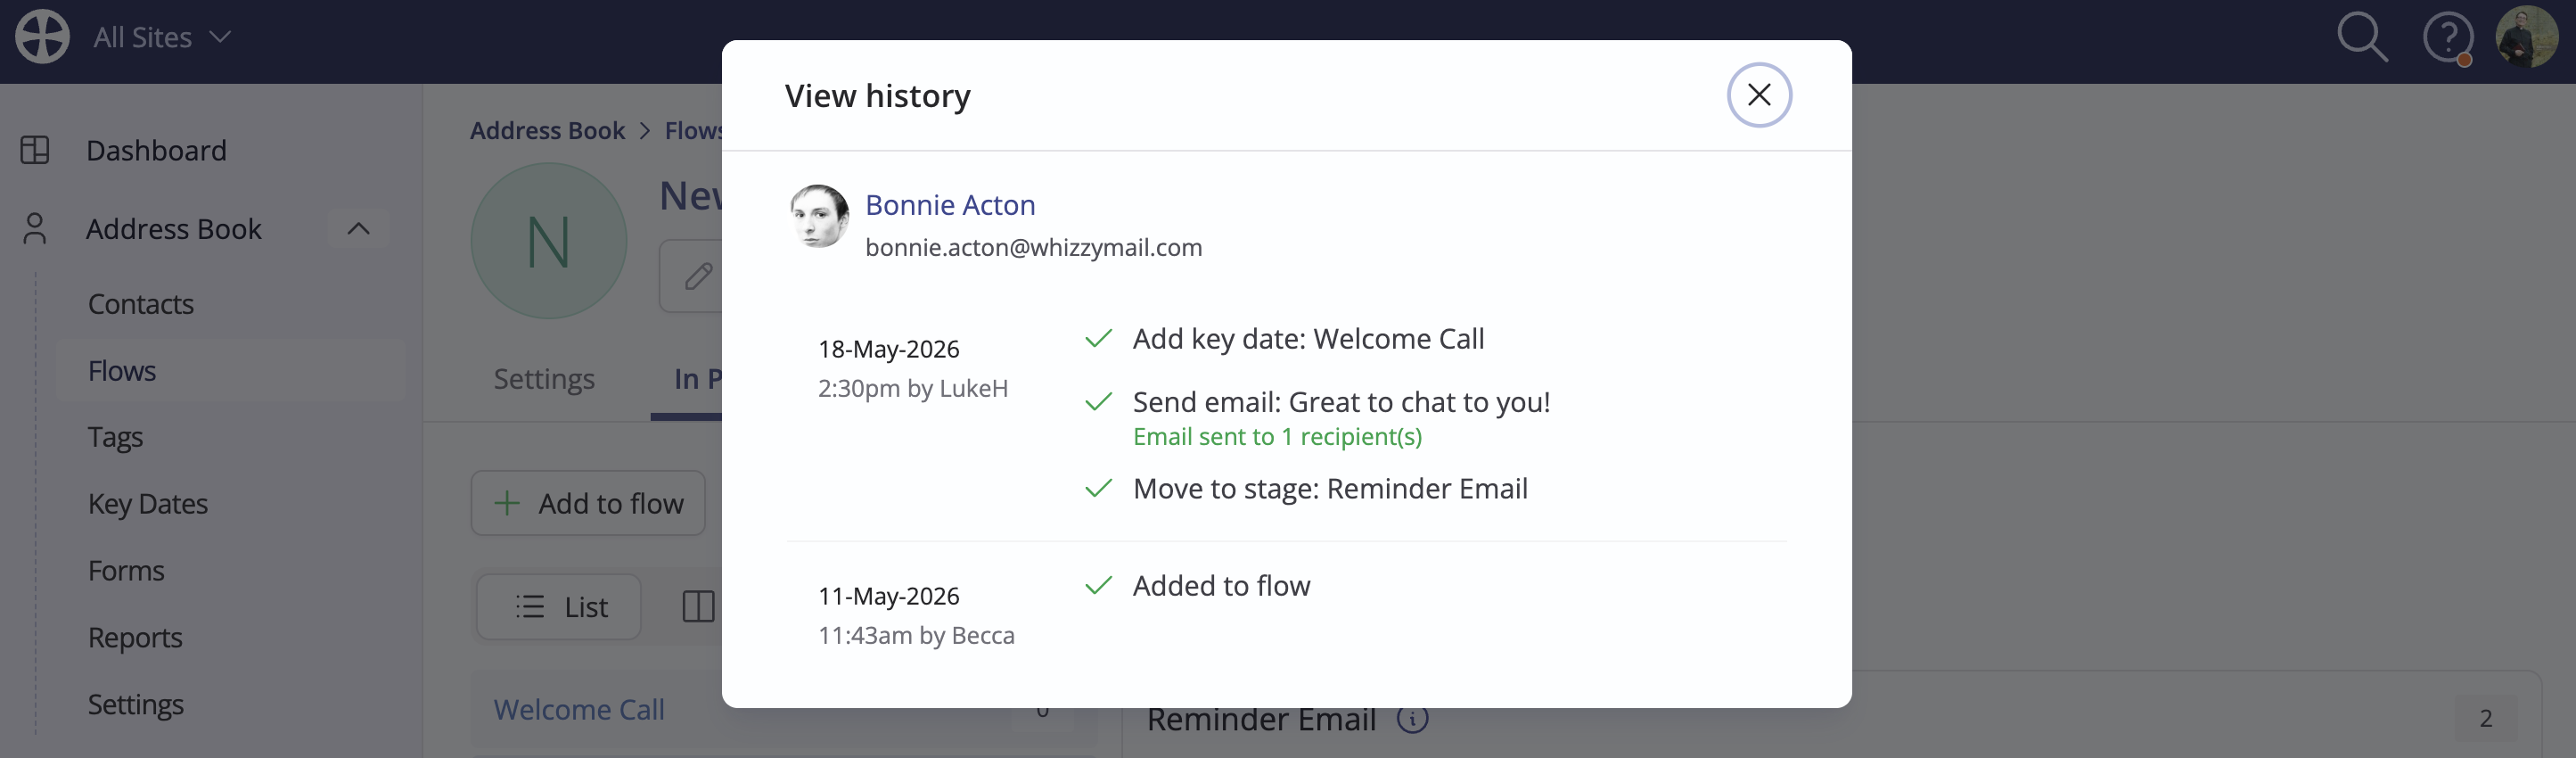
The tracking history shows details of the actions processed and the user who processed them:
Bulk processing multiple people through Flows
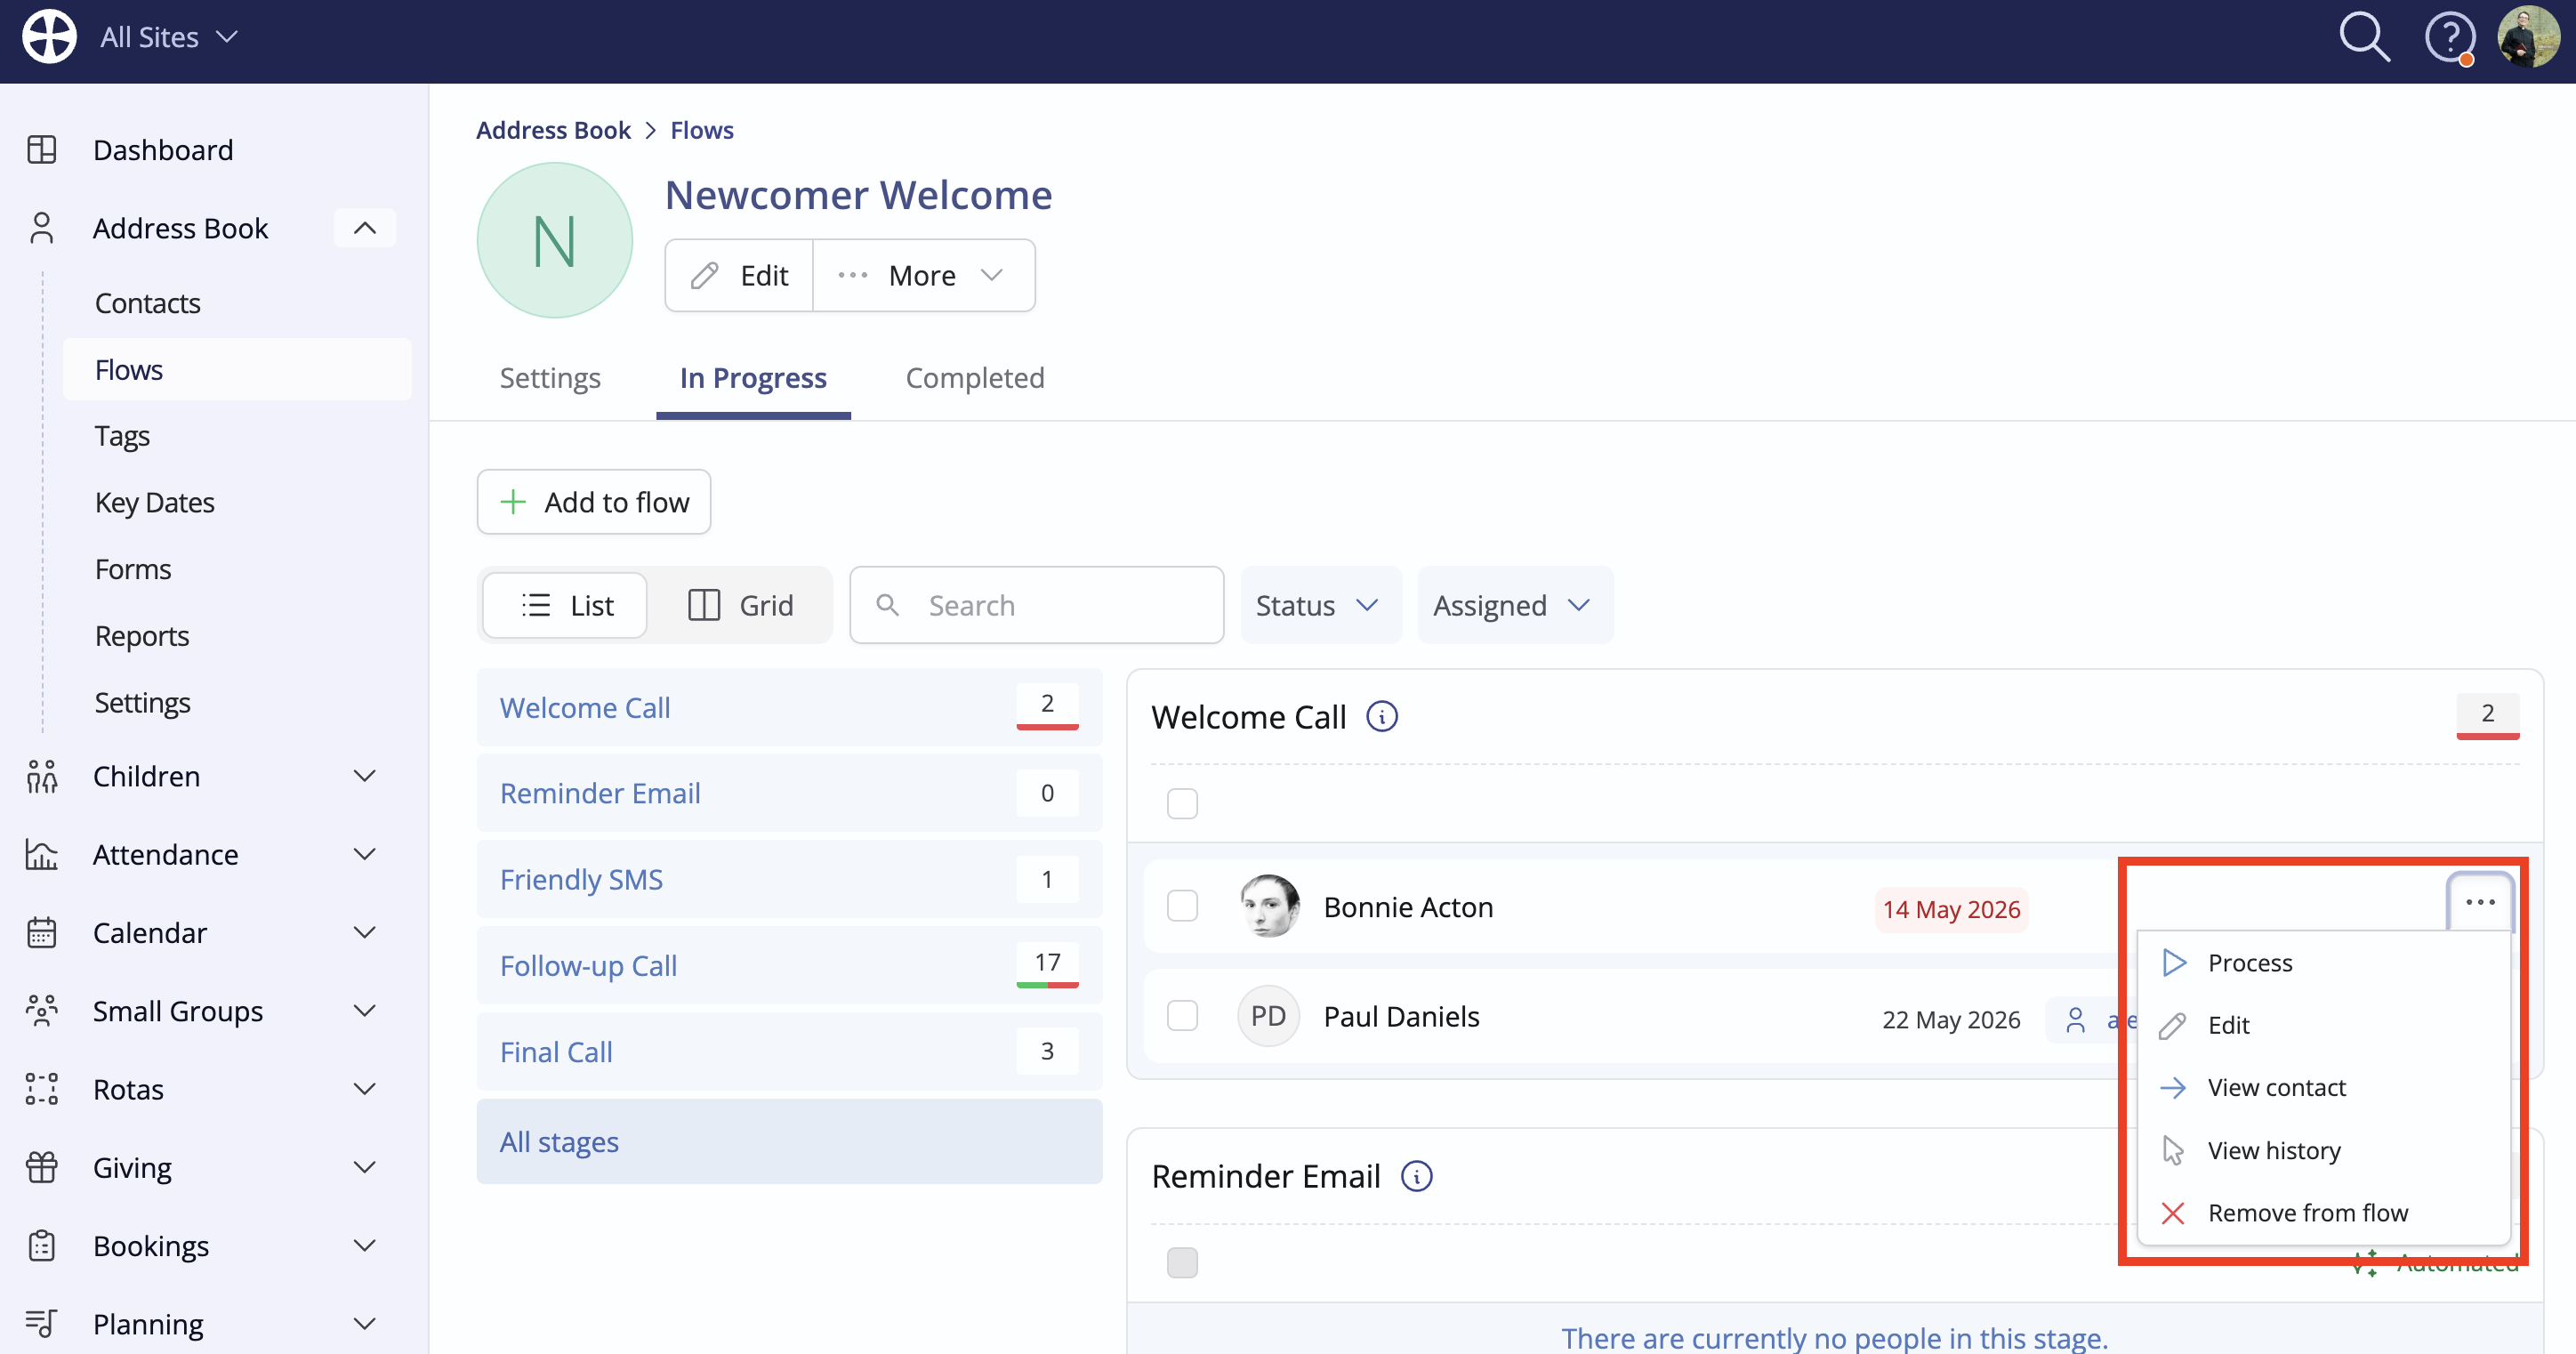
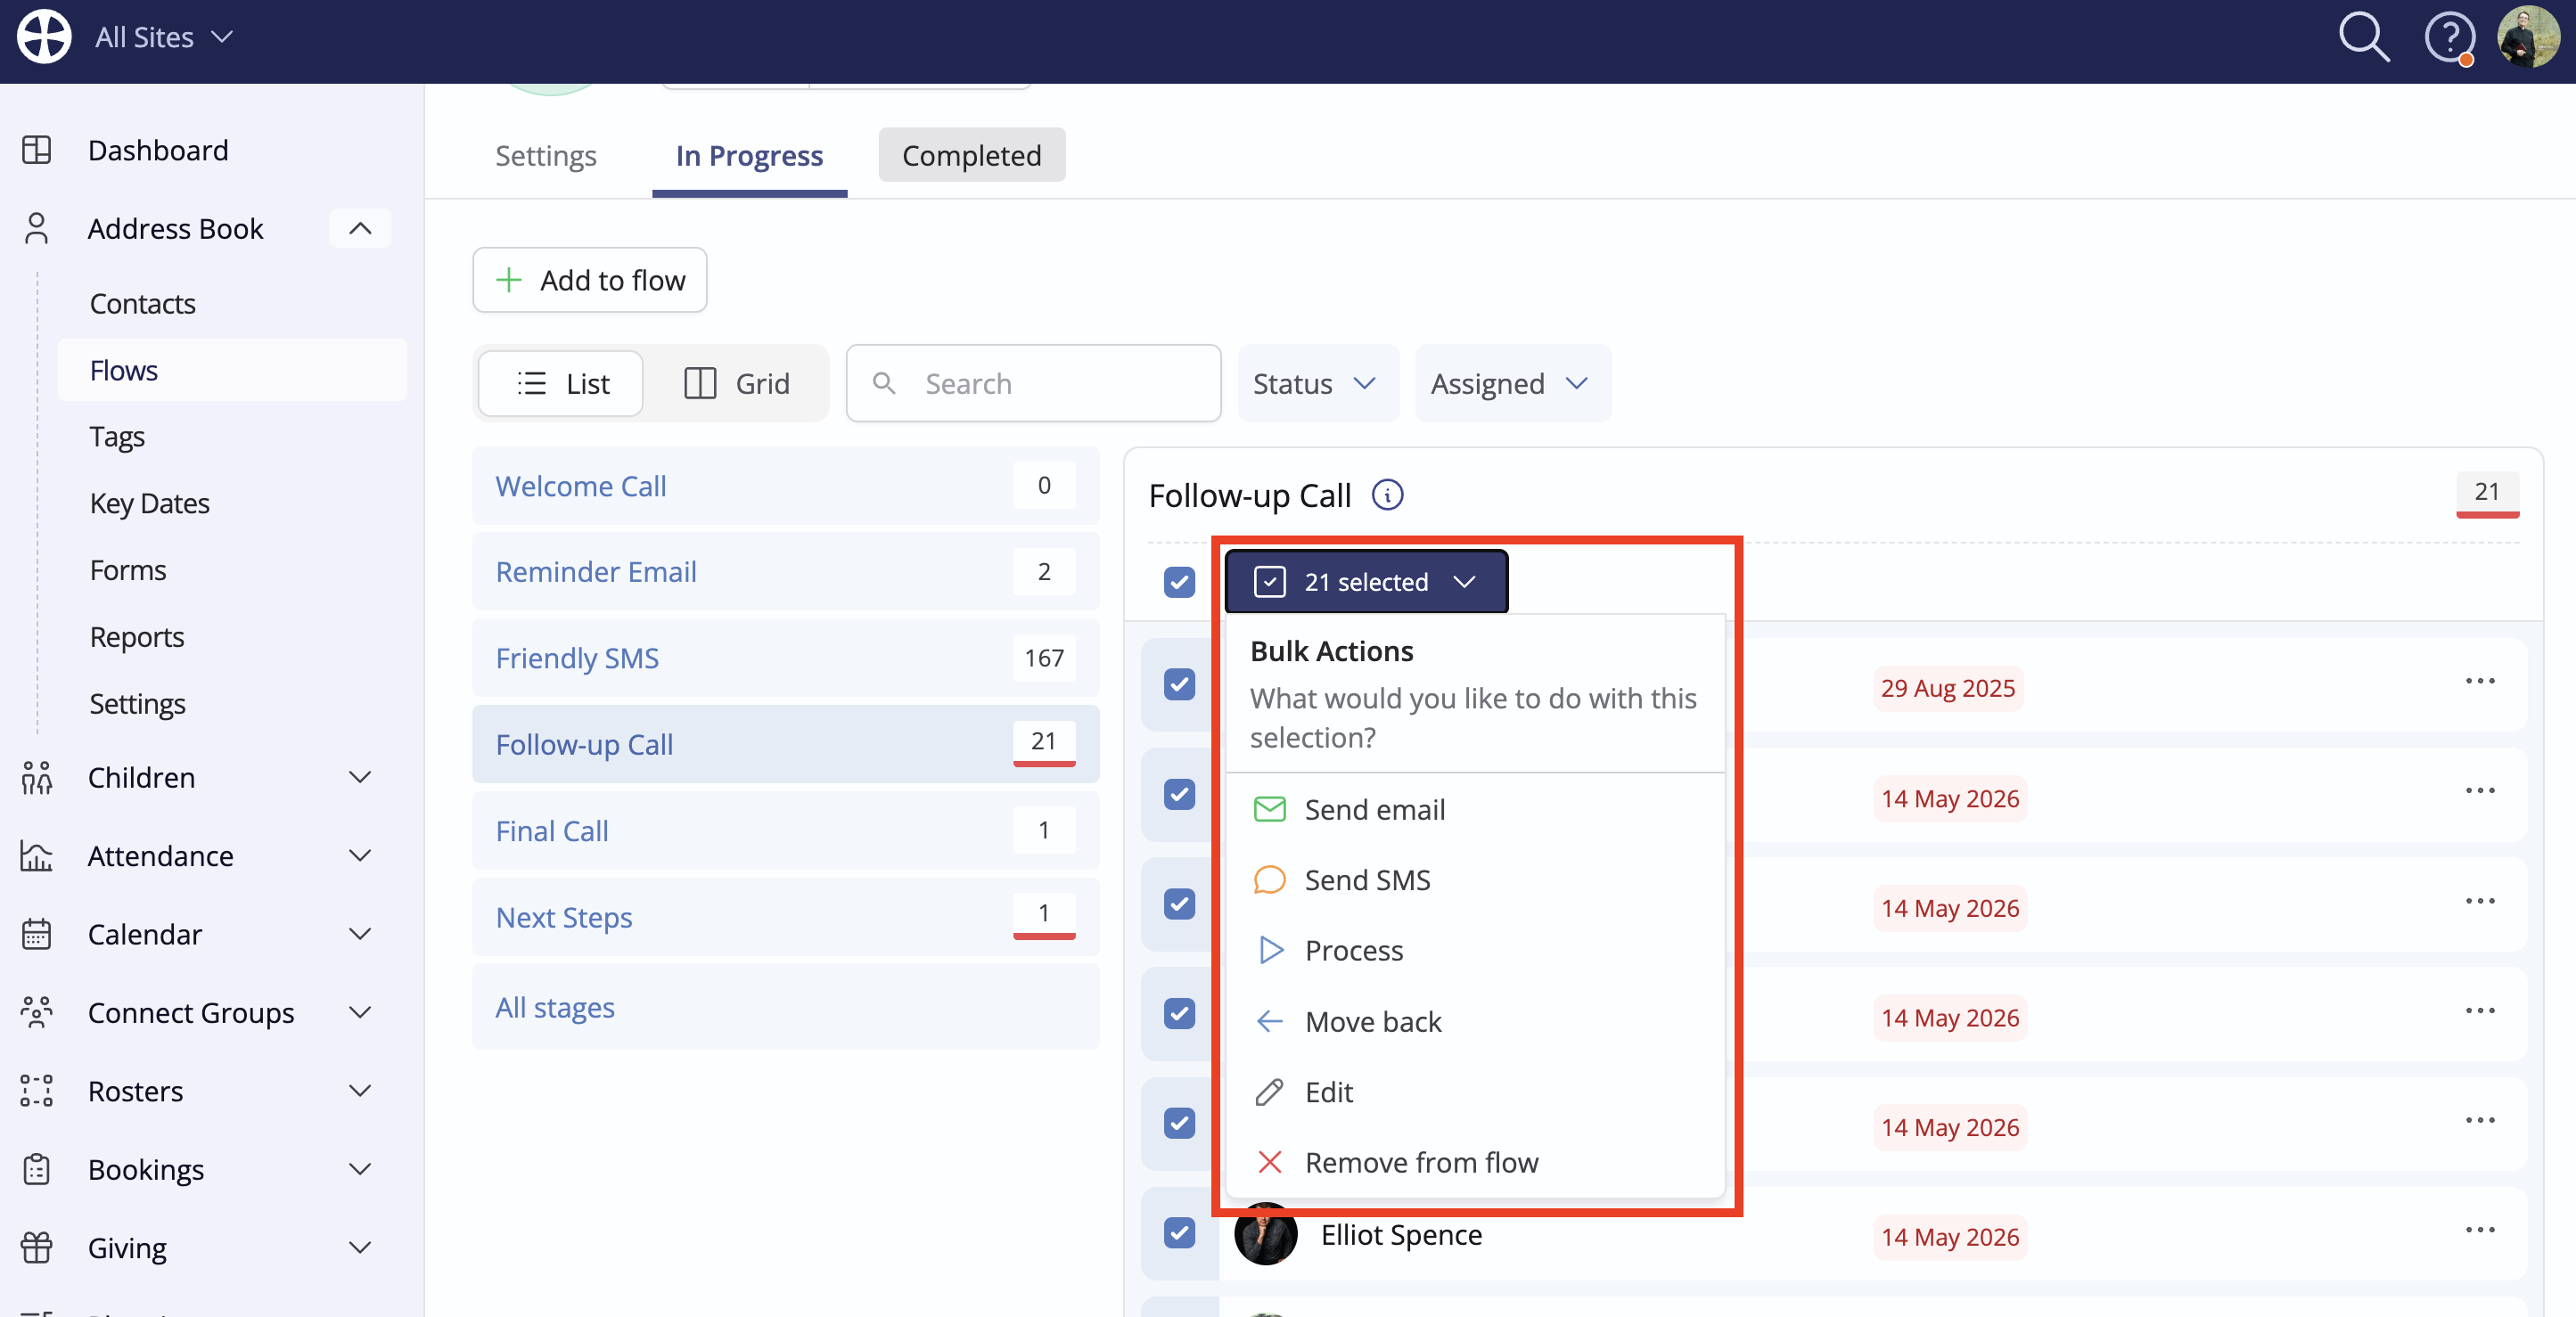
In addition to processing individuals, you can easily process multiple people in a single step. On the In Progress tab, use the checkboxes to select the people to be processed, then choose Process from the drop-down bulk Actions.
The Process pop-up summarises the number of people who will be updated and a list of stage Actions to select from. Check the box to indicate you are sure you wish to proceed and then click Process to run the actions for all the chosen people.

Bulk Actions are also provided to bulk change the Due date and Assigned user - choose the Edit action to make changes:

Flow automation
As seen in the earlier sections of this article, those who are due for processing in a flow can be processed manually by a module user or automatically at a preset time on the due date on a stage-by-stage basis. Many flow-stage applications lend themselves to automation, which frees your users to focus on other tasks. In this section, we look specifically at how to Automate a flow Stage and what happens to the Actions defined in that stage as each person becomes due. Importantly, a flow can comprise a mixture of manual and automated stages. Note that flow reminder notifications to Managers and Assigned users are not sent for automated stages. Note also that people can always be manually processed through all flow stages, including automated stages - ideal where you want to process someone immediately rather than wait for the next automation time to run.
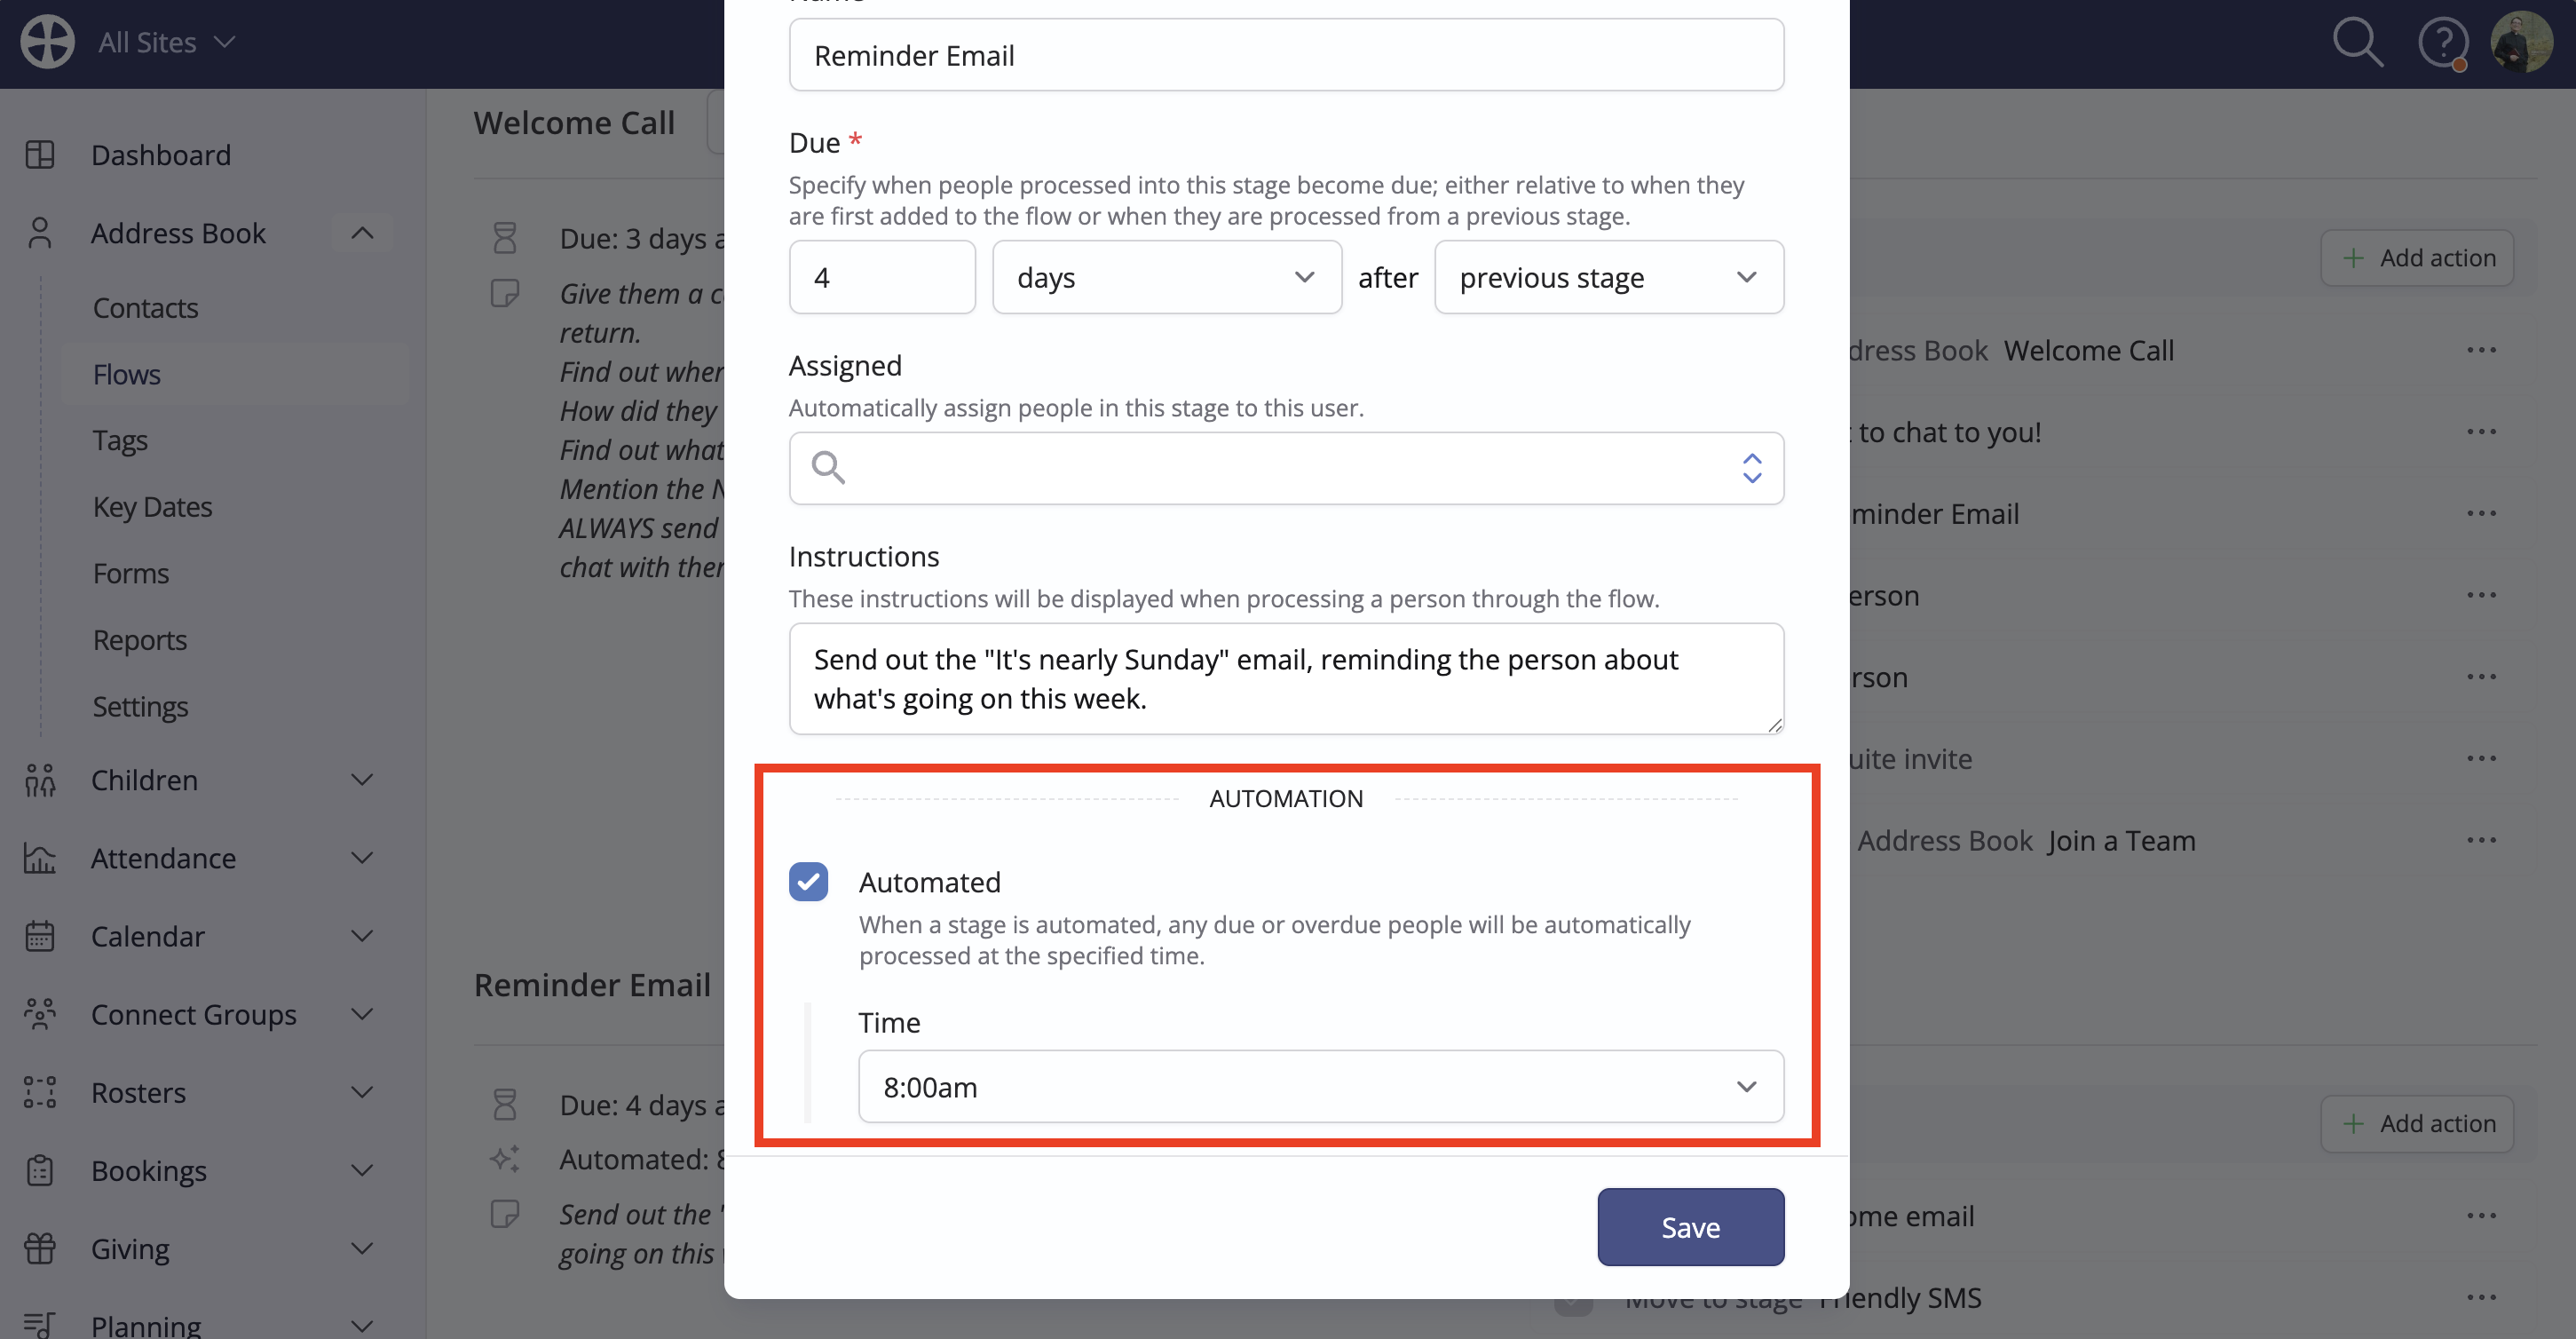
When adding or editing a Stage in a flow, notice the setting to Automate the stage. You can now set the Time when people who are due are processed for this stage.
When people become due or overdue in an automated stage, all stage actions that have been set to Selected/Automated are run in the order they are listed in the stage, so make sure the Move to stage action is positioned after any other actions that need to be processed automatically first. Any actions set as Unselected by default are ignored.
Top Tip! Automated flow example
Let's look at an example to illustrate how you might use automation in a simple Newcomer Welcome flow.
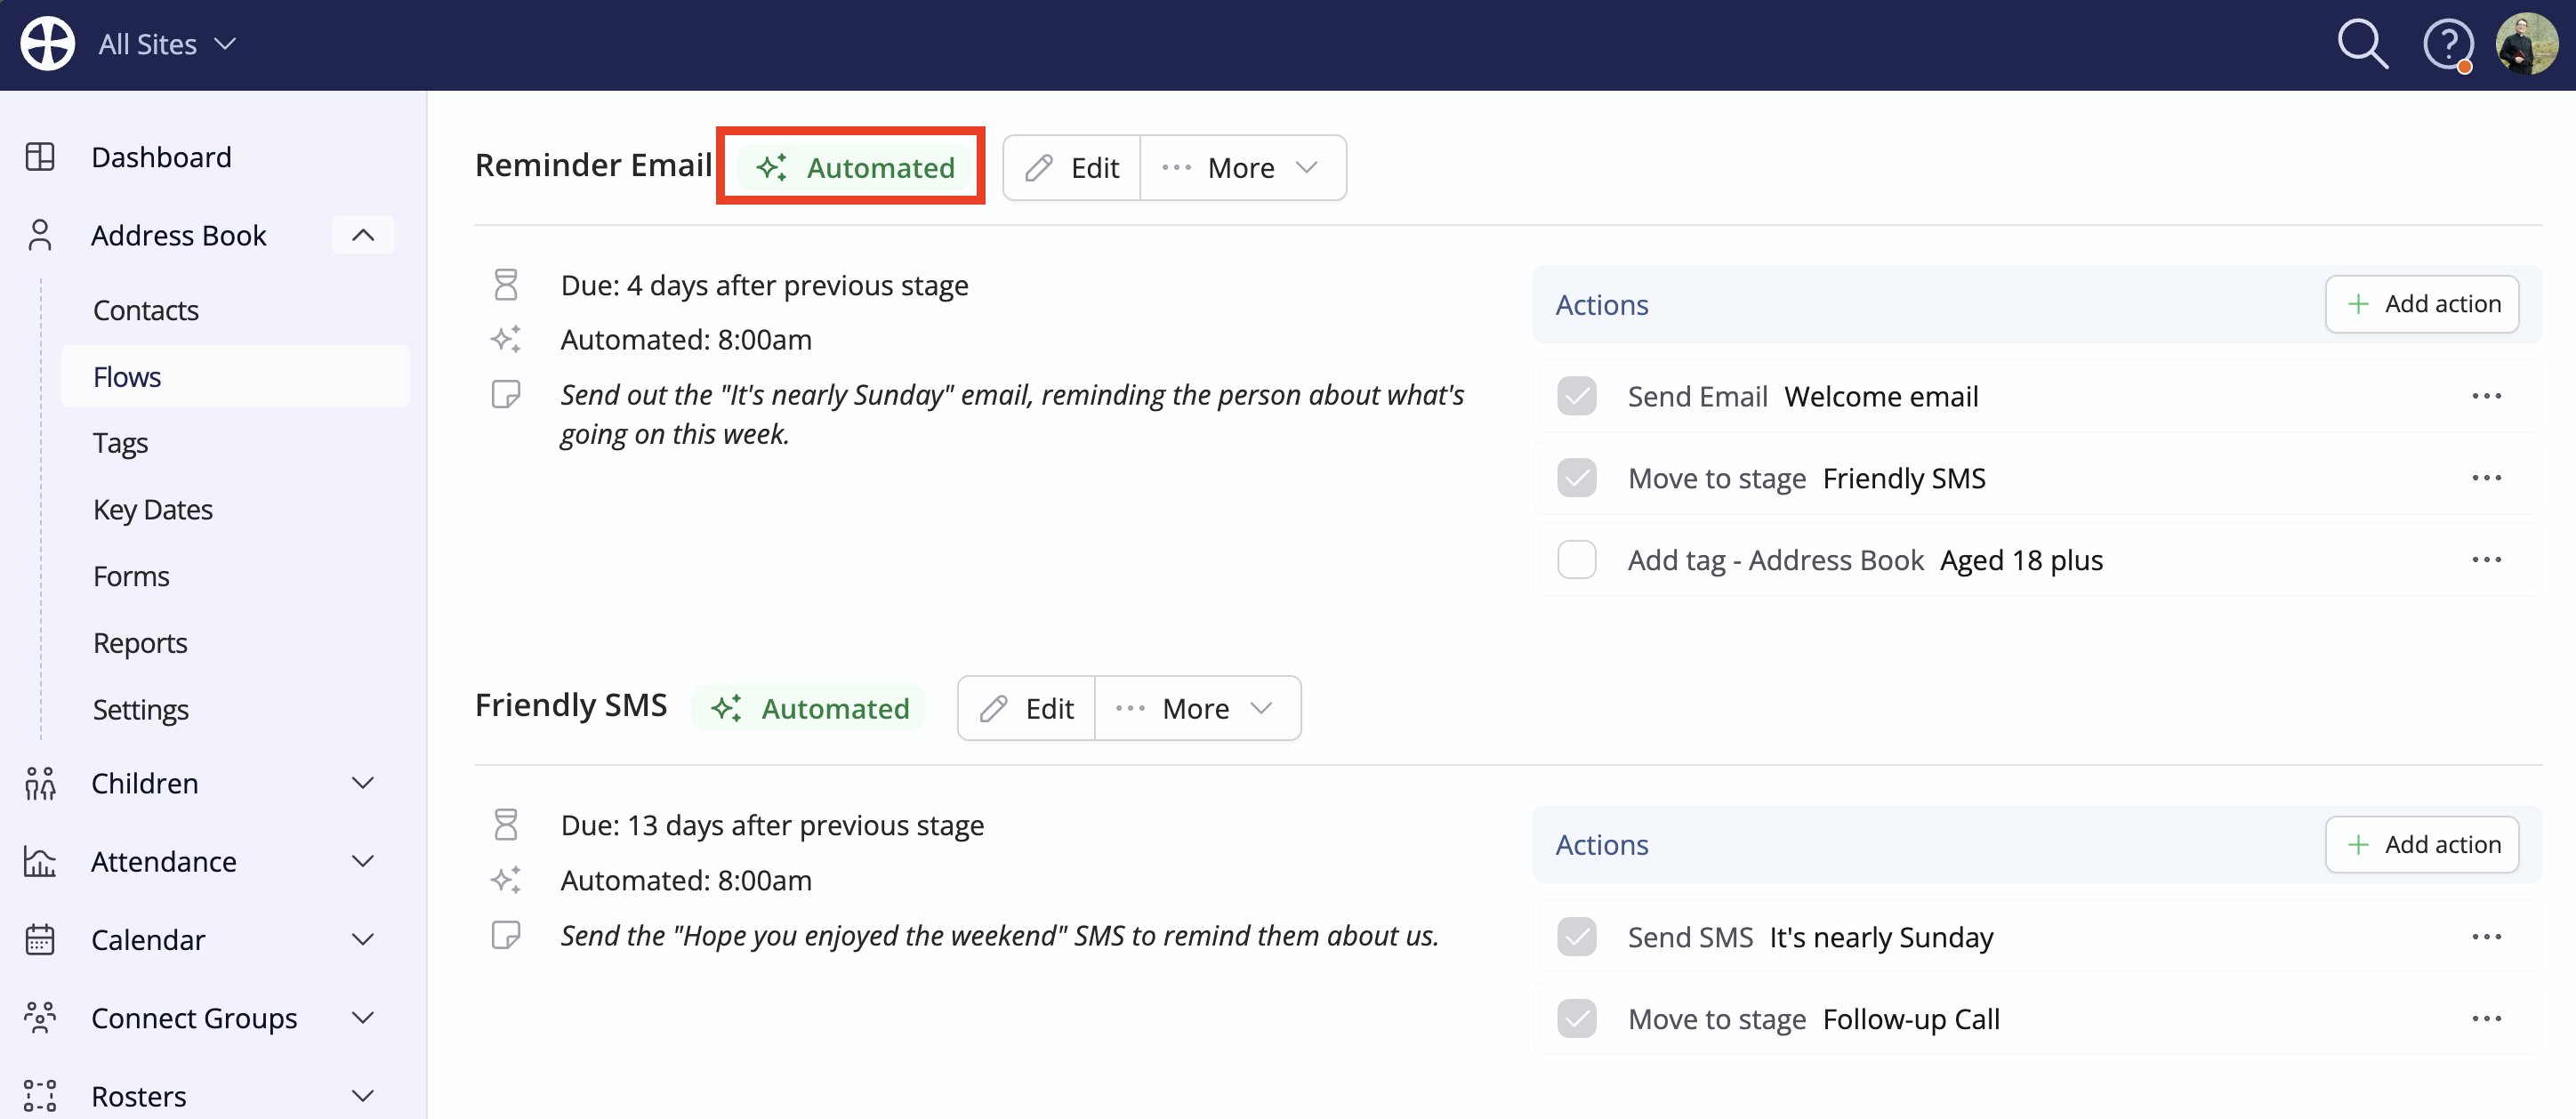
The Reminder Email stage has been set to be automated, and two preset actions have been defined, each set "Selected/Automated", so that they both run automatically at 8.00 am each day for each person who becomes due in this stage. A preset welcome email is sent, and a final action moves the person automatically into the next stage of the flow.
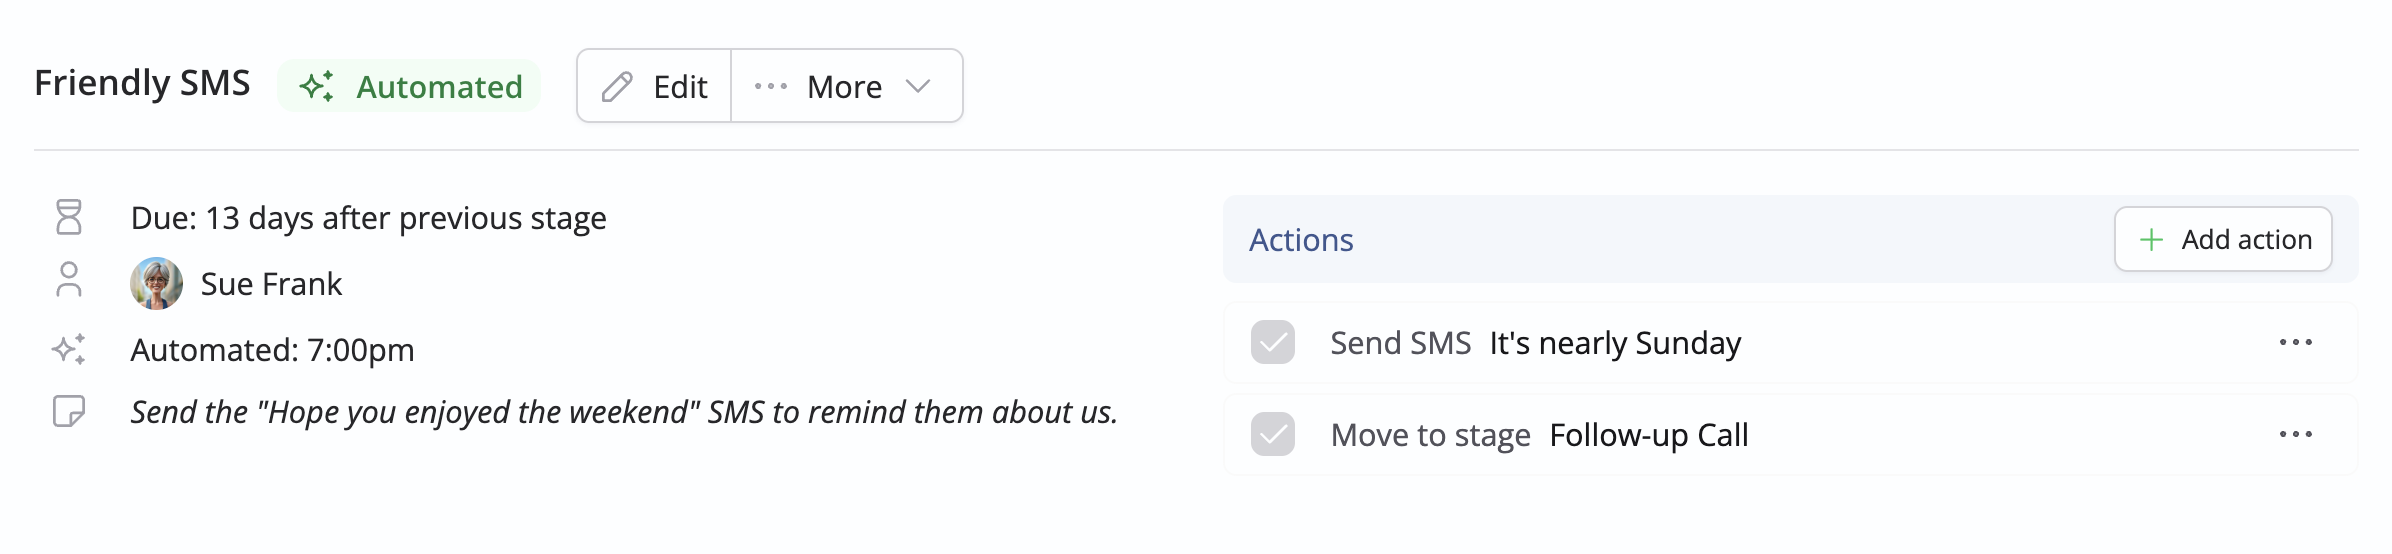
This next stage is also Automated. Two weeks after being added to the flow, two preset actions will be run at 7:00 pm on the due date: a preset SMS will be sent, and the person will be automatically moved into the next flow stage.
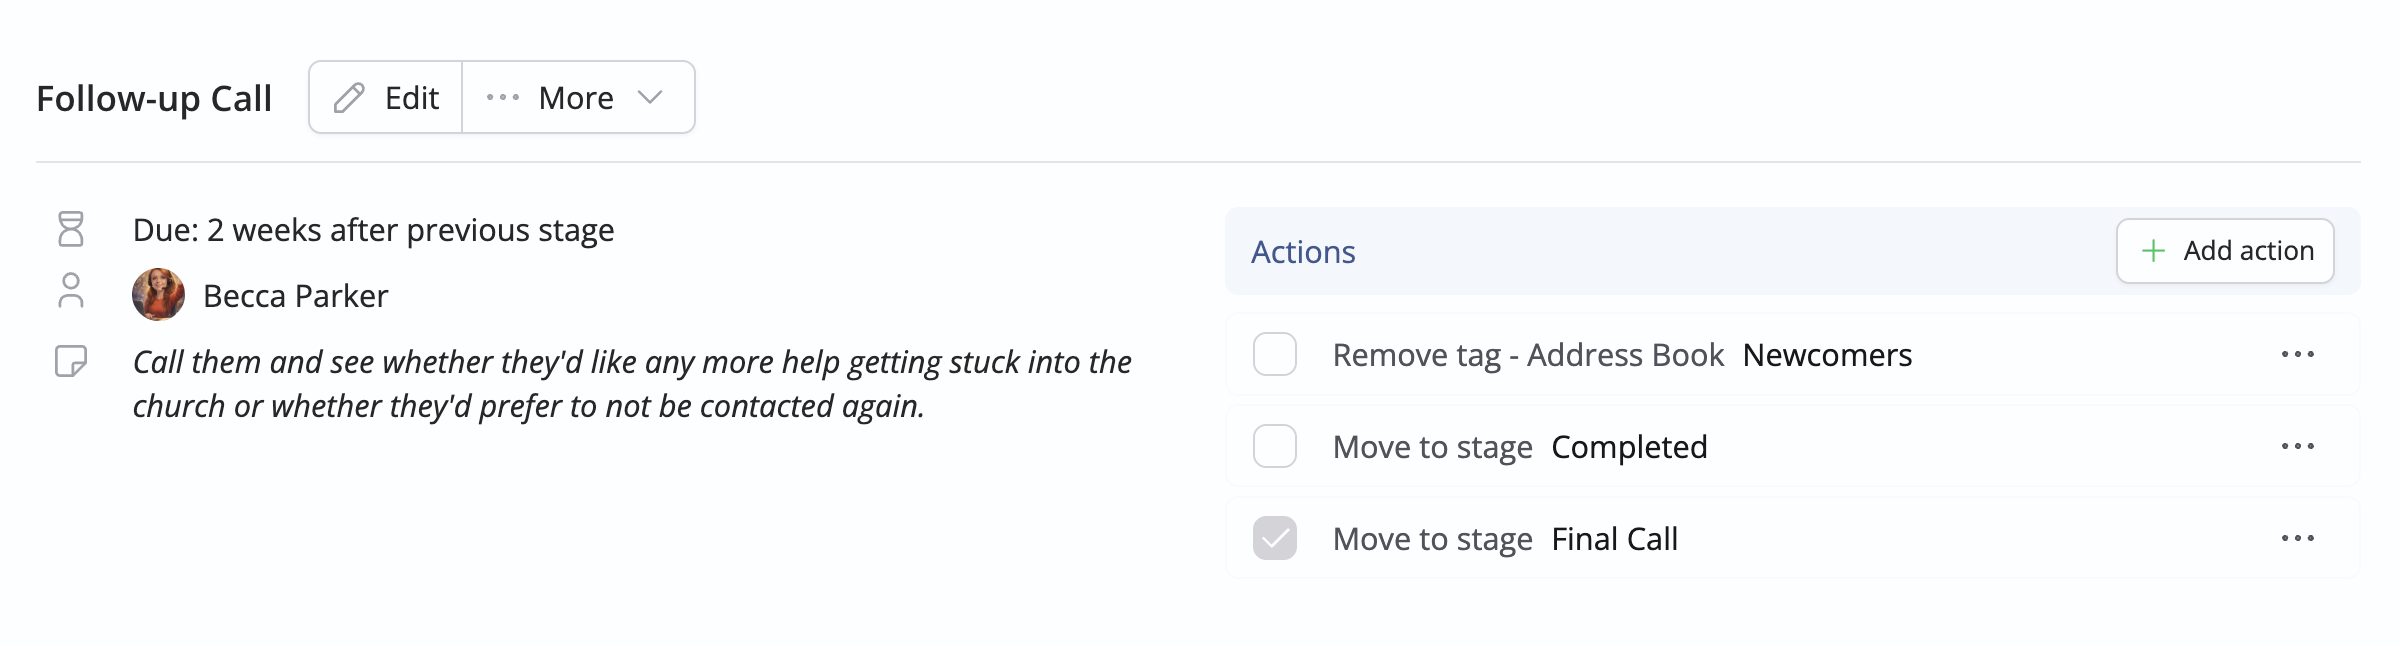
This final stage is not automated. As seen from the stage Instructions, it requires a user to make a telephone call. Three possible actions have been defined, two set as unselected by default. This means that a flow manager or assigned user will receive a flow reminder notification when a person becomes due in the stage. The notification will remind them to process people through this stage manually, choosing the appropriate actions to run for each person who becomes due.
Flow tracking
Comprehensive tracking is maintained about each person as they are added to and processed through each stage of a flow. The tracking is completed and retained when a person is processed out of the flow. Flow tracking is deleted when a person is removed from a flow without being processed out of the flow.
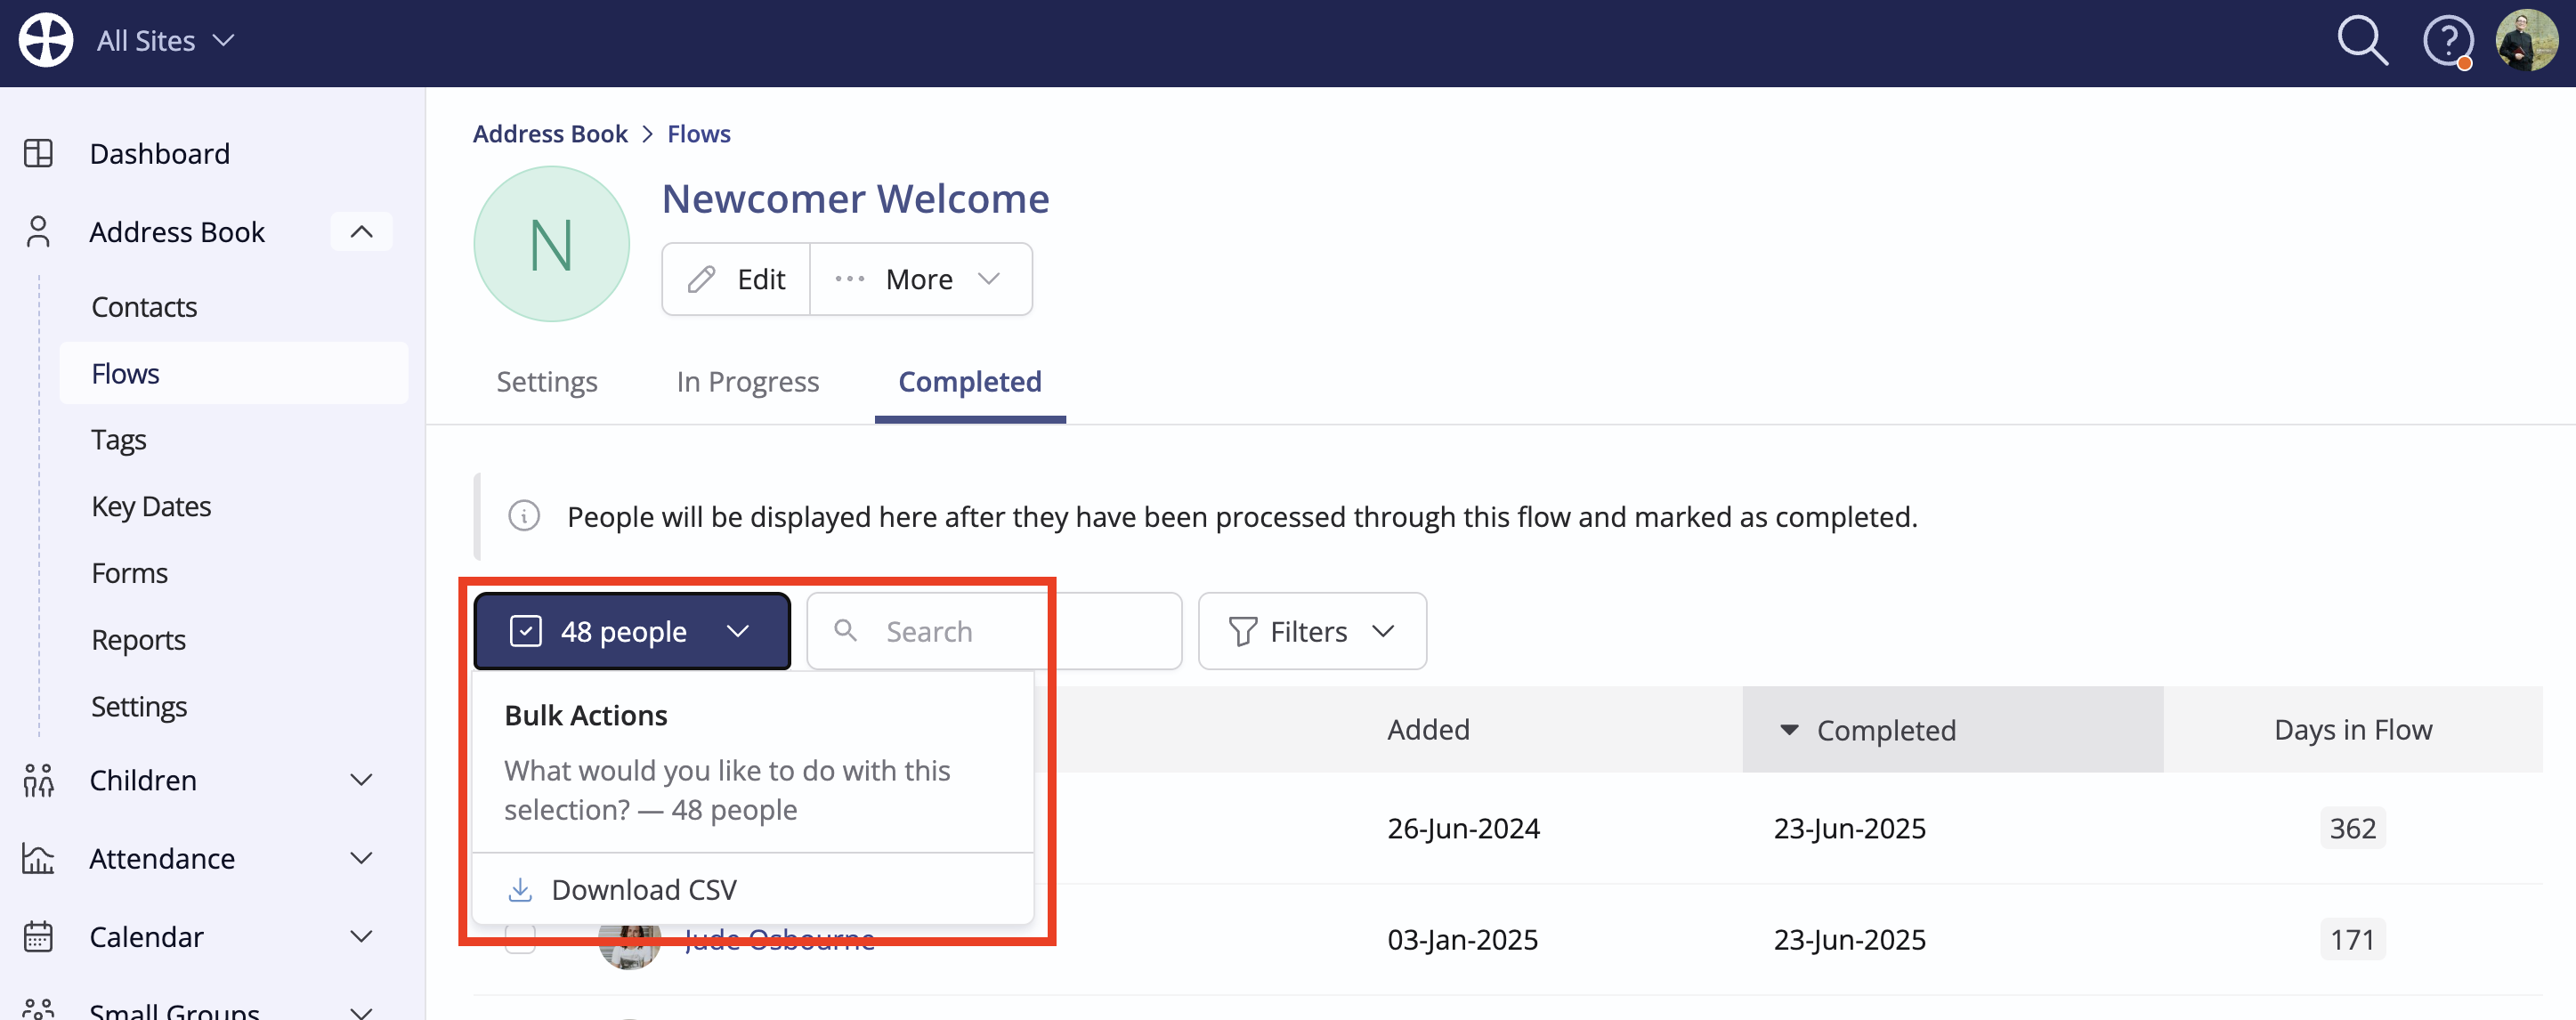
You can view historic flow tracking for a flow in the Completed tab. Here you can search for a particular contact or filter the list by the date they were Added to the flow or the date they Completed it:

Clicking on the Days in Flow pill for a contact opens a pop-up showing the tracking history, demonstrating which actions were processed when and by which user. This data can give helpful insights into historic flow processing and highlight where those being processed may have experienced a bottleneck in your admin processes.
You can also use the Bulk Actions to Download a CSV of those who have completed the flow, showing the date they were added to the flow, the date the flow was completed and the number of days in the flow.
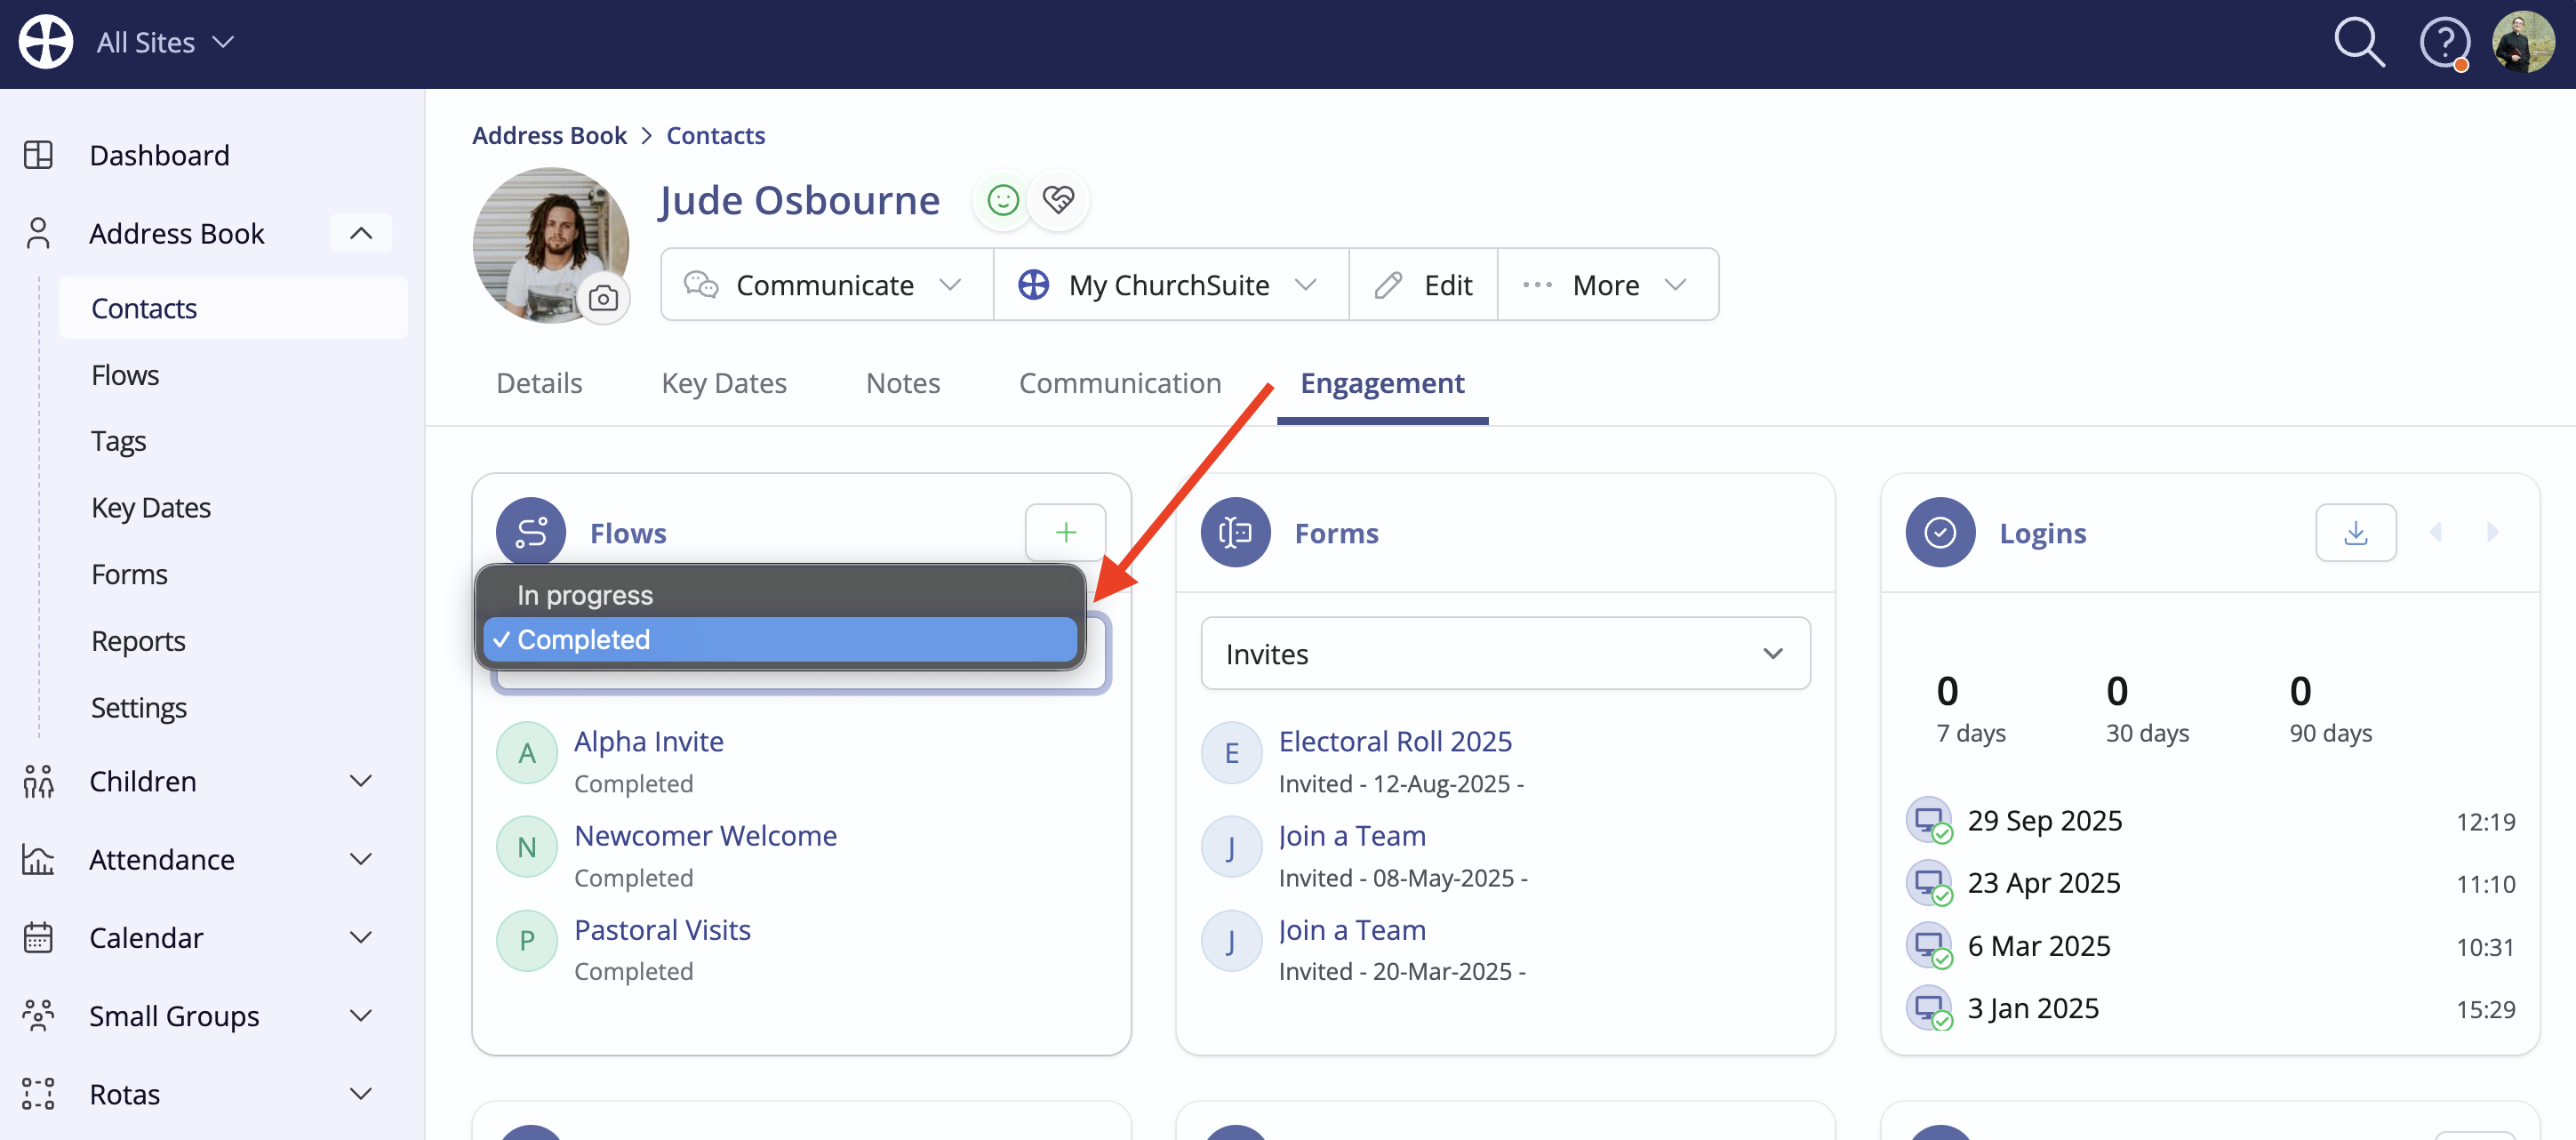
Additionally, you can view completed flows either on the Engagement tab of a person's profile or on the optional Details tab widget, selecting Completed.
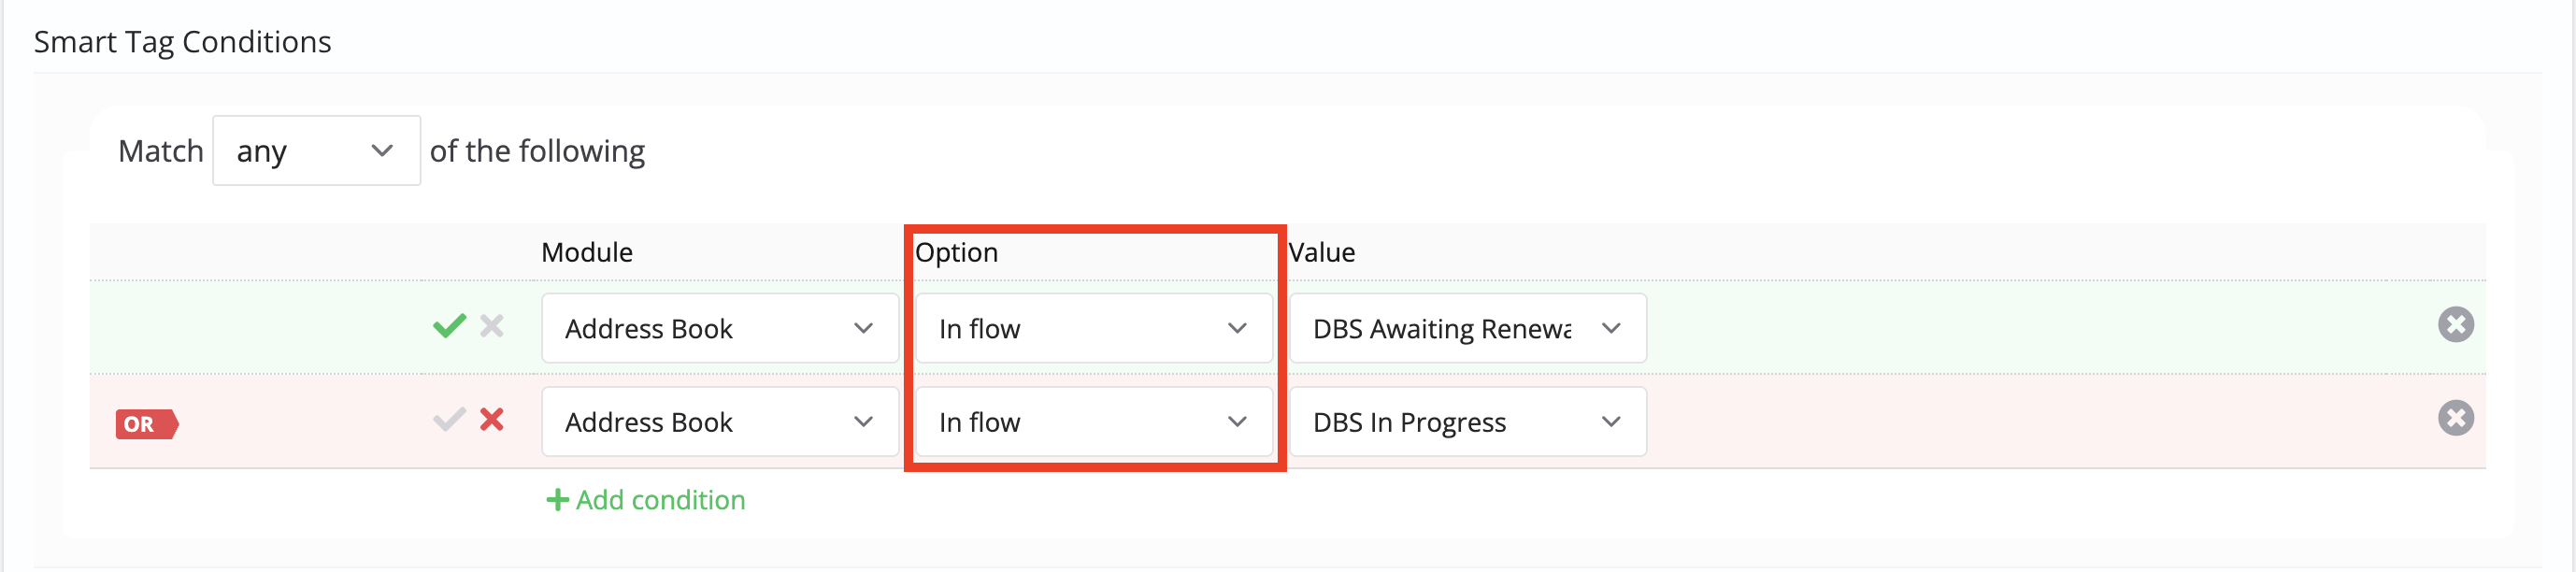
Finally, we've provided Smart Tag conditions to match those who are in or not in any flow or a specified flow:
Archiving and deleting Flows
Care should be taken before deleting a flow, as this is a permanent and irreversible action with destructive consequences. Always consider first archiving a flow that is no longer needed - archived flows can be set as active again. Remember, the flow may be visible in other modules, so archiving or deleting it may impact the workflows of other users still using it in another module.
When archiving a flow, any people still in the flow (in any module the flow is visible in) remain, and they can still be processed or removed. However, flow reminders are no longer sent, and you cannot assign people to an archived flow.
Deleting a flow that is also visible in other modules will only delete the flow from the module being viewed. If the flow is visible in different modules, it will persist unchanged. Deleting a flow will remove all people from the flow for that module. Also, before deleting, consider that flows may be referenced in Smart Tag conditions and a module's settings for other features relating to Embed.
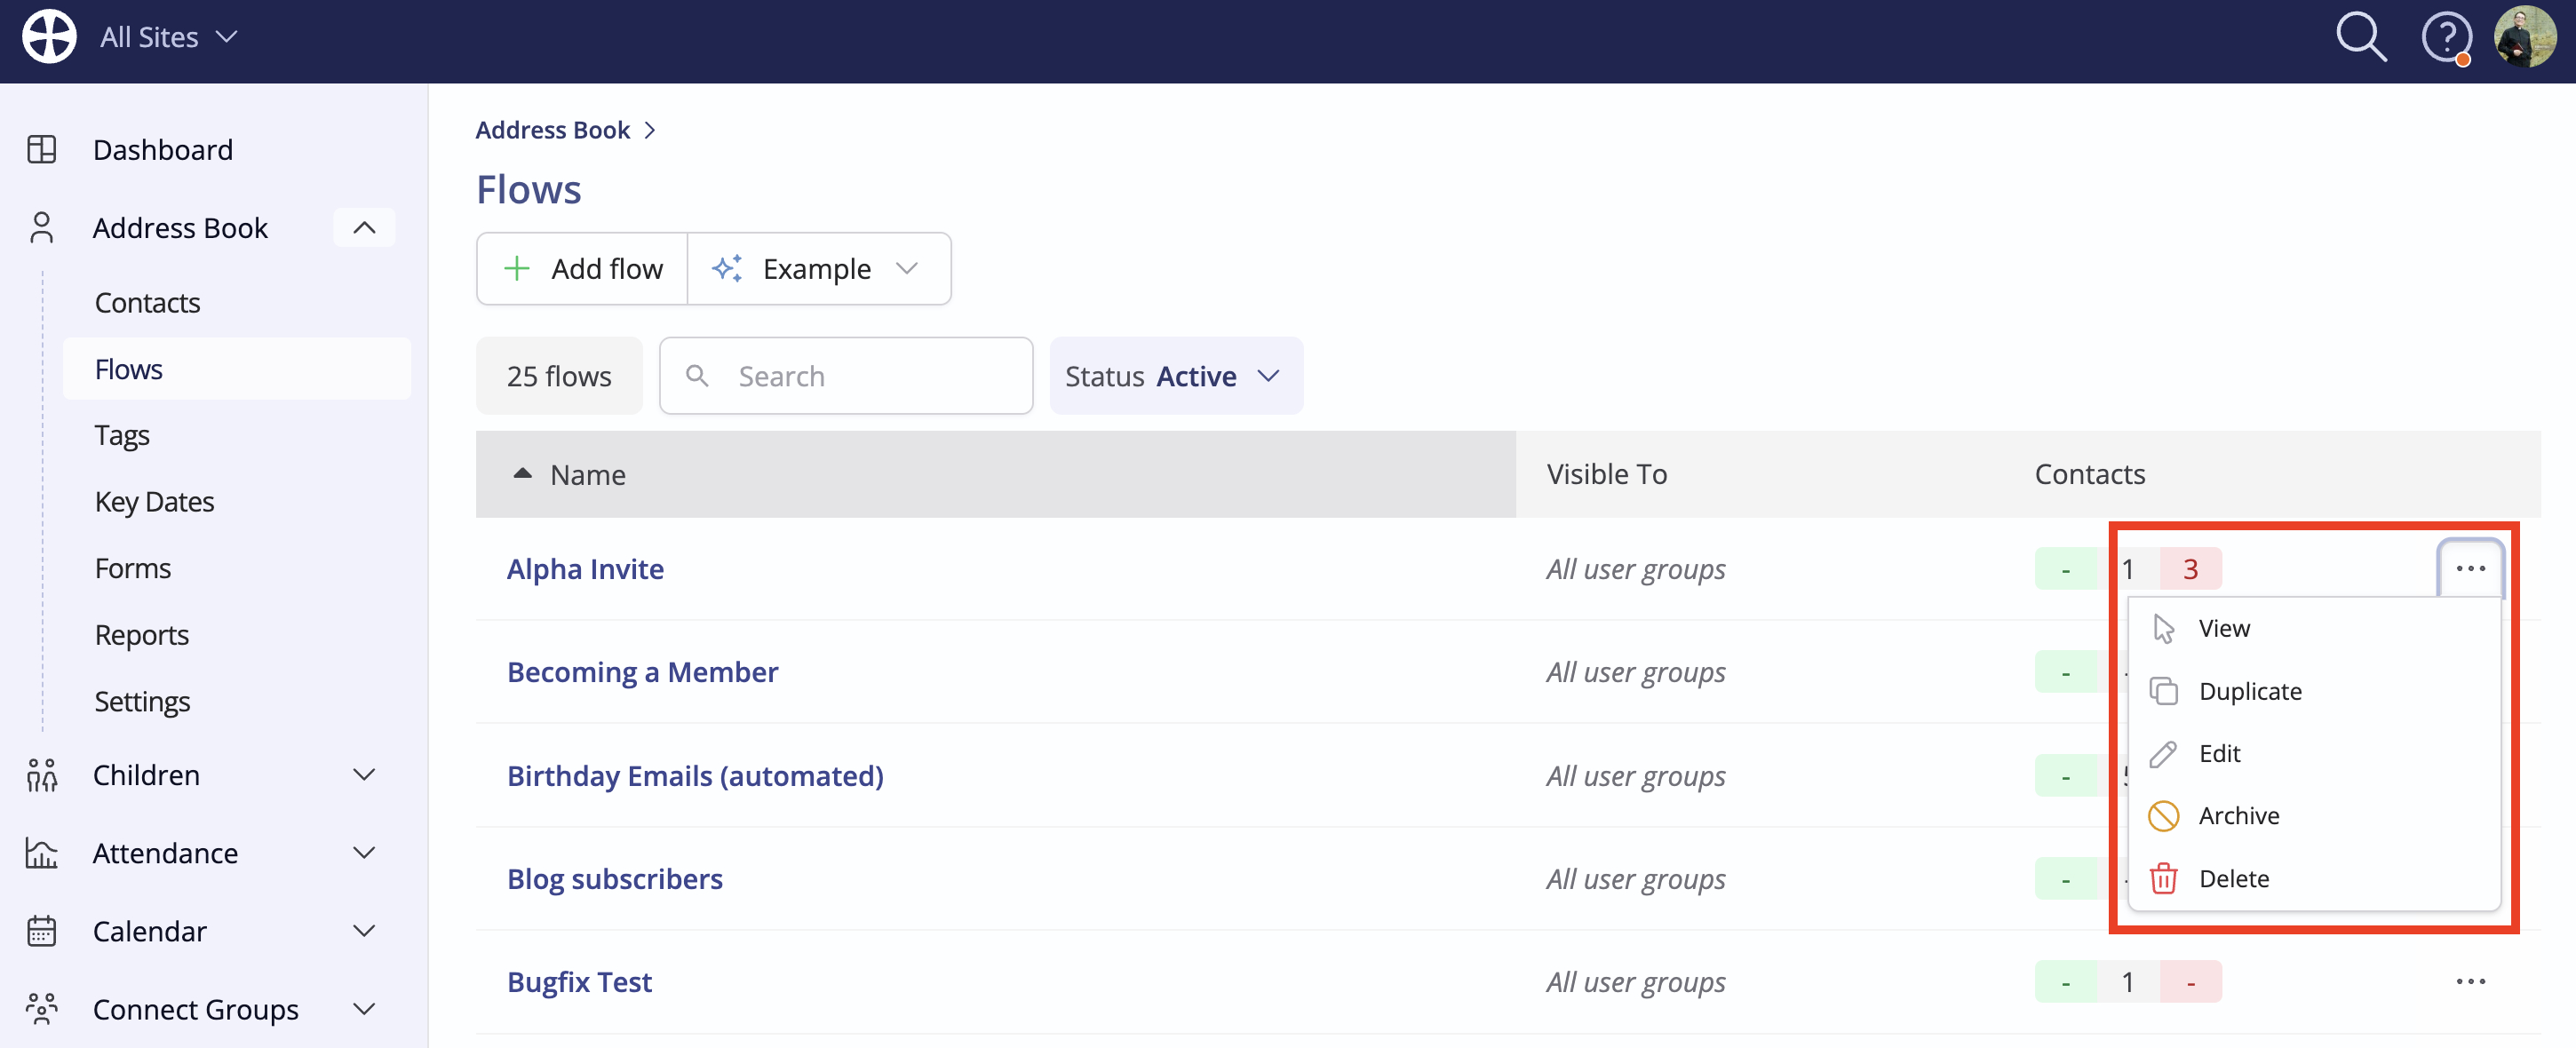
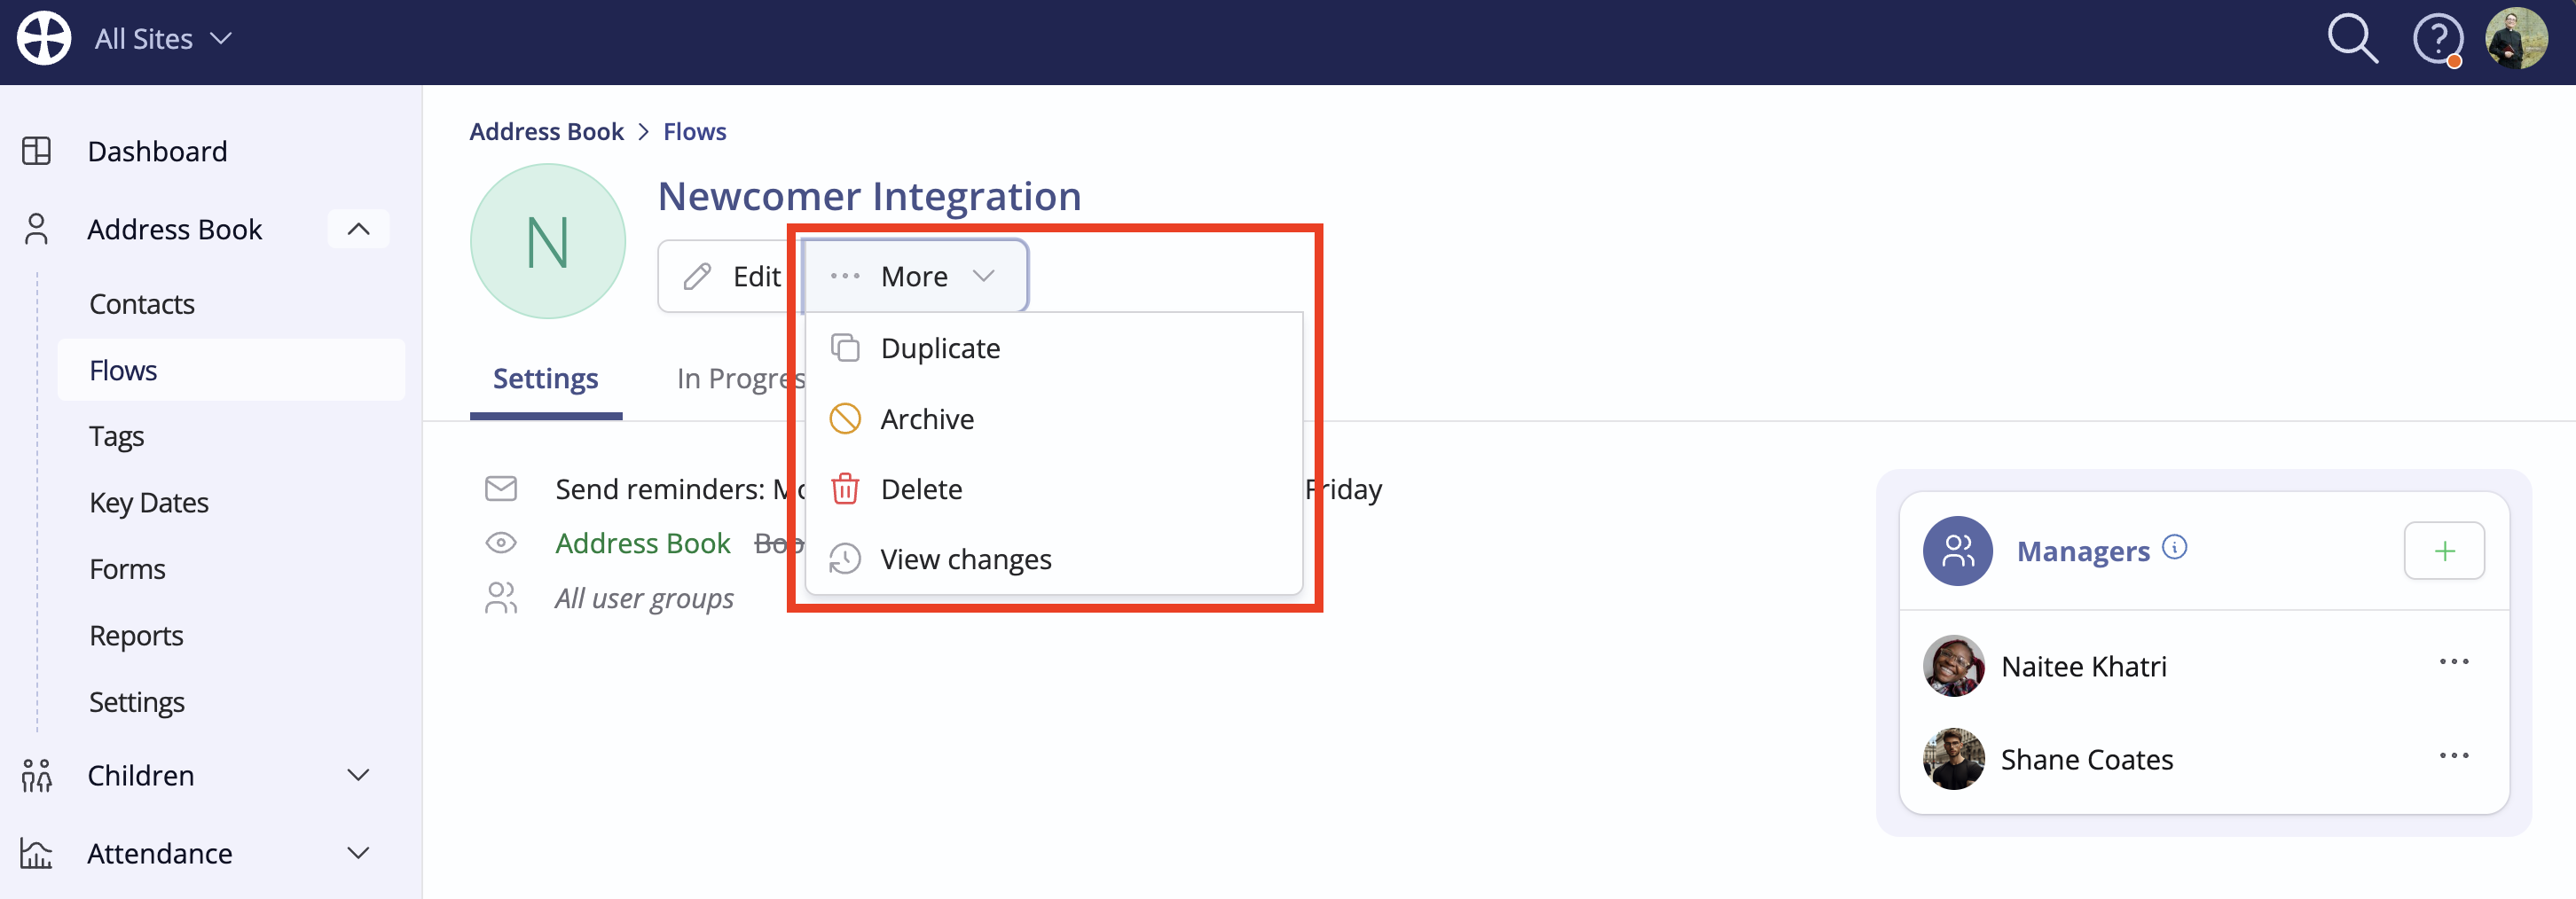
To archive or delete a flow, click Archive or Delete from the flow View:
...Or select Archive or Delete from the Actions in the Flows section of a module.