Event check-in
In this article
It's great to see who's signing up for your events but do they actually attend? Or, have you ever wanted to take an impromptu register of attendance for an event but then the moment passes? The Calendar module Event Check-In functionality is designed to help with recording event attendance in both of these scenarios.
Overview of intended functionality
Check-In can be initiated by Calendar module Users from within ChurchSuite and by designated event Overseers from within My ChurchSuite for any event with a Confirmed status. In addition to checking in attendees from a list, users and overseers using the ChurchSuite app on a smartphone or tablet can use their device camera to scan the Check-In QR code from a signup's confirmation email and check them in. For busy events, multiple devices can run check-in simultaneously - check-in attendance is recorded and updated in real-time, so check-ins on one device are immediately reflected on other devices.
As each person is checked in, a confirmation pop-up shows any sign-up details, including details of tickets, payments, and event question responses, making the on-the-door user experience easy to administer; and for Unpaid and pay-on-arrival tickets, there is the option to Mark Paid any manual payments collected on the door as part of the Check-In process.

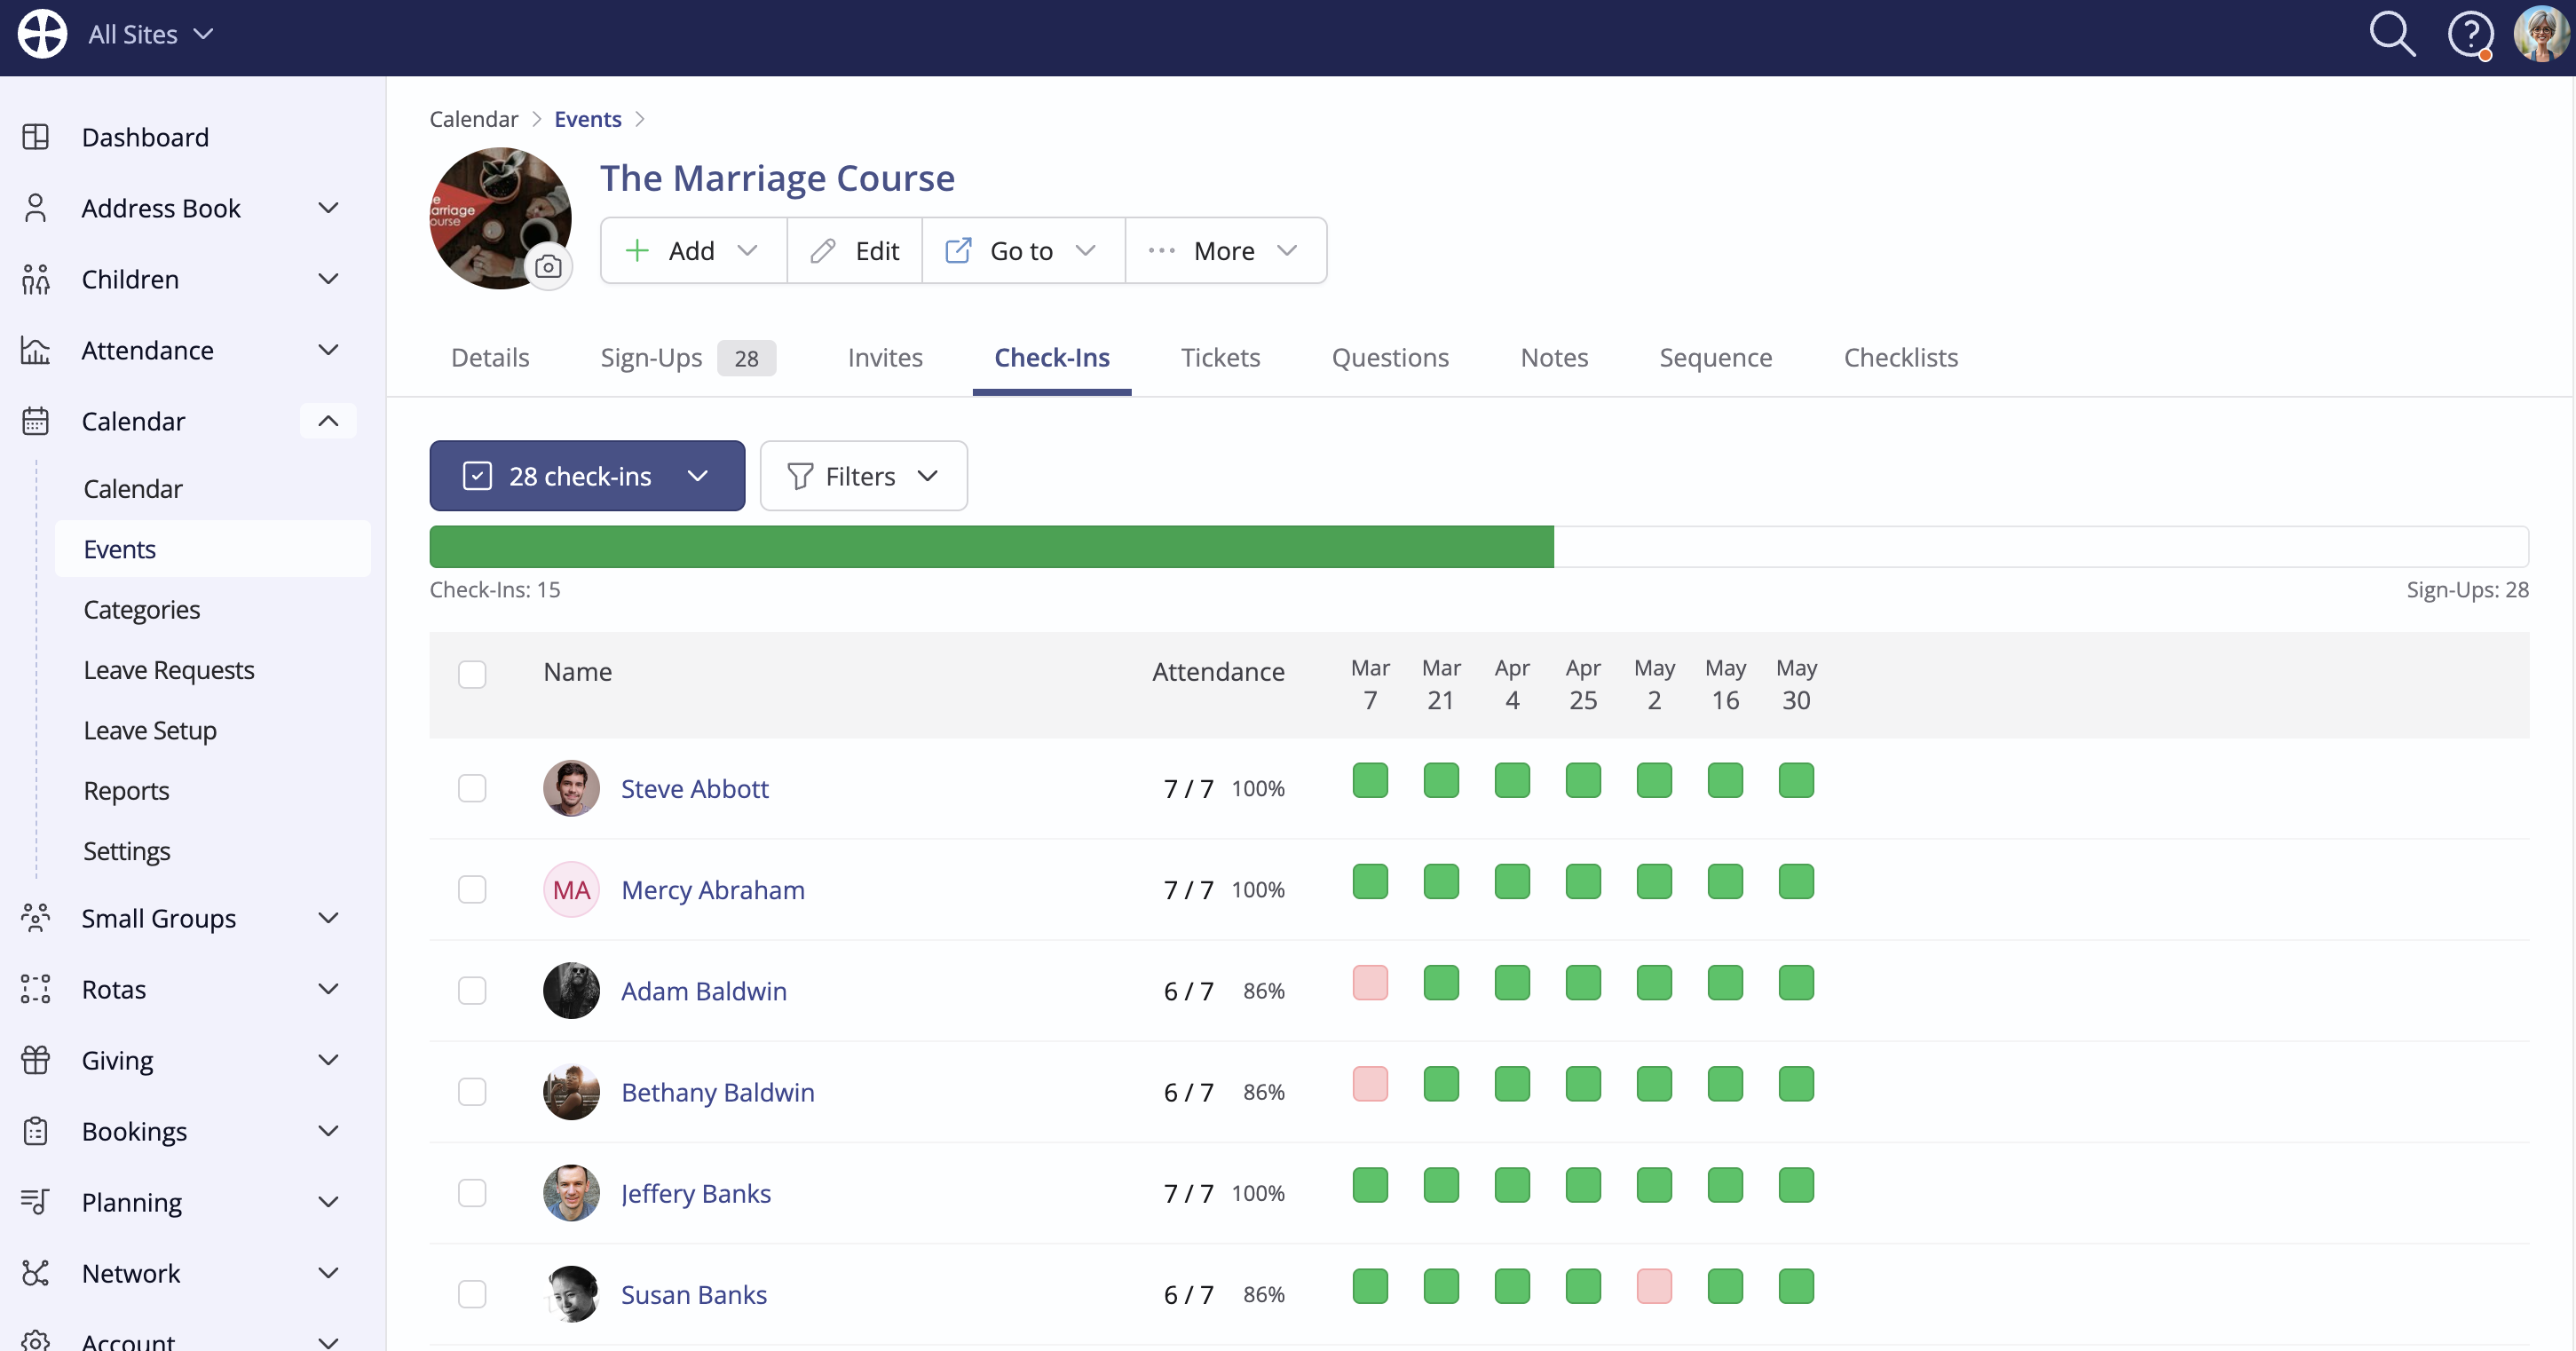
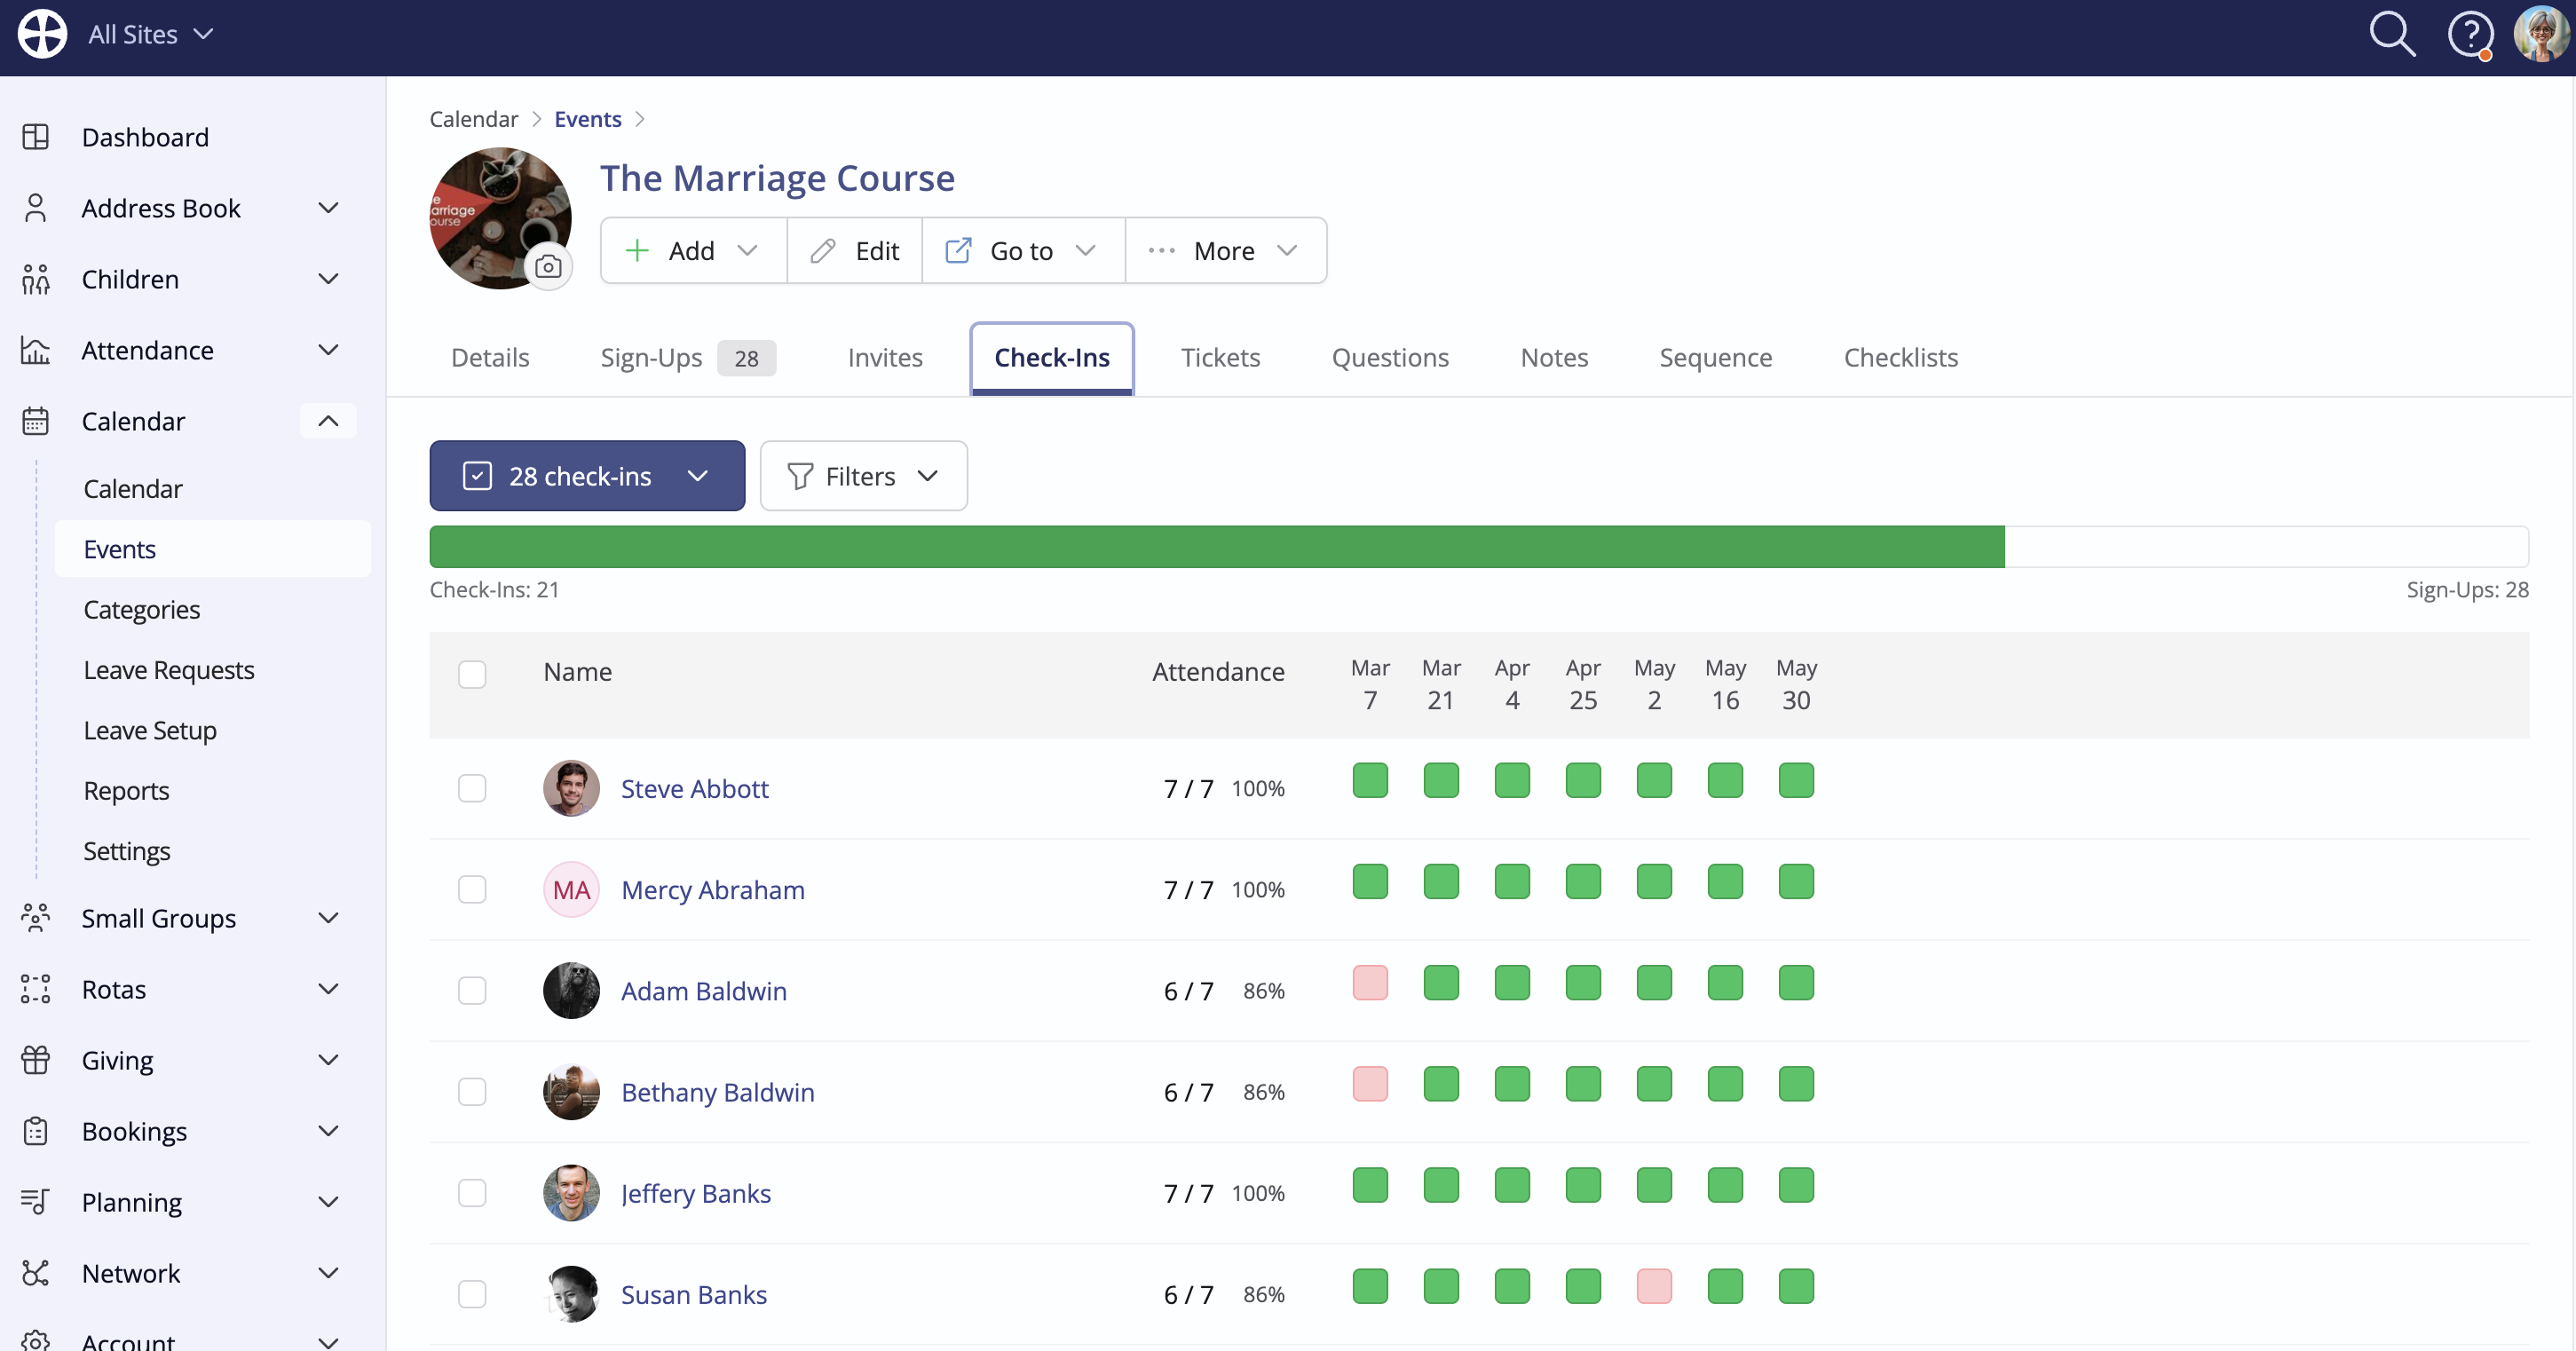
Check-In attendance data is added against the event in ChurchSuite in real-time. You may need to refresh the page to see the added attendance data.
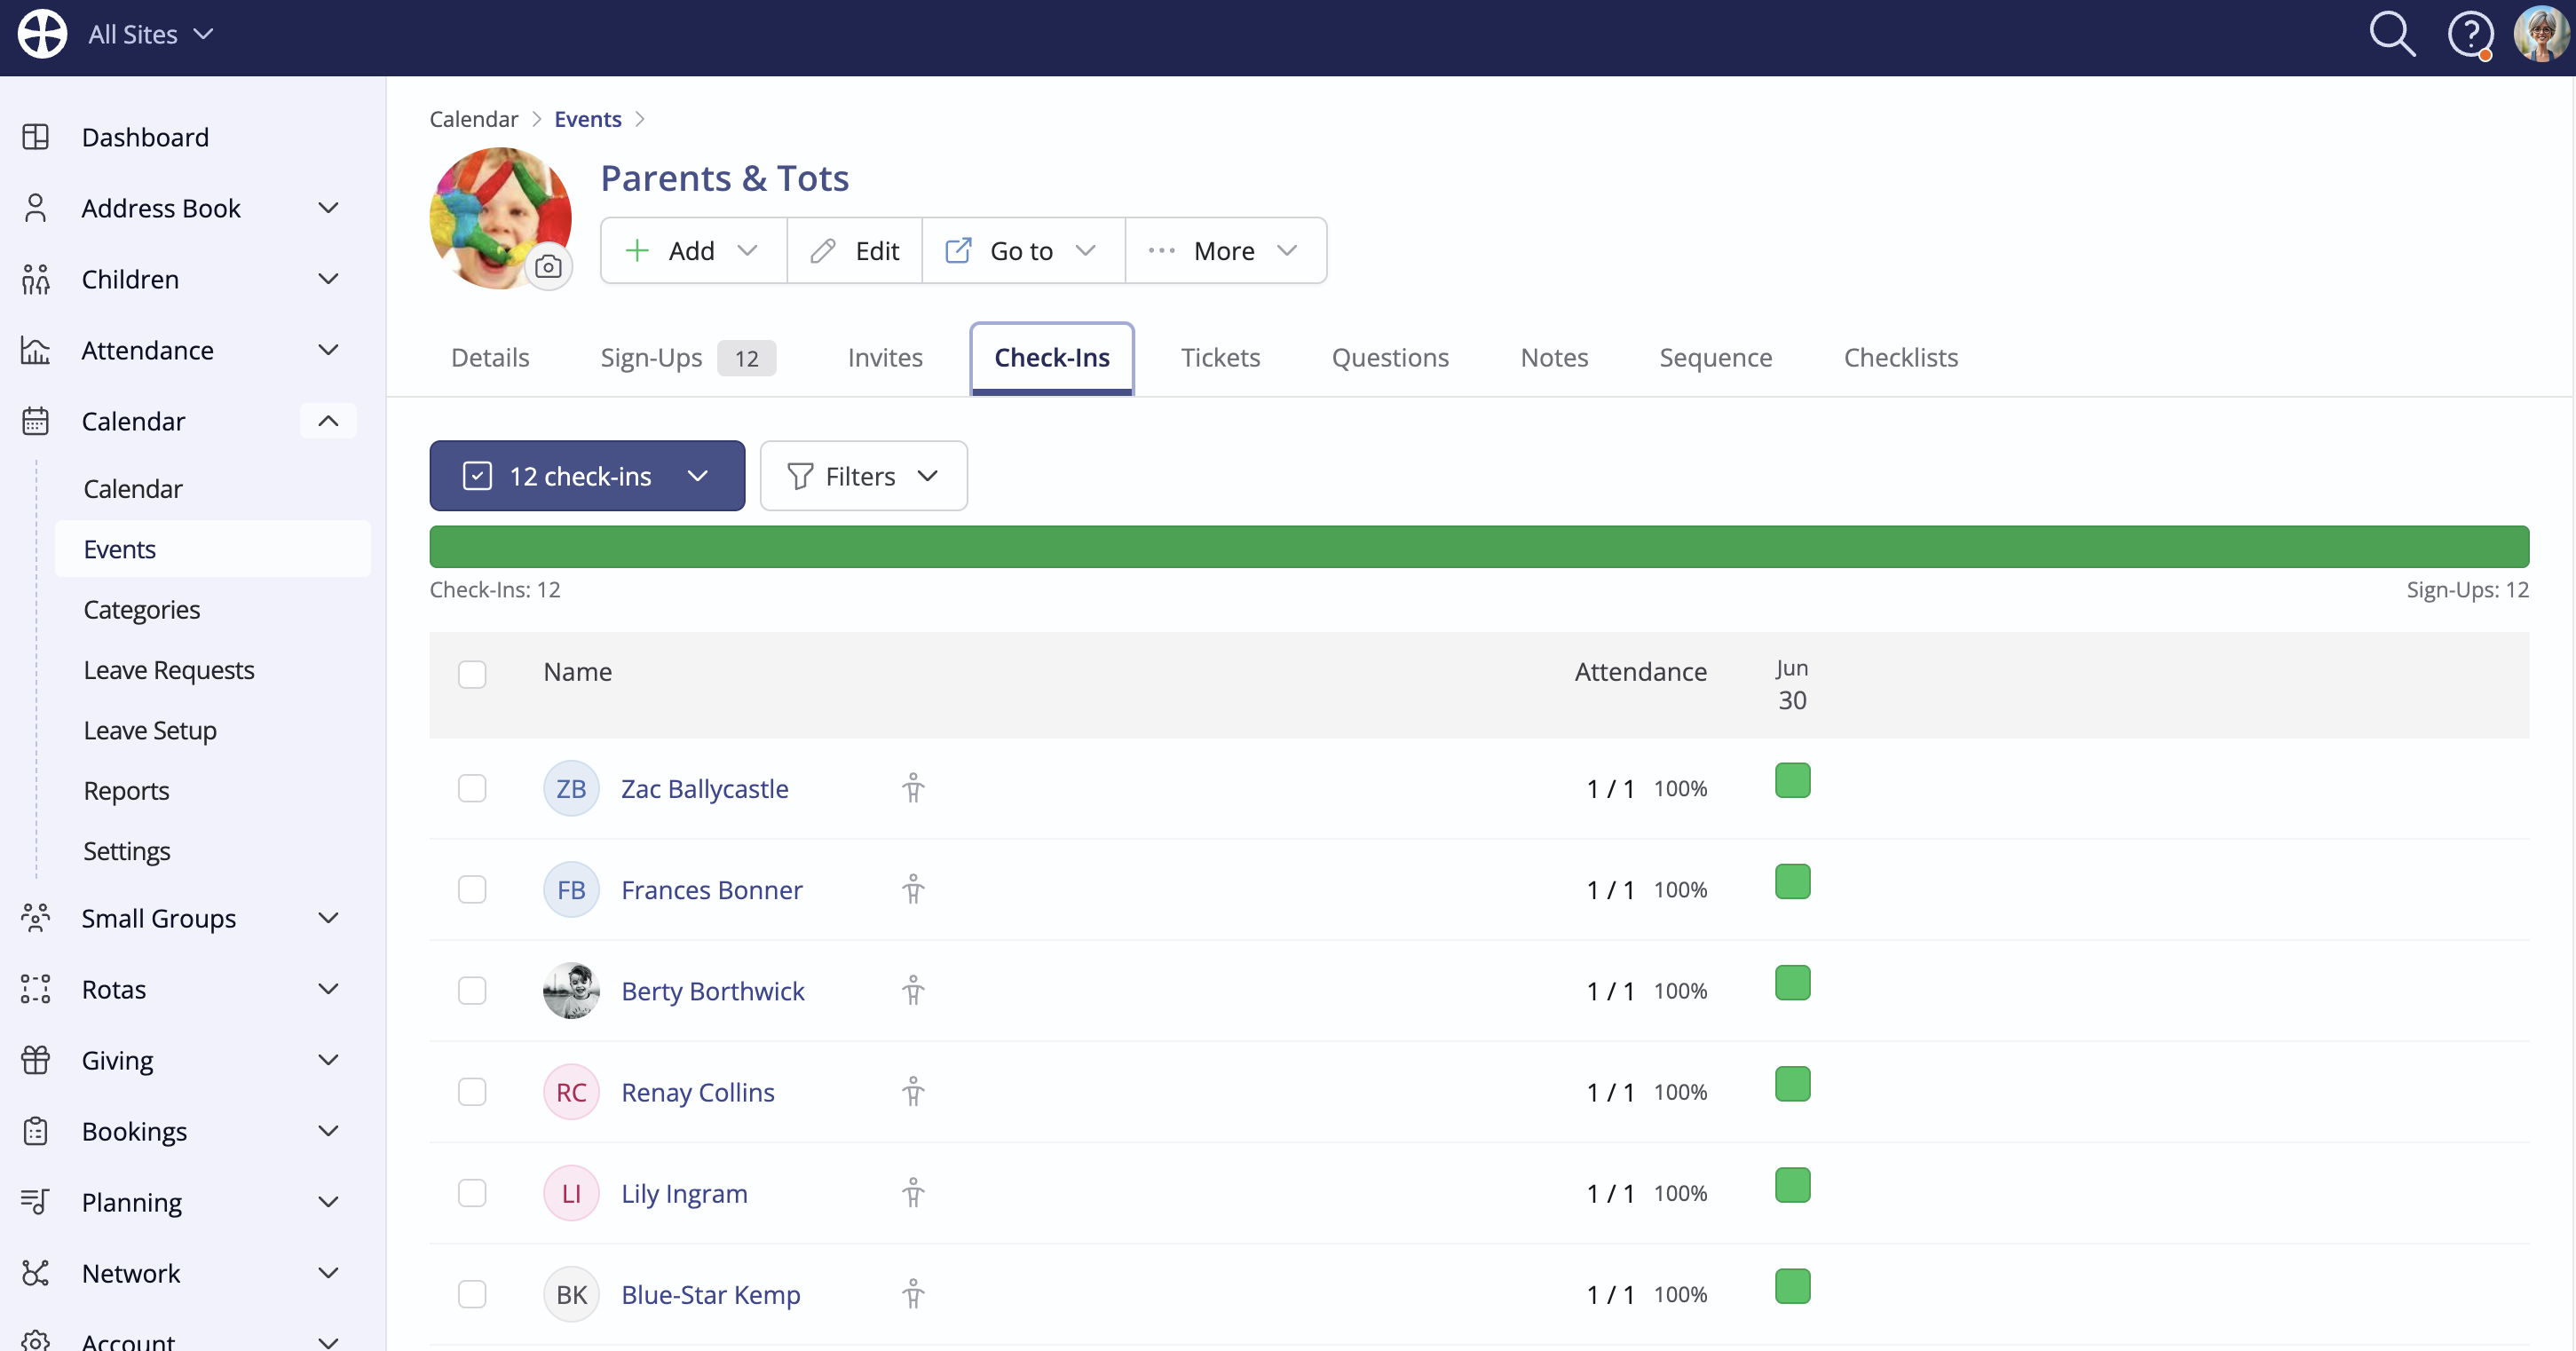
For events set as Sign up to the sequence—like a multi-week course where people sign up for all dates in the sequence—the added attendance data builds into a helpful table of attendance over time:
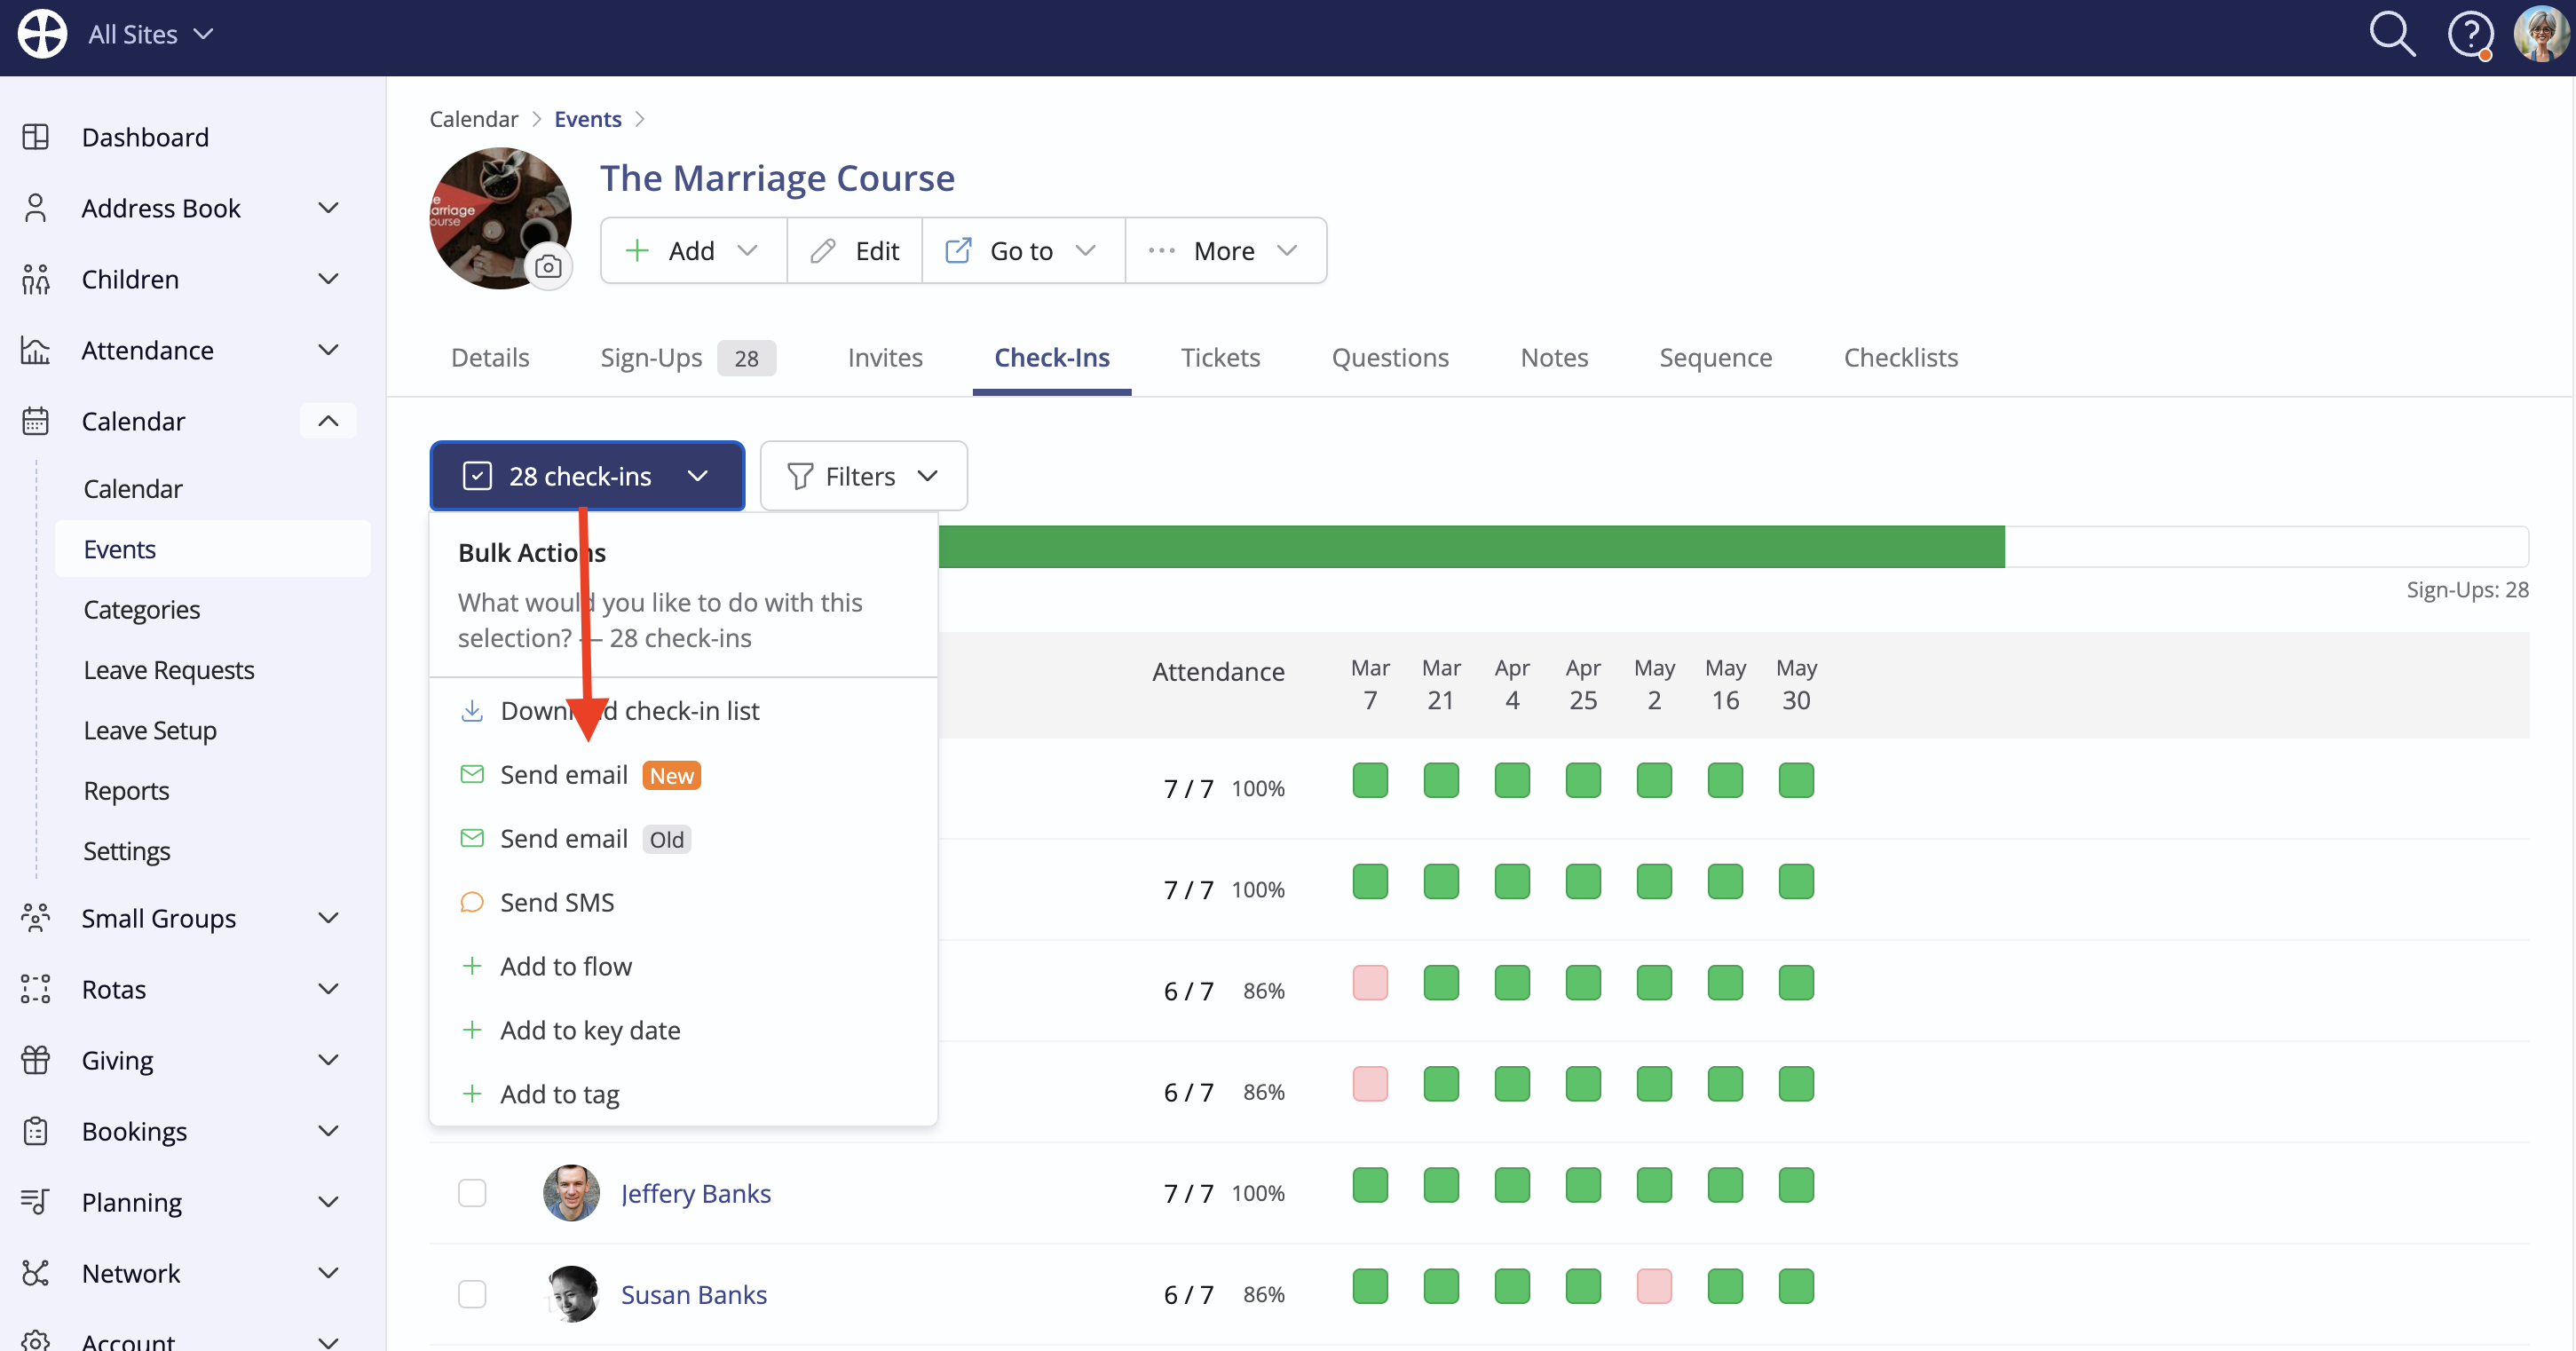
Event management features are available to Communicate with checked-in attendees, Add them Key Dates, Tags and Flows, and a Filter to drill down further into your event attendance data:
Using event check-in
There are no special settings needed to make use of the Check-In functionality. Check-In can be run for any Past or Future event in the Calendar module with a Confirmed status: either by a Calendar module User from the event View - select Go to event check-in:
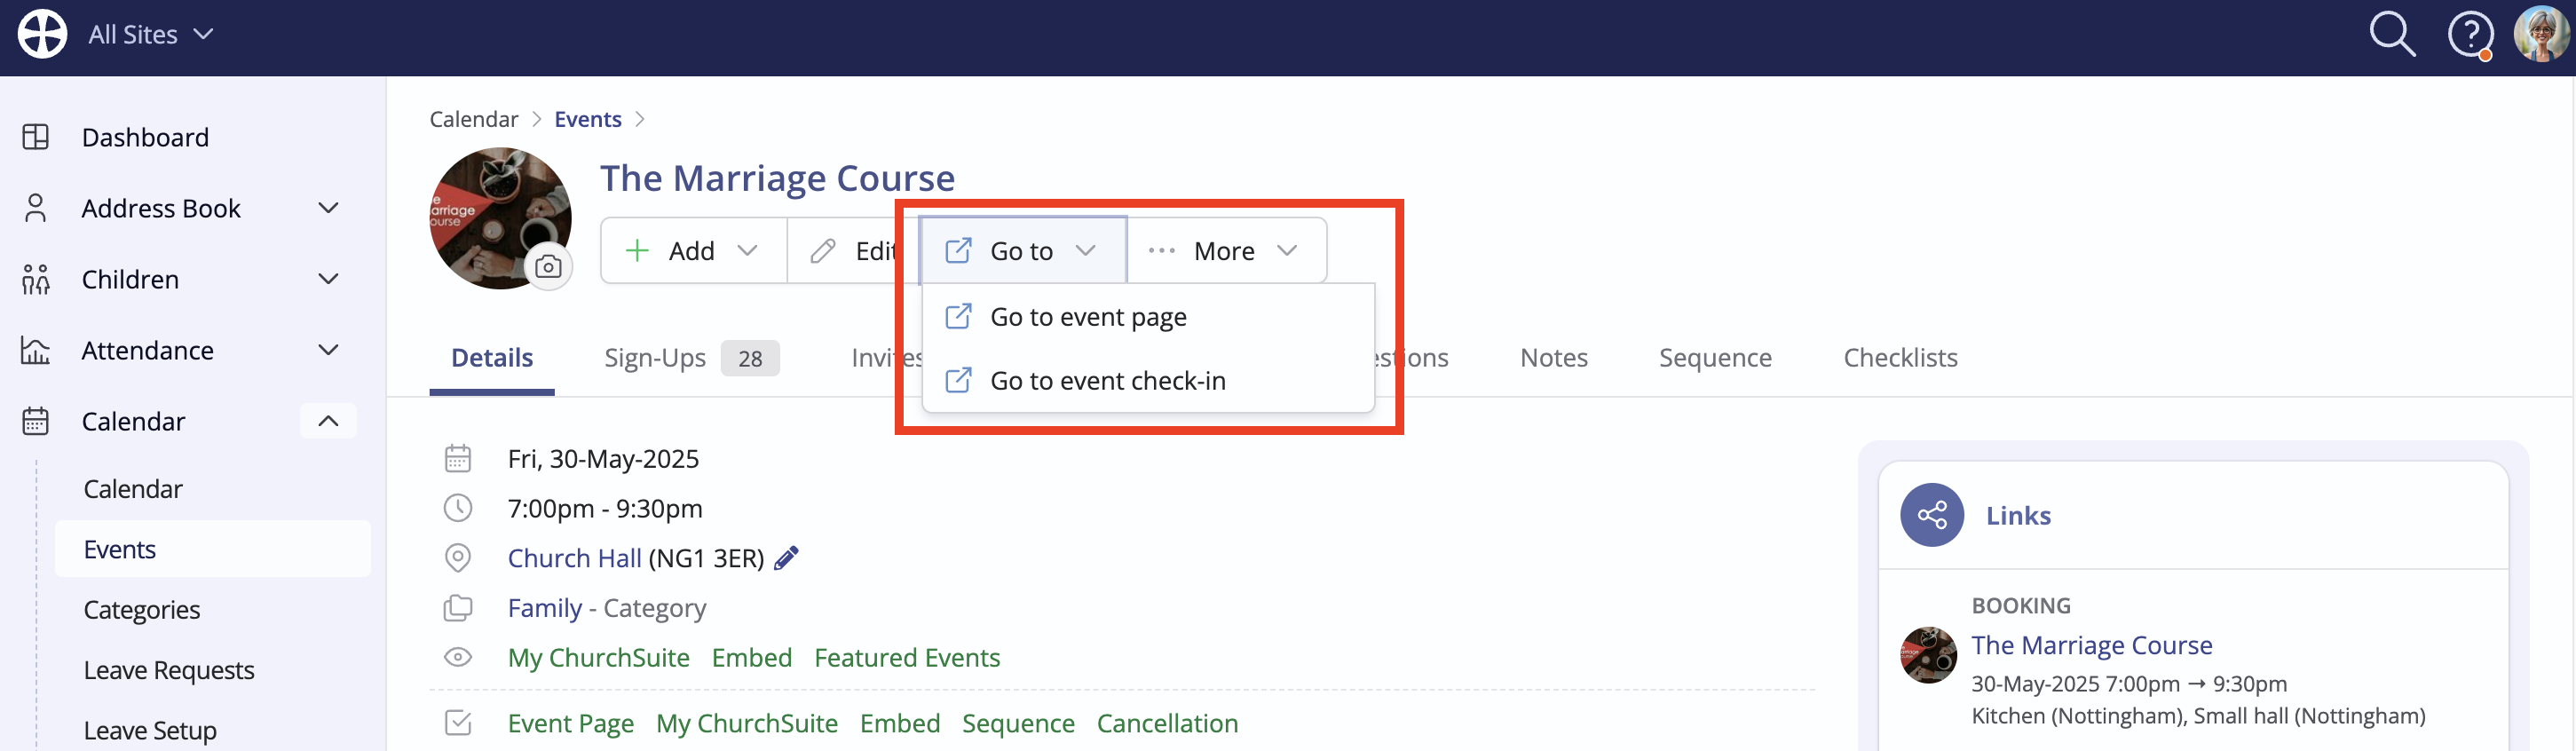
Or by designated event Overseers from the My Events section within My ChurchSuite on the event View, selecting Check-In. The Check-In button is accessible in My ChurchSuite for up to seven days after the event date. Only a Calendar module user can add attendance for older events.

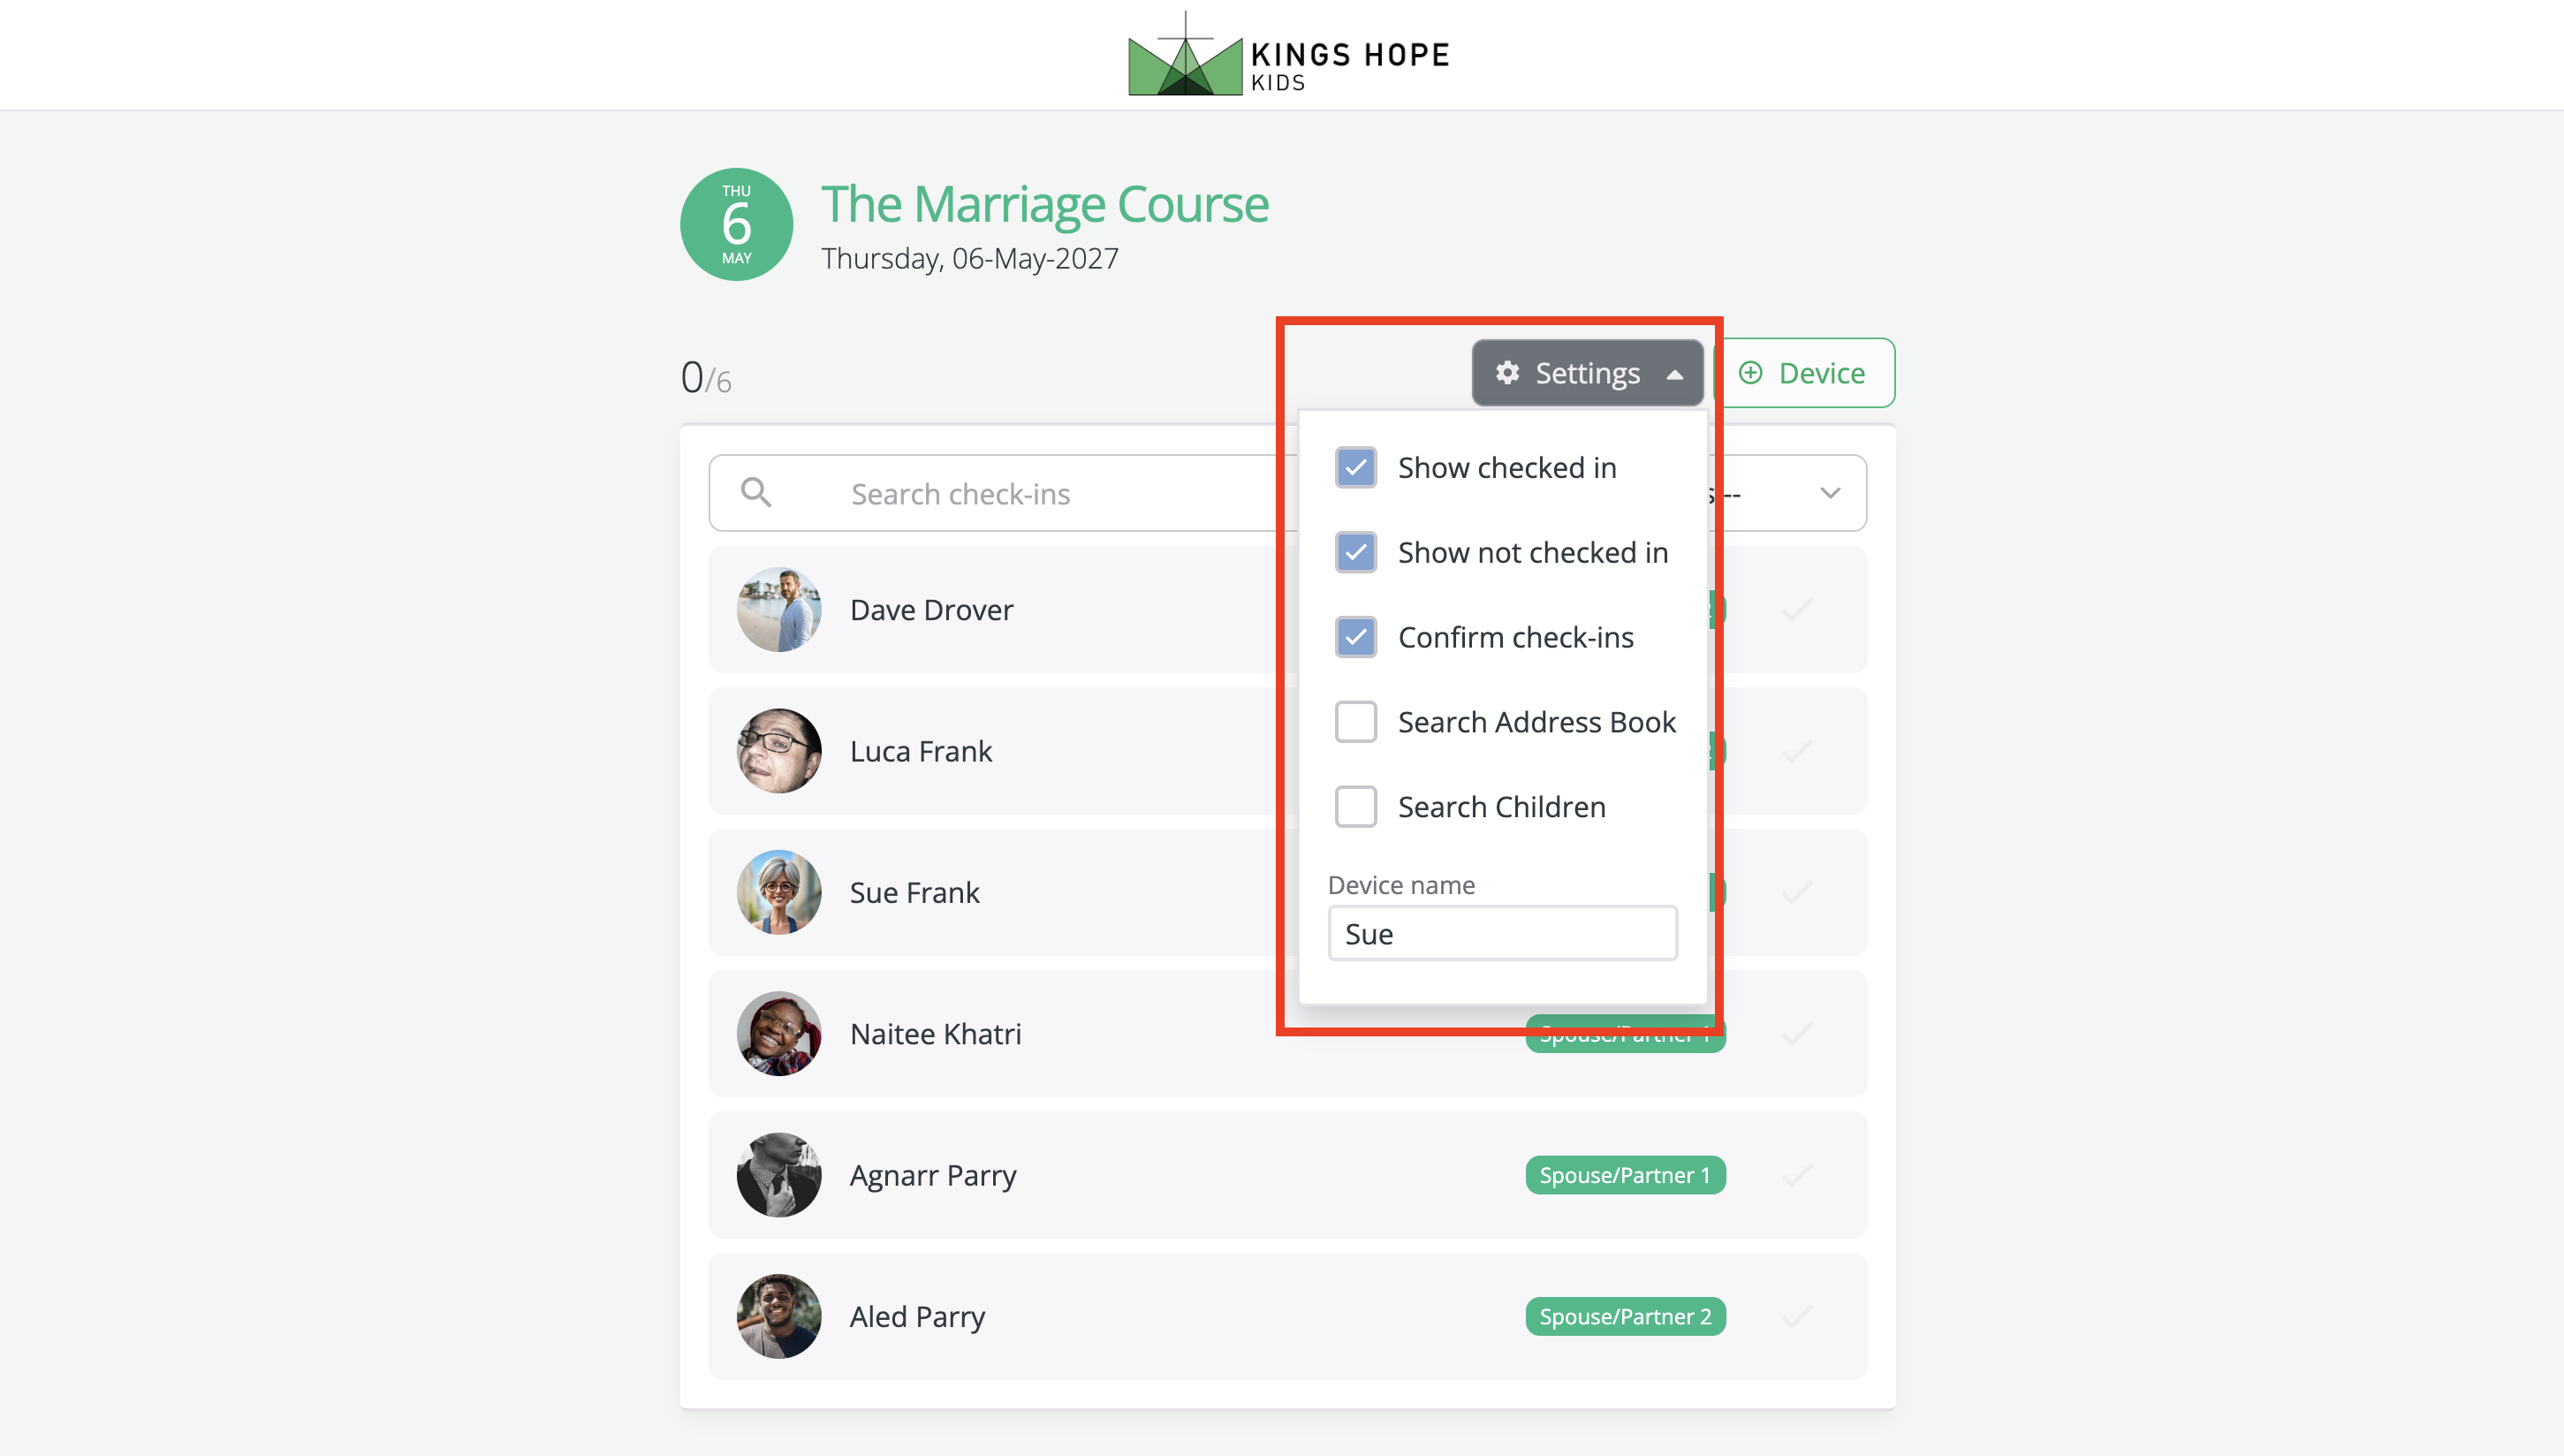
Working within a browser or from the iOS or Android ChurchSuite app, the Check-In Page opens to show a list of people currently signed up for the event. If signup is disabled for the event or there are no signups, the Check-In page will show empty. When working with long lists of people, you can use the Search to find names - the list filters as you type. For events with multiple ticket types, a Ticket filter can also be used to filter by a certain ticket of interest. You can further customise the user experience from the Check-In Settings. For example, by unchecking Show checked in, the list only displays those not yet checked in, and the list gets shorter as people are checked in. Similarly, disabling Confirm check-ins will prevent the confirmation pop-up from showing - ideal when you need to process a long queue quickly.
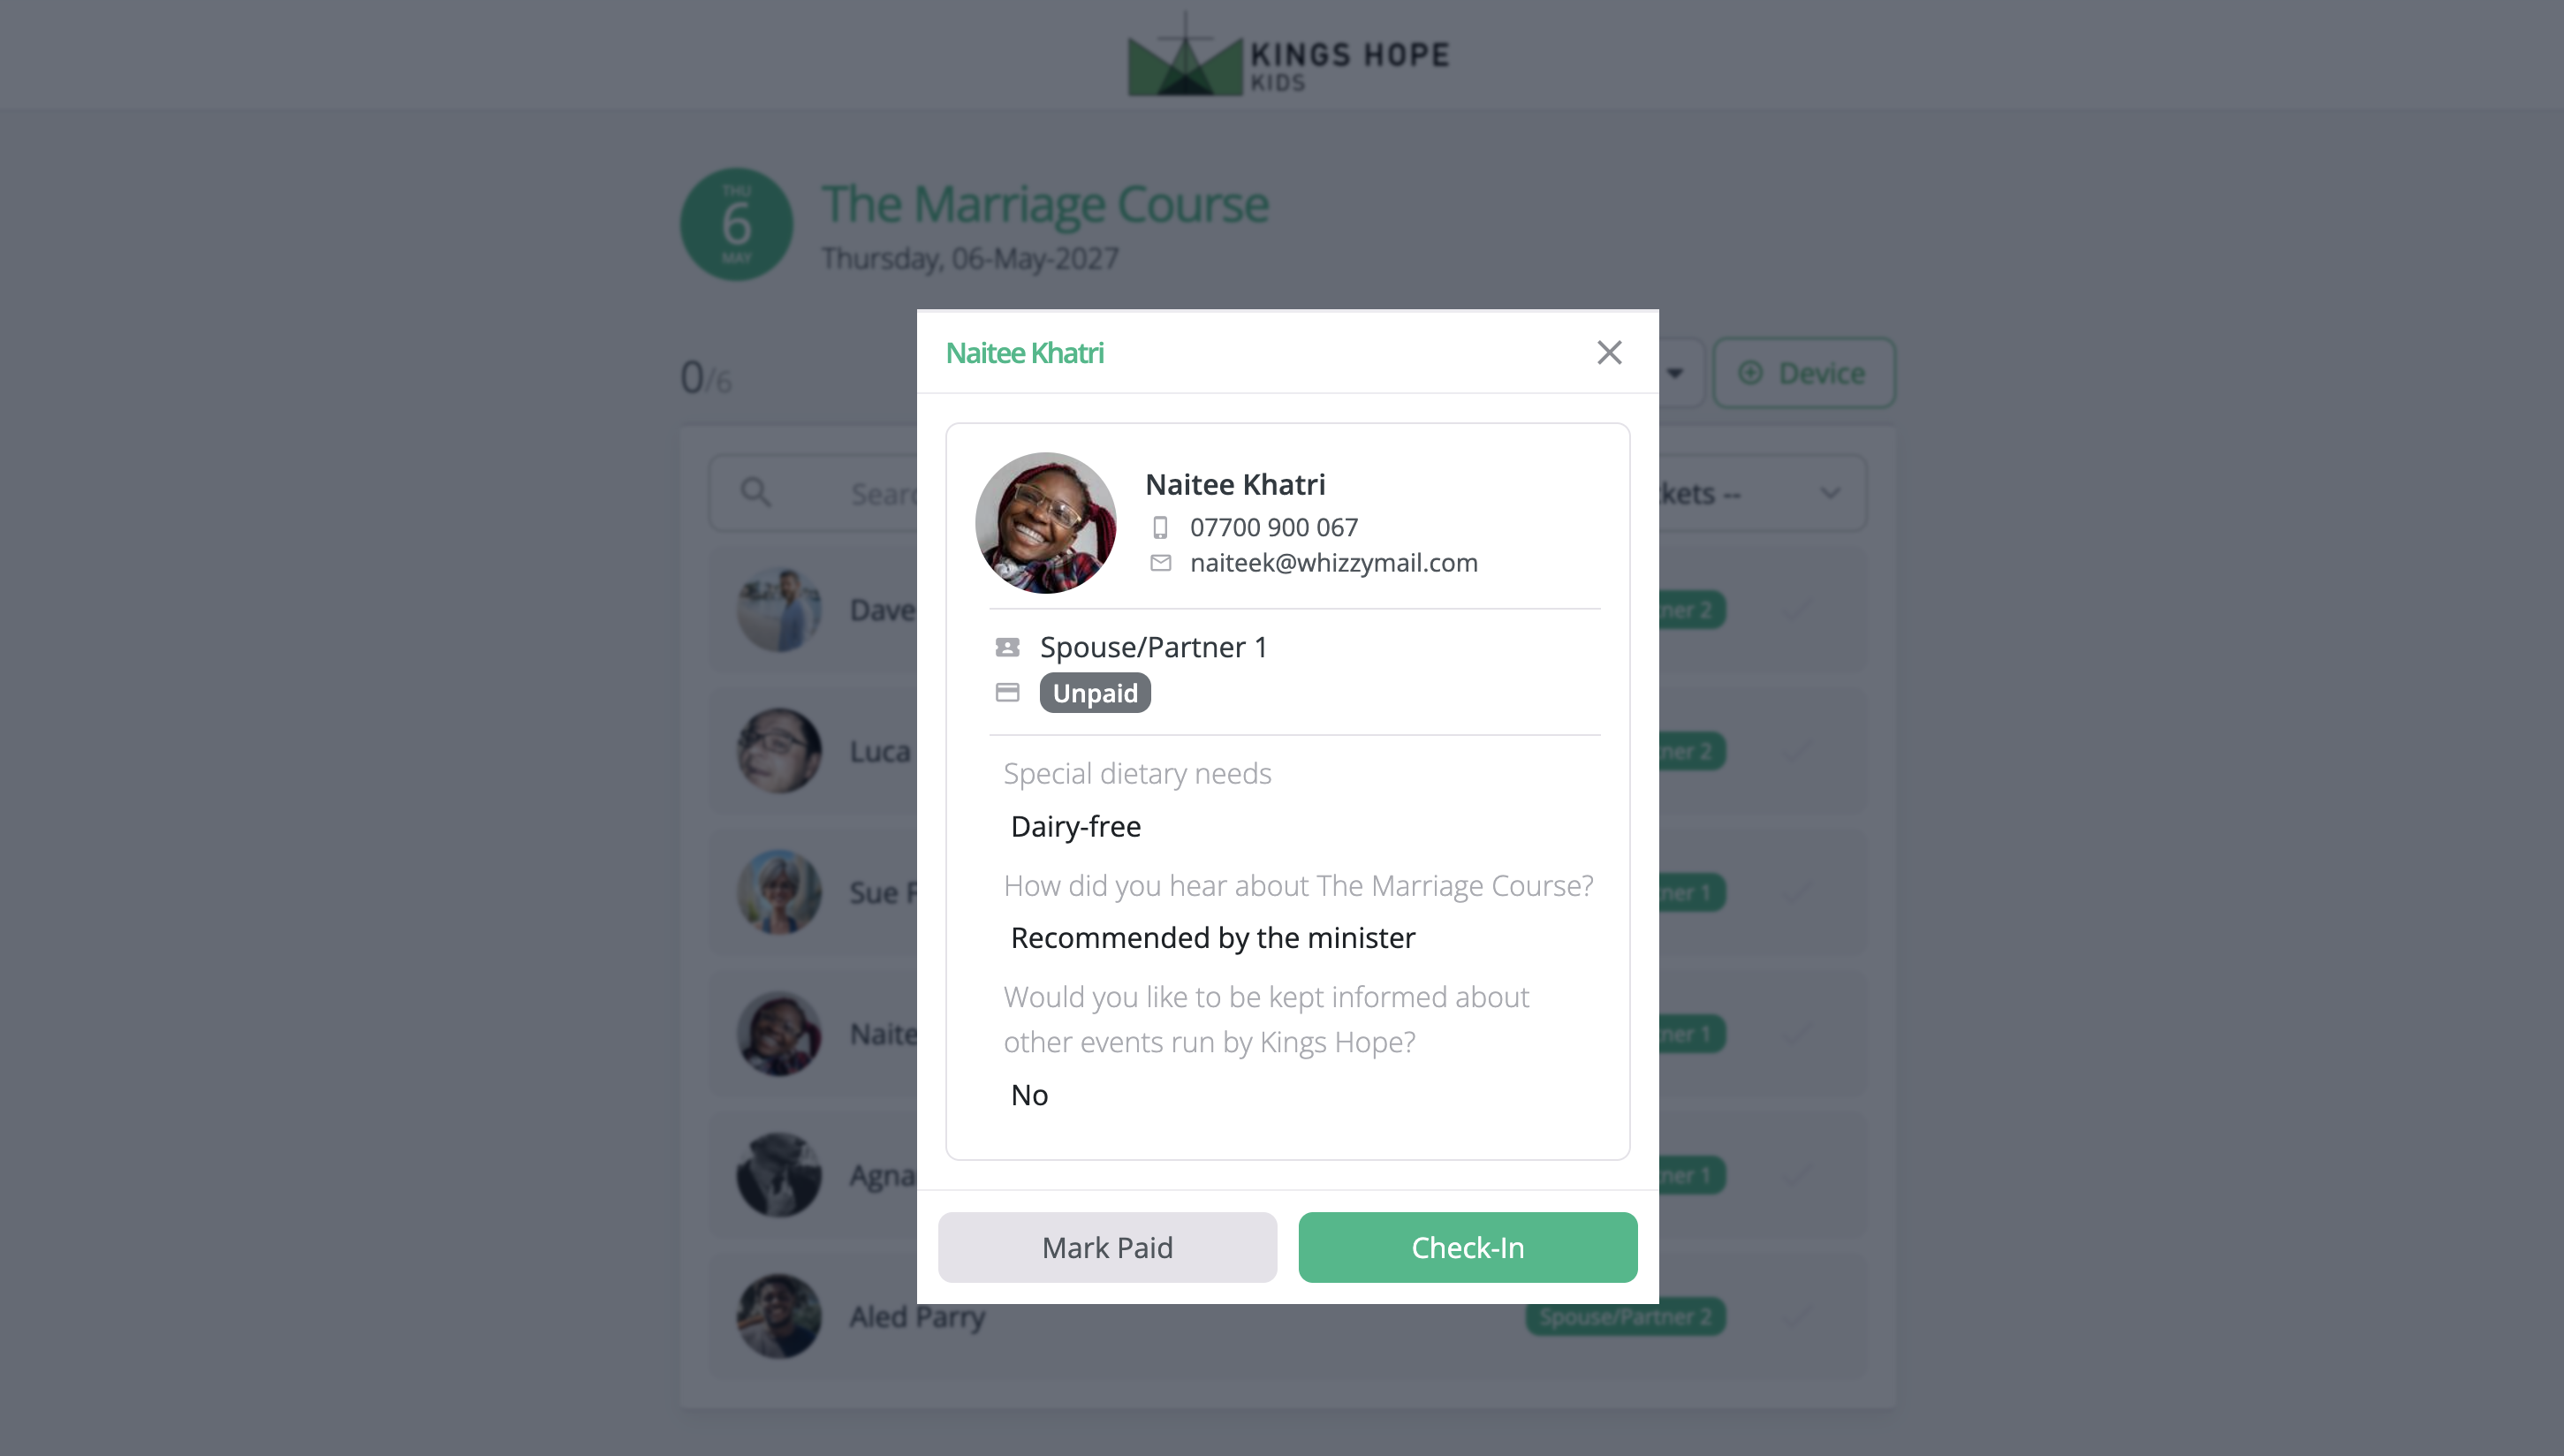
When Confirm check-ins is enabled, a pop-up shows details of each person's ticket, payment details and event question responses. For Unpaid and pay-on-arrival tickets, there is the option to Mark Paid any payments collected on the door as part of the Check-In process, and a Paid status is applied to the ticket back in ChurchSuite. Note that Mark Paid is intended for collecting manual payments, perhaps made in cash. It's not possible to process on-the-door card payments - card payments can only be processed when first signing up for the event.
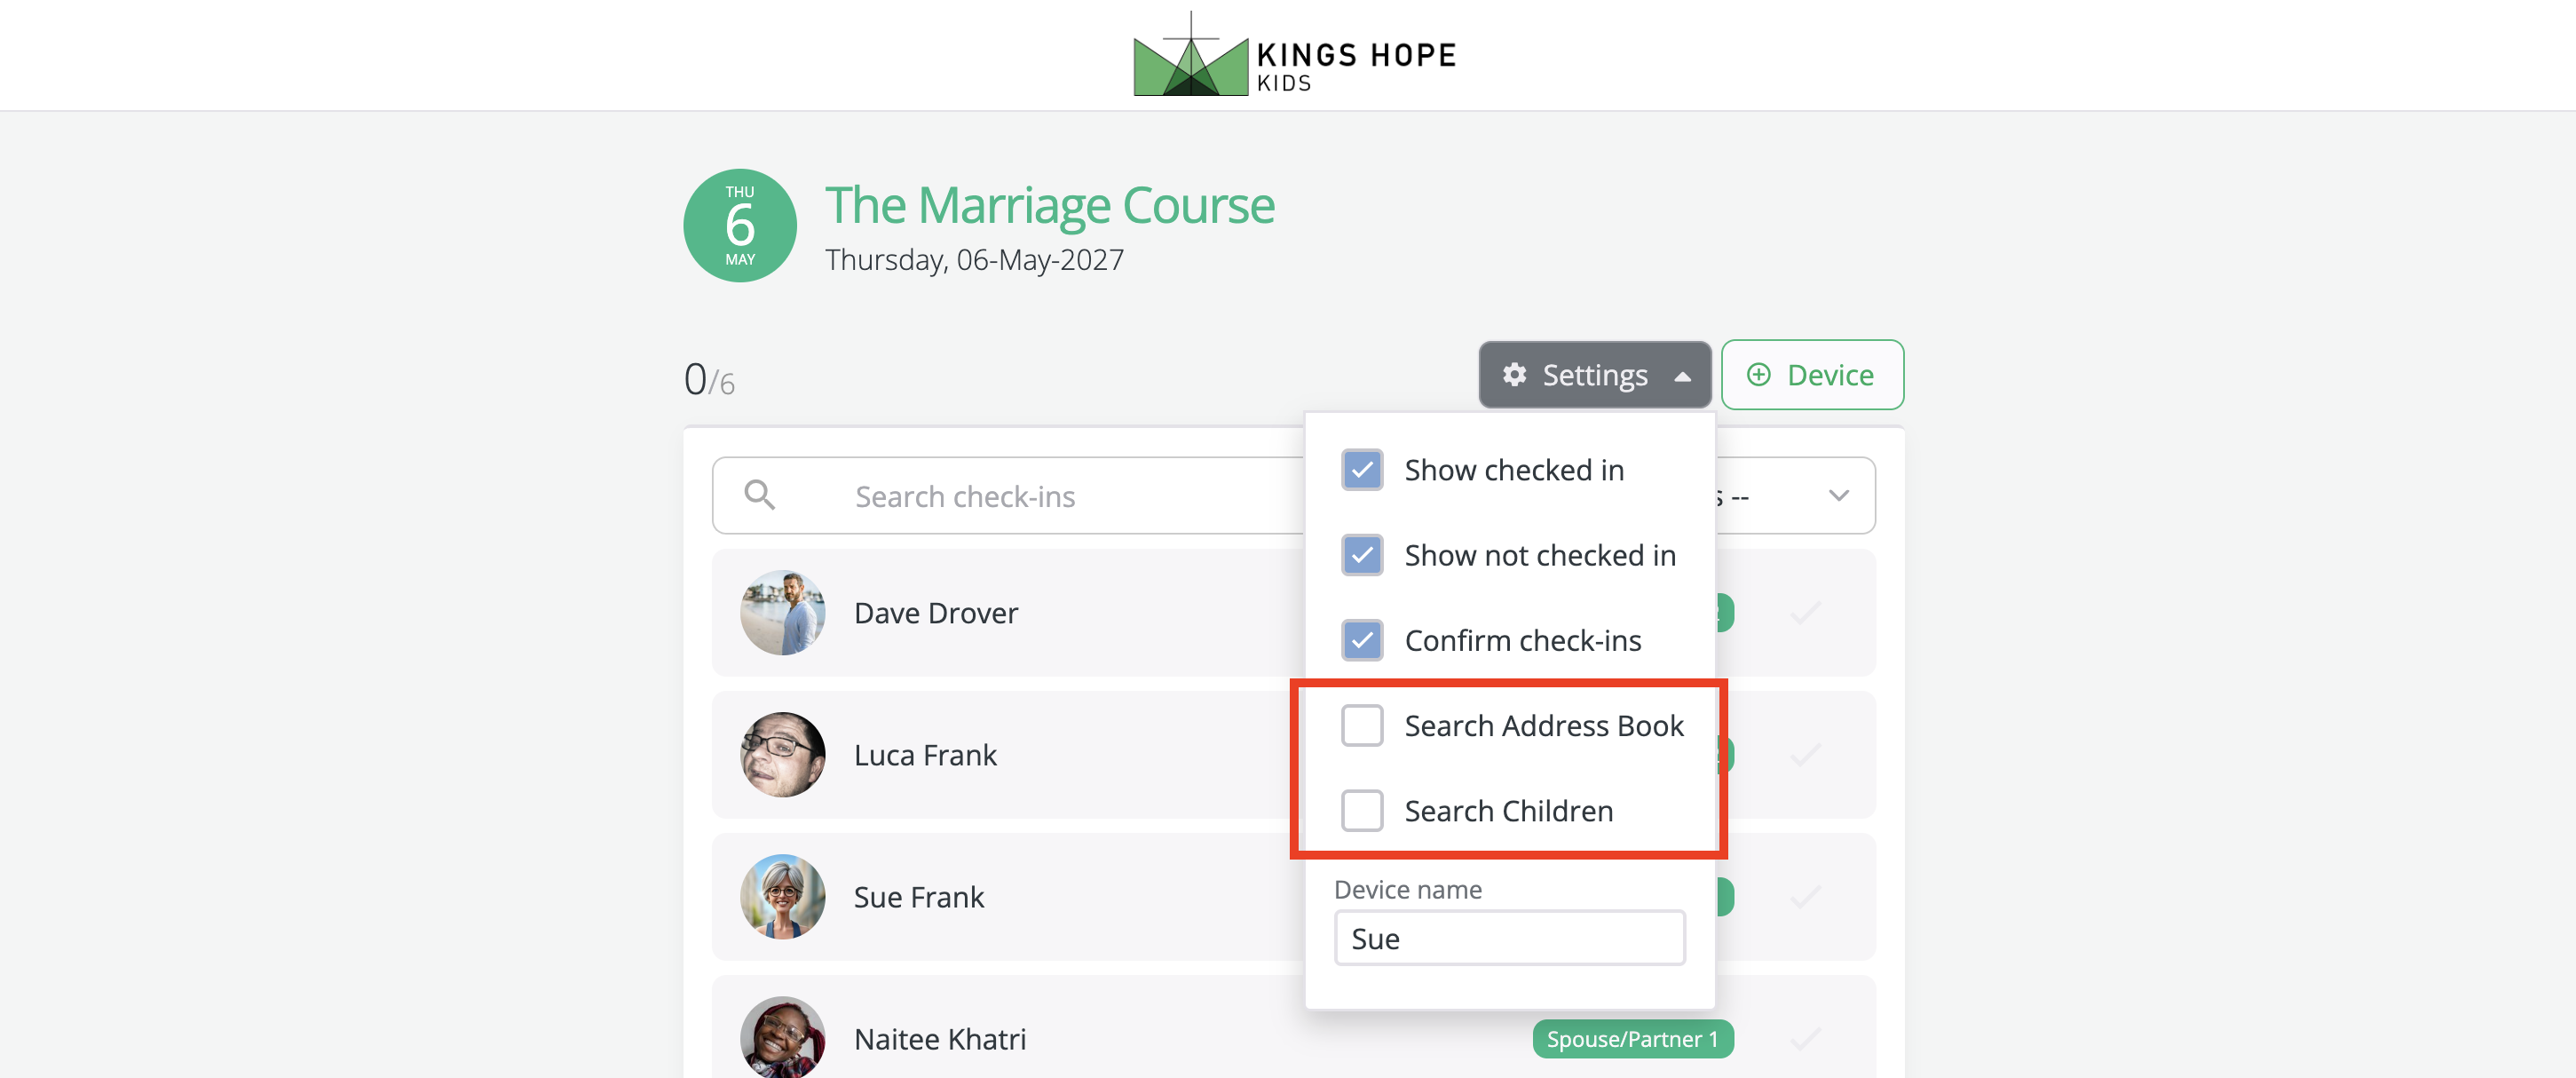
For events where you wish to record attendance for people who have not signed up previously or where you want to take an impromptu register of attendance for a non-sign-up event, you can enable Search Settings to Search Address Book, Search Children or both. For events with My ChurchSuite visibility restricted by tags, ticking Search event tags shows a filtered list of people in those tags. When marking attendance for those who haven't signed up for the event, a sign-up is automatically added for each person added as you check them in, meaning that everyone who is checked in will also have a sign-up recorded for the event, even if sign-up is disabled for the event.
QR Code scanning and authorising additional devices
As an alternative to ticking attendee names, Calendar module Users and designated event Overseers accessing the Check-In Page from the ChurchSuite iOS or Android app can click Scan QR to use their device camera to check people in. Each signup confirmation email contains a Check-In QR code, and signups with My ChurchSuite access can access their code from the My Events section.

Users and overseers accessing the Event Check-In page from the ChurchSuite app can authorise additional devices. This may be helpful at busy events where additional helpers who are not overseers can be authorised to help with check-in using any device with an in-built camera and any installed third-party QR Scanner app. Once authorised, they will use their third-party QR-Scanner app (rather than the ChurchSuite app) to scan QR codes a check people in. To authorise another device, click +Device to surface an authorisation QR code and PIN that others can scan (no PIN is required). Others can also authorise their device by scanning the QR code from any signup confirmation email, which opens the Check-In page requesting the authentication PIN. PIN entry is only required when the first check-in QR code is scanned, but not for subsequent check-ins.

The number of concurrent Check-In devices that can be authorised is unlimited. Each device can be uniquely named in the Settings menu. When a new device is first authorised using either method above, the Check-In Page opens in the authorised device browser. An authorised device user can either manually tick names on the check-in page or switch to their device's native QR Code Scanner app to continue scanning check-in codes.