Adding tickets to an event
In this article
Adding tickets
Adding tickets is only possible if sign-up has been enabled for the event. Viewing the event, click Edit and scroll down to the Sign Up settings. Selecting Sign up through Event page surfaces additional sign-up settings but Sign-up through Event Page must be ticked in order to add tickets.
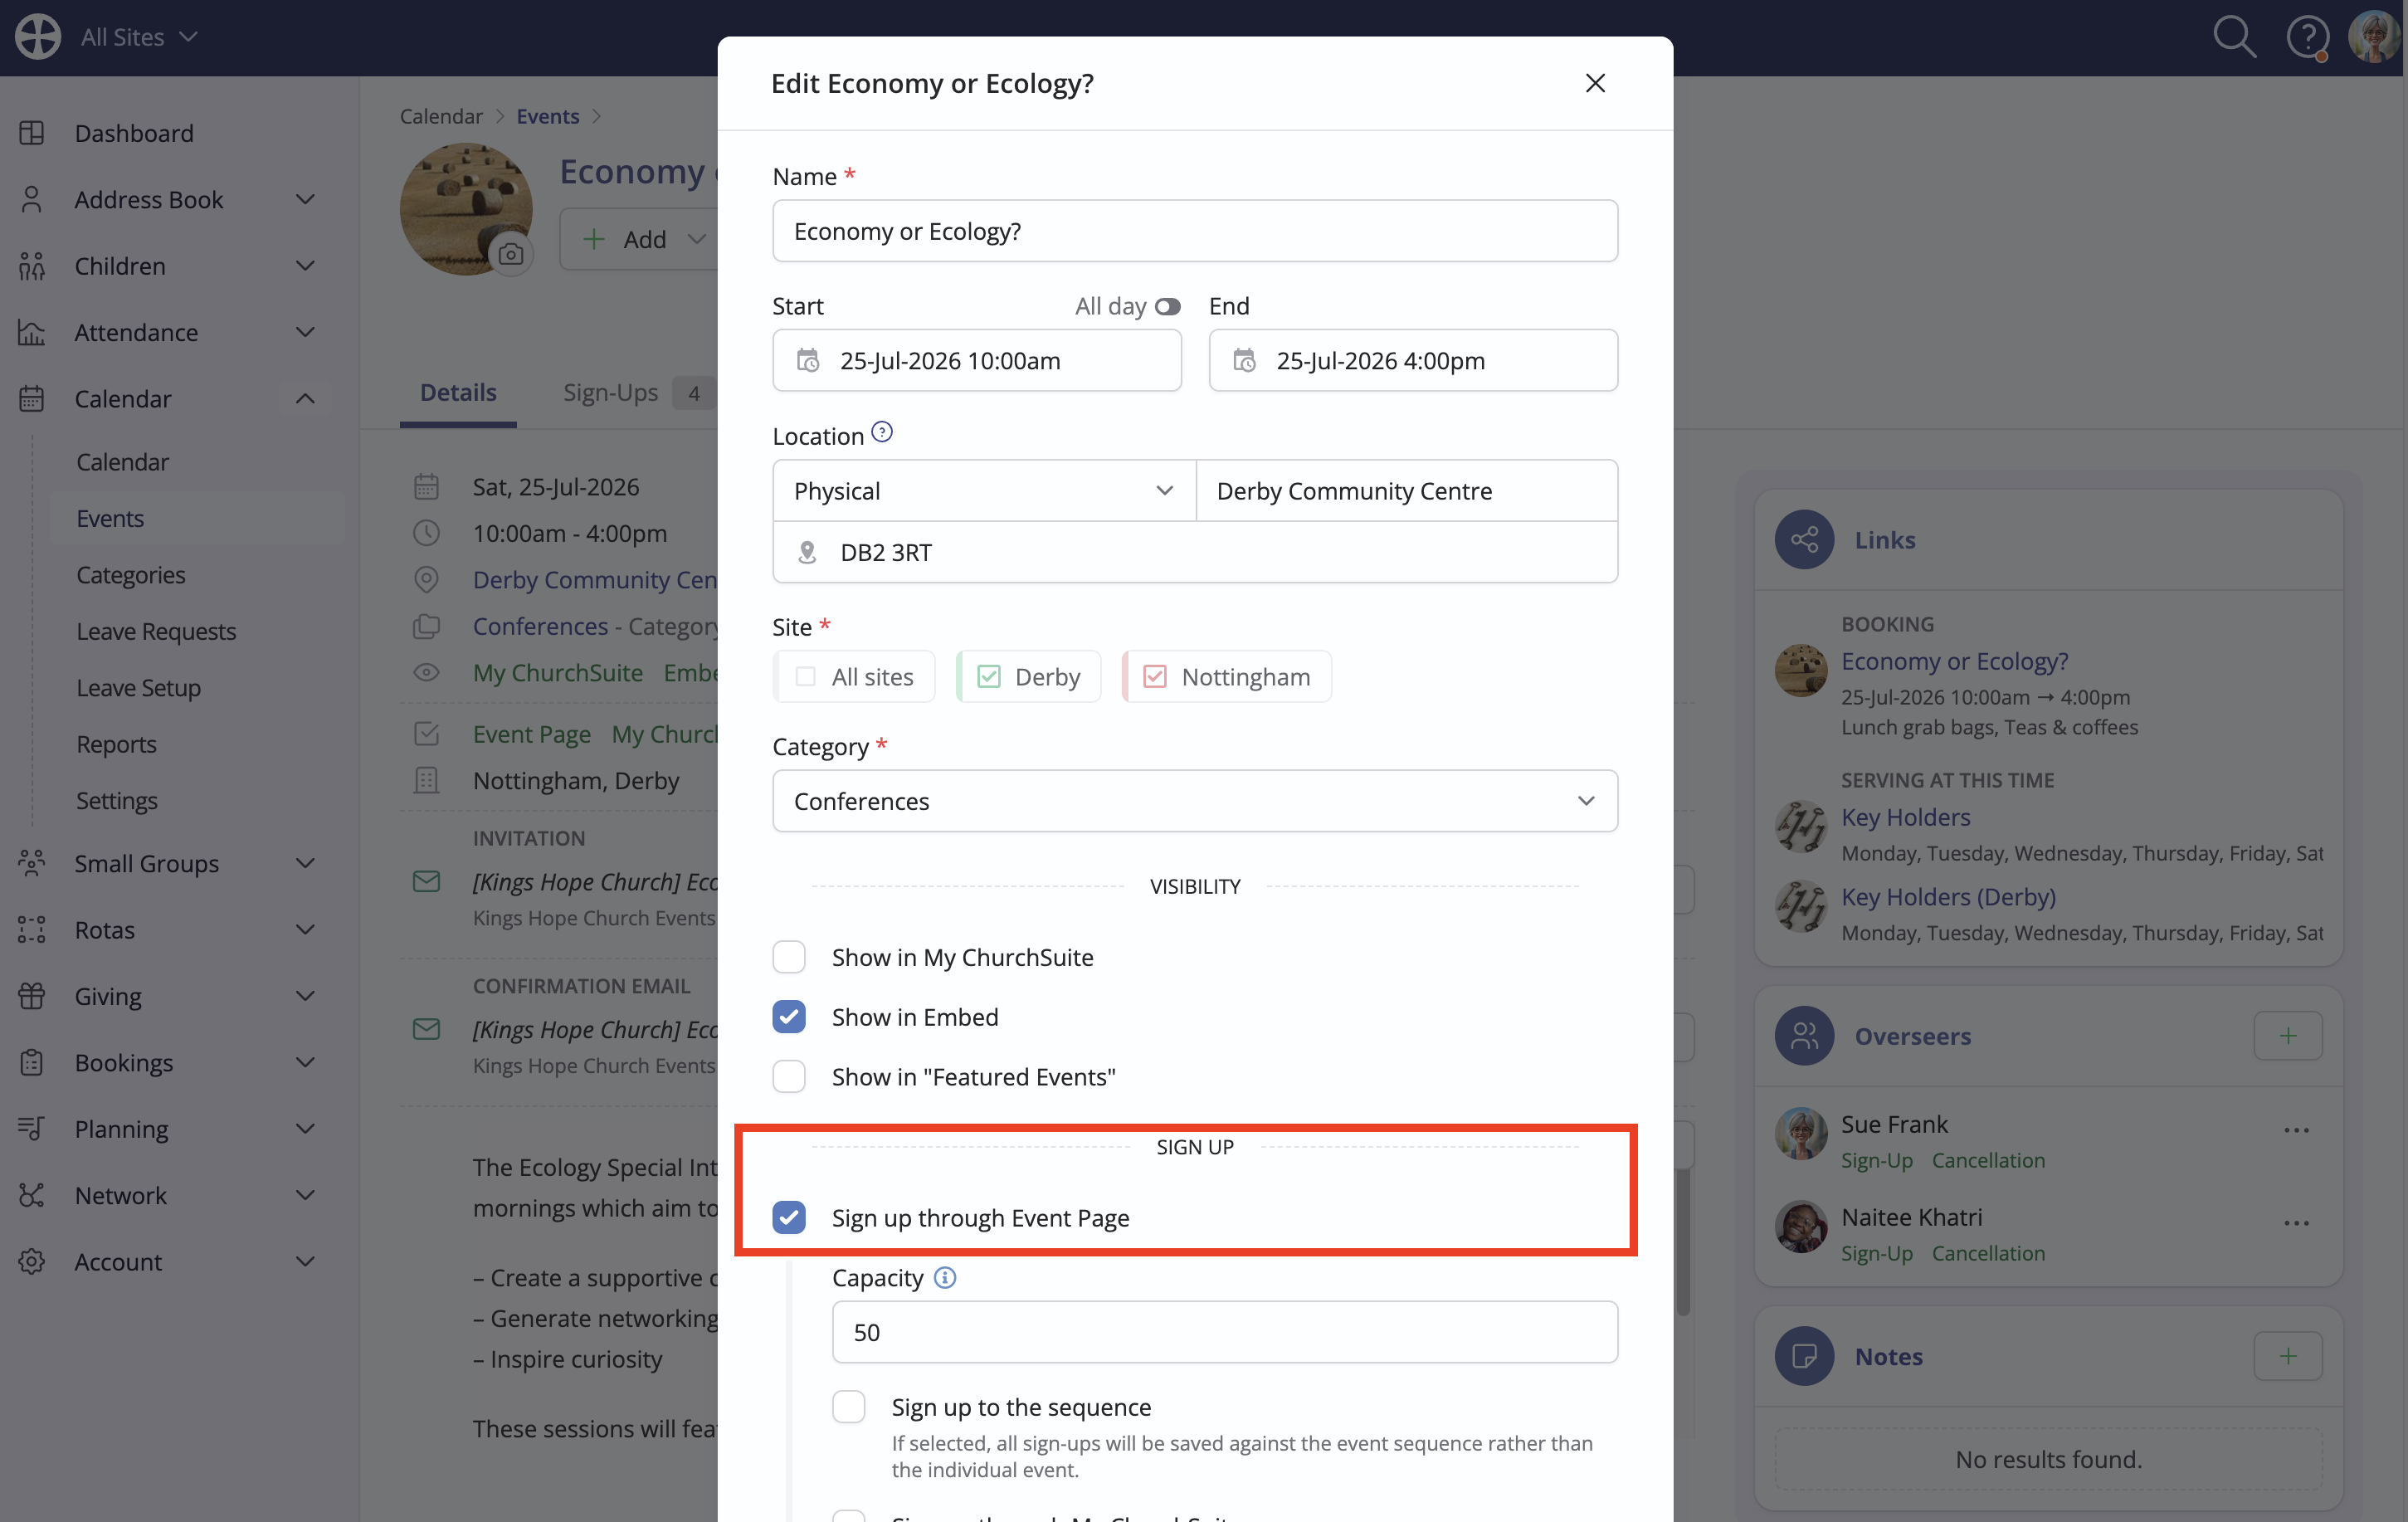
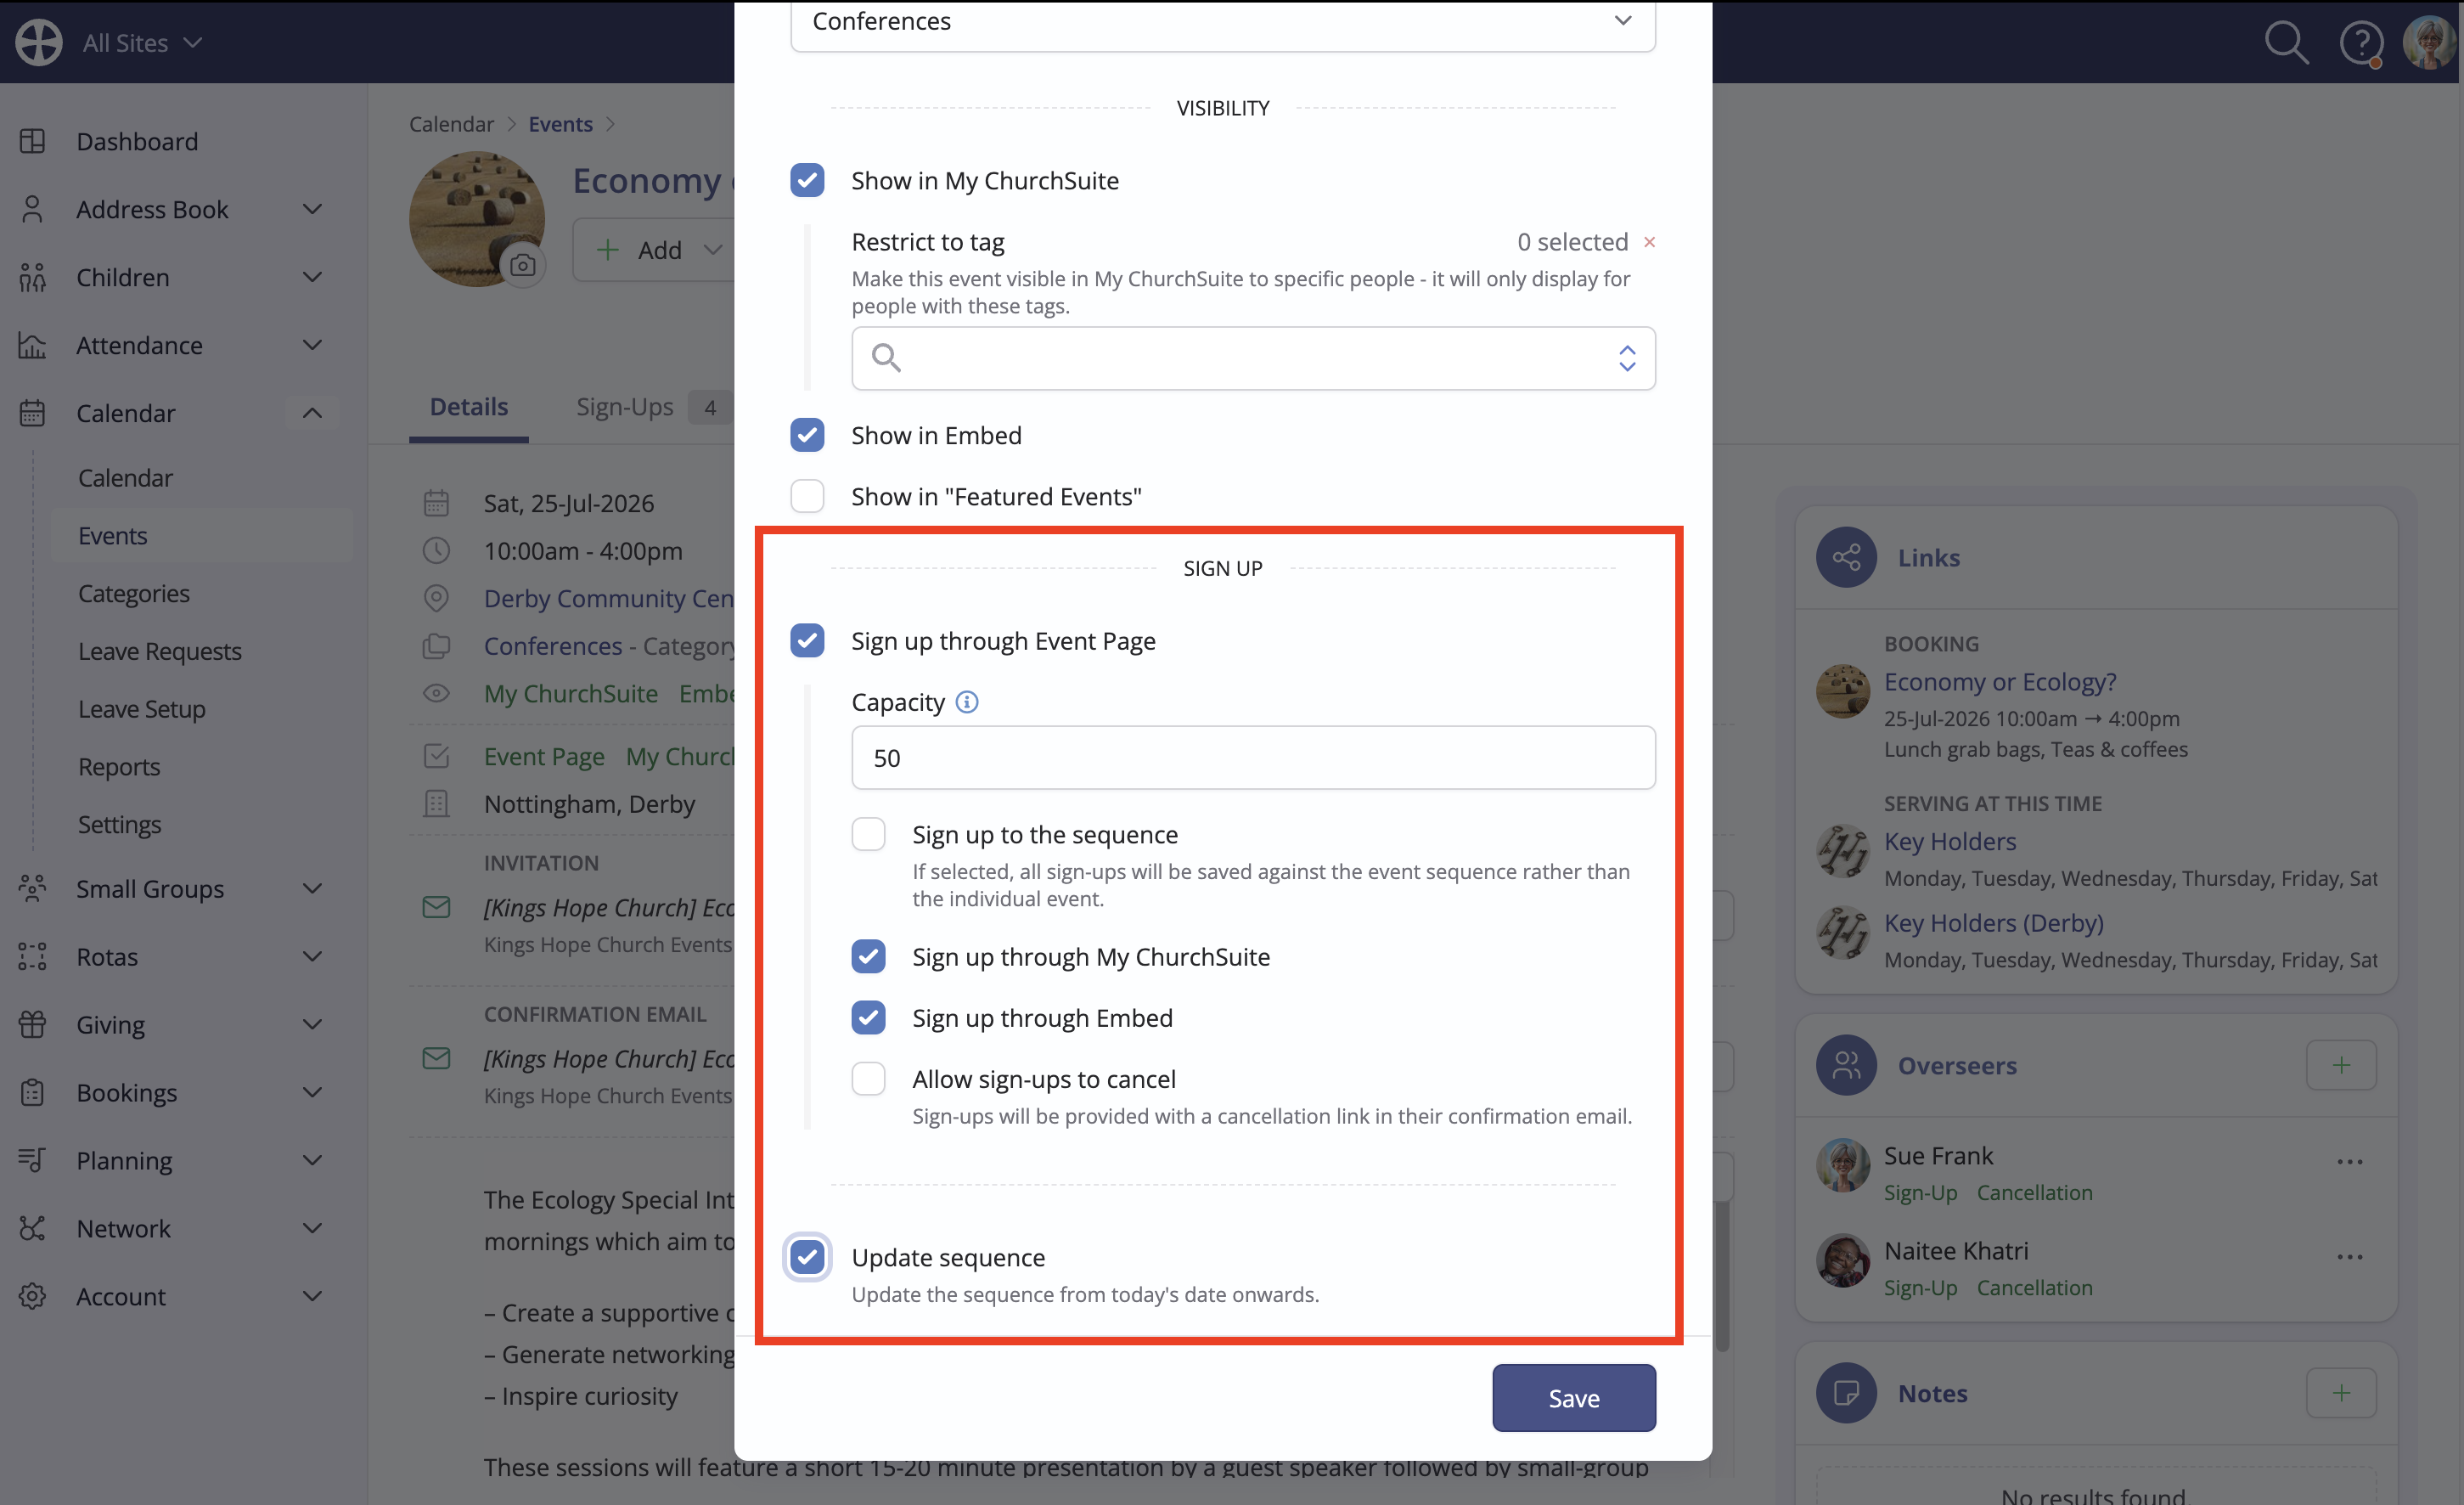
Select the options that you wish to apply to this event. If the event is a sequence, remember to select Update the sequence if you wish the settings to apply to all events in the sequence and then click Save:
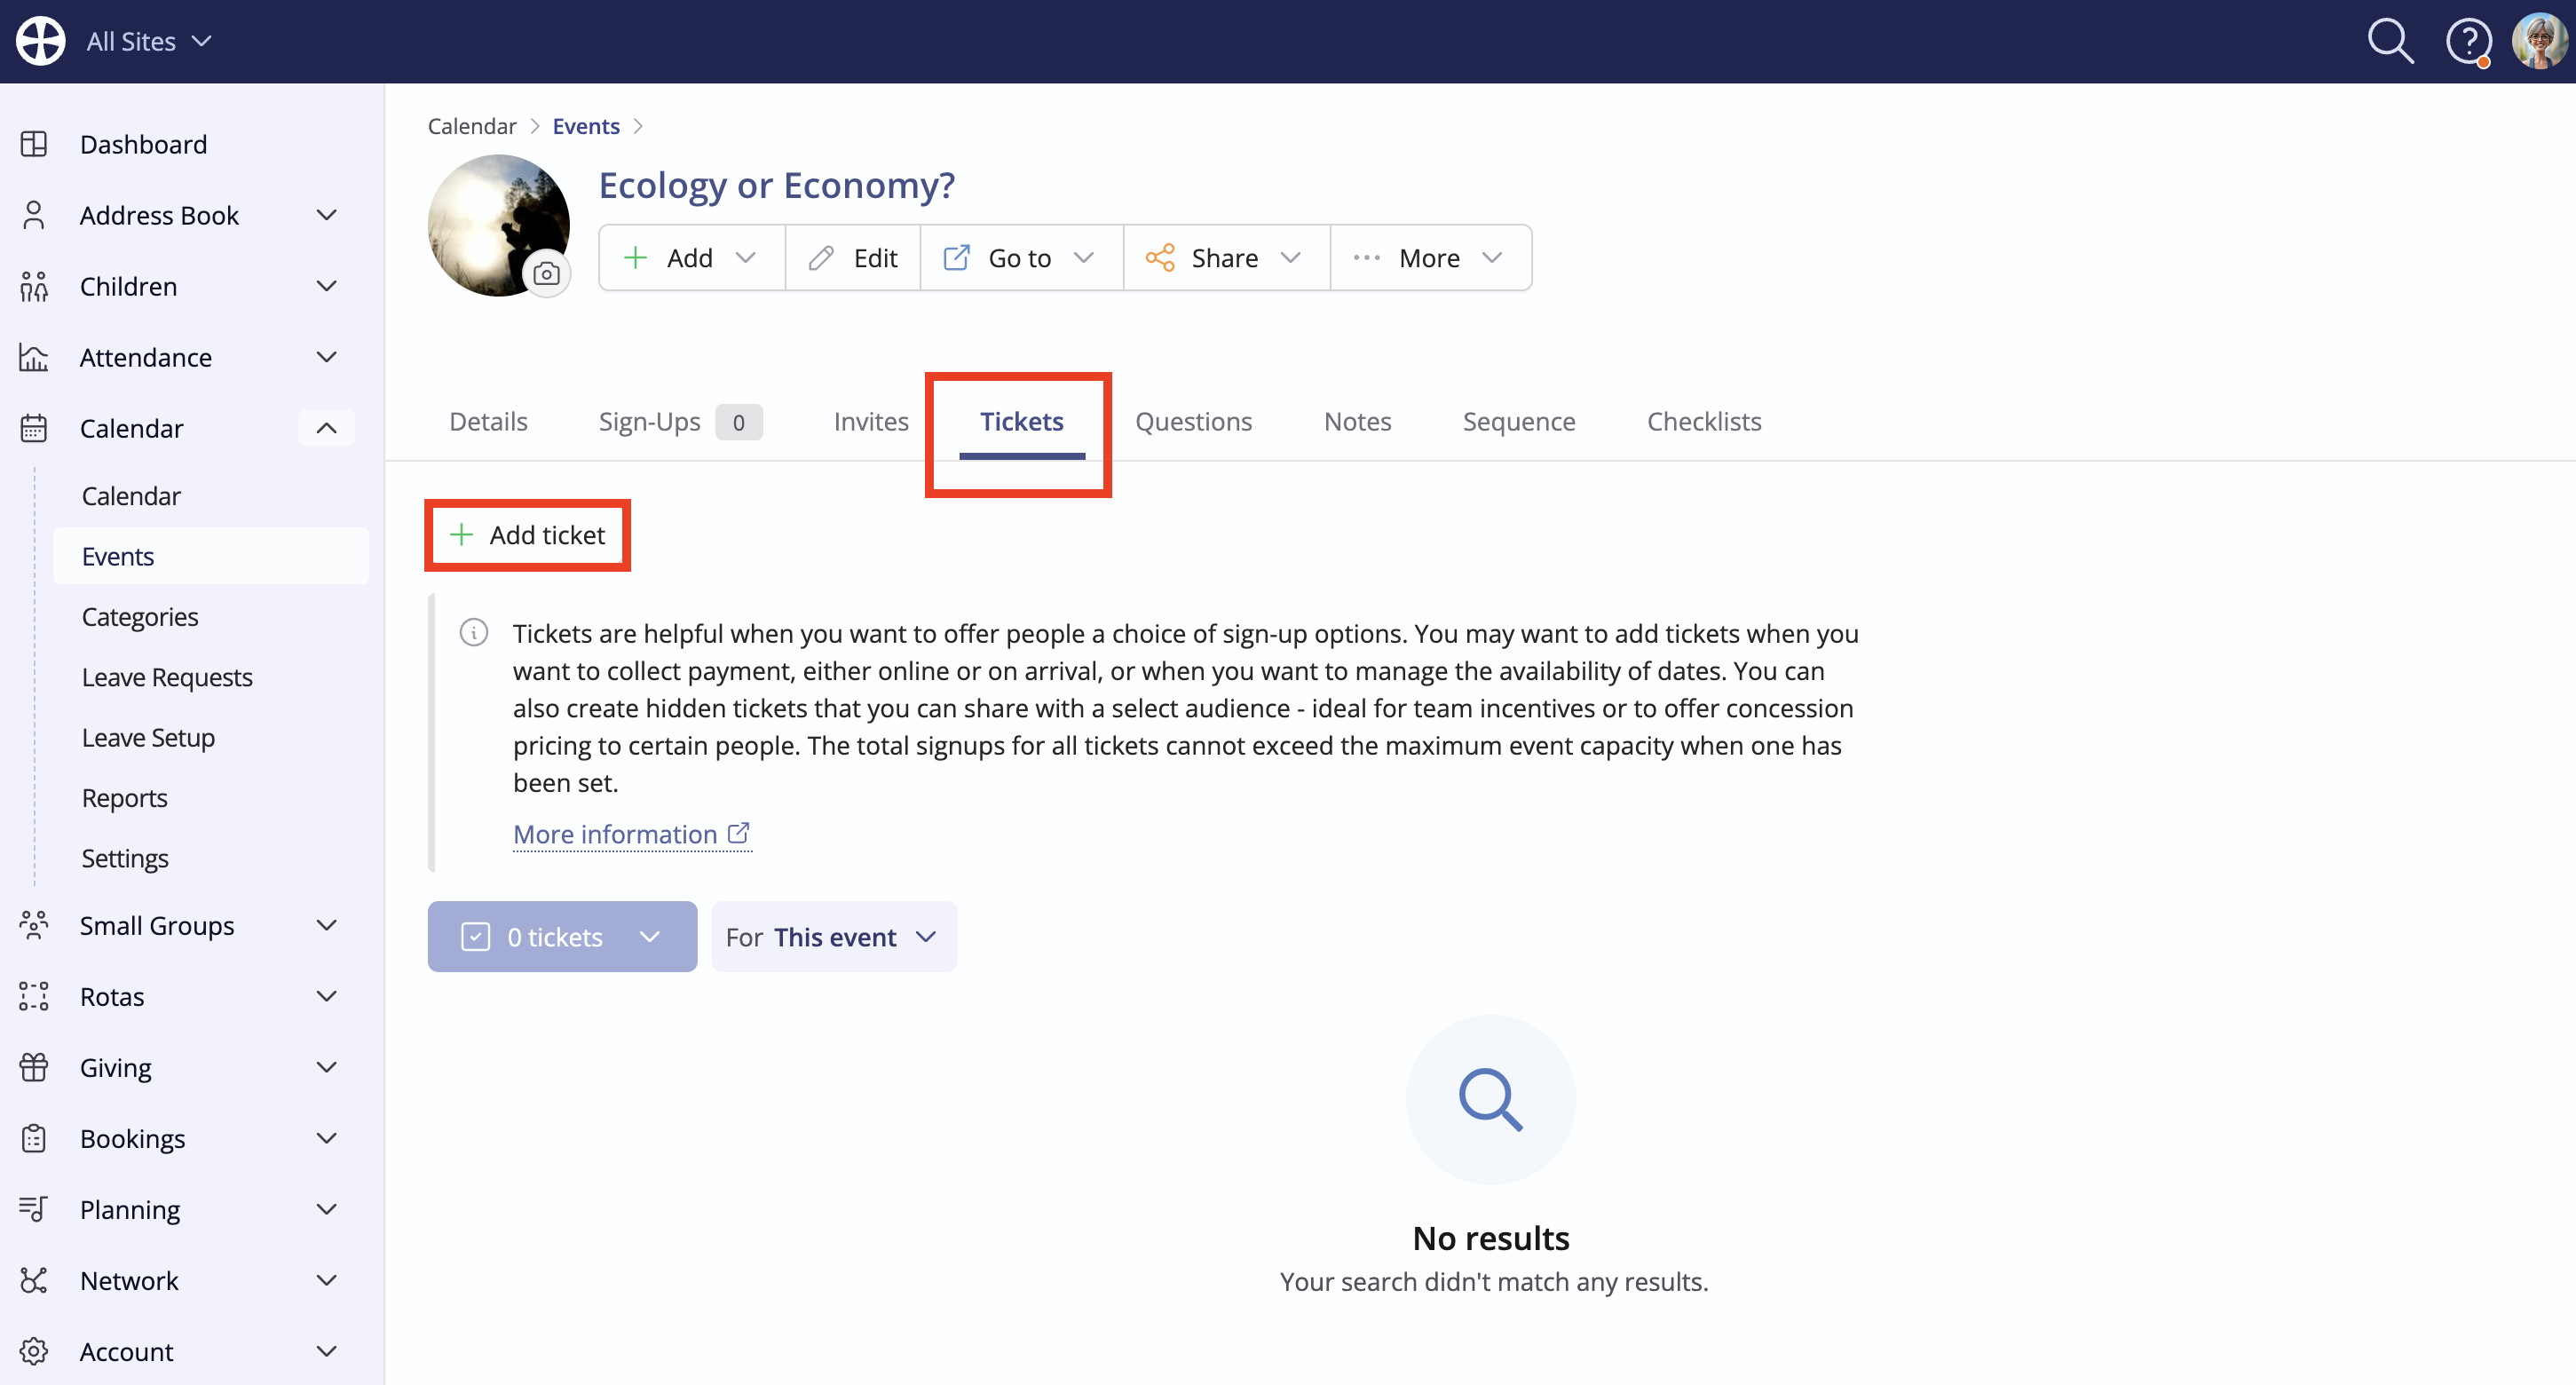
Click on the Tickets tab and select Add Ticket:
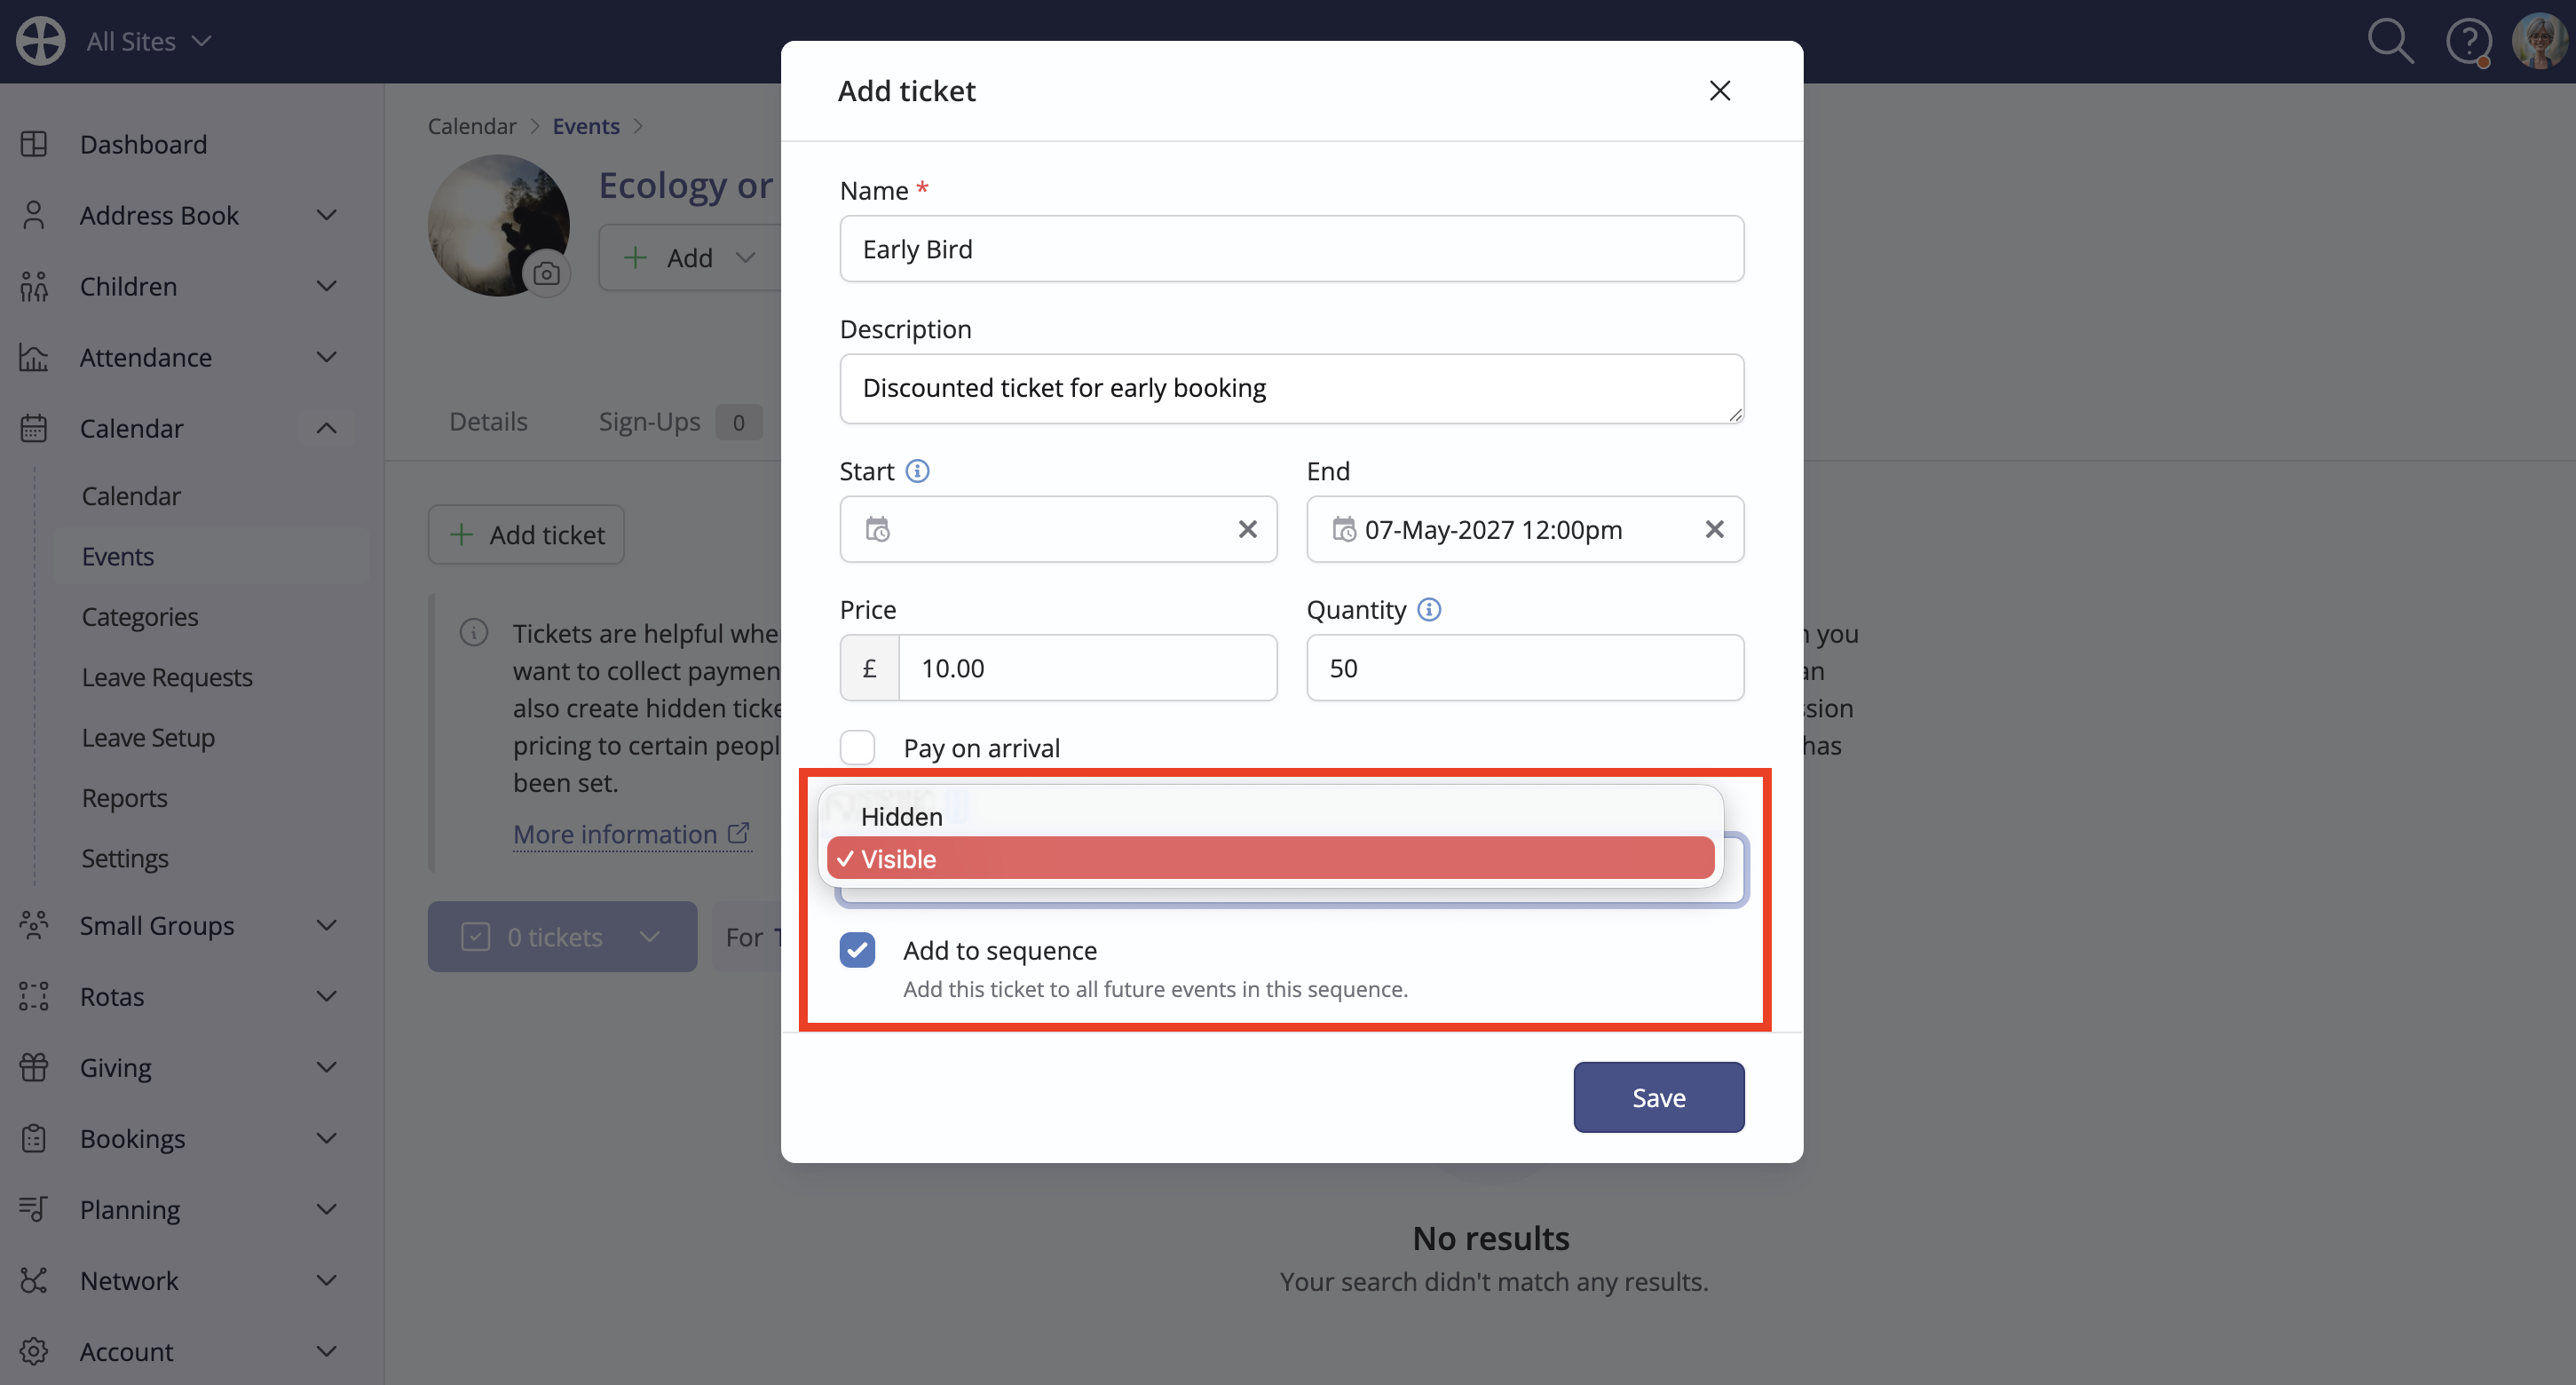
On the Edit ticket pop-up, update the ticket Name and optionally add a Description, perhaps to give details of what the ticket includes. Optionally enter a Start and/or End date - by later adding separate tickets with different availability dates, you can easily offer "early bird" price incentives and standard-price tickets. The dates/times specified determine when the ticket is visible on the Event Page. A ticket will cease to be visible when the End date/time has passed (optional) or when the event date/time has passed; however, you can also set the end date/time after the event date/time - ideal if you need to keep tickets visible on the event page for collecting late signups/payments for 'walk-ins' who didn't register before the event.
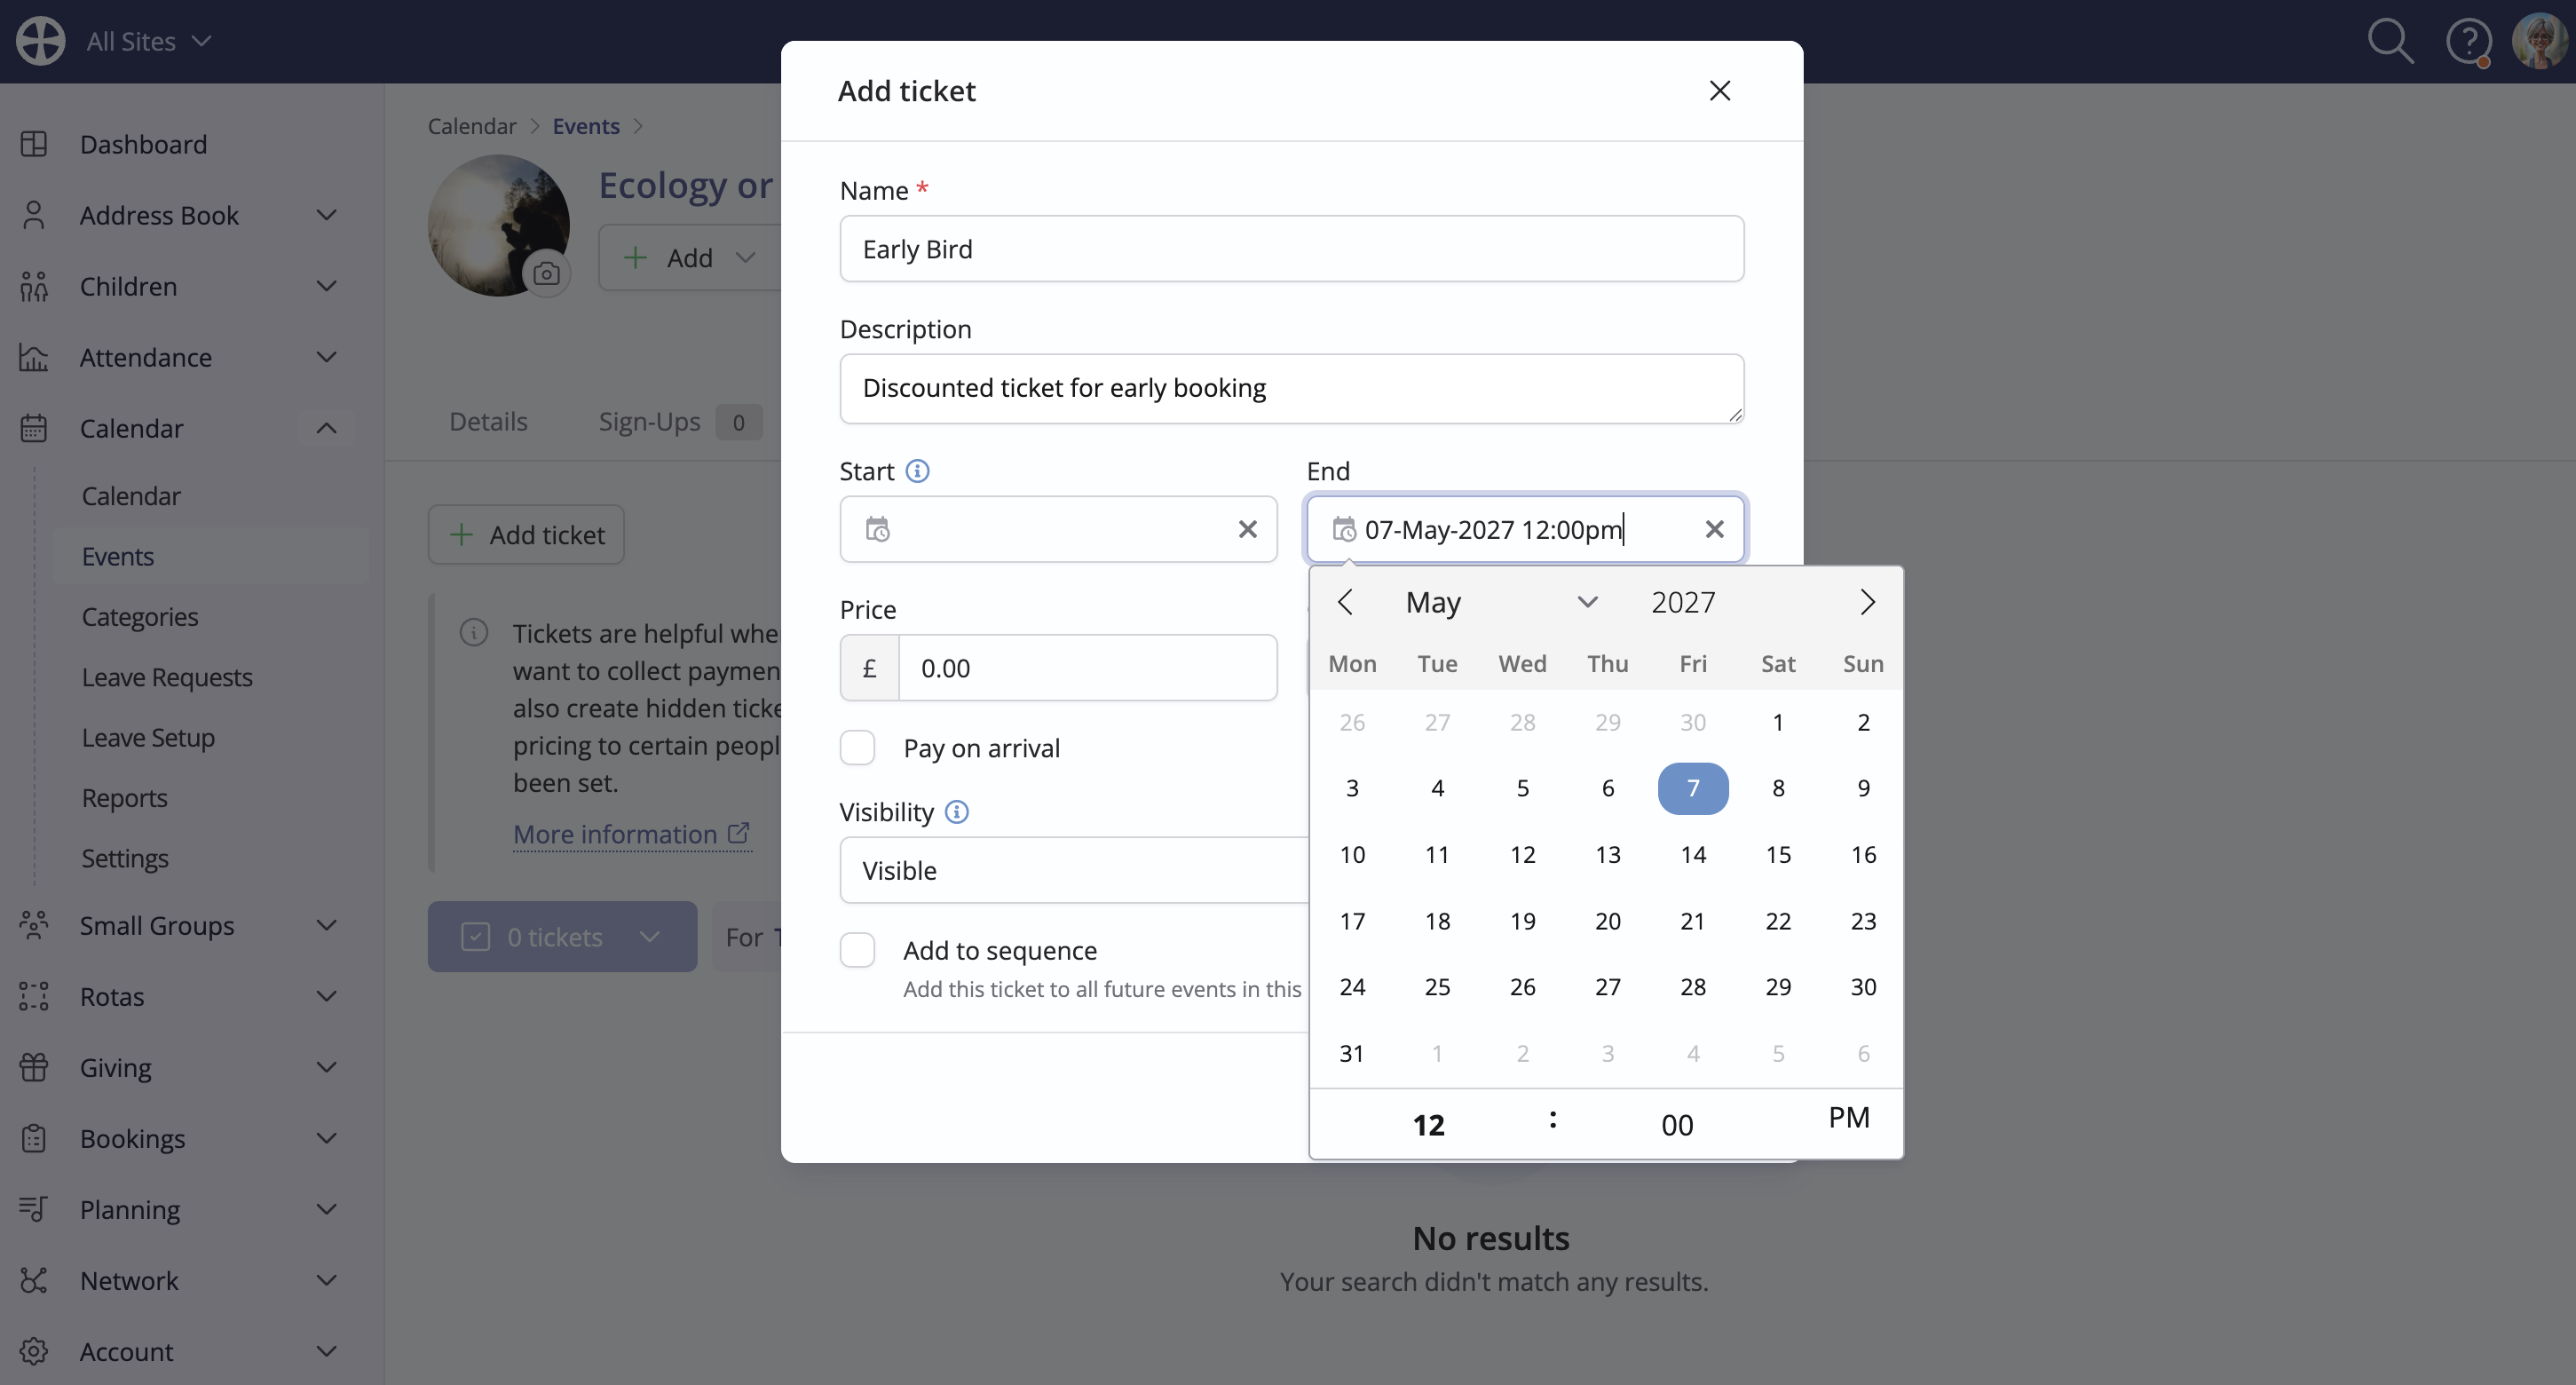
Add the ticket Price - this can be left as zero if the ticket is 'Free'. The Price is always in your local ChurchSuite account currency - multi-currency ticket prices are not supported.
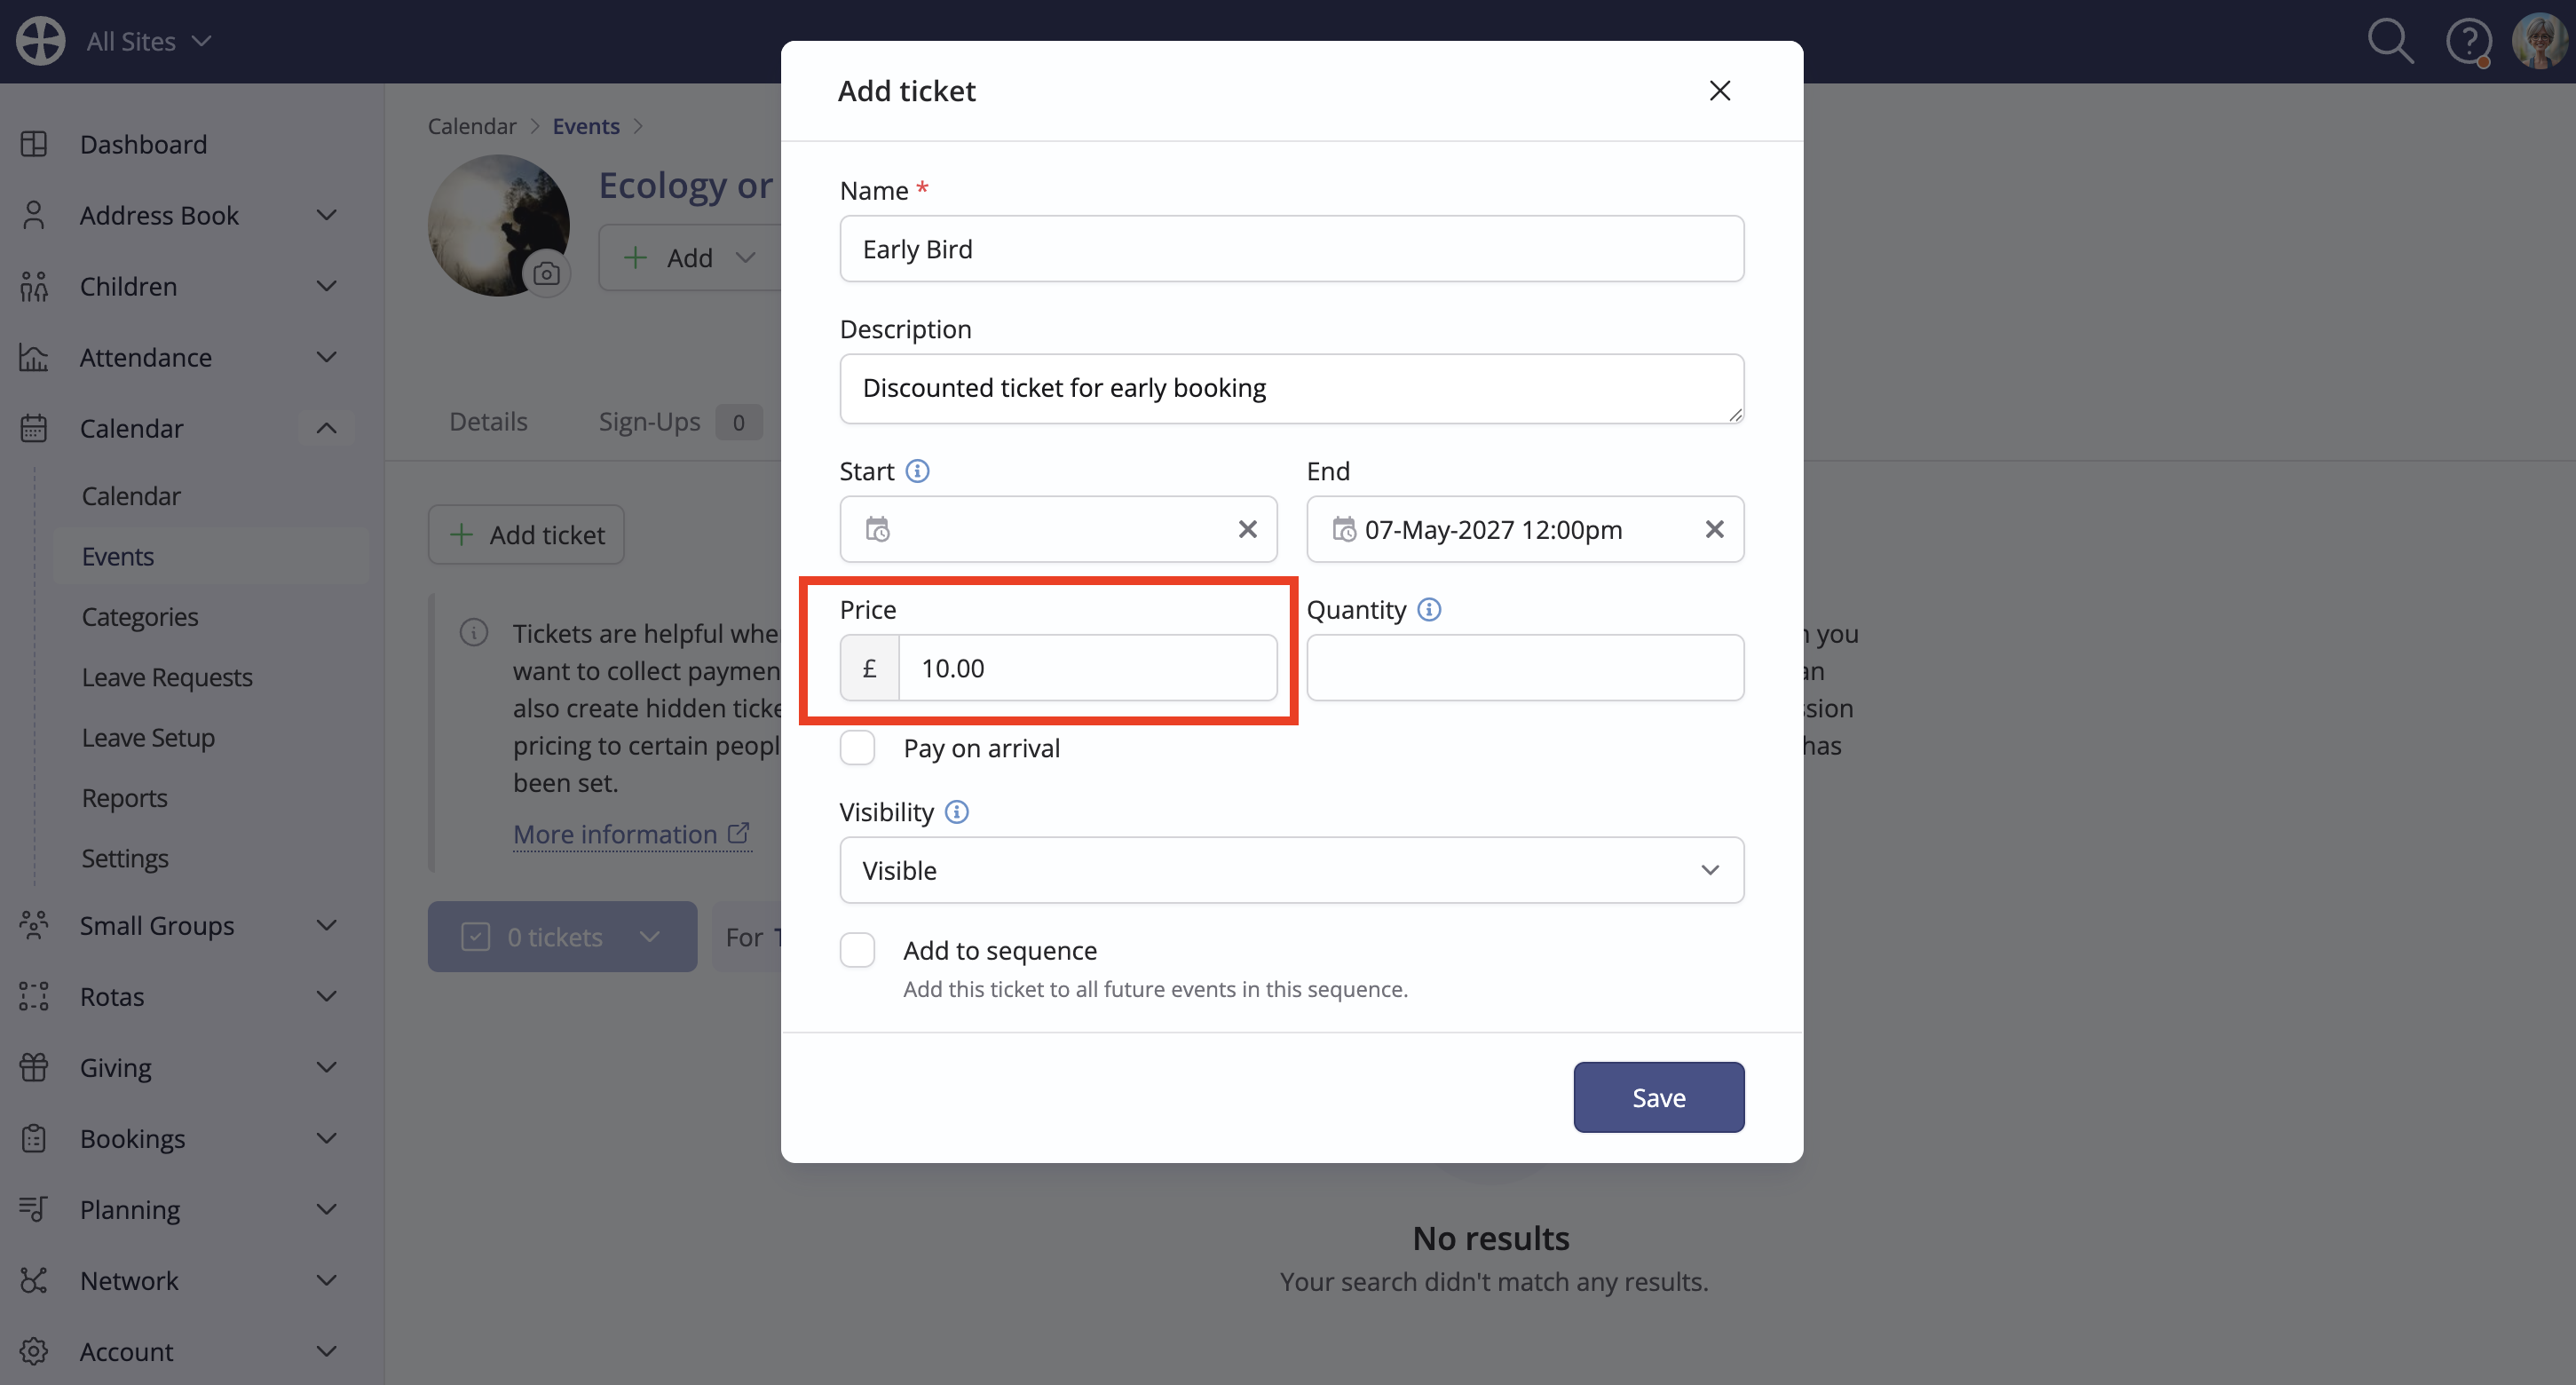
In addition to 'pay online' tickets, note the option for Pay on arrival, which, if selected, reveals a further field to add alternative payment instructions. Those choosing a pay-on-arrival ticket can still sign up online but will not be required to enter payment details. Pay-on-arrival sign-ups are added against the event as Unpaid and the sign-up confirmation email makes clear that payment is required, is unpaid and shows payment instructions if added. If using Event Check-in at your event, you have the option to mark those on-arrival payments as Paid. Note, you are unable to process card payments through ChurchSuite on arrival - card payment is only supported for non-pay-on-arrival tickets.
Processing online ticket payments through Stripe
"Pay online" tickets can only be processed if the Stripe integration has been completed. Card payments are subject to a transaction fee deducted by Stripe at source, with the net-of-fees amount deposited in your bank account. For further information on transaction fees and completing the integration, see the related support article Integrating with Stripe for online card payments. Note that, if the Stripe integration is not present, it is still possible to 'purchase' a paid for ticket - the sign-up is successfully processed, without payment, and is surfaced as an 'unpaid' sign-up.
When someone signs up for an event, a "customer record" isn't created in your Stripe account, which means that Stripe doesn't store an email address against the transaction. This means it's not possible for Stripe to auto-send receipts. While the sign-up receives a confirmation email containing details of their transactions, the only way to send a Stripe payment receipt is to send it manually from within your Stripe account, where you'll be prompted to enter an email address to send the receipt to.
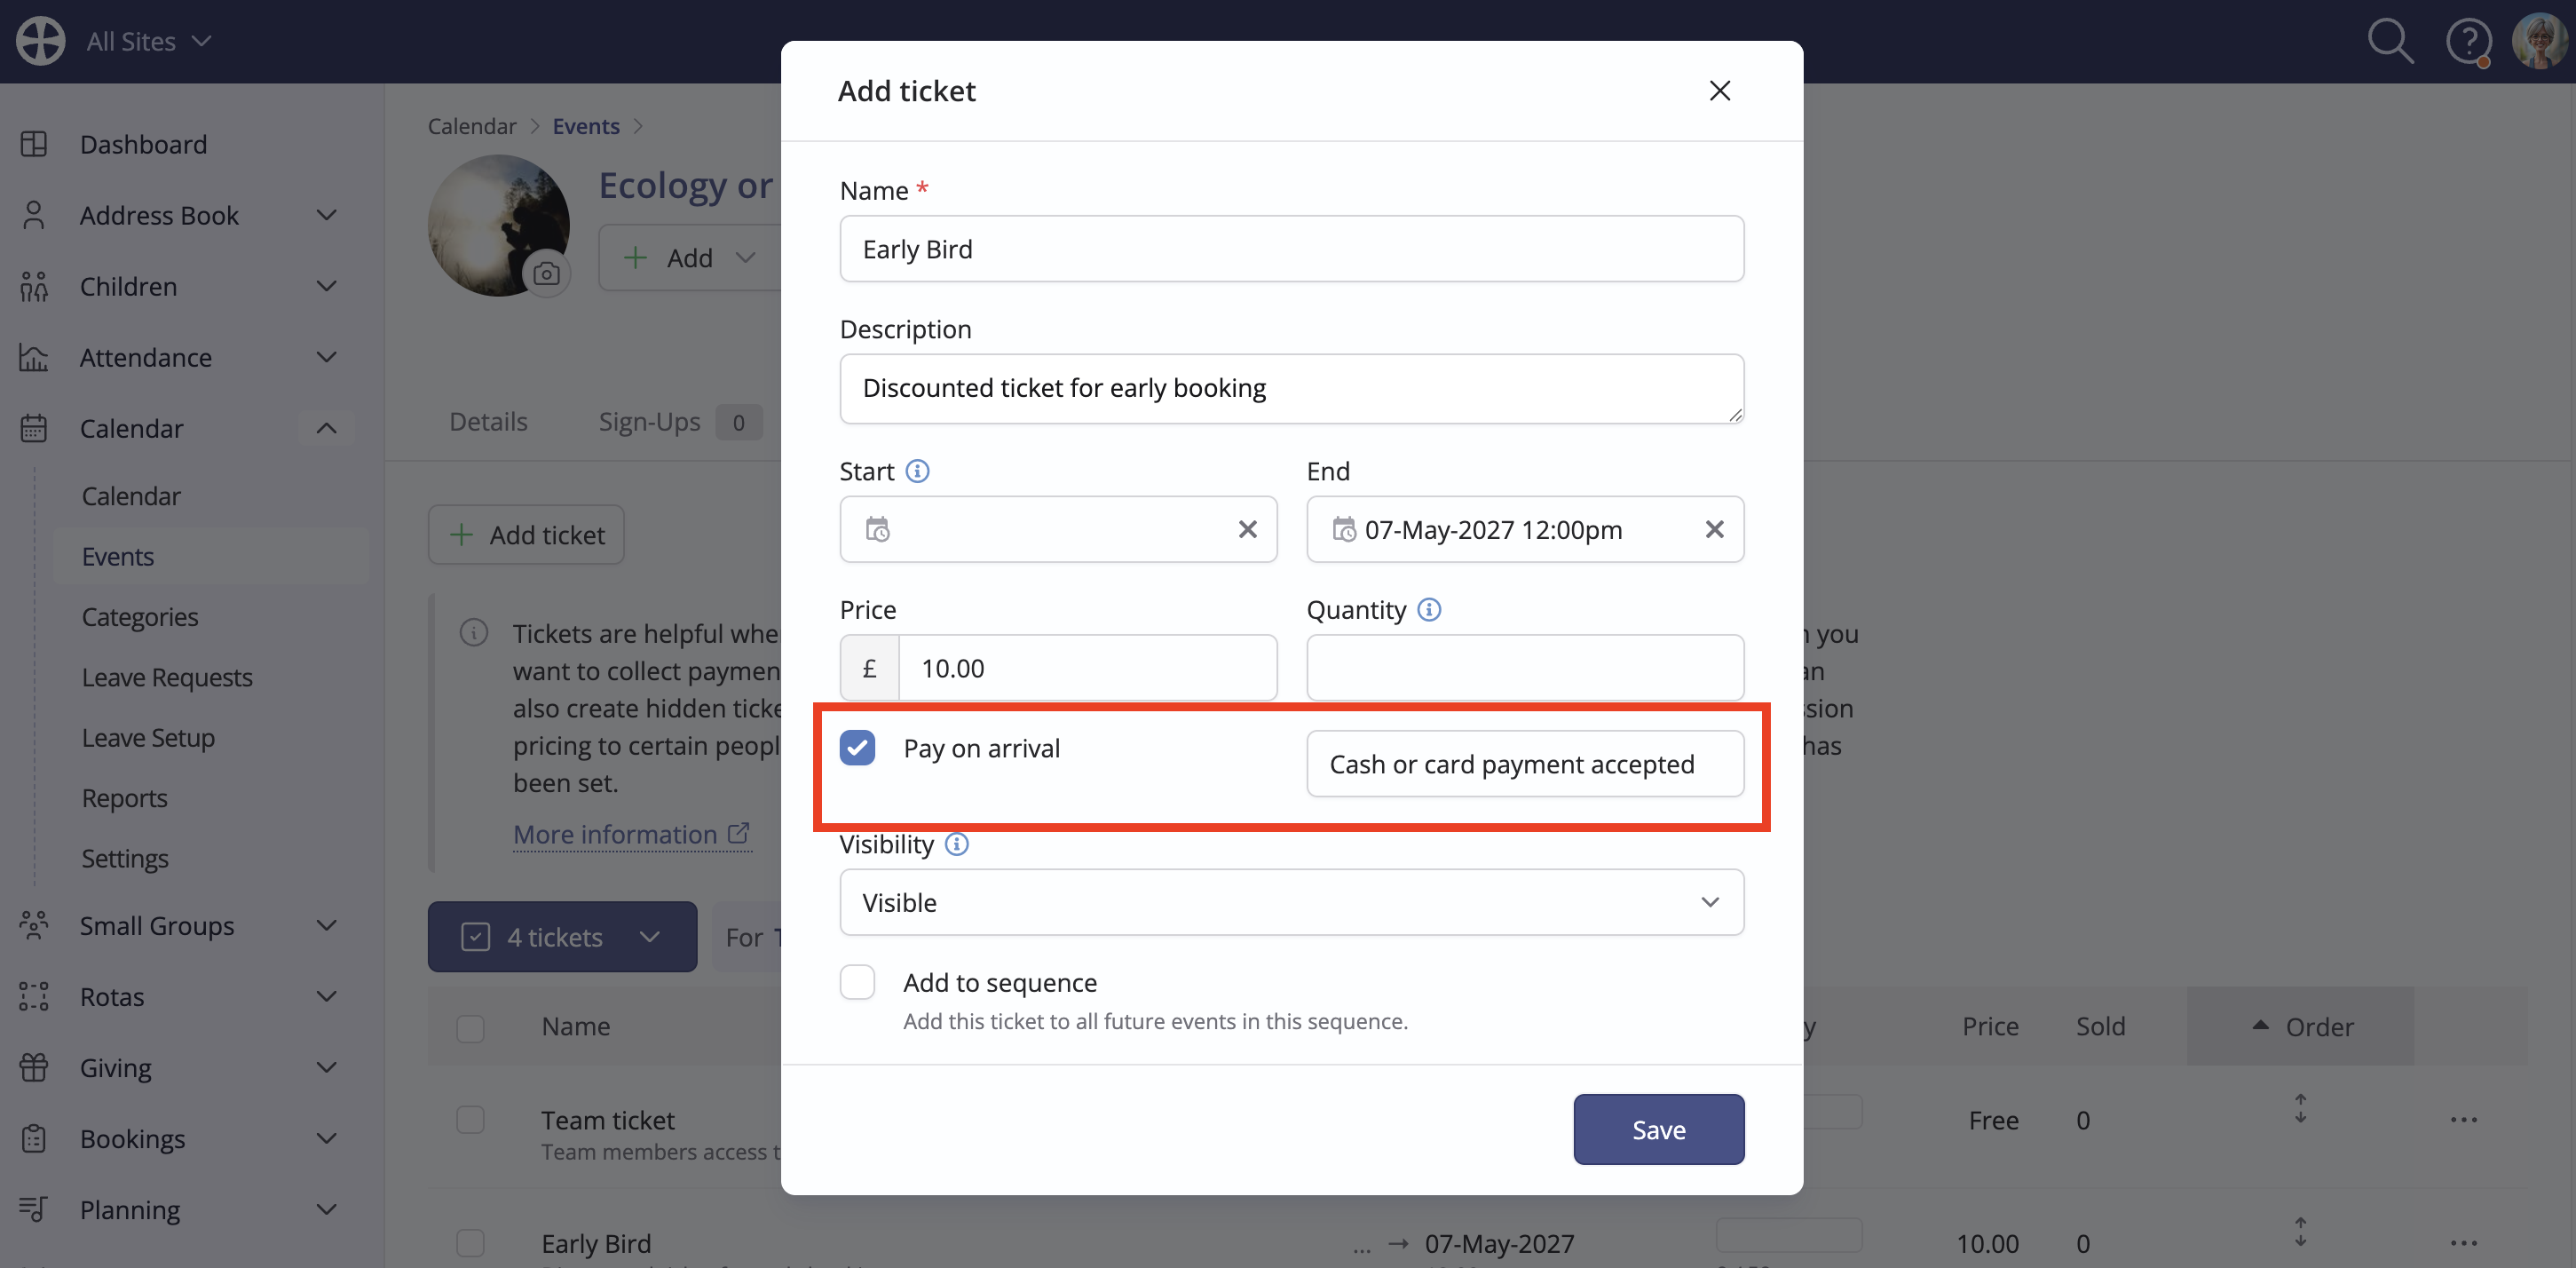
Optionally set a ticket Quantity where you wish to limit the number of sign-ups for a certain ticket. The ticket Quantity works in conjunction with the event Capacity (if set), perhaps where you have venue constraints and need to restrict the overall number of all tickets. For example, you might have three tickets, each with a maximum quantity of 100 but have an event capacity of 100. In this scenario, no more than 100 tickets of any combination will be sold.
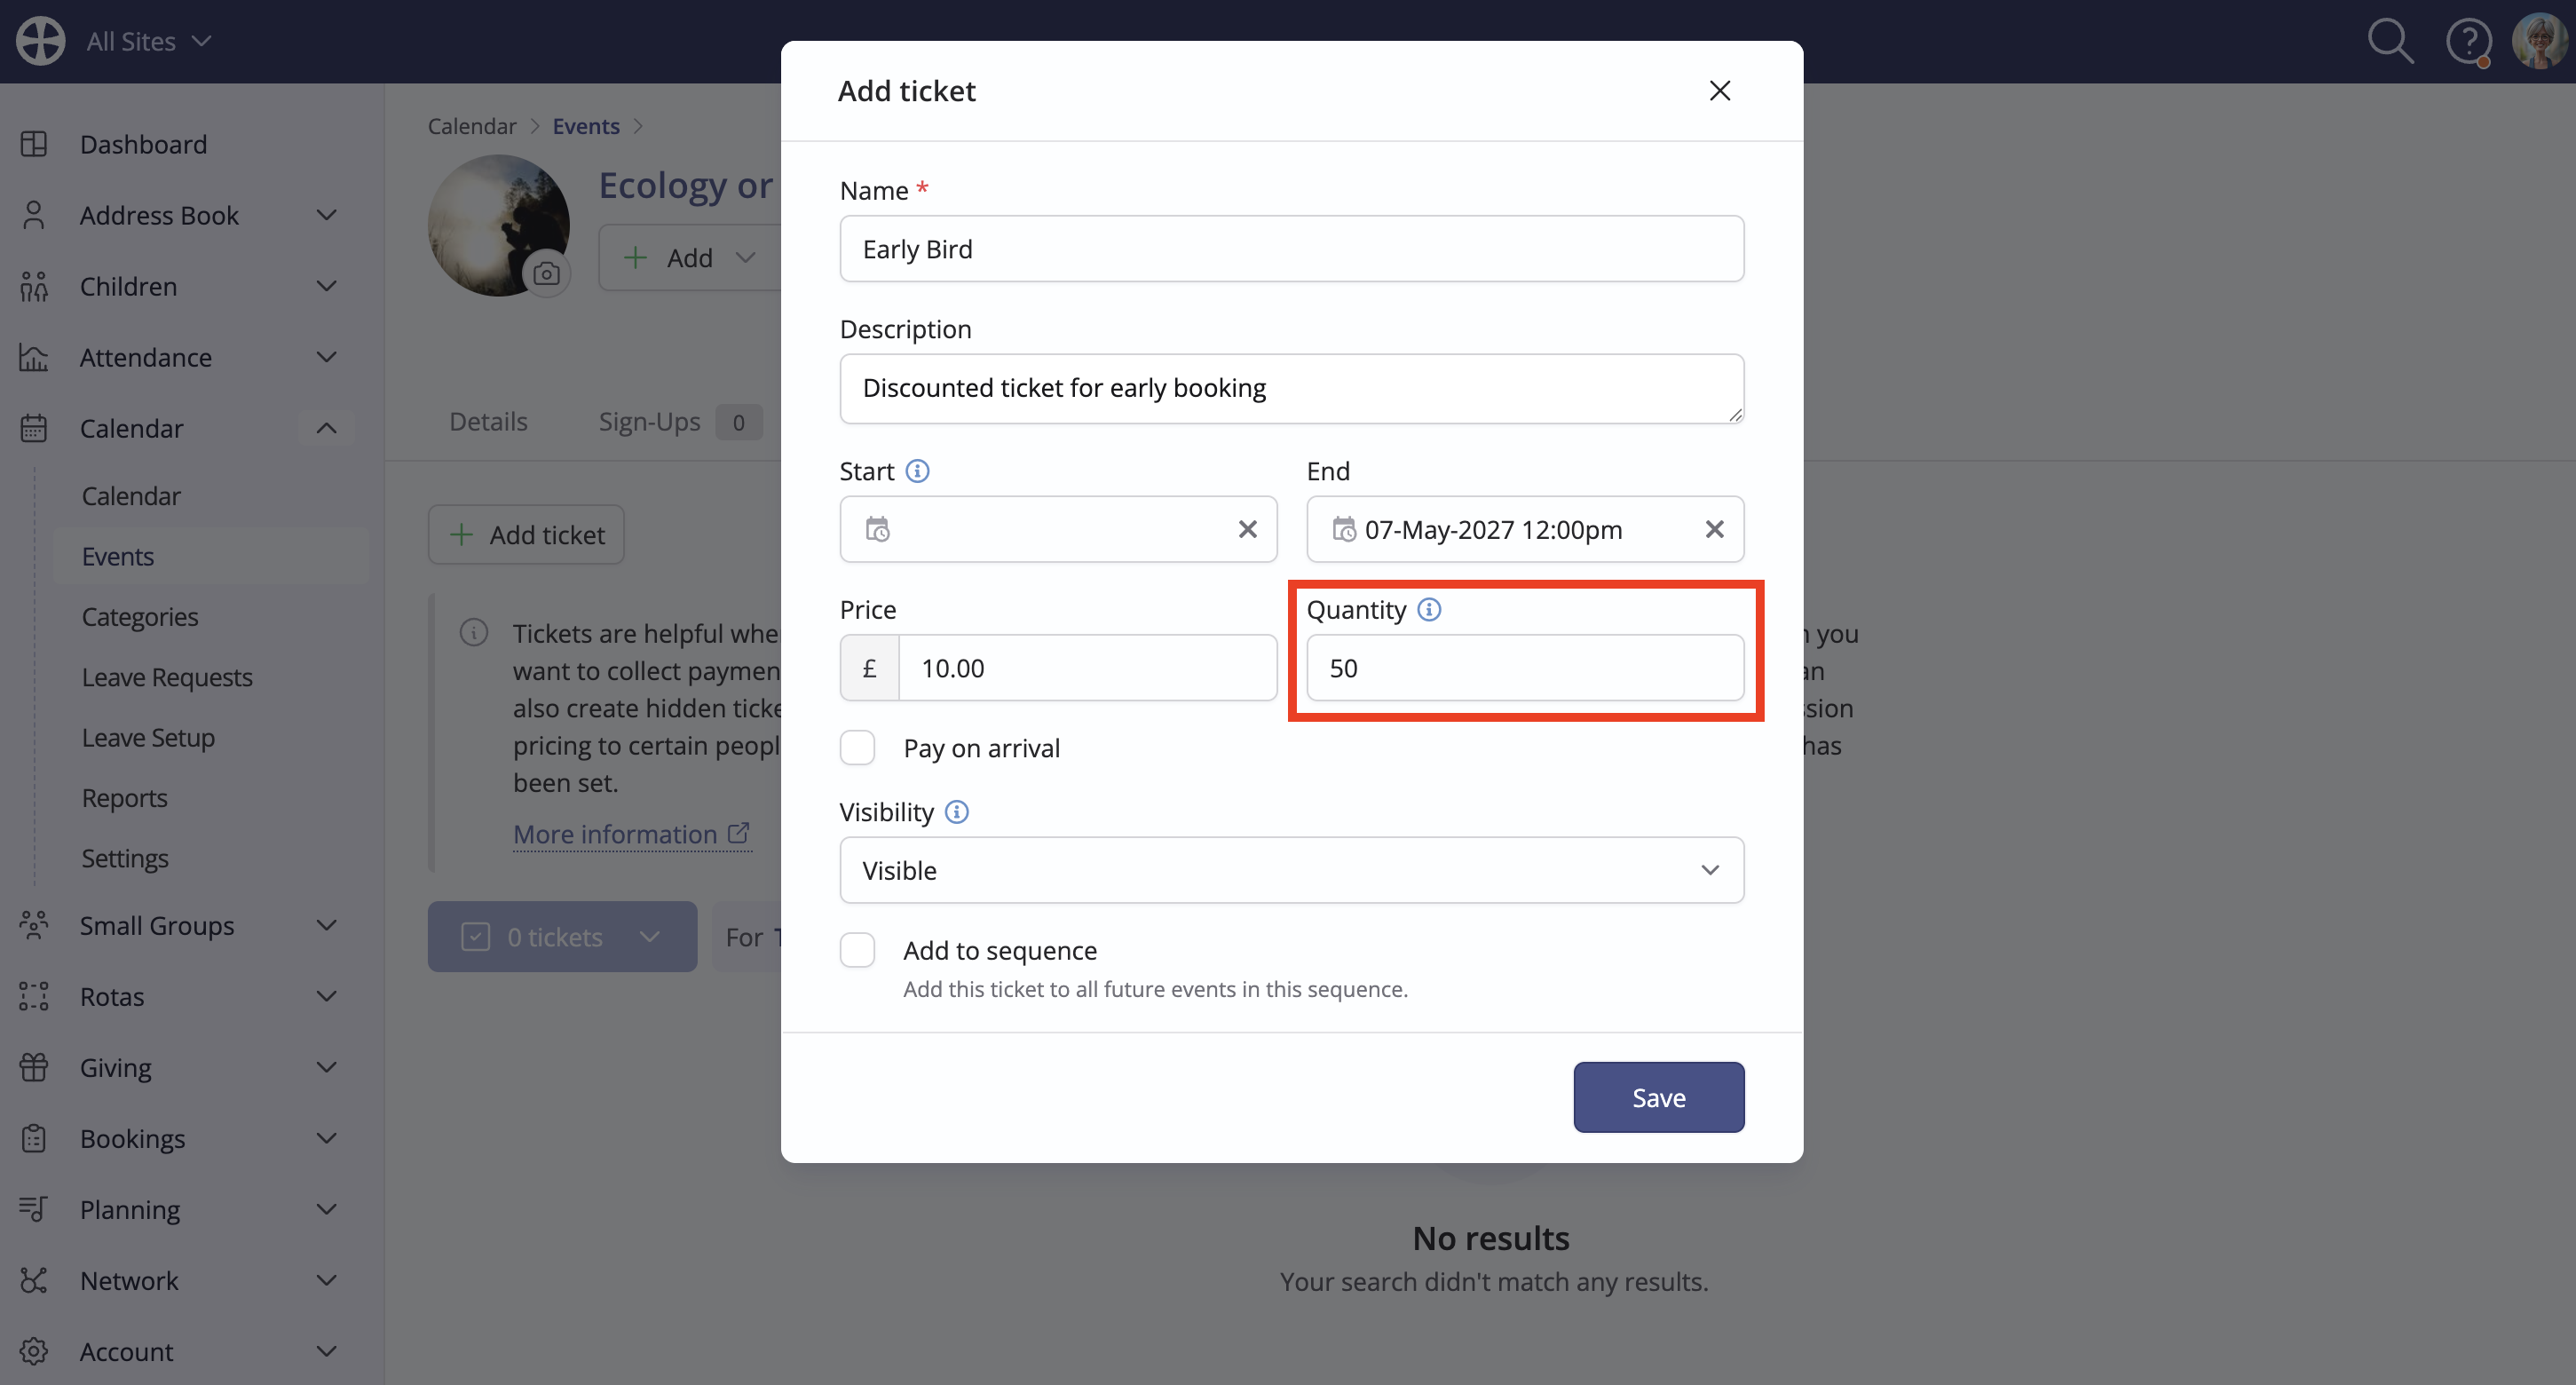
The Visibility setting determines whether the ticket is shown on the Event Page. Typically, you'll set tickets as visible but you can also create hidden tickets where you wish to restrict ticket usage to just Calendar module users (who can manually add sign-ups for a hidden ticket) or where you want to share a private event page link that includes hidden tickets to just a certain audience. For example, a hidden ticket for a concession-priced or free ticket could be shared with just a few selected people. The private link will provide those people with access to an alternative version of the event page that only includes selected tickets, including hidden tickets if you wish. See the next section of this article for further information about hidden tickets. Finally, where the event belongs to a sequence, tick Add to sequence to add this ticket to all other future event sequence dates from today. Click Save to add the ticket.
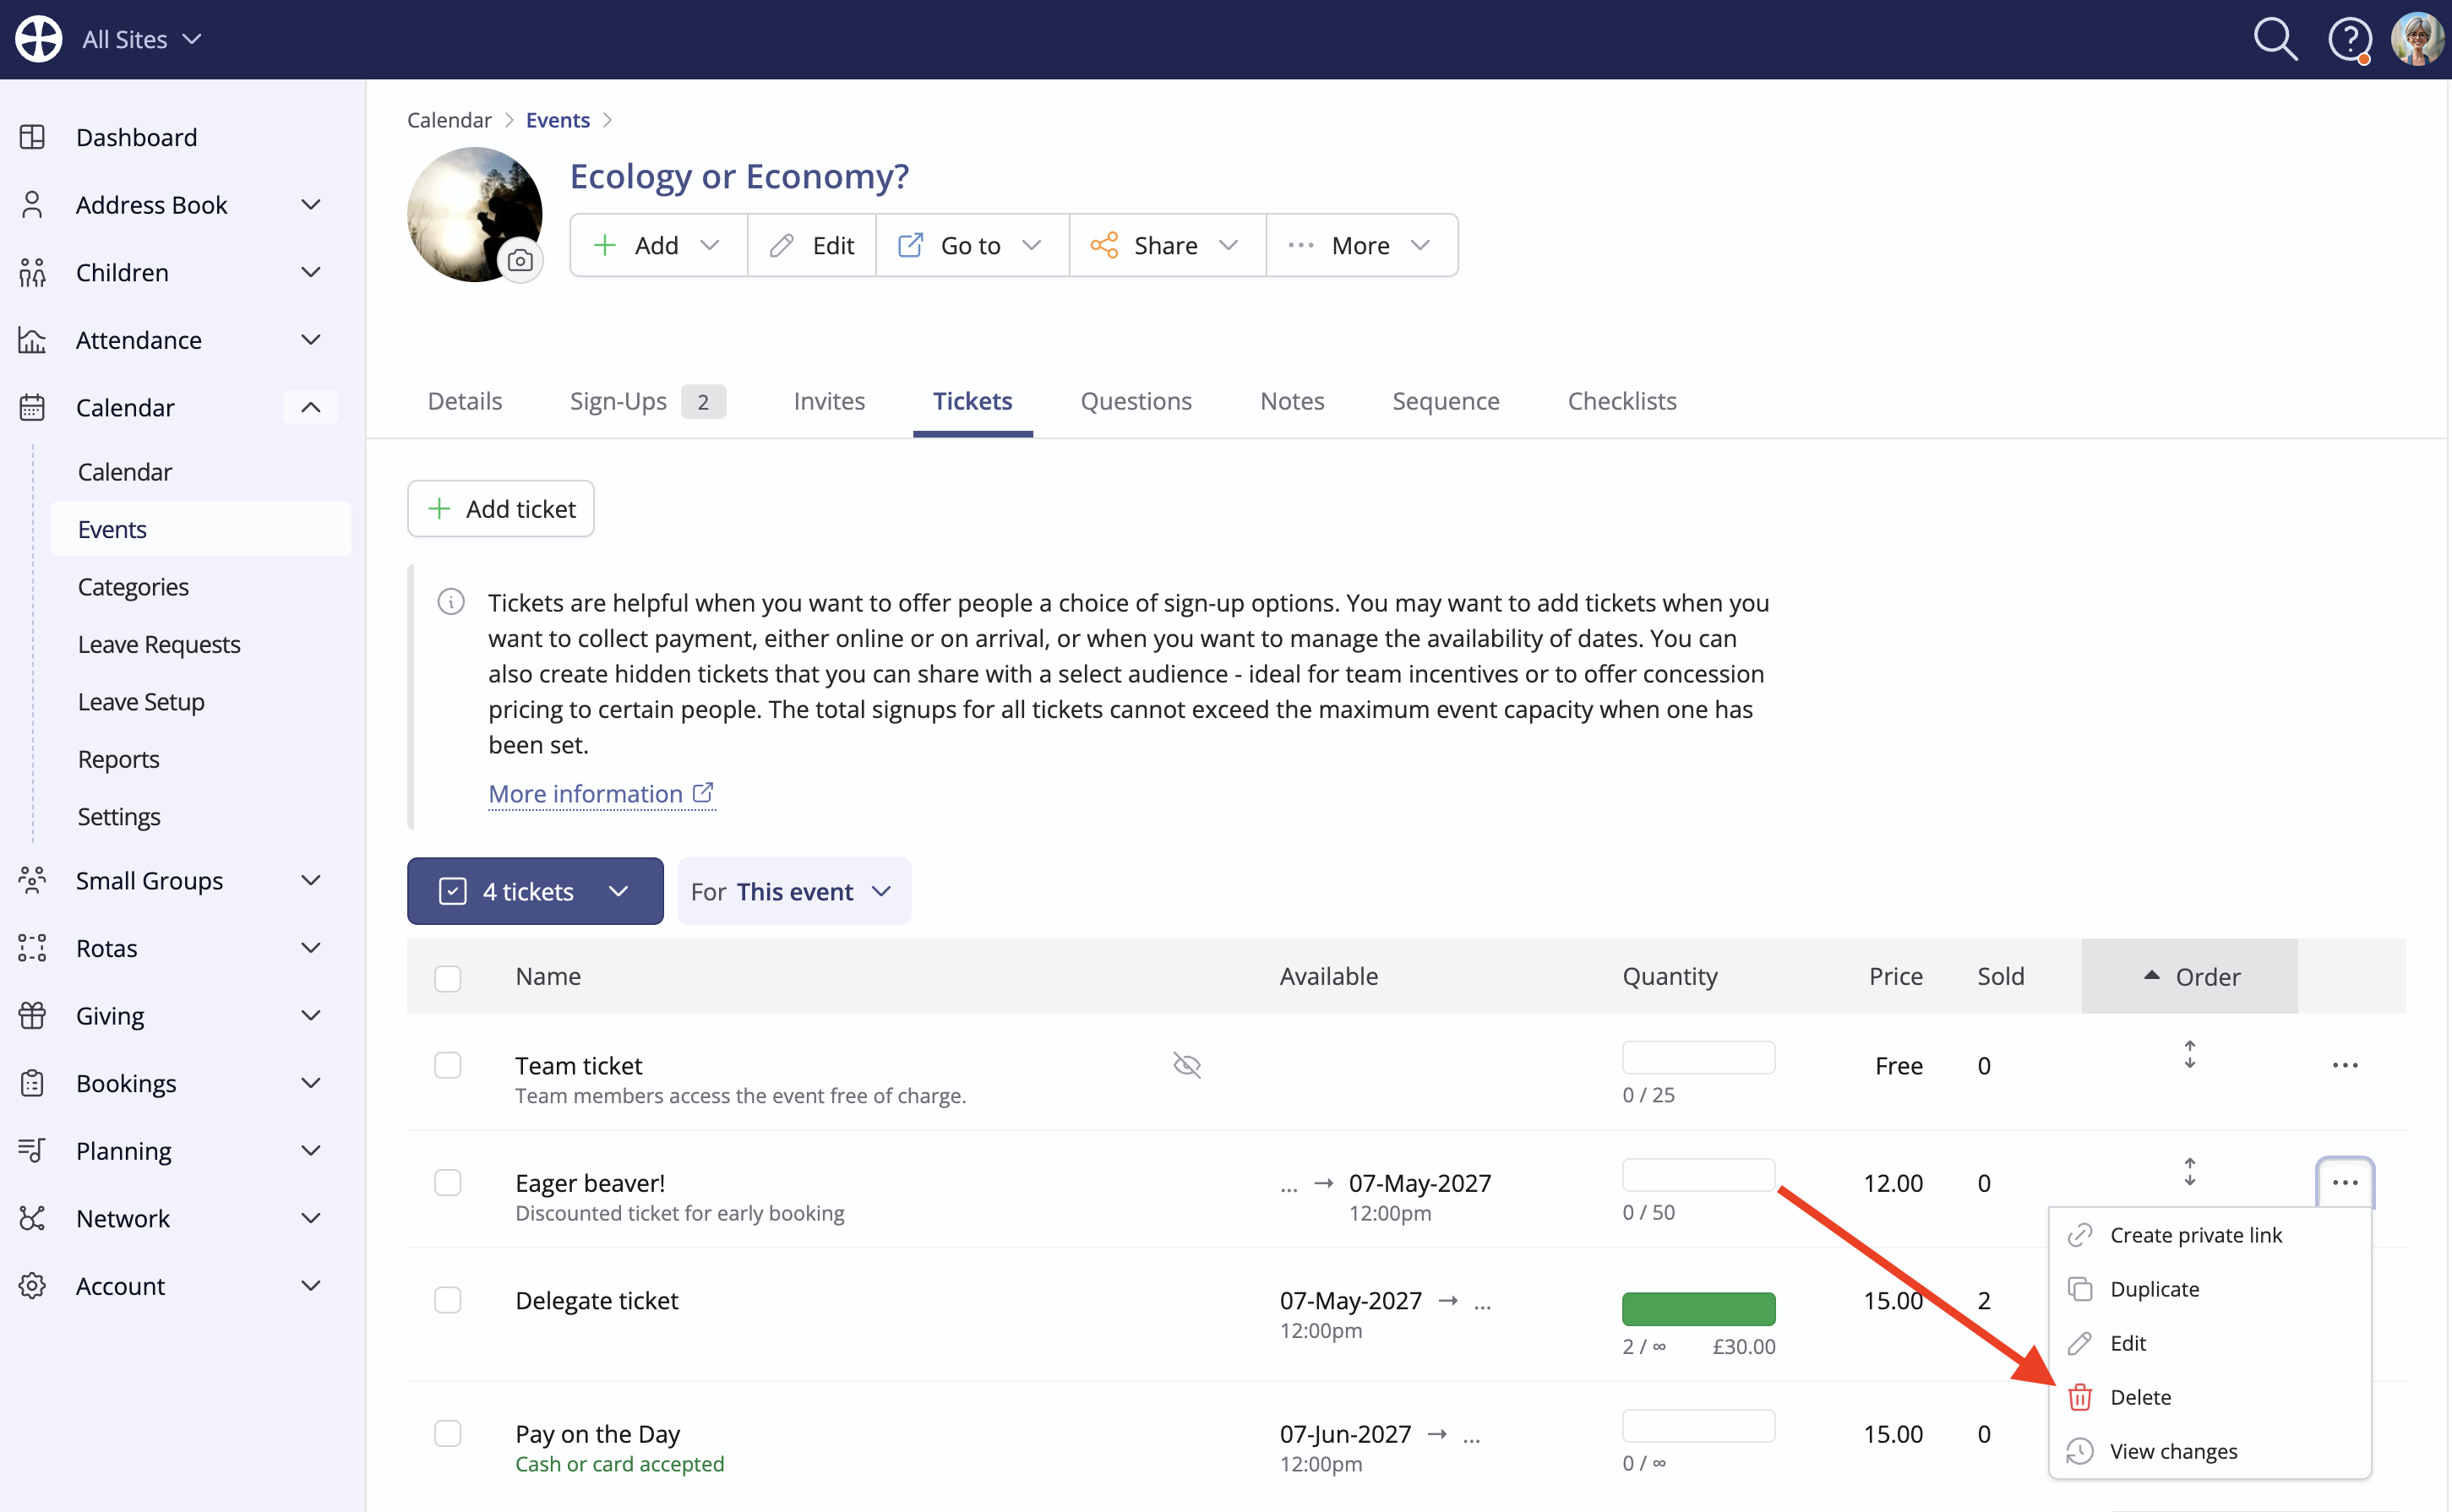
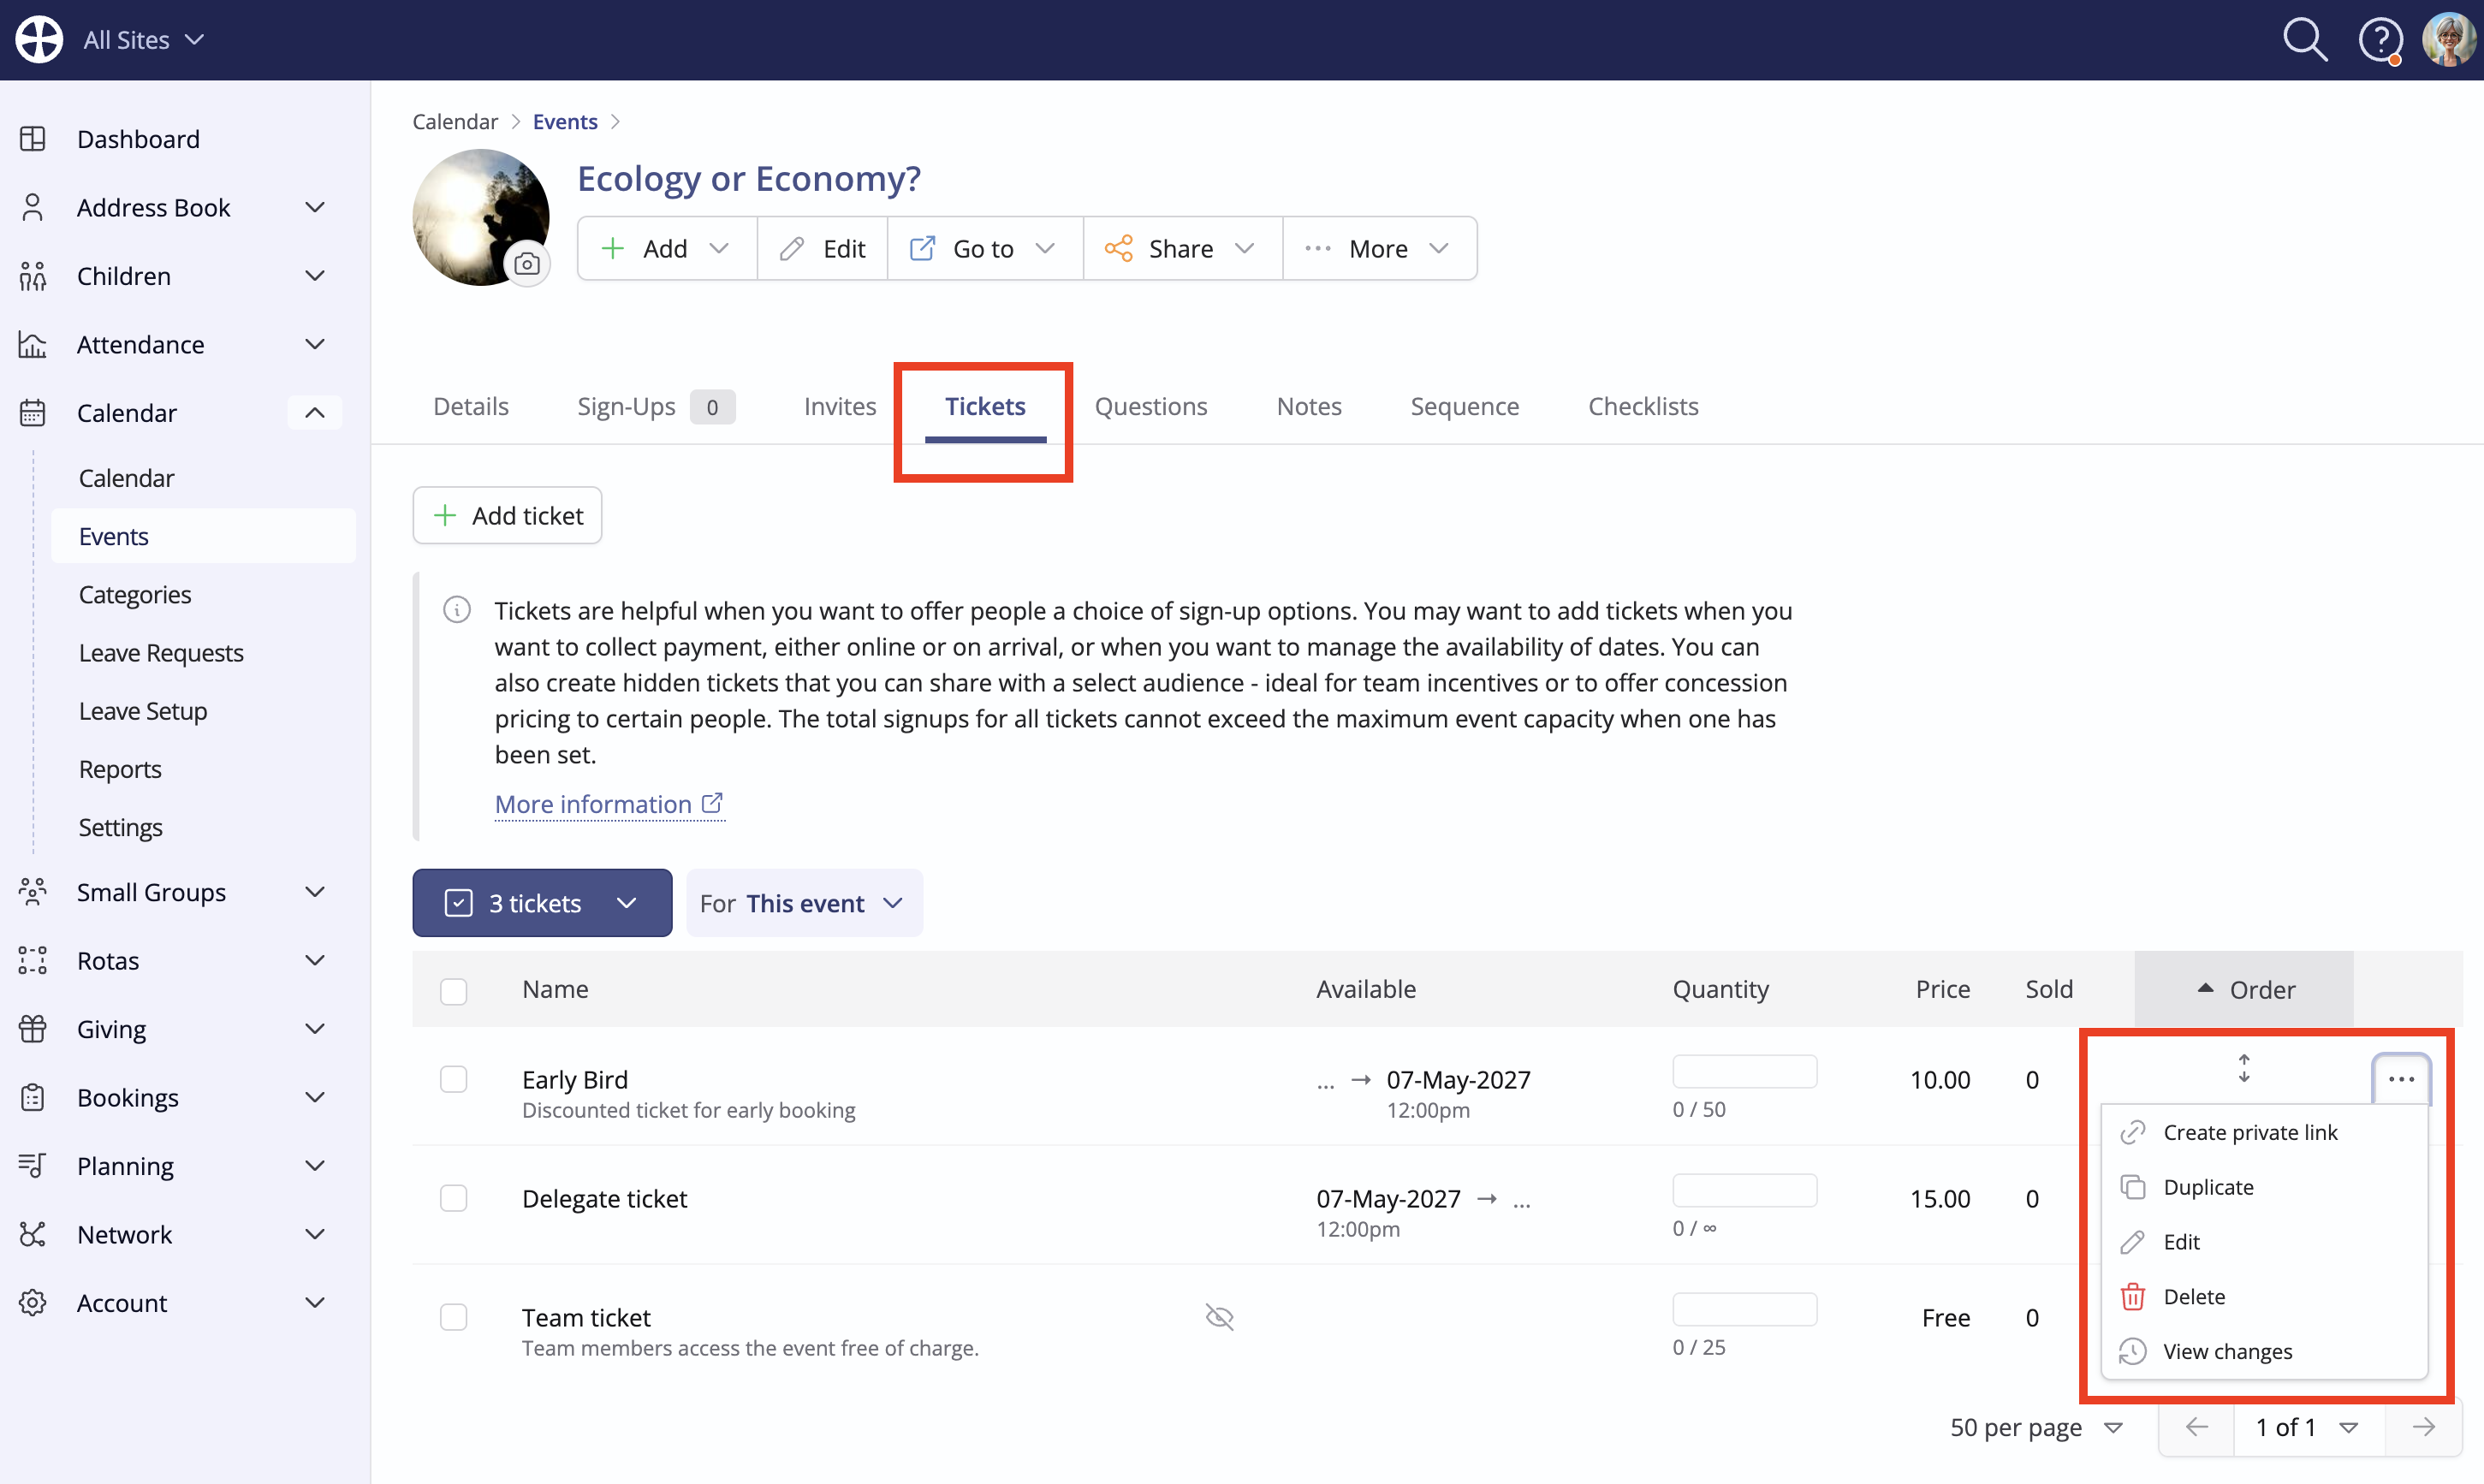
Continue adding other tickets as desired. Working within the Tickets tab for an event, note the available ticket Actions to Duplicate or Edit an existing ticket. The Delete action is only shown if there are no sign-ups for that ticket. You can also change the Order of tickets, which determines the order they are displayed on the event page.
Hidden tickets
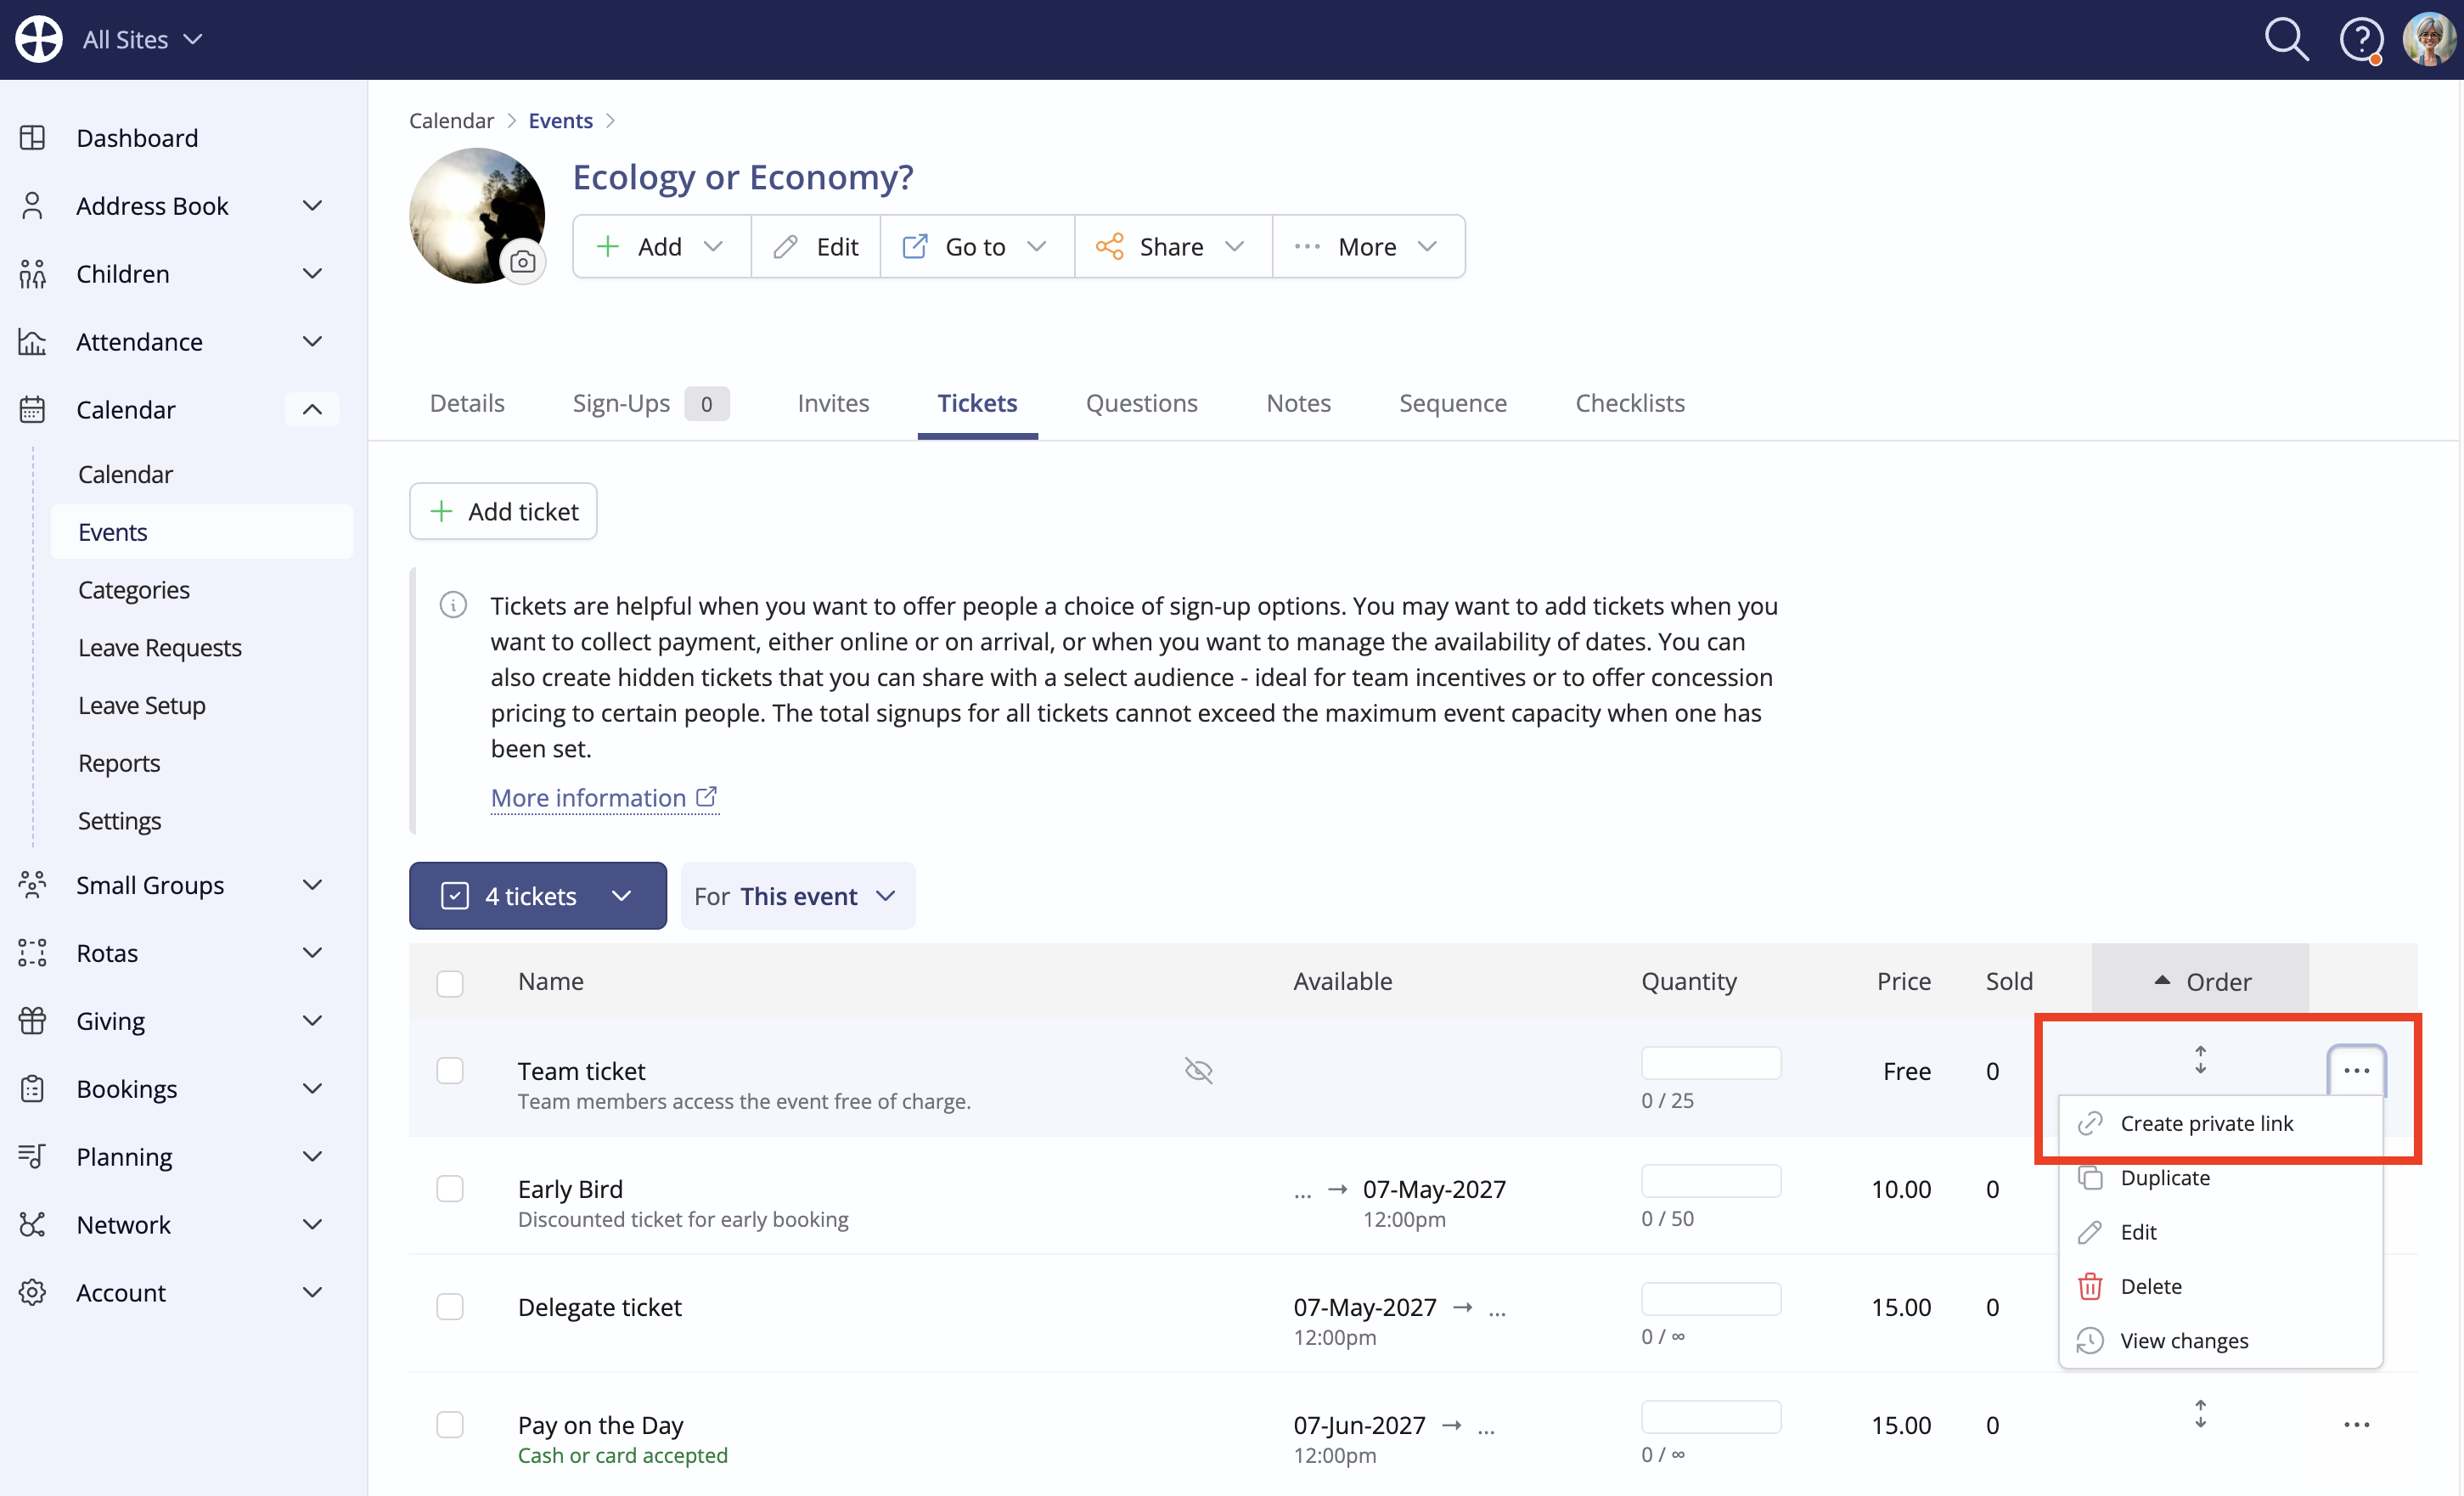
The event below has a variety of ticket types - including pay-online, pay-on-arrival and a hidden team ticket. Choosing to Create private link from any ticket Action opens a pop-up through which a private link can be generated:
On the Create private link pop-up, select each of the tickets to include. In this example, the private link will be for an event page showing just the team ticket. You can Preview the private event page to check it shows only the expected ticket options.
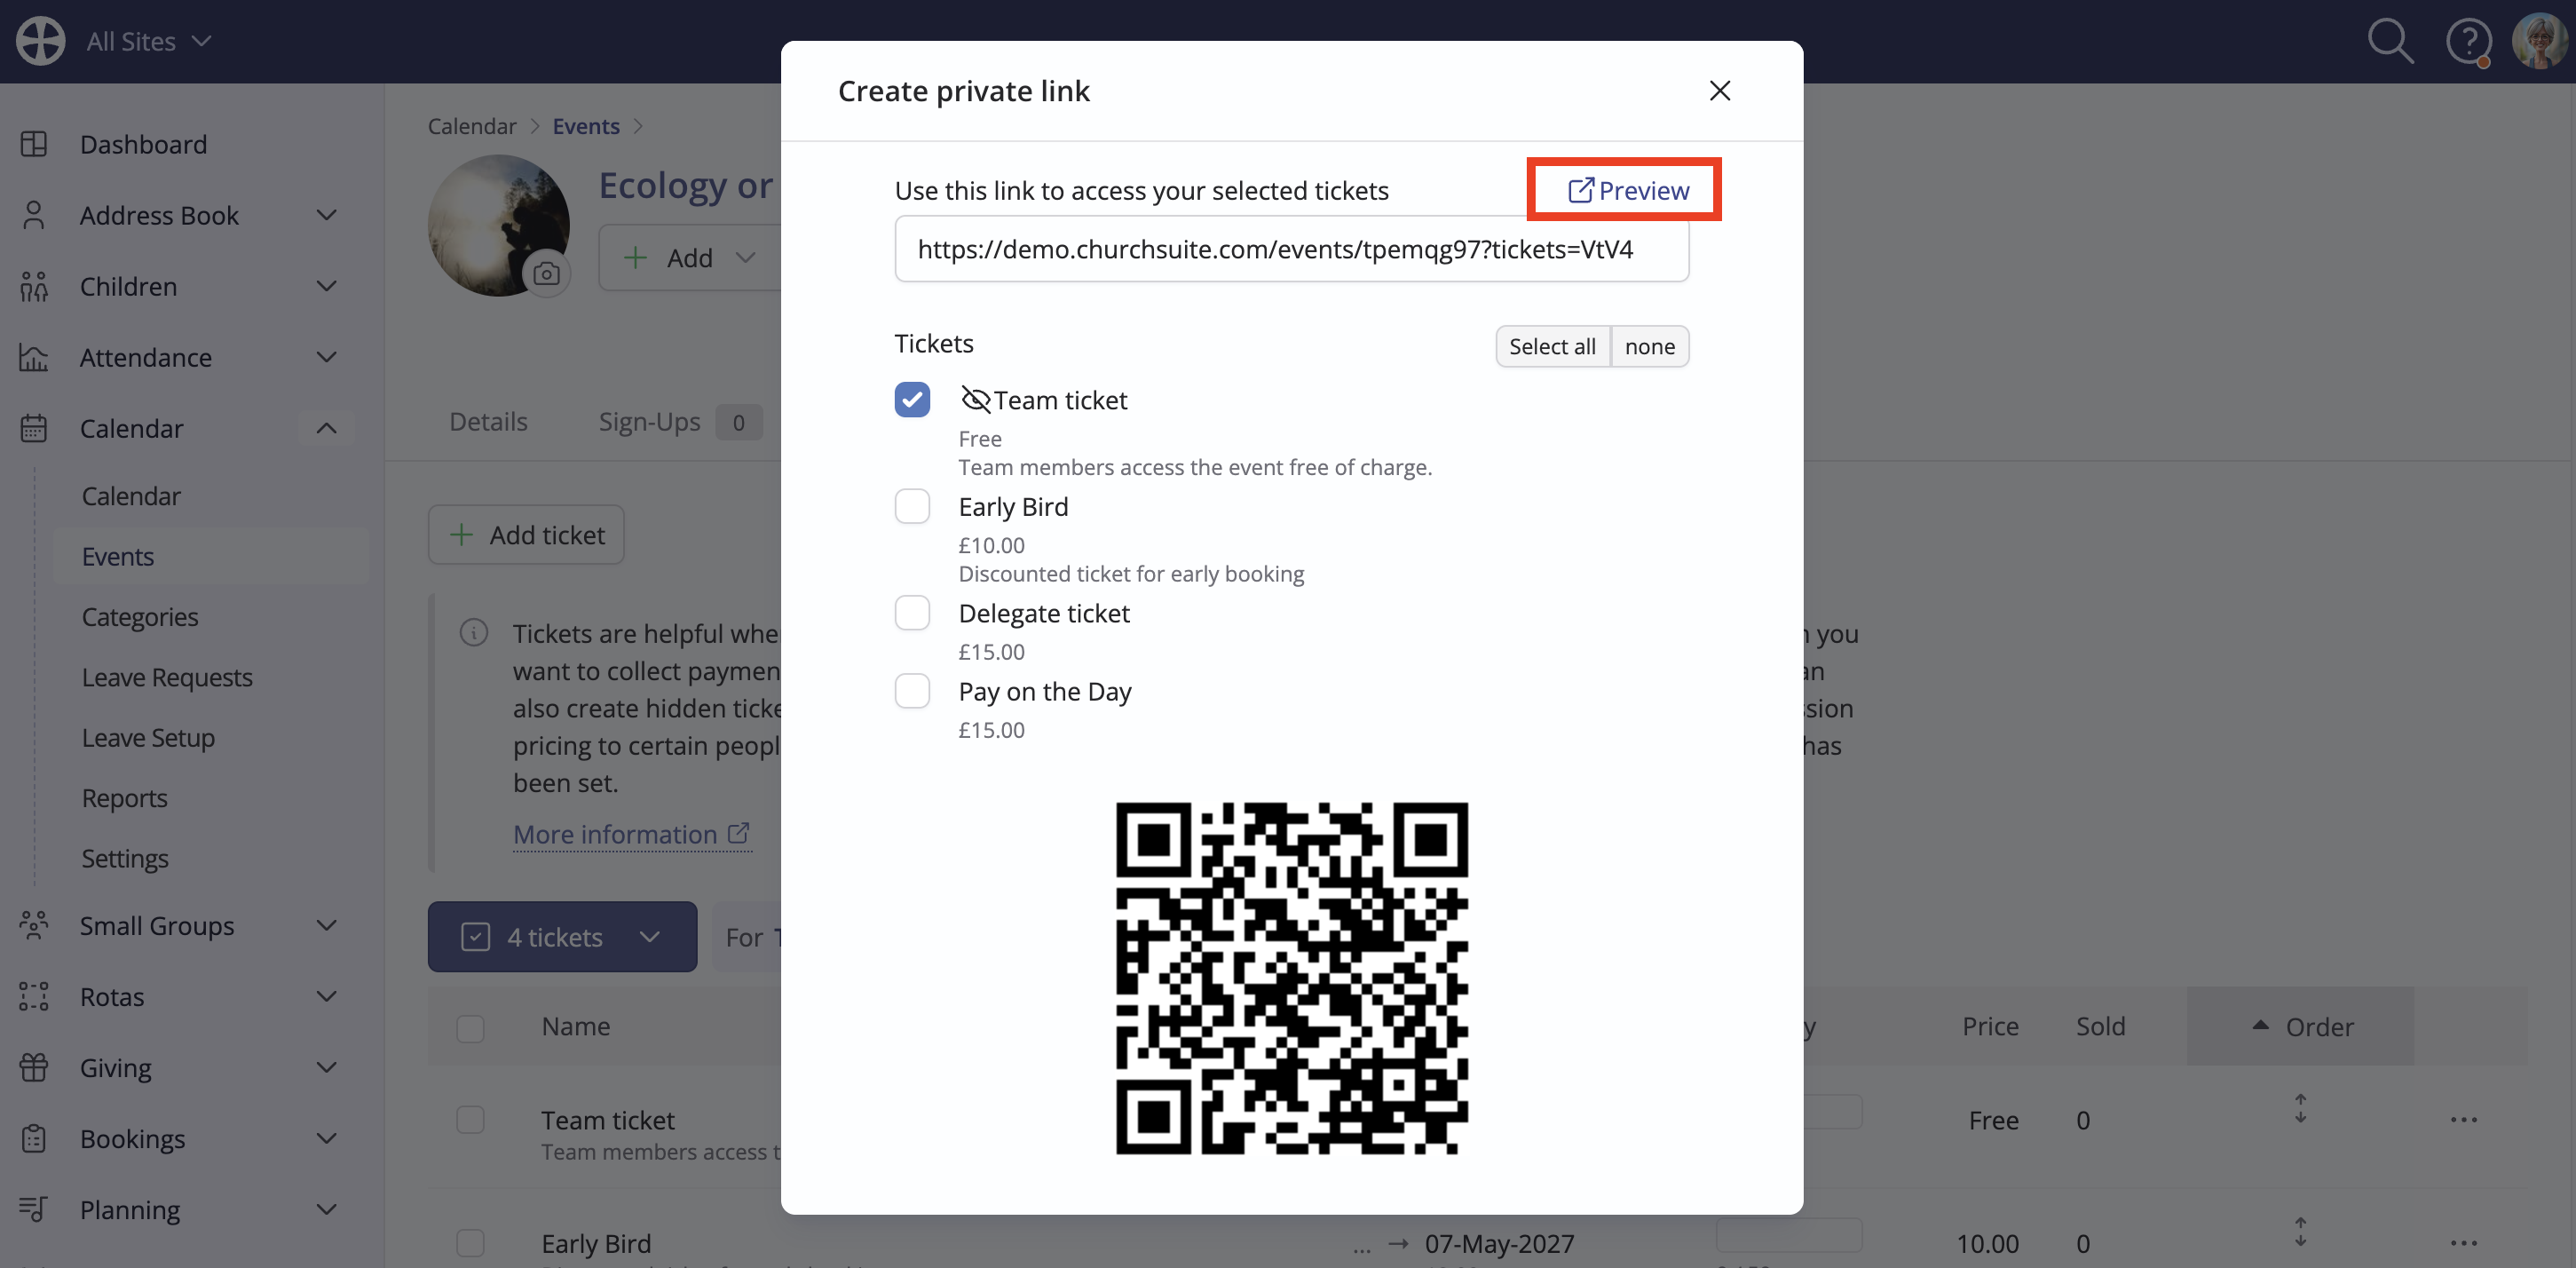
You can then share that private event page URL or the QR code with your intended audience, perhaps in an email.
Editing or deleting tickets
Care should be exercised before making changes to tickets where sign-ups have already been processed. Where Sign up to the sequence is enabled, changes made to tickets for one event date are applied to all dates in the sequence, which may have unexpected consequences on past and future events in the same sequence that have existing sign-ups!
Editing tickets with existing sign-ups
To edit a ticket, select that option from the ticket's action menu:
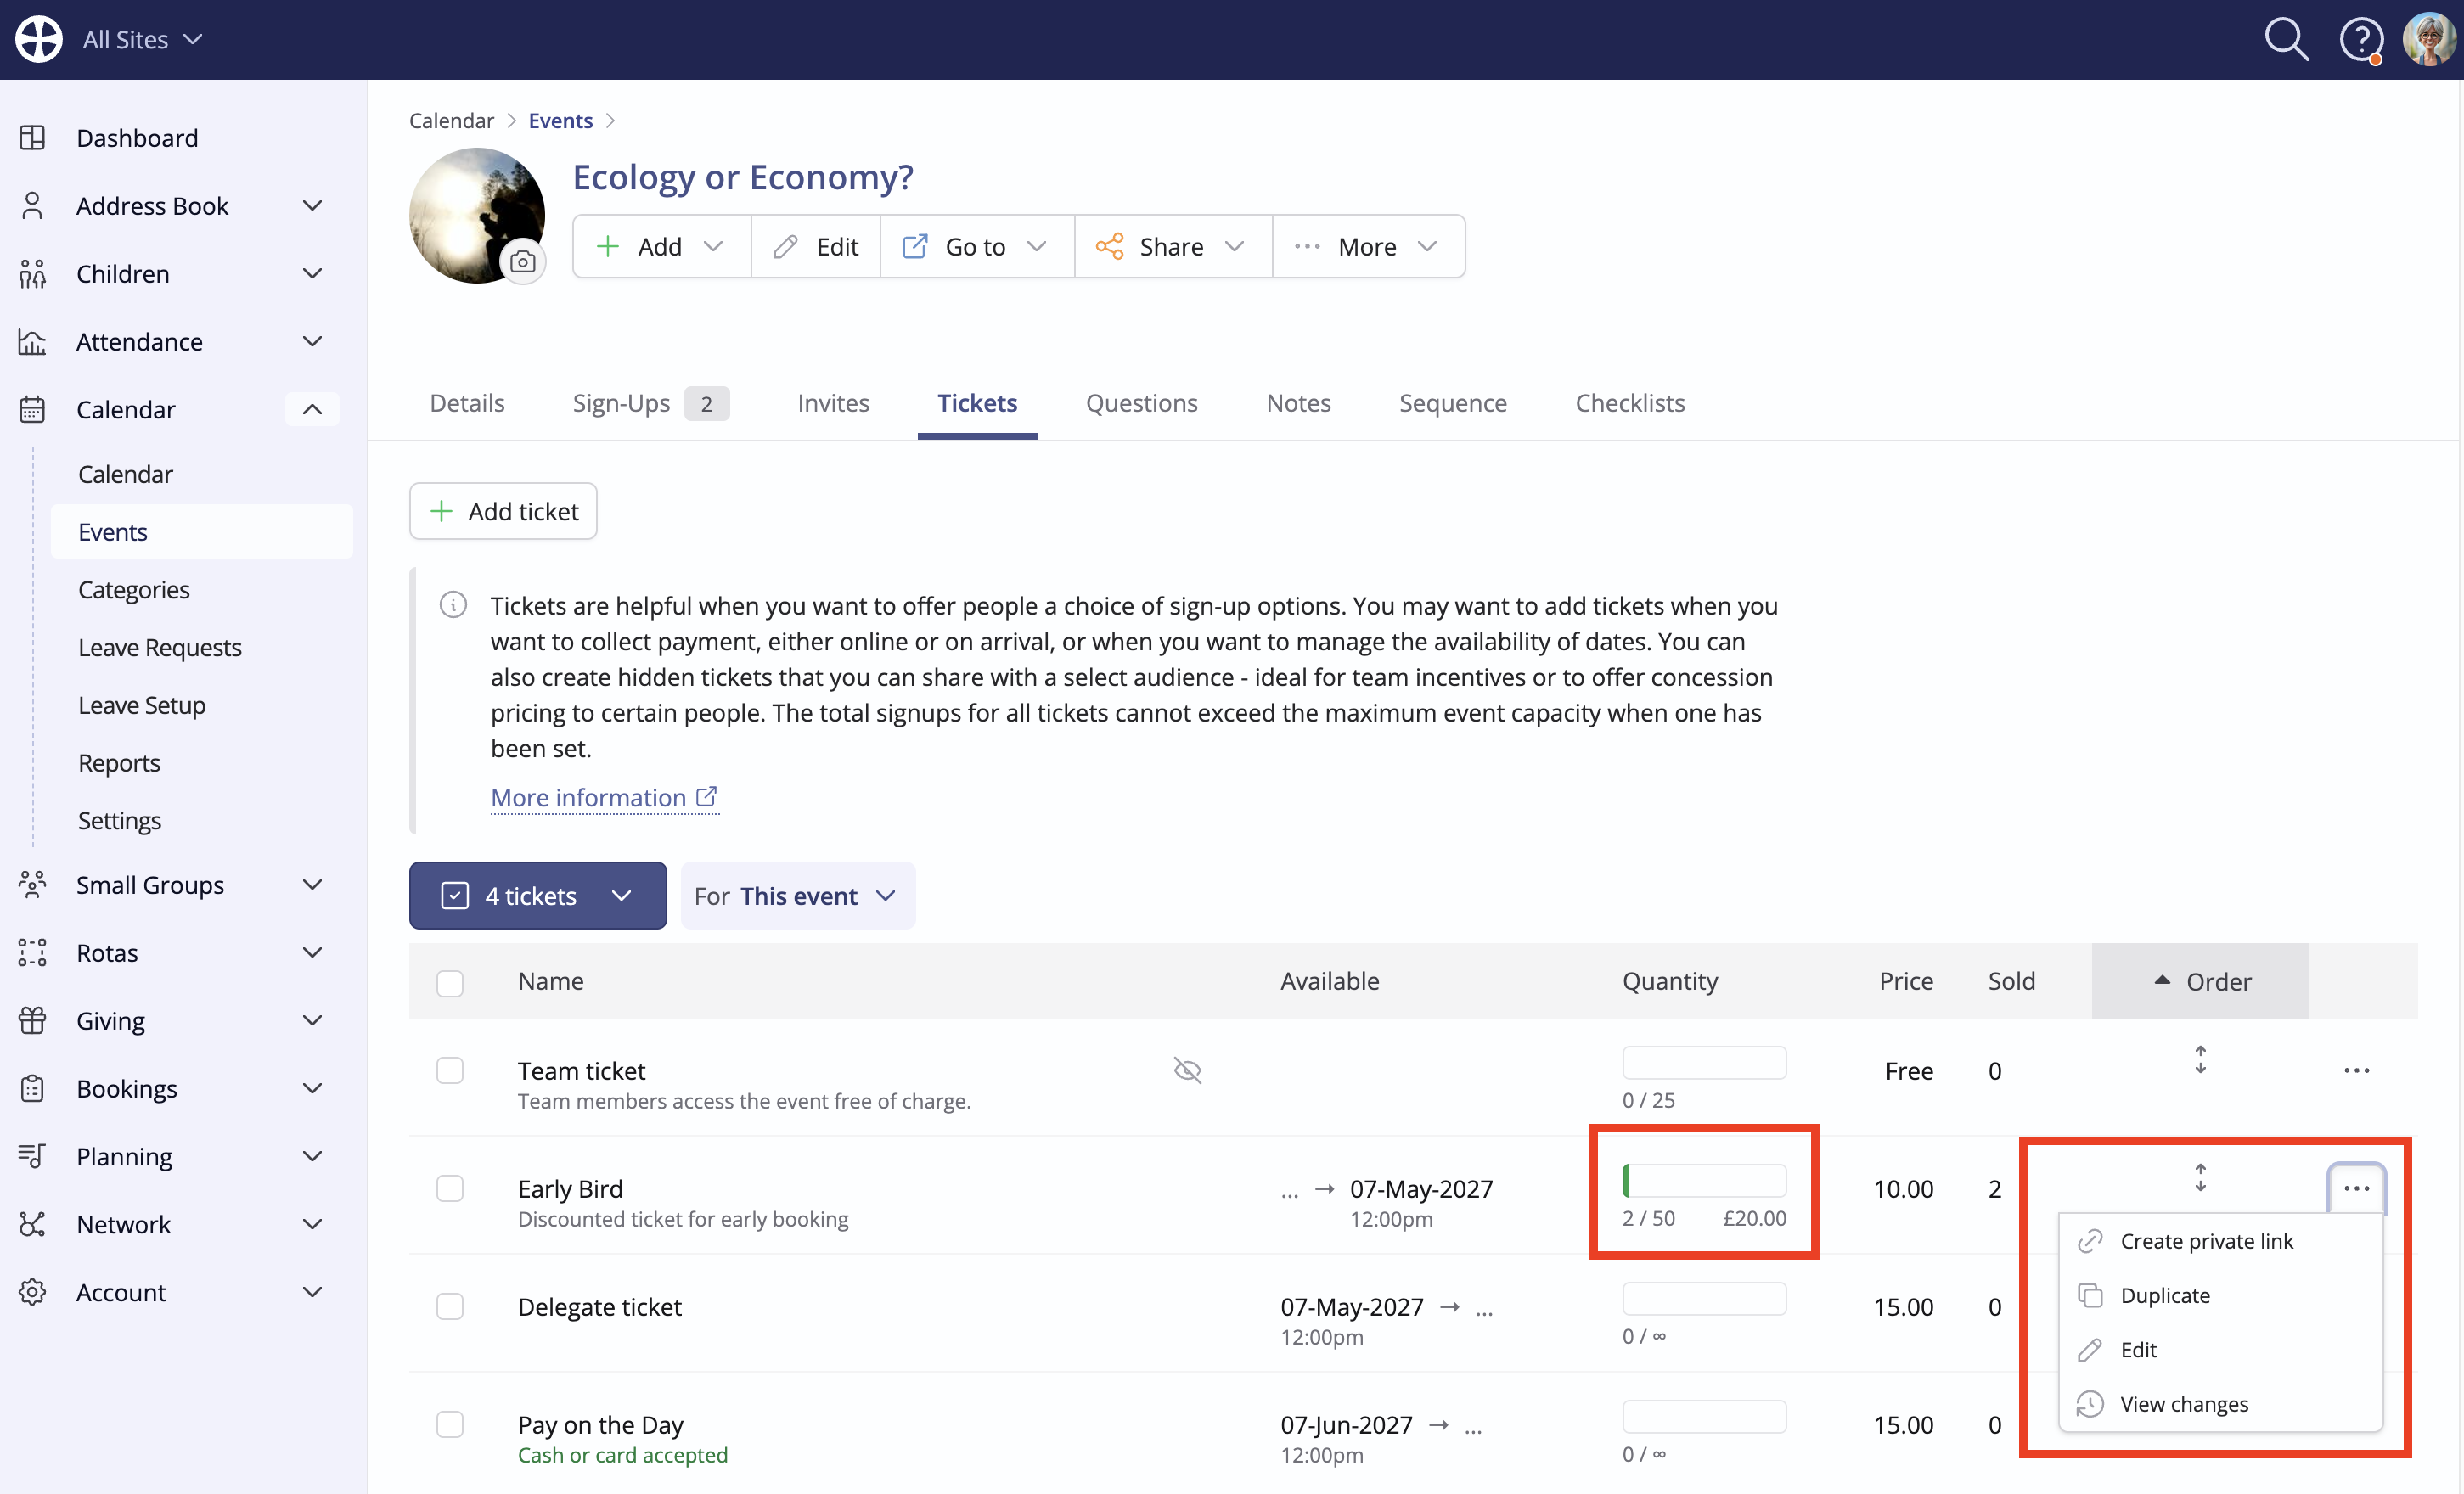
Changes to a ticket Price will immediately affect existing sign-ups - existing sign-ups will show as either overpaid or partially paid, depending on whether the revised ticket price is lower or higher than the amount they paid at sign-up. Existing sign-ups who have not yet paid (e.g. pay on arrival) will continue to show as unpaid.
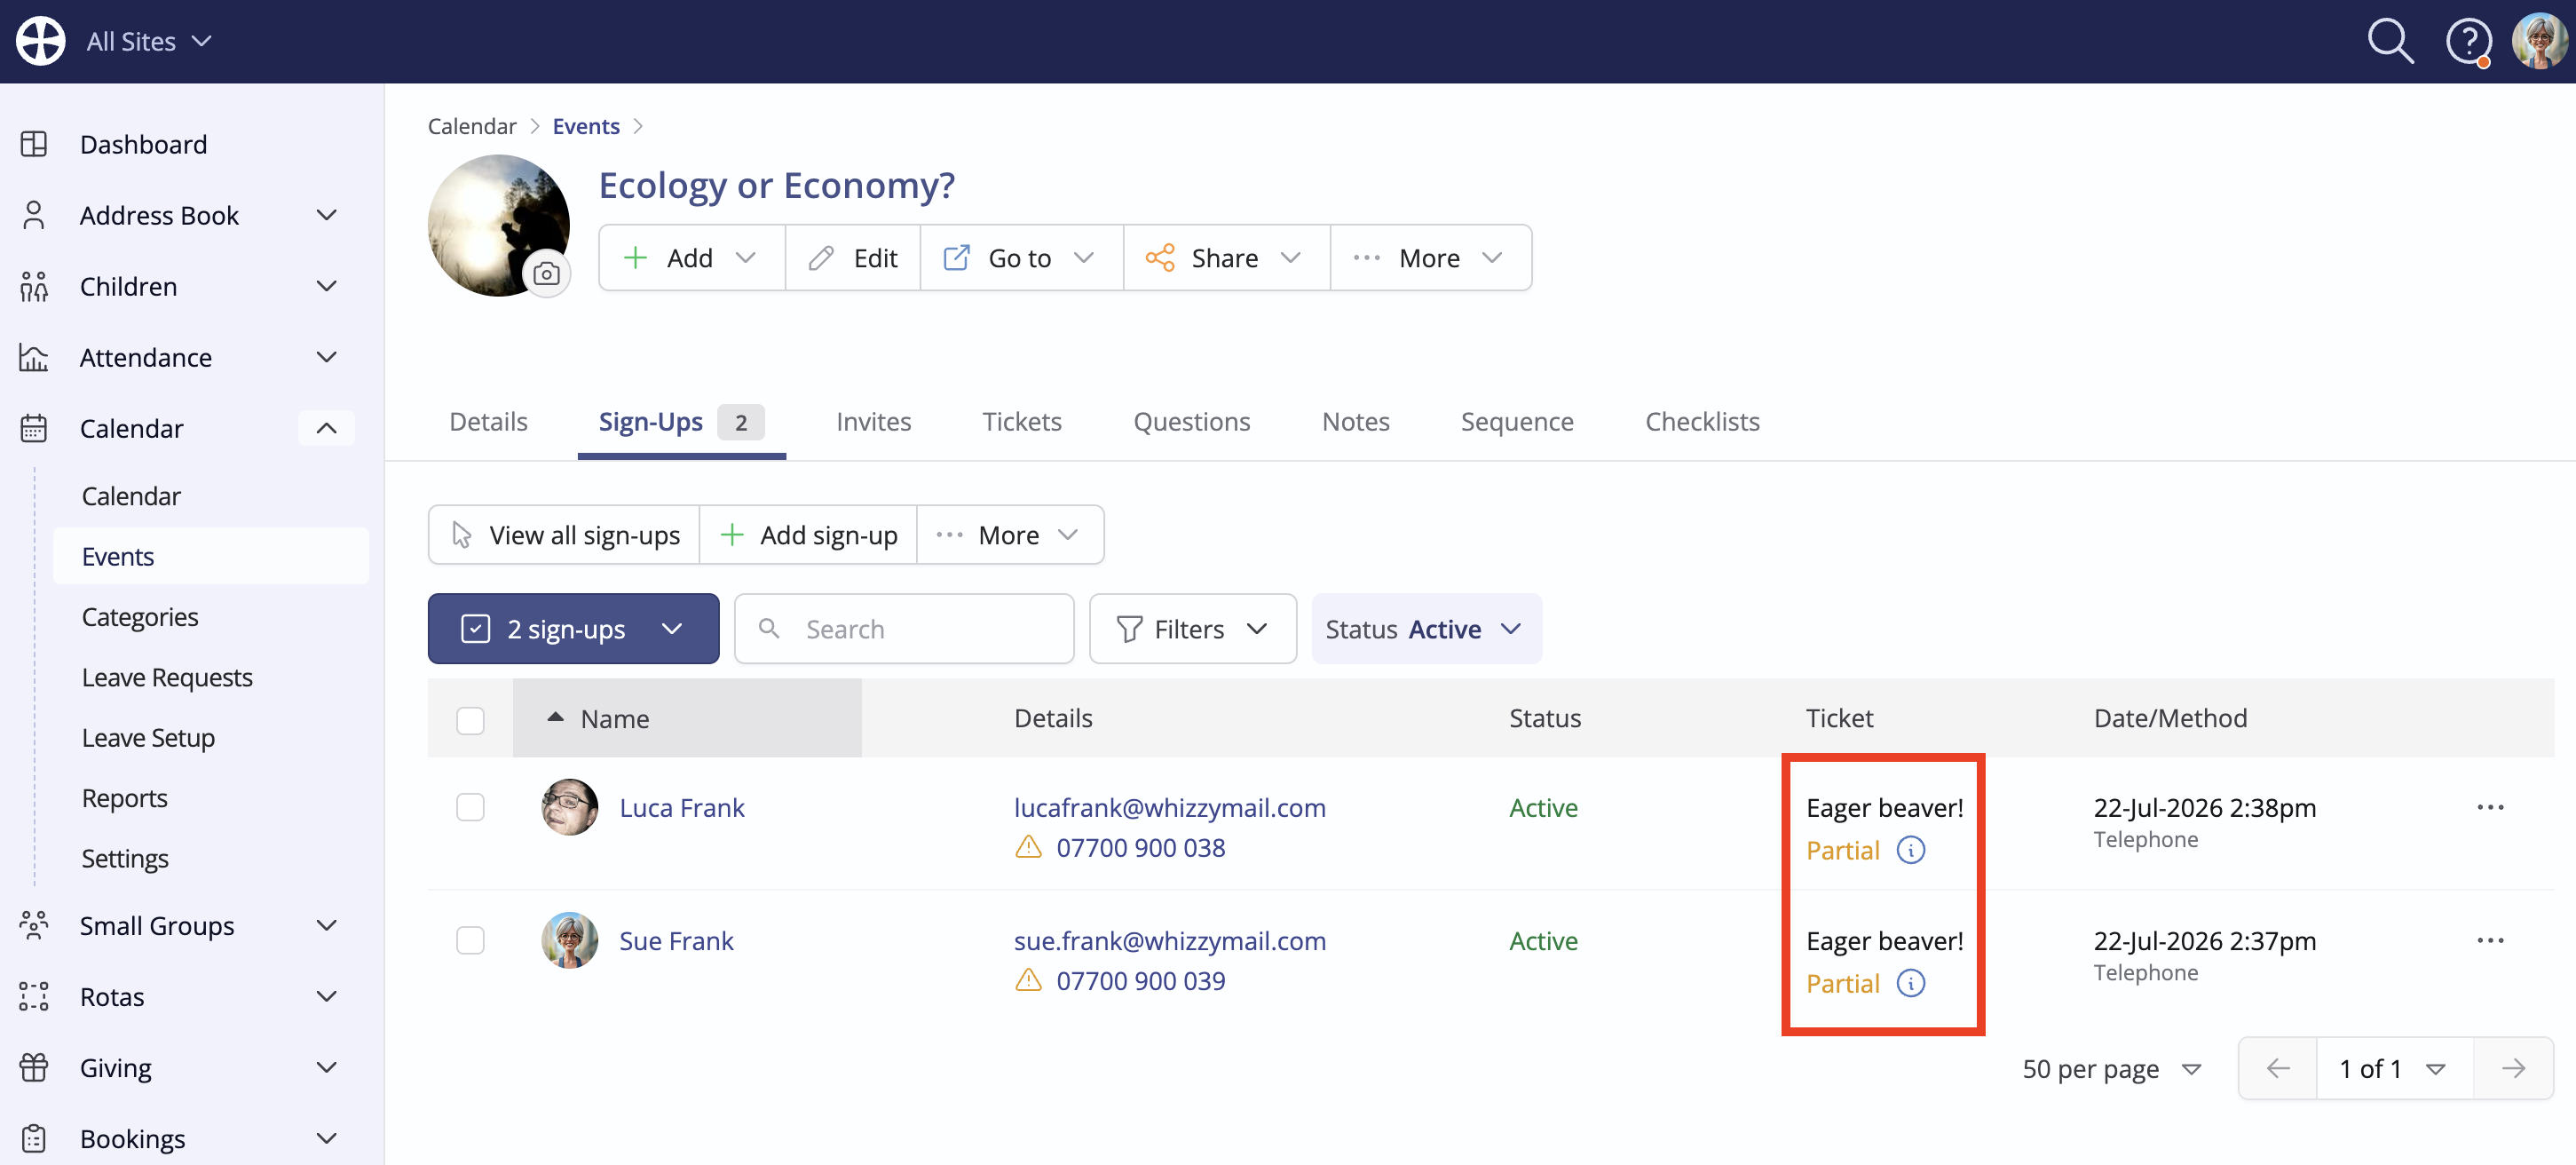
Changes to any other ticket details will have no impact on existing sign-ups.
Deleting tickets with existing sign-ups
The option to Delete a ticket is only available for tickets without any sign-ups. If you wish to delete a ticket that already has sign-ups, you will need to Edit each sign-up for that ticket and select an alternative ticket. Once all sign-ups have been reassigned, the Delete action will be available.