Rota accept/decline
Enabling rota members to accept or decline the rota dates they've been assigned can help them stay on top of their serving commitments while also giving those managing rotas greater clarity about the serving status of those scheduled to serve. Let's see how...
In this article
Overview of the intended functionality
Enabling the rota accept/decline functionality
Sending rotas in ChurchSuite (Users)
Sending rotas in My ChurchSuite (Overseers)
The rota member user experience
Overview of the intended functionality
The Rota Accept/Decline functionality is first enabled in the Rotas module's settings and then optionally on a rota-by-rota basis.
Once enabled for a rota, rota members can accept or decline rota dates they've been assigned to. Rotas module users (in ChurchSuite) and ministry overseers (in My ChurchSuite) always see the current serving status of each rota member for each rota date, visually distinguished on rota views by simple icons. The serving status changes from pending to sent when a rota is sent and then to accepted or declined as rota members respond.
While rota members typically accept or decline their rota dates, module Users and ministry overseers can also process responses on behalf of a rota member. Comprehensive change logs help you keep track of all rota changes, including changes to the serving status for each person and rota date.
When sending a rota with Rota Accept/Decline enabled, the system keeps track of which rota members and dates are sent - distinguishing unsent and sent members/dates - ensuring you won't unintentionally resend a rota to people for rota dates previously sent or resend to those who may have already accepted or declined or who are unavailable. For example, having sent a rota to all members when it was first published, if you later add people to rota dates, you can easily send the rota to just those people for their previously unsent rota dates. Rota members without an email address persist with an unsent serving status.
Rota members can process accept/decline responses in two places - through their personal Rota Page (a Rota Page link is included whenever you send a rota) - and in the My Rotas section of My ChurchSuite, where they can also respond on behalf of a linked spouse/partner/child. Those declining a rota date can add an optional comment. Importantly, previously accepted dates can be declined without constraint (and vice versa). Accept/decline responses will update the rota immediately. Decline responses made by a rota member trigger a timely decline notification to ministry overseers.
When rota members organise swaps or sign up for a 'signup-enabled' rota in My ChurchSuite, they are added to rota dates with an accepted status. When users or overseers add people to a rota or swap people on rota dates, they are added to rota dates with a pending unsent status - rotas can then be sent to those people.
While unavailability creates a clash for all rotas for a date, a decline only creates a clash for an individual rota for a date. Both clash types are distinguished on rota views in red strikethrough font with a hover-over pop-up that further explains the clash and any comment that may have been added. When unavailability is added, any previous accept/decline response is hidden, and the accept/decline actions are no longer available. If the unavailability is later removed, the original serving status is resurfaced, and the accept/decline actions are available again.
Enabling the rota accept/decline functionality
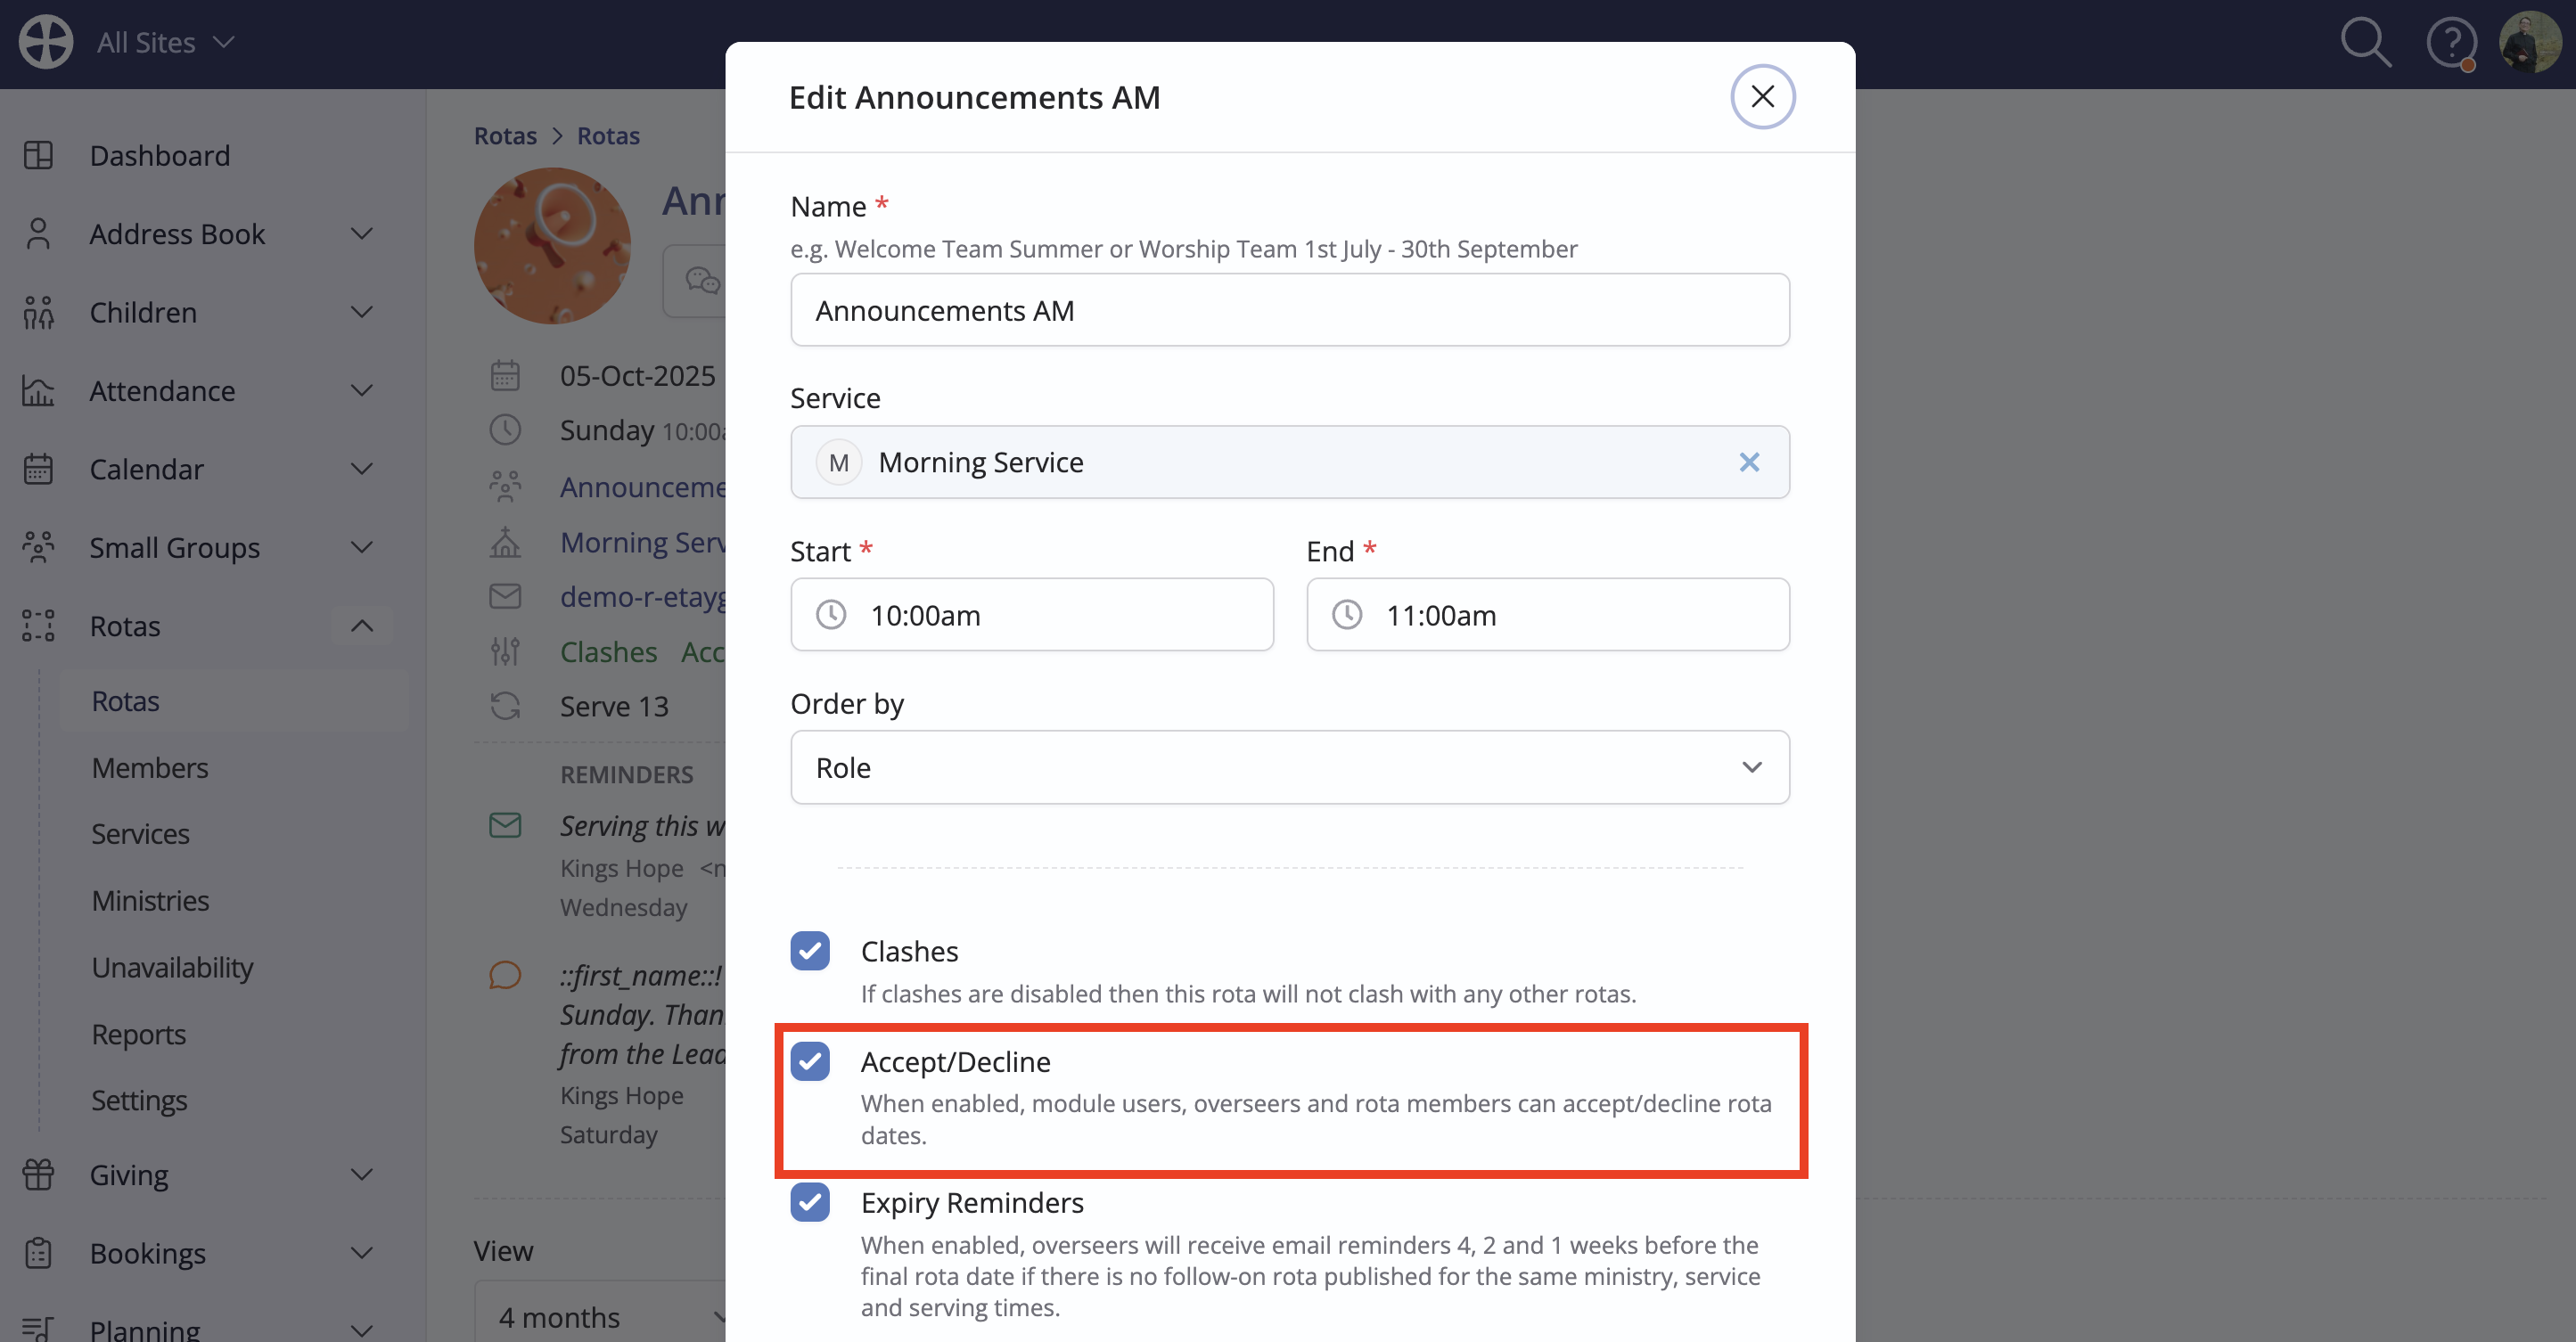
Rota Accept/Decline is first enabled in the Rotas module's settings, which in turn enables the functionality for existing and new rotas.
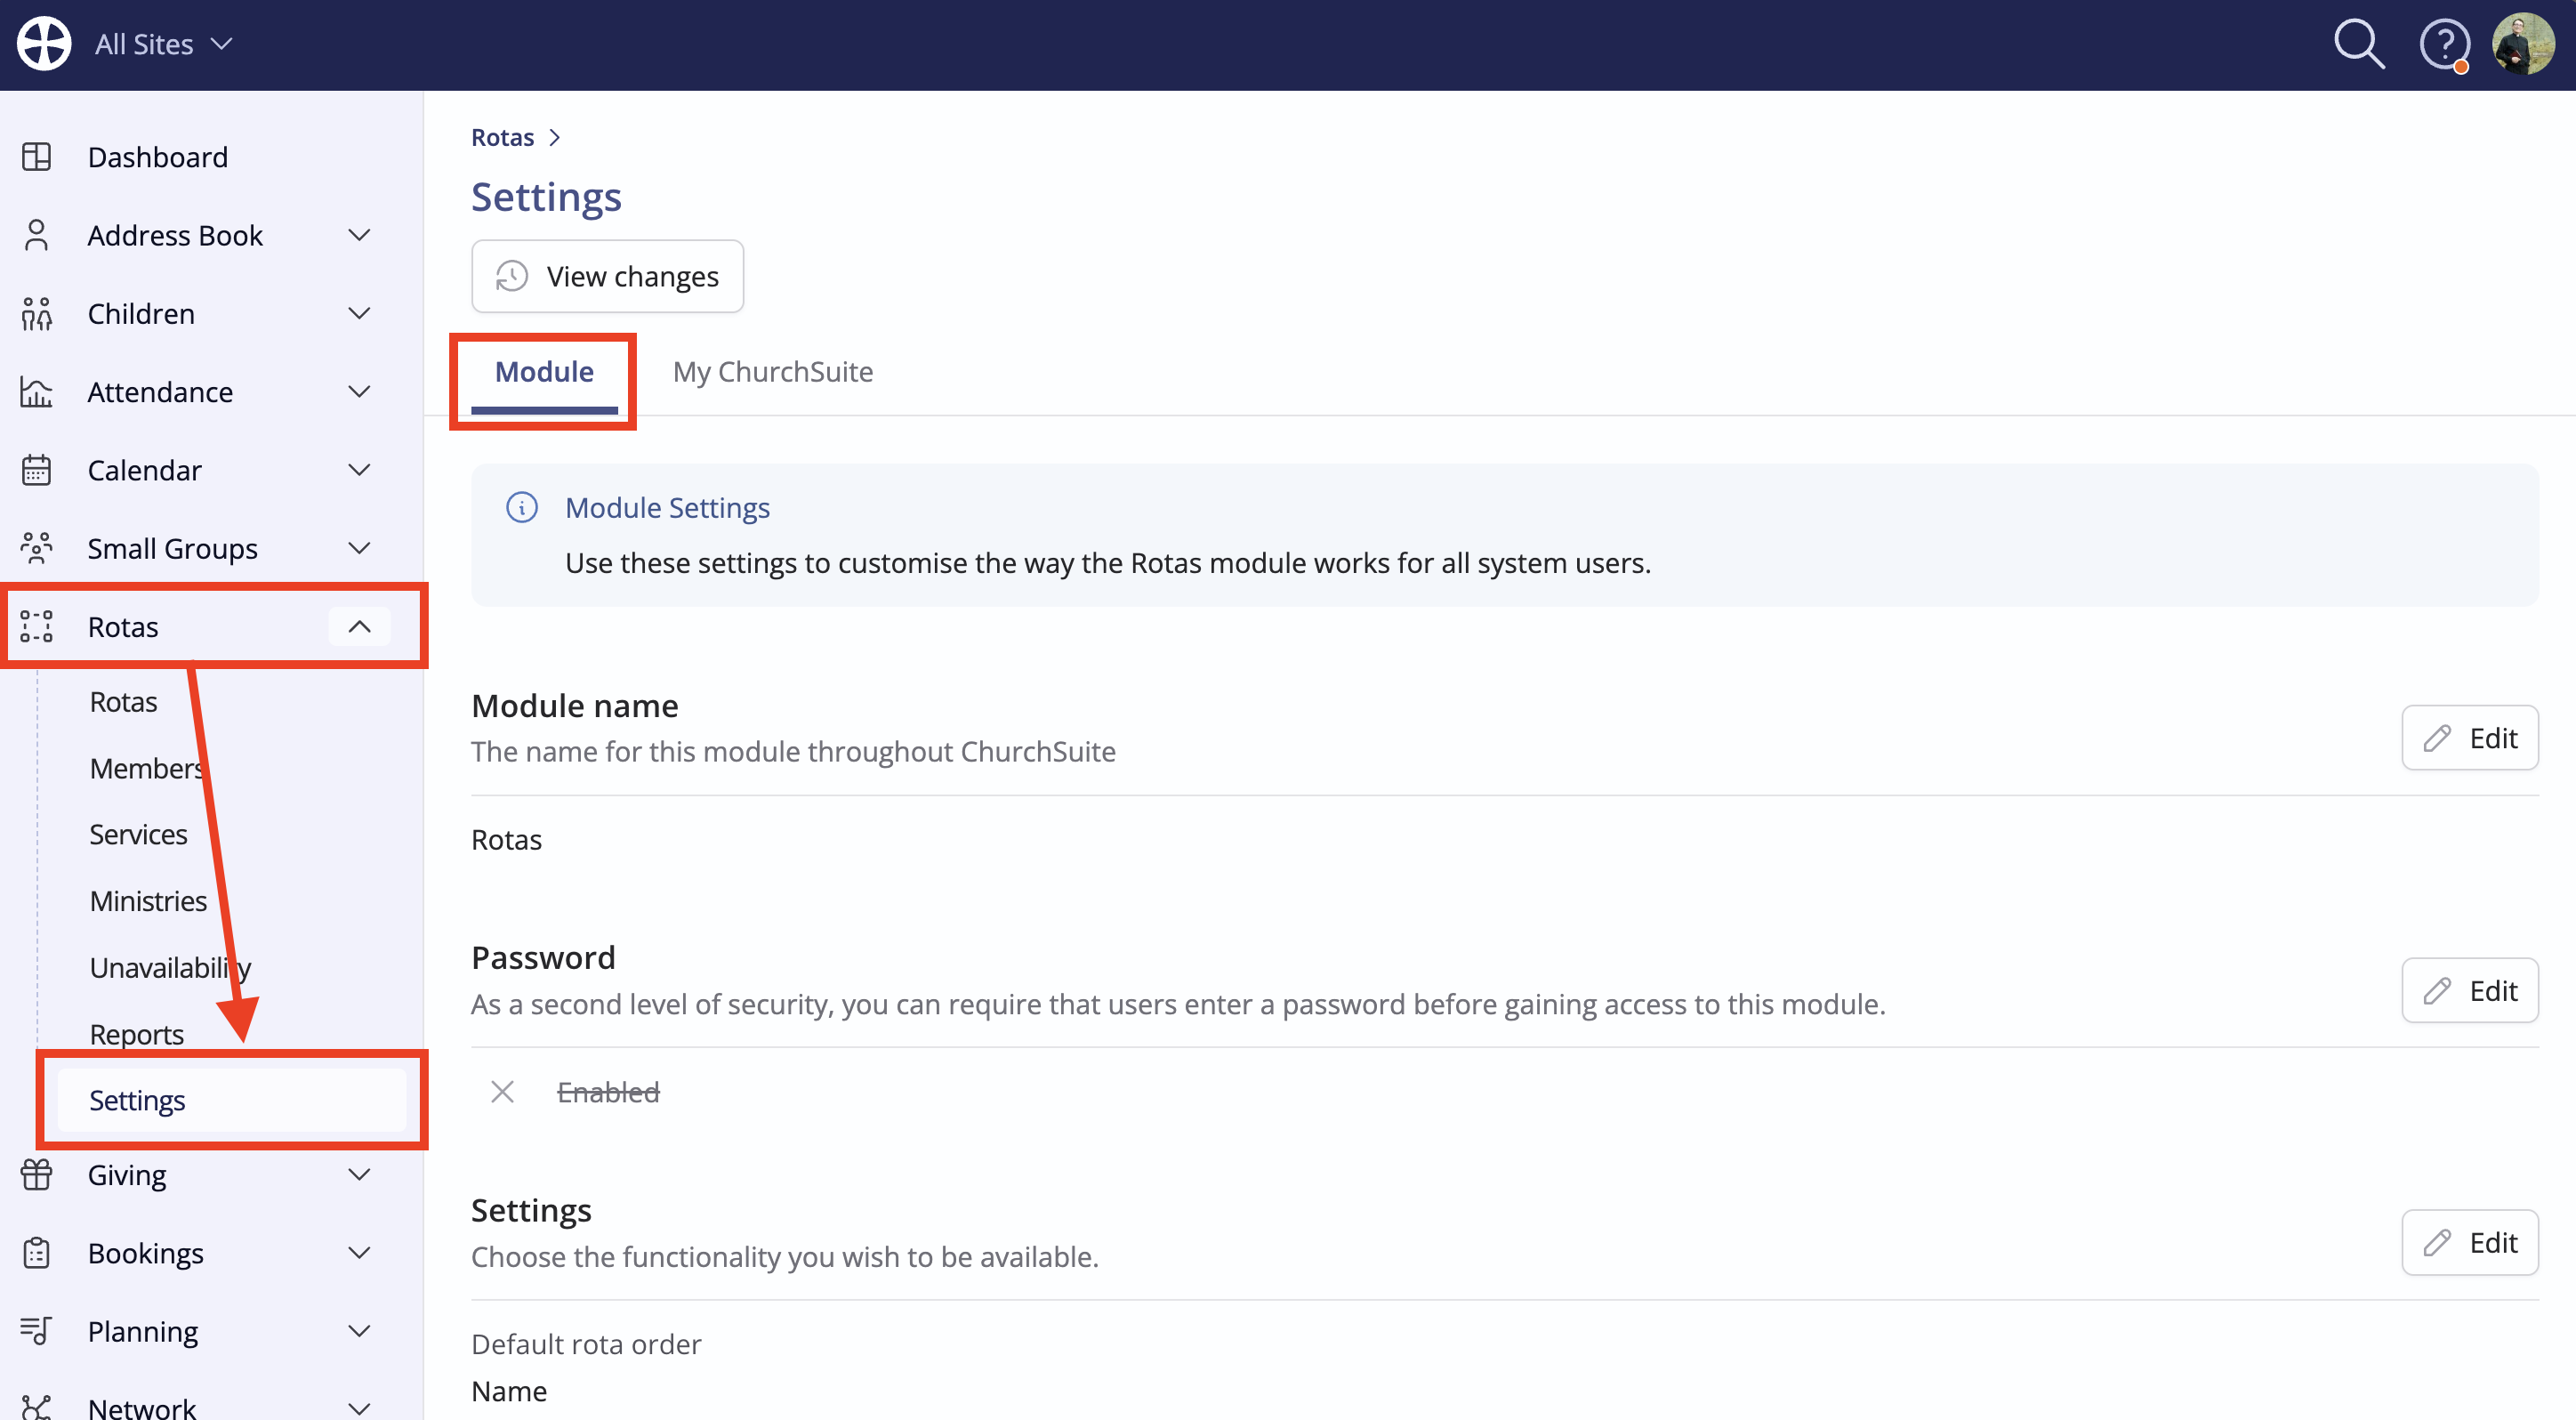
Scroll down the Module Options tab and enable Accept/Decline - click Edit to make changes.

Now, when adding rotas in ChurchSuite or My ChurchSuite, Rota Accept/Decline is enabled by default but can be optionally disabled on a rota-by-rota basis.
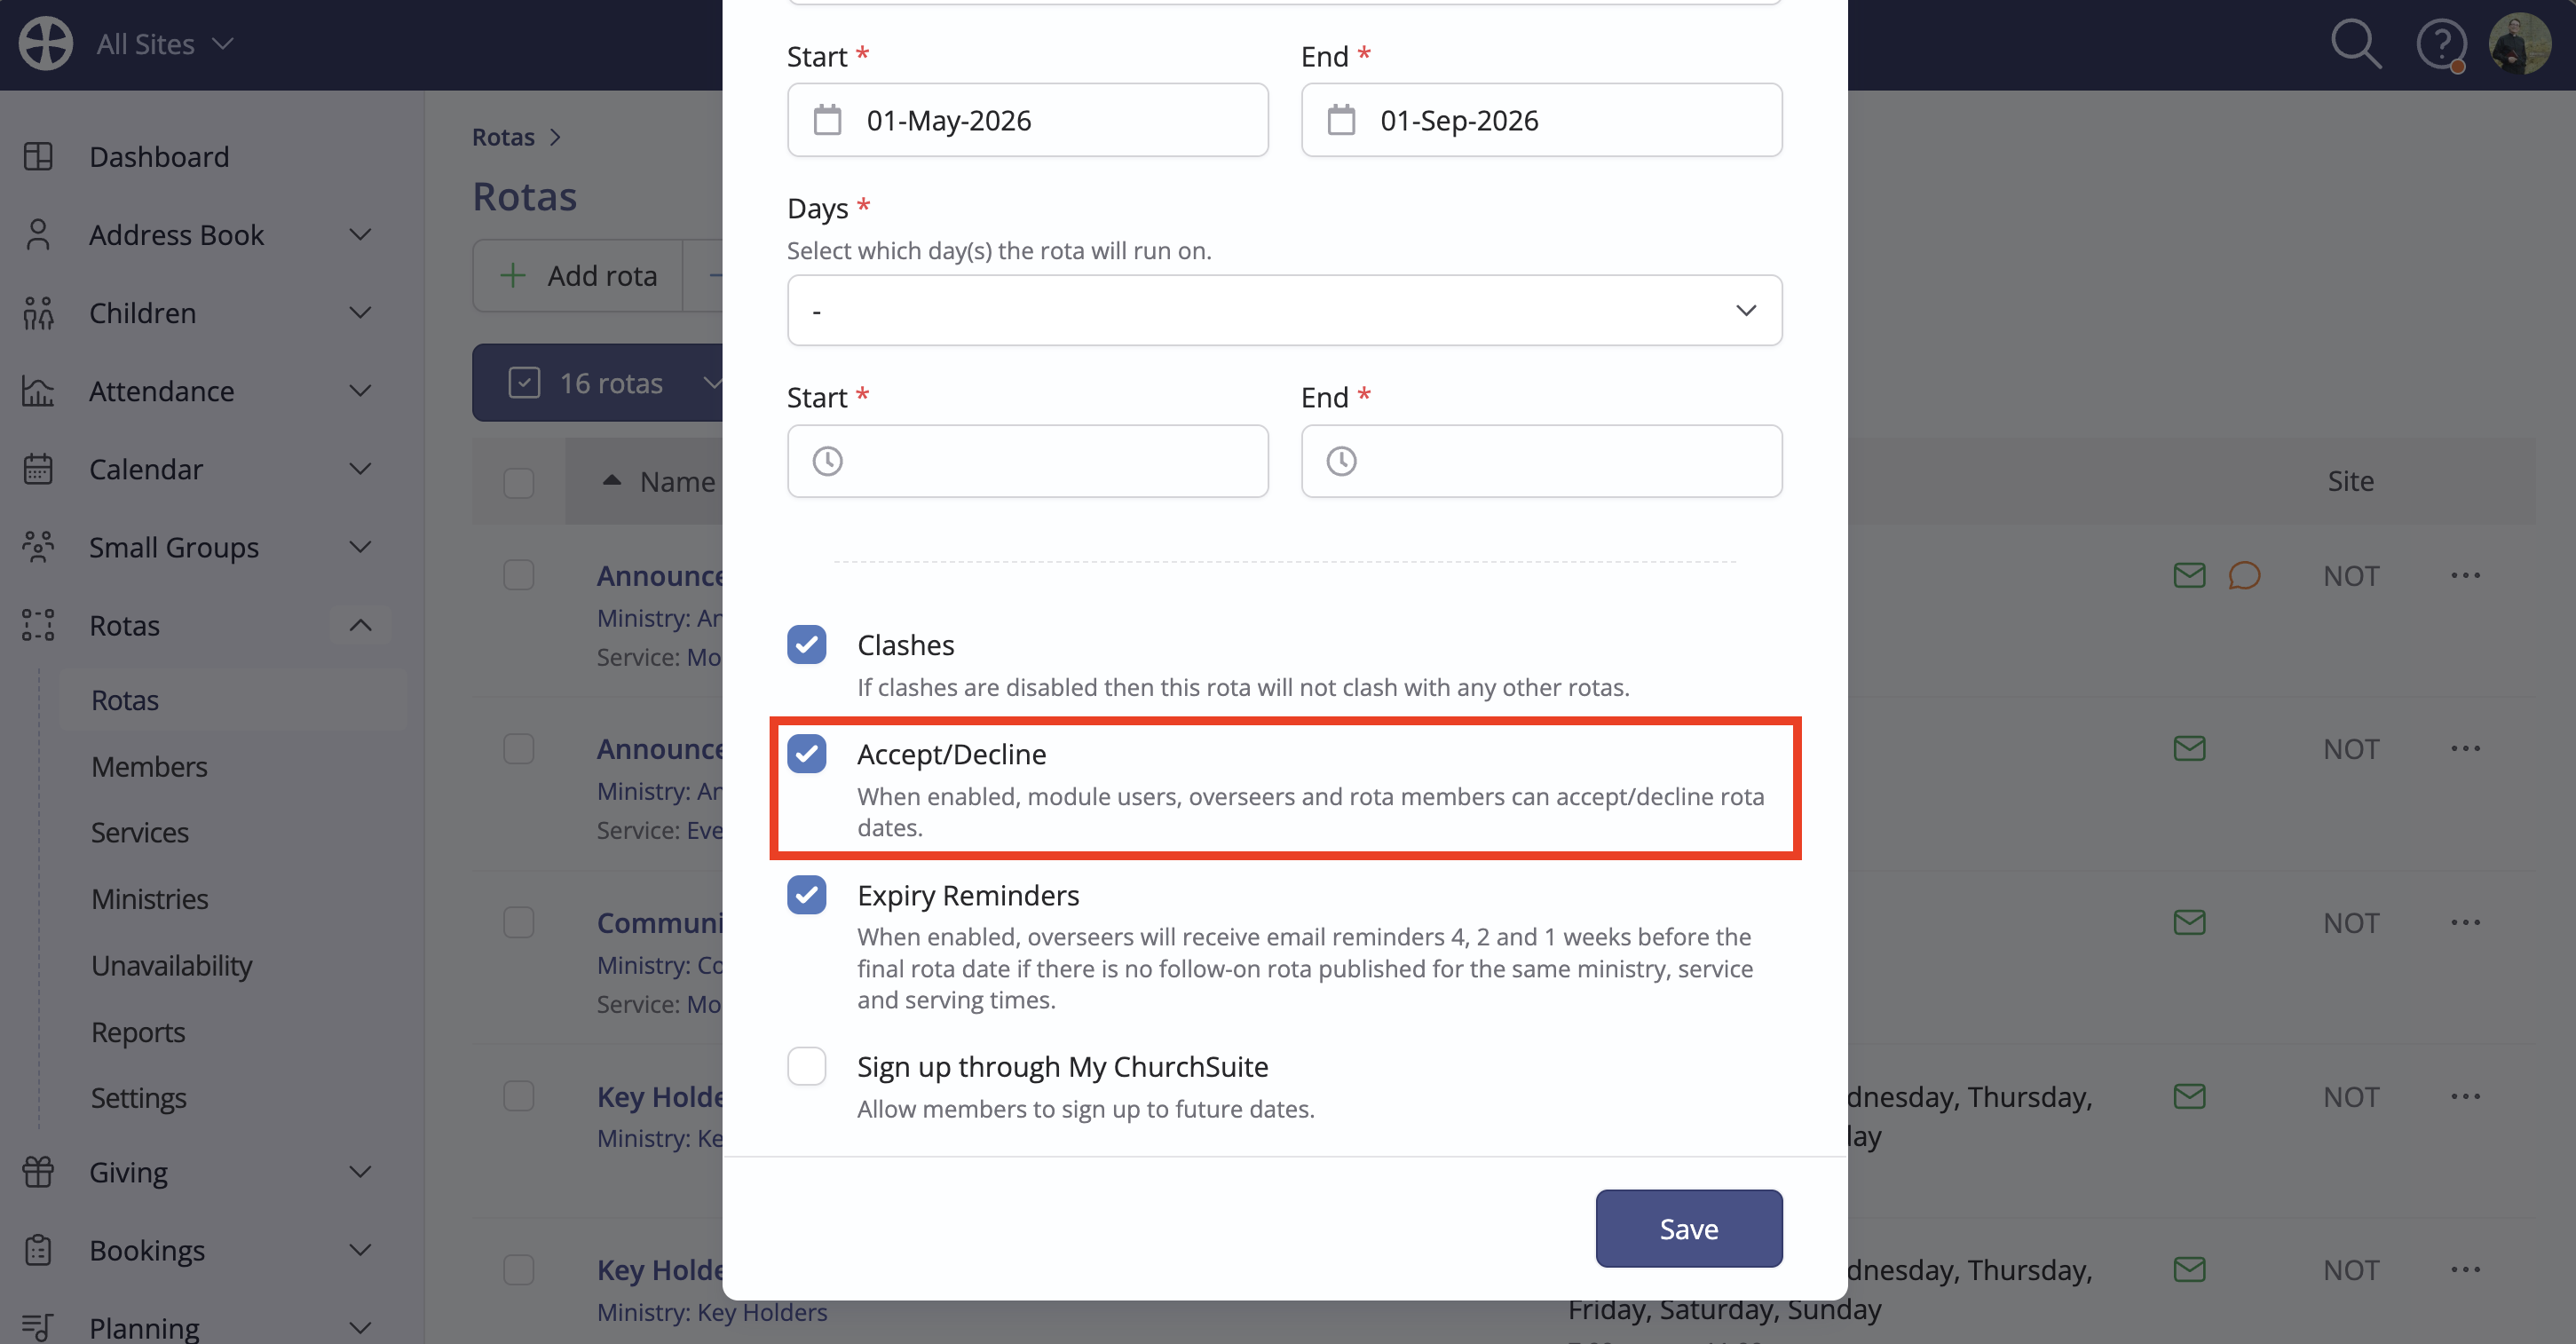
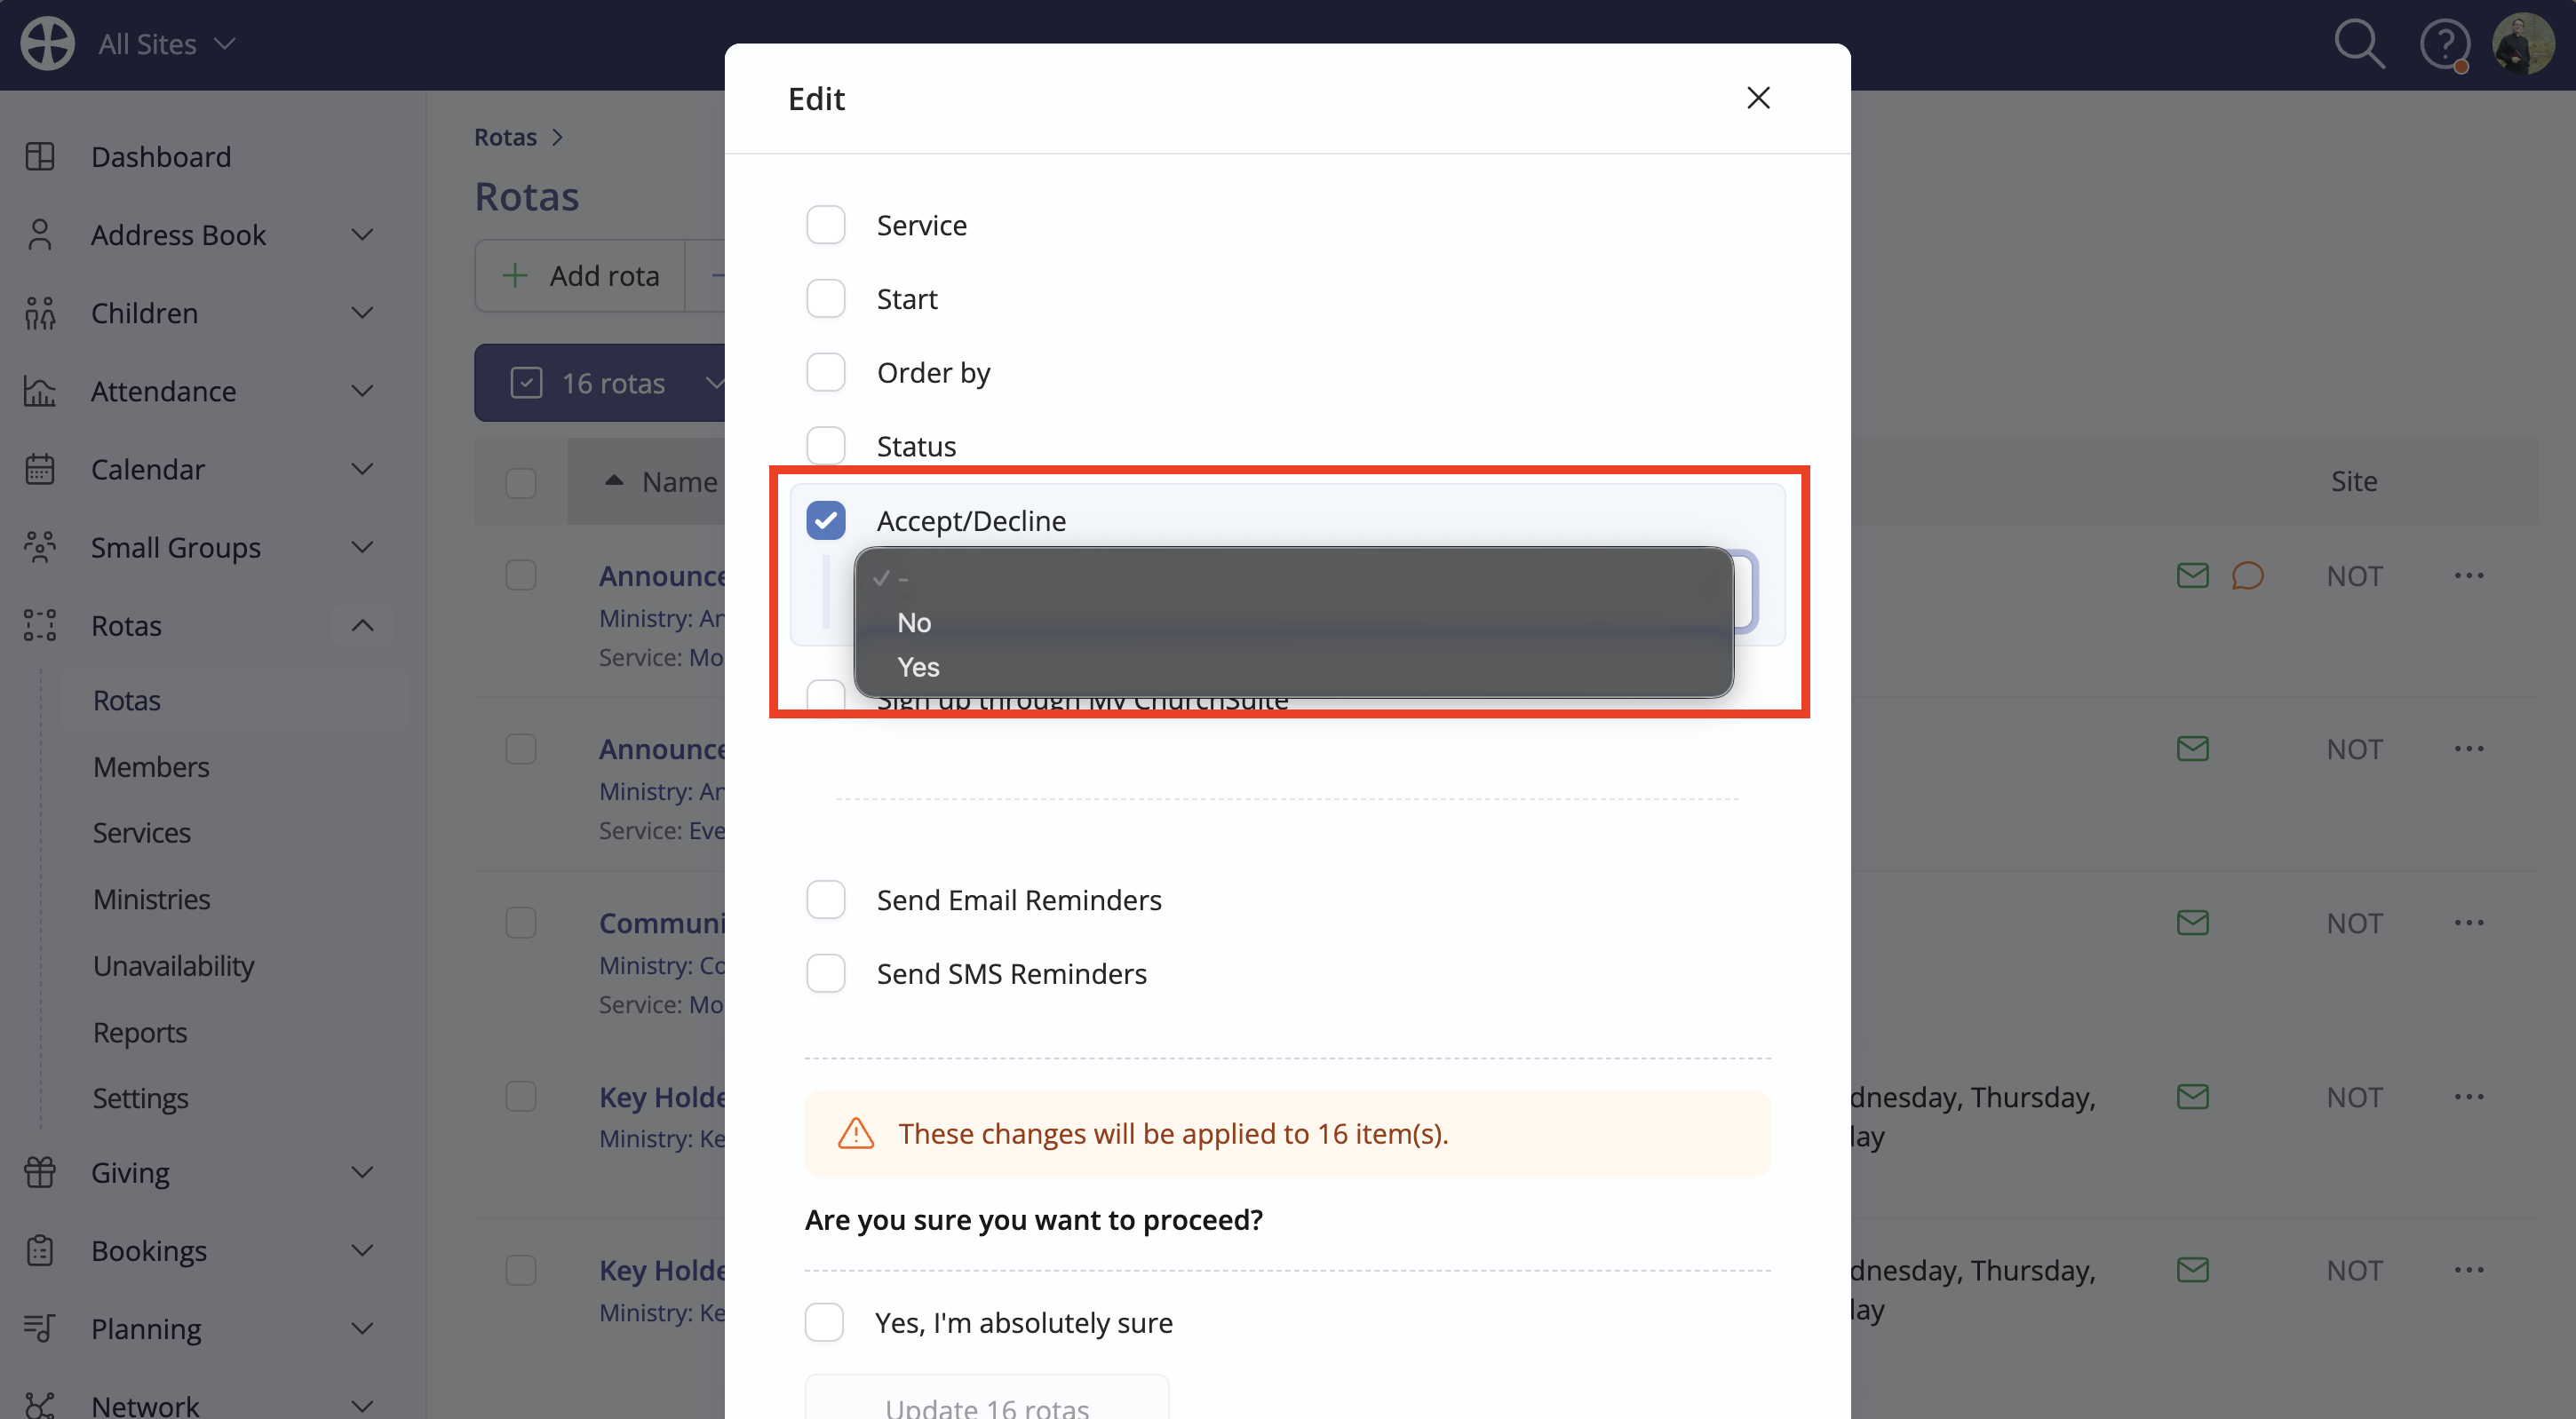
Rota Accept/Decline can also be enabled for existing rotas at any time - either using the Edit Bulk Action in the Rotas section...
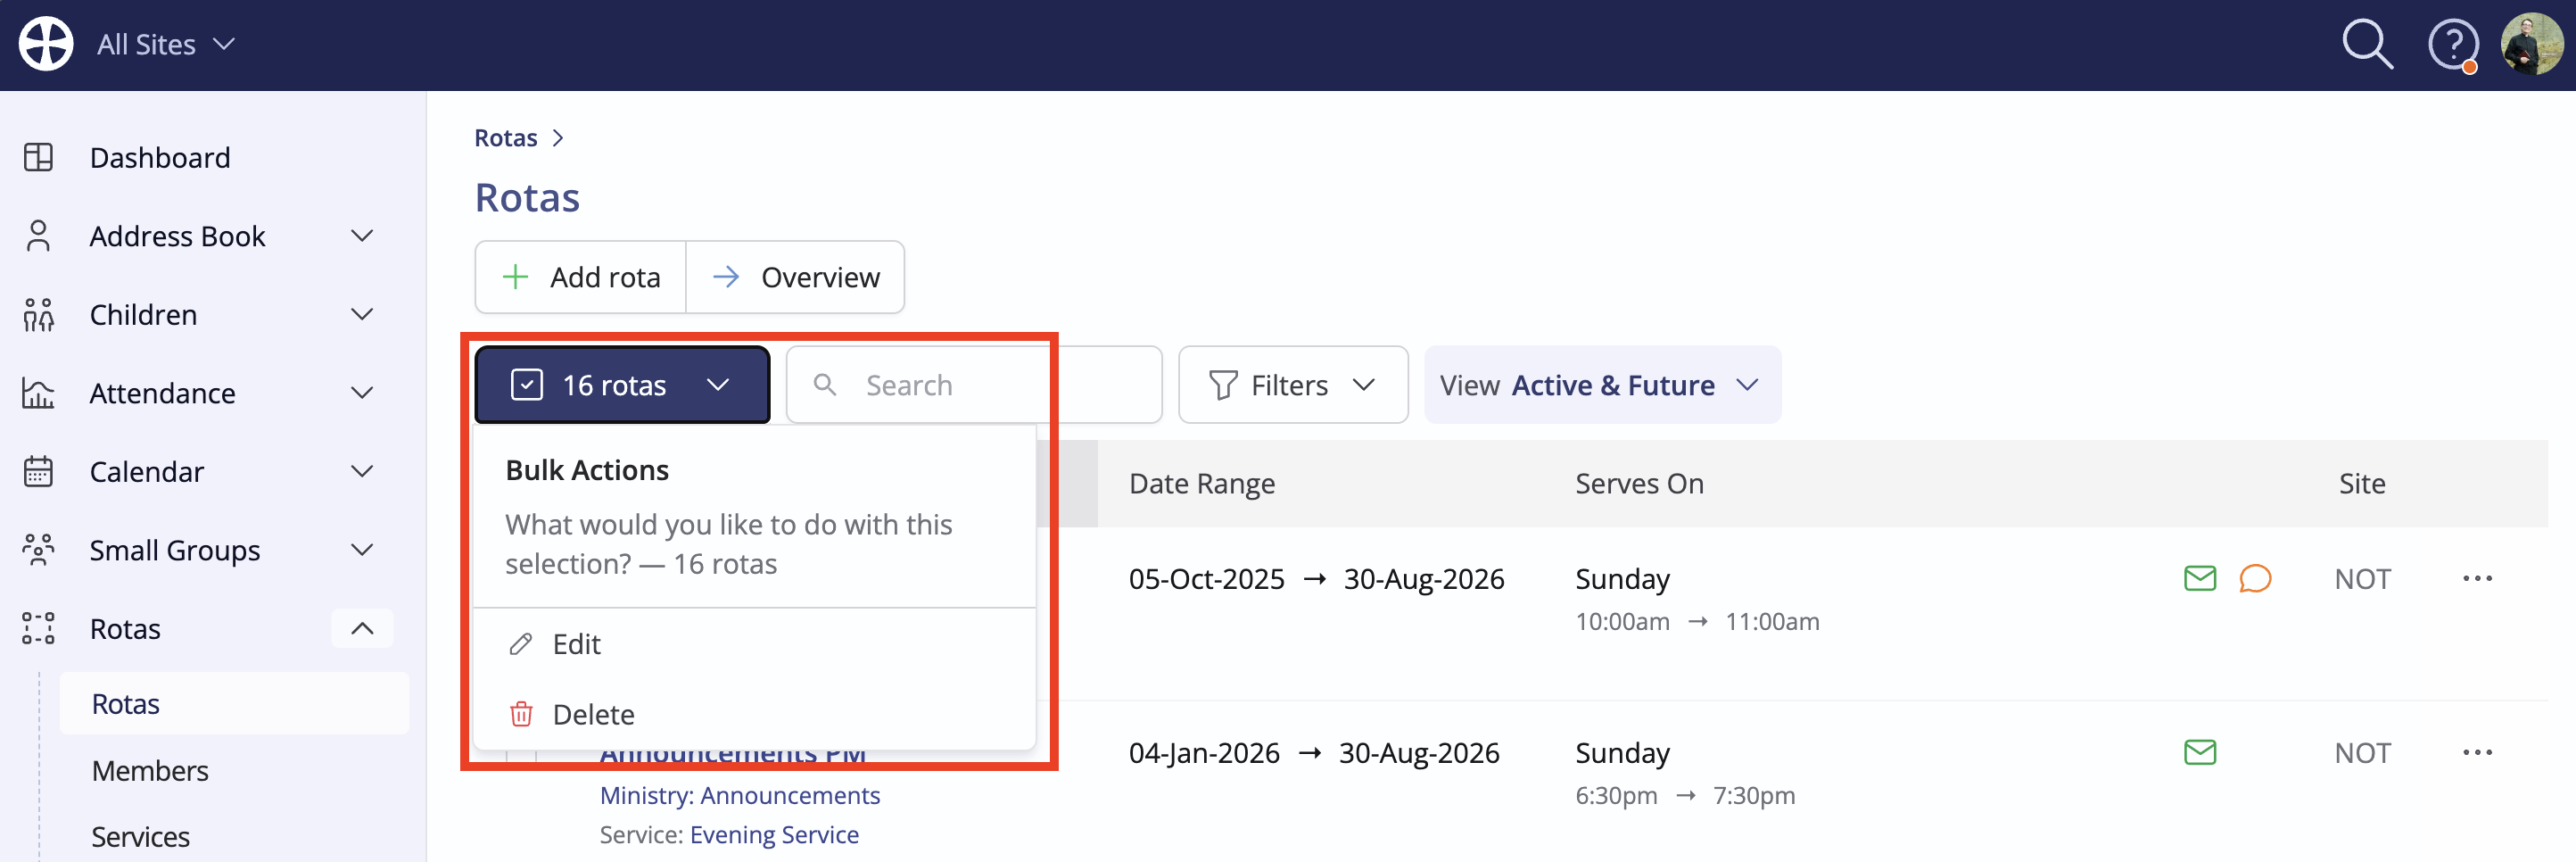
to make changes to multiple selected rotas...
...or on an individual rota-by-rota basis, in the rota settings in ChurchSuite or My ChurchSuite - when viewing a rota, click Edit to make changes to the rota settings.
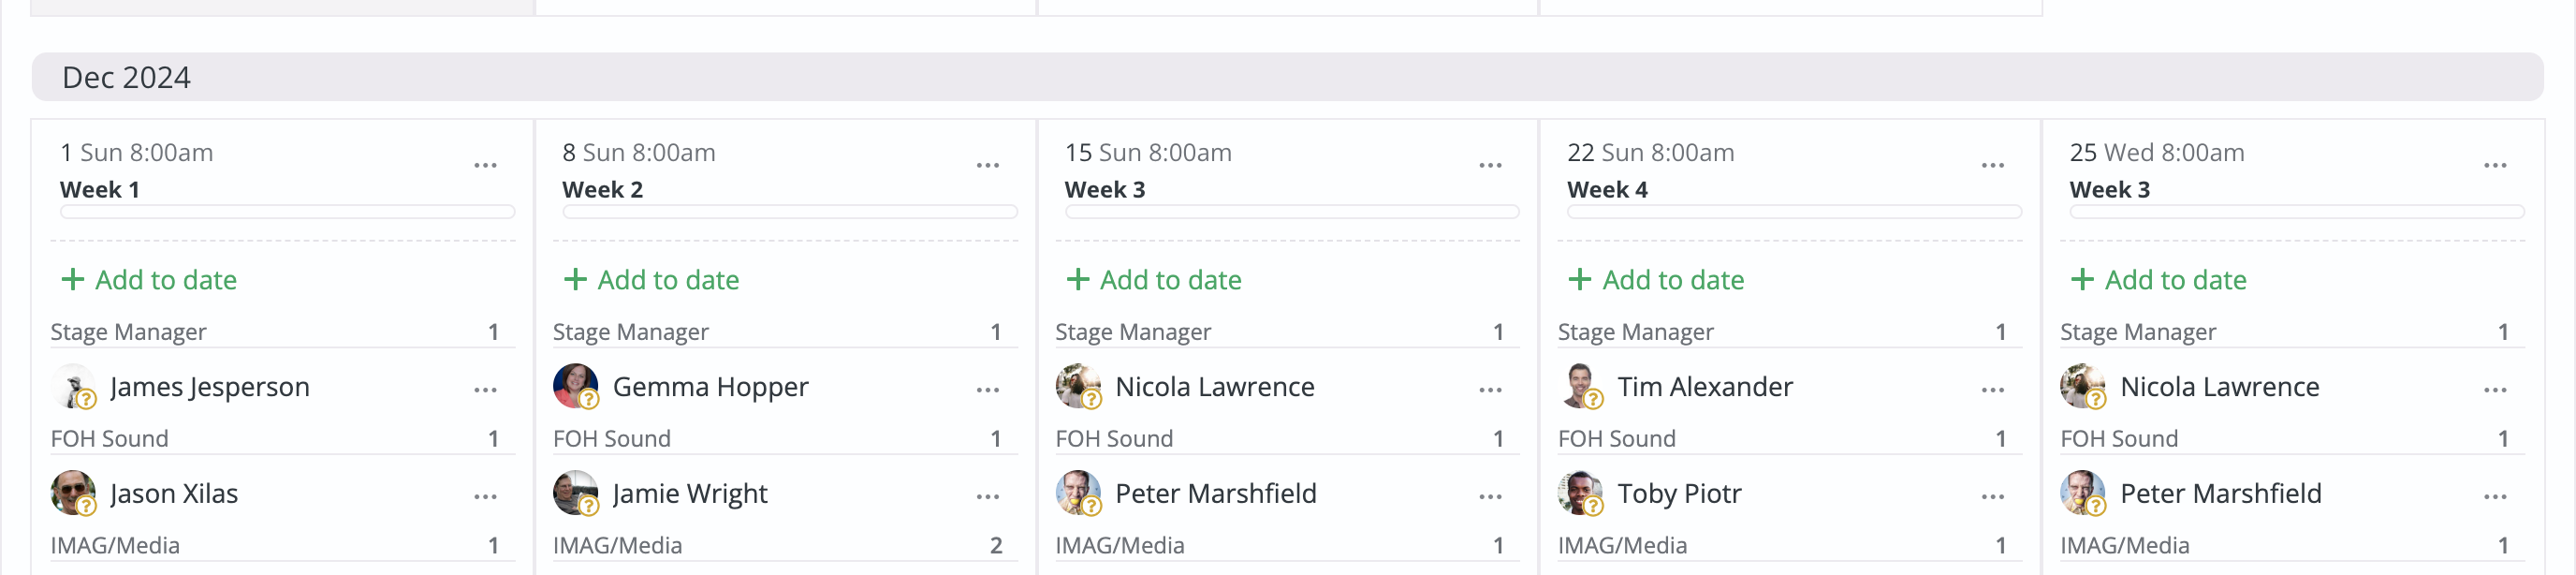
For published rotas with Rota Accept/Decline enabled, rota members begin with a pending (unsent) serving status. The current serving status is distinguished visually on all rota views and automatically updates from unsent (no icon) to sent (yellow question mark icon) and then to accepted (green tick icon) or declined (red cross icon and red strikethrough styling) as serving responses are processed by users, overseers or rota members. An example is shown below...

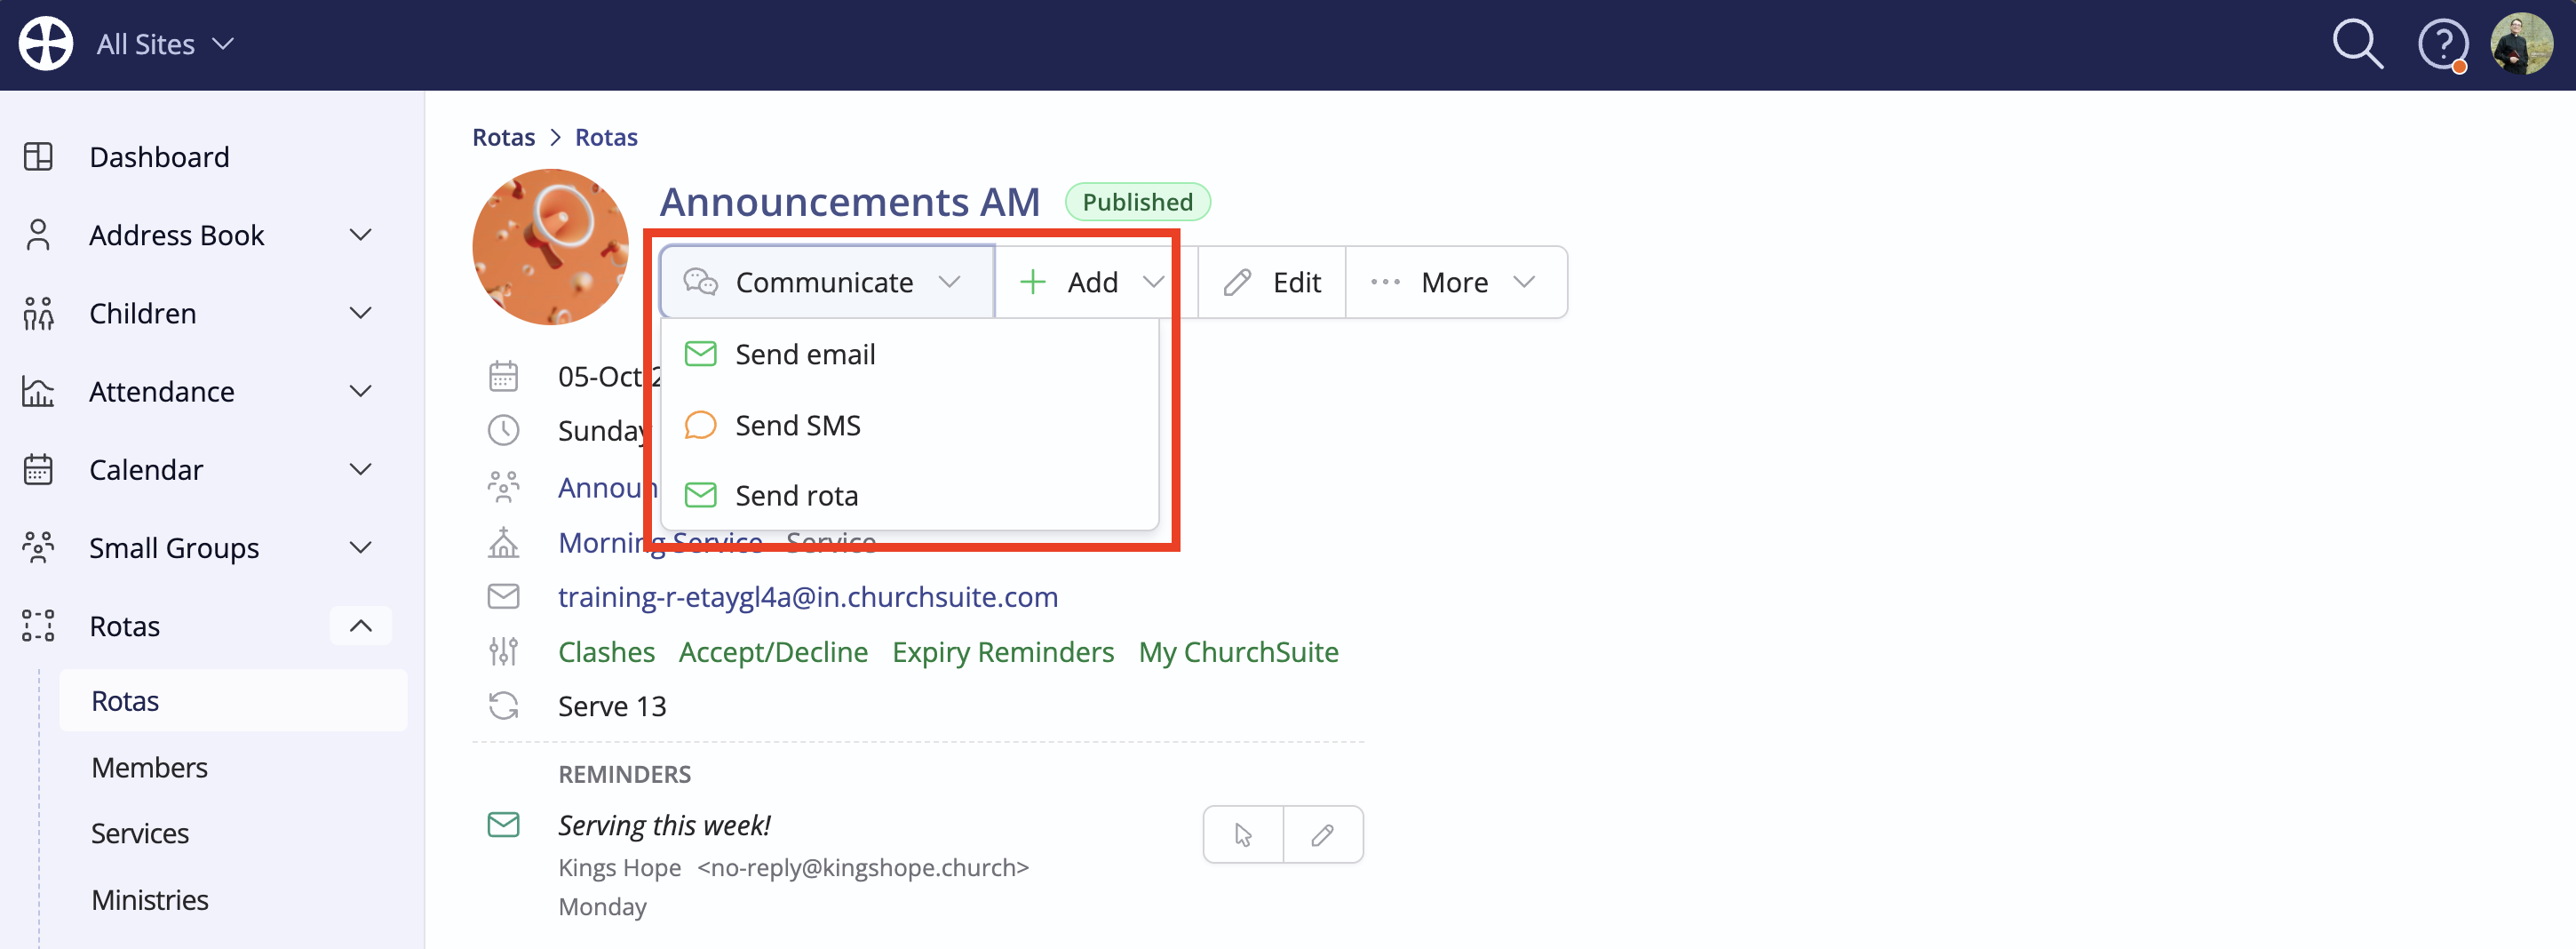
Sending rotas in ChurchSuite (Users)
Users can send a rota from wherever they may be working within the Rotas module:
- From a Rota View, when sending to
- a custom range of rota dates or
- a single rota date or
- an individual rota member on a rota date
- From the rotas Overview report, when sending to
- a single rota for a date or
- an individual rota member on a rota date
- From the Service View, when sending to
- all rotas for a service date or
- an individual rota for a service date or
- an individual rota member on a rota for a service date
Let's begin by looking at sending rotas from a rota "view" page. From the Communicate drop-down button, selecting Send rota opens a pop-up.
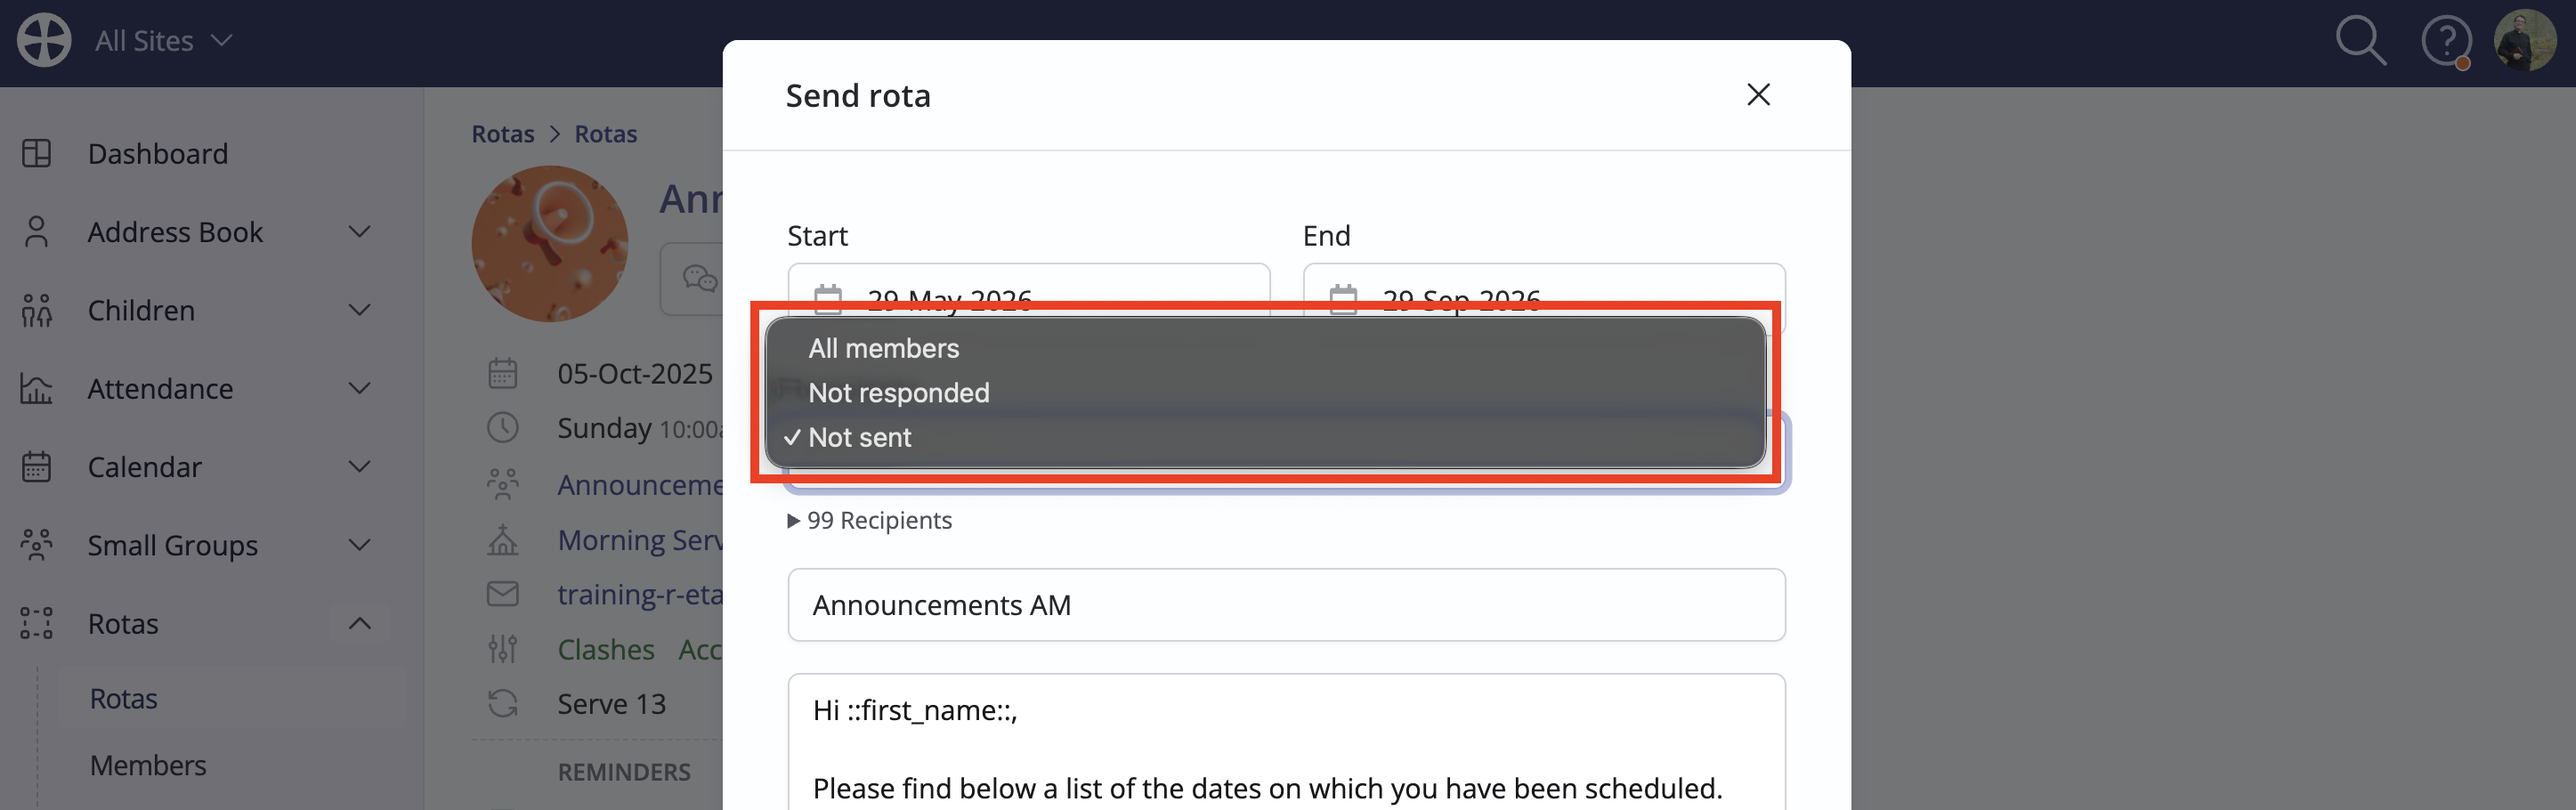
On the Send rota pop-up, specify the range of rota Dates to be sent - the click-expandable Recipients count shows who will receive the rota email based on the options selected. By default, rota emails will only go to those Not sent, that is, those rota members on the selected dates whose status is pending/unsent and exclude those previously sent. You can optionally resend to those Not responded - which will exclude those who have already accepted or declined or added unavailability - or All members - which will send to all rota members regardless of their current serving status or unavailability.
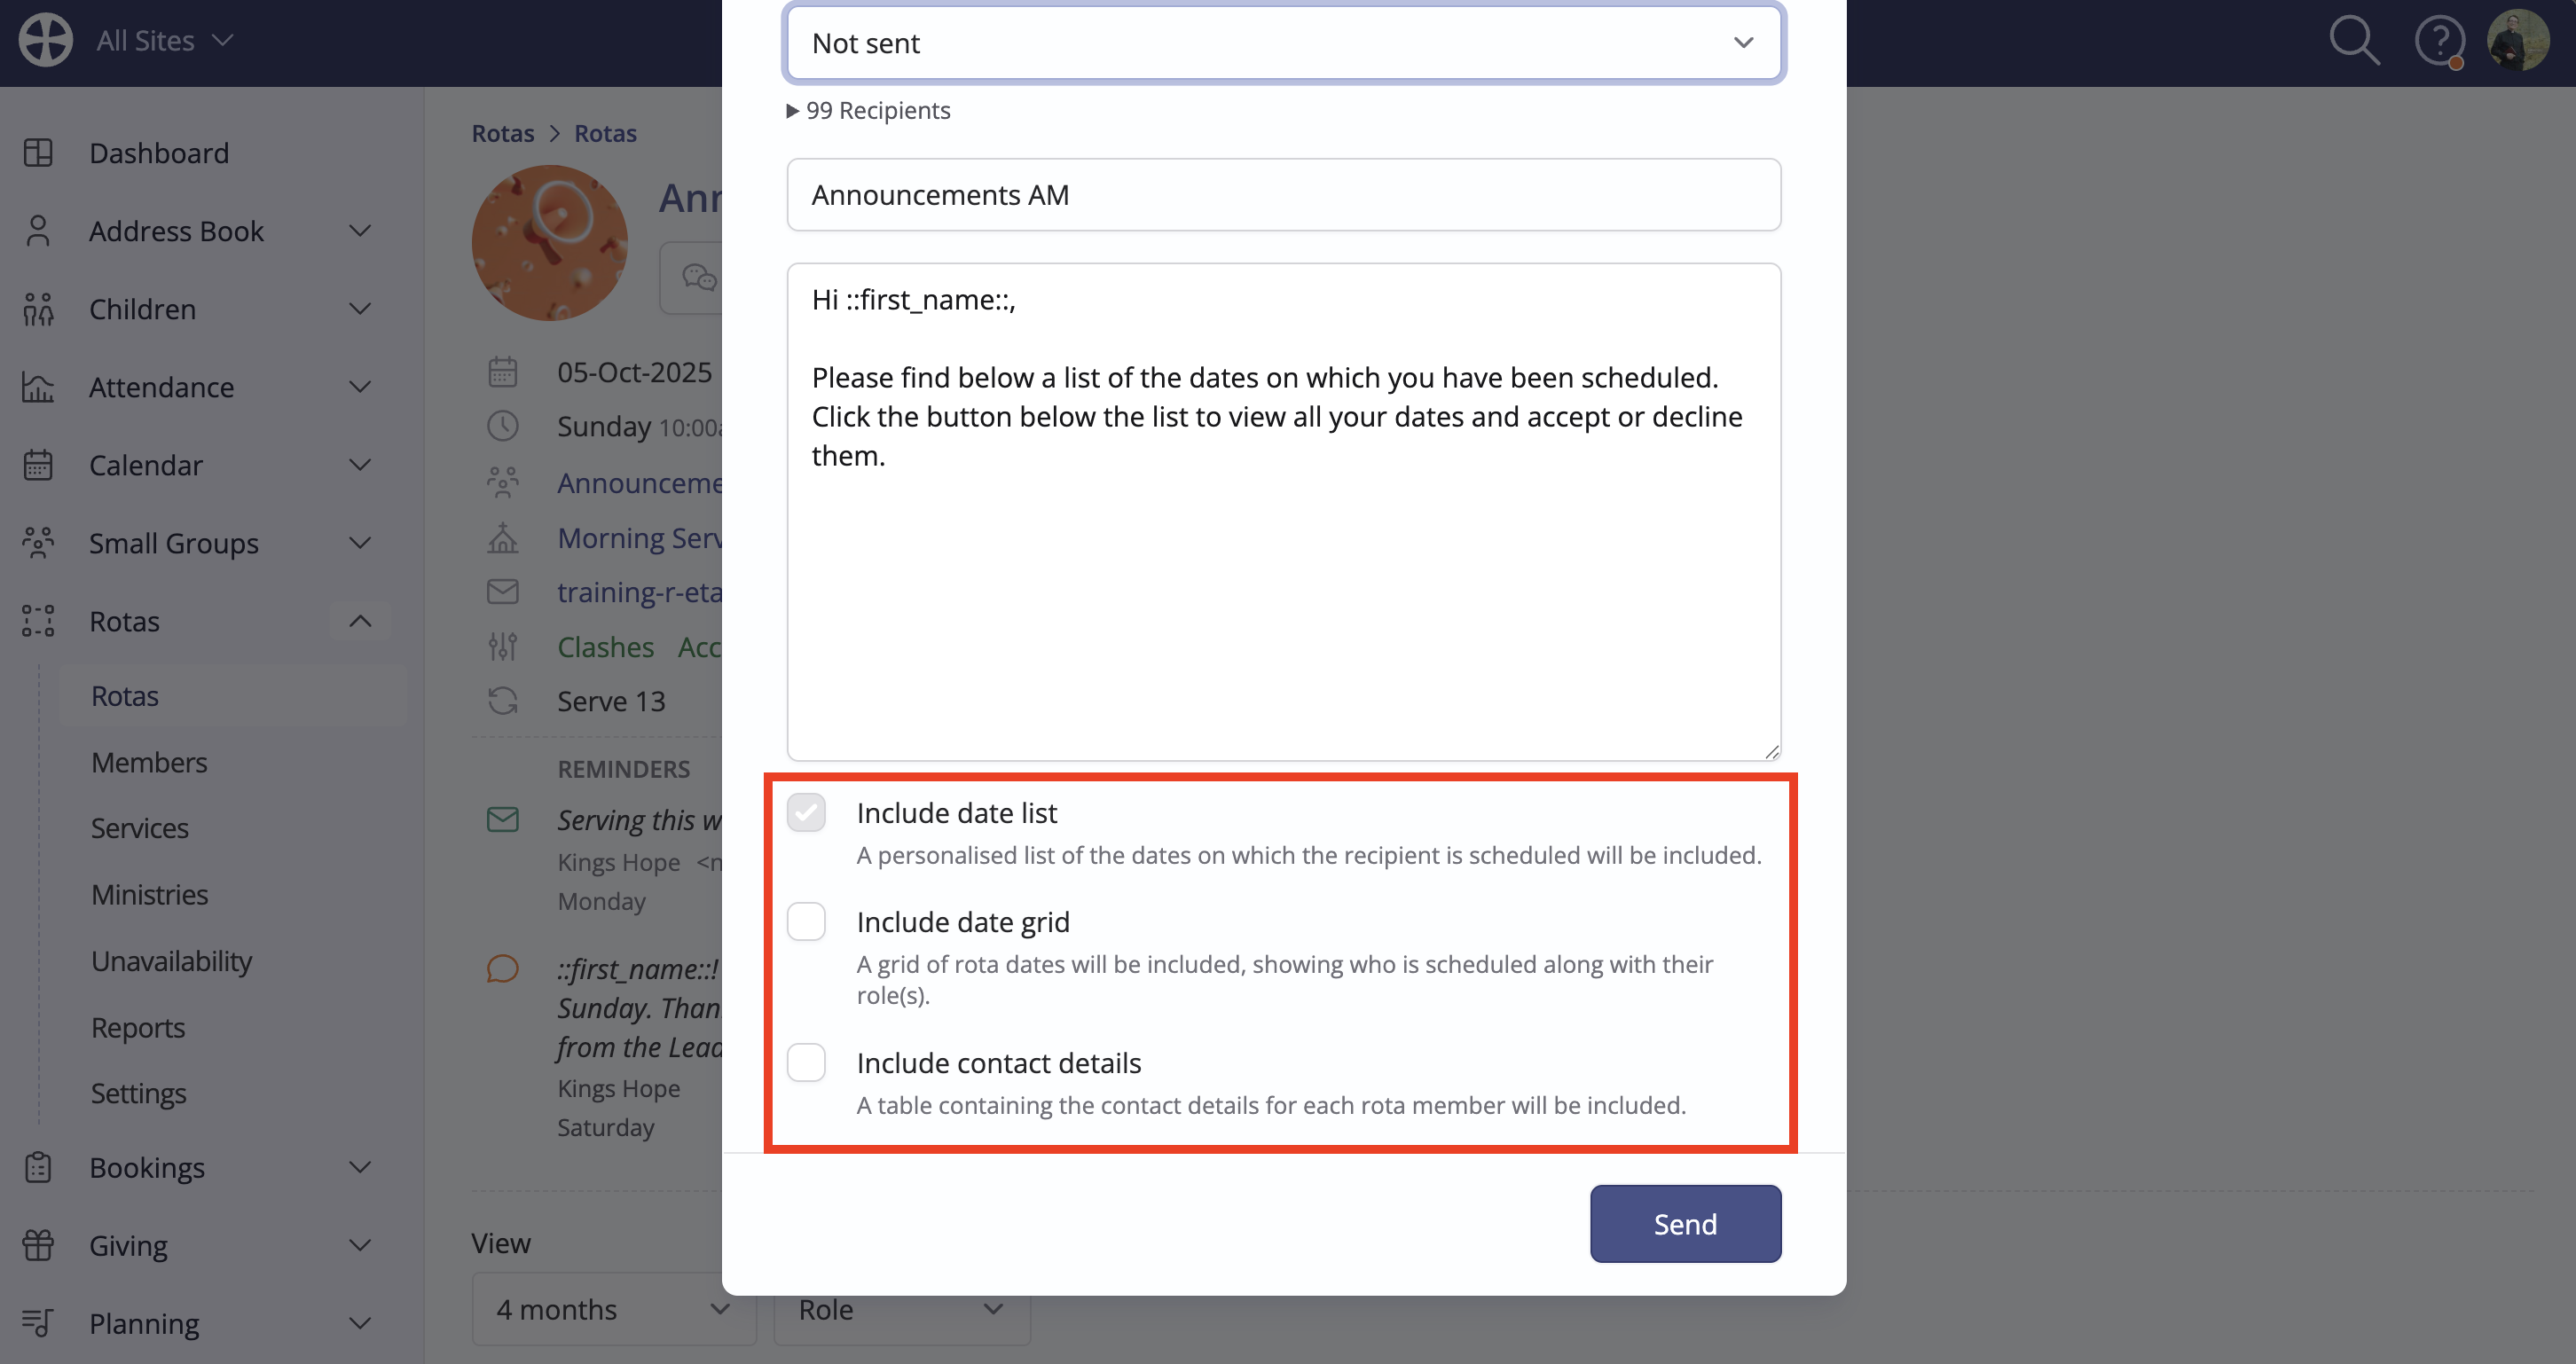
The 'Send rota' email Subject and Message can be optionally further customised - a first_name merge field is supported for email personalisation. Each recipient will receive one email that includes a Date List - a list of their serving dates for the rota. The list includes details of the rota name, the service name (if applicable) and the serving times and roles for each date. You can optionally tick to Include a date grid - the rota itself, showing who else is scheduled to serve along with their roles - and to Include contact details - a table of contact details for all rota members (only surfacing contact details according to each person's privacy settings. No children contact details are listed). Click Send to complete the process.
The rota serving status is updated for each recipient rota member, with sent dates distinguished with a yellow question mark icon. Rota members without email addresses will persist with a pending (unsent) status.
Rotas are sent to the rota member's email address, which for children will be the Child email address and is logged in their Communication log viewable on their profile in the Address Book or Children module and Communication reports. Sending rotas disregards communication options - they are always sent - it's not possible to unsubscribe from receiving rotas. Here's an example - notice the customised greeting and message, the list of serving dates and the embedded button that links the recipient through to their personal Rota Page where they can view all their rota serving details and accept/decline. If the options were selected, the email also contains the rota grid and rota member contact details table.


The Rota Page is further explained later in this article.
Sending rotas in My ChurchSuite (Overseers)
Ministry overseers have the same Send rota functionality in the member-facing My ChurchSuite. Overseers can send a rota from the actions button on a rota 'view' page, sending it for
- a custom range of rota dates or
- a single rota date or
- an individual rota member on a rota date


Clicking Send rota opens a pop-up.
On the Send rota pop-up, specify the range of rota Dates to be sent - the click-expandable Recipients count shows who will receive the rota email based on the options selected. By default, rota emails will only go to those Not sent, that is, those rota members on the selected dates whose status is pending/unsent and exclude those previously sent. You can optionally resend to those Not responded - which will exclude those who have already accepted or declined or added unavailability - or All members - which will send to all rota members regardless of their current serving status or unavailability.

The 'Send rota' email Subject and Message can be optionally further customised - a first_name merge field is supported for email personalisation. Each recipient will receive one email that includes a Date List - a list of their serving dates for the rota. The list includes details of the rota name, the service name (if applicable) and the serving times and roles for each date. You can optionally tick to Include a date grid - the rota itself, showing who else is scheduled to serve along with their roles - and to Include contact details - a table of contact details for all rota members (only surfacing contact details according to with each person's privacy settings. No children contact details are listed). Click Send to complete the process.

The rota serving status is updated for each recipient rota member - sent dates are distinguished with a yellow question mark icon, and the member name is italicised. Rota members without email addresses will persist with a pending (unsent) status.

The rota member user experience
Rota members can process responses in two places - through their personal Rota Page and in the My Rotas section of My ChurchSuite, where they can also respond on behalf of a linked spouse/partner/child. Let's look at both places...
As explained earlier in this article, a Send rota email includes a personal Rota Page link through which each recipient rota member can access their personal rota page, which shows a curated list of all their Next Serving commitments and the current serving status for each rota and date. Dates are listed in chronological order, with 'next serving' showing first. The rota page can be filtered further by Rota, Date range and, if Rota Accept/Decline is enabled in the module's options, by serving Status too.

How each rota date in the list is styled is dependent on whether Rota Accept/Decline is enabled for the rota. Let's consider some examples...
For rotas with Rota Accept/Decline disabled, dates are listed unstyled on a grey background. A date clash - where a rota member is serving on more than one rota on the same date at the same time - is styled with a red rota name.

For rotas with Rota Accept/Decline enabled, Accept and Decline response actions are shown. Dates not yet responded to are shown unstyled on a grey background. A date clash - where a member is serving on more than one rota on the same date at the same time - is distinguished with the rota name in red. If unavailability is added, serving dates during the unavailable period are no longer shown on their Rota Page.
Clicking Accept will immediately update the serving status on the rota, and the entry on the rota page is styled with a green background. A previously accepted request can be declined without constraint.

Like unavailability, a Decline (with optional comment) gives rise to a clash - with the rota name styled in red strikethrough font on a red background. While unavailability creates a clash that affects all rotas for the unavailable date, a decline clash only affects a specific rota and date. In this way, rota members can decline some rotas while remaining available to accept other rotas. A previously declined request can be later accepted without constraint. An optional decline comment can be added and edited. Overseers receive a decline notification when a rota member declines a serving request through their rota page or My ChurchSuite. Rota reminders are not sent to rota members for dates where they are unavailable or where they have declined a serving request.
Note: The overseer decline notification is intentionally deferred for 15-30 minutes, enabling the system to group declines for multiple dates for the same ministry by a rota member into a single, curated notification. A rota member who initially declines but then quickly accepts won't trigger a false decline notification. Similarly, a rota member who quickly declines several dates on the same rota will trigger a single overseer notification.

Once a rota member has responded to a serving request for a date - either accepted or declined - it is not possible to reset the serving status back to pending.

The Next Serving section in My ChurchSuite shows each rota member's upcoming rota serving dates and the current serving status. For rotas with Accept/Decline enabled, accept and decline response actions are shown within the list. A rota member can switch to see the next serving details for linked family members, and they can process accept/decline responses on their behalf.

Navigating through to a rota View, rota members can also process Accept and Decline responses on each date they are assigned to serve. When rota members Organise swaps or Sign up for a 'signup-enabled' rota, they are added to rota dates with an Accepted status.

