Connecting a Check-In printer
The Check-In system supports badge printing using a compatible Brother label printer. Badge printing can be done at a central registration point or in-room at each of your in-person events and gatherings on iOS and Android mobile devices using the Check-In app and on Mac OS and Windows devices in a browser environment.
In this article
Which printer?
Which Check-In device?
Choosing the default badge size
Setting the badge printing options for each of your groups
Badge printing using the iOS/Android Check-In app
Badge printing using a Mac OS device
Badge printing using a Windows device
Which printer?
The Check-In system can be used for badge printing using the following supported Brother label printers:
| Model | USB | Wireless | Bluetooth | Colour |
| Brother QL-800 | Yes | No | No | No |
| Brother QL-810W | Yes | Yes | No | QL-810Wc |
| Brother QL-820NWB | Yes | Yes | Yes | QL-820NWBc |
| Brother QL-1100 | Yes | No | No | QL-1100c |
| Brother QL-1110NWB | Yes | Yes | Yes | QL-1110NWBc |
| Brother QL-1115NWB | Yes | Yes | Yes | QL-1115NWBc |
| Brother QL-580N (Discontinued) | Yes | No | No | No |
| Brother QL-570 (Discontinued) | Yes | No | No | No |
| Brother QL-710W (Discontinued) | Yes | Yes | No | No |
| Brother QL-720NW (Discontinued) | Yes | Yes | No | No |
Top Tip! Wi-Fi & internet considerations
The Check-In system records session attendance data in real-time and requires uninterrupted internet access during an active session. To minimise connectivity issues, we recommend using a private Wi-Fi network for mission-critical processes like Check-In rather than your public/guest Wi-Fi, which will experience peaks in network traffic during an active session. Many routers and Wi-Fi access points are only capable of handling 30-50 simultaneous connections, prioritising the newest connections. As a result, older connections (such as your Check-In devices) are disconnected first to balance the router's load. While your leaders will have success connecting when they set up the Check-In system at the start of a session, lost connectivity can be experienced as people begin to arrive and connect to the public/guest Wi-Fi network. Portable MiFi solutions or tethering to a smartphone data service may also be suitable alternatives where the 4G/5G signal is good in your venue.
Which Check-In device?
Wireless (inc. Bluetooth) printing
The Check-In system can print wirelessly and via Bluetooth to a compatible Brother printer from an iOS or Android mobile device running the Check-In app. This is the most popular connection method and the easiest to set up, with printer drivers built into the app. The Amazon Kindle Fire and Google Chromebook are not suitable devices.
With wireless printing, multiple devices can print to the same printer; Bluetooth printing is one device to one printer only. A Bluetooth printer will need to be reconnected to the Check-In device (in the device Bluetooth Settings) each time the printer is turned off and on again. However, the Brother Printer Settings Tool includes a setting to enable automatic reconnection.
Wired (USB) printing
We recommend using a Windows device running Google Chrome, which supports 'silent printing' in a kiosk mode. This means there won't be any print-confirmation pop-ups in the User experience, and the device can be securely locked to just the Check-In system to prevent unwanted access to other applications or websites. Mac OS devices can also be used for browser printing, but silent printing and kiosk mode are not supported. Desktop printing through a browser on a Mac OS or Windows device may require the installation of additional printer drivers before use. Brother does not currently support Windows Surface devices.
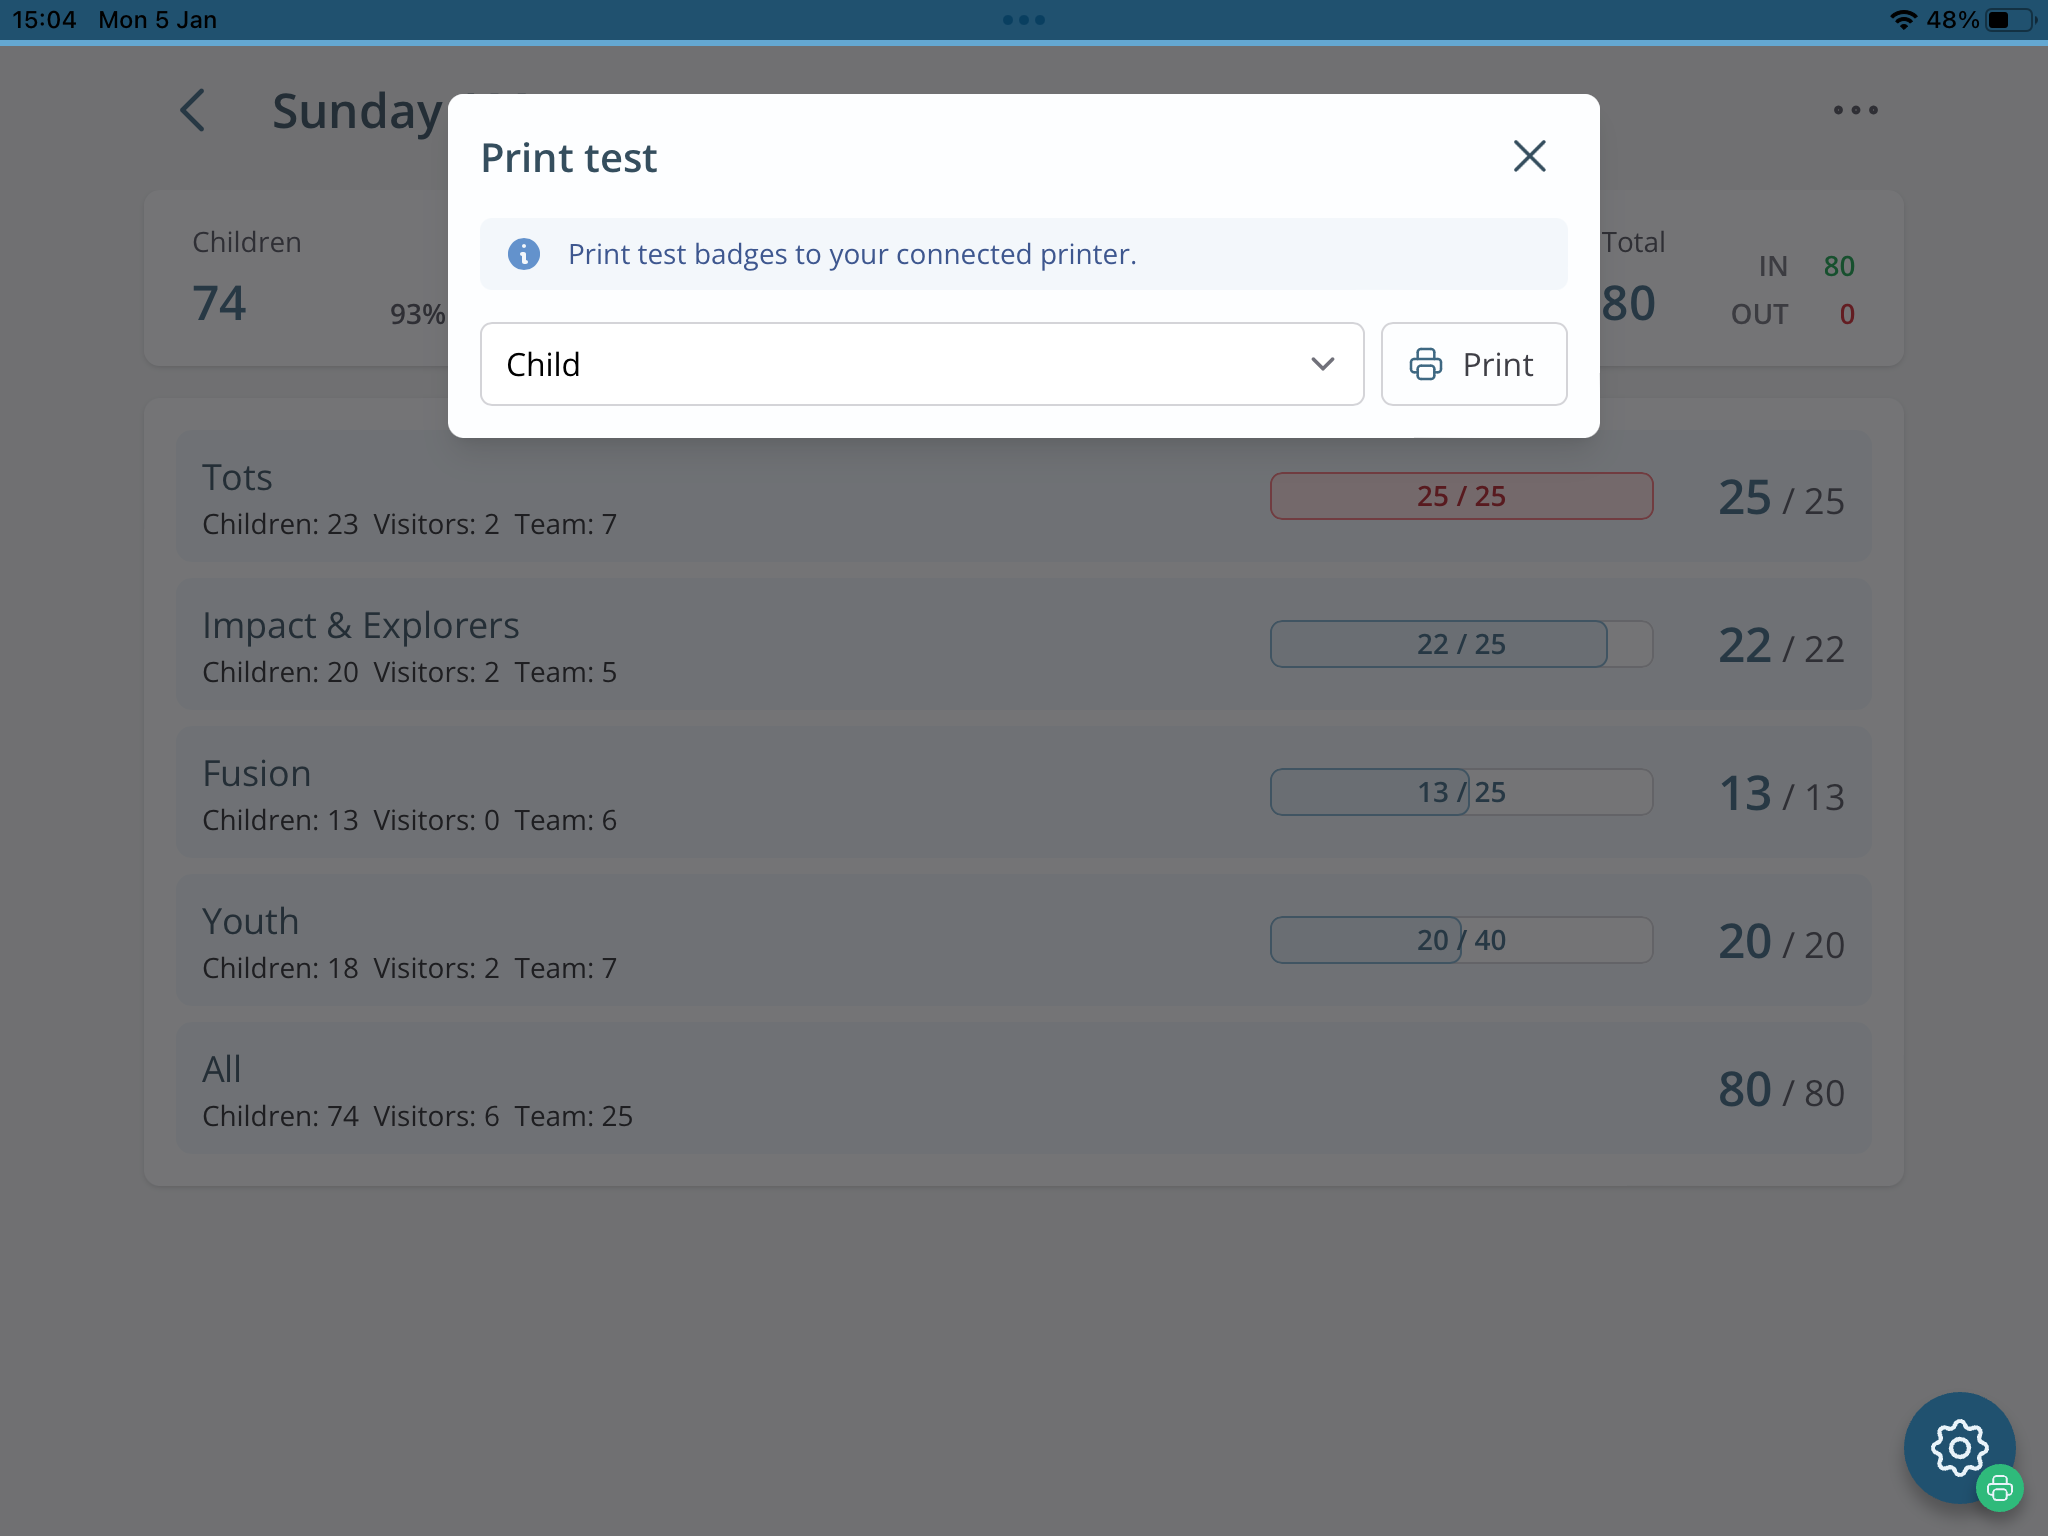
Top Tip! Testing your printer settings
The Check-In Admin page Menu includes a Print test action that can be used to test print Child, Attendee or Team badges. You may find it helpful to print test badges from each Check-In device at the start of every session.
Selecting 'Child' will print five test badges, one for each type: child badge, child room badge, visitor badge, visitor room badge and a parent/carer pick-up badge.
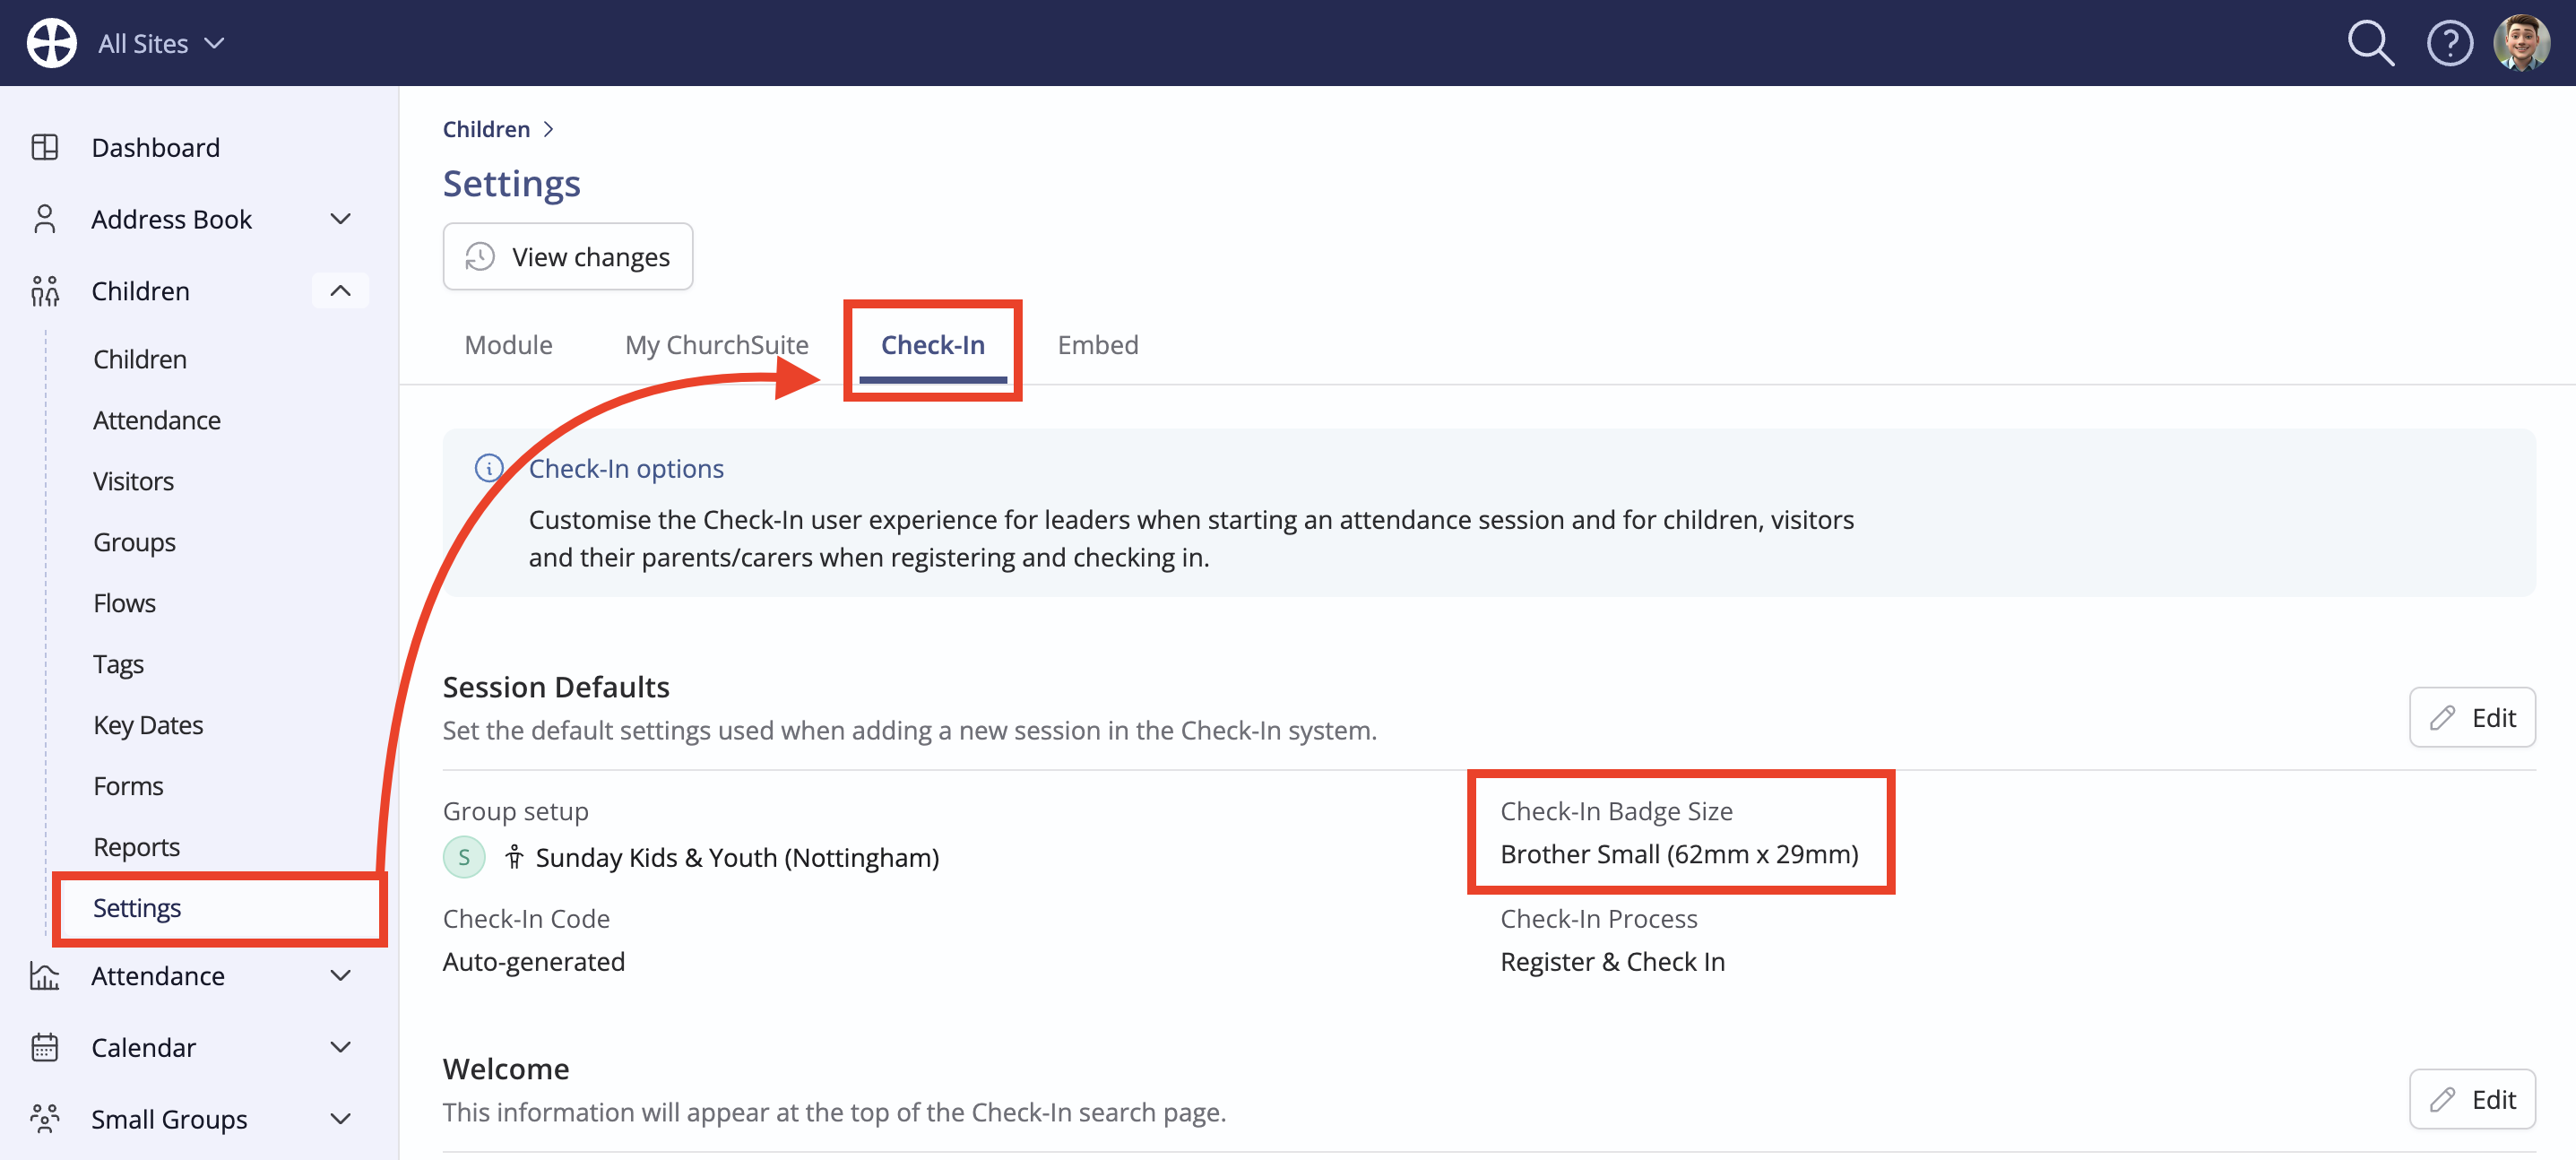
Choosing the default badge size
While the default badge size is controlled automatically in an app environment, a Check-In option in the Children module settings controls the aspect and size of the badge PDFs generated when using Check-In in a browser environment. For the best results, the Check-In options should match the label stock in the printer and the print settings on the Check-In device.
Navigate to the Check-In options in the Children module settings and click Edit to make changes to the Check-In Badge Size. Choose between 'Brother Small (62mm x 29mm)' or 'Brother Large (100mm x 62mm)' labels, which both print on DK22205 continuous roll labels (62mm wide). DK11202 labels (62mm wide by 100mm) can only be used for Brother Large labels.
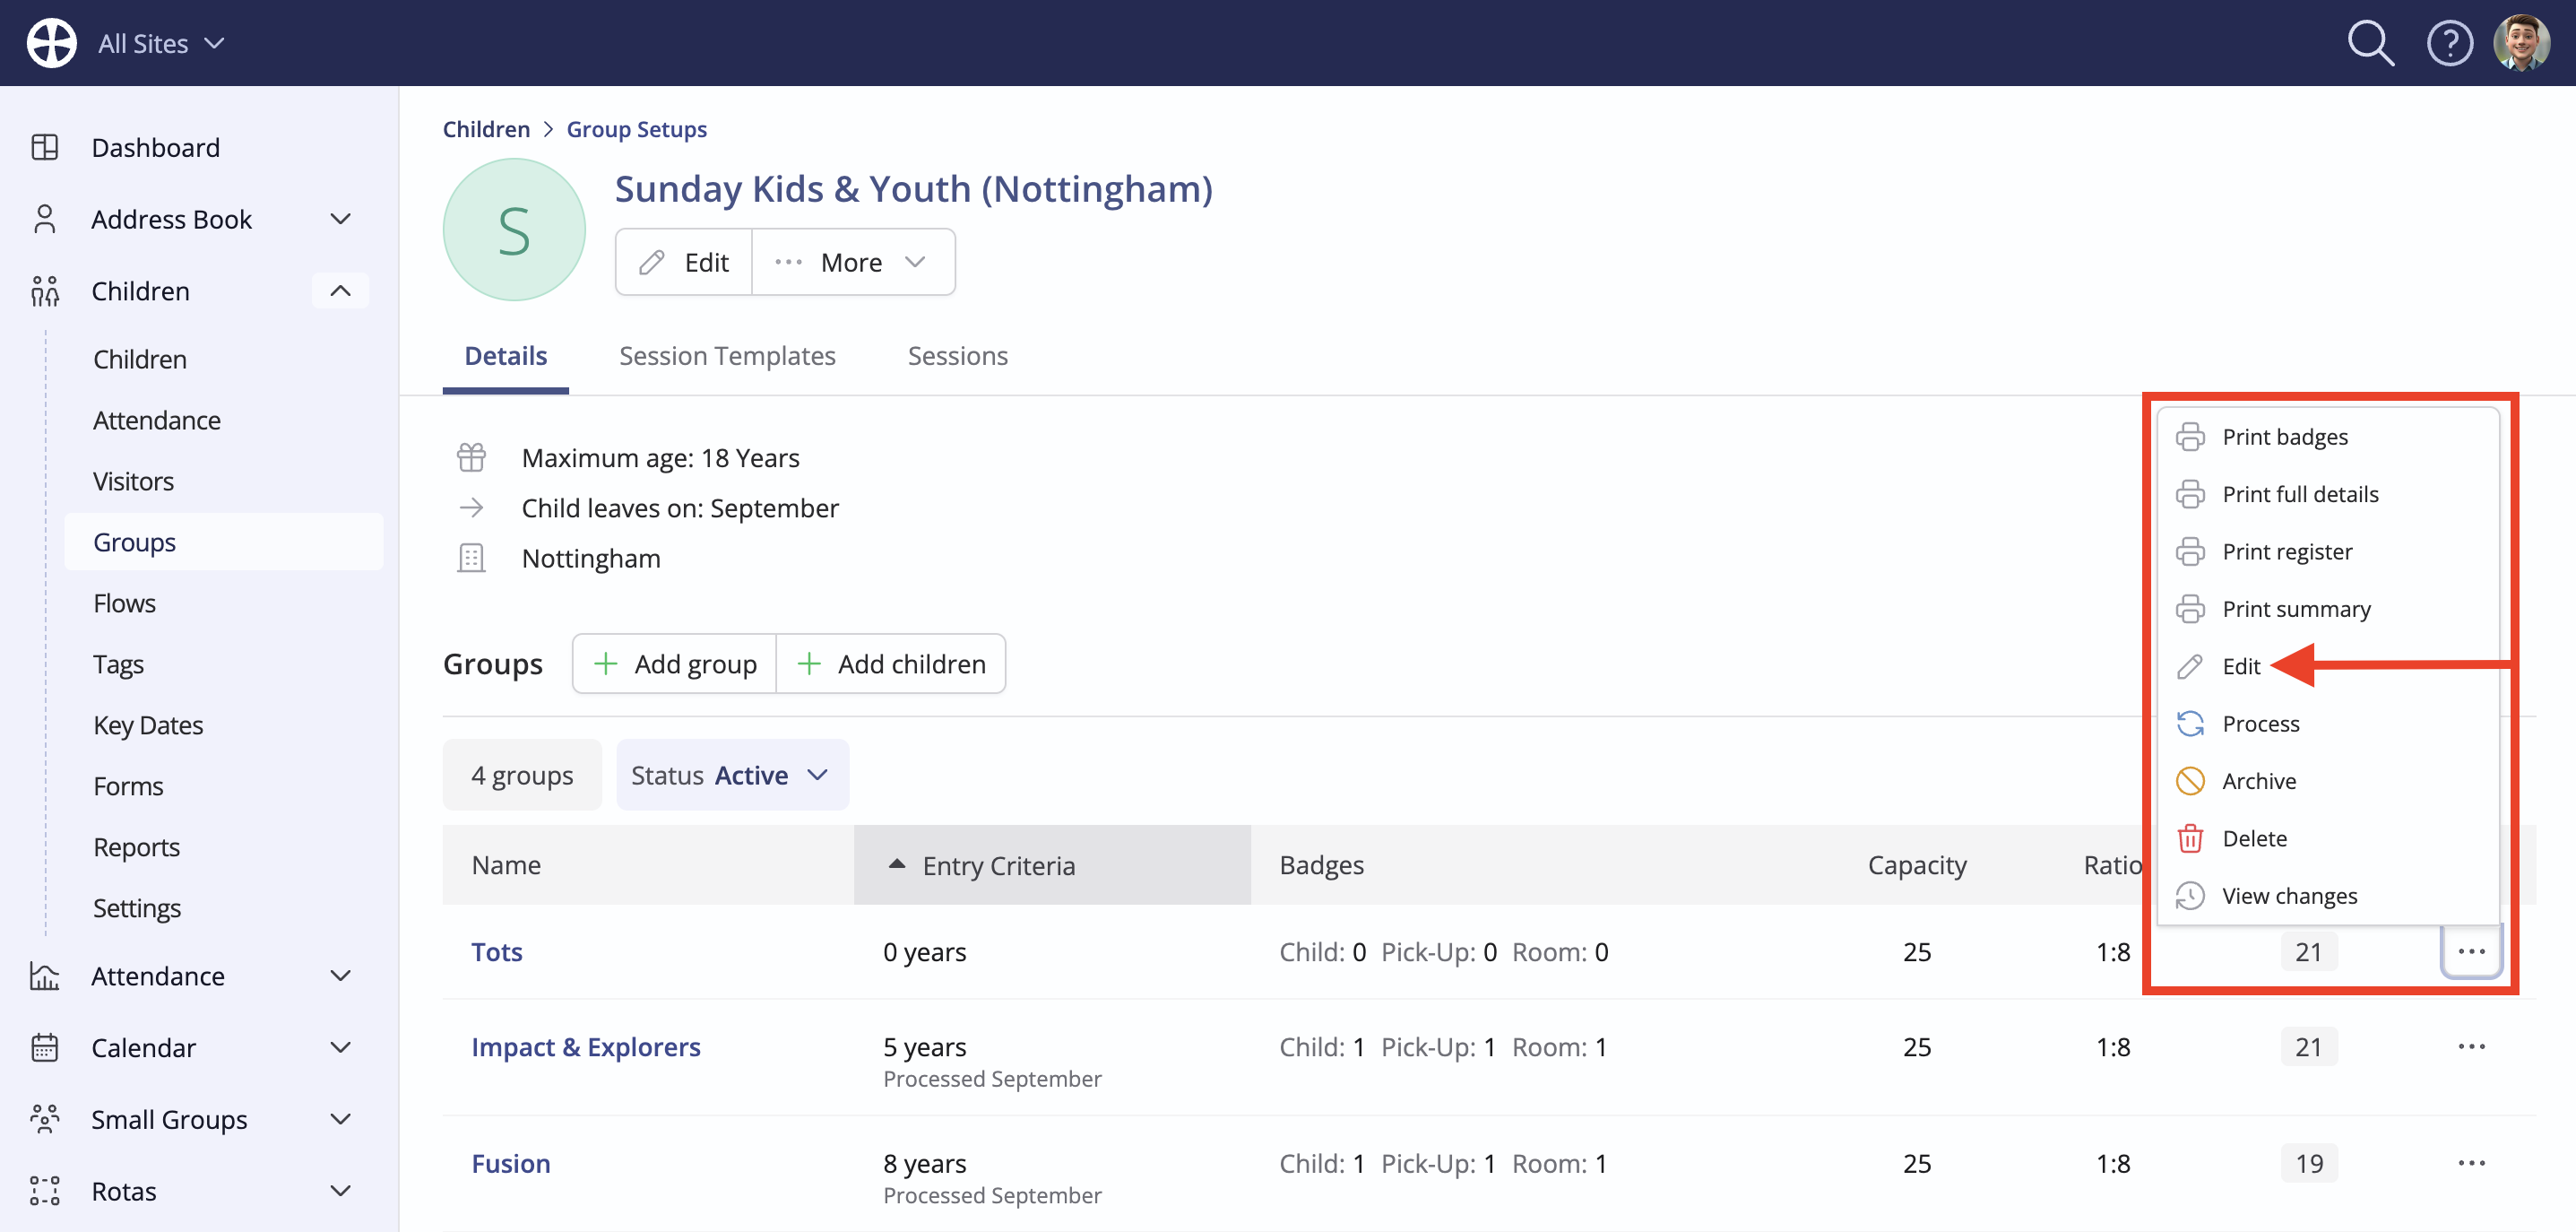
Setting the badge printing options for each of your groups
You can specify the print quantity for each badge type - Child, Pick-up and Room - for each group (or turn off badge printing entirely if it is not required).
Additionally, on a group-by-group basis, and for each group that children and visitors will be checked in for, you can optionally set a maximum capacity and adult-child ratio. During an active session, the Admin Area 'summary' shows the group fill progress and the current state of adult-child ratio based on the number of checked-in adult team members, children and visitors. Further check-ins are permitted after a group's adult-child ratio is reached - you might draft in additional adults and check them in as team members to satisfy your safeguarding ratio requirements. However, once a group is full, no further check-ins will be possible.
To review these Check-In options, navigate to the Groups section of the Children module. Click on a Group Setup of interest to see the list of Groups. For each group in turn, click Edit:
On the Edit pop-up, note the Check-In Options. Optionally set the group Capacity or leave it empty to allow unlimited check-ins for the group. Set the group adult-child Ratio in accordance with your Child Safeguarding Policy based on the age of children in the group. Finally, set the quantity for each of the Badges that will be printed when a child or visitor is registered to the group during an active Check-In session. Setting a value of 0 (zero) will disable printing for that badge type. For example, for a Creche group, you might choose to print two 'Child' badges, one for the child and one for their changing bag.
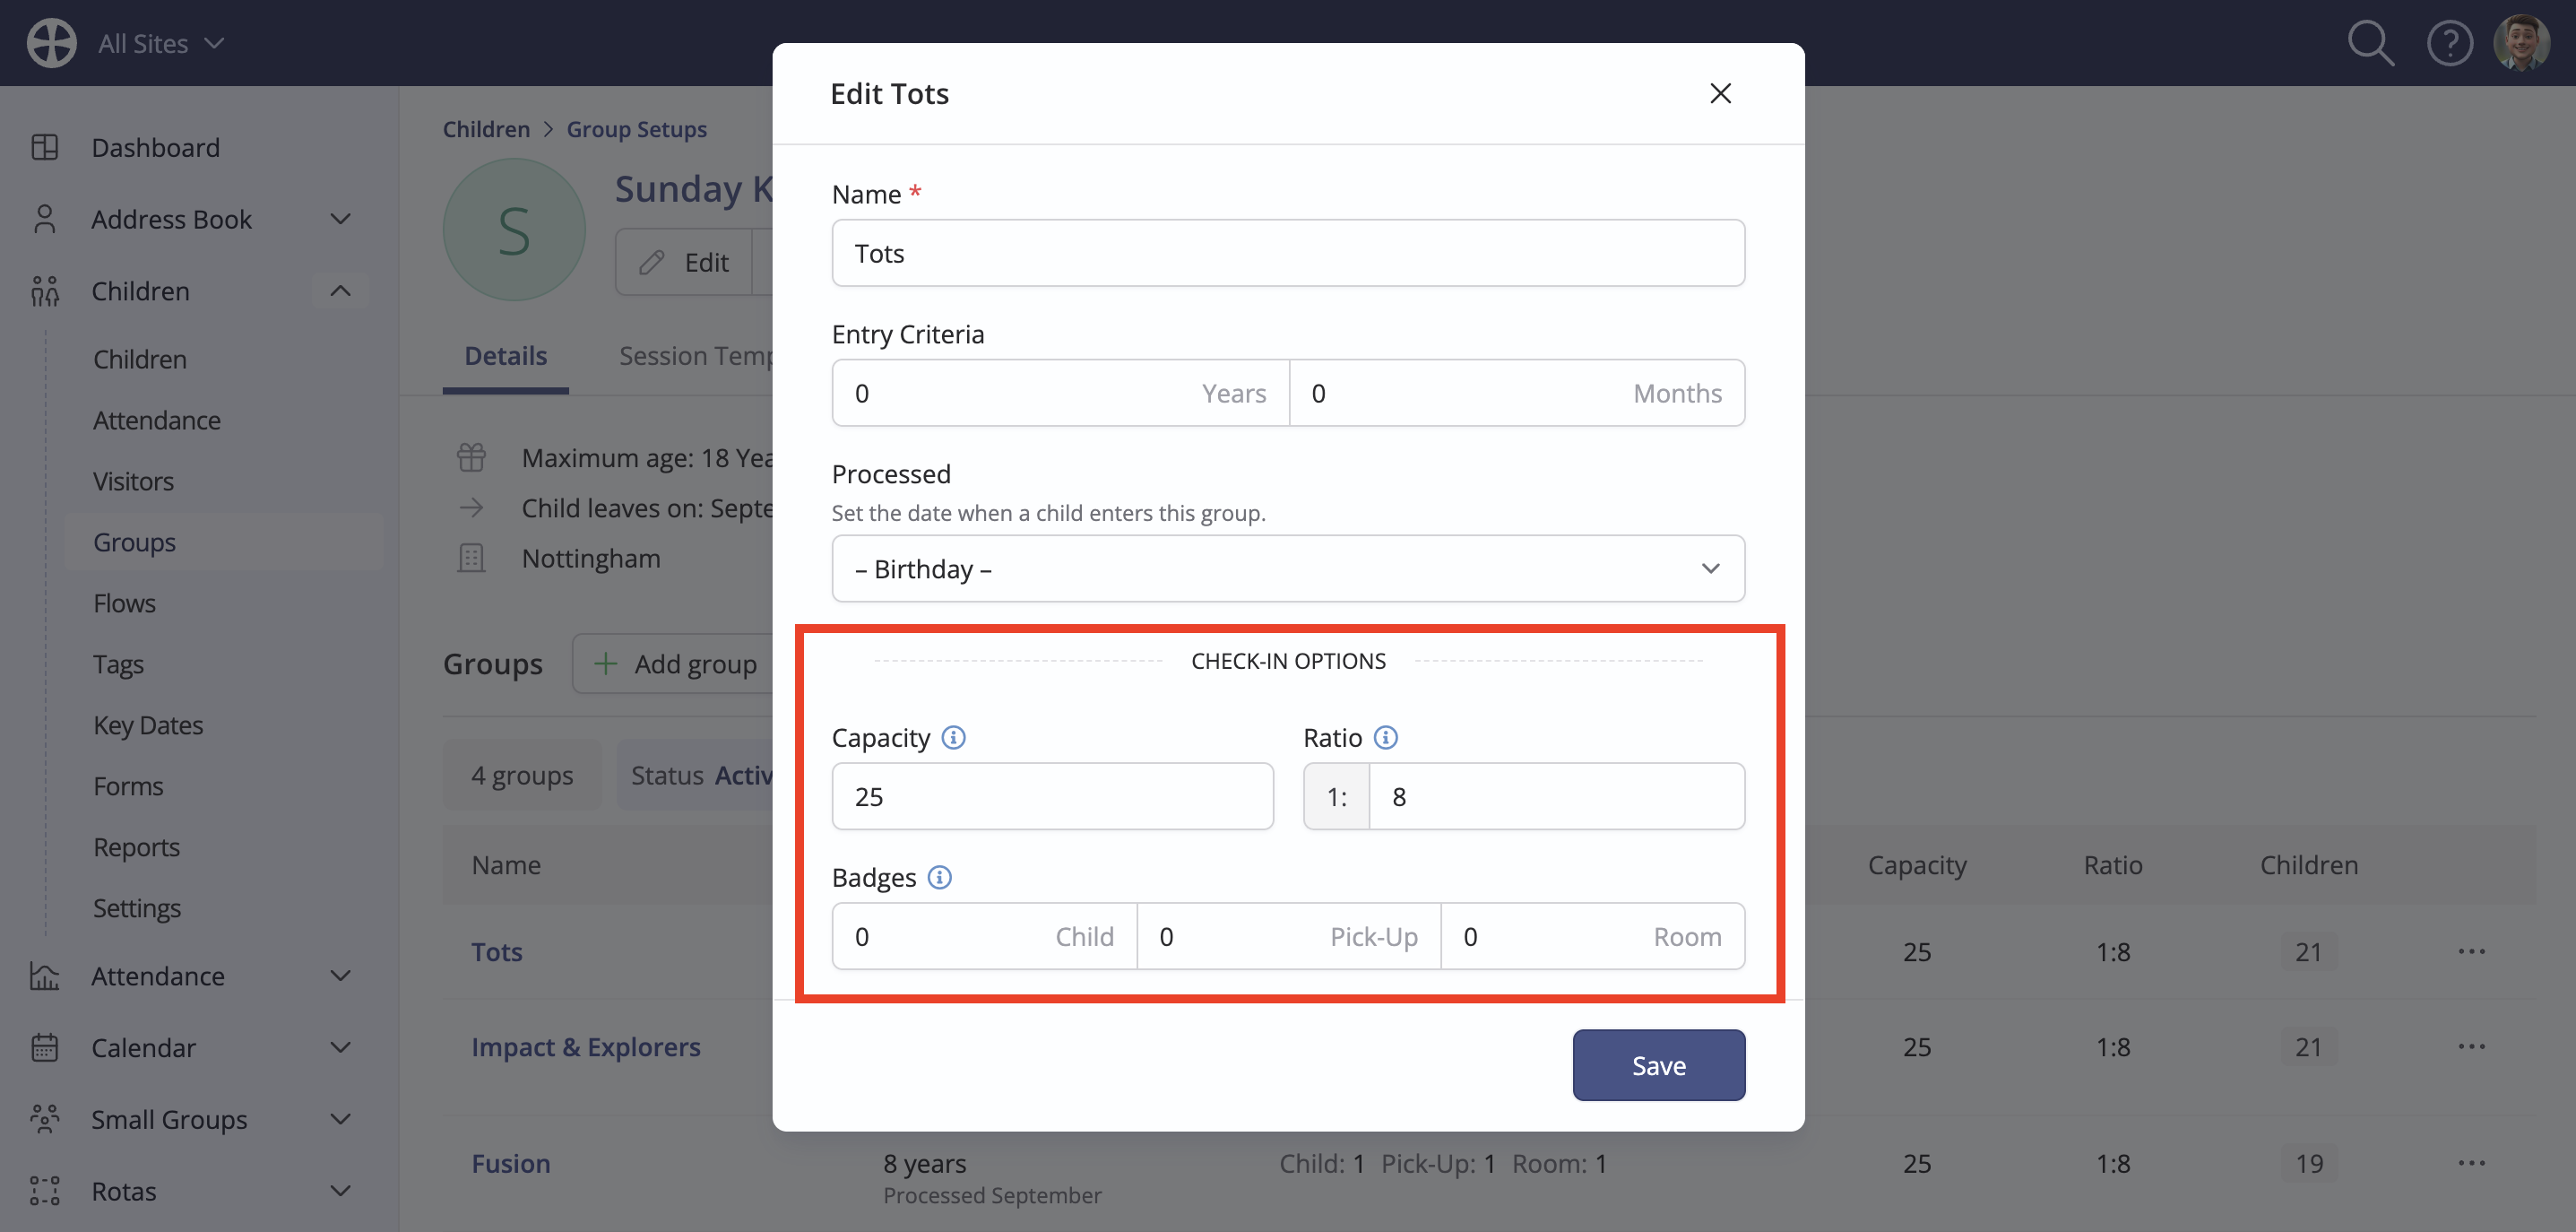
Save any changes made and repeat this step to review the Check-In Options for the other groups in the Group Setup.
Top Tip! How to use room badges for an emergency roll-call
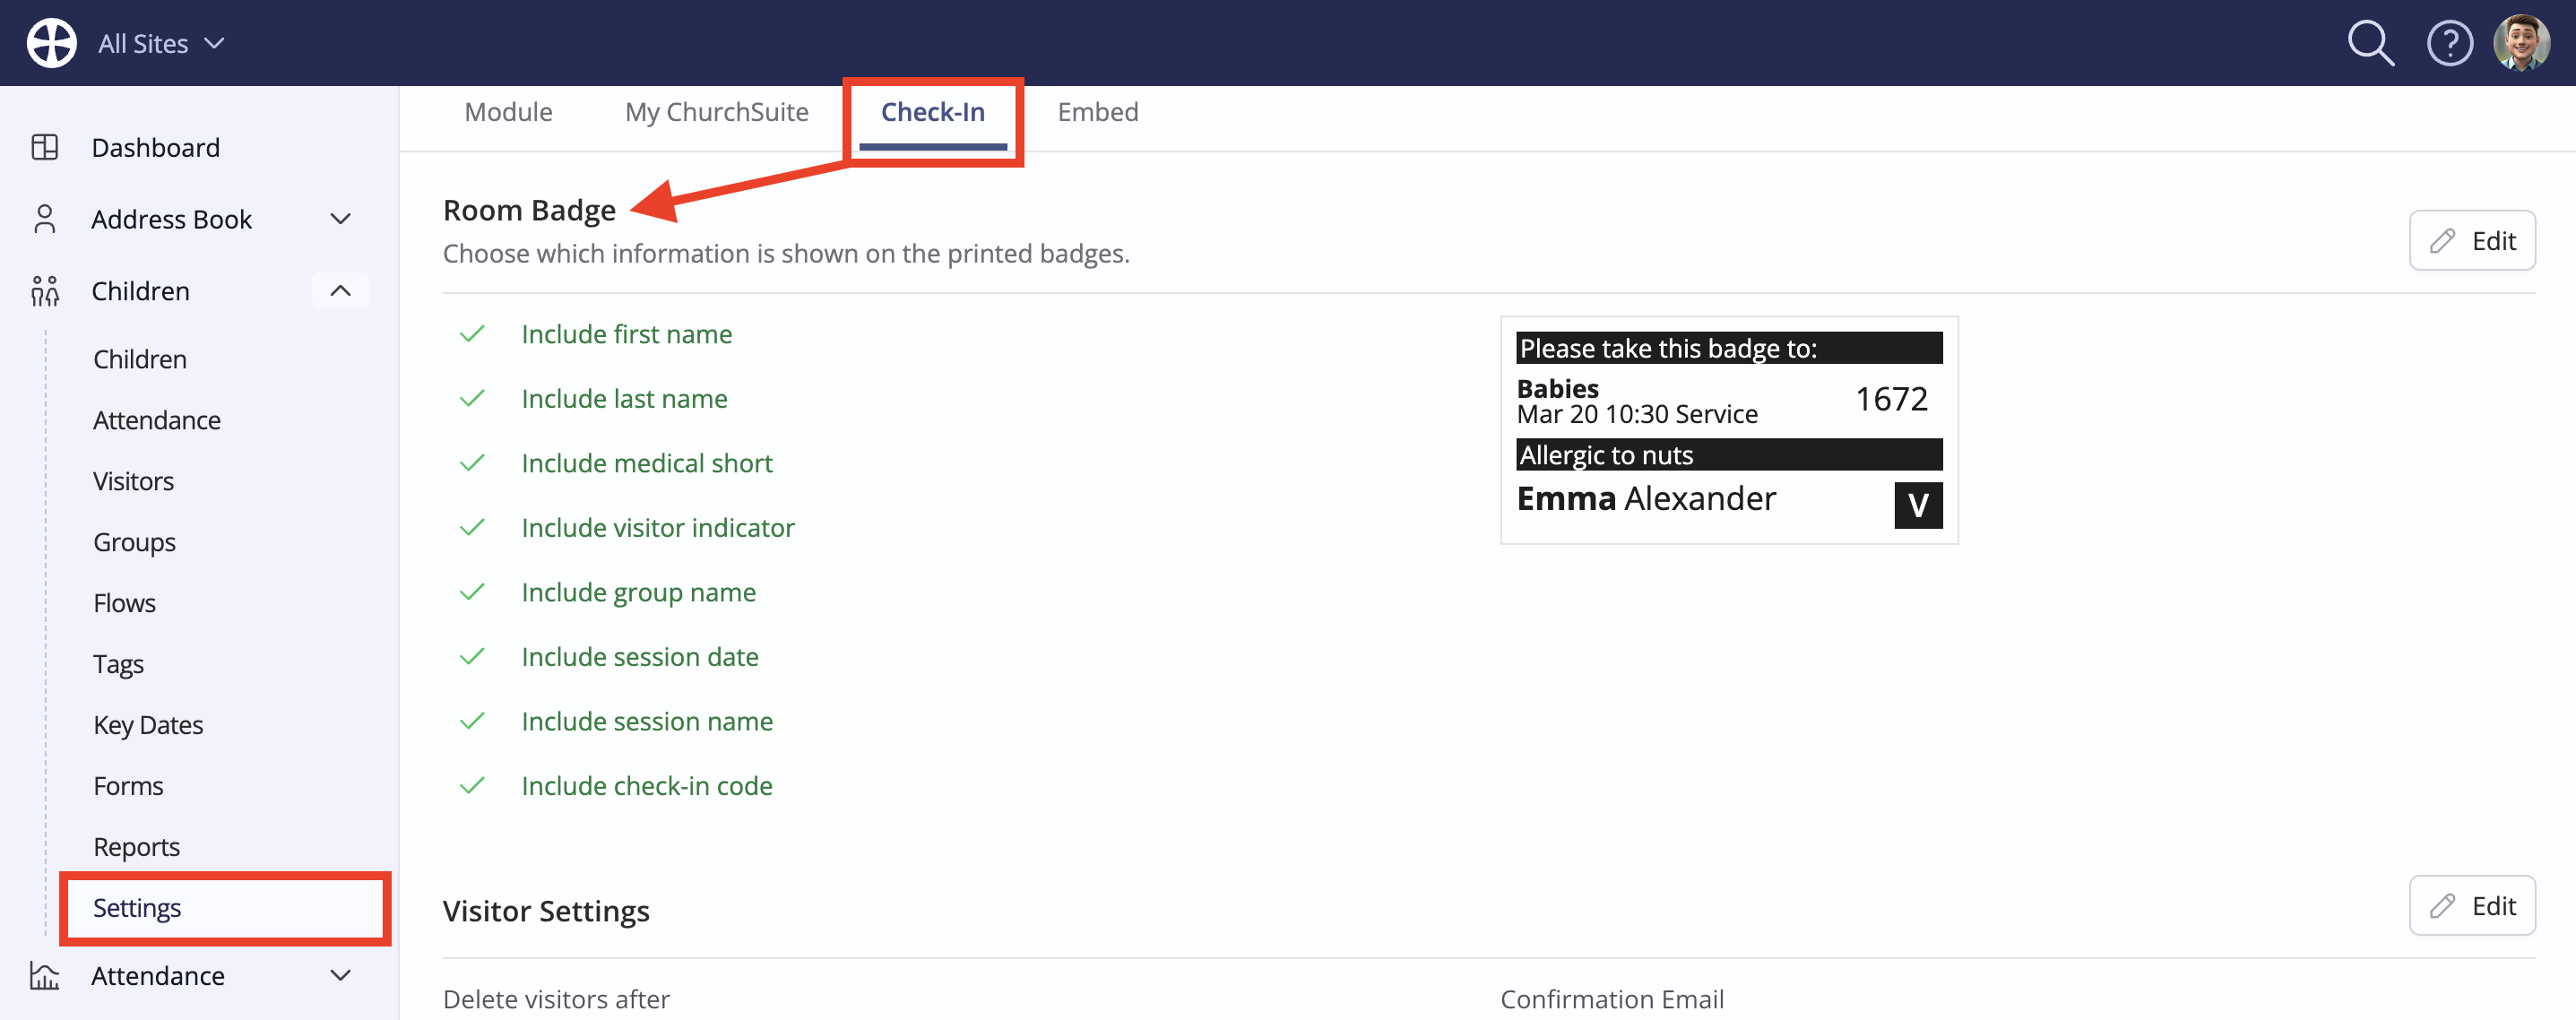
The optional Room badge, enabled on a group-by-group basis, is helpful in scenarios where internet access may be restricted or unreliable, such as during an evacuation due to a fire or other emergency. Rather than relying on tethered internet access on a check-in device to view a register of checked-in children, group leaders can use the room badges to maintain a paper-based register of the children and visitors handed into their care when they arrive at the group at the start of the session. The room badge can then be cancelled or destroyed as children are returned to their parents/carers at the end of the session. Many churches like to collate the room badges on a piece of paper and retain it as an additional permanent record of attendance to the group.
You can customise the details shown on a room badge in your Children module settings on the Check-In Options tab:
Badge printing using the iOS/Android Check-In app
A Check-In app is available to download for free from the respect app stores for iOS and Android devices. The app has built-in printer drivers for all supported Brother label printers.
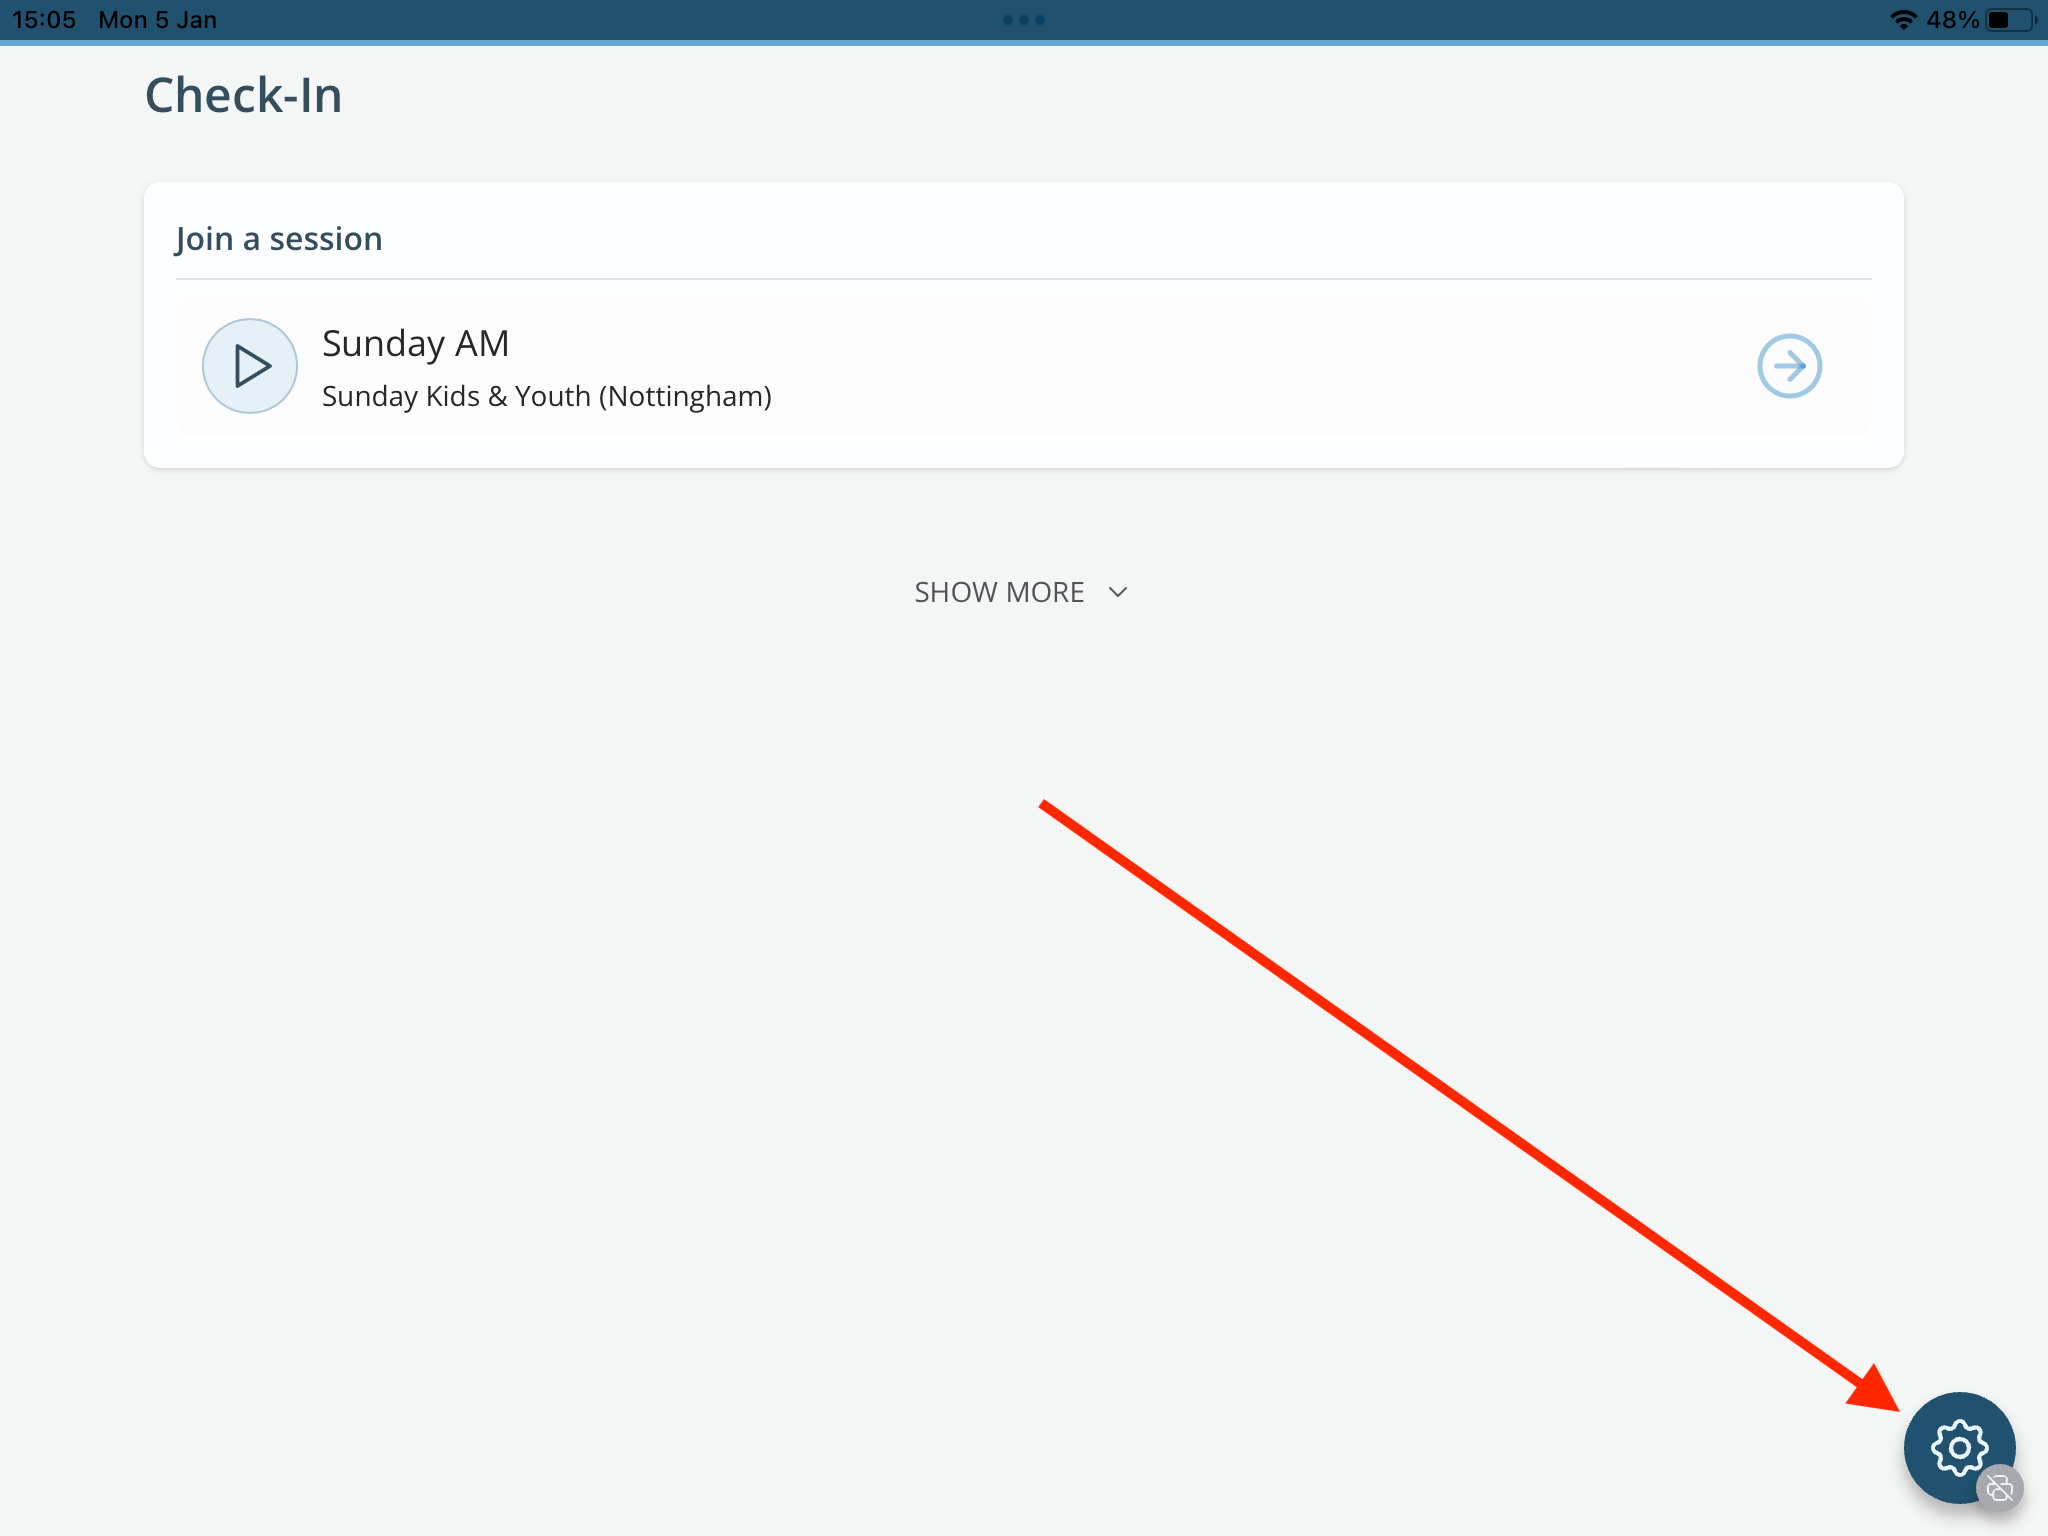
Once downloaded, open the app and follow the on-screen instructions to log in: search for and select your church or charity and enter your Username or User email address and password. Once authenticated, with the printer powered on, loaded with a roll of labels, and before starting or joining a session, click the Print Settings icon in the bottom-right corner of the screen.
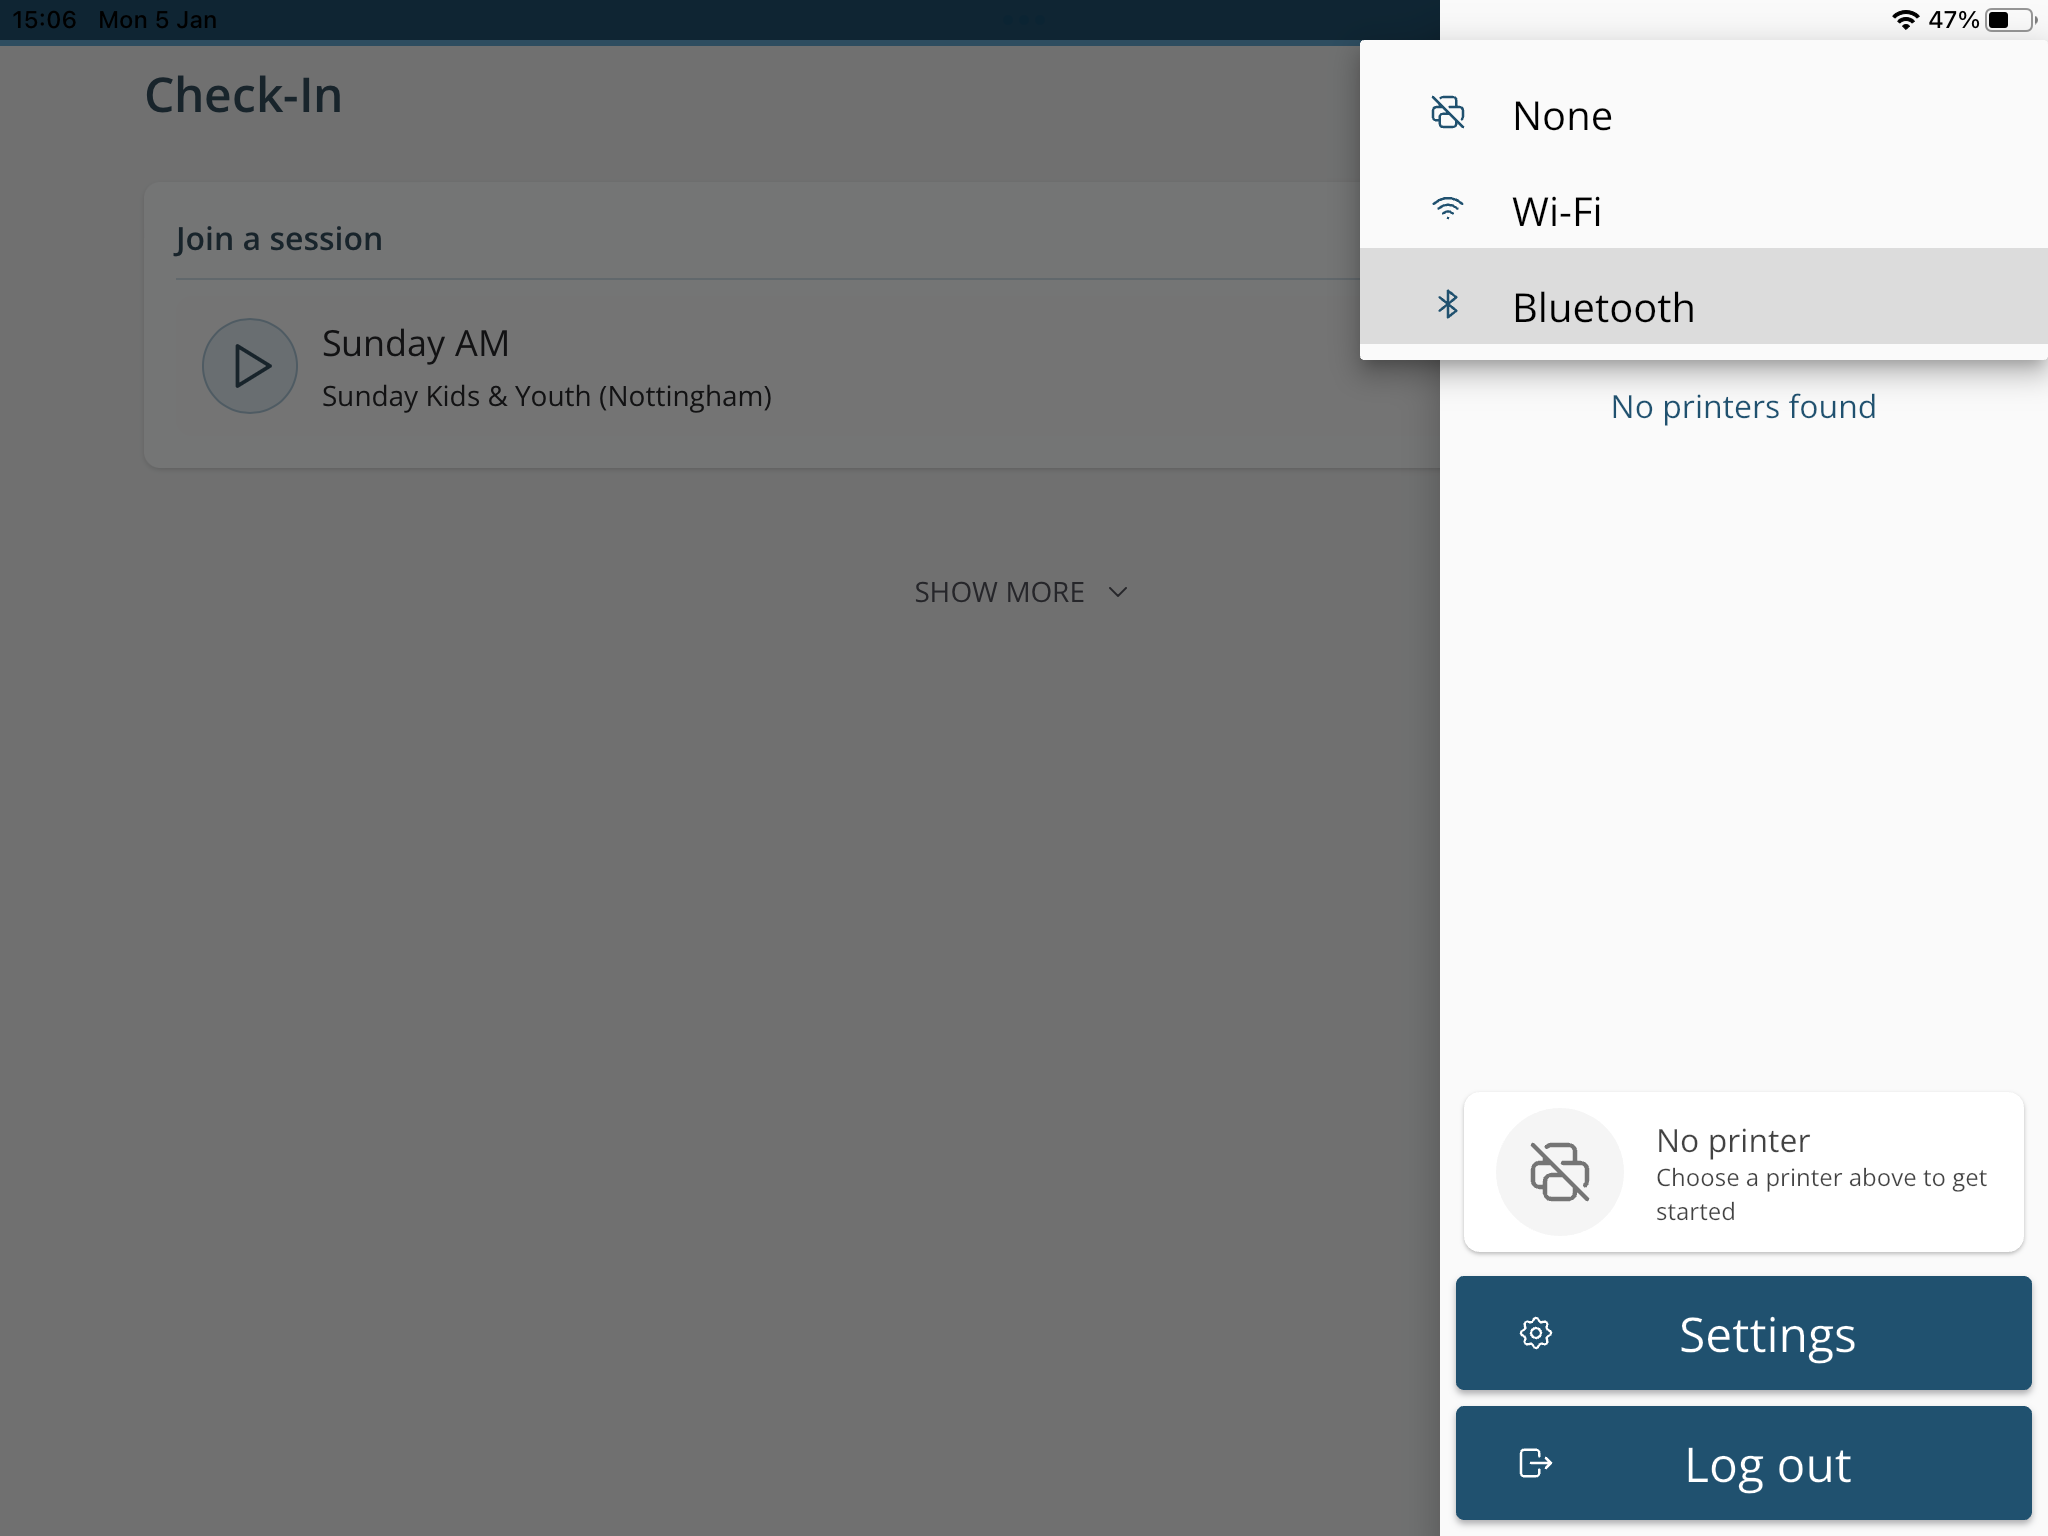
The Print Settings pane is revealed. Use the selector at the top to choose the Connection appropriate for your printer.
When the printer is found, click on the printer name in the list and click Setup.
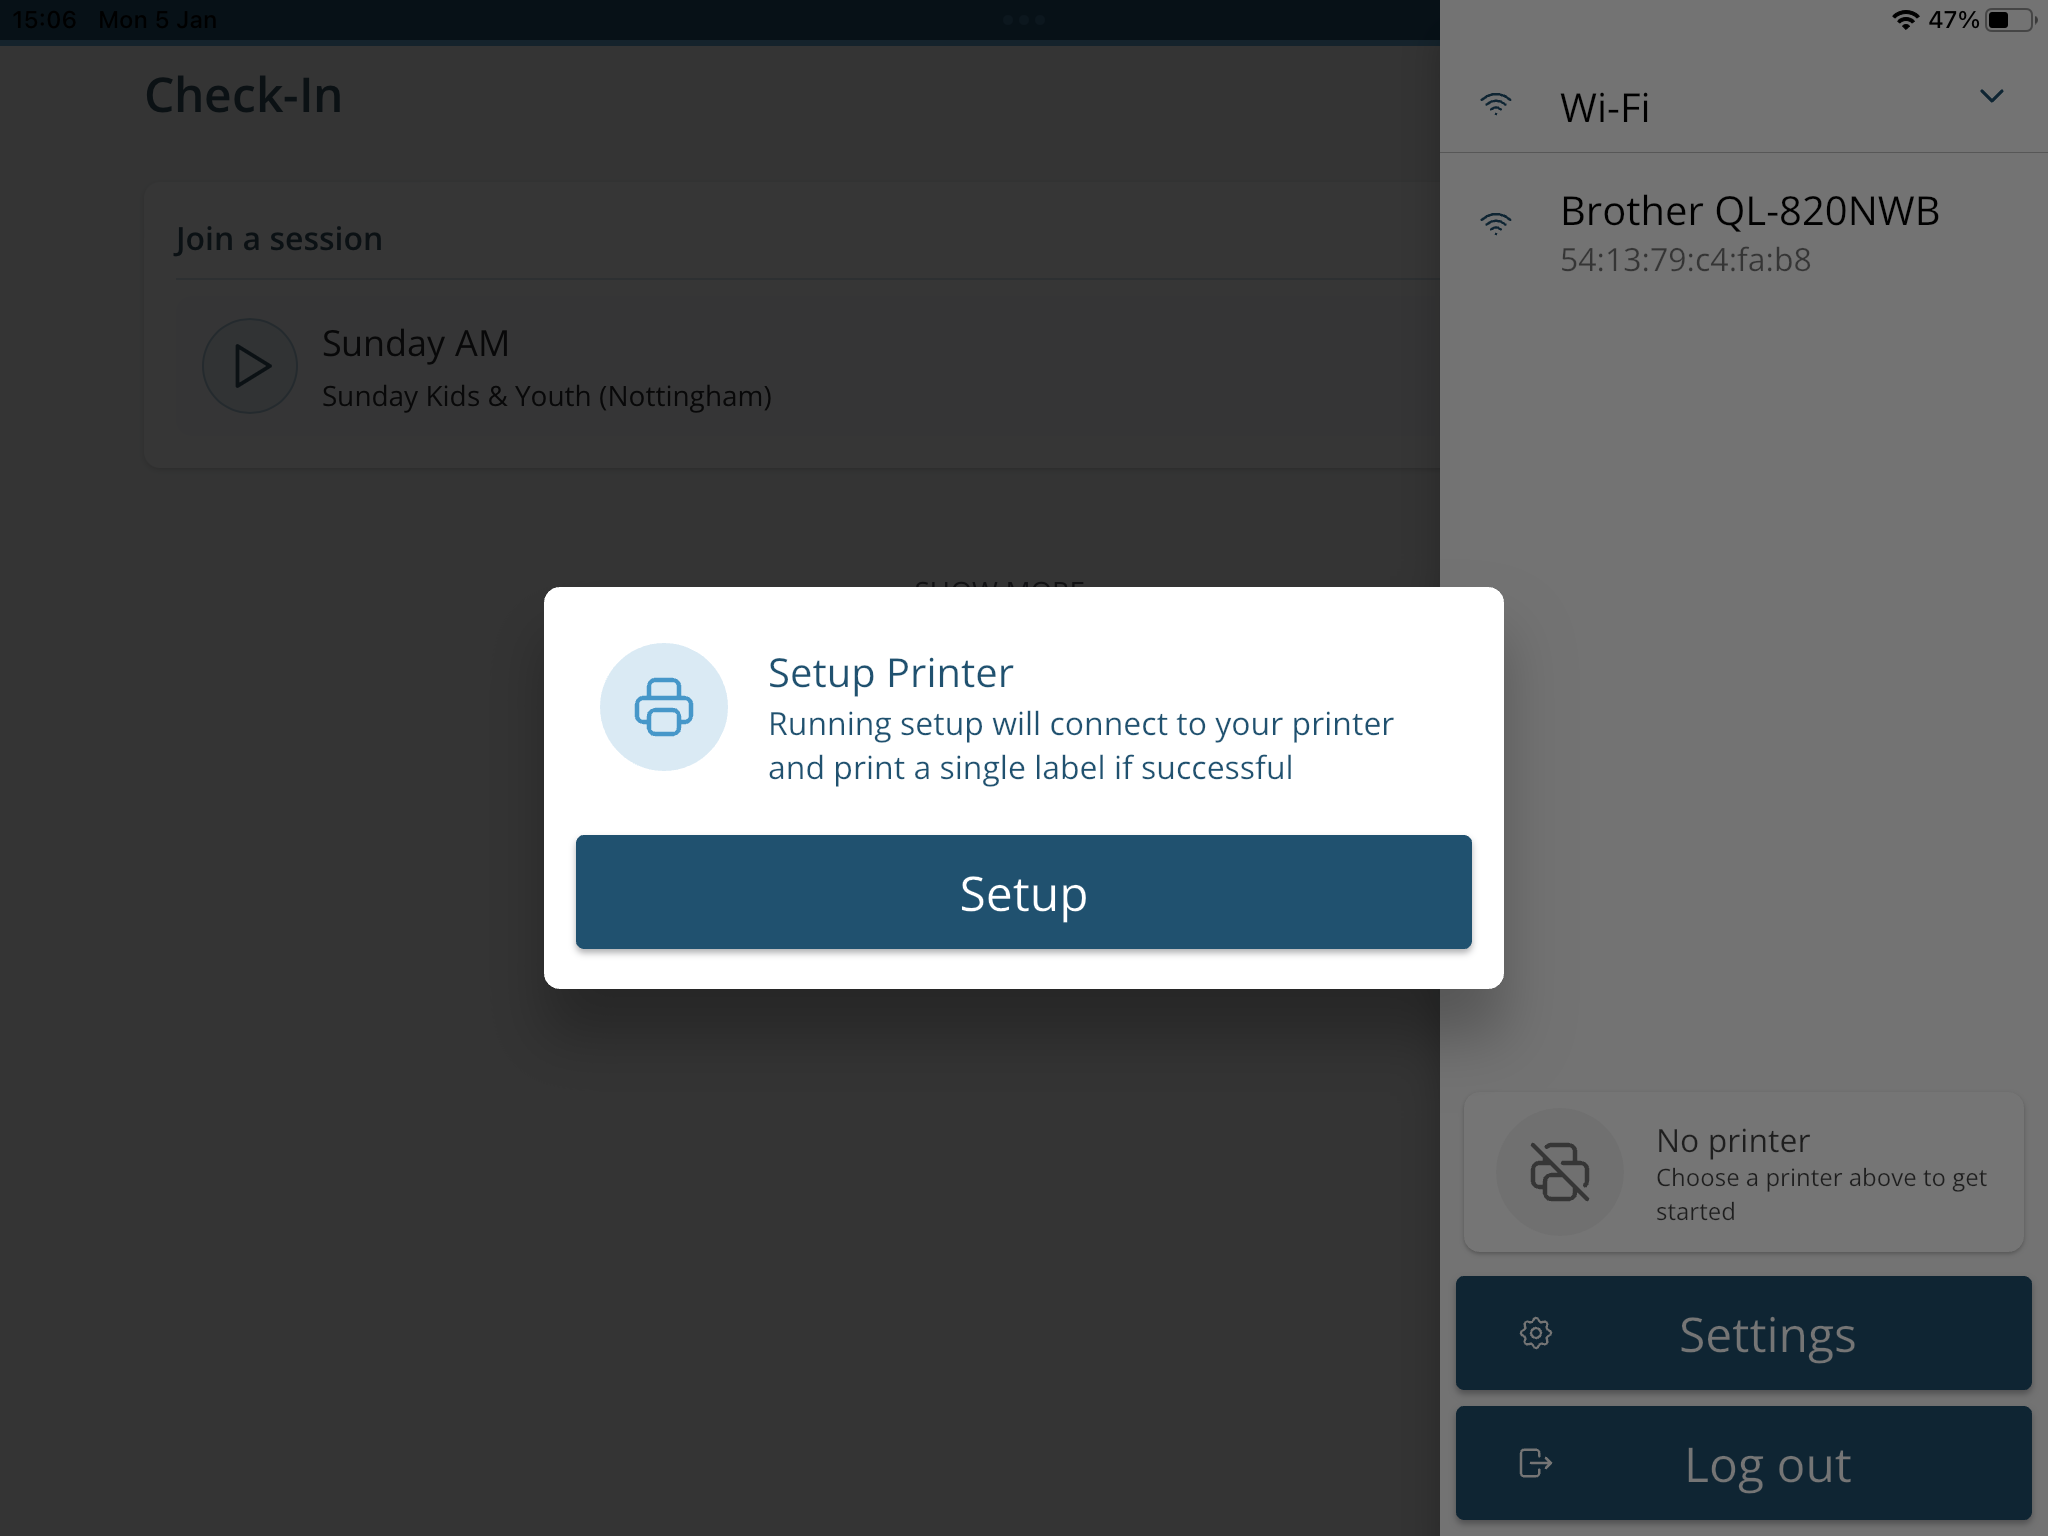
When completed, a single label will be printed. That test label will contain details of the printer model and the label stock currently loaded in the printer. Click OK to dismiss the "Setup Complete" confirmation. Click off the Print Setting pane to hide it.
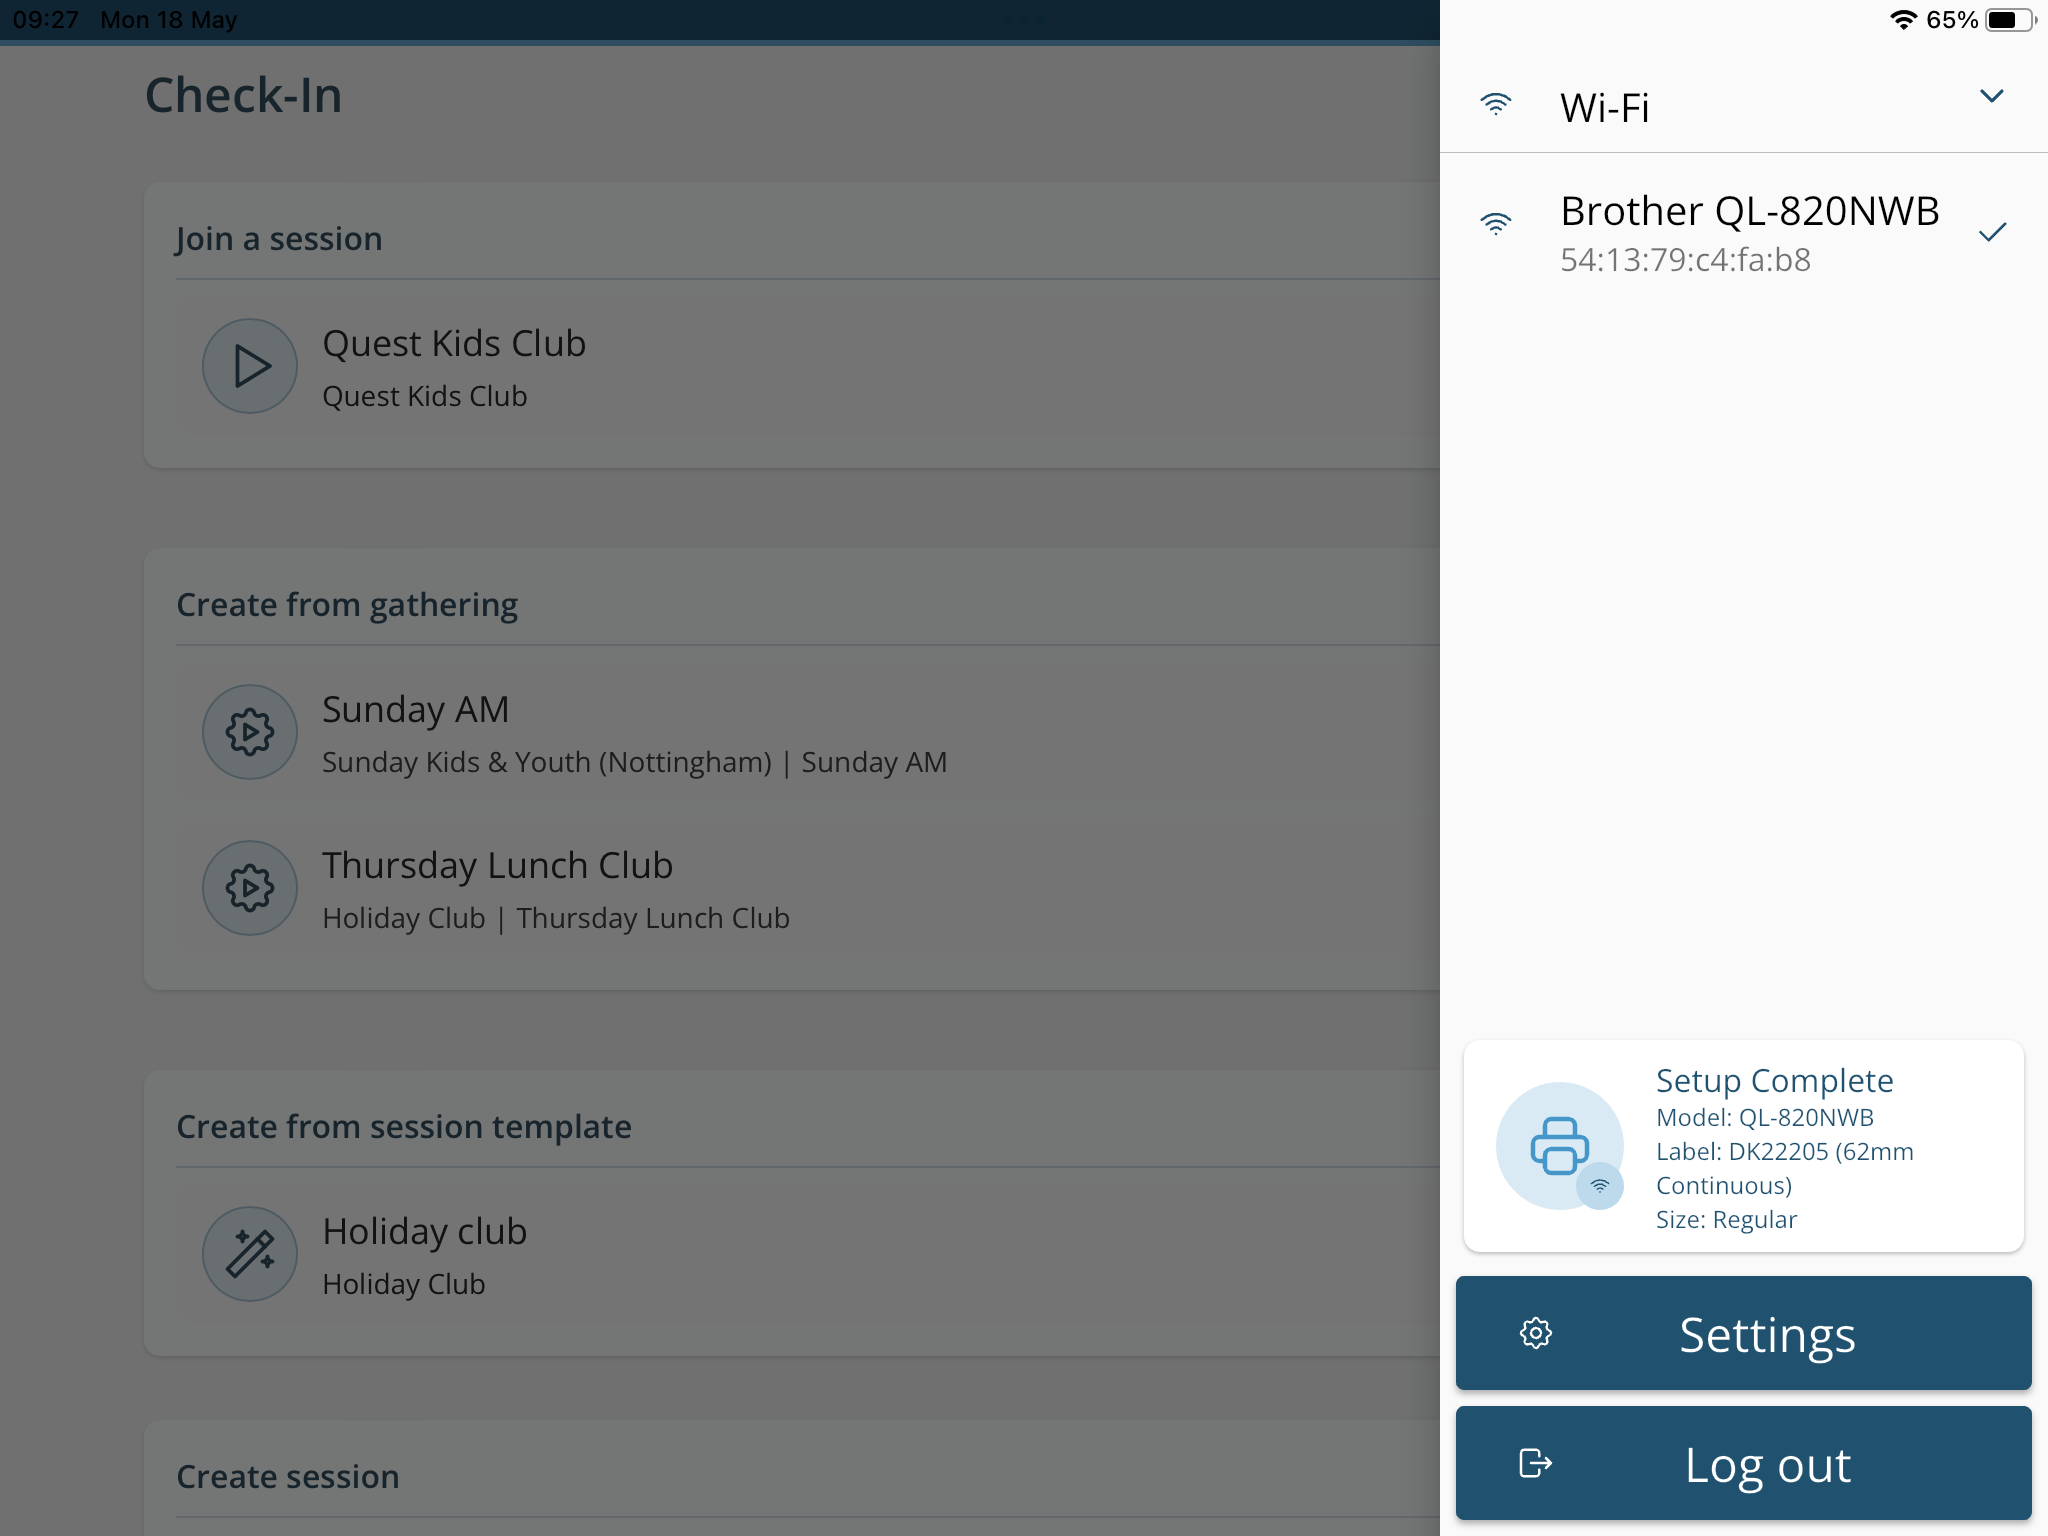
The device is now ready for badge printing.
App printing via Bluetooth
With the printer powered up and Bluetooth turned on, open your Check-In device Bluetooth Settings and connect/pair to the Brother printer. Next, from the Check-In app Admin area, access the Print Settings through the cogwheel icon in the bottom-right corner of the screen. Select Bluetooth from list drop-down list of Connections (rather than None or Wi-Fi). When the printer is found, click on the printer name in the list and click Setup. When completed, a single label will be printed. That test label will contain details of the printer model and the label stock currently loaded in the printer. Click OK to dismiss the "Setup Complete" confirmation. Click off the Print Settings pane to hide it. The device is now ready for badge printing.
Badge printing using a Mac OS device
In this section, we show the use of the Google Chrome browser. The same principles apply to other browsers, such as Safari and Firefox.
Step 1 of 3 - Install the Brother printer driver
Download and install the printer driver files from the Brother website. No printer driver installation is required for those using macOS version 11 or newer; however, the printer must be connected to the Mac OS device using USB and powered on.
Step 2 of 3 - Add the browser printing custom paper size
Open Google Chrome to a new page and press Option+Cmd+P to open the browser's print settings pop-up. From the drop-down Paper Size list, select Manage Custom Sizes:
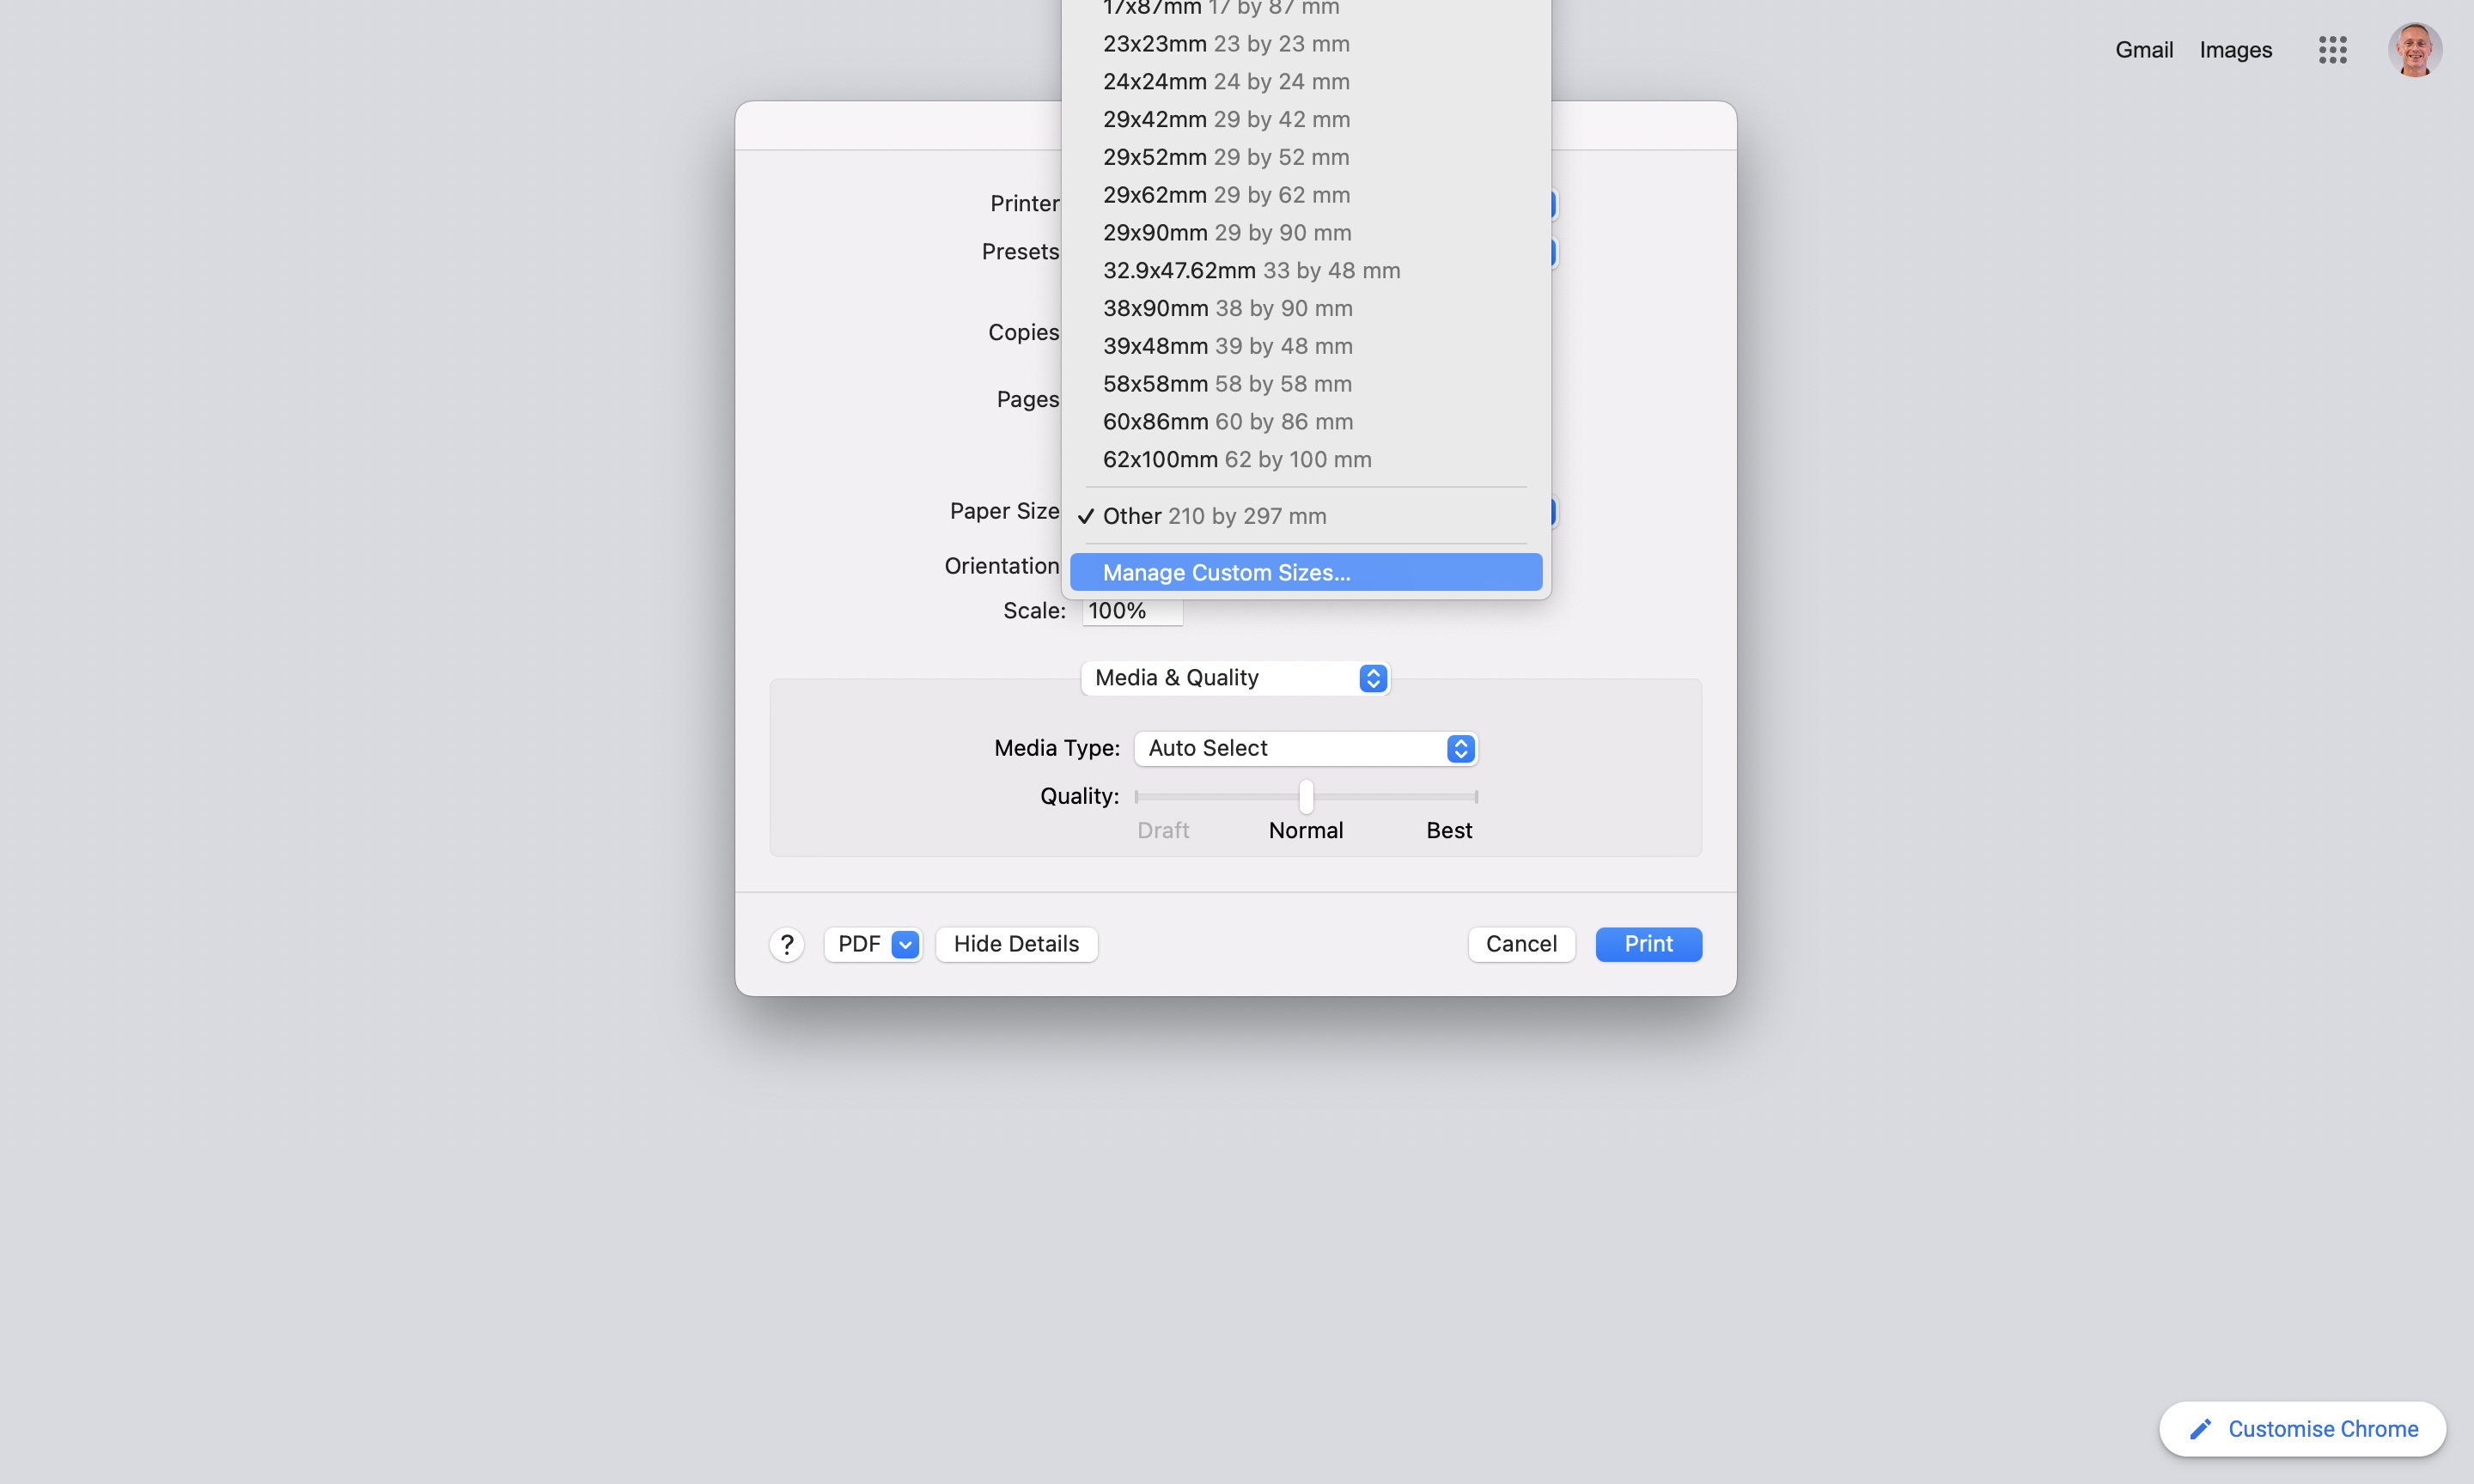
On the pop-up, click the " +" button (bottom left) to Add a new custom paper size to the list. Rename added items by double-clicking and overtyping the default name. Press <Enter> to apply the item name change.
Earlier in this article, you set a Default Badge Size in your Children module settings. For Brother Small labels, enter Width 62mm and Height 29mm. For Brother Large labels, enter Width 62mm and Height 100mm. You can add both options - later you'll set the default. All other label settings are left as default. Click OK to close the pop-up and Cancel to dismiss the print settings pop-up.

Step 3 of 3 - Add the printer and set the default printer and paper size
From the menu, select System Settings:

Select Printers & Scanners (located at the bottom of the list of settings on the left) or use the 'search' to find the Printers & Scanners setting. Click Add Printer.

With the printer connected by a USB cable (provided with the printer) and powered on, select the Brother printer from the list and click Add.

Finally, set the Default printer and paper size. As explained earlier in this article, the default paper size must match the Default Badge Size set in your Children module settings. When completed, close the pop-up.

The device is now ready for badge printing using the Check-In system. The Check-In system login page is accessible in your preferred browser at login.churchsuite.com (or login.charitysuite.com for CharitySuite customers).
Note: Google Chrome for Mac OS does not support a browser 'kiosk' mode with silent printing, which means users will experience print pop-ups during badge printing and will need to click Print each time badges are previewed during the check-in process. This print preview is displayed for around 10 seconds before auto-closing and cycling the system, ready to check in the next child. Those wishing to avoid these Print pop-ups should consider using a Windows device running Google Chrome in 'kiosk' mode with silent printing.

Badge printing using a Windows device
The Check-In system can be used for badge printing on a Windows device using any popular preferred browser. We recommend using Google Chrome, which supports silent printing in kiosk mode. This means there won't be any print-confirmation pop-ups in the user experience, and the device can be securely locked to just the Check-In system to prevent unwanted access to other applications or websites.
Step 1 of 2 - Install the Brother printer driver
Download and install the printer driver files for the appropriate version of Windows OS from the Brother website. Once the printer is connected to the Windows device by a USB cable and powered on, it should be automatically added to the list of printers on your device.
Step 2 of 2 - Configure the printing settings for the Brother printer
Click on the Windows Start menu and select Settings.

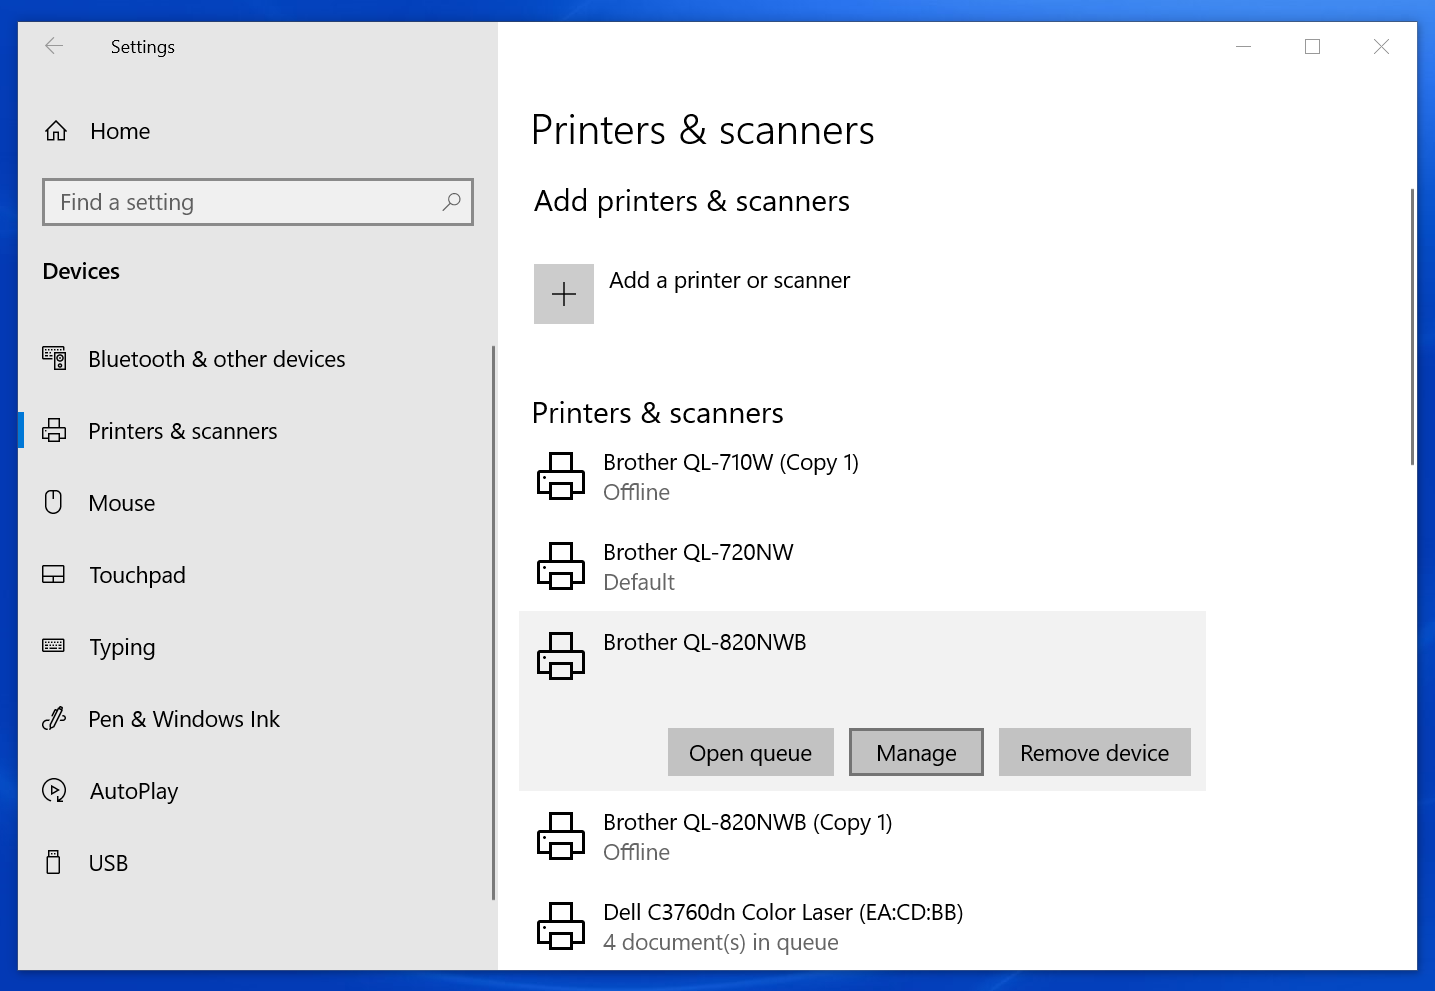
Click on the Devices section.

Click Printers & scanners. You should see the connected printer listed; otherwise, with the printer connected using USB and powered on, click Add a printer. Once listed, click on the Brother printer and click Manage.
Click Set as default. Then click Printing preferences.
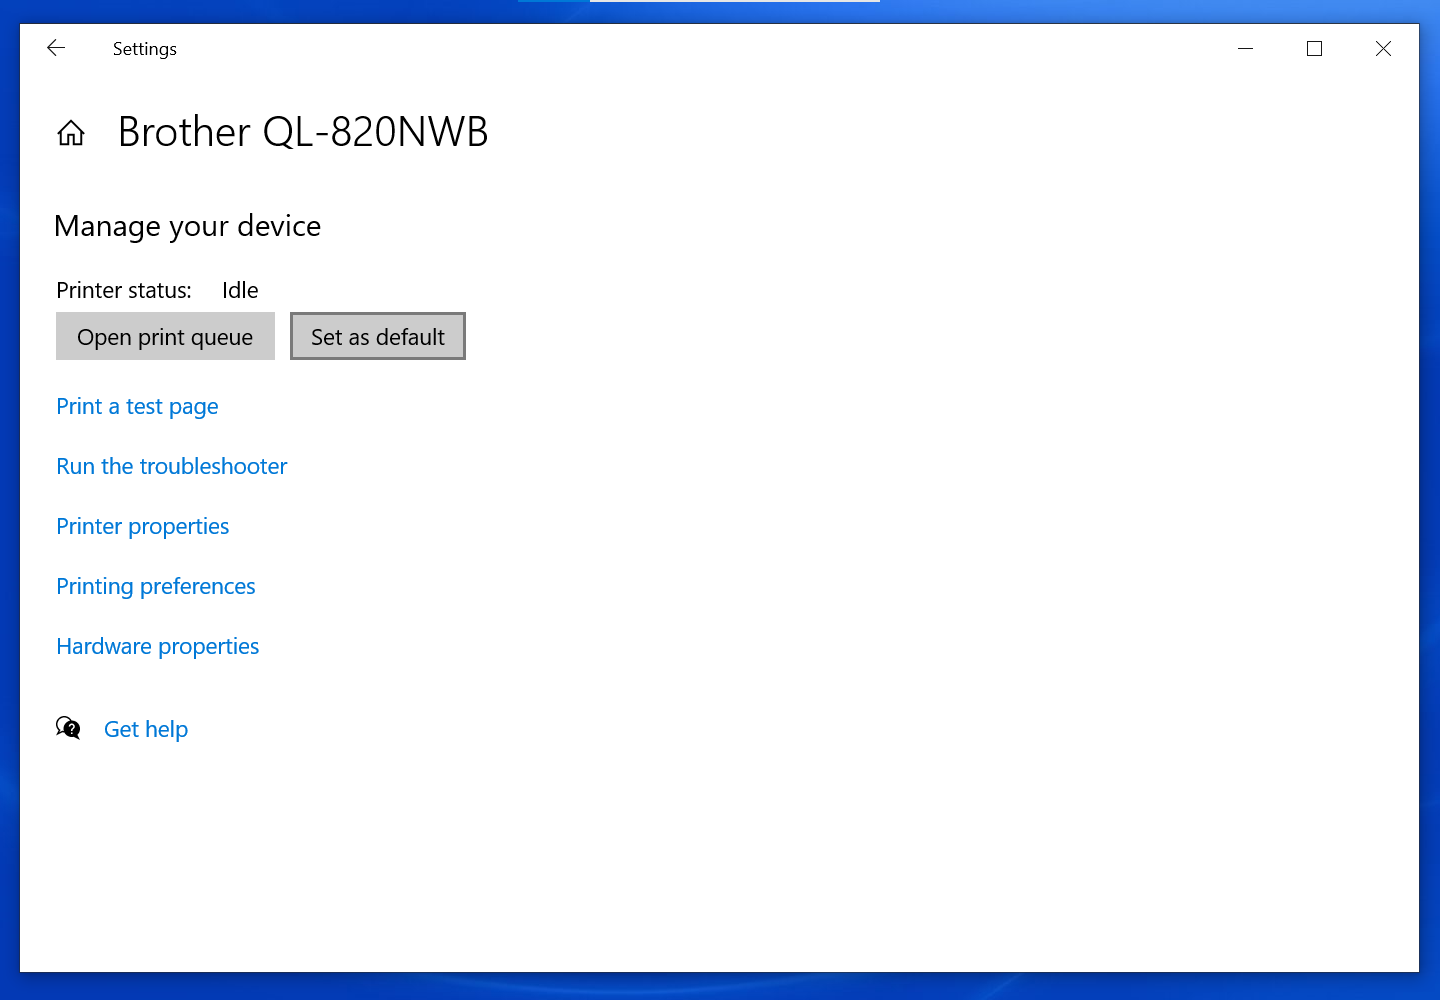
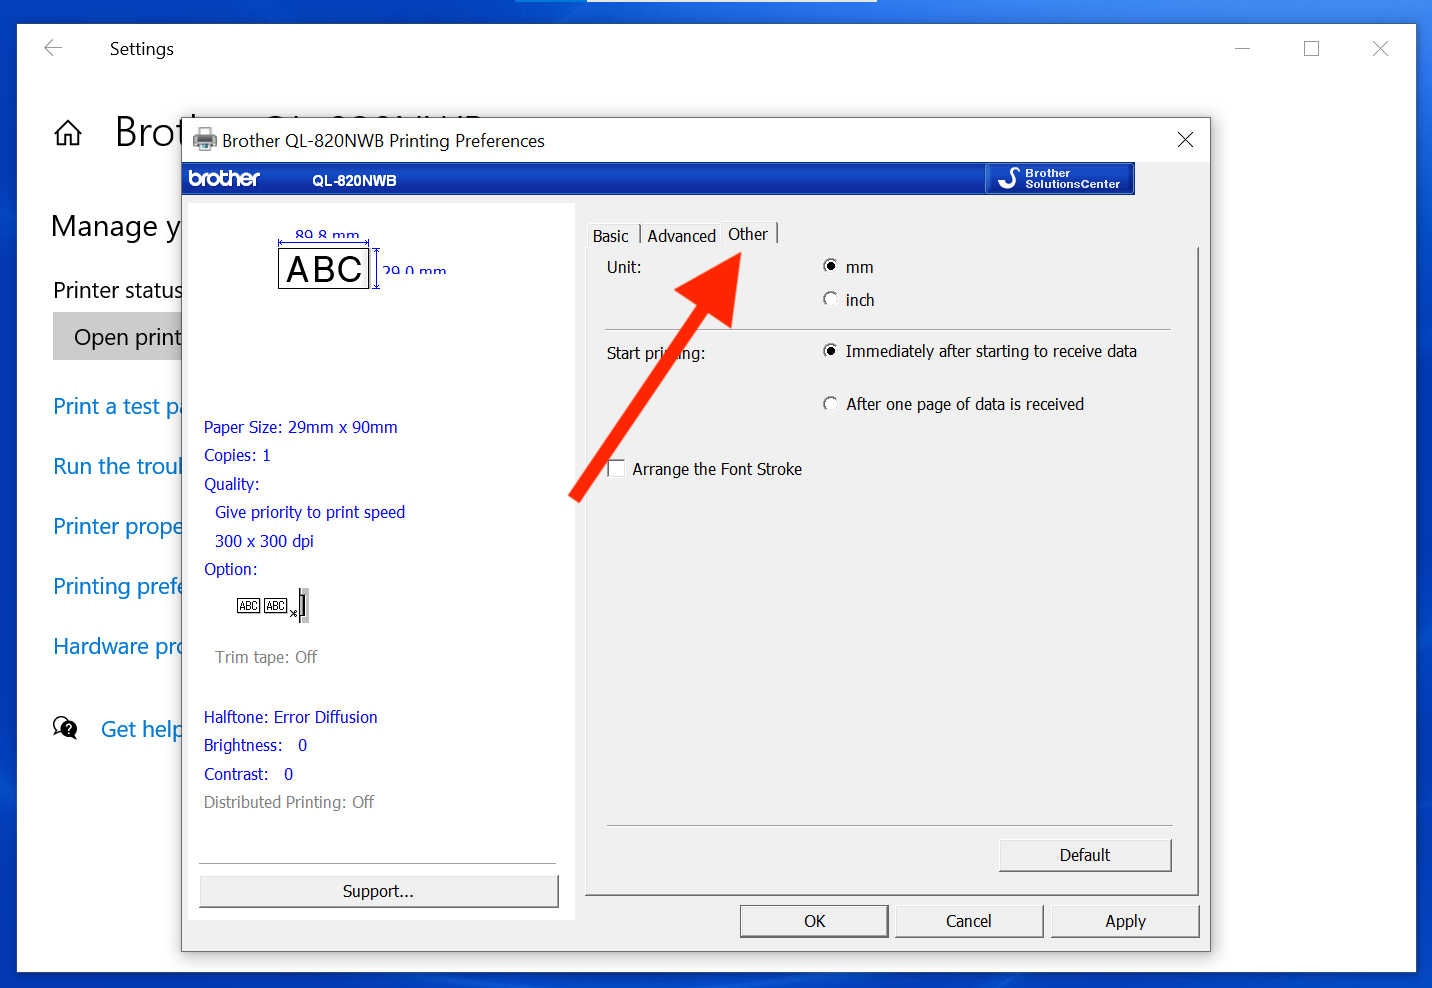
On the Printing Preferences pop-up, click on the Other tab and set the Unit as mm. Click Apply.
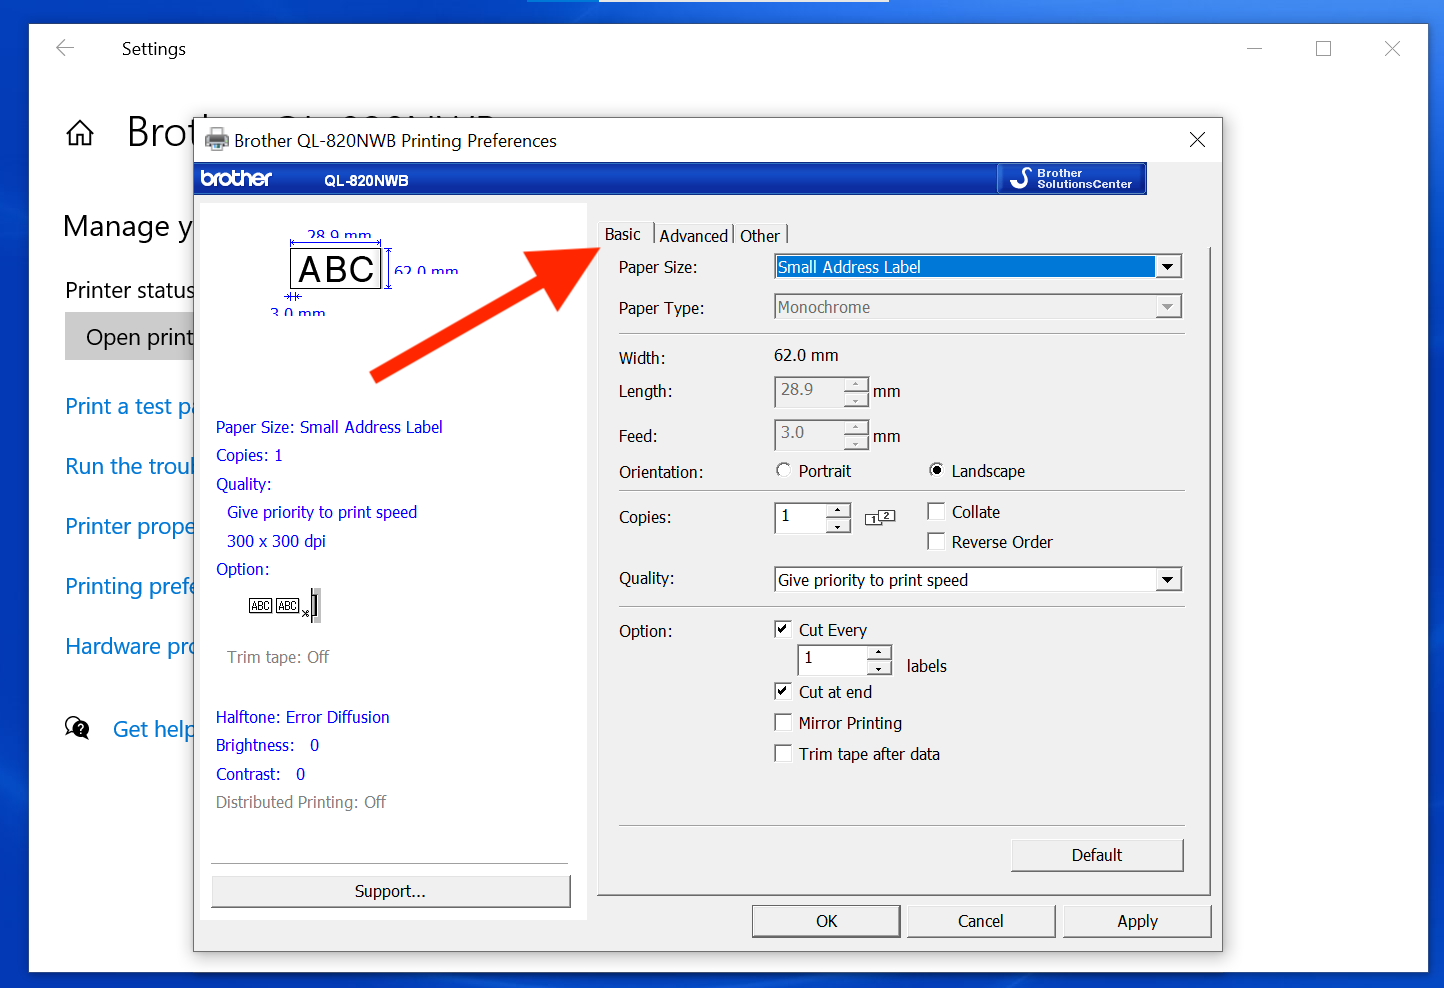
Earlier in this article, you set a Default Badge Size in your Children module settings. On the Basic tab, set the Paper Size to match, choosing Small Address Label for small labels 62mm x 29mm or Large Address Label for large labels 100mm x 62mm. All other label settings are left as default. Click OK to save the changes and close the pop-up.
The device is now ready for badge printing. The Check-In system login page is accessible in your preferred browser at login.churchsuite.com (or login.charitysuite.com for CharitySuite customers).