Running a Check-In session as a kiosk
In this article
Introduction to Kiosk mode
Starting a session
Running a session
Checking in visitors
Checking in team members and adult attendees
Overriding a child’s assigned group for a session
Checking children out at the end of a session
Closing the active session
Introduction to Kiosk mode
The Check-In System is designed to help churches register and check children into their groups quickly and securely, and then, just as easily, check them out again at the end of the session. Session attendance for each group is automatically added to the Children module. The System can be used at any of your in-person events and gatherings, not just your weekend services, and handles check-in for your known, regular children, serving team members and visiting families.
It’s incredibly versatile. You can run a Check-In session in a browser environment or on an iOS or Android mobile device running the Check-In app, which has built-in printer drivers. When used with a compatible Brother label printer, the System can produce printed badges for the session or in quantities set on a group-by-group basis. The System can produce child name badges, parent pick-up badges, room badges and team badges, or you can disable badge printing if not required for a session. For example, for a creche group, you might set the child badge quantity to two - one for the child and one for their snack box or changing bag.
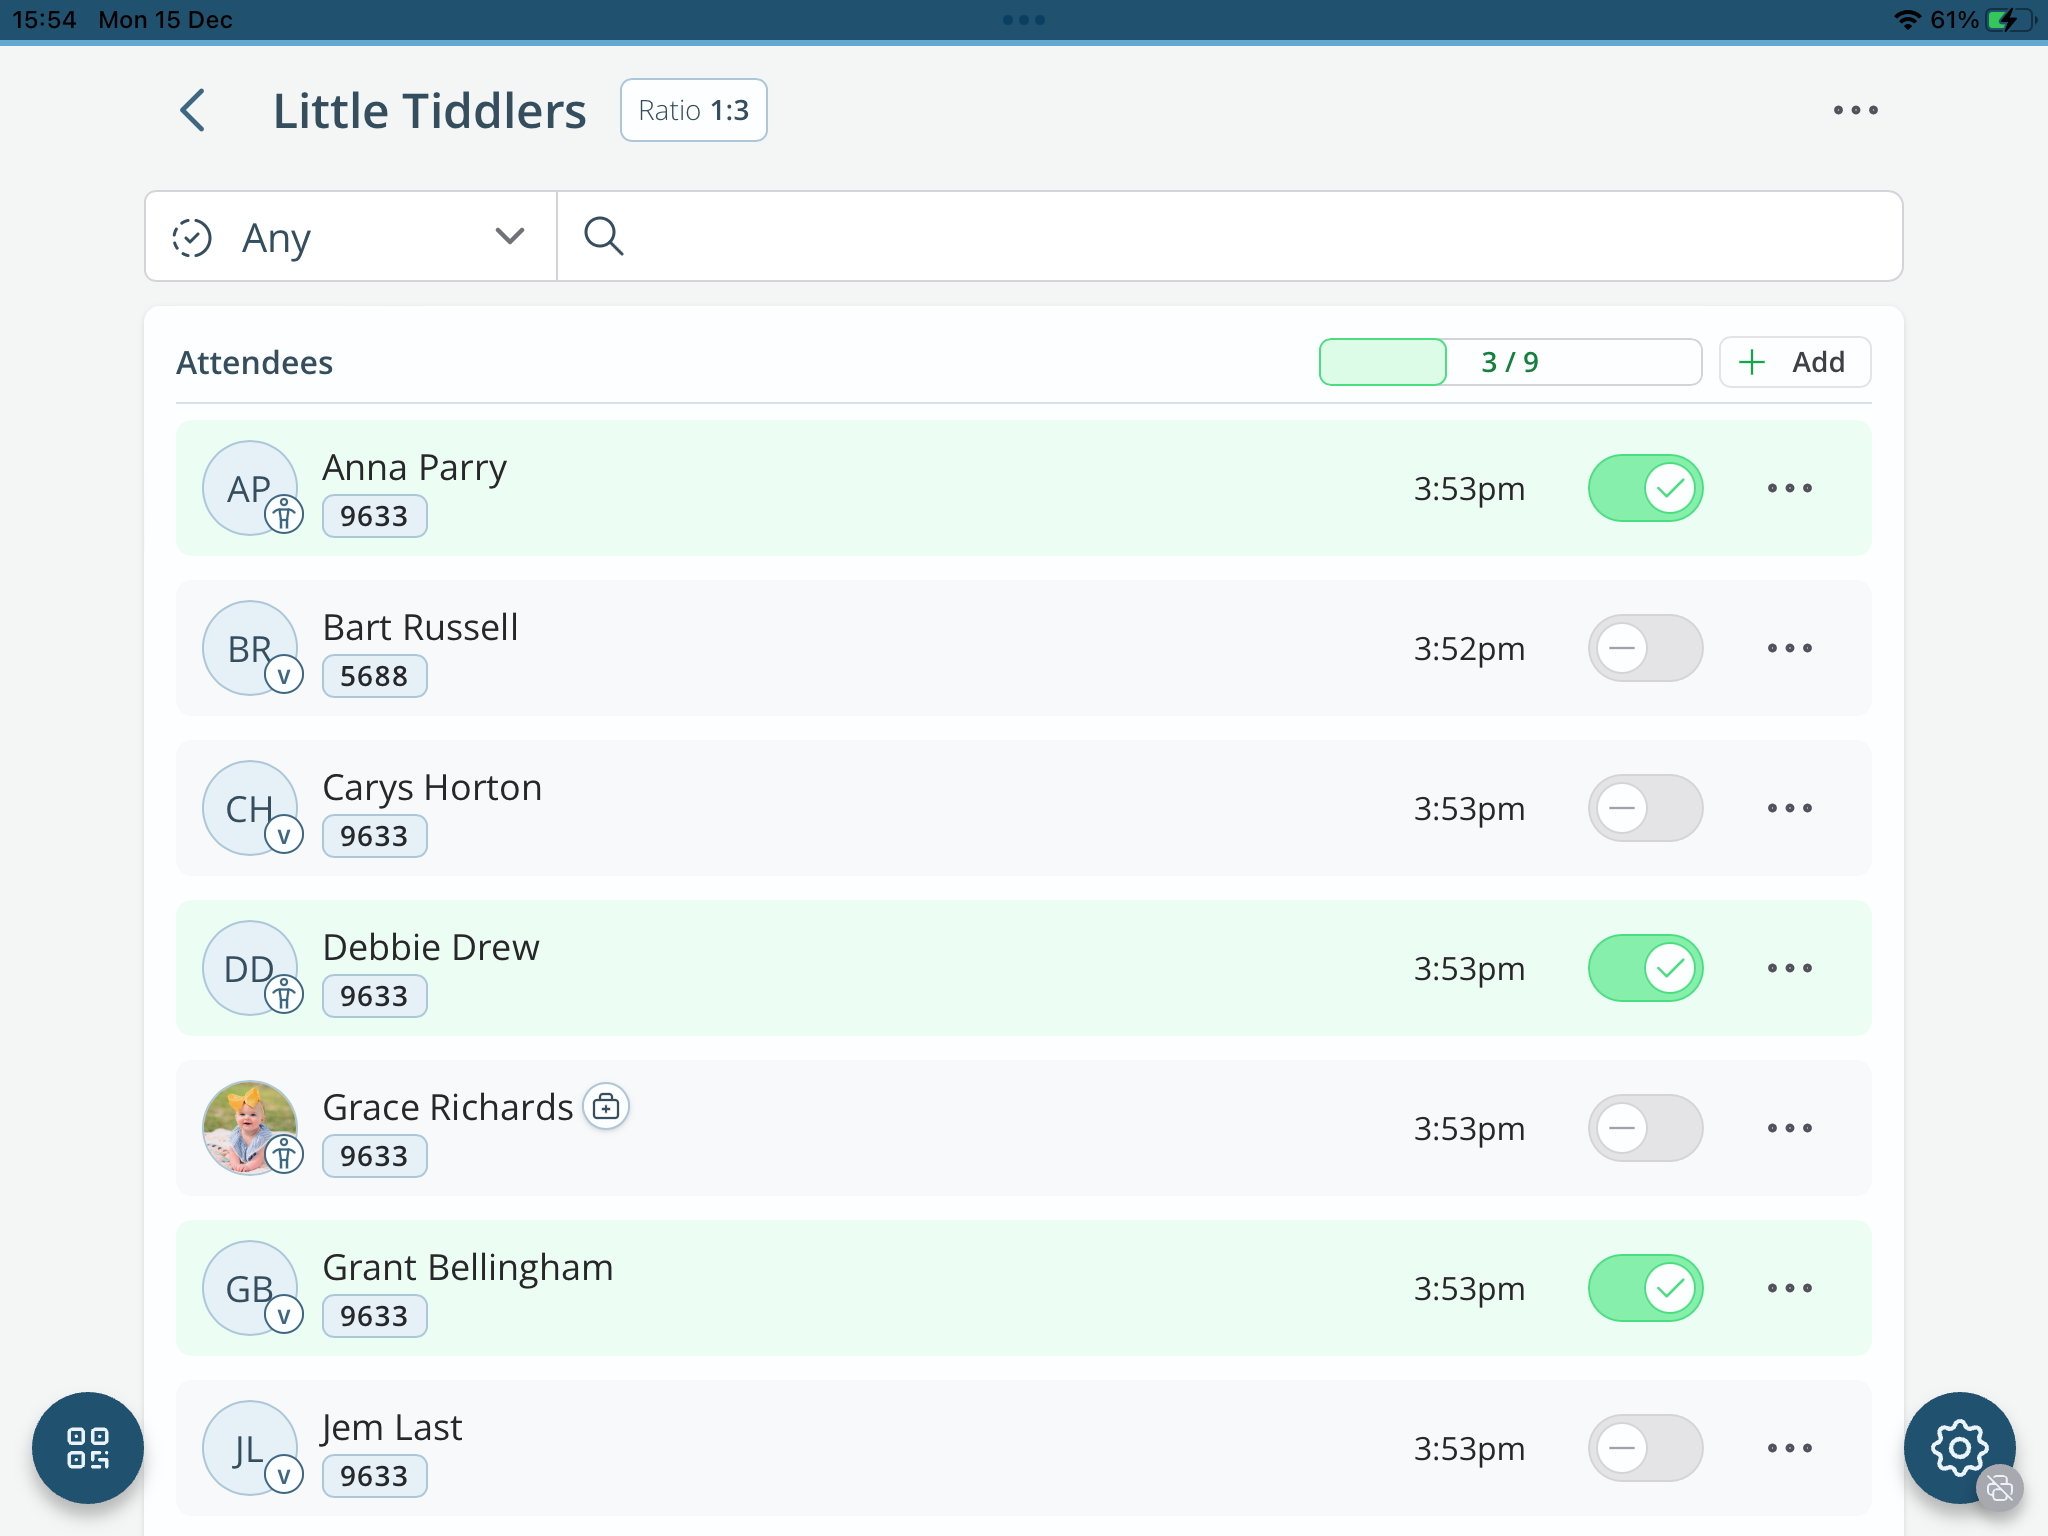
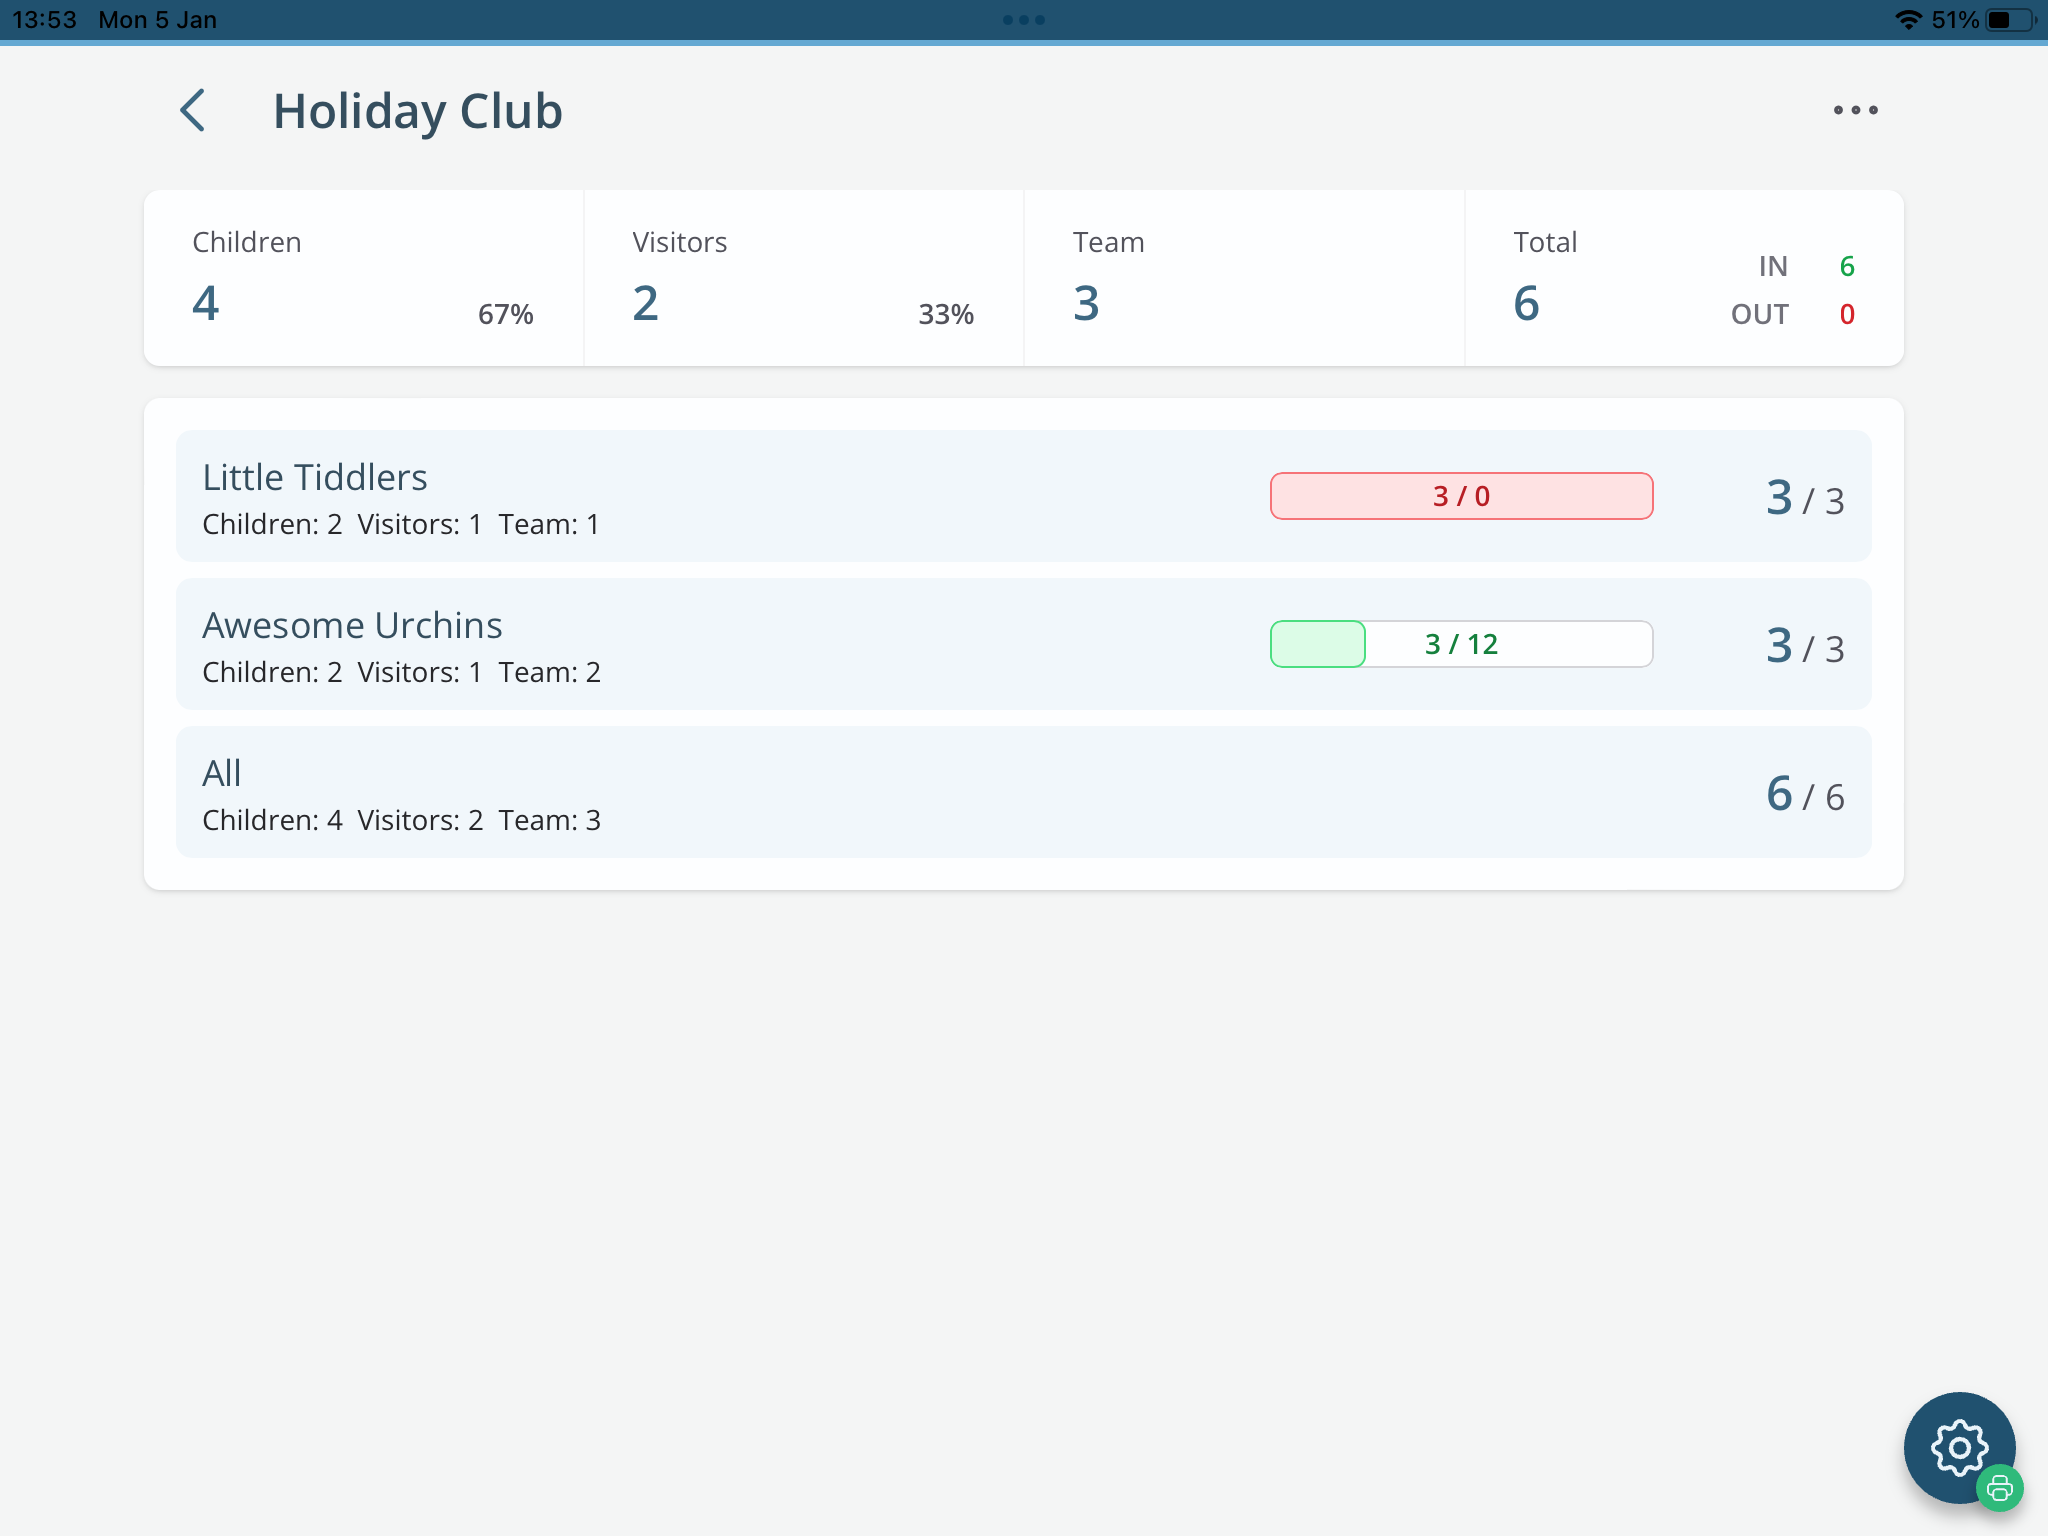
A secure leader Admin area provides a helpful summary of check-in progress for the active session and gives group leaders access to all the information they need to manage their groups and the children in their care effectively. Your group leaders also have at-a-glance access to pertinent medical and allergy details, photo/video consent, additional child information and emergency parent/carer contact details. This will be essential before serving snacks or before the website photographer begins taking pictures. And, if your team members also check into groups, the Admin area “summary” can help you manage each group’s adult-to-child ratio. A progress indicator colour alerts you to groups that are nearing capacity or approaching the maximum group ratio.
Importantly, the Check-In system is easy to set up and use. It’s one of our most popular features, used by hundreds of churches every week.
We’ve designed the Check-In system to be used in different configurations - perhaps as a Register at a central registration point or “in-room” by your friendly welcome team or group leaders, or unstaffed in a Kiosk mode where parents and carers can self-check their children into groups.
Before you read on, let’s check in!
In this article, we focus on the user experience for your parents/carers using the System in Kiosk mode to self-register and check in their children at a staffed or unstaffed registration point (with or without badge printing).
We’ve produced a separate article on Running a Check-In session as a register, which group leaders typically use for in-room check-in. In Register mode, leaders tick the names of attending children from a group register. Visitors can also be registered and checked in using this mode.
Starting a session
Open the Check-In app or log in to the Check-In System from a desktop browser. Once authenticated, the Check-In Session page is shown. From here, you can Join a session if one is already running.

Or click Show More to reveal other session options: You can create a new session from scratch or create one from a gathering. Configuring gatherings will help your Check-In team start their session with a single click without requiring them to know all the Check-In settings needed for their session. See the related support article, Adding and managing gatherings.
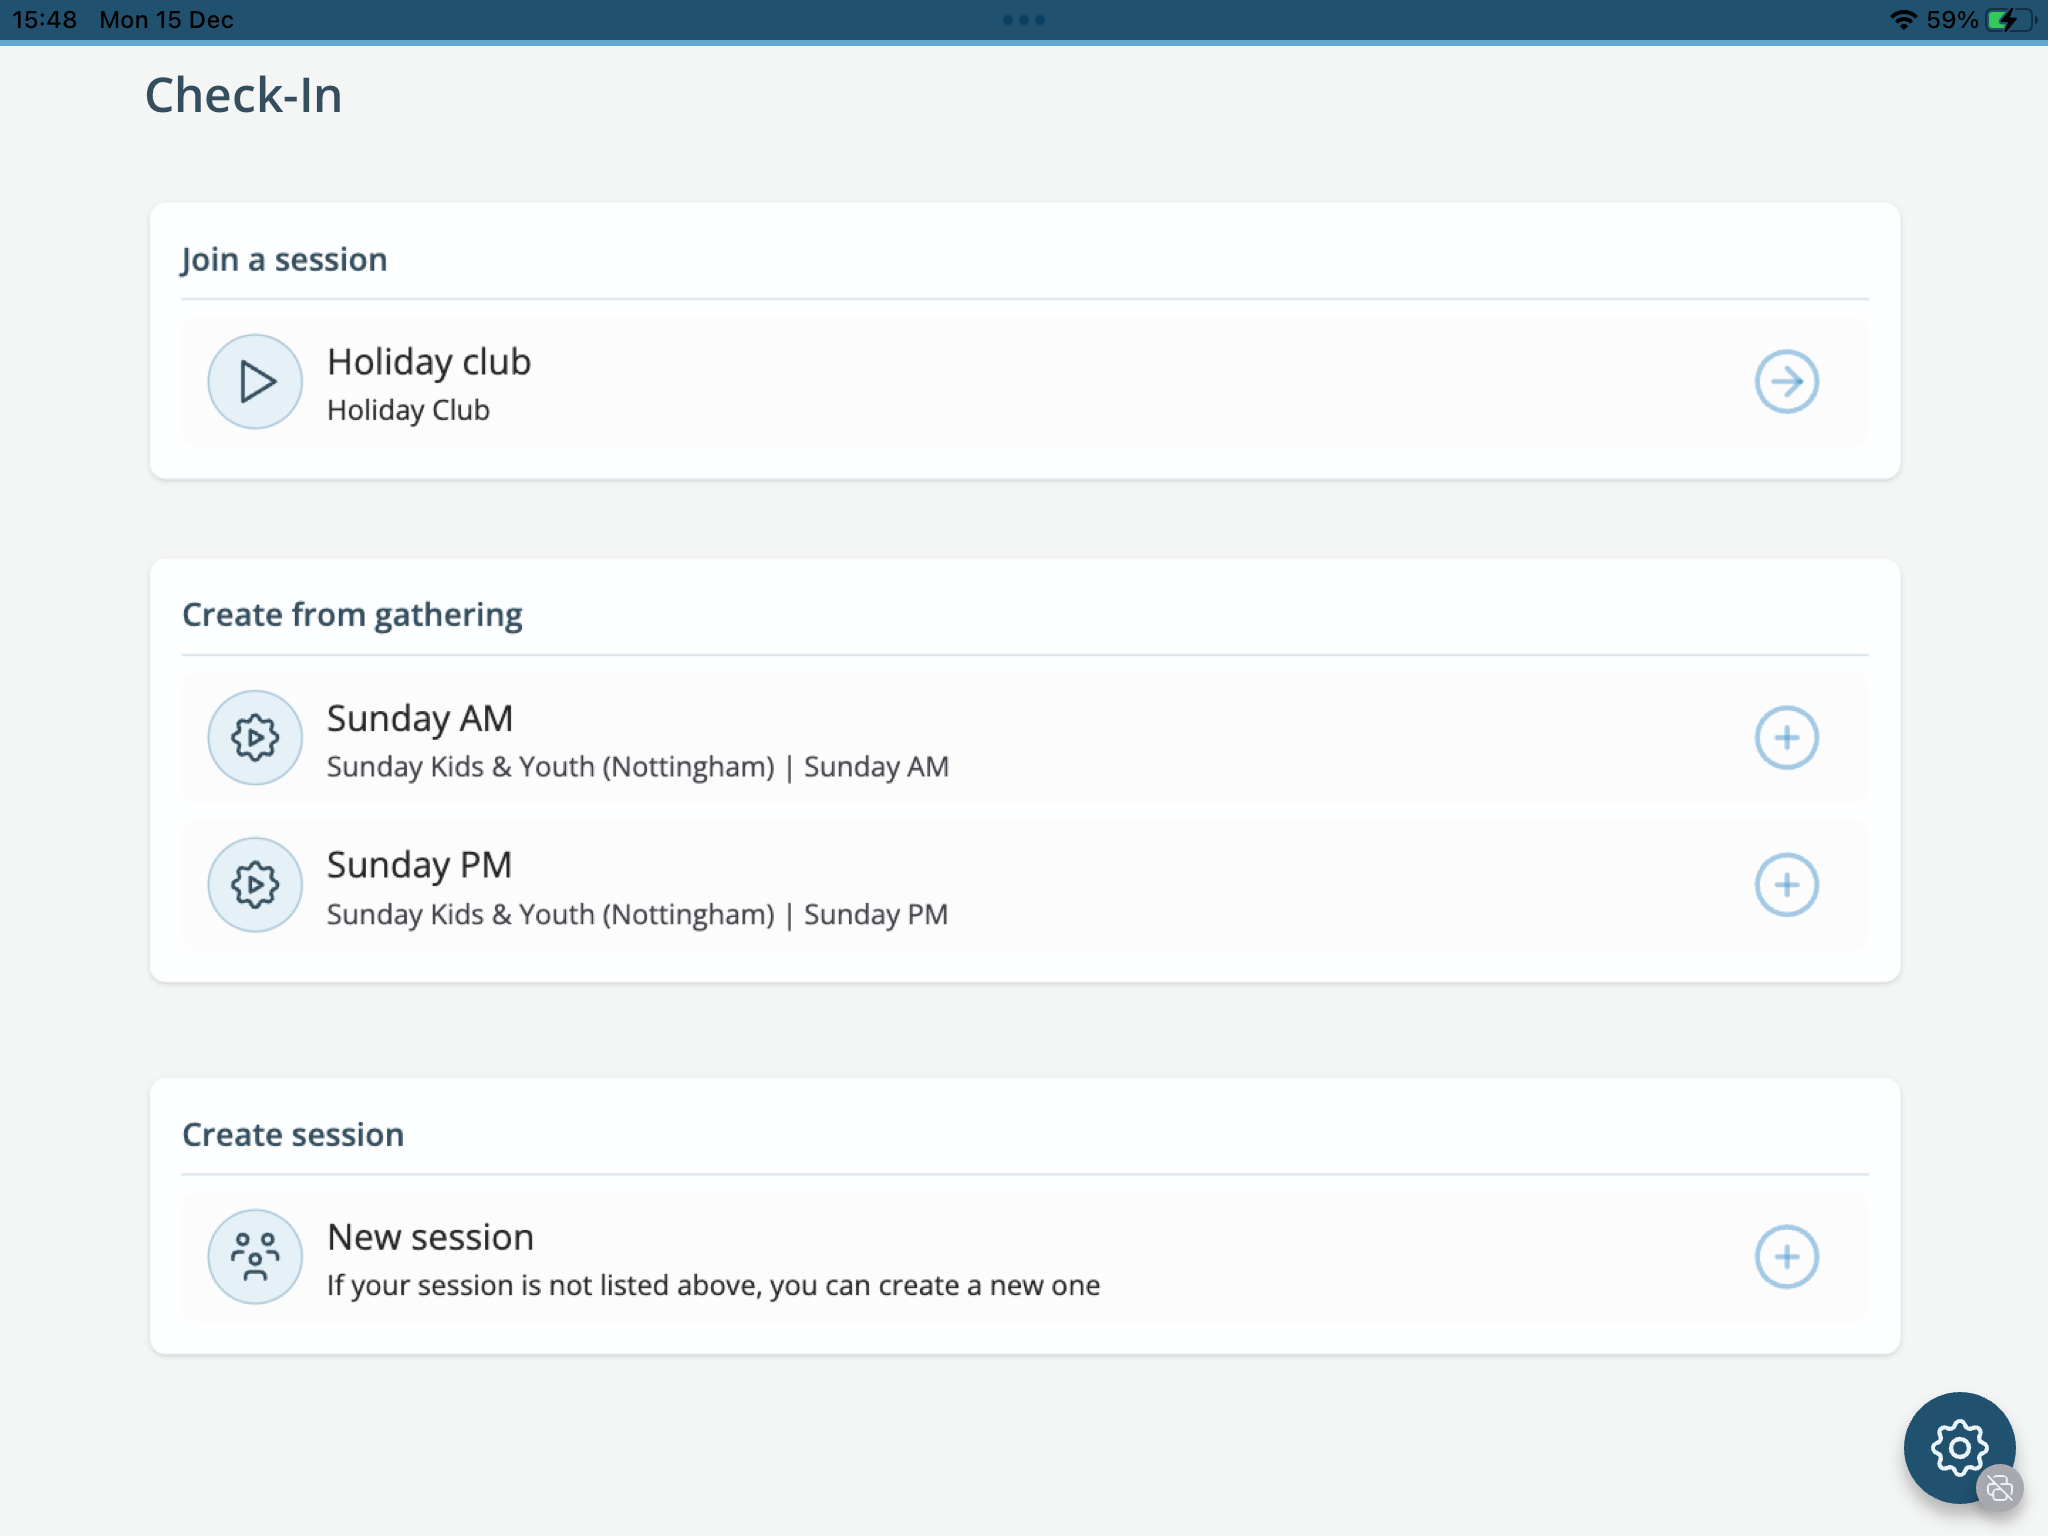
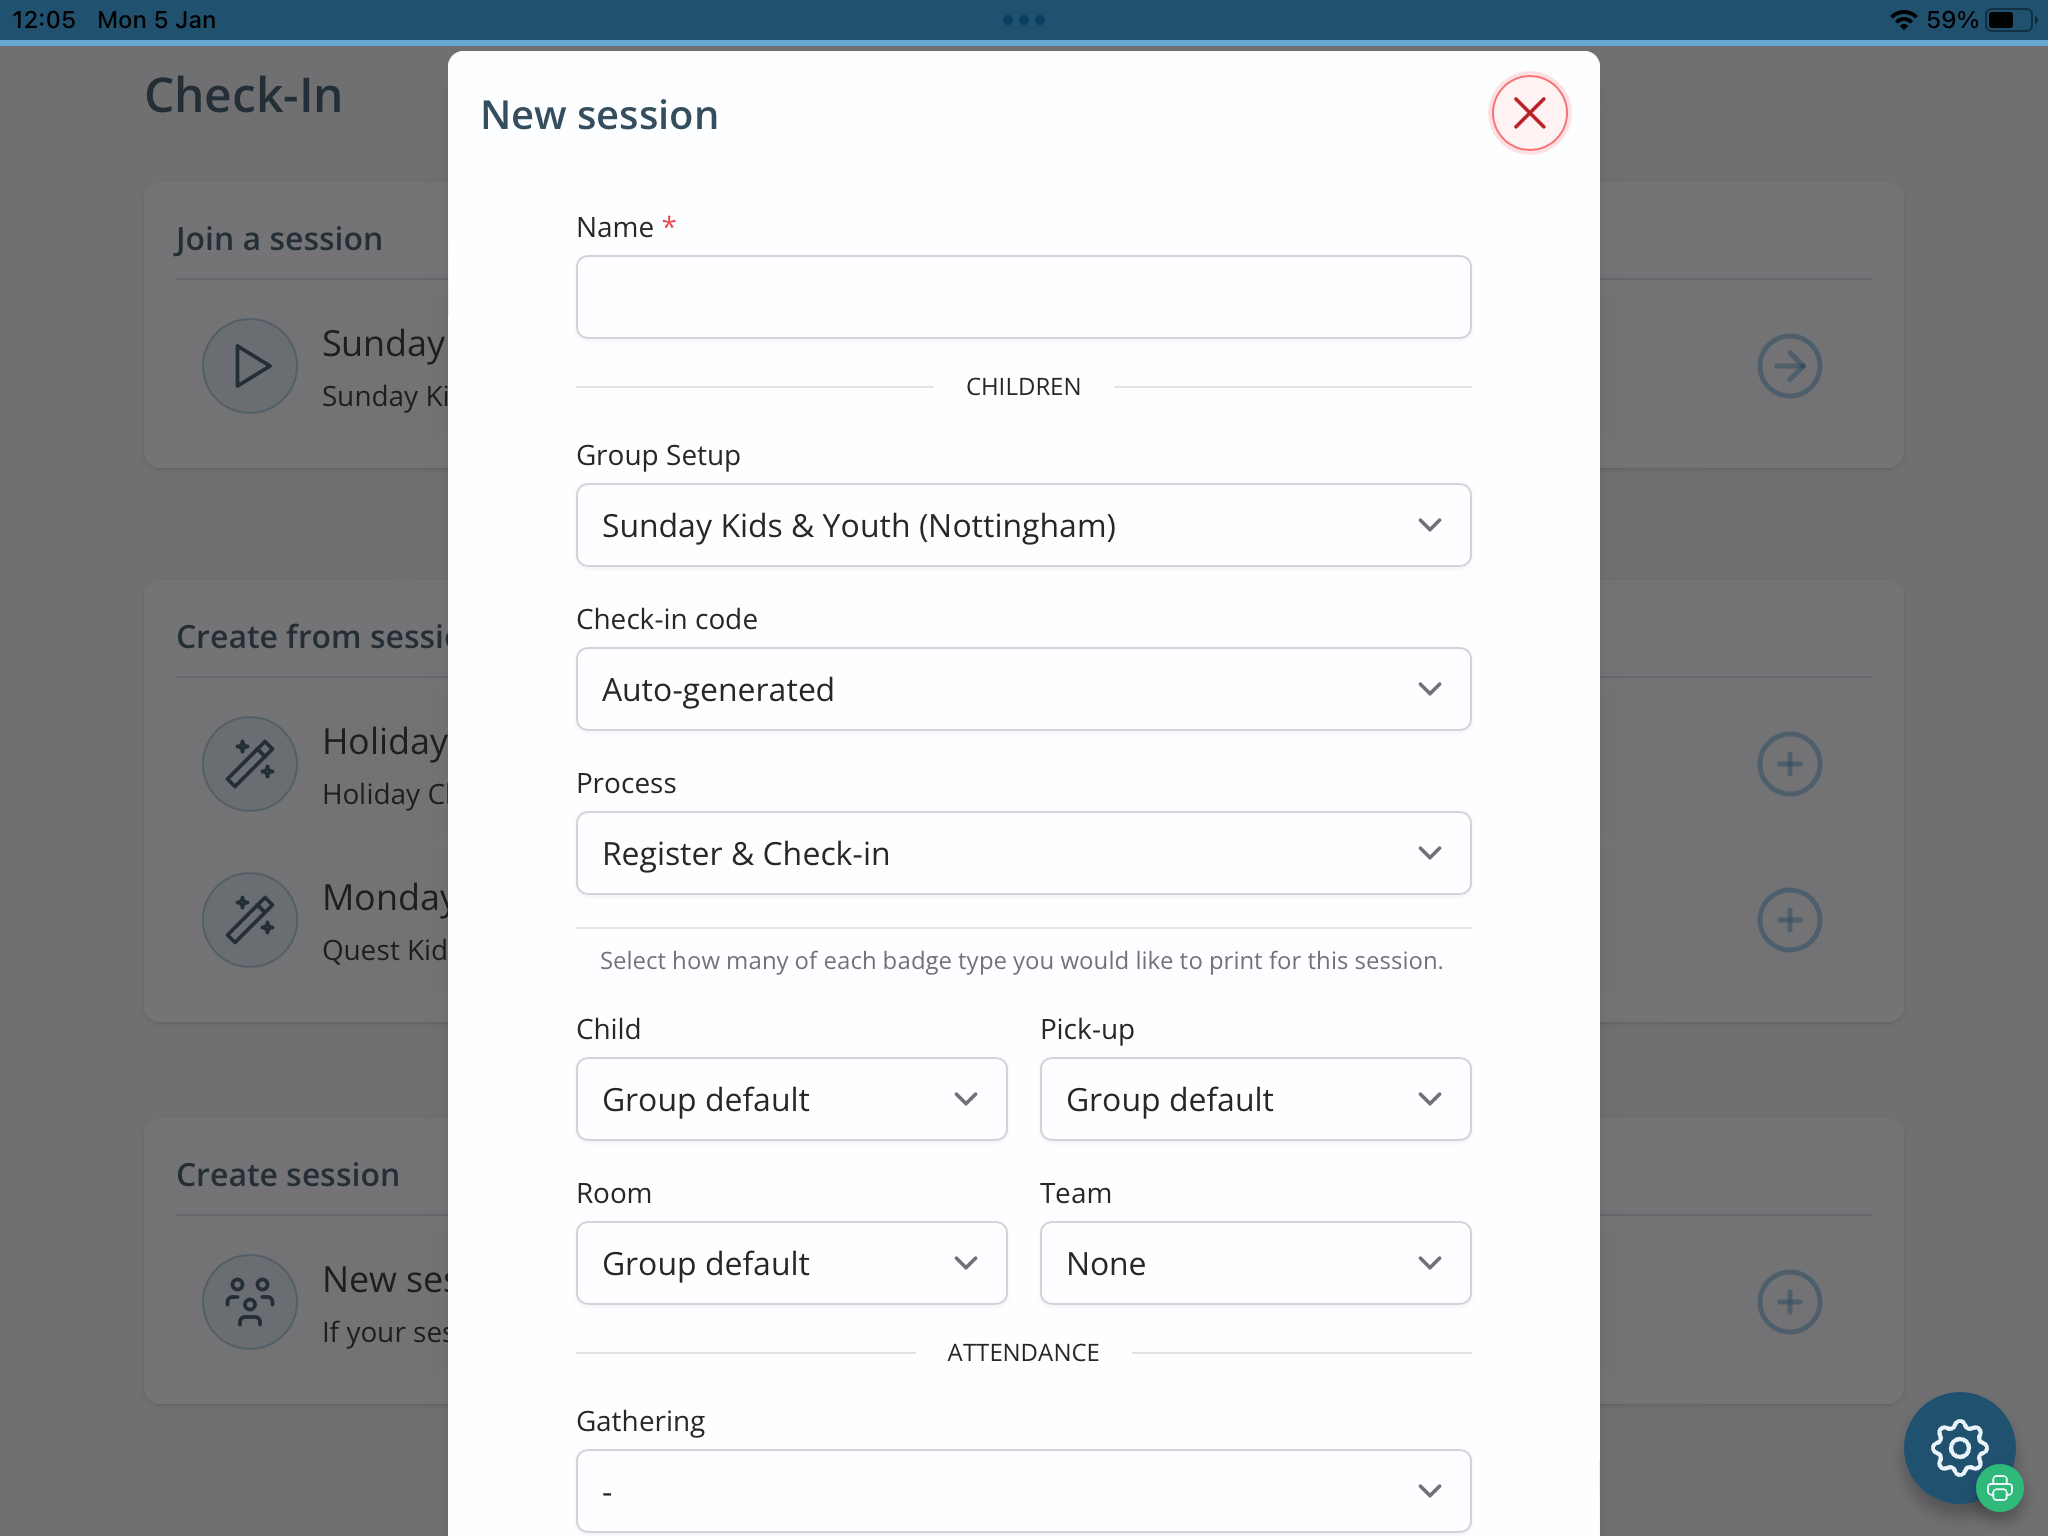
When creating a New session, begin by giving it a suitable Name, e.g., ‘11.30 AM Service’. Select the Group Setup you’re running this session for. Our related support article, Adding and managing gatherings, contains a detailed explanation of the other session settings. Click Save to start the newly created session.
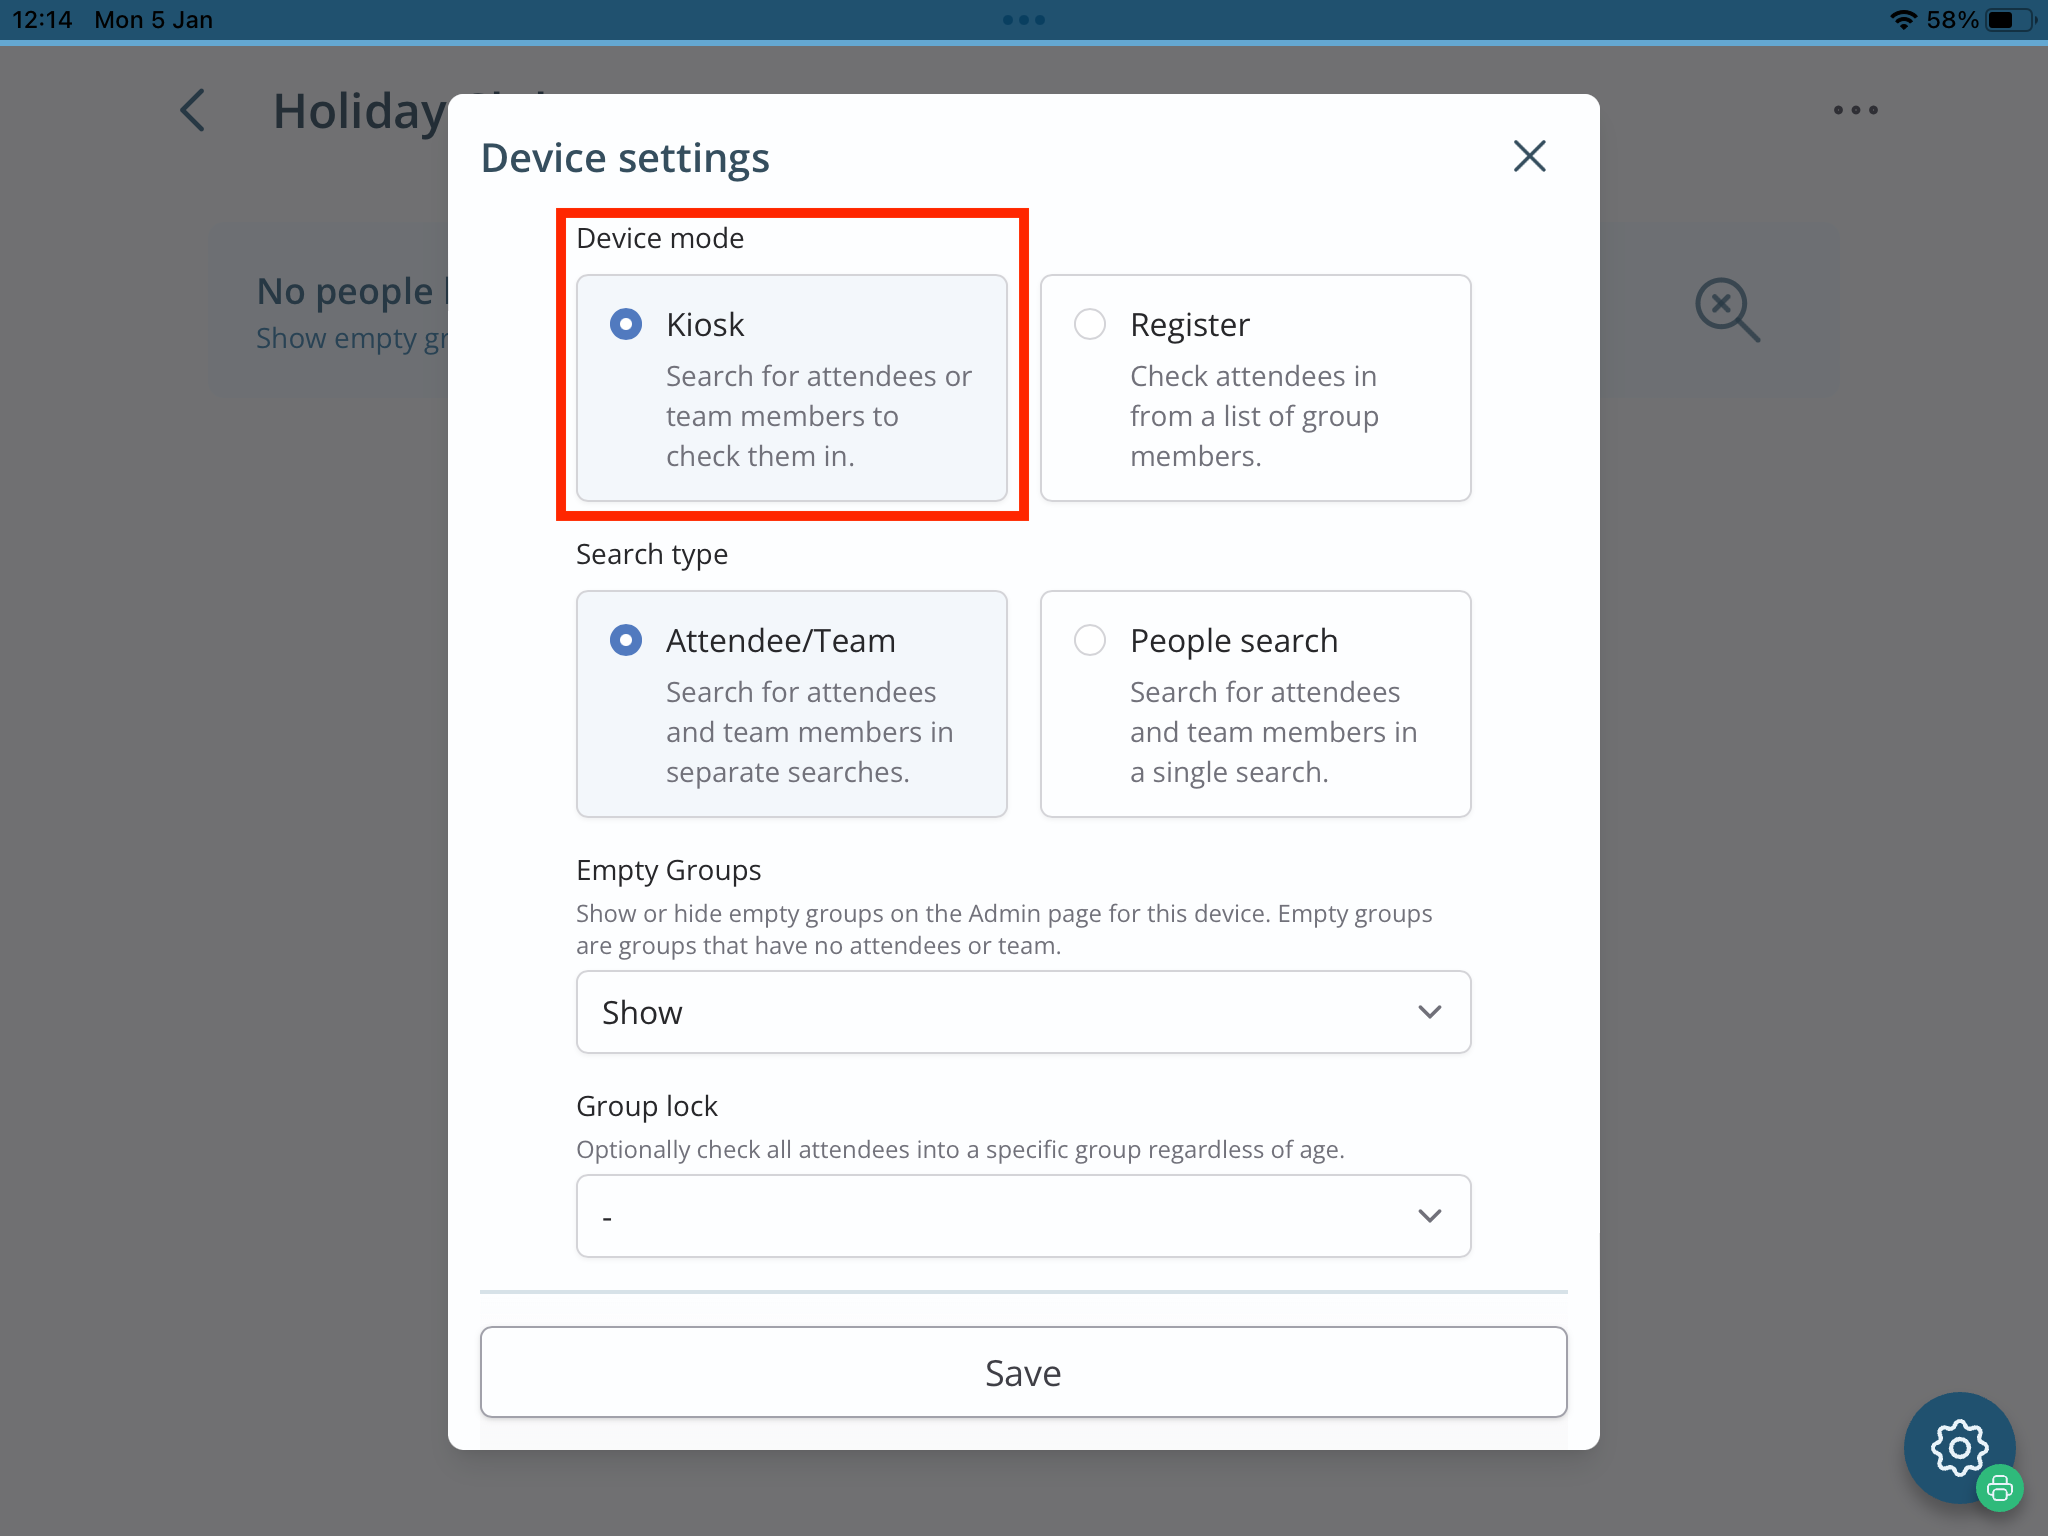
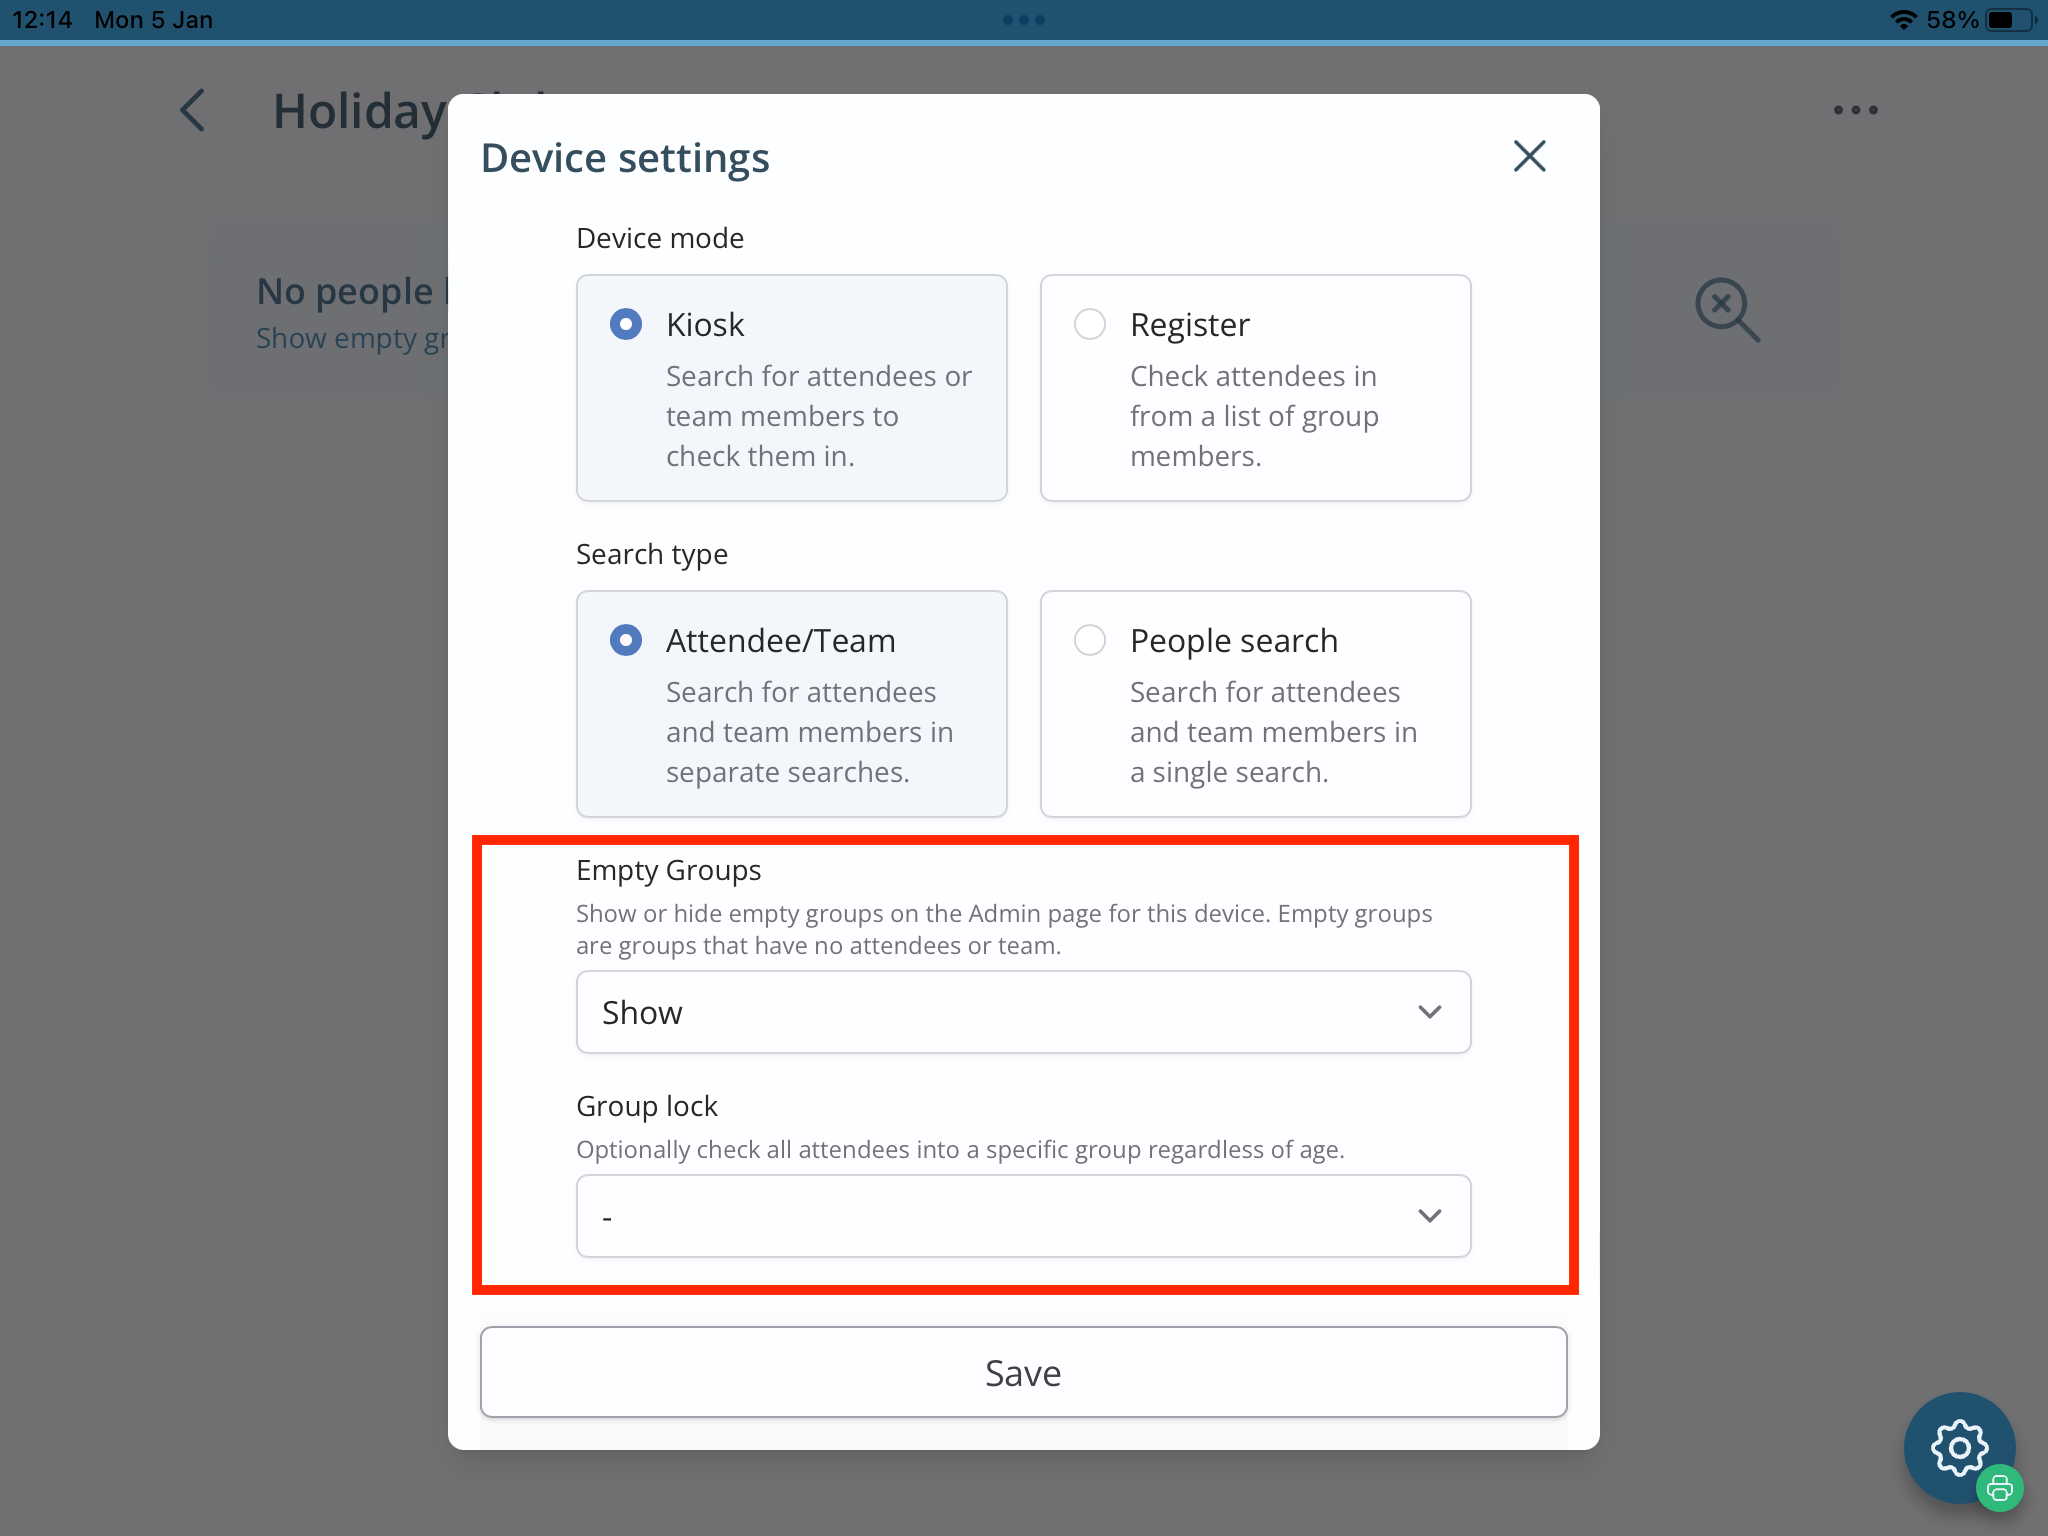
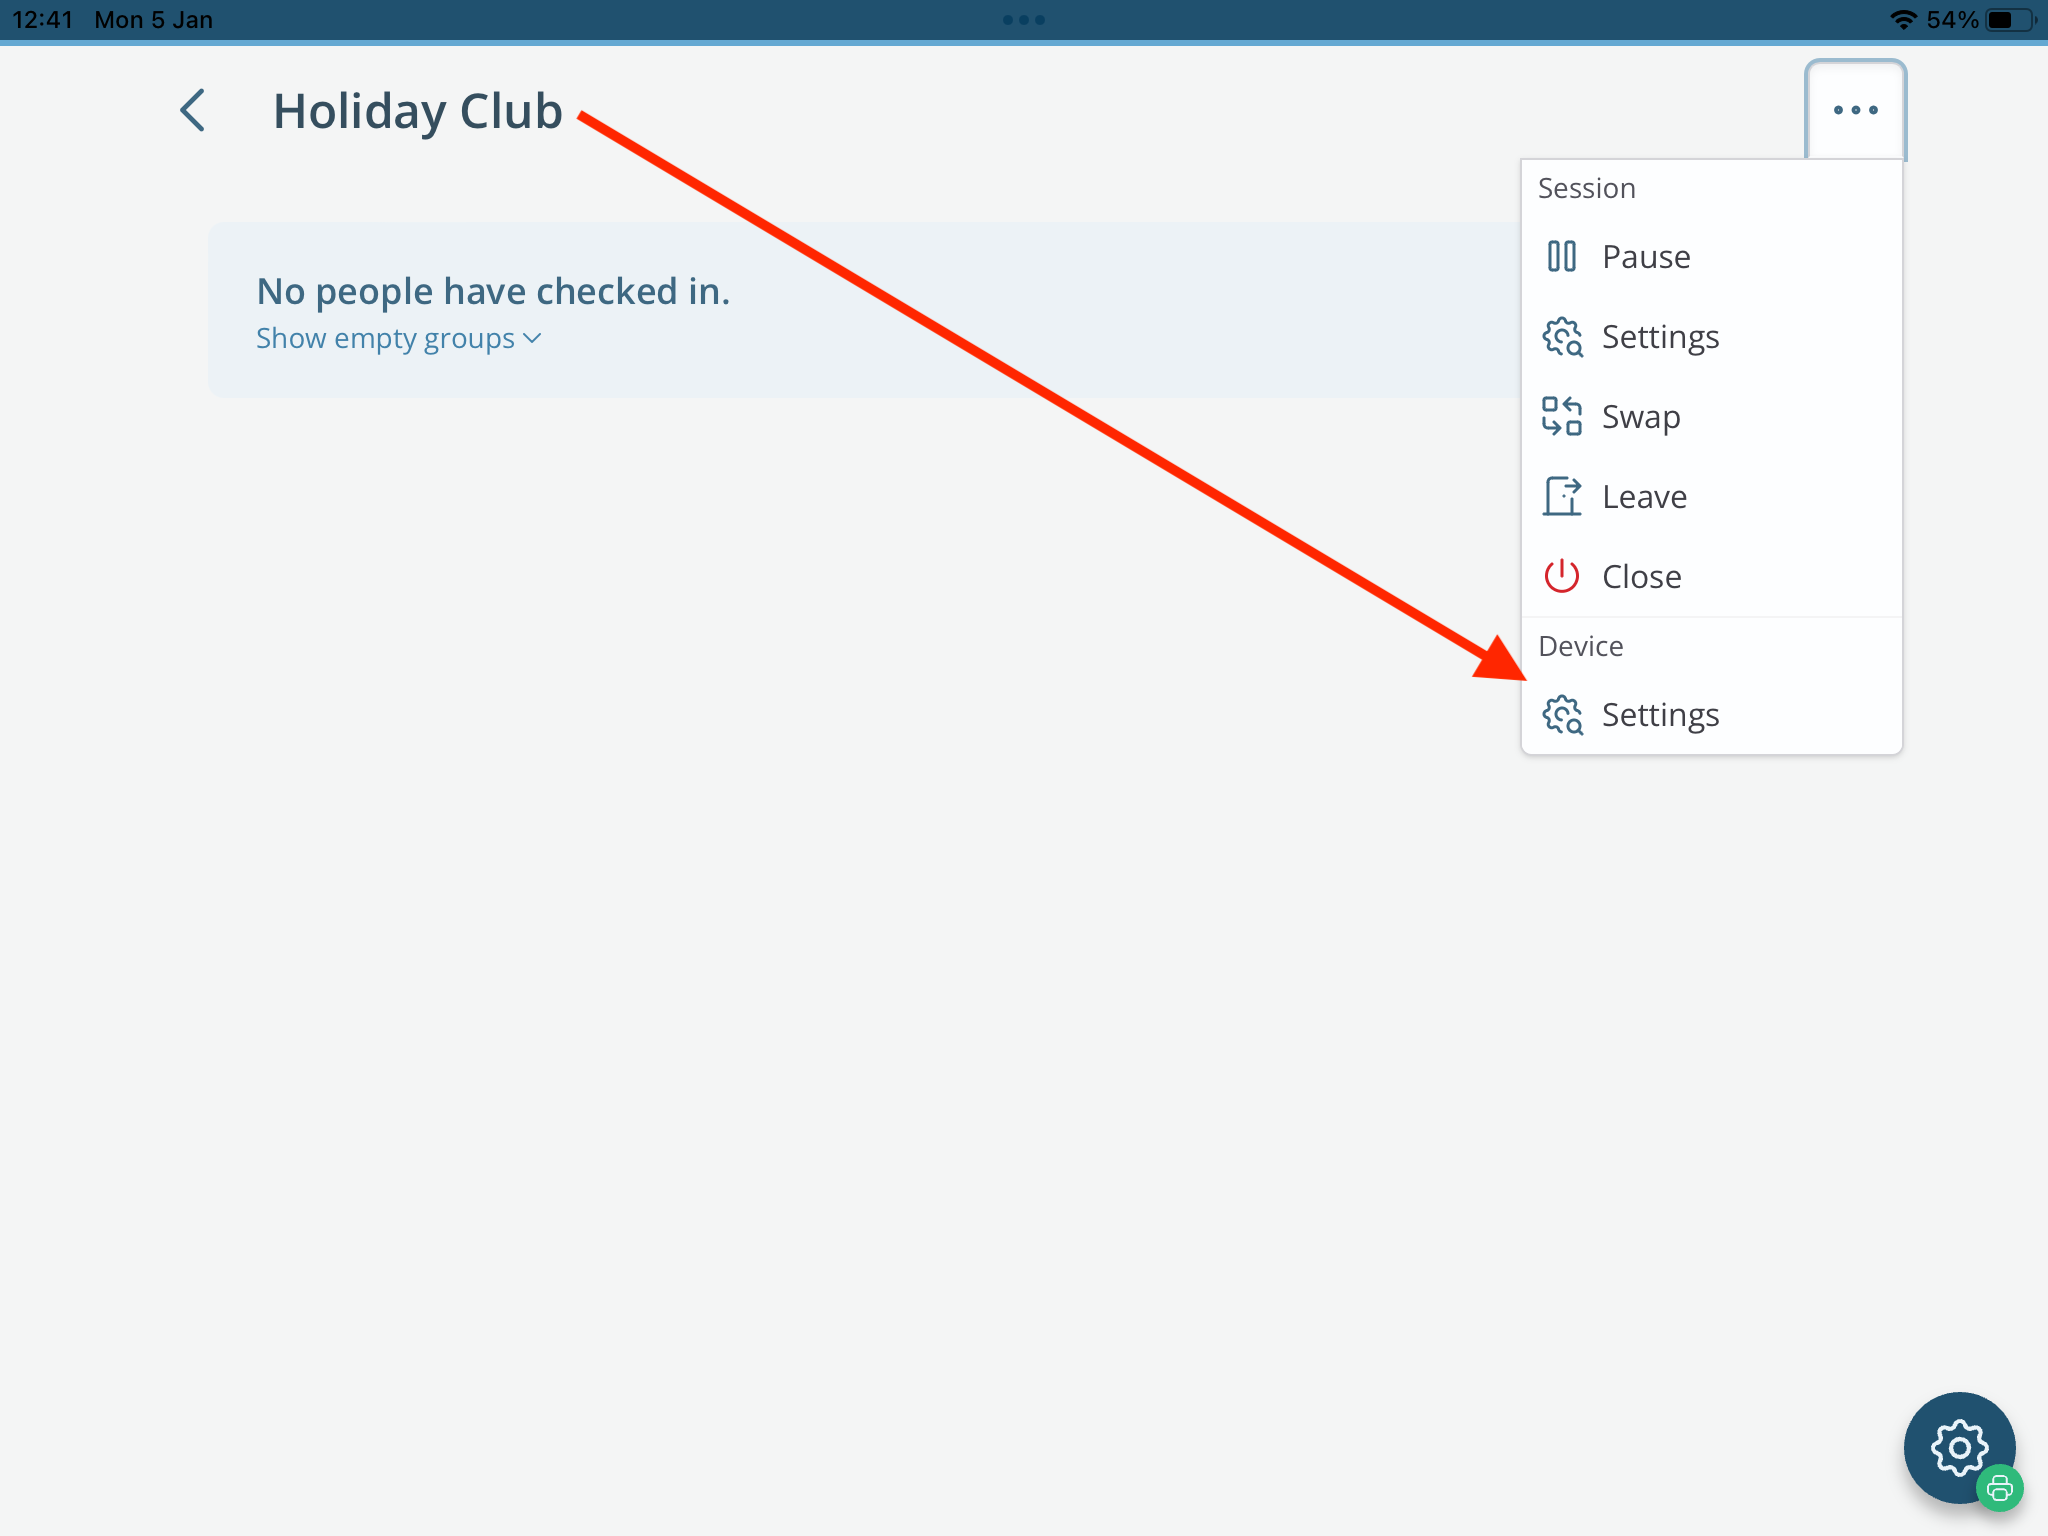
When using a Check-In device for the first time, you will now be prompted to set the Device settings. These settings are remembered and used each time you start or join a session on that device; you can change device settings at any time from the Admin area actions. You can watch our related video on managing device settings:
Select Kiosk mode, which is typically used for an unstaffed parent/carer self-check-in experience, with or without badge printing. In kiosk mode, the User searches for children to check in rather than checking in children from a group register. We’ve produced a separate related article on Running a Check-In session as a register, which is typically used where registration and check-in happen in the room for a group.
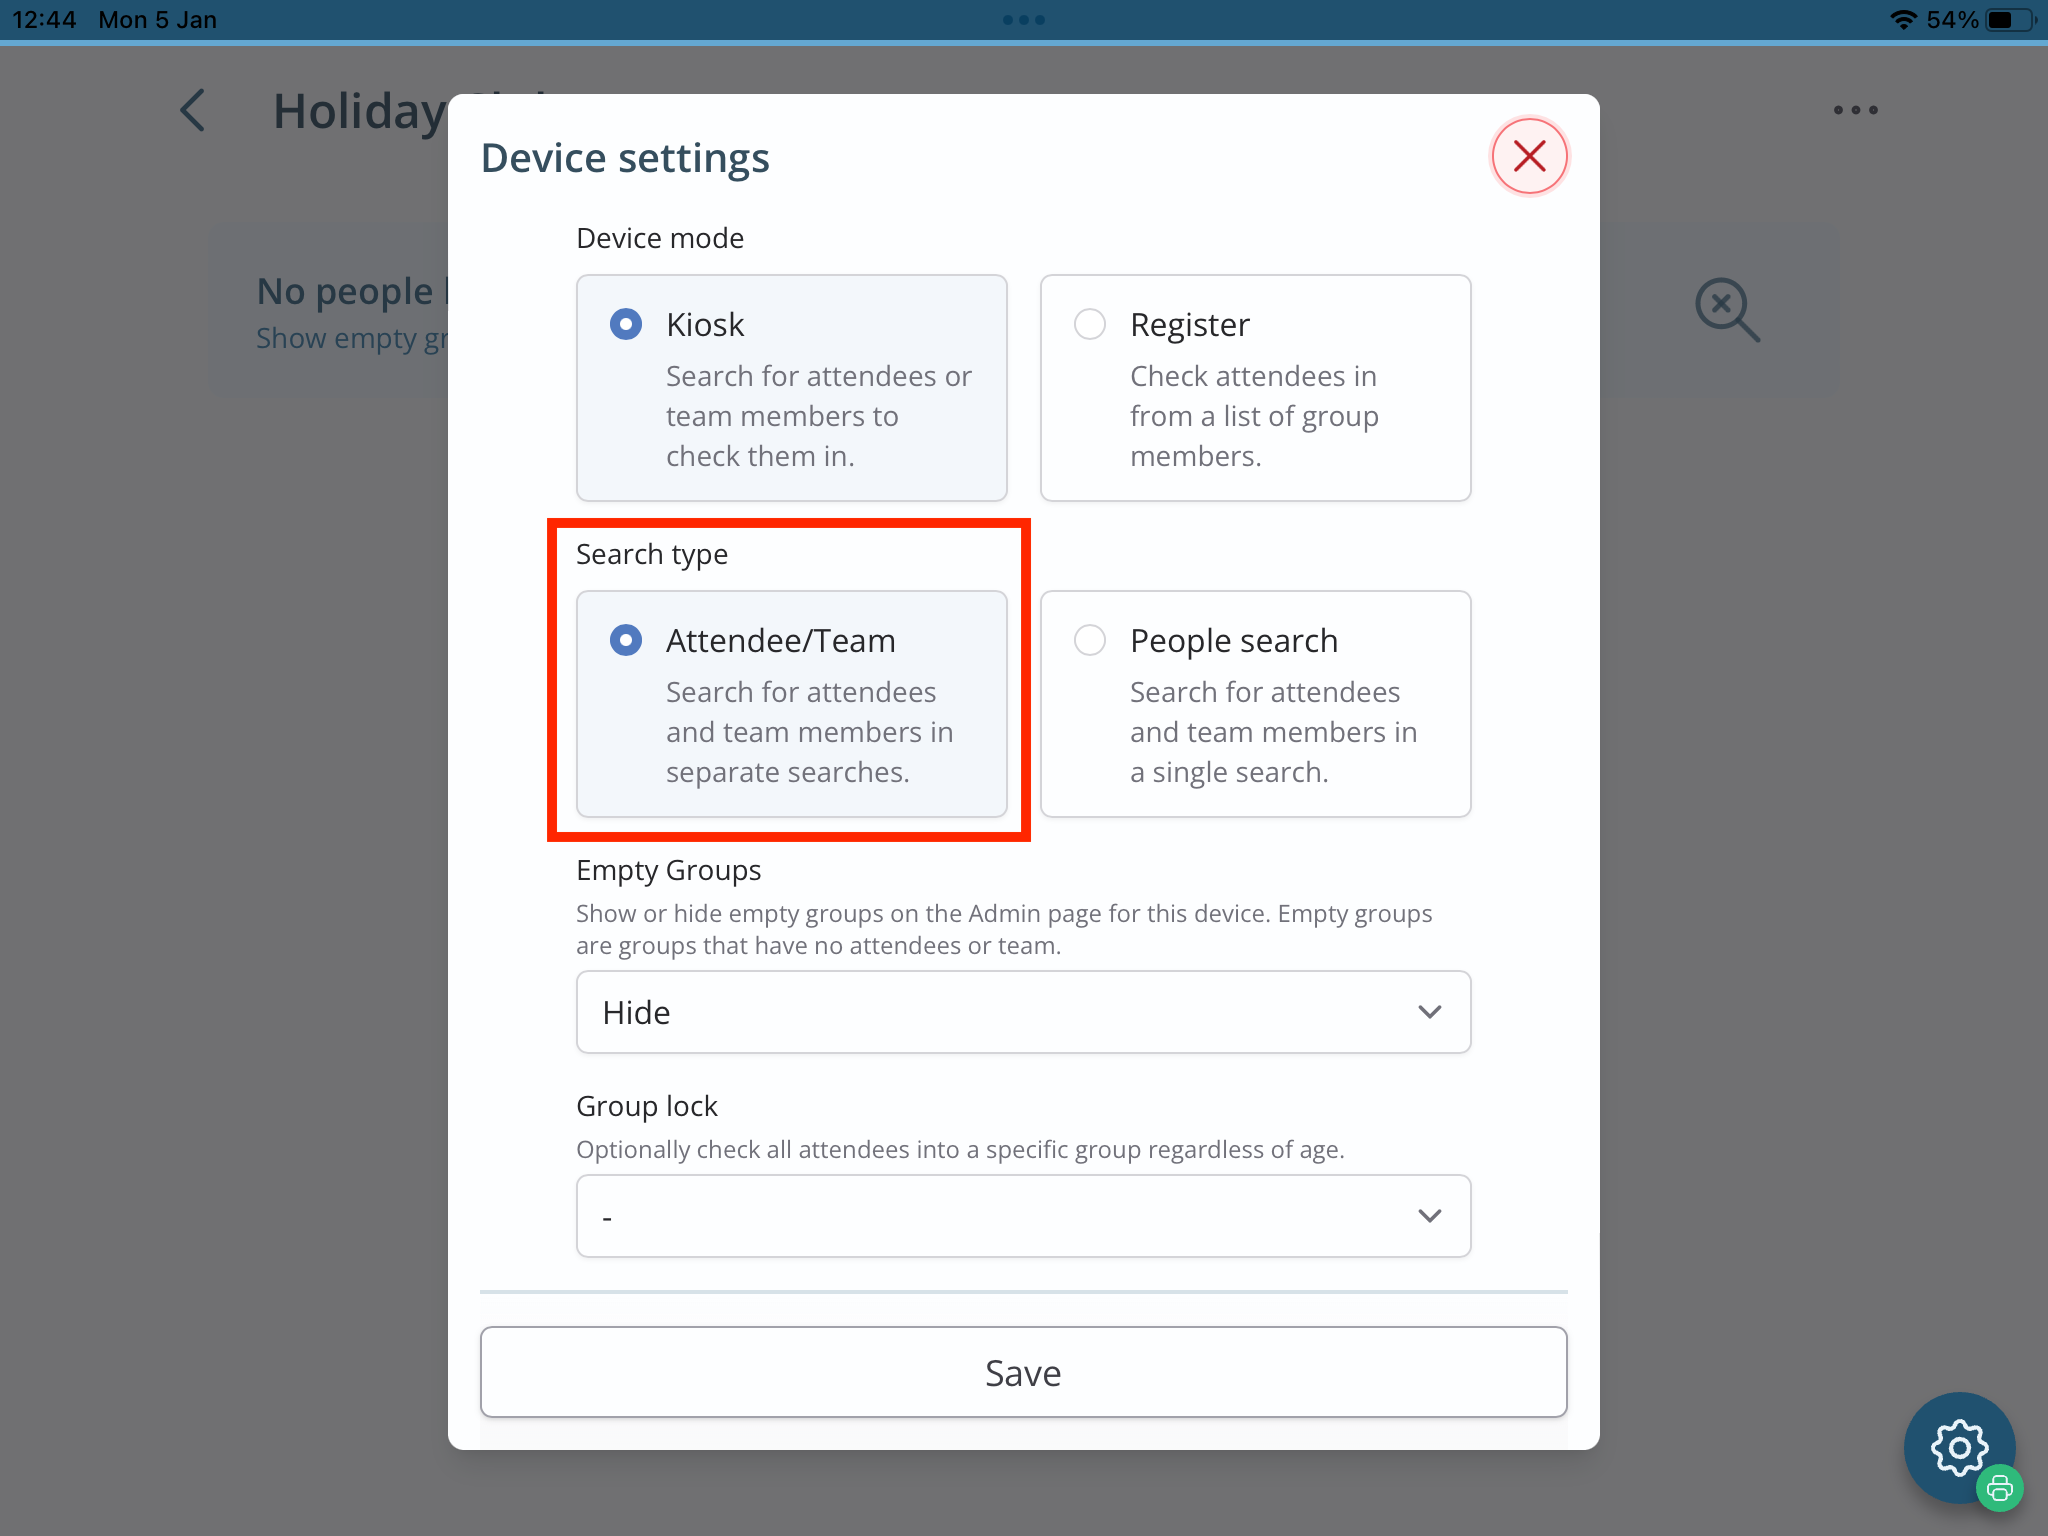
For Kiosk mode, choose a preferred Search type.
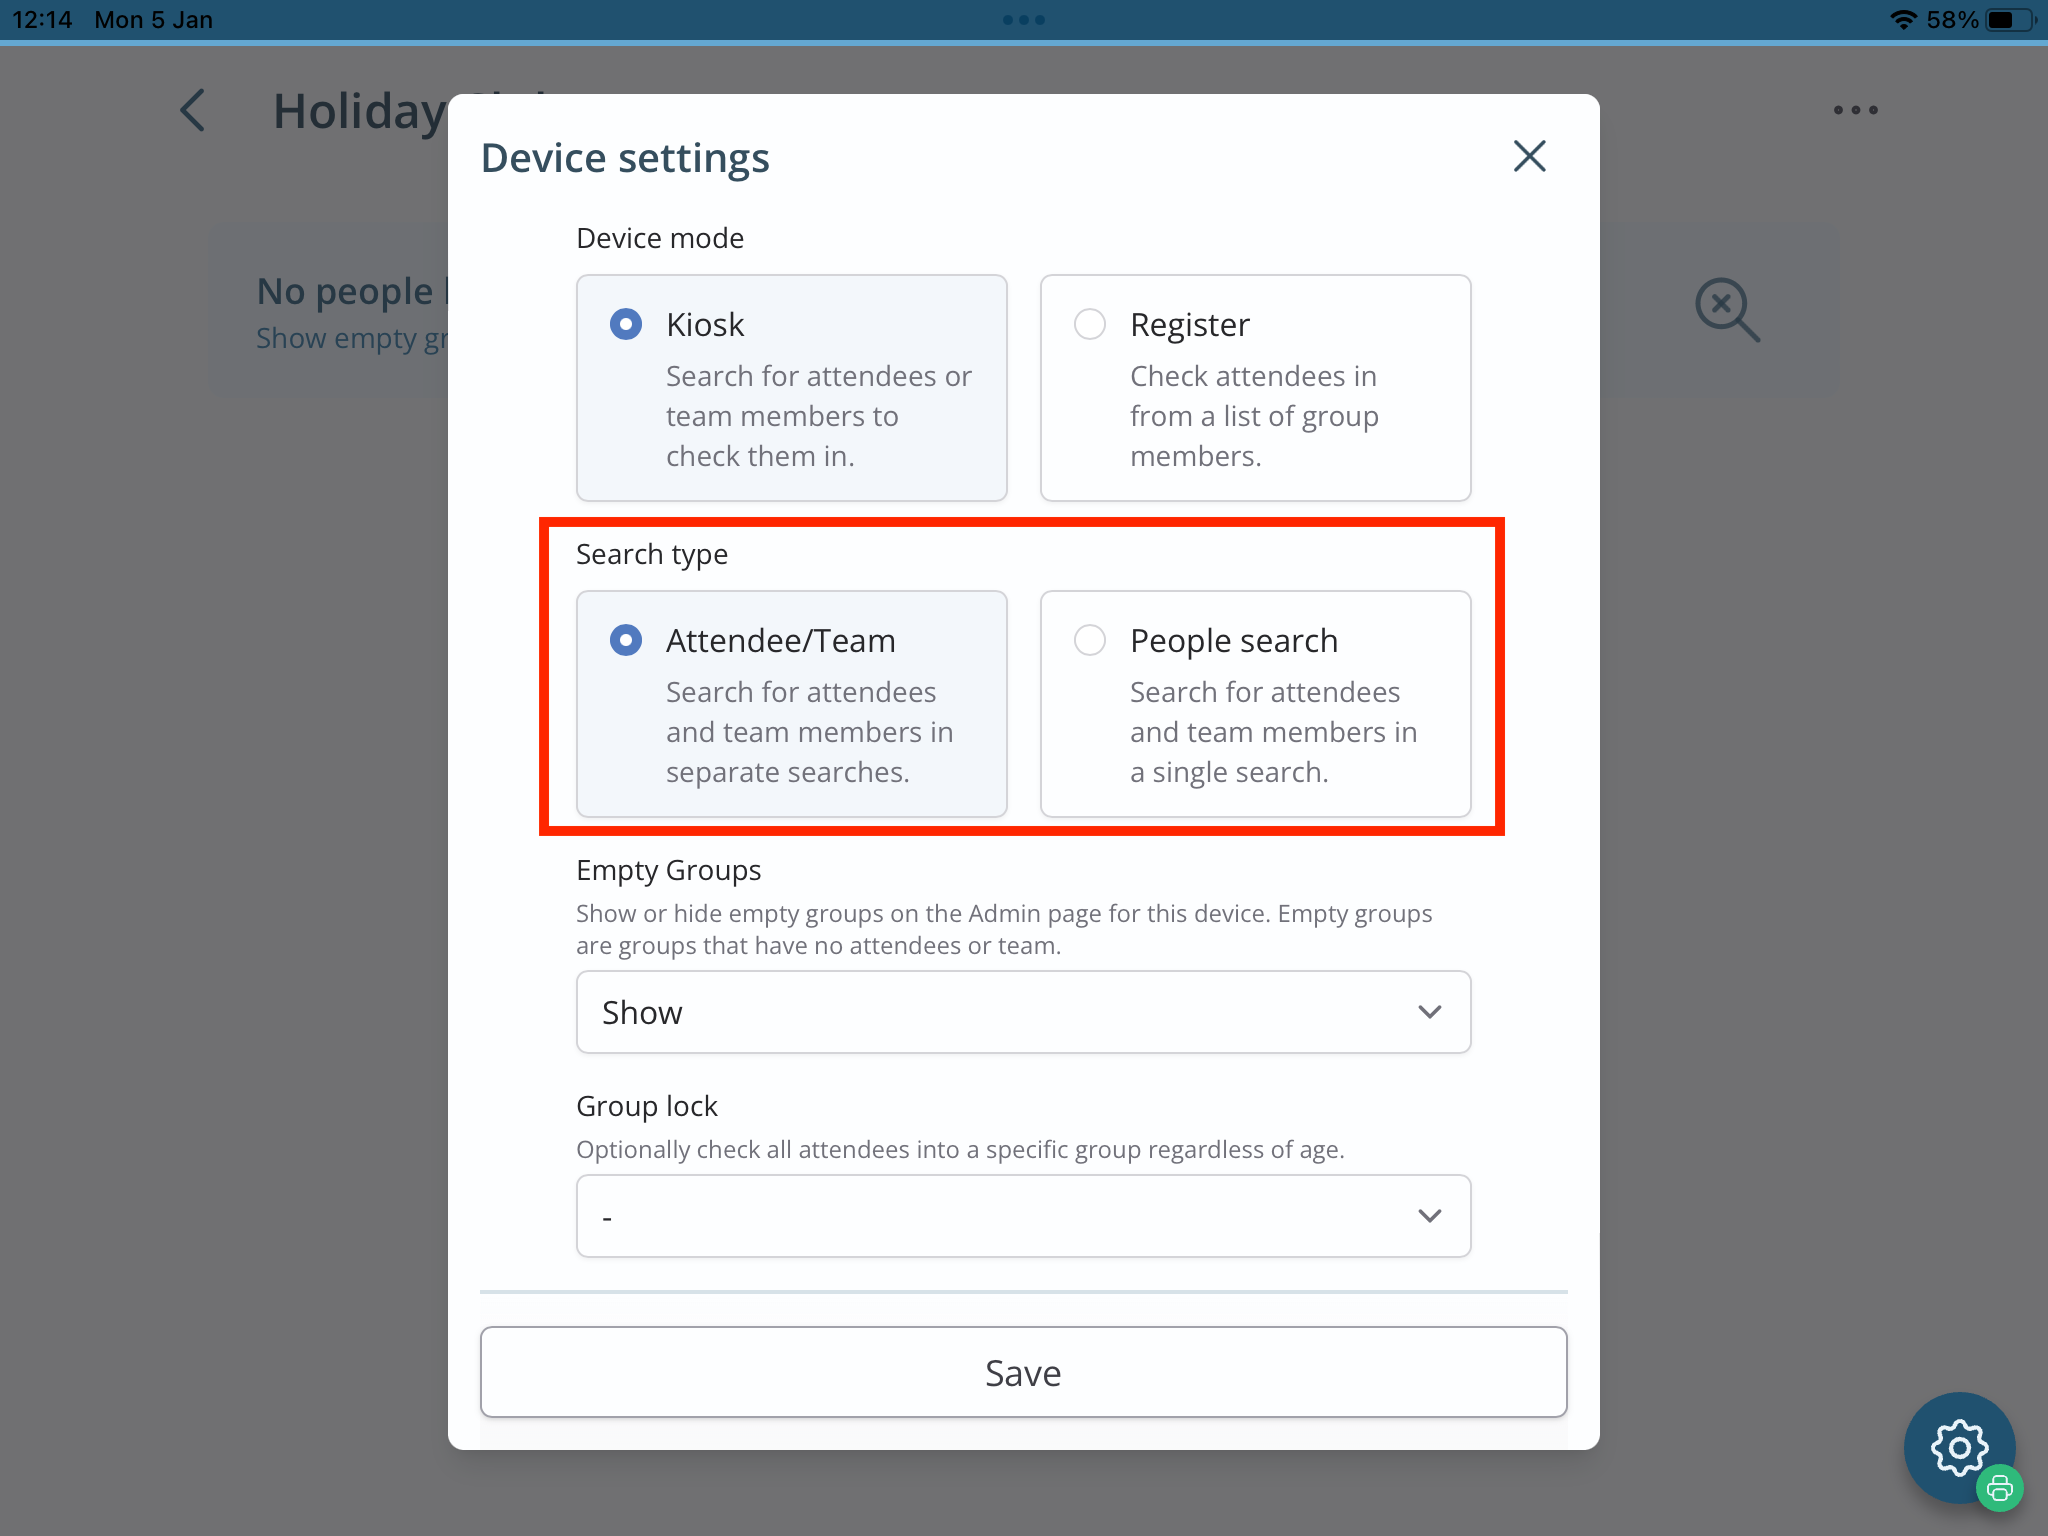
Further device settings are used to show or hide Empty Groups when viewing the Admin page on this device. The Group lock will check all children into a specific group regardless of their age. Click to Save changes to device settings.
Running a session
The Check-In workflow depends on the type of session Process you’ve chosen:
- Register first, Check In later - Registration and badge printing take place first, typically before the start of the meeting. Children and visitors register for groups but remain with their parents/carers until later in the meeting. The group attendance check-in will happen later when groups begin and children are handed into your care. While Register mode can be used for registration, your group leaders will need to switch from the Register to the Admin area to complete the ‘check-in’ stage when children later arrive at their group. Remember, attendance is only recorded at check-in, not registration, when children are handed into your care in the group.
- Register & Check In - Registration, badge printing and check-in attendance happen at the same time, typically when children and visitors are checked into your care right from the start of the session. Register mode is better suited for this process because group leaders will be able to work entirely from the Register and not need to switch to the Admin area to record a check-in.
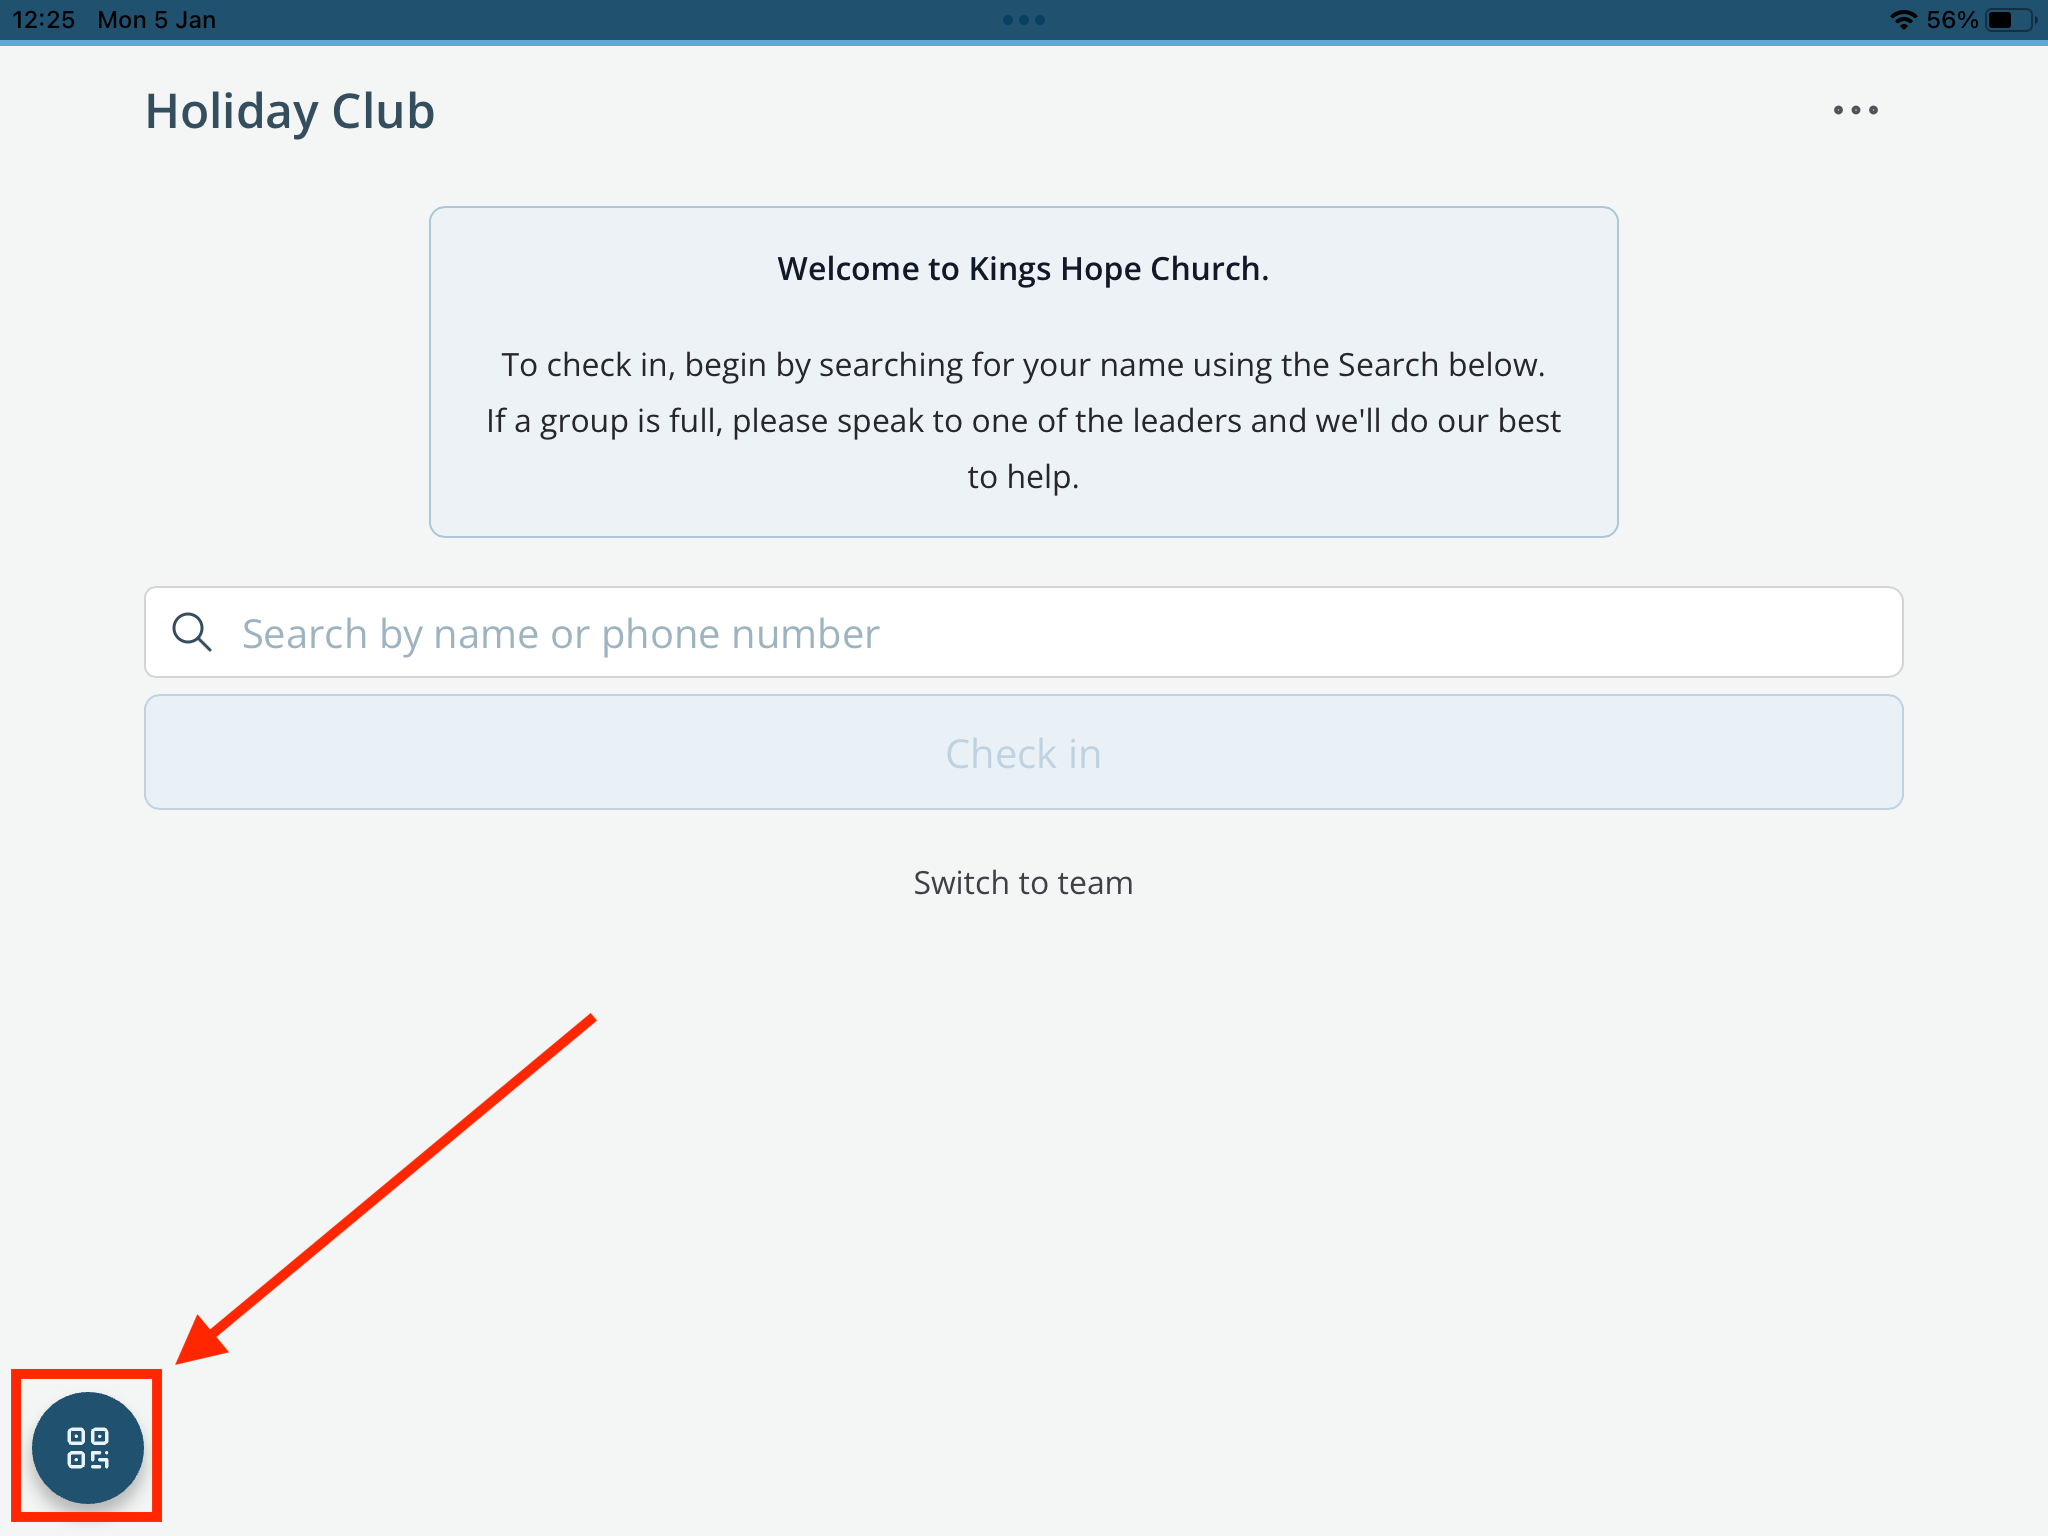
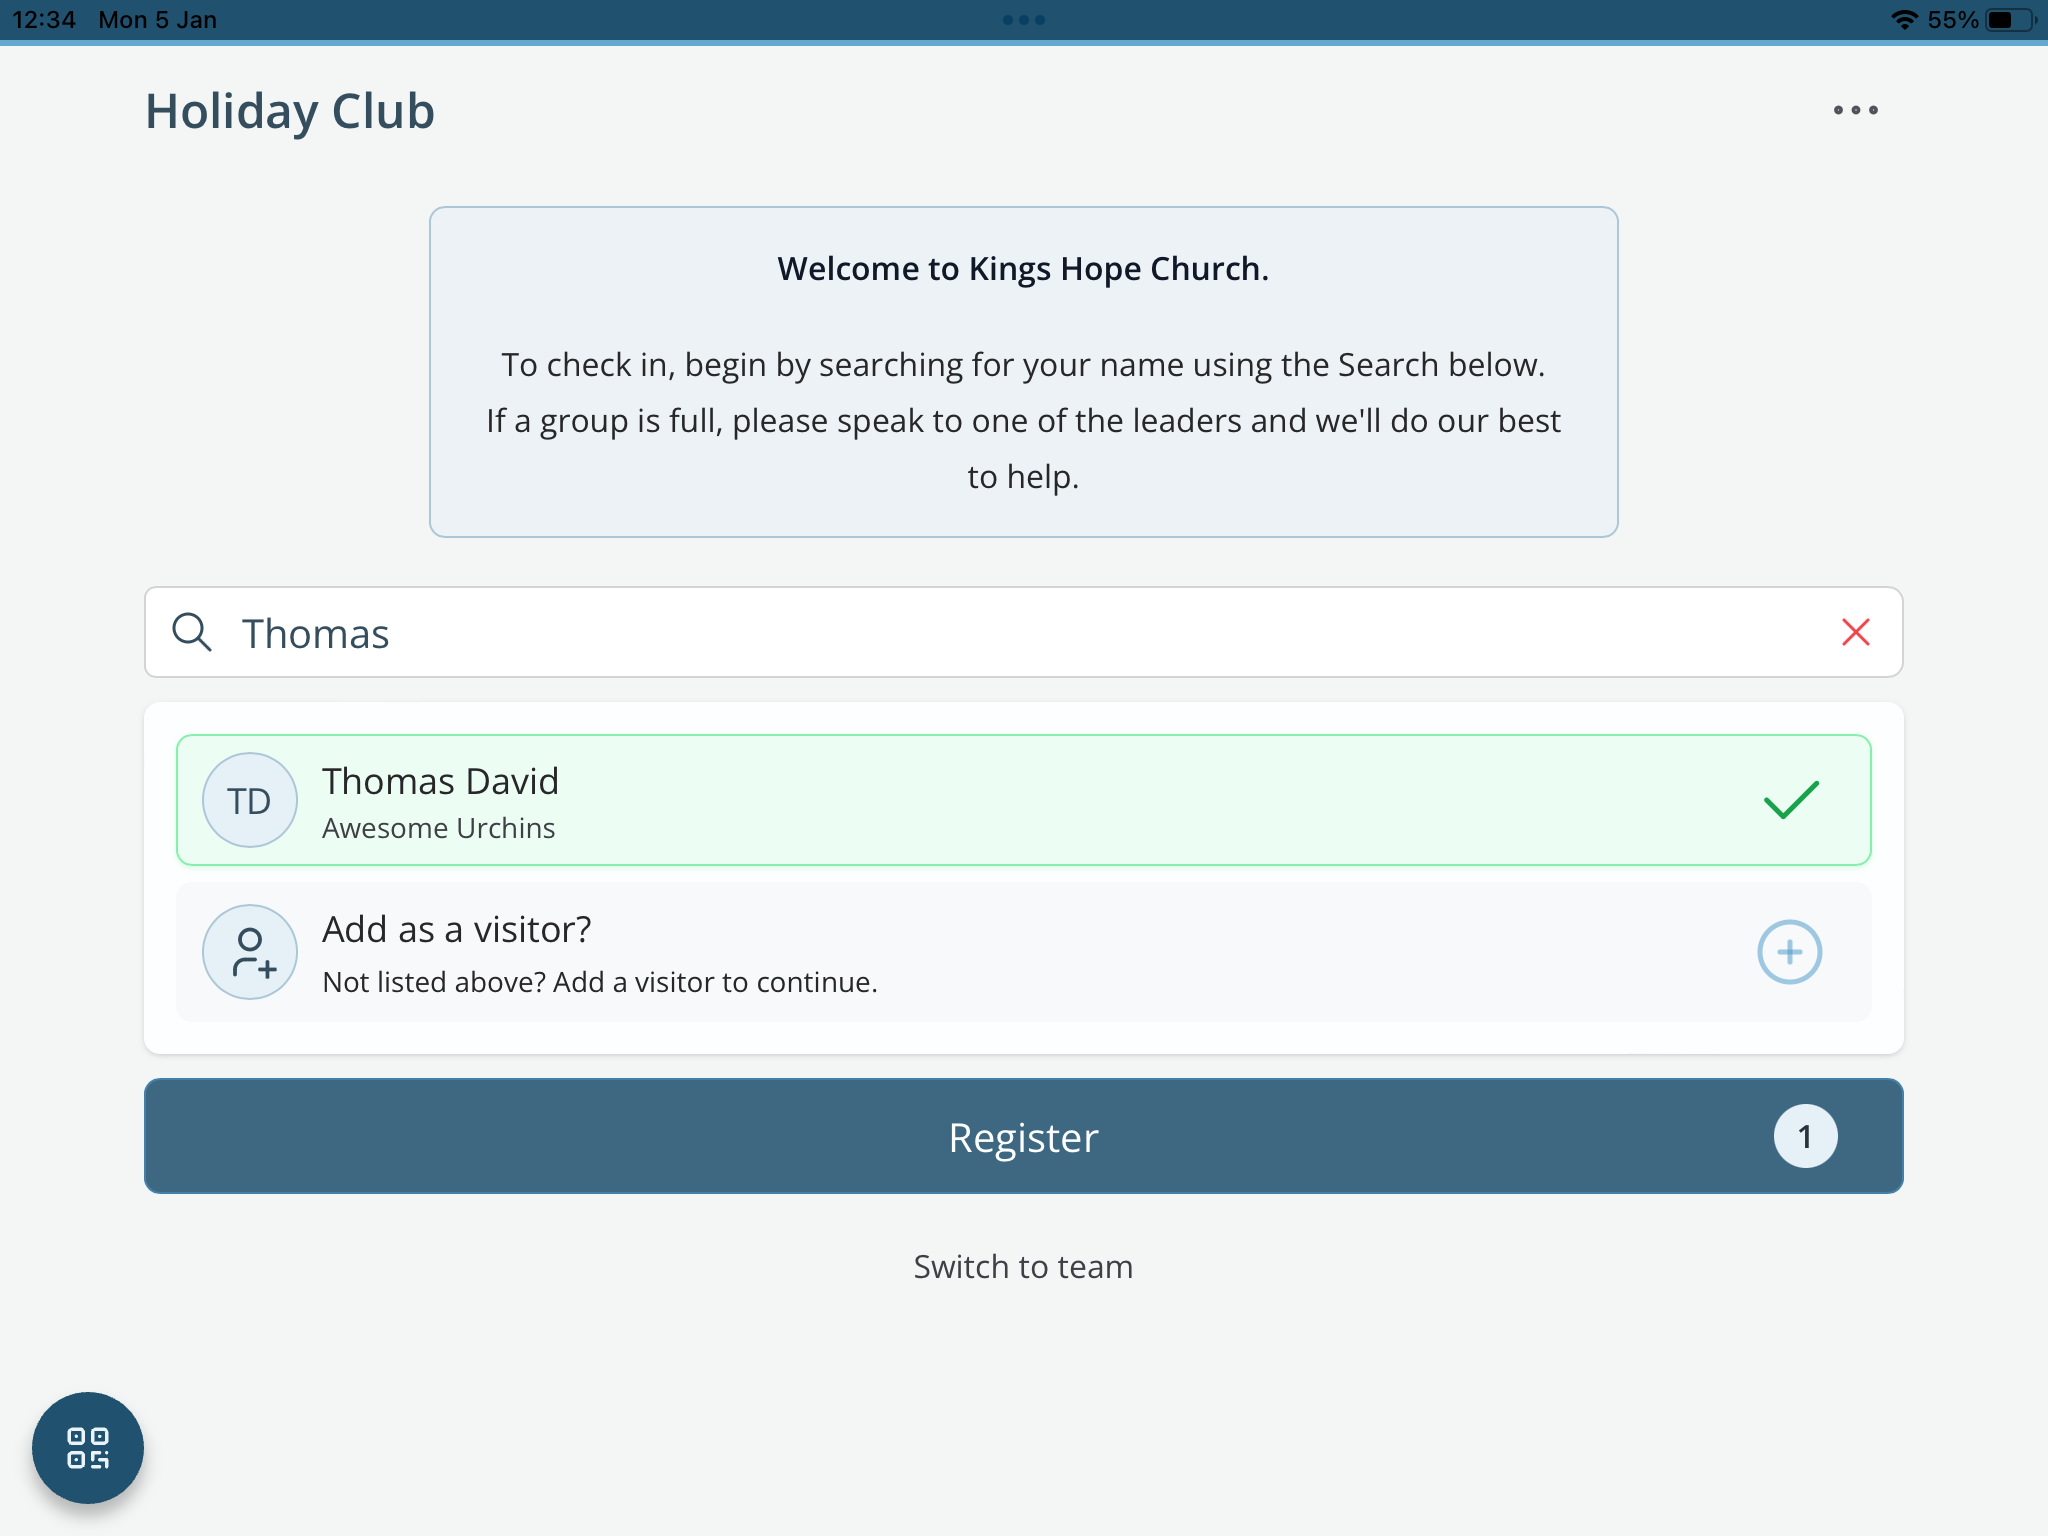
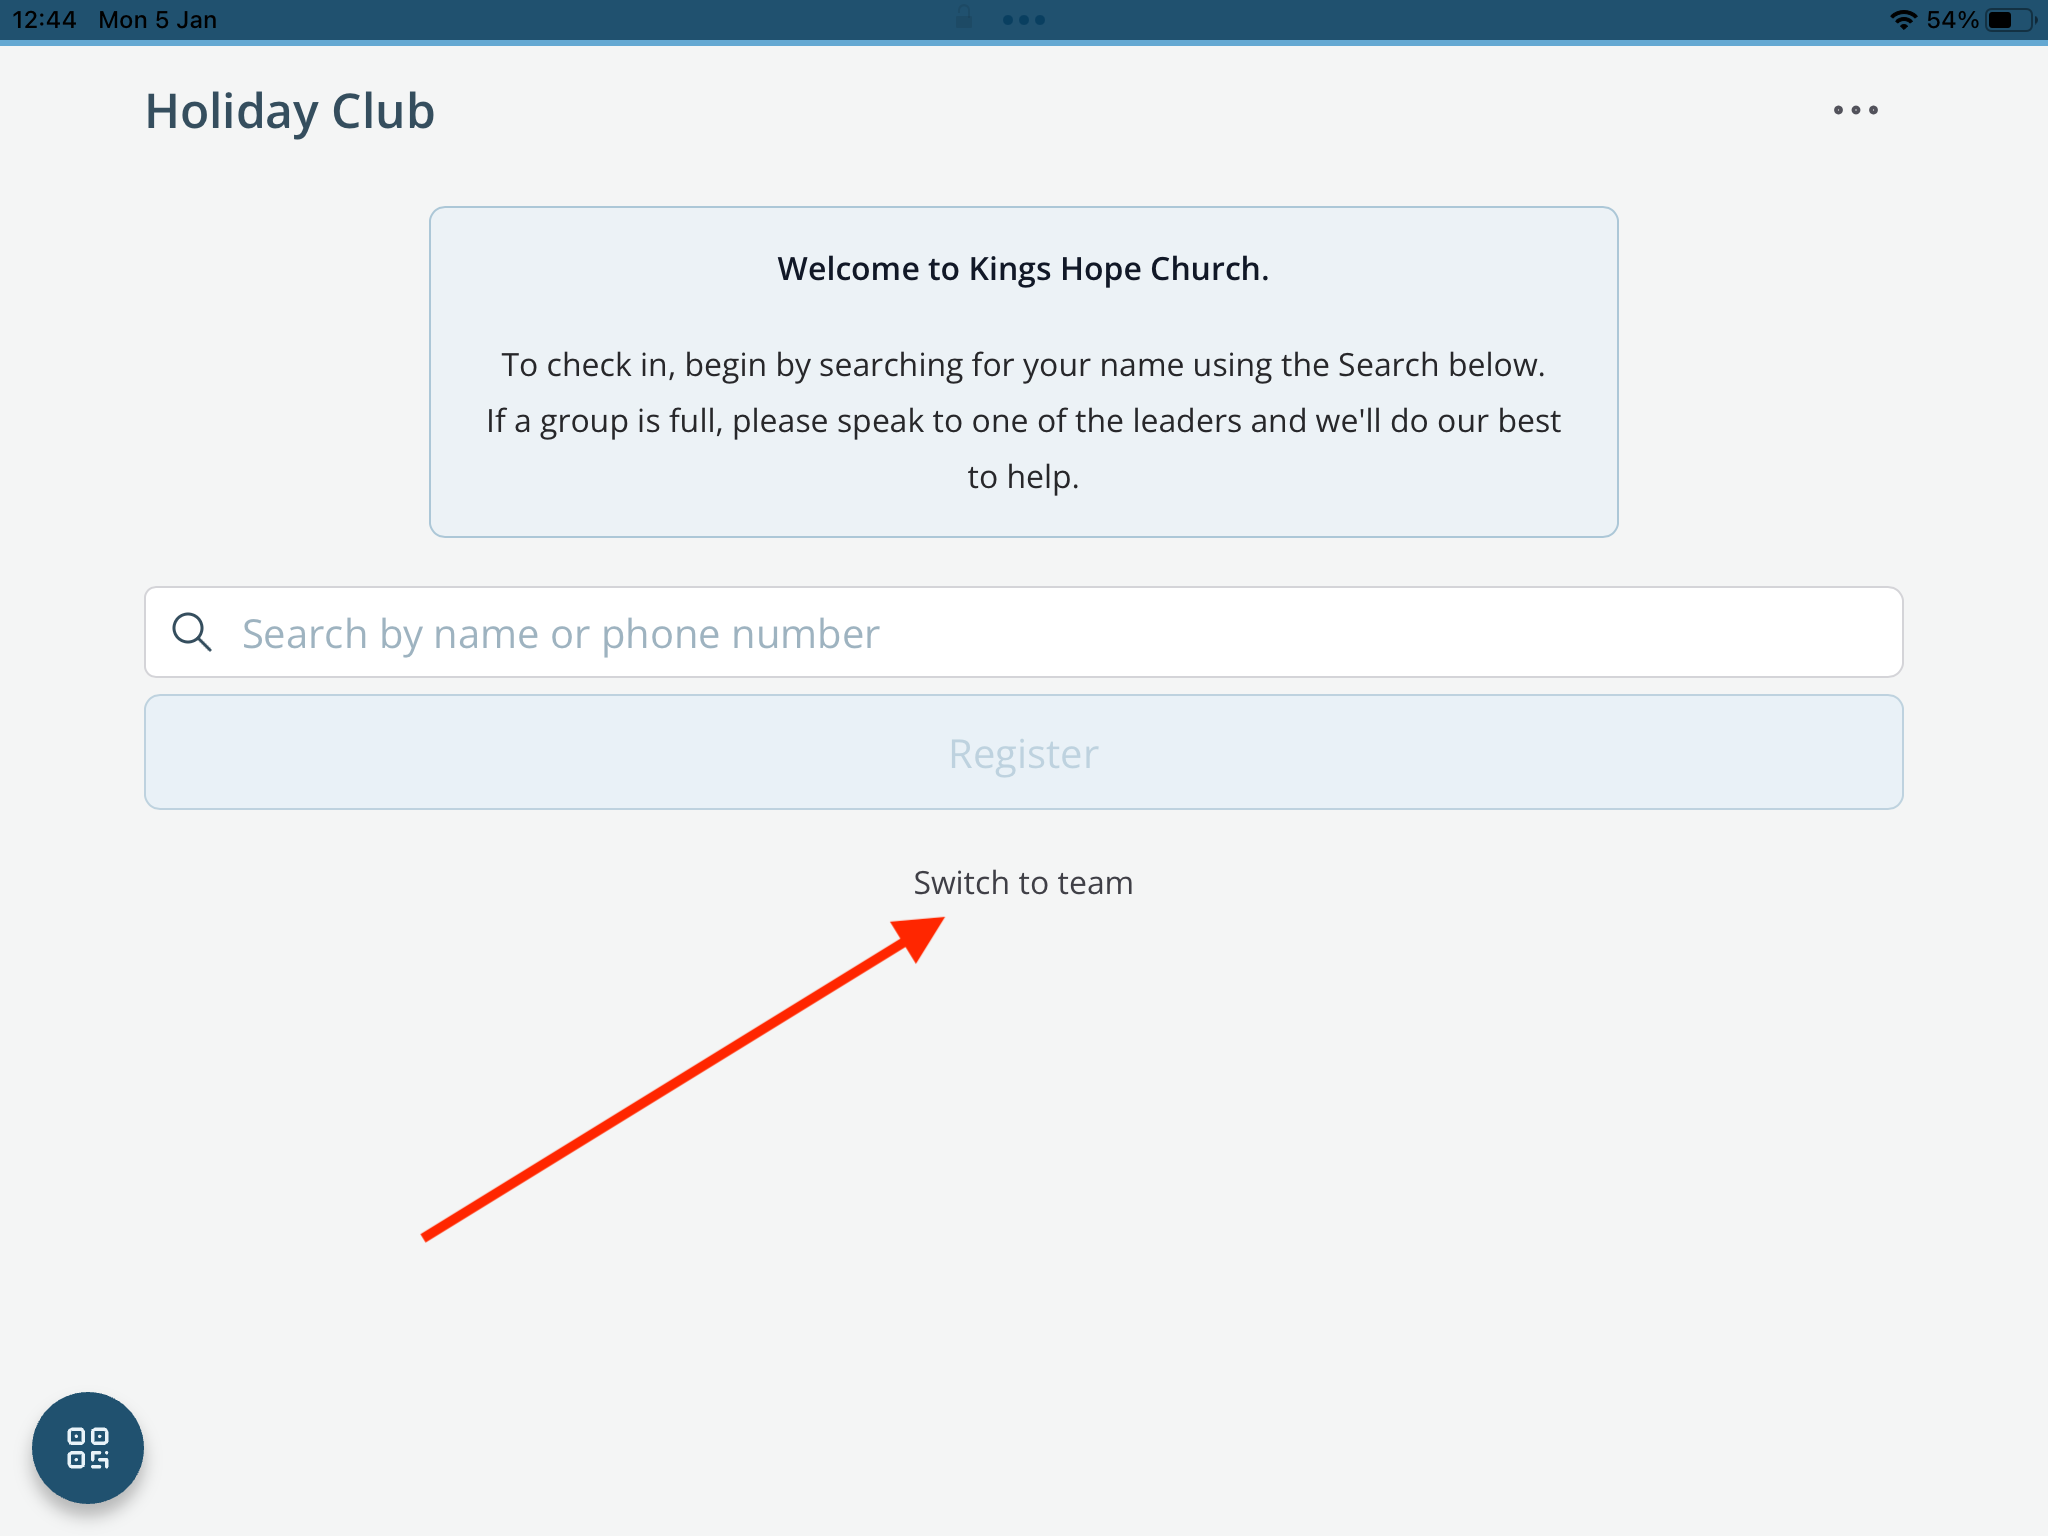
In Kiosk mode, parents/carers or your Check-In team members begin by searching for a child using any of the search criteria shown. Alternatively, an app-only QR Scanner button in the bottom-left corner of the device screen can be used to scan a parent/carer’s QR code, which they can access from their My Children section in My ChurchSuite during an active session. Scanning their QR code will show a list of their children.
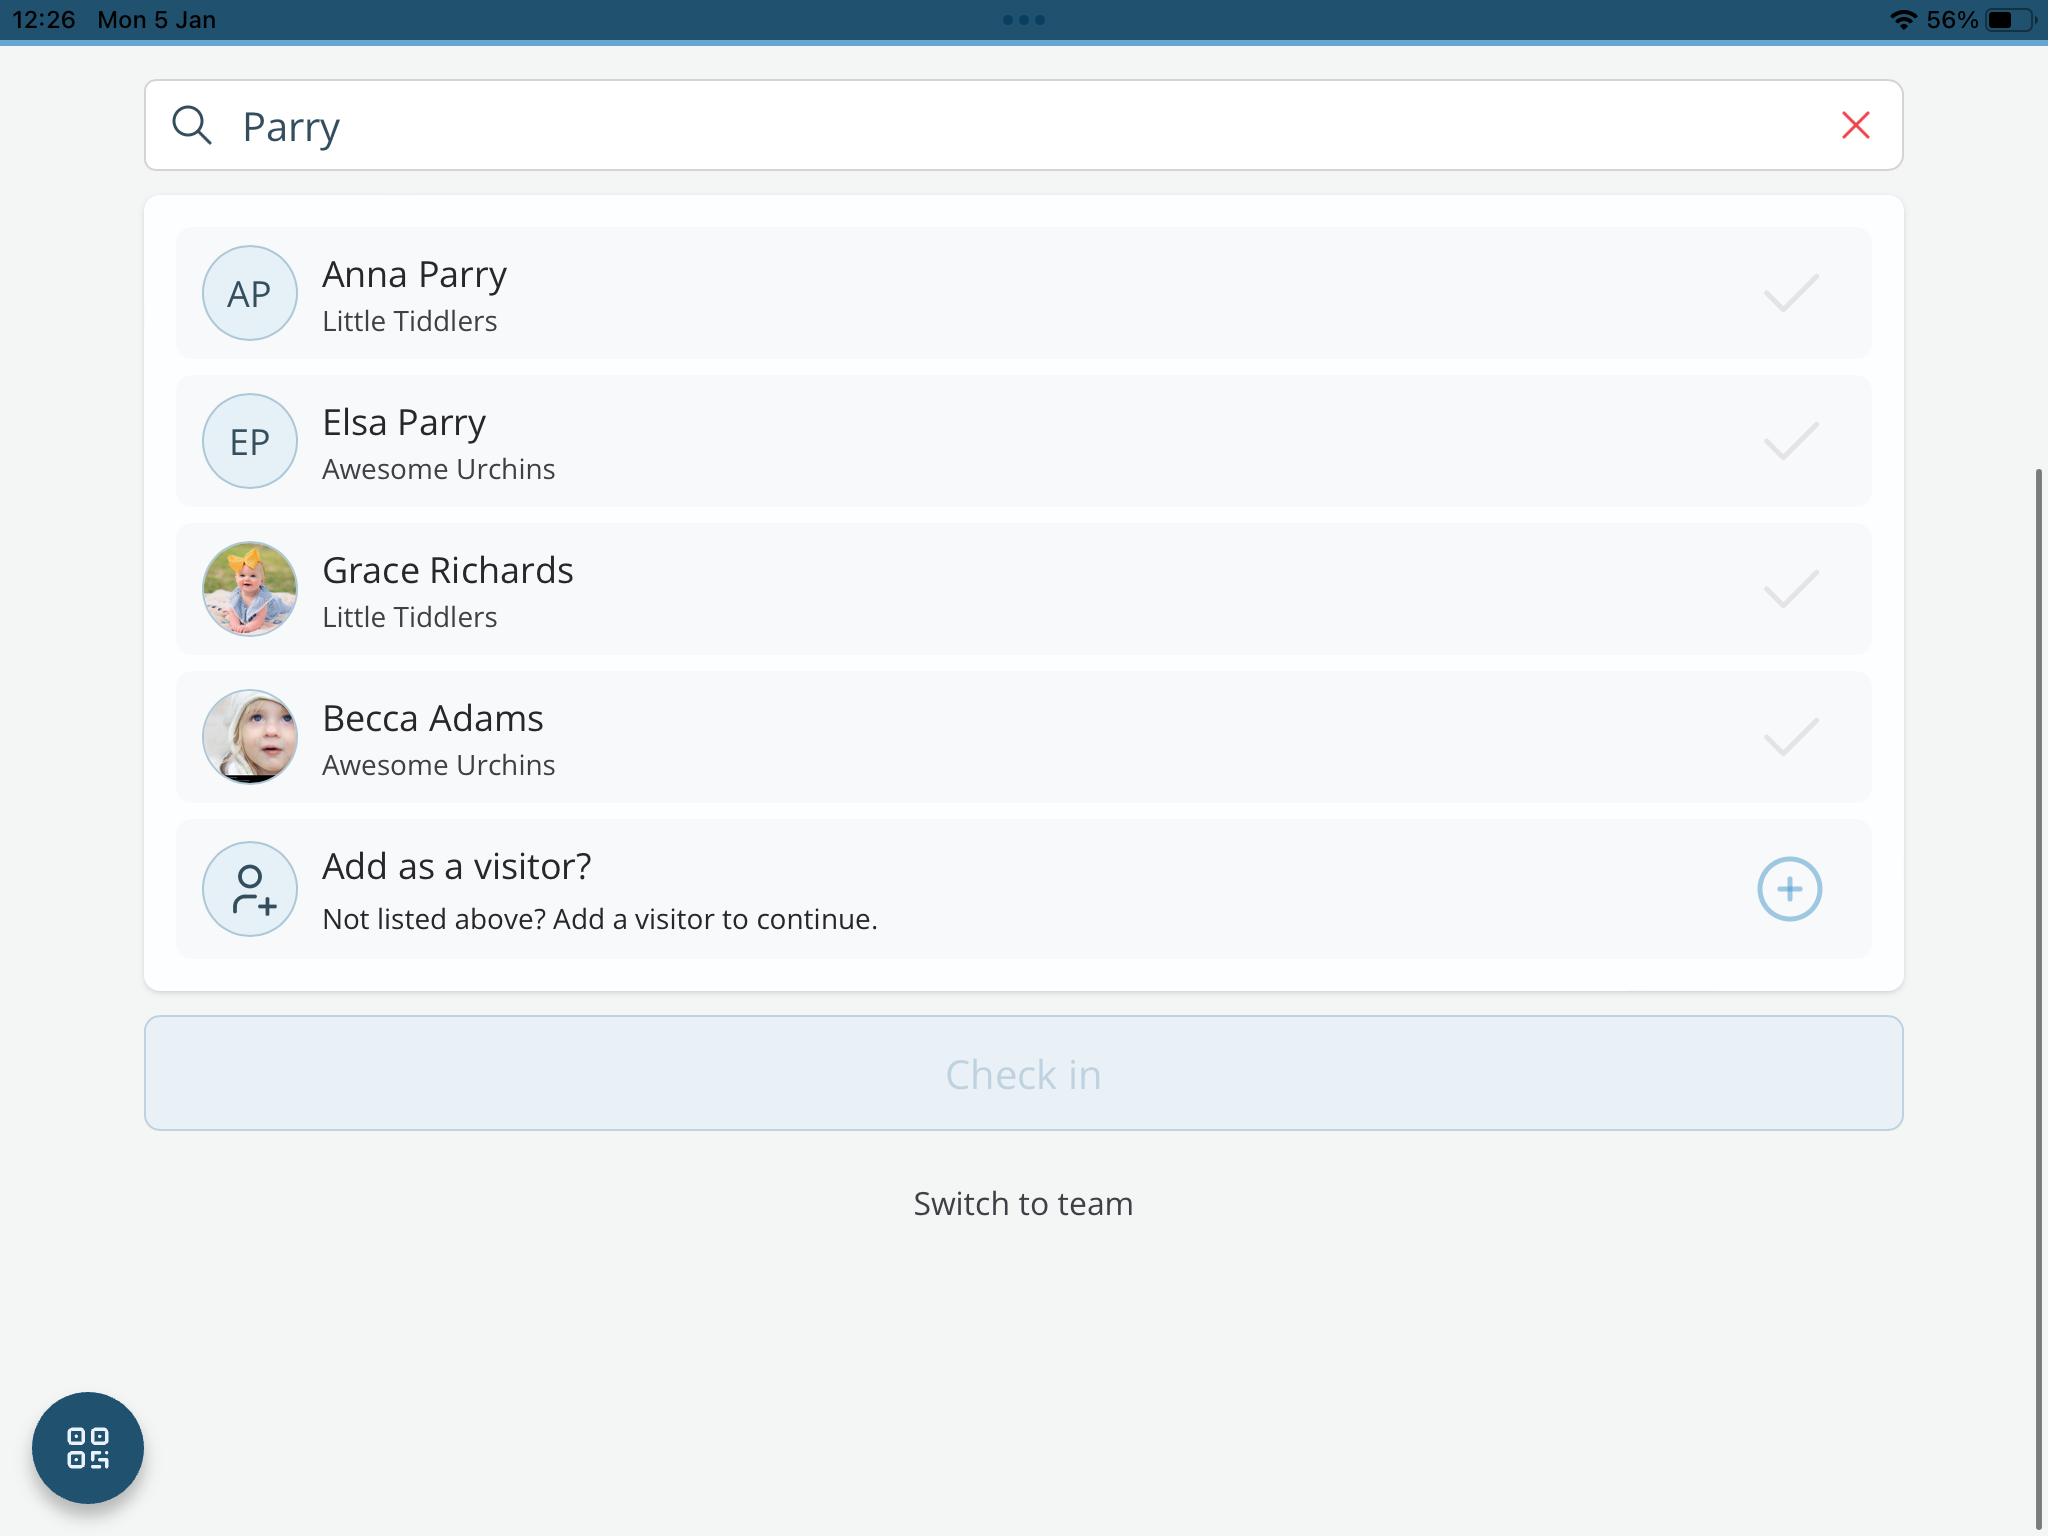
Matching children and returning visitors are shown. Select the child to be checked in. Their record changes colour to green and shows a green tick on the right. Families can check in multiple children in a single check-in. Click Register (for a Register first, Check in later session) or Check-In (for a Register & Check In session). Badges of each type are produced in accordance with the group and session settings. The check-in page refreshes and recycles, ready for the next child.
For Register & Check in sessions, the group attendance record is immediately added to the Children module as each child is checked in. However, for Register first, Check in later sessions, registered children and visitors are later checked into groups by leaders from the group page in the Admin area as parents/carers hand their children into their care. As each registered child is checked in, a record of their attendance (including a time stamp) is added for the group in the Children module. This is also the page that your group leaders will use to check children out of groups at the end of the session.
Checking in visitors
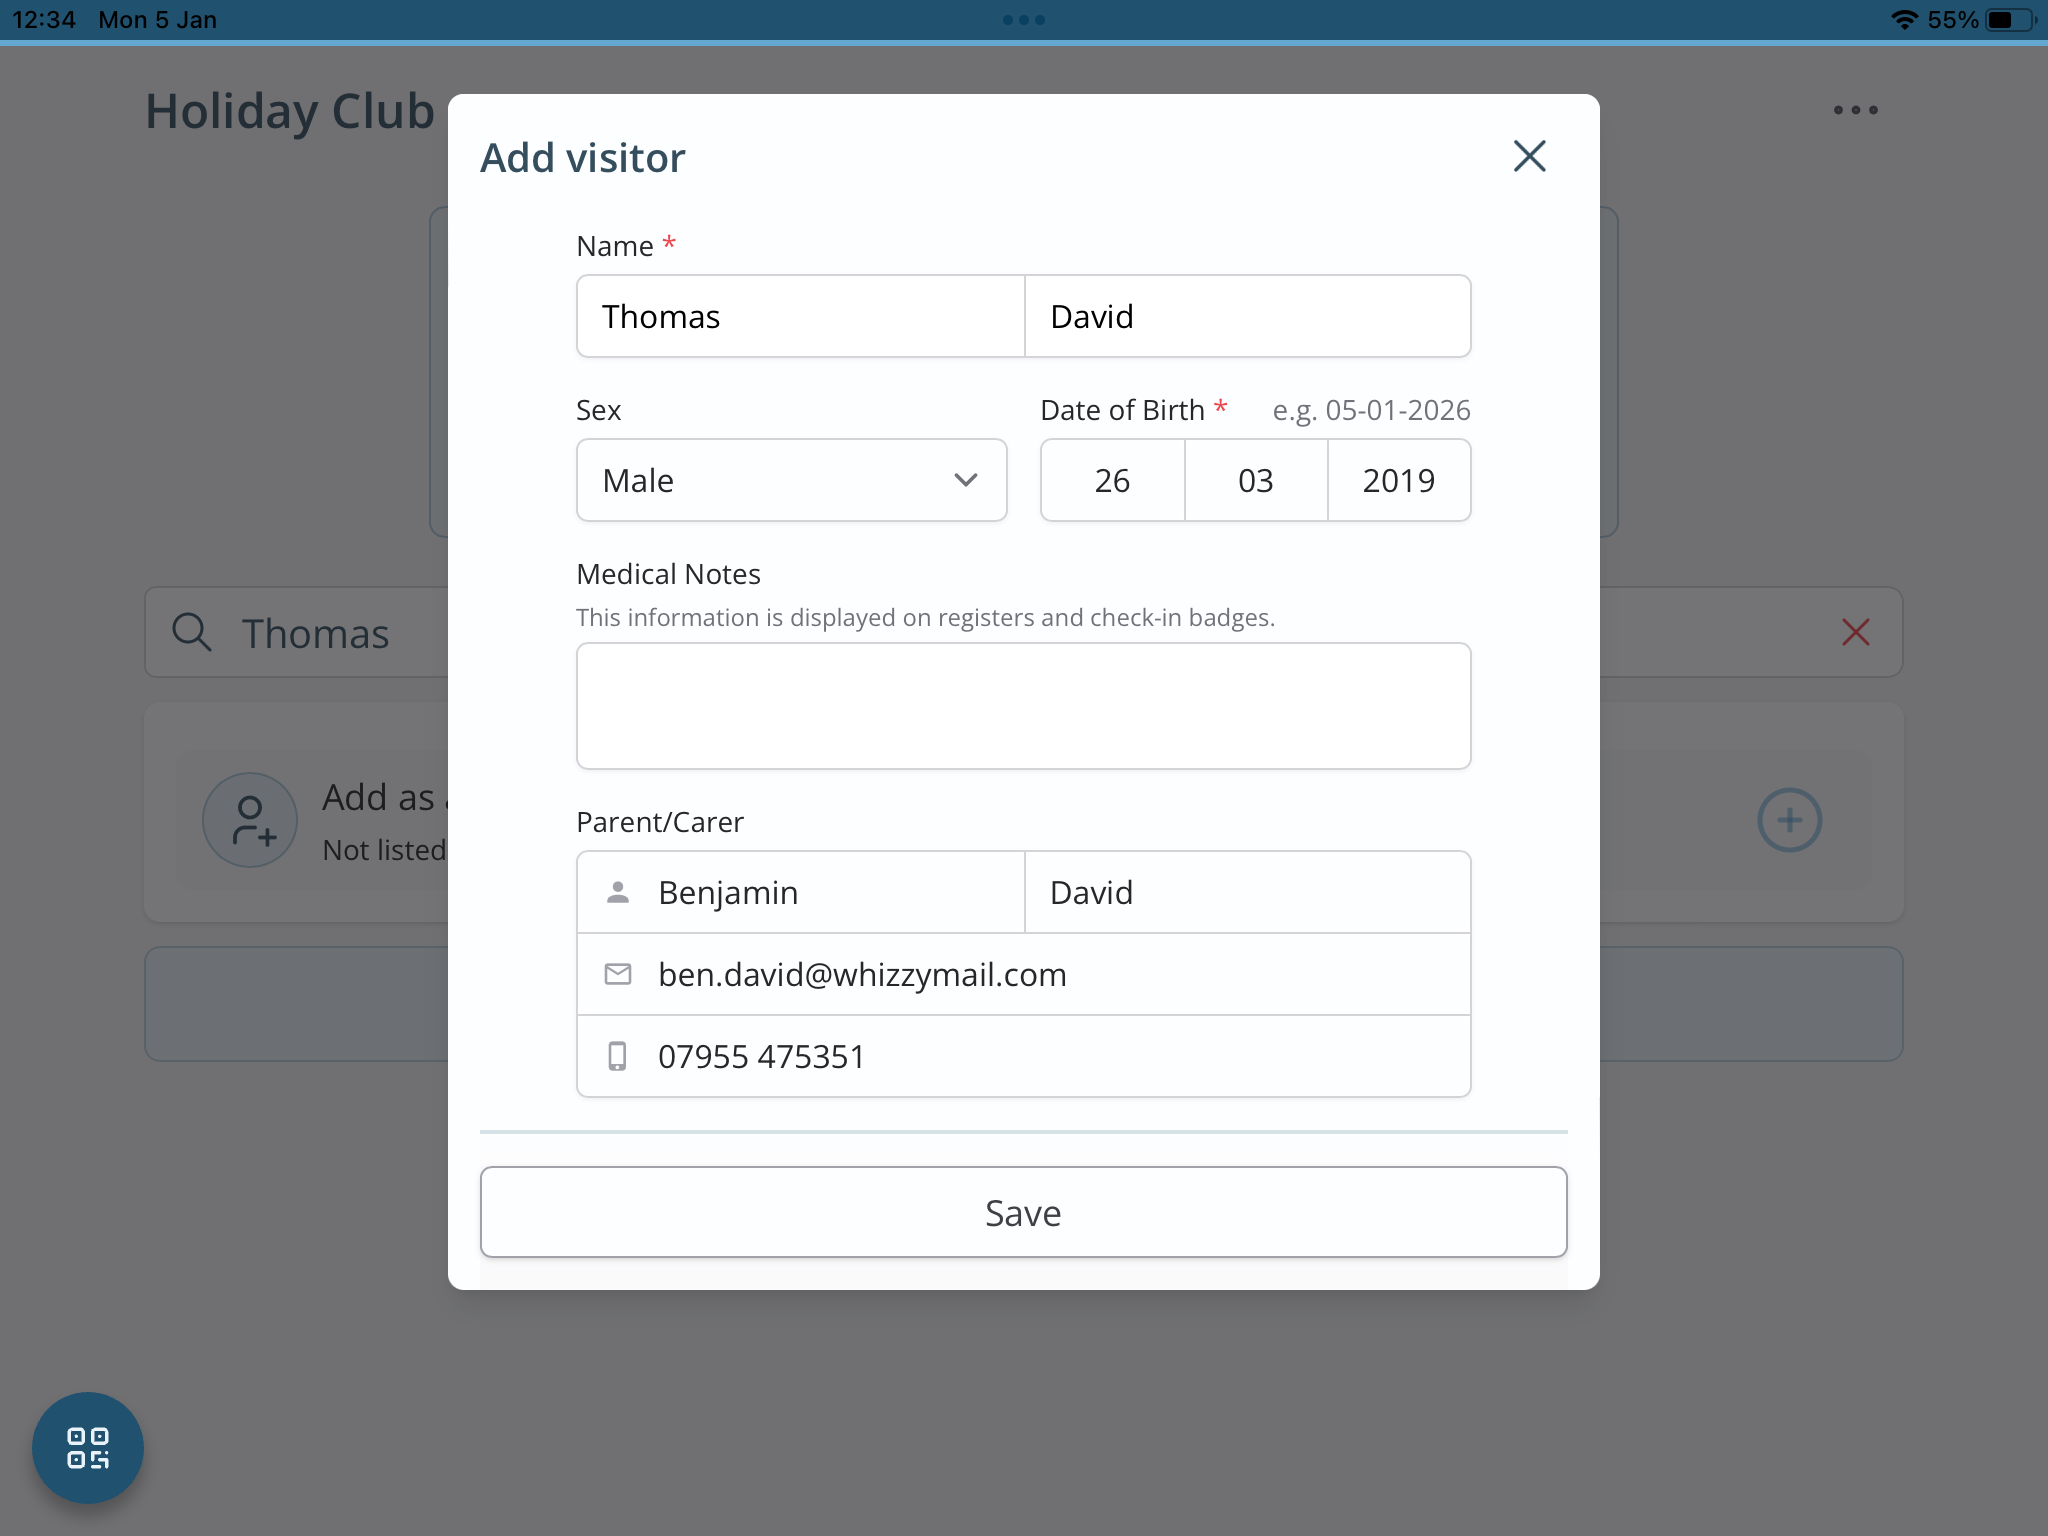
The process of checking in guests and visiting children is the same as for your regular children. Begin by searching for the visitor. If there is no match, click Add as a visitor.

Complete the Add visitor pop-up, collecting all the pertinent details needed to register the child. The child’s age, determined by their date of birth, is used to assign the child to the appropriate group in the active session. We’ve produced a related support article on Managing details of visiting children that contains instructions for customising the fields shown and required on the Add visitor form. You might momentarily hand the Check-In device to the parent/carer to complete the form. Click Save to register the visitor. A visitor profile is automatically created in the Visitors section of the Children module.
Click Register (for a Register first, Check in later session) or Check-In (for a Register & Check In session). Badges of each type are produced in accordance with the group and session settings. The check-in page refreshes and recycles, ready for the next child.
As previously mentioned, for Register & Check In sessions, the group attendance record is immediately added to the Children module as each visitor is checked in. However, for Register first, Check In later sessions, registered visitors can be checked into groups by leaders from the group page in the Admin area as parents/carers hand their children into your care. As each registered visitor is checked in, a record of their attendance (including a time stamp) is added for the group in the Children module.
Checking in team members
By requiring team members to check in when they arrive for the session, you can manage the adult-child ratio for each group, ensuring you have sufficient adult team members to remain within your organisation’s Safeguarding Policy.
We recommend using a Check-In device in Kiosk mode to check in team member group leaders and produce their badges. In Kiosk mode, the device settings include two Search types for team check-in. Let’s look at both types. Navigate to the Check-In Admin area and to the Device Settings:
Method 1: Search Type: Attendee/Team
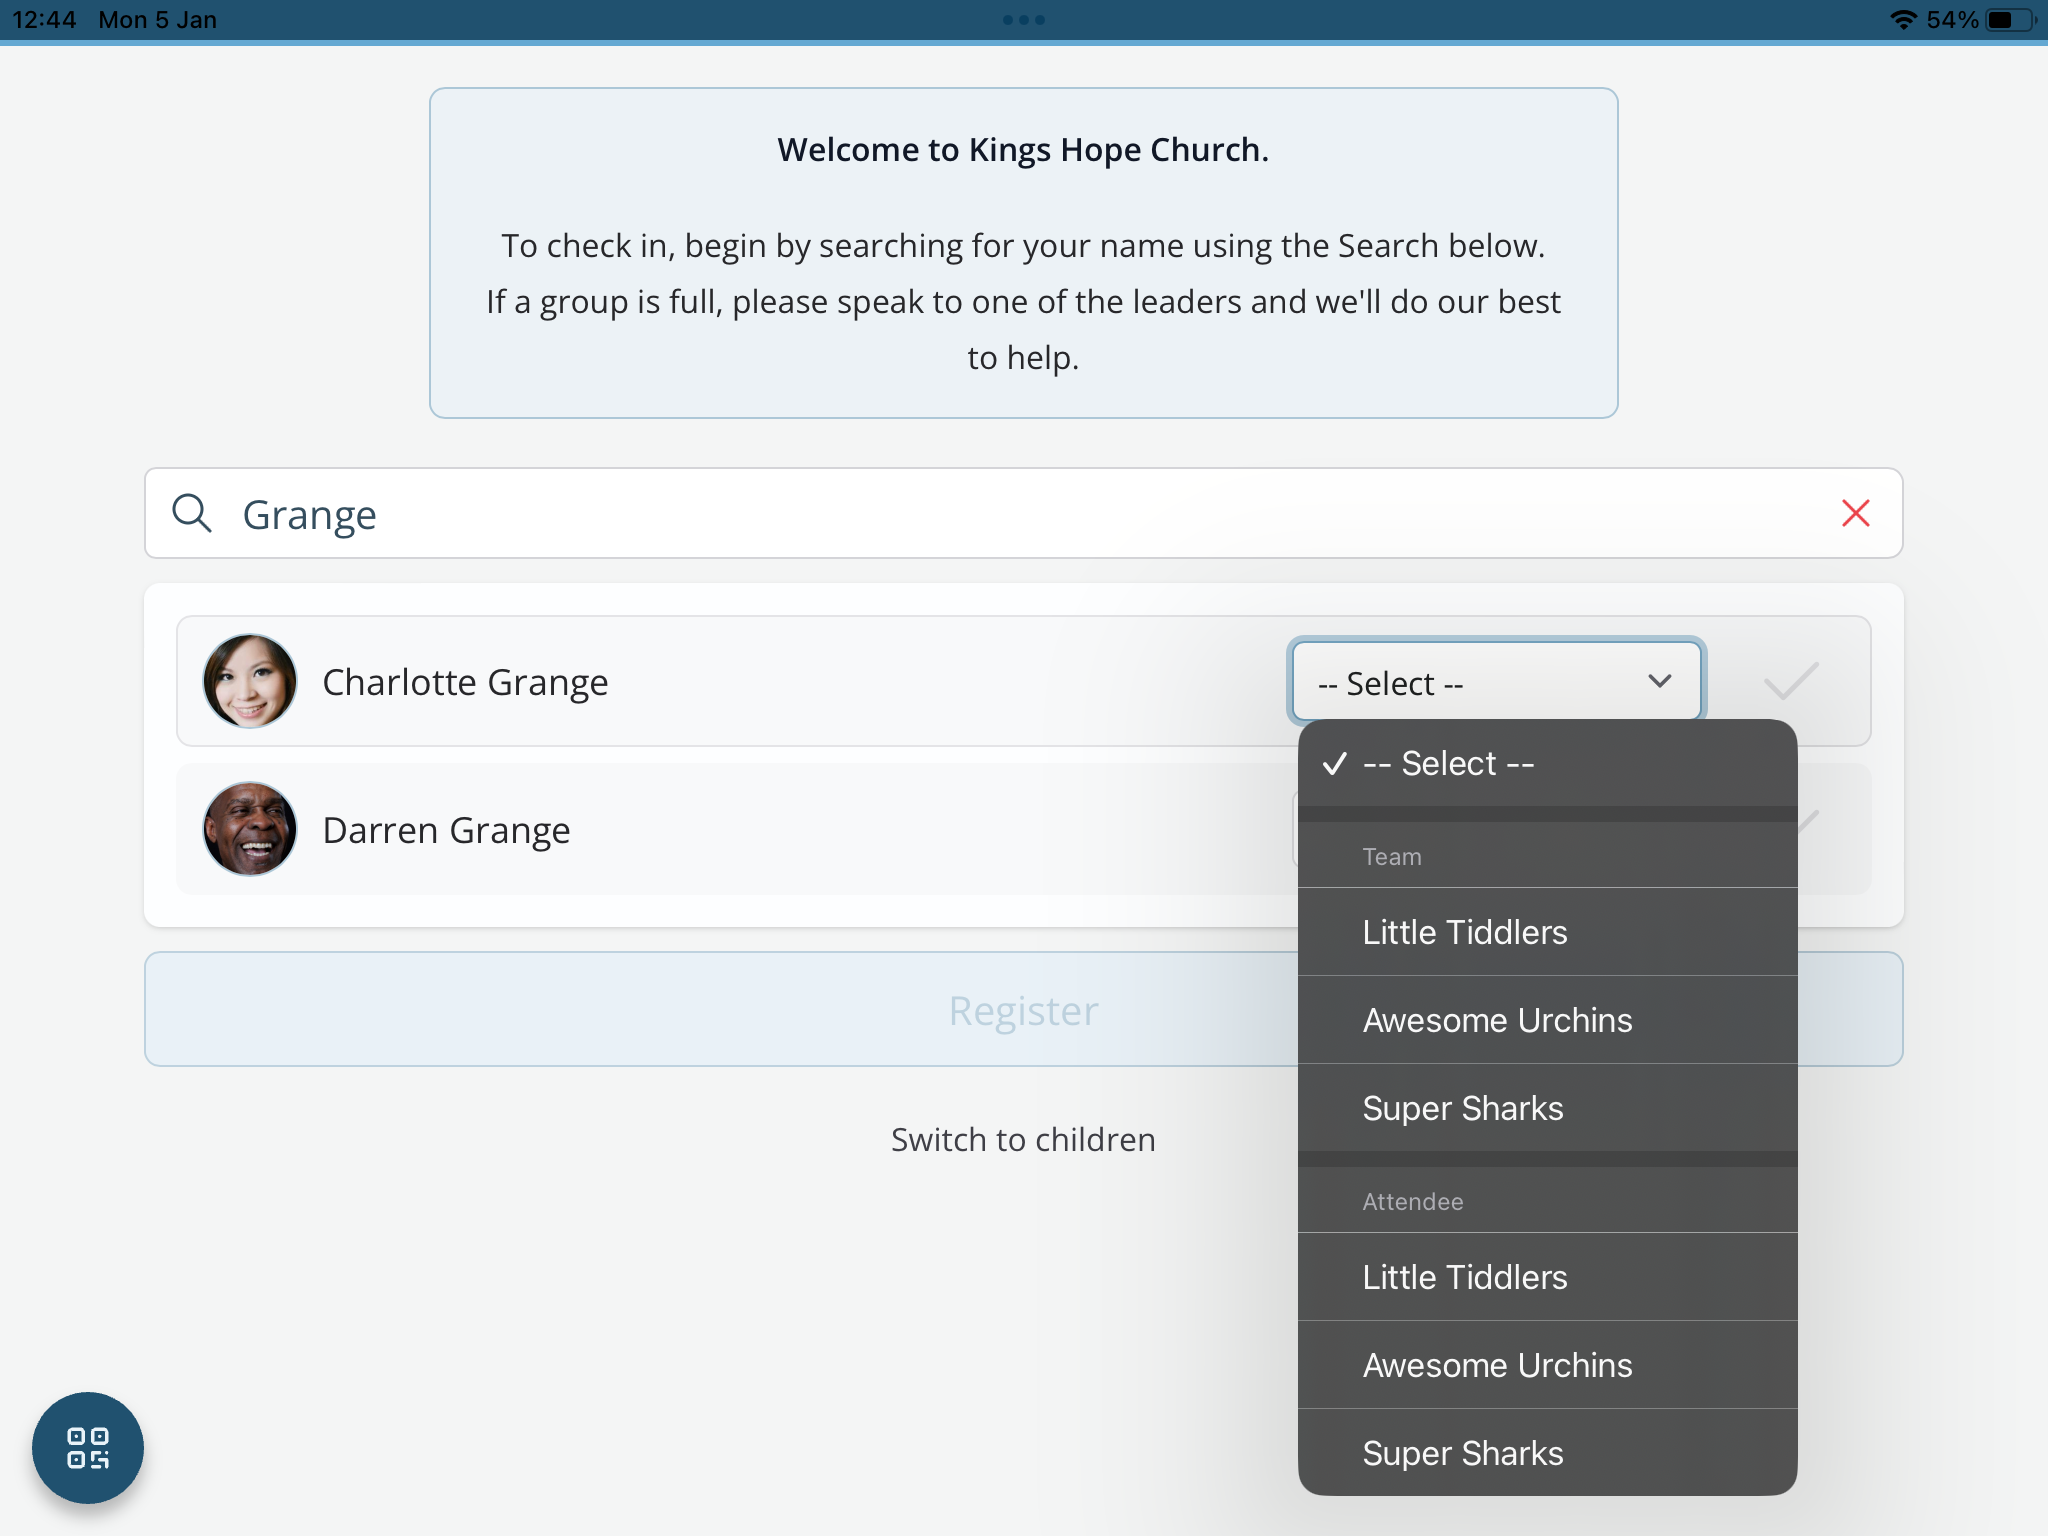
In the Search type, choose Attendee/Team. With this method, the Check-In Search page handles children and team members in separate searches.
By default, the Check-In page searches children and visitors, but note the option to Switch to team:
‘Team Search’ can be used to find people to check in as team members. Choose the team member Group and click Check-In to complete the process and print their team badge (if team badge printing is enabled for the session). After a team check-in, the page refreshes and reverts to searching for children and visitors.
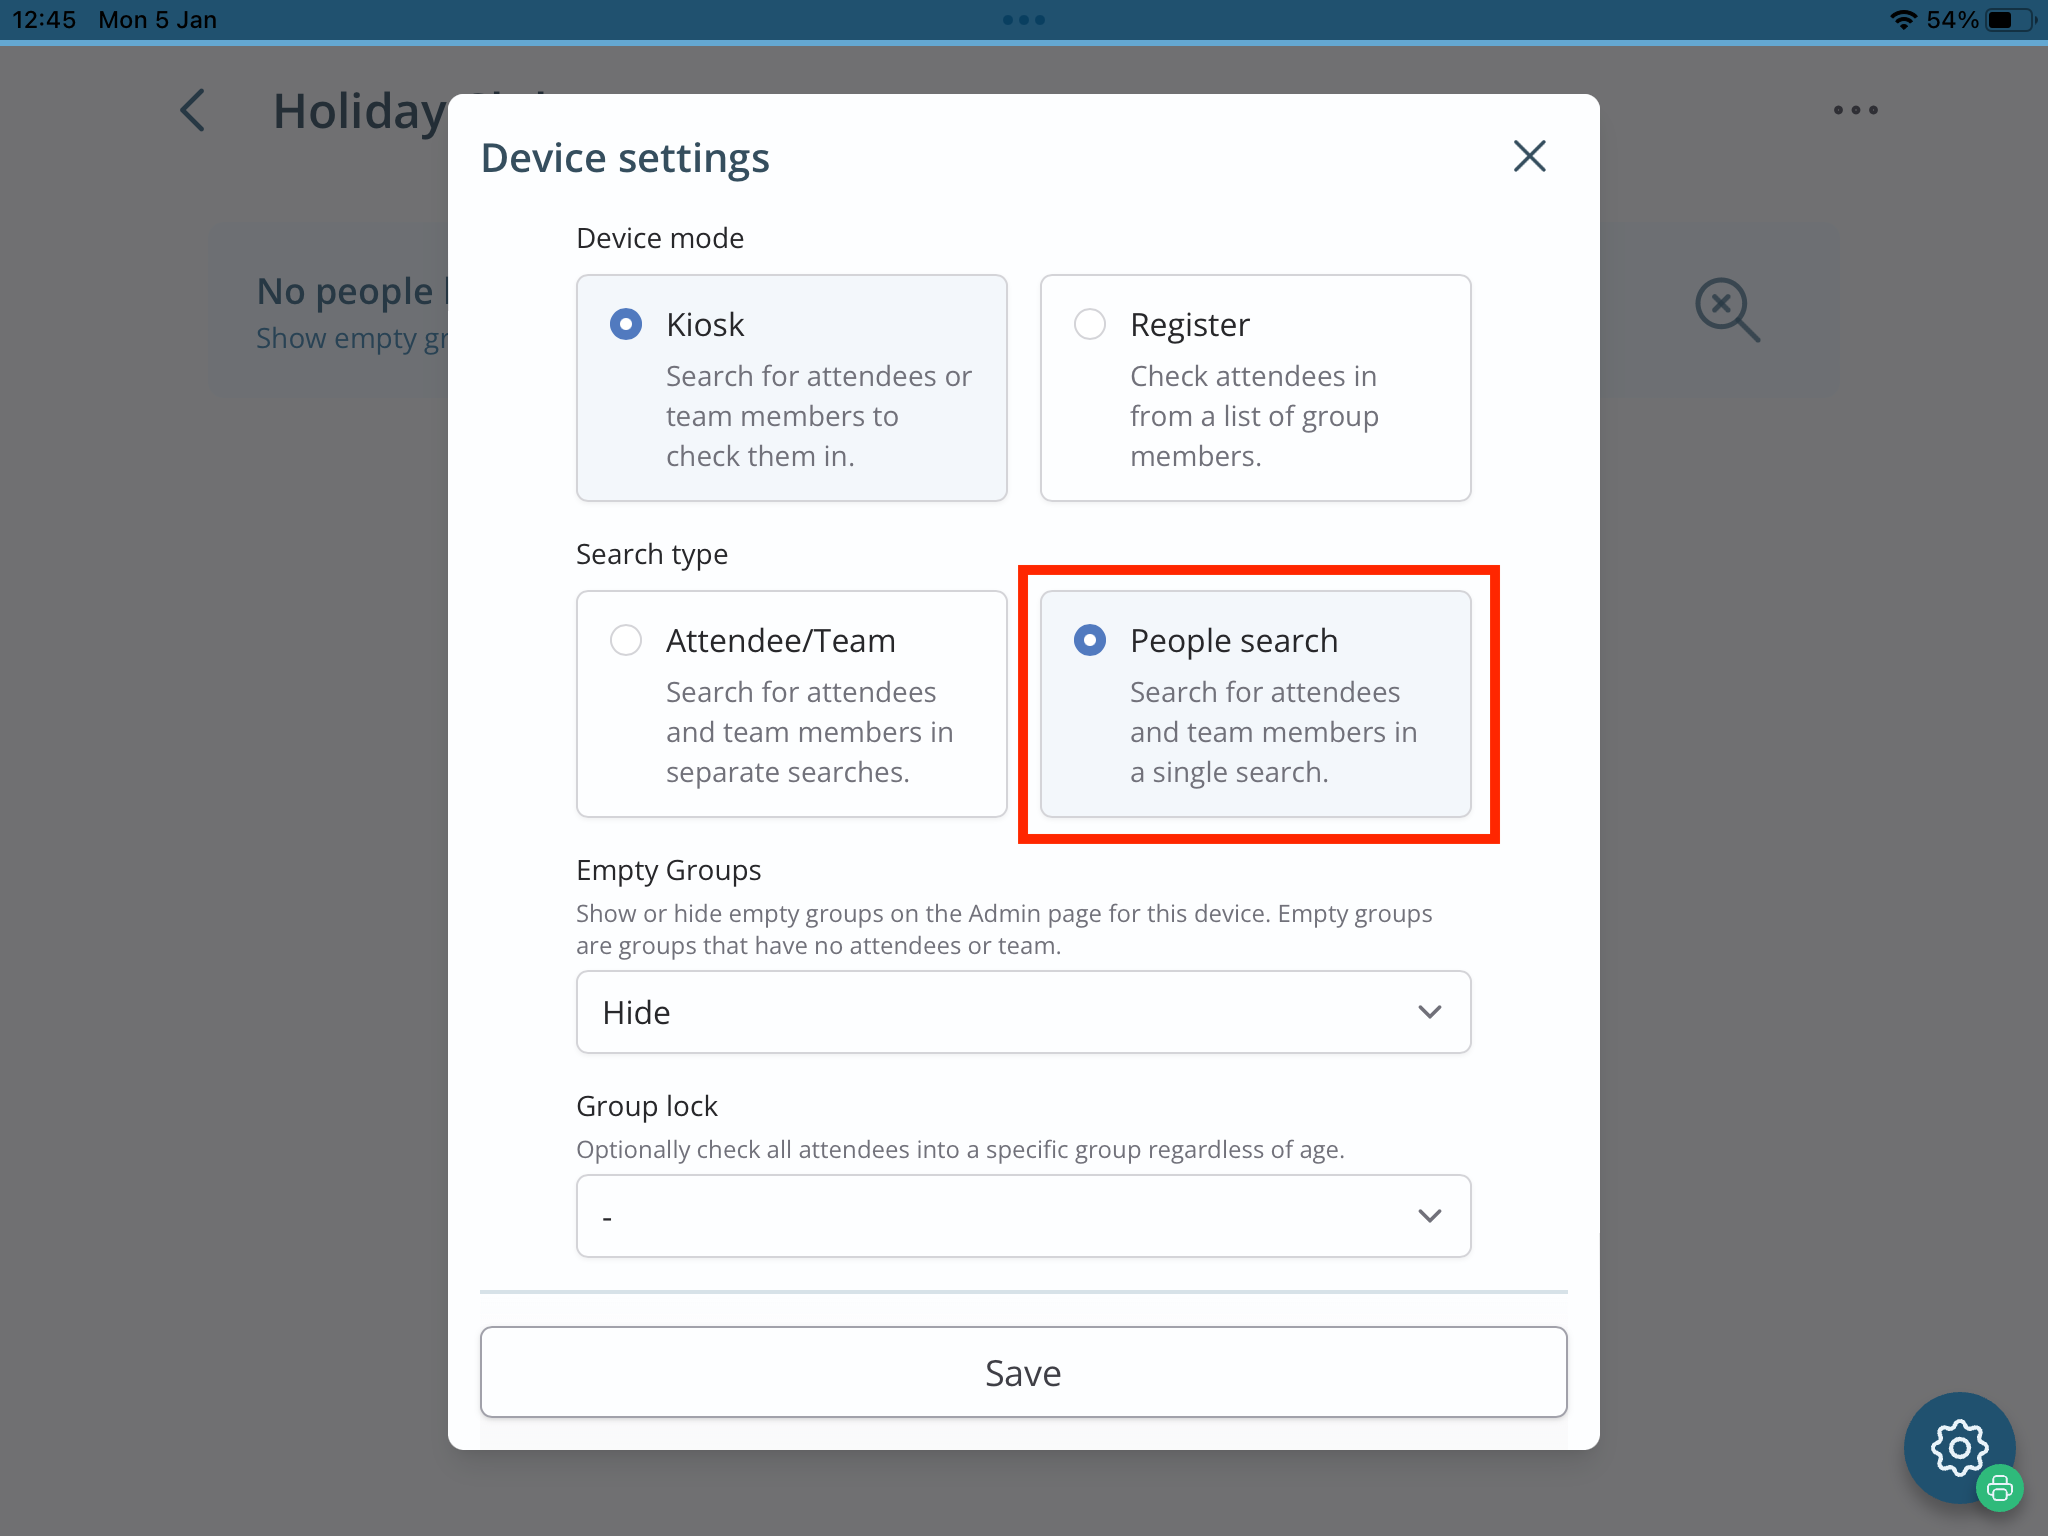
Method 2: Search Type: People search
The other Search type in the Device Settings is People search. A single, unified Search page is used to find children, team members and adult attendees (contacts attending your children's groups).
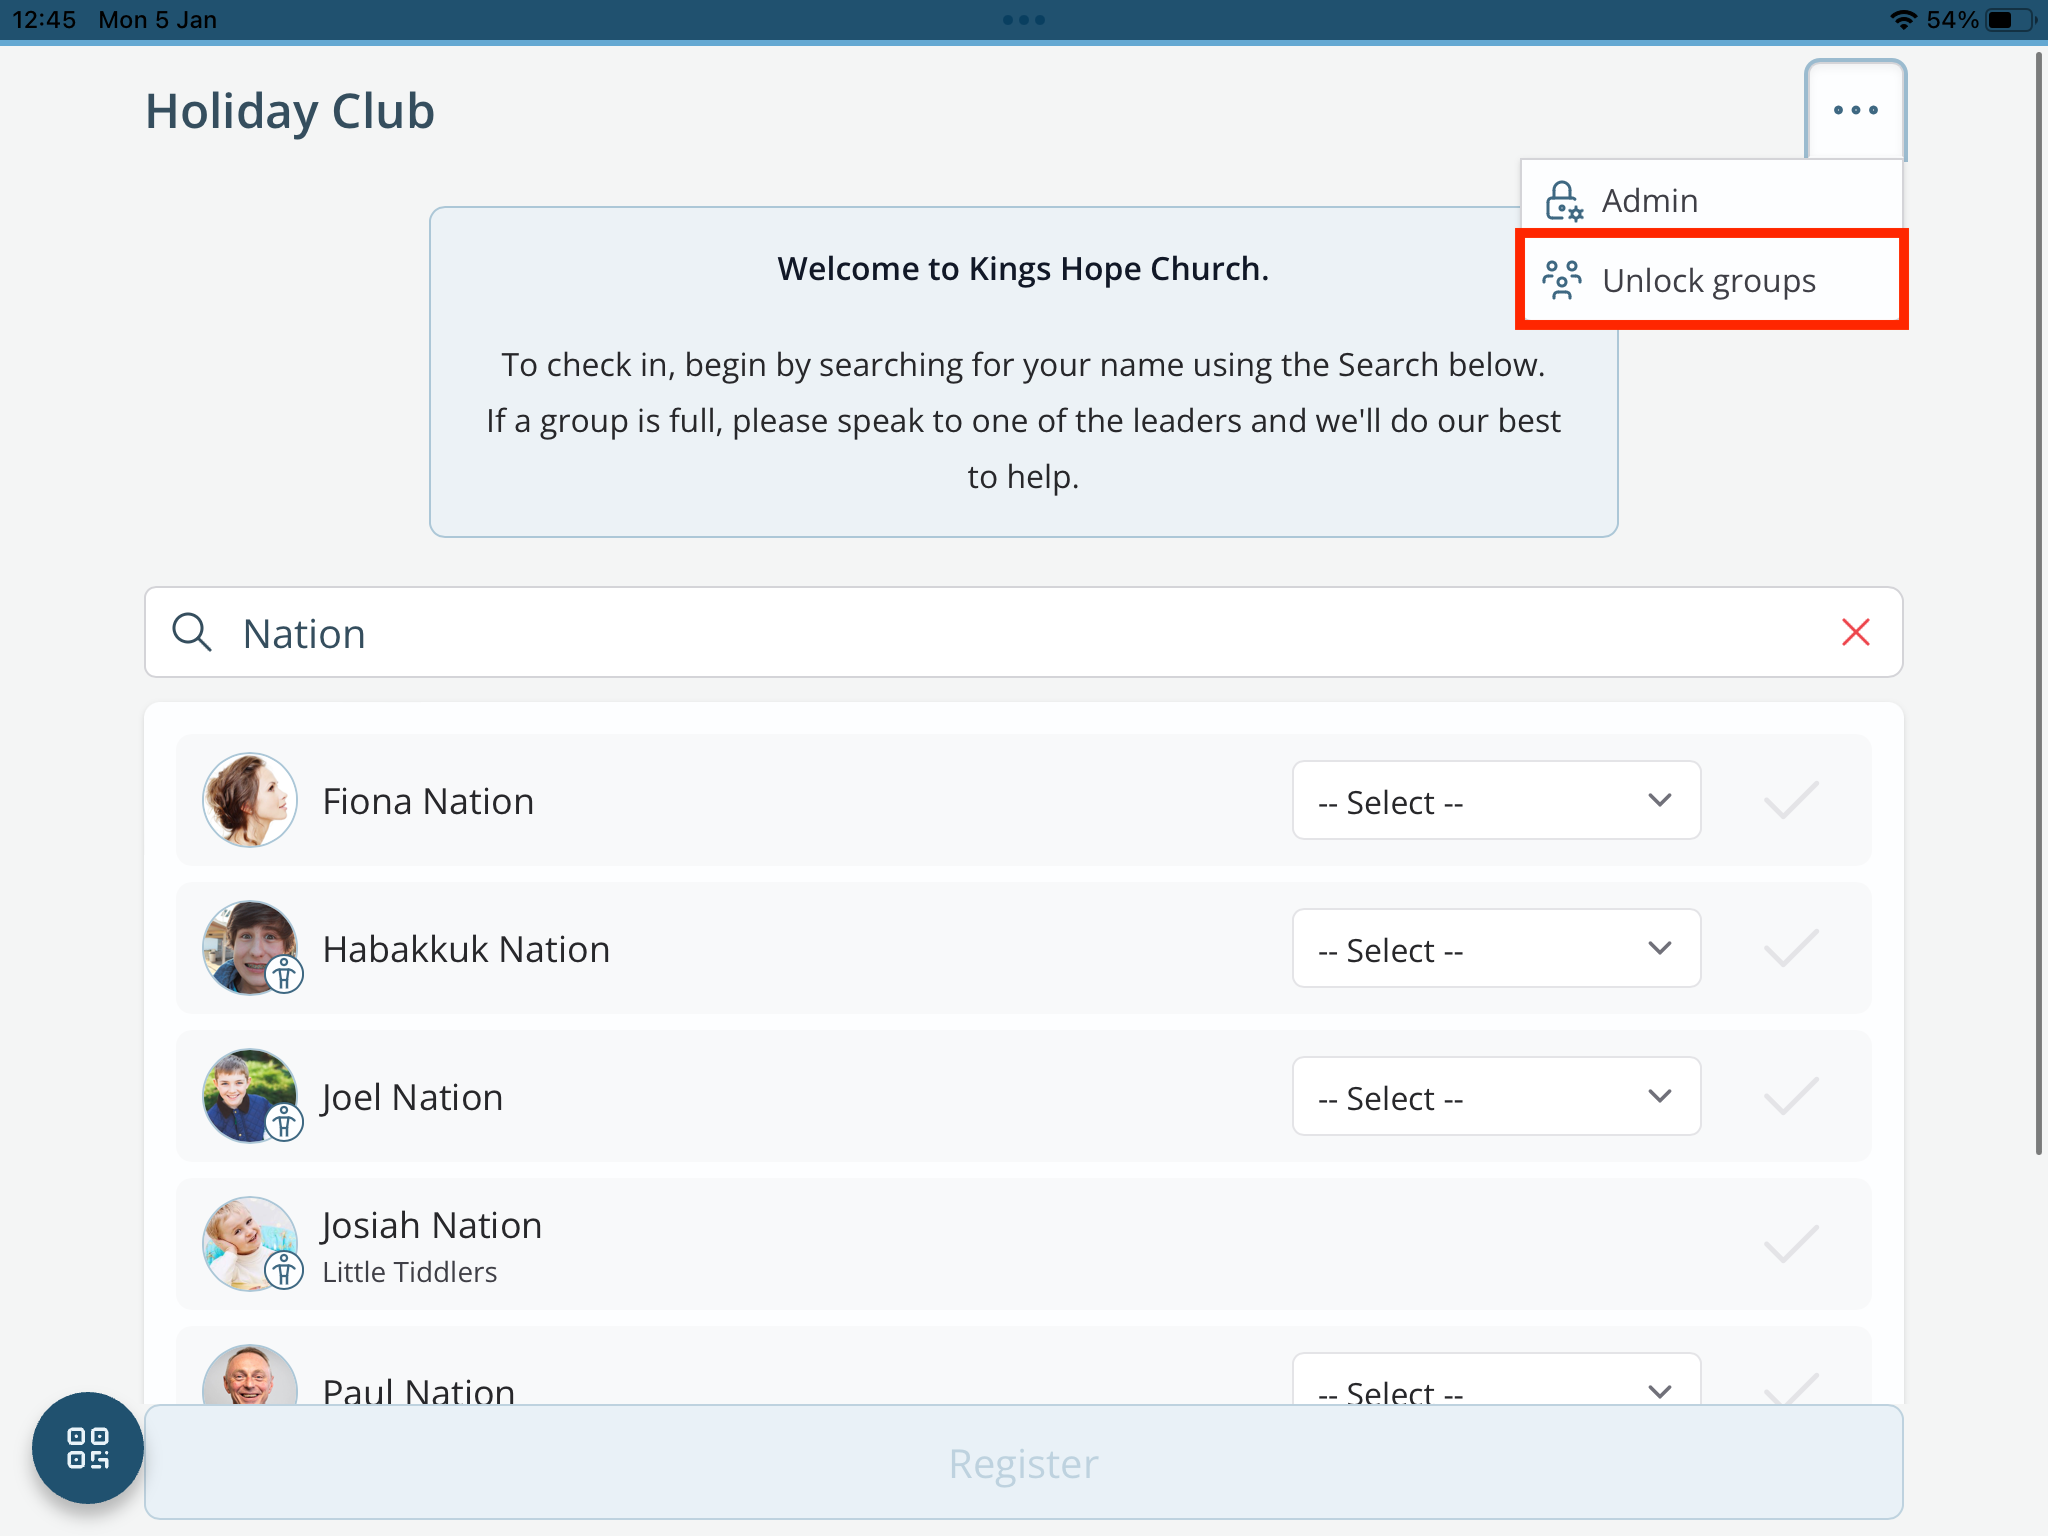
Unlike method 1, there is no Switch to the team option. Instead, the Search shows results for children, adult attendees and team members in the same search. For adult team members, select the relevant Group from the Team section of the drop-down list and for adult attendees, select the Group from the Attendee section:

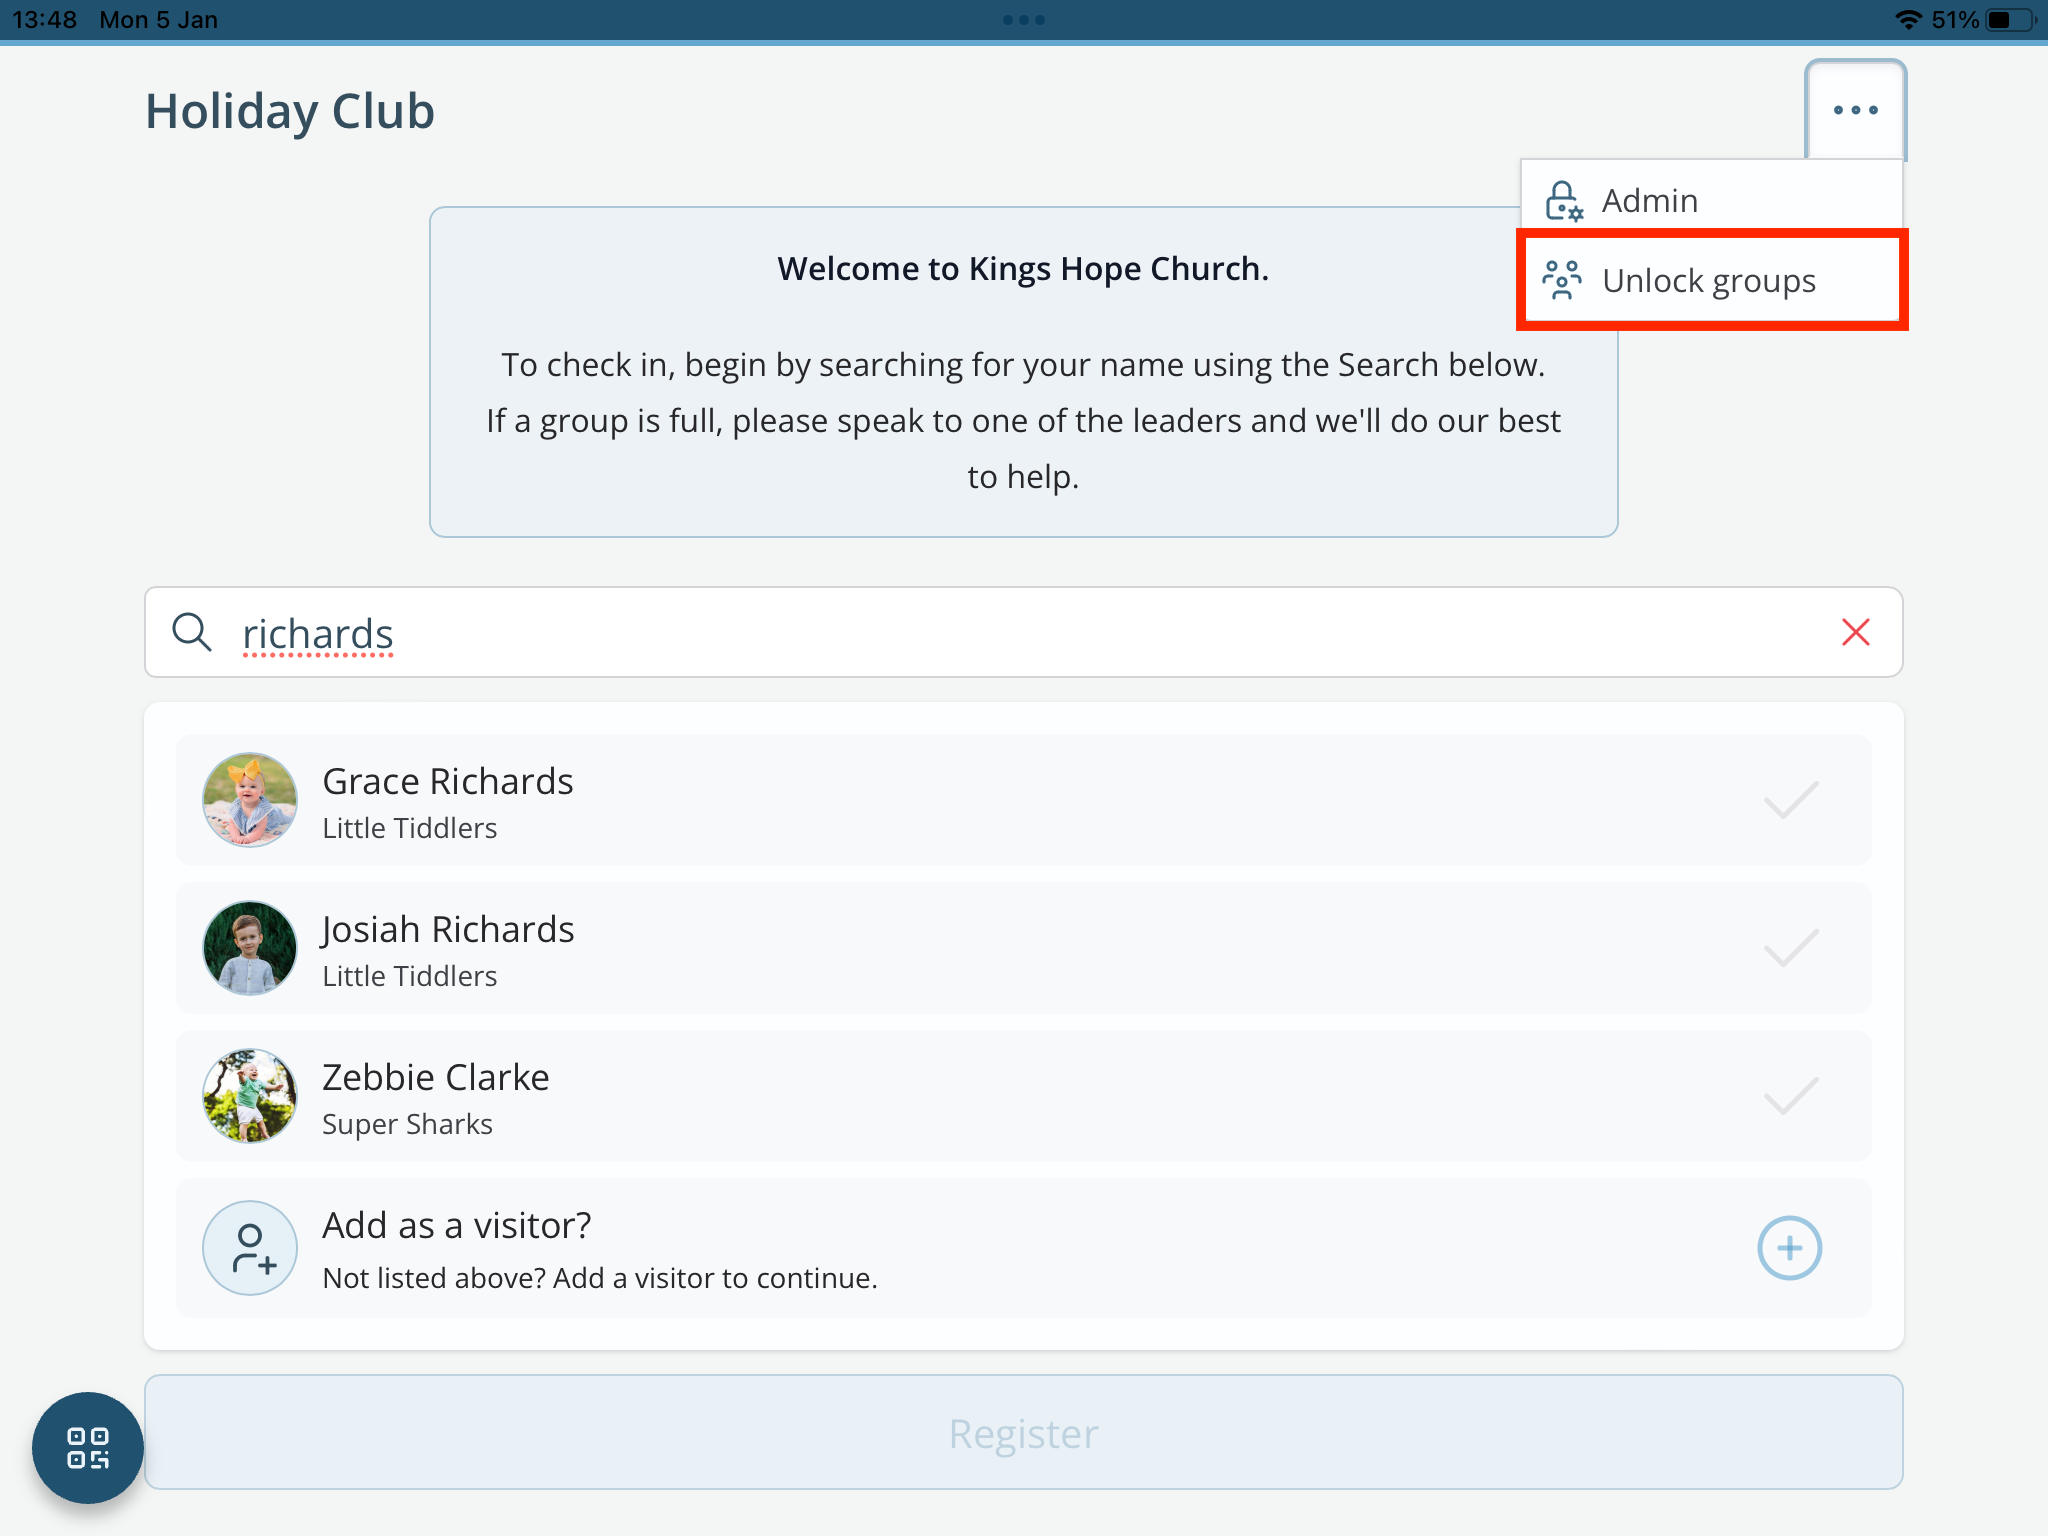
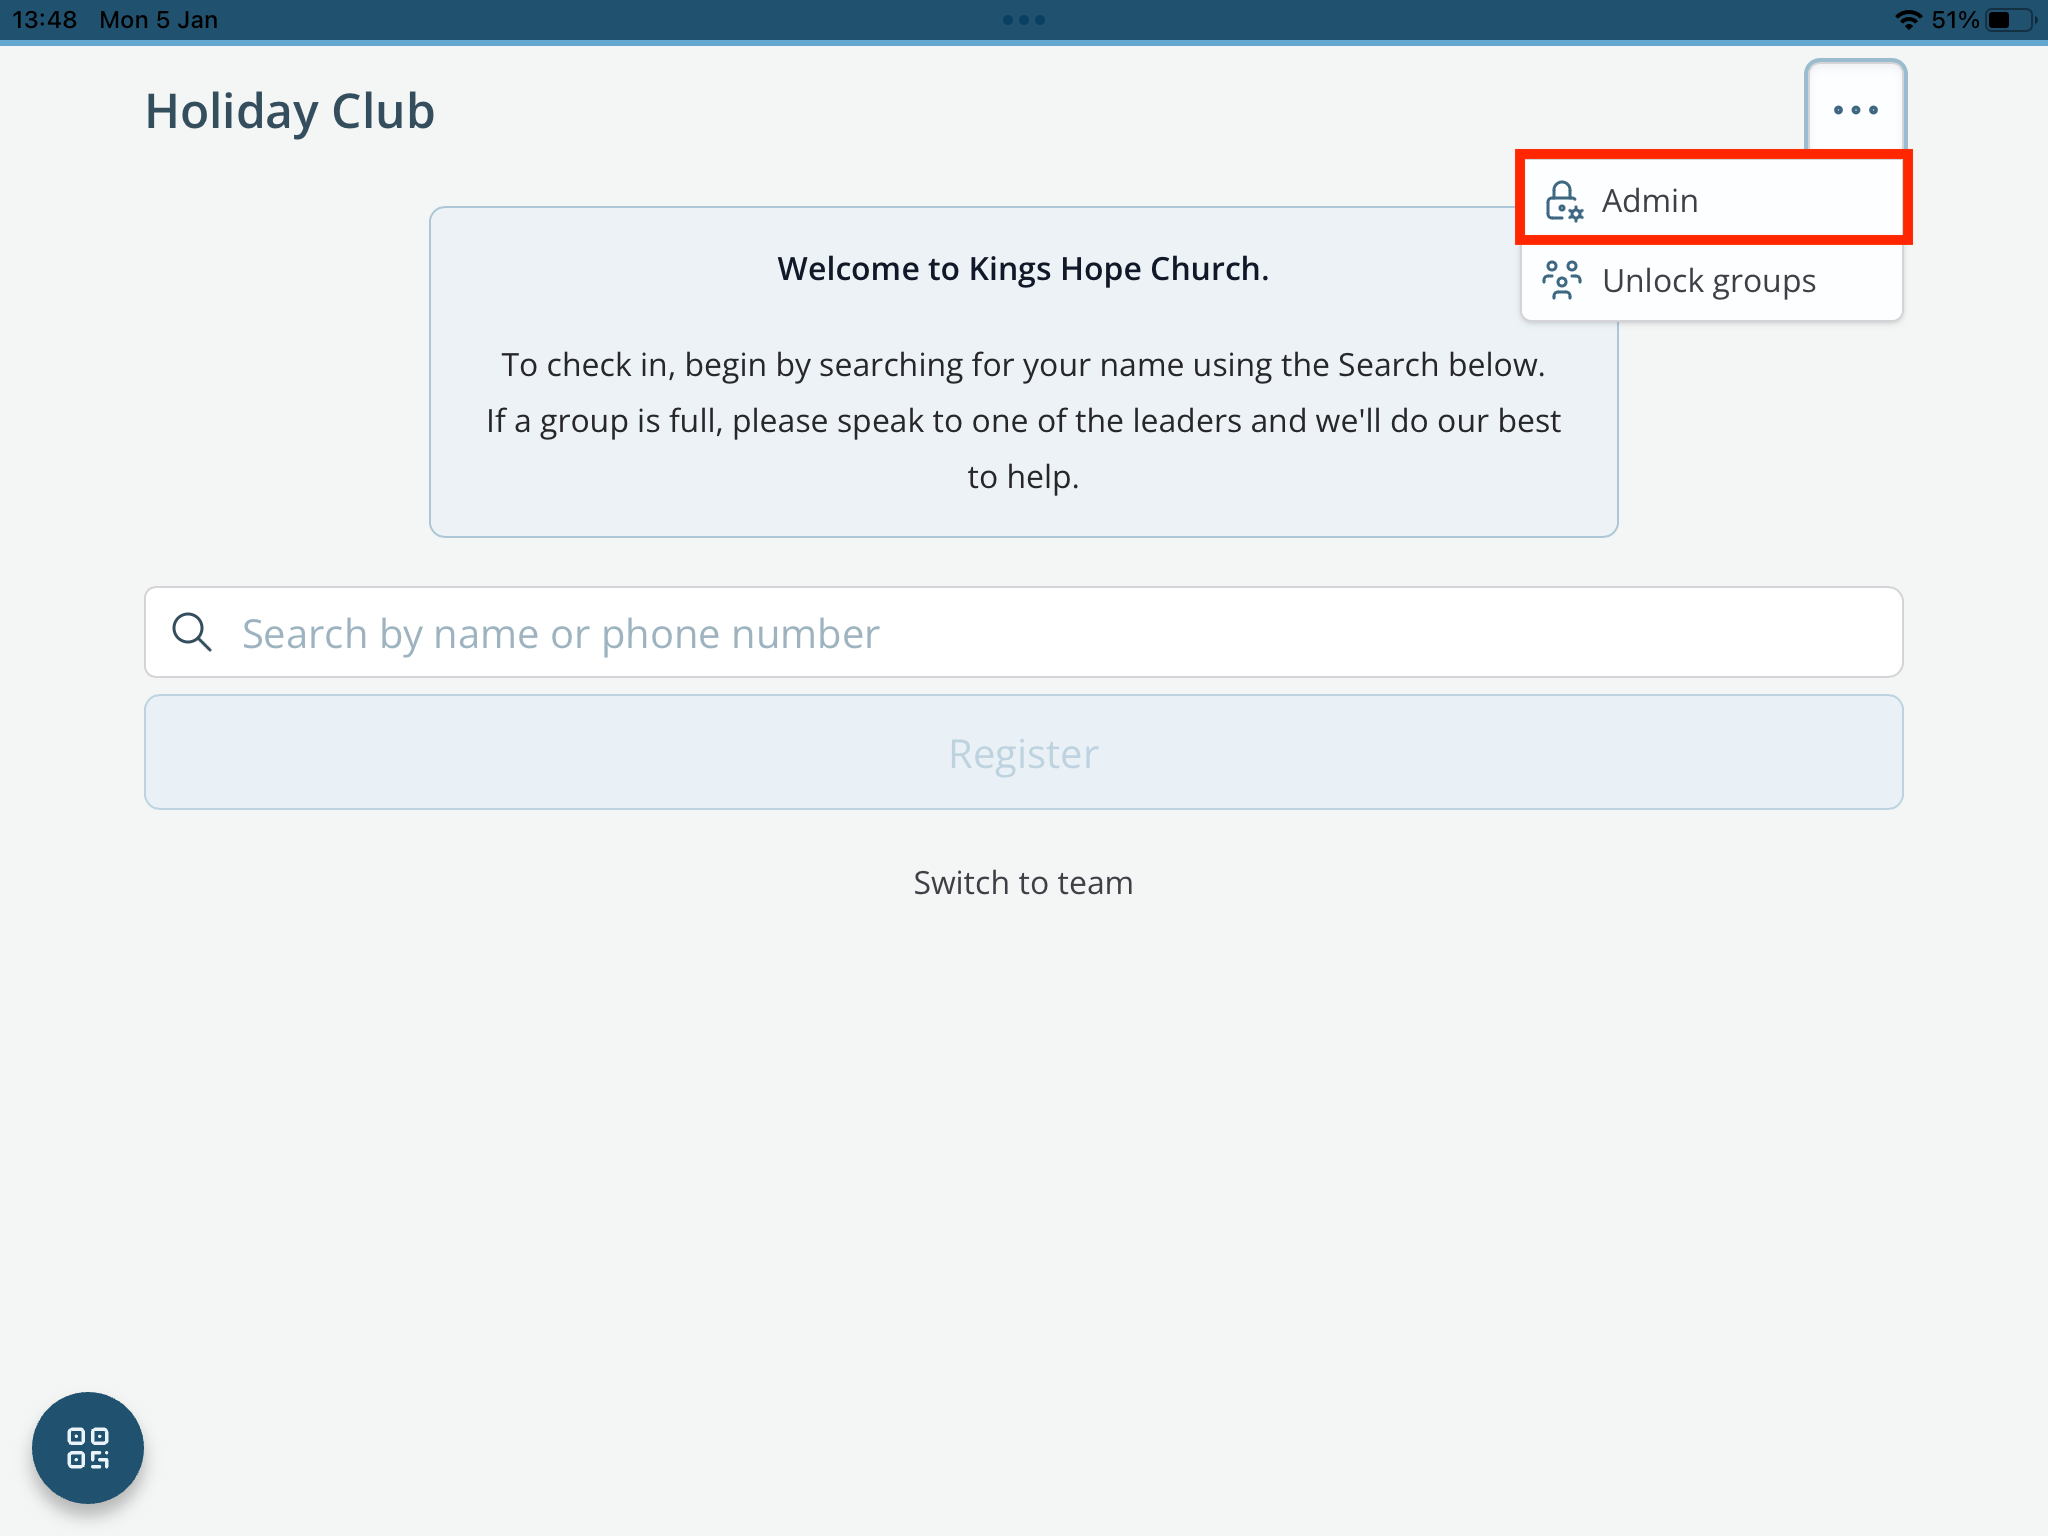
Ordinarily, children are checked in as group members, but it is entirely possible to check in an older child as a team member. To do this, click Unlock groups:
From the drop-down list, you can select a Group to check the child into as a Team member.

Click Check in to complete the process and print team member badges (if team badge printing is enabled for the session). It's not possible to print adult attendee badges or to check in visiting adults.
Overriding a child’s assigned group for a session
Children and visitors are typically assigned to groups based on their age, with regular children processed through groups in the Children module as they get older. However, there may be times when you may want to override a child’s assigned group; for example, an unsettled child who needs to be with an older sibling or a visitor that you want to place with a friend in another group. You can easily do this from the Check-In page at the time the child is registered, or you can move a child between groups after they are checked in. Let’s see how to do both of these tasks:
Overriding at check-in
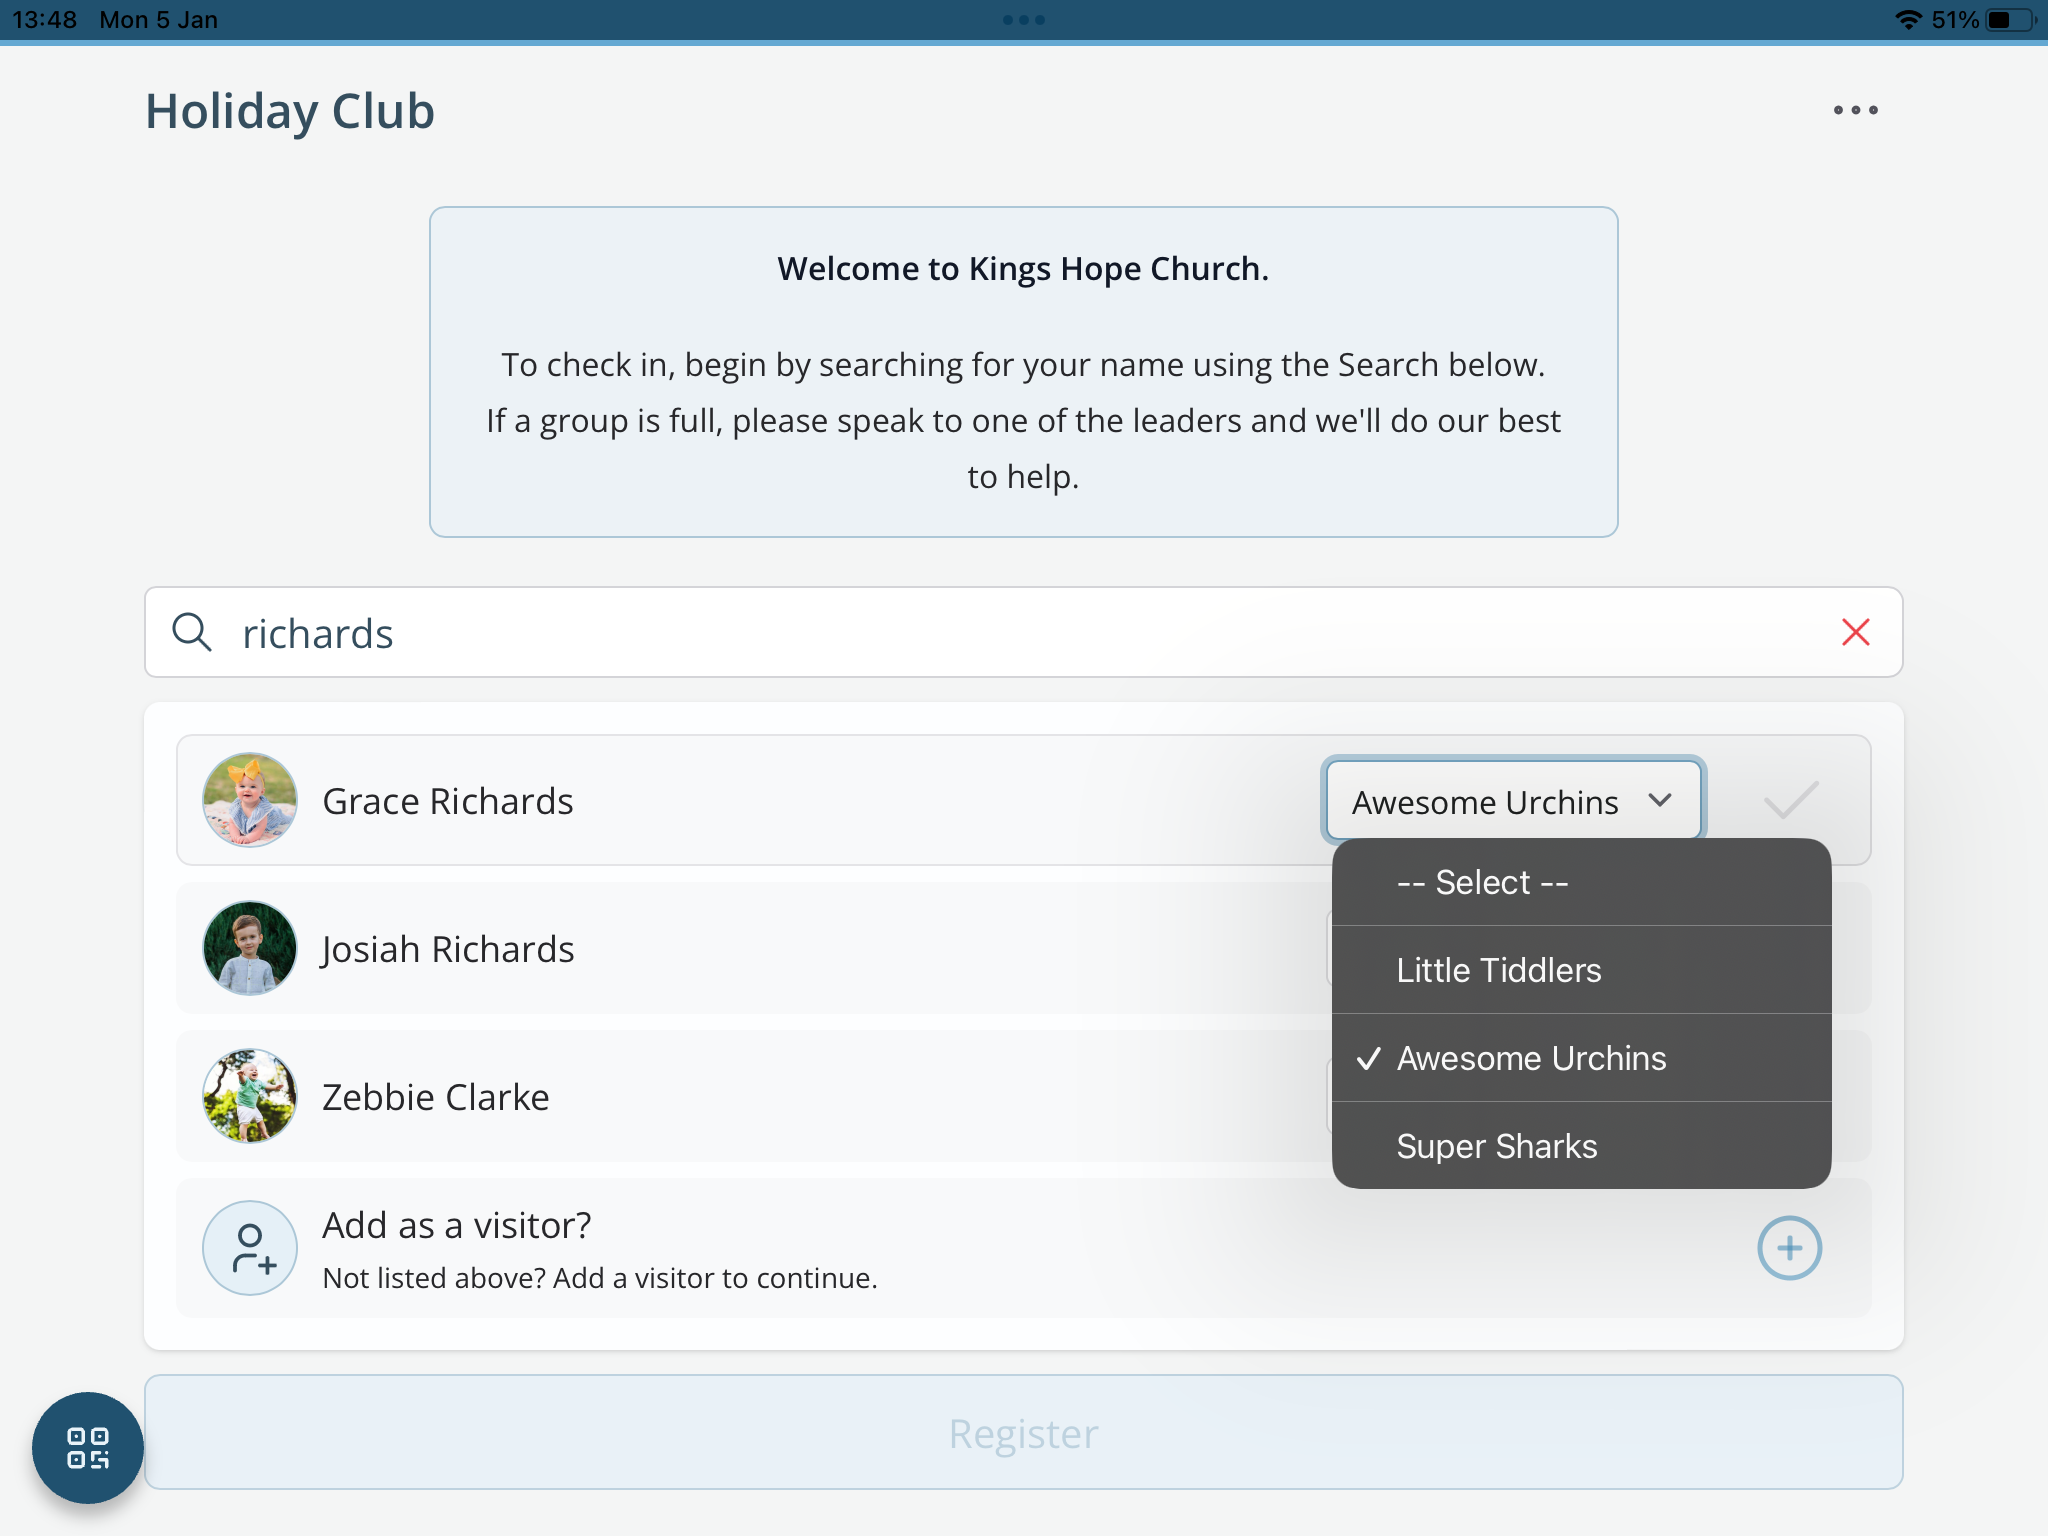
From the Search page, select Unlock groups and confirm.
Select an alternative group. The child is selected and can be checked in in the usual manner, with badges produced reflecting the newly assigned group.
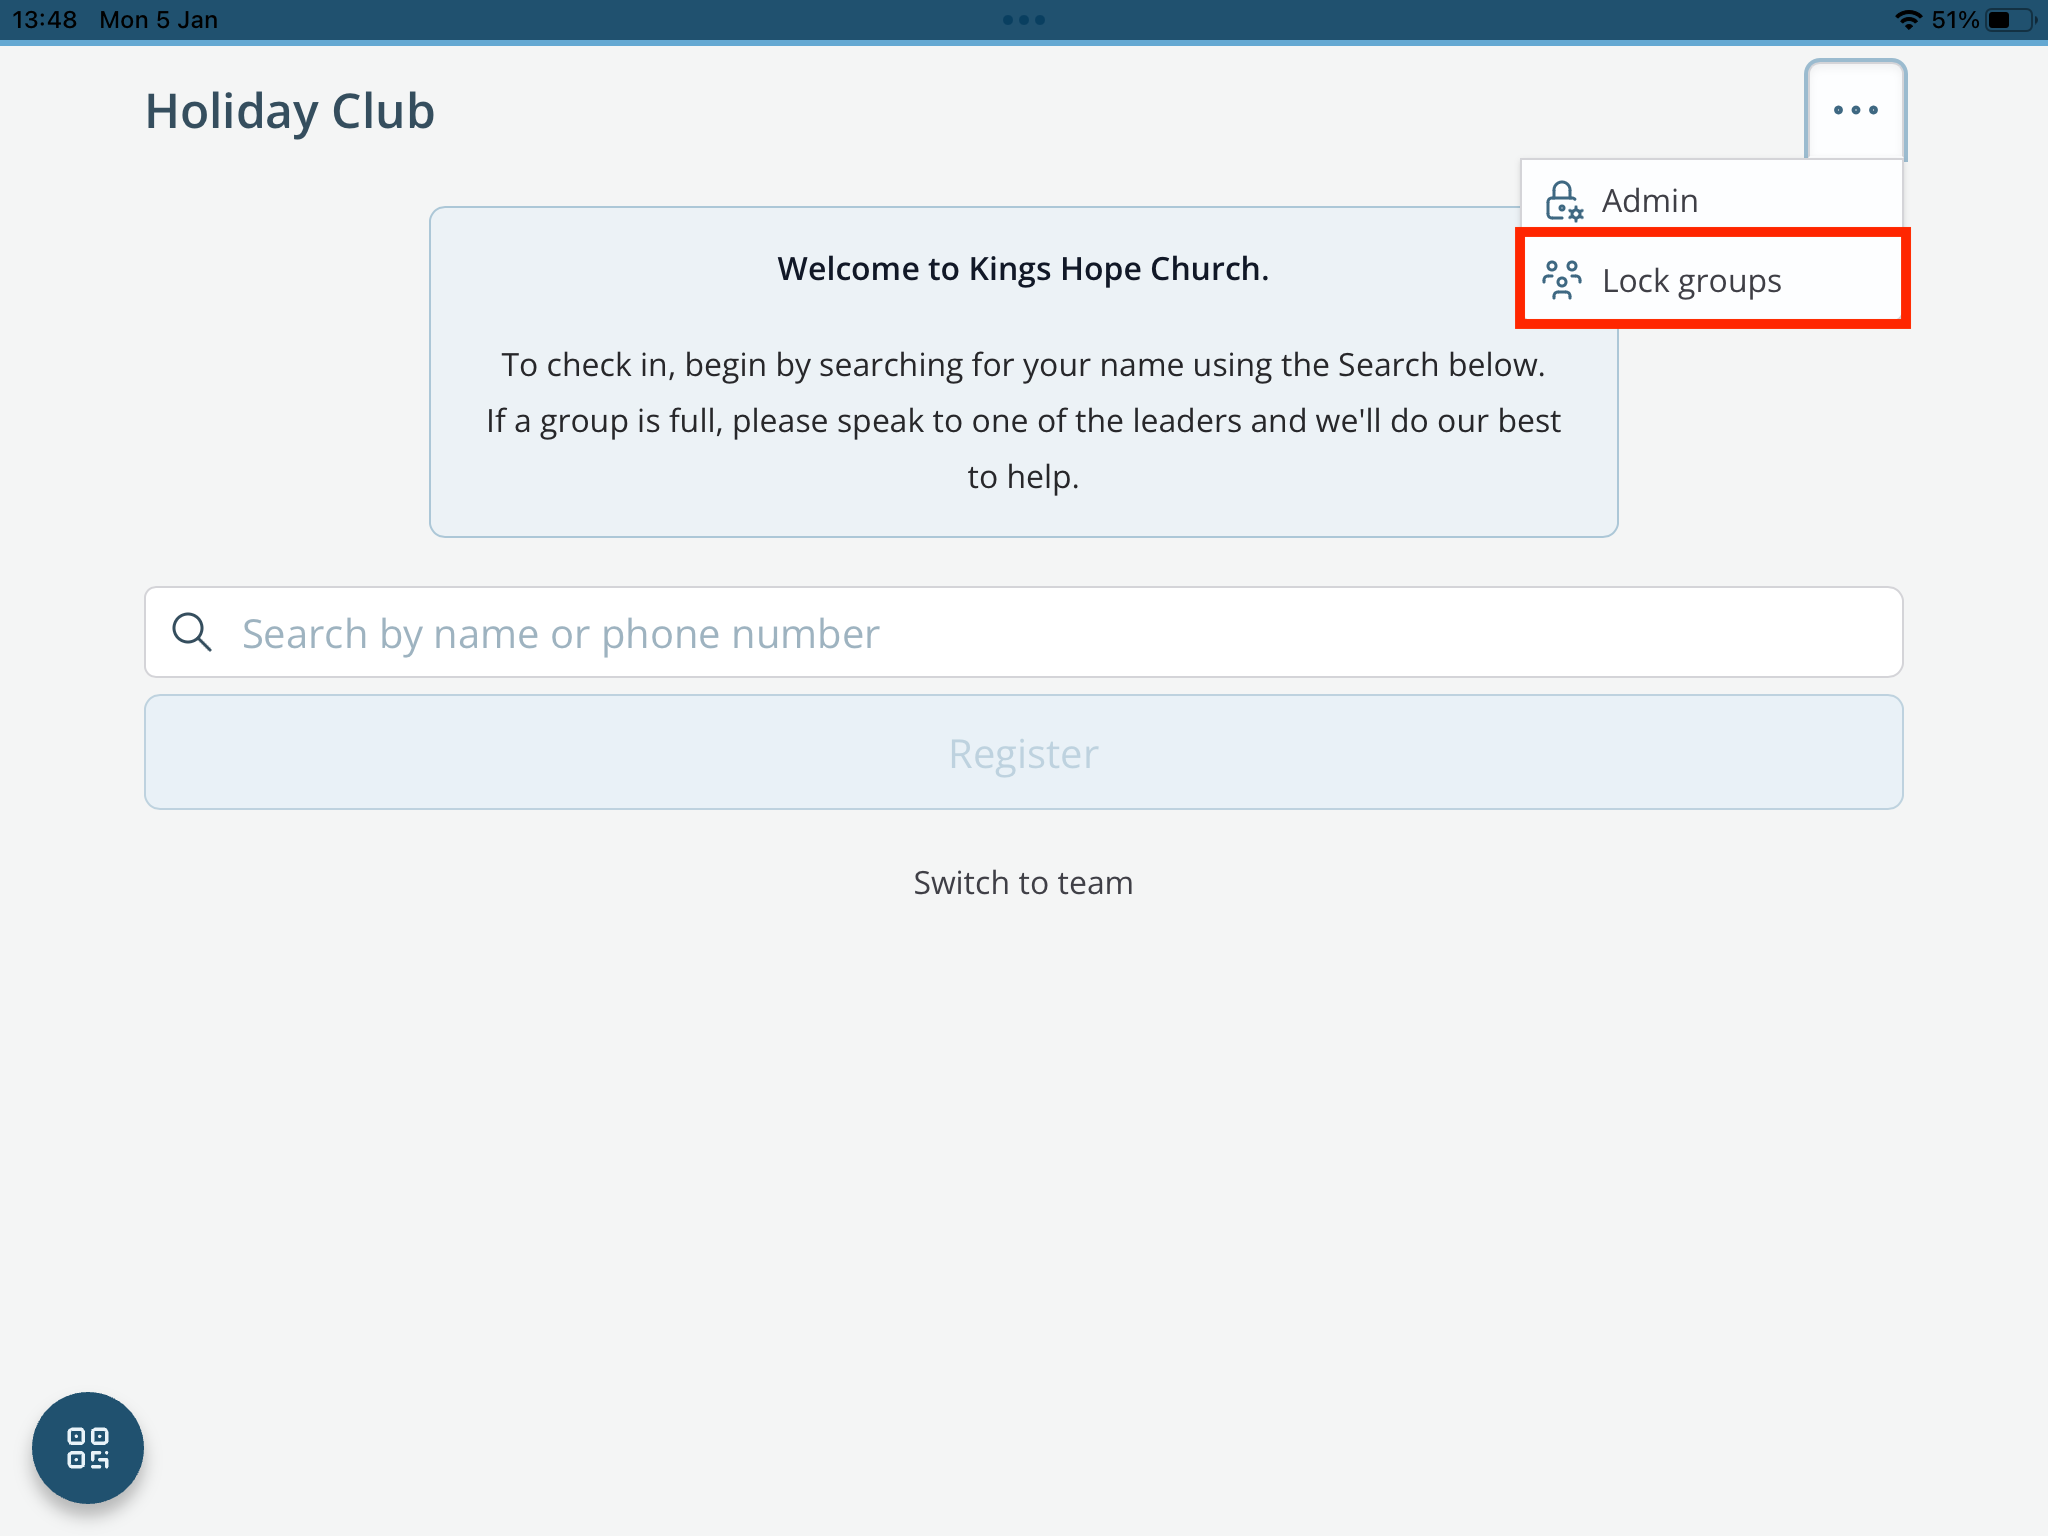
The unlock remains active until locked. Click Lock groups to revert to checking children and visitors into their assigned groups.
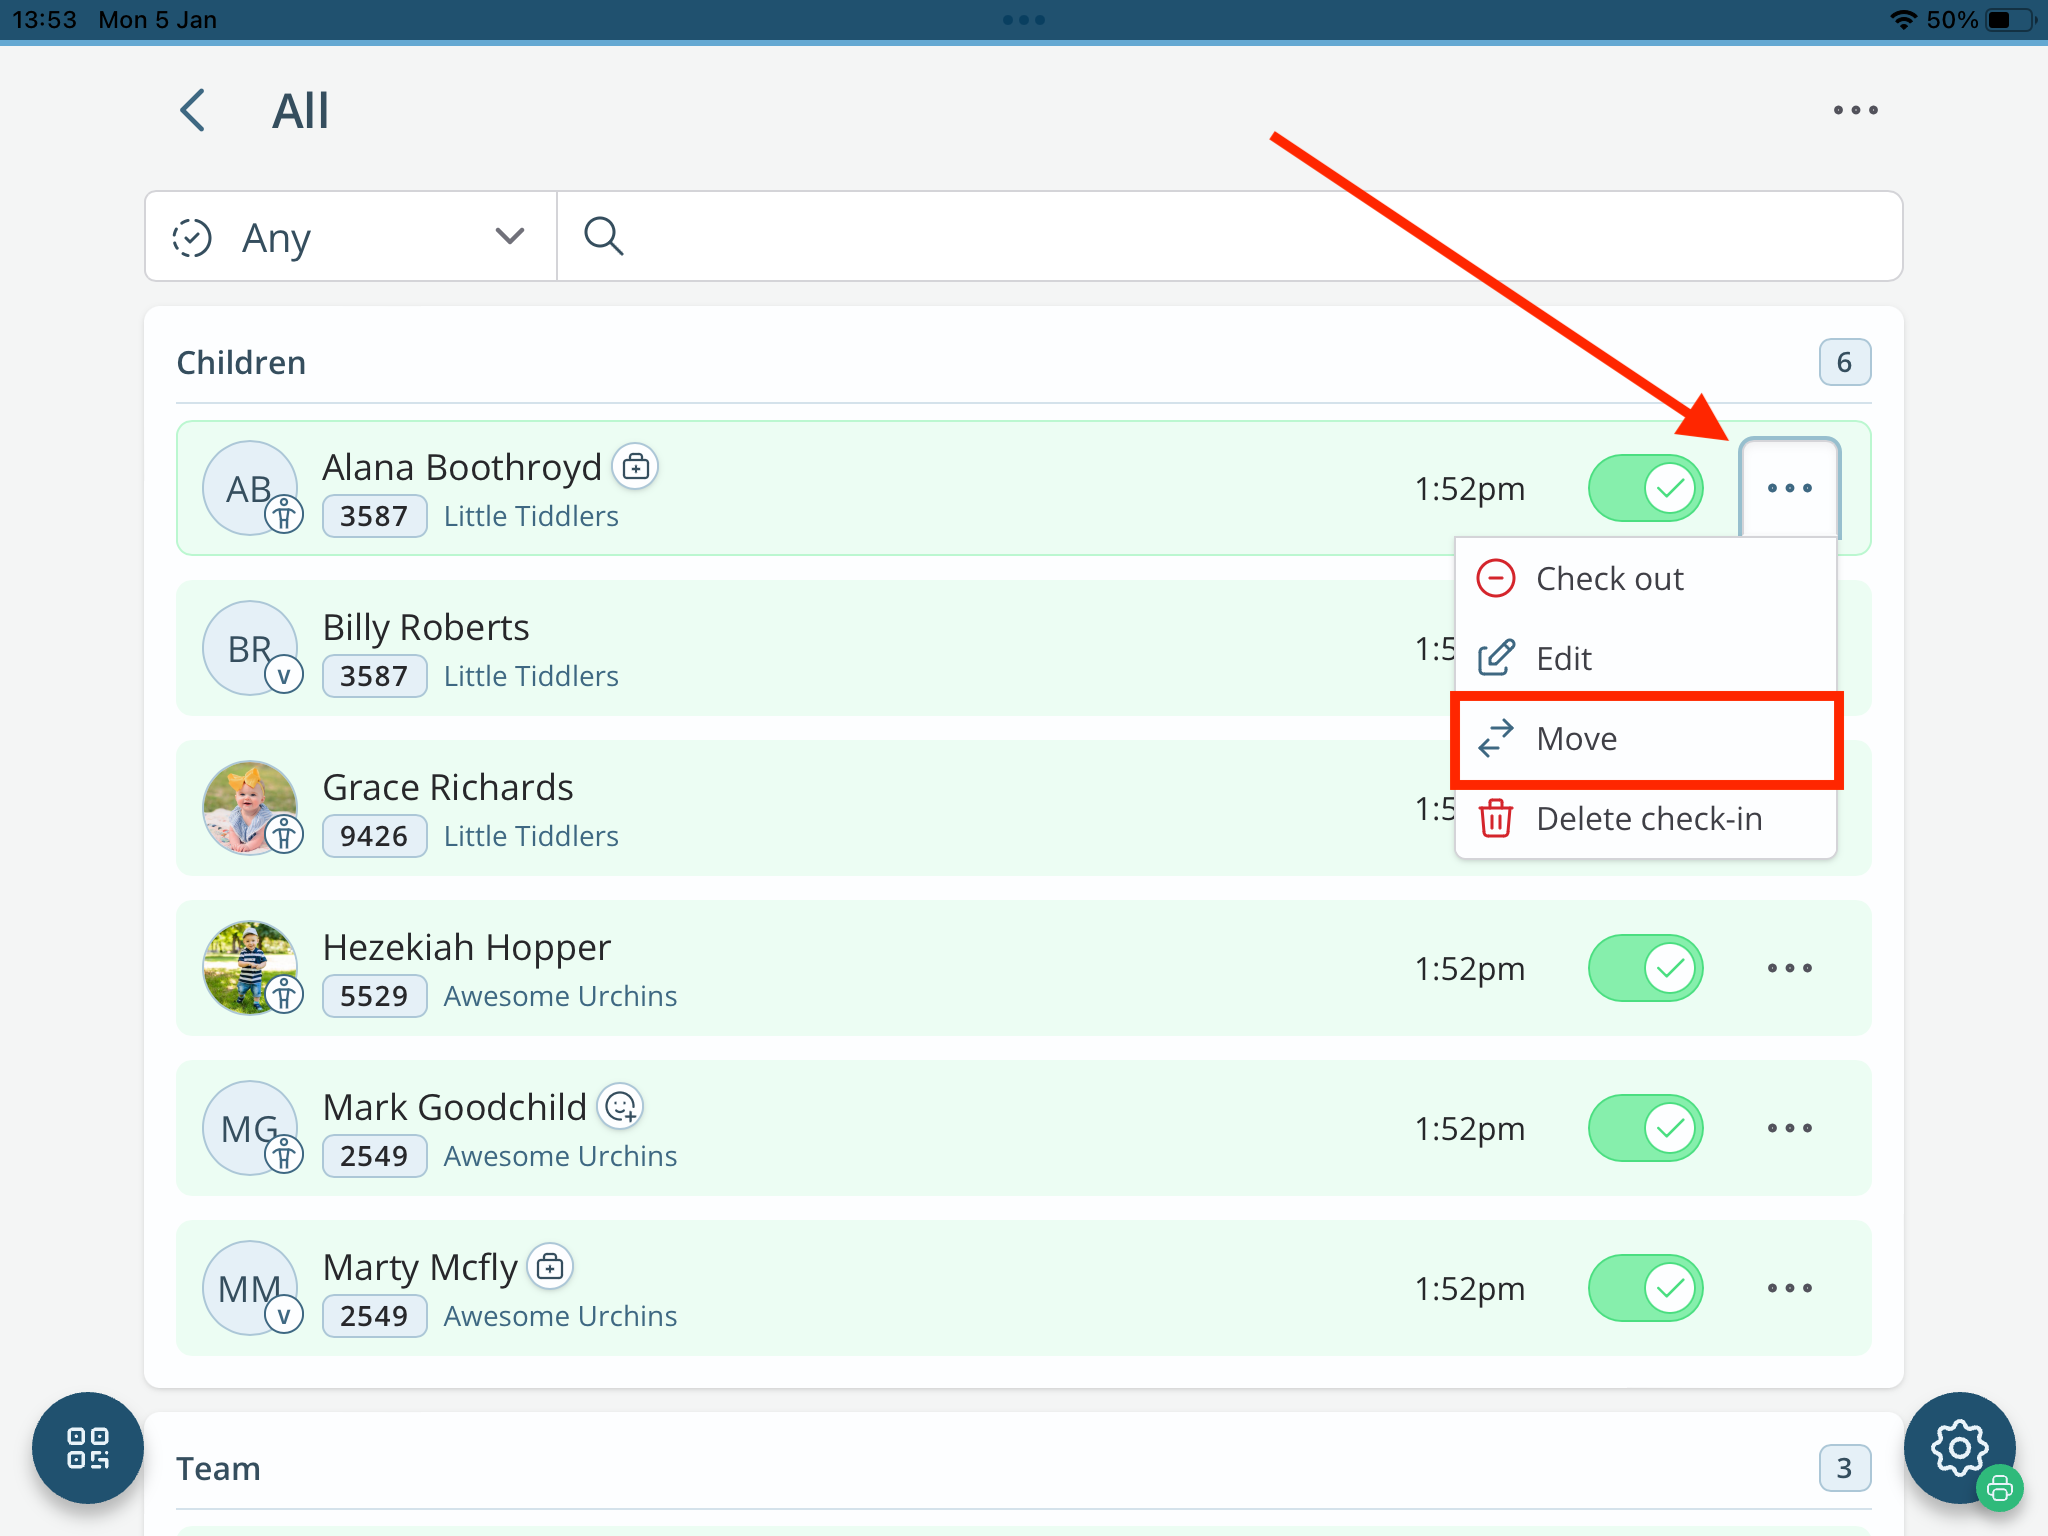
Moving a checked-in child to a different group during the session
From the Search page, navigate to the Admin area:
From the Admin summary page, click on the child’s group or click to view All groups to find the child of interest:
Select Move. Note also the Re-print badge action, which you might use after the child is moved to produce updated badges for the moved child or visitor.
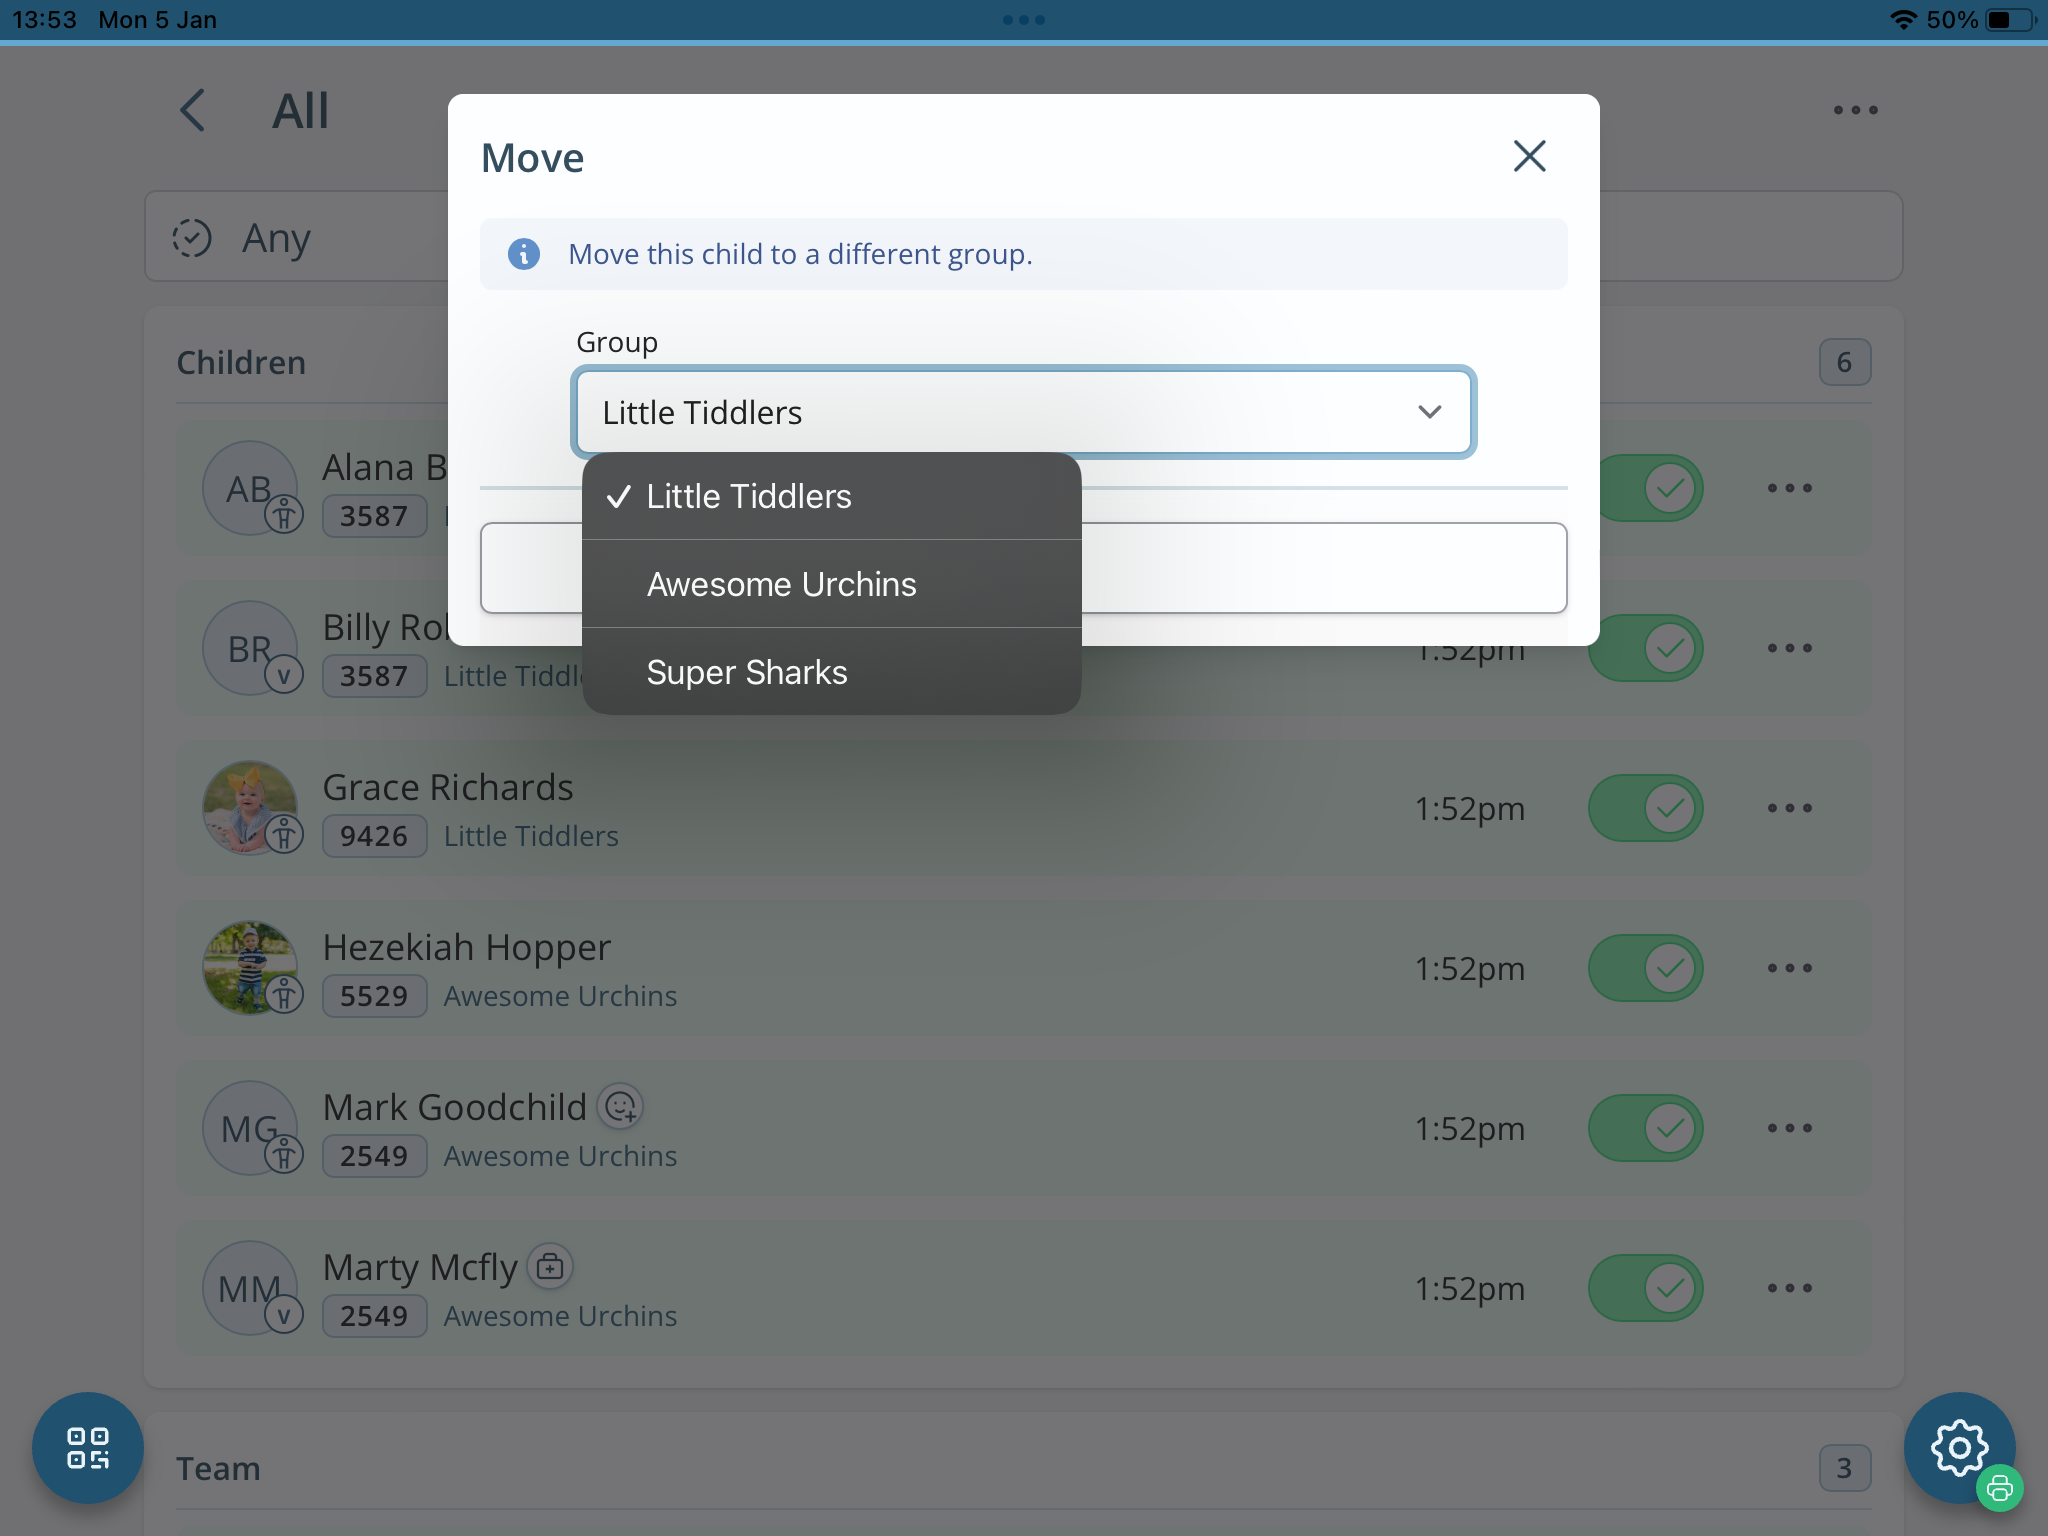
Choose the Group the child is moving to and click Move to complete the process. The moved child or visitor will now show on that group’s Register when viewed in the Admin area.
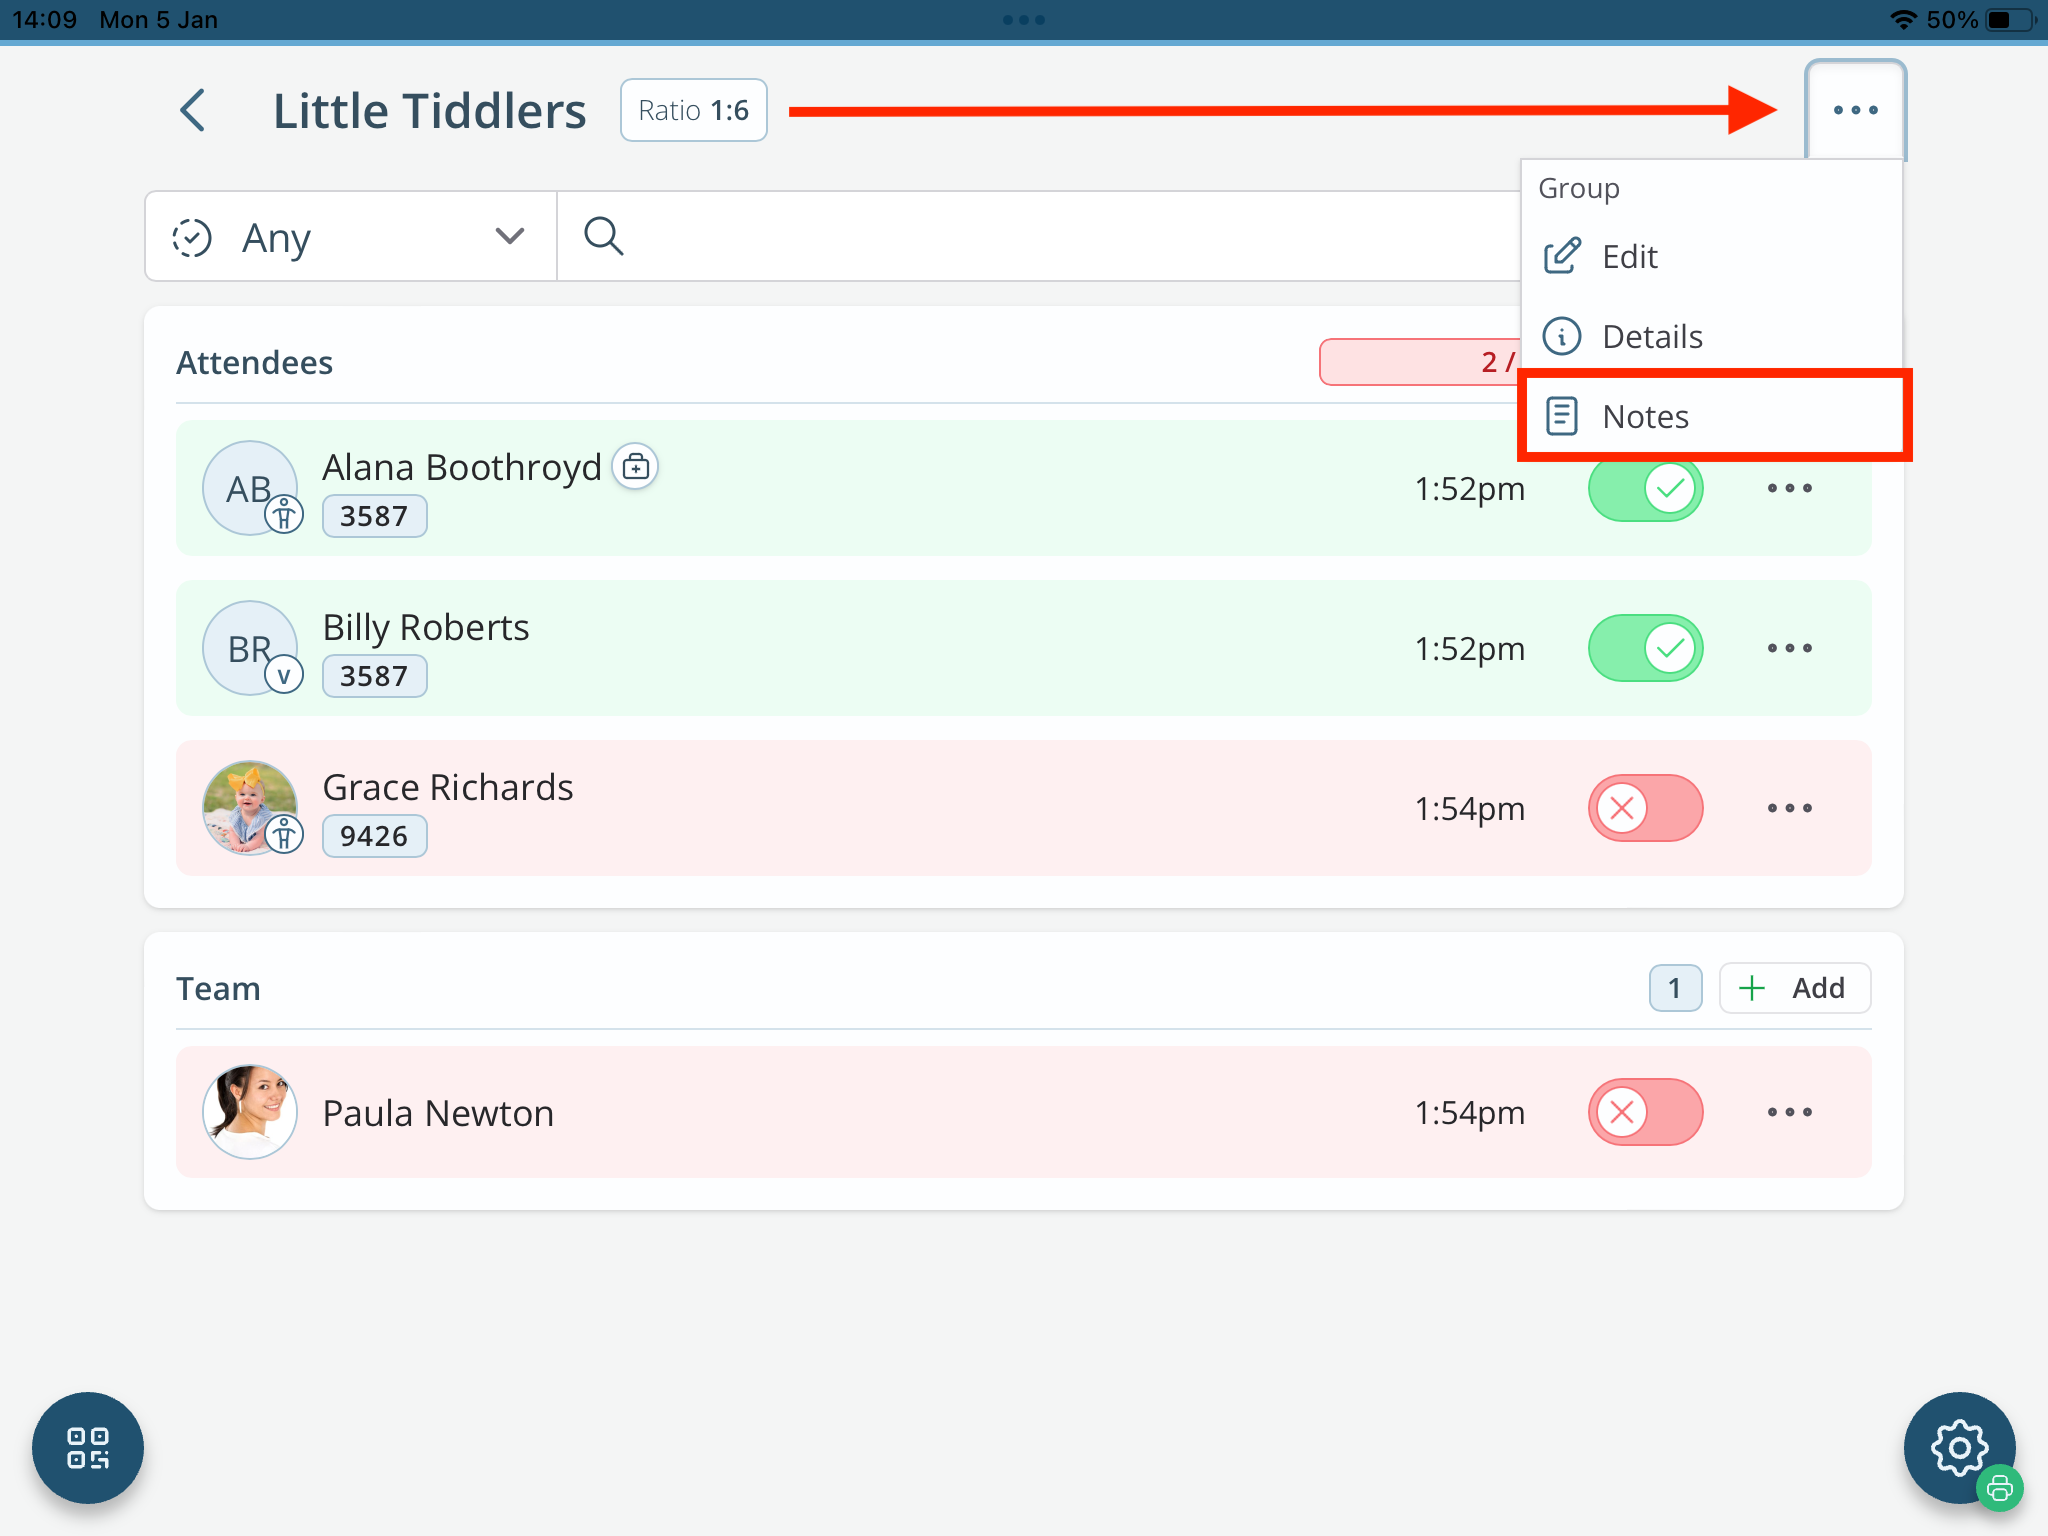
Checking children out at the end of a session
The Check-In system records a time stamp against each child and visitor as they are checked out of their group and returned to their appropriate responsible adult. This is typically at the end of the session, but you can also check children out during a session and check them back in again if they return. For example, a parent/carer checking out a young child to change a dirty nappy or administer medication. In this way, the Check-In system always has the latest register of checked-in children and visitors in your care - ideal for a ‘roll call’ register in the event of an emergency - group leaders always have an up-to-date record of who has been registered but not yet checked in, who is checked in and in their care, and who has been checked out.
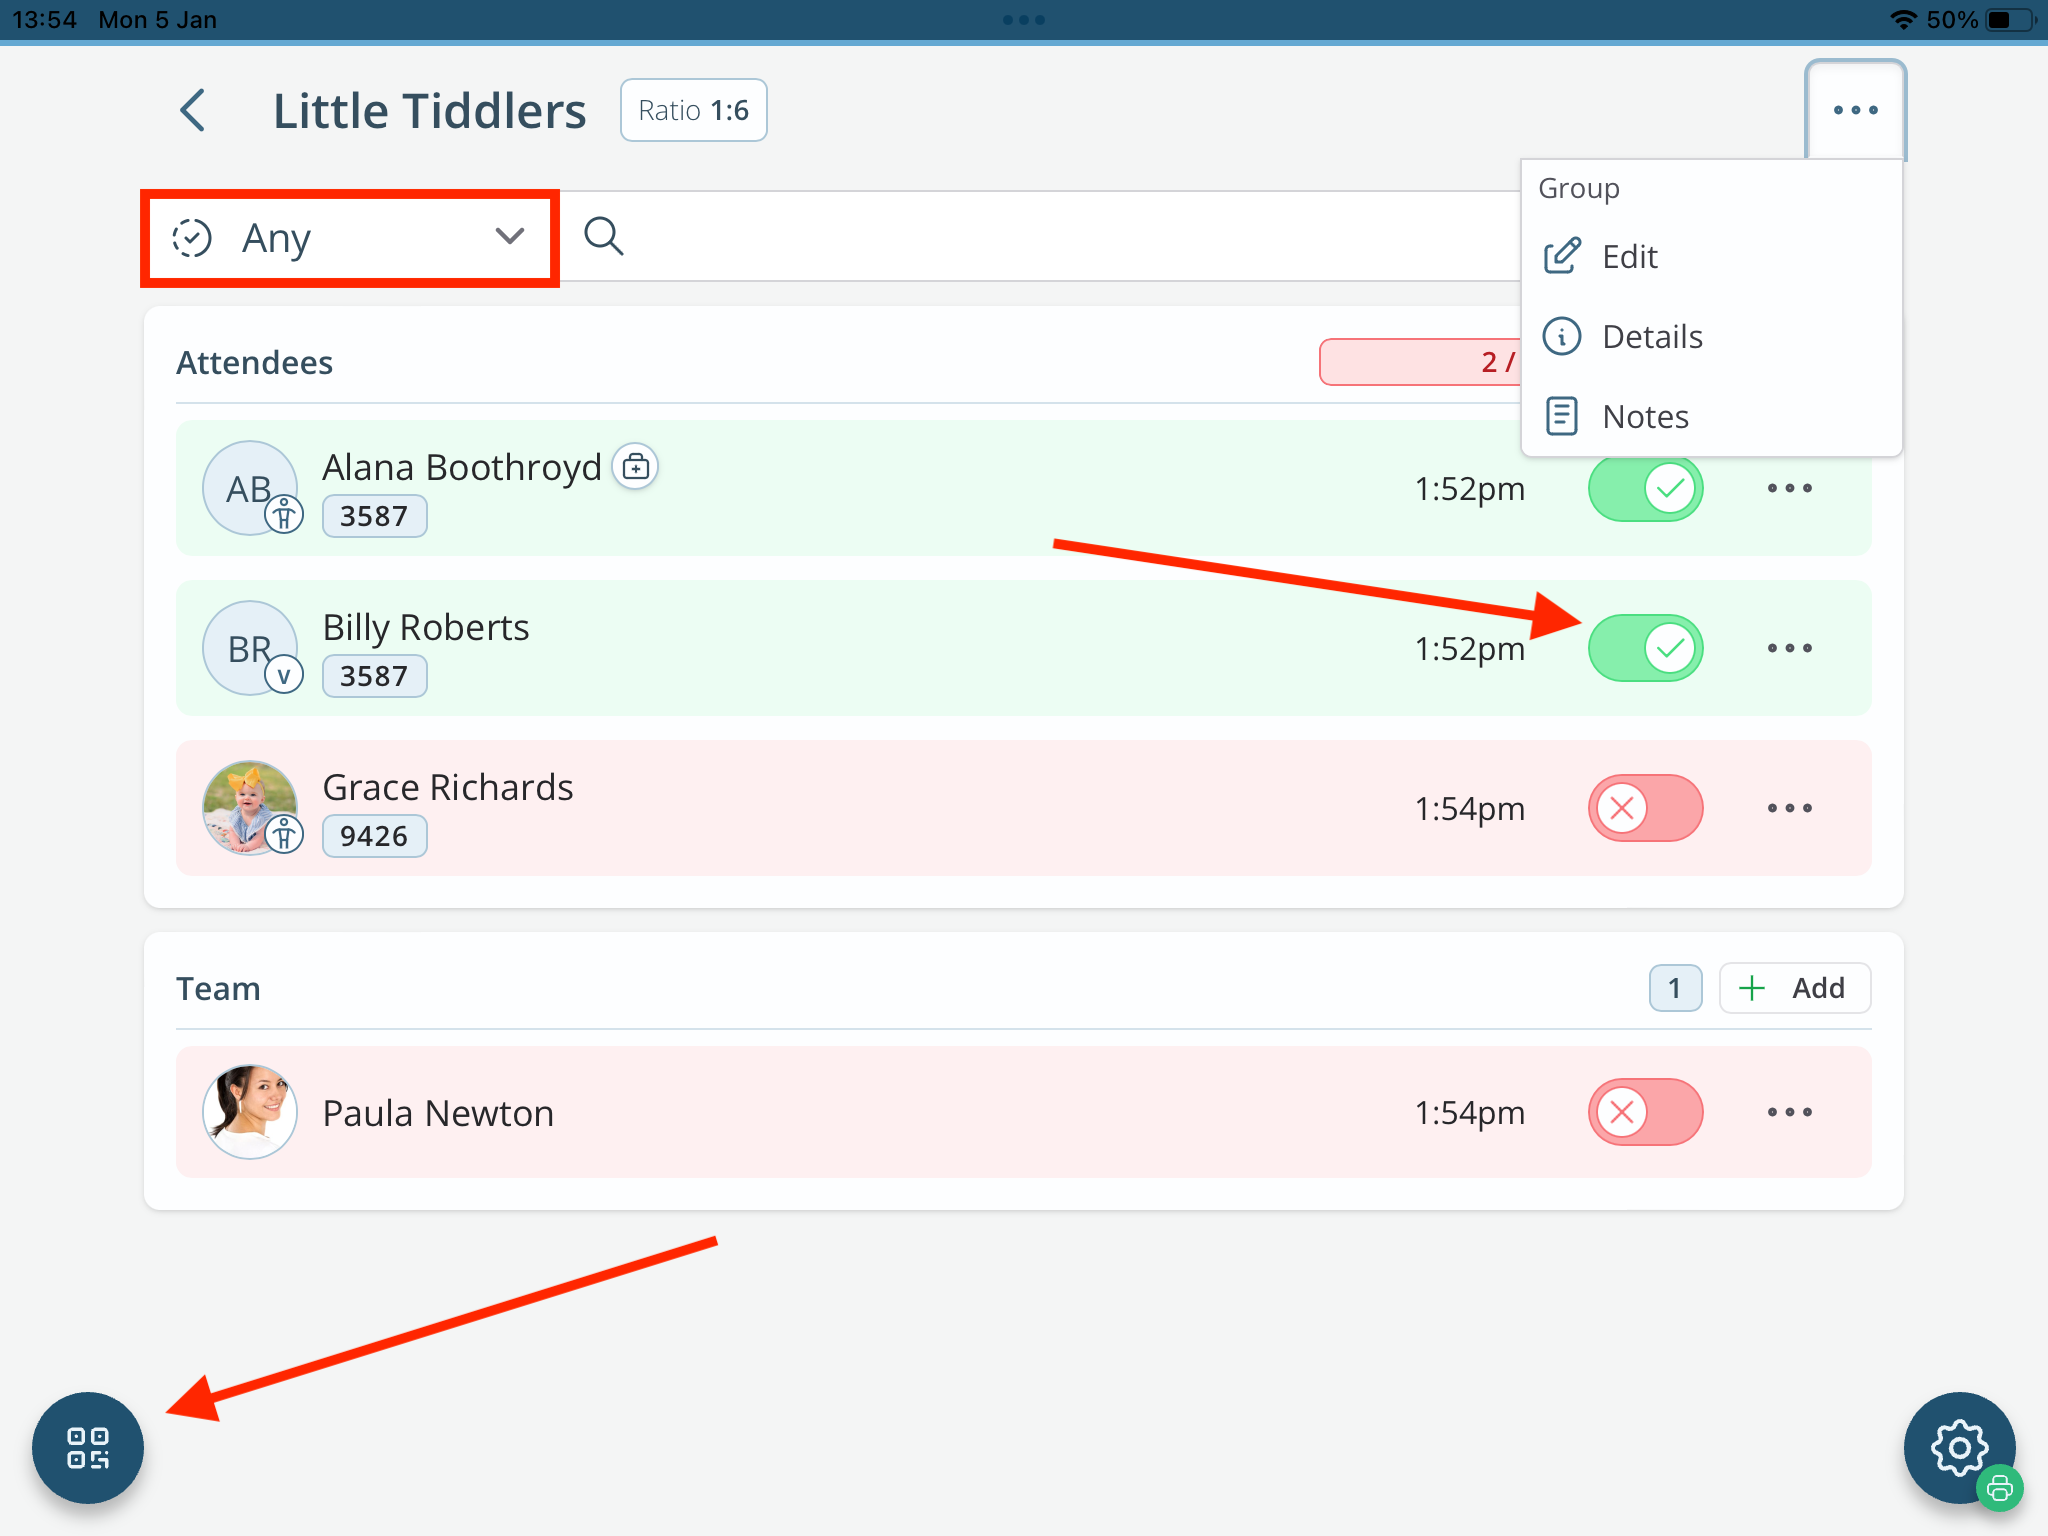
Child check-out is done from the group register in the Admin area.
From the Check-In Summary page in the Admin area, click on the group of interest or click All to see a complete list of children, visitors and team members for the active session.
Click the check-in/out slider to toggle between checked-in and checked-out. A timestamp is added each time. Group leaders can use the Filter to view Registered, Checked-in or Checked-out children. Finally, note the app-only QR Scanner button in the bottom-left corner of the device screen, which can be used to scan the parent/carer’s QR code on their printed parent/carer pick-up badge; this is also shown in their My Children section in My ChurchSuite during an active session. Scanning a pick-up QR code will filter the list of checked-in children using the security Code in the Search to show just their children, ready to be checked out. Remember to clear the Code from the Search bar afterwards to return to the list.
Closing the active session
Navigate to the Admin area.
Before closing the active session, group leaders can optionally add Notes - ideal for providing feedback about the session and any follow-up that may be required. Notes are recorded against the group attendance record in the Attendance section of the Children module.
From the active session actions, click Close. Any remaining checked-in children and visitors will be automatically checked out when the session is closed or at midnight, whichever is first. After closing the session, the device is returned to the Session list, ready to join a new session. Any other devices that had joined the session will see an in-platform message that the session has been closed, and those devices are also returned to the Session list, ready to join a new session.
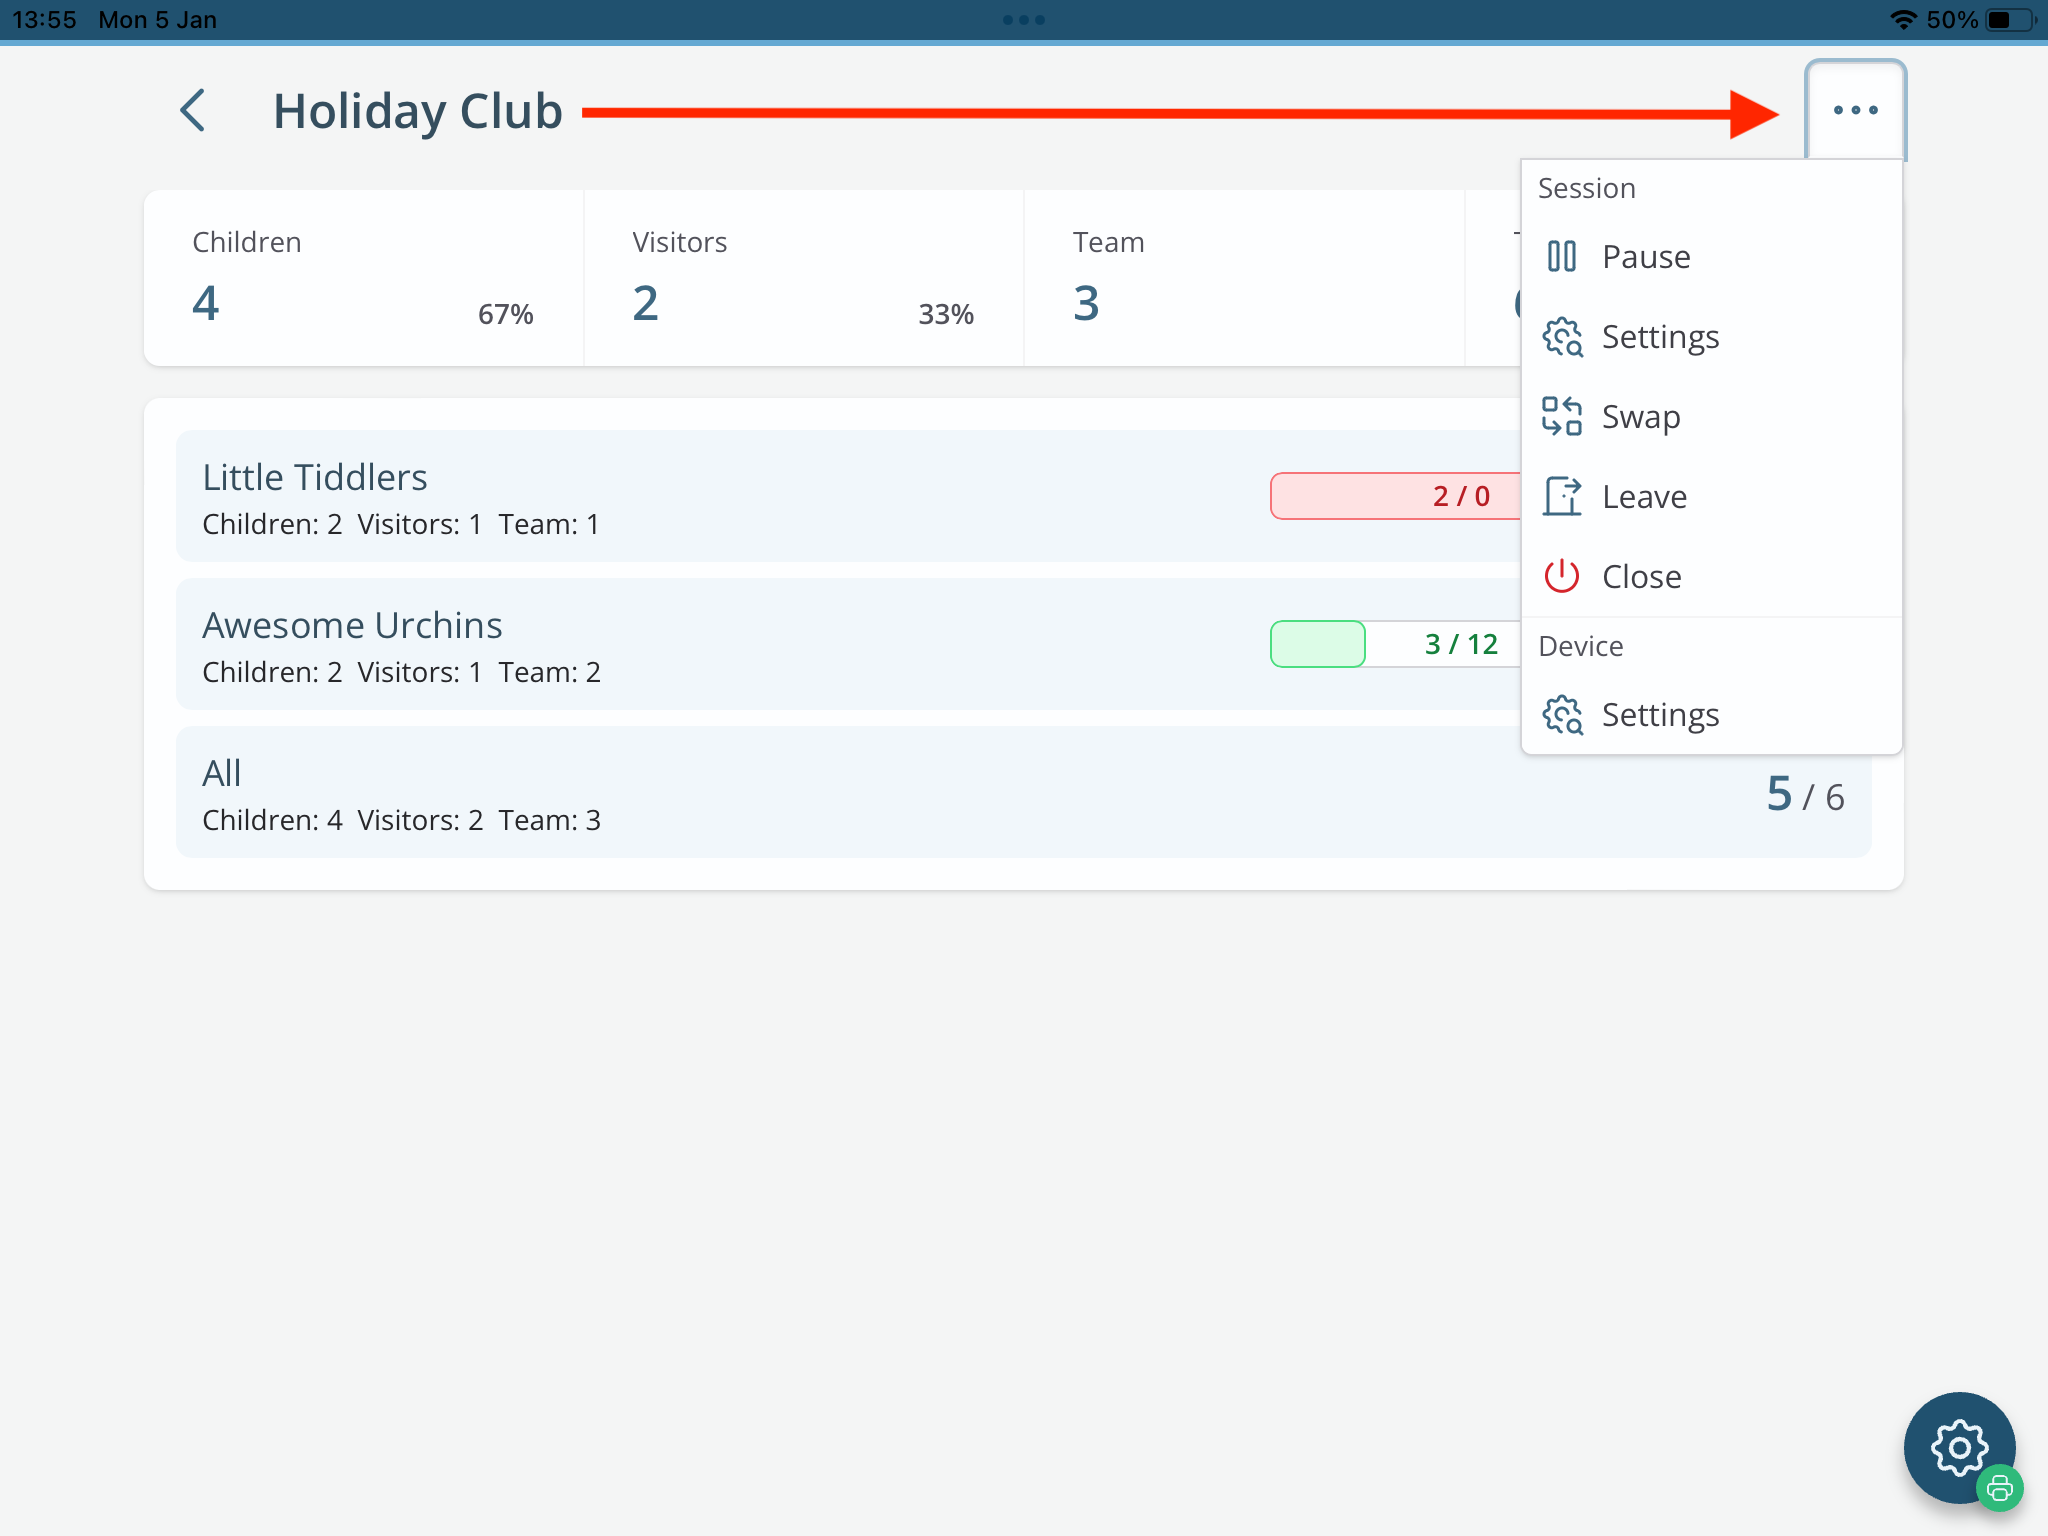
Other available session actions:
- Pause (Resume) - You can pause an active session from any Check-In device. This will prevent further registrations or check-ins until the session is resumed.
- Swap - From any Check-In device, group leaders can swap between other active sessions. This is ideal when you need to check the status of groups between consecutive sessions.
- Leave - A Check-In device can leave an active session and return to the Session list if it is no longer being used for the session.