Case Study: Managing safer recruitment
About the author...
 Kerry was the former Operations Manager and Safeguarding Lead for a multi-site church in North Wales and North West England and is now part of the ChurchSuite customer support team. In this case study, she explores how some of the features in your ChurchSuite admin-facing system can be used to help manage Safer Recruitment processes for volunteers on youth or kids teams.
Introduction
Churches and charitable organisations that work with children and young people will want to follow best practices to ensure their staff and volunteers are suitable to work with those under 18. These best practices are often referred to as Safer Recruitment.
The specifics of Safer Recruitment at your church or charity will depend on the process laid out in your Safeguarding Policy. In this case study, we’ll explore an example of a Safer Recruitment process.
In this article
In this case study, we'll explore two key areas where ChurchSuite can help you:
Create a volunteer application form, using Forms
Keep on top of the application process, using Flows
Application Form
To record someone’s interest in volunteering with children or young people, your Safeguarding Policy may require a Volunteer Application form to be completed.
Using the Forms functionality, you can put together a volunteer application form which asks relevant questions about the person’s details, their history, their experience, why they want to serve and details of referees for you to obtain references later in the Safer Recruitment process.
Before going further, you may find it helpful to take a look at our Support Articles on Creating Forms and Connecting fields on your forms to the appropriate fields in ChurchSuite.
Adding the Form
Give your "Safer Recruitment Form" a suitable name, such as "Volunteer Application Form", and set any optional visibility settings (e.g. that only members of your Safeguarding User Group can see it), choose which modules the form will be visible in (usually Address Book) and the Primary Response Type (usually Contacts). You may wish to include the form in the Children module if you're considering using it for junior helpers (under 18s) or you may wish to create a separate form and flow for junior helpers. Choose the level of Access and Site if relevant.
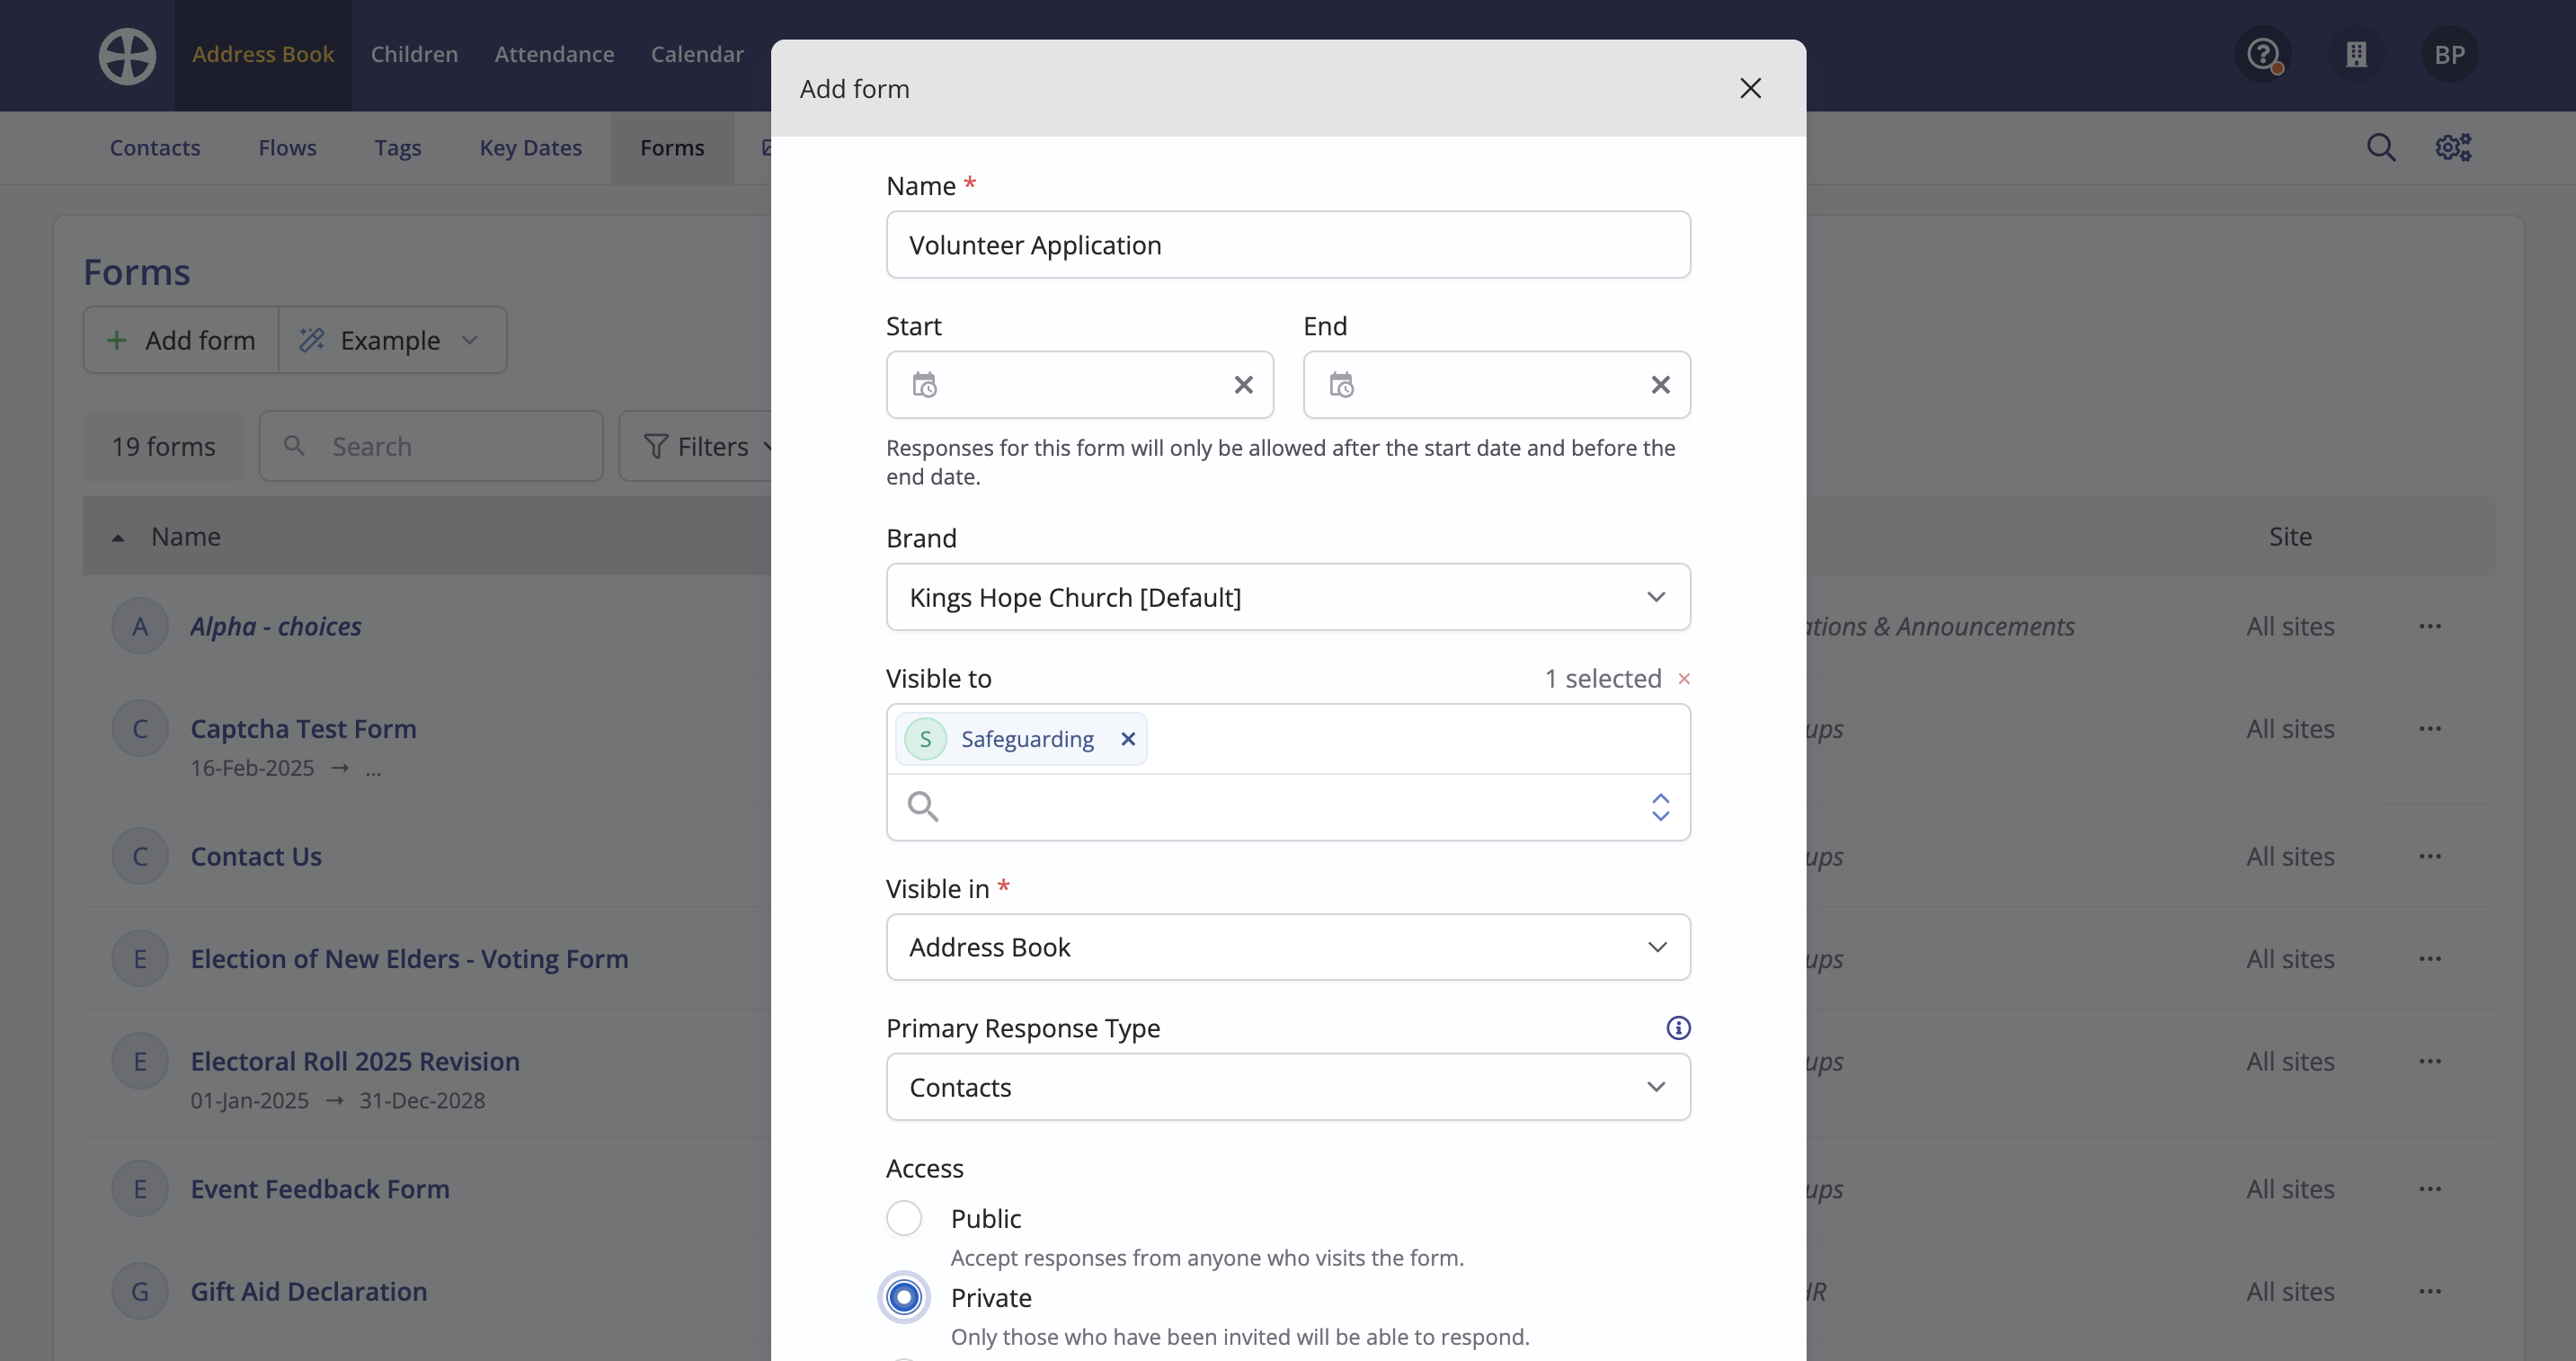
Ensure that the relevant person is added as a Manager.
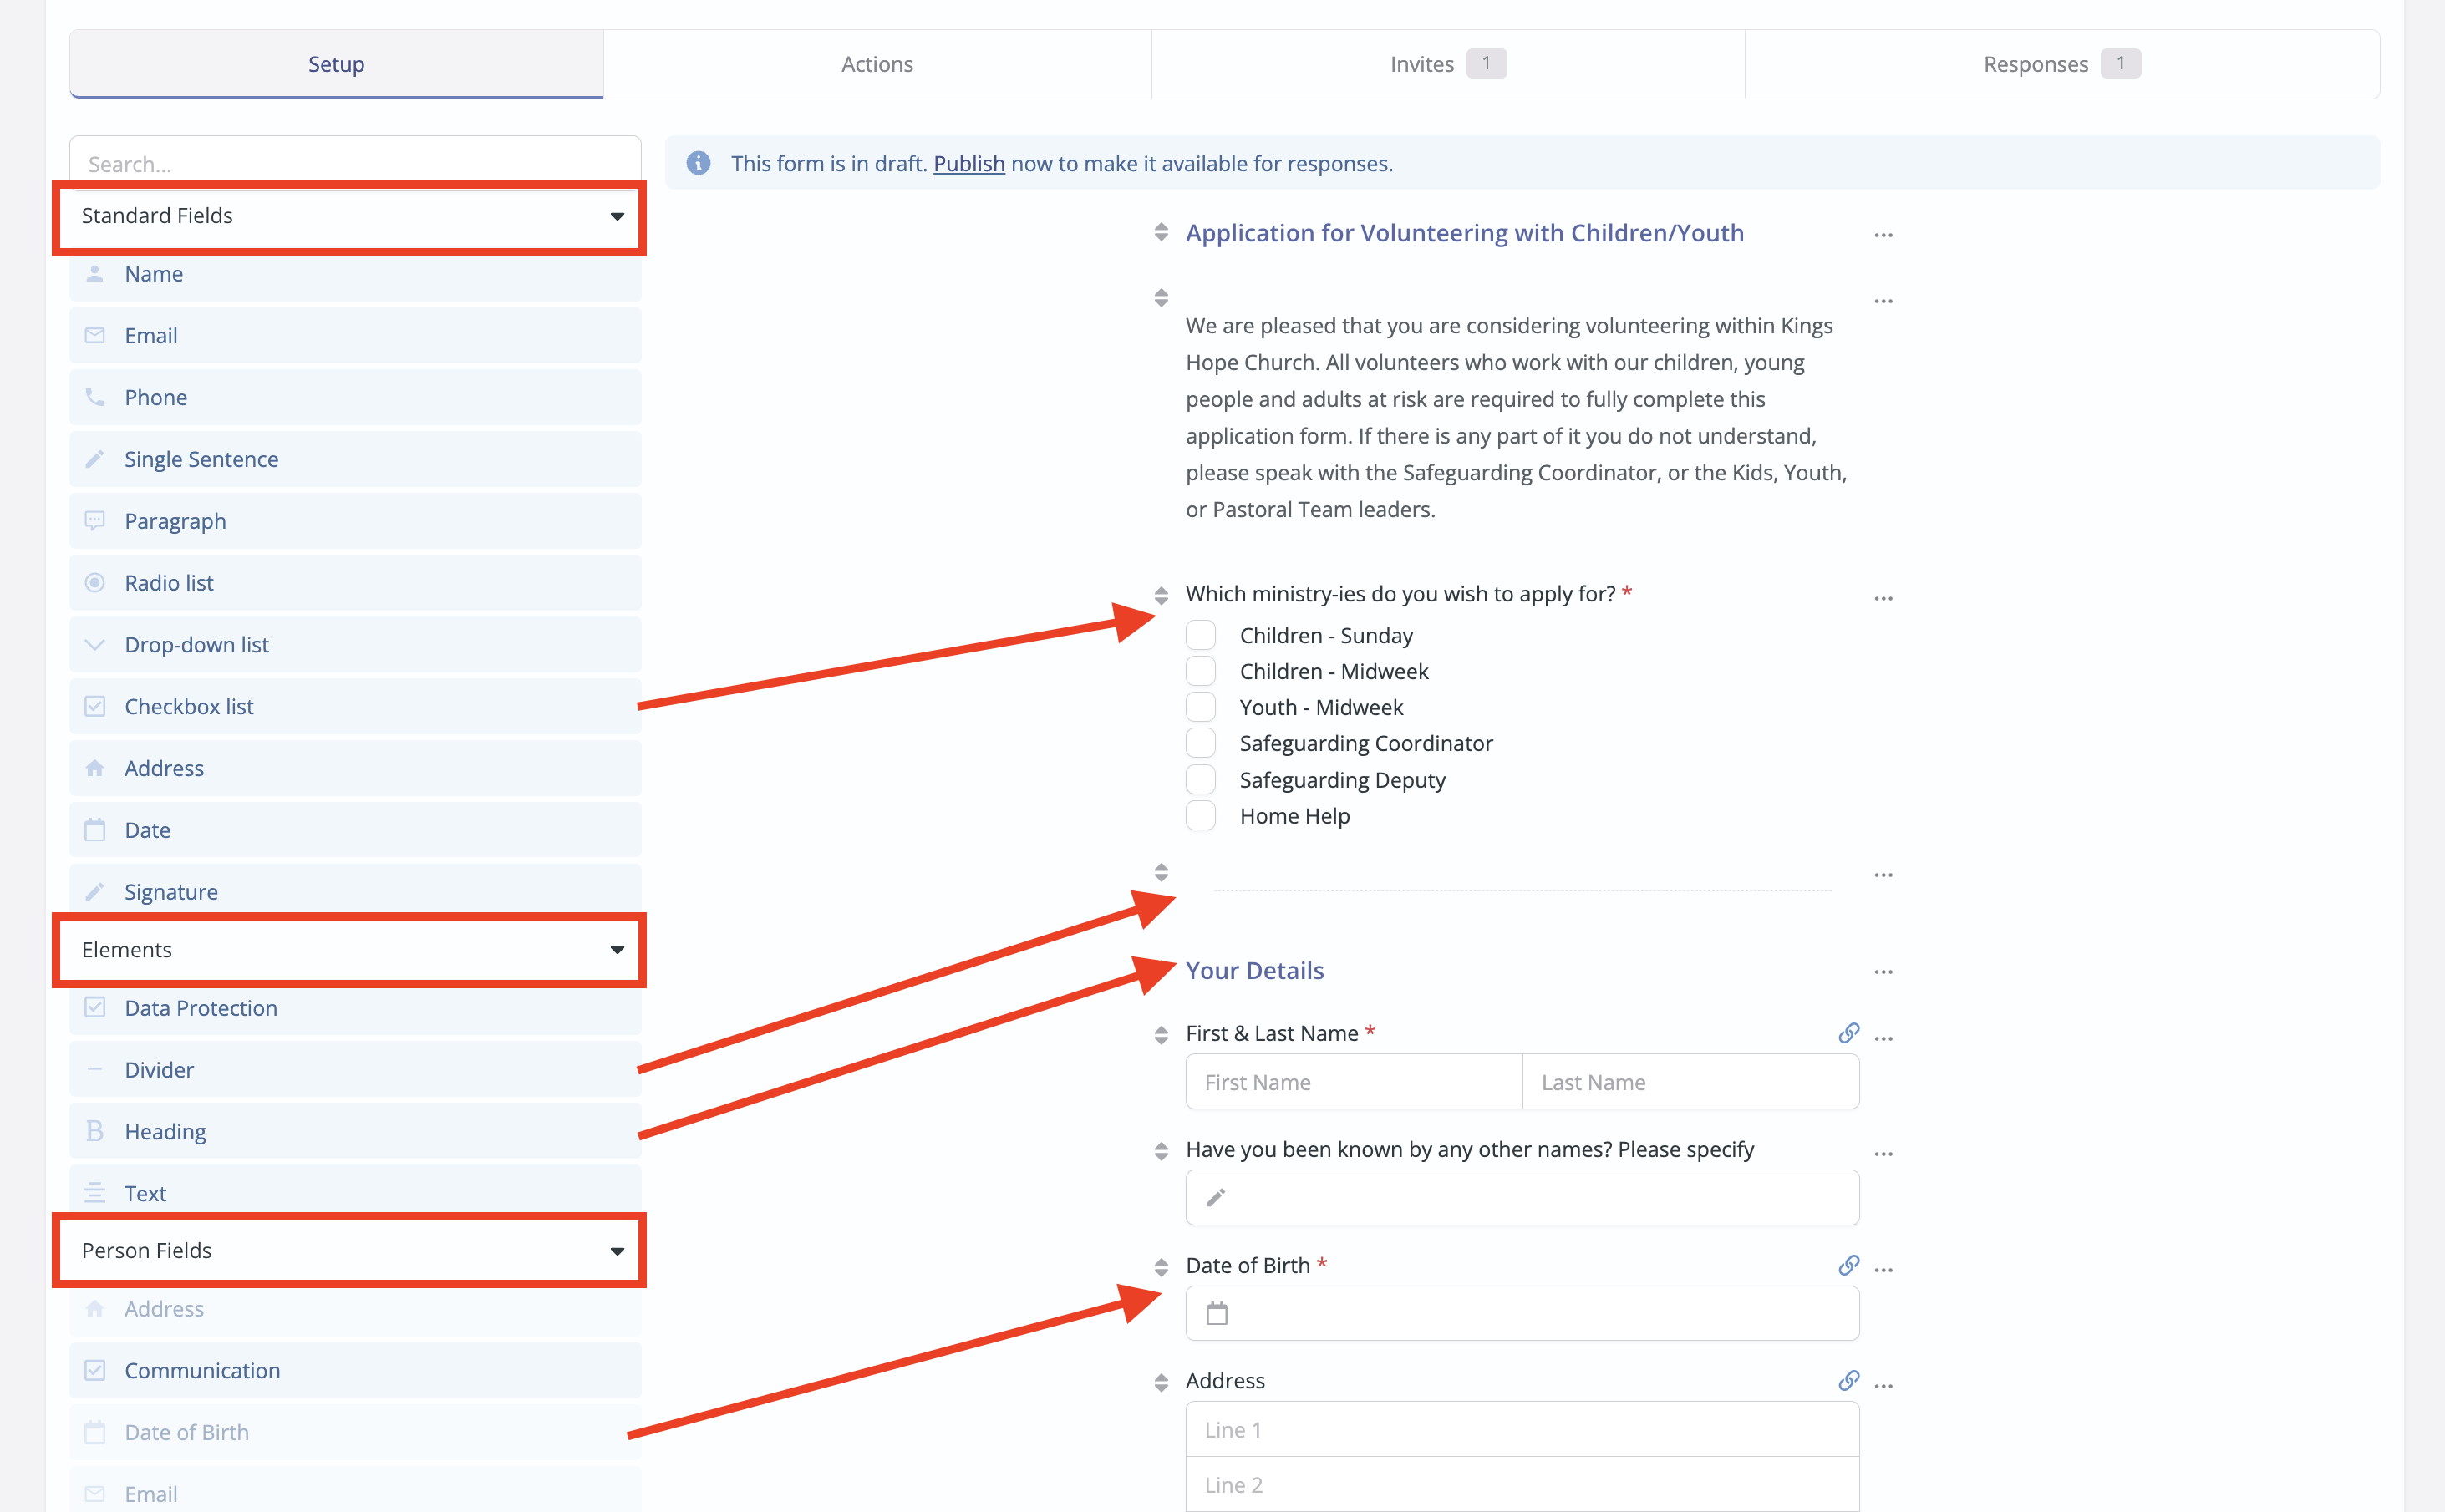
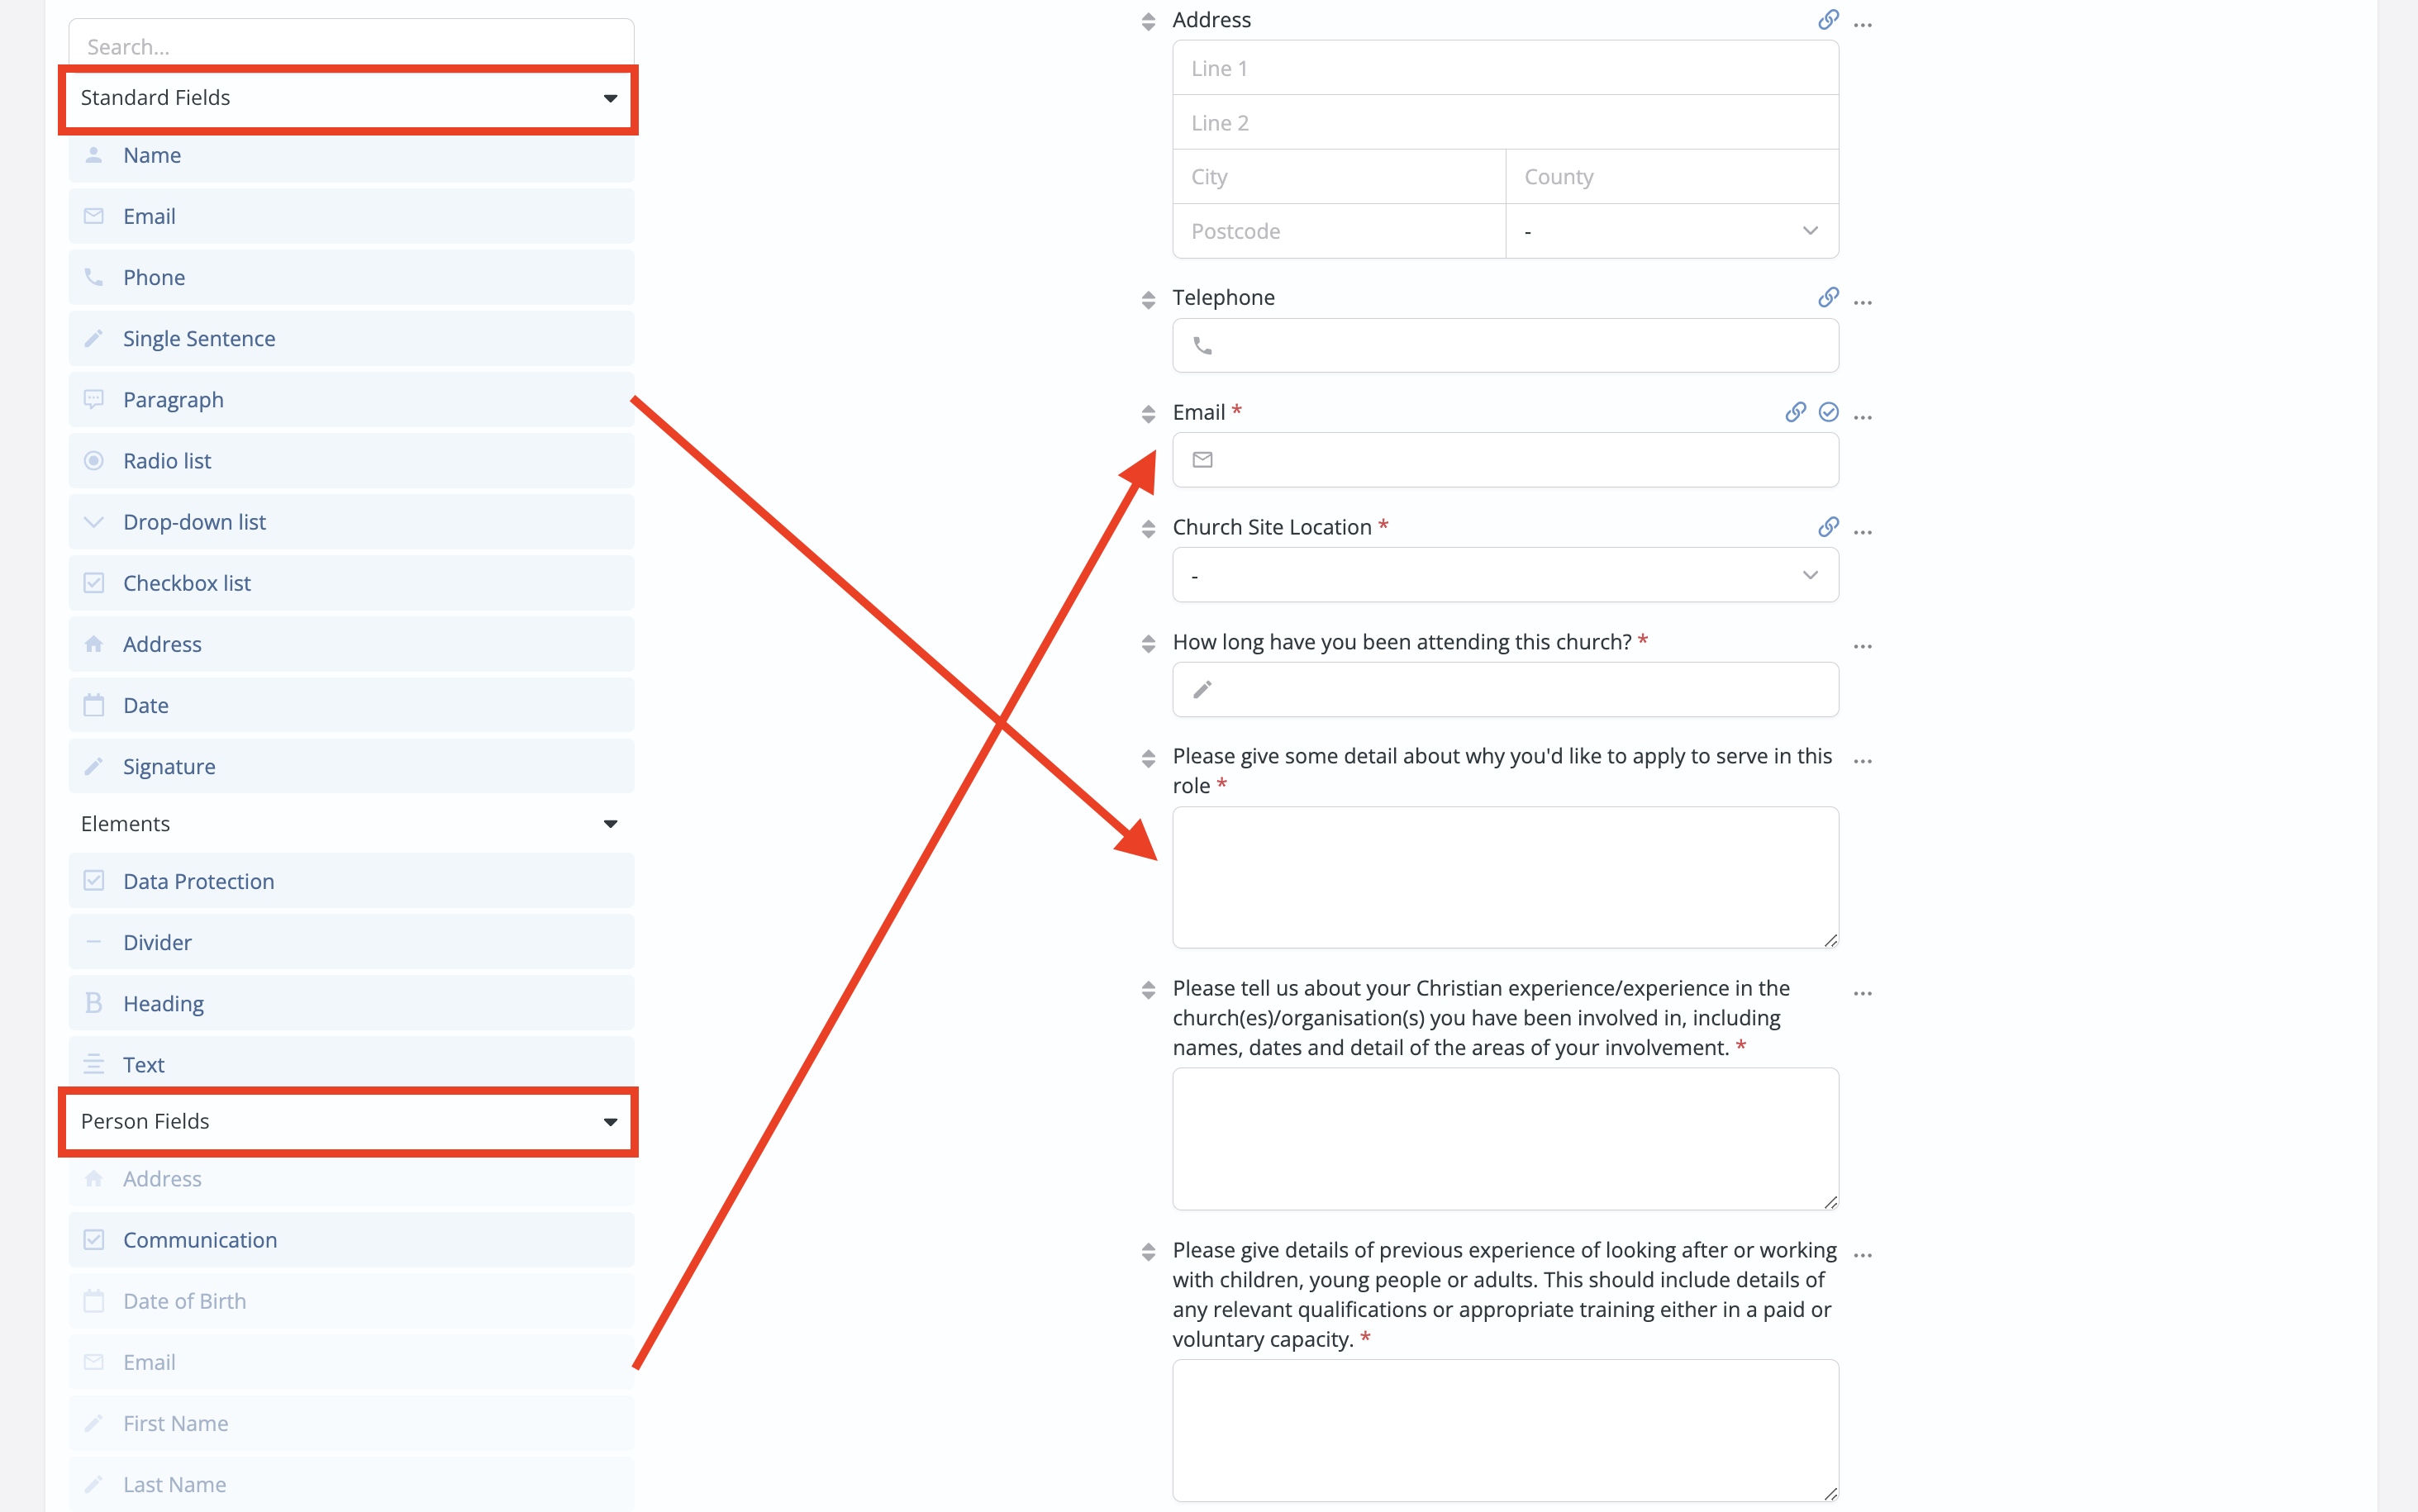
Next, in the Setup tab, add Items for each area of the form, choosing from the item list on the left side. You may want to consider:
- Headings, text and dividers from the Elements sections to add titles, instructions or explanations and sections to your form
- Using items from the Person and Contact sections to collect personal information such as name, date of birth and contact details
- Using paragraphs, single sentences and lists from the Standard Fields section to collect answers to questions
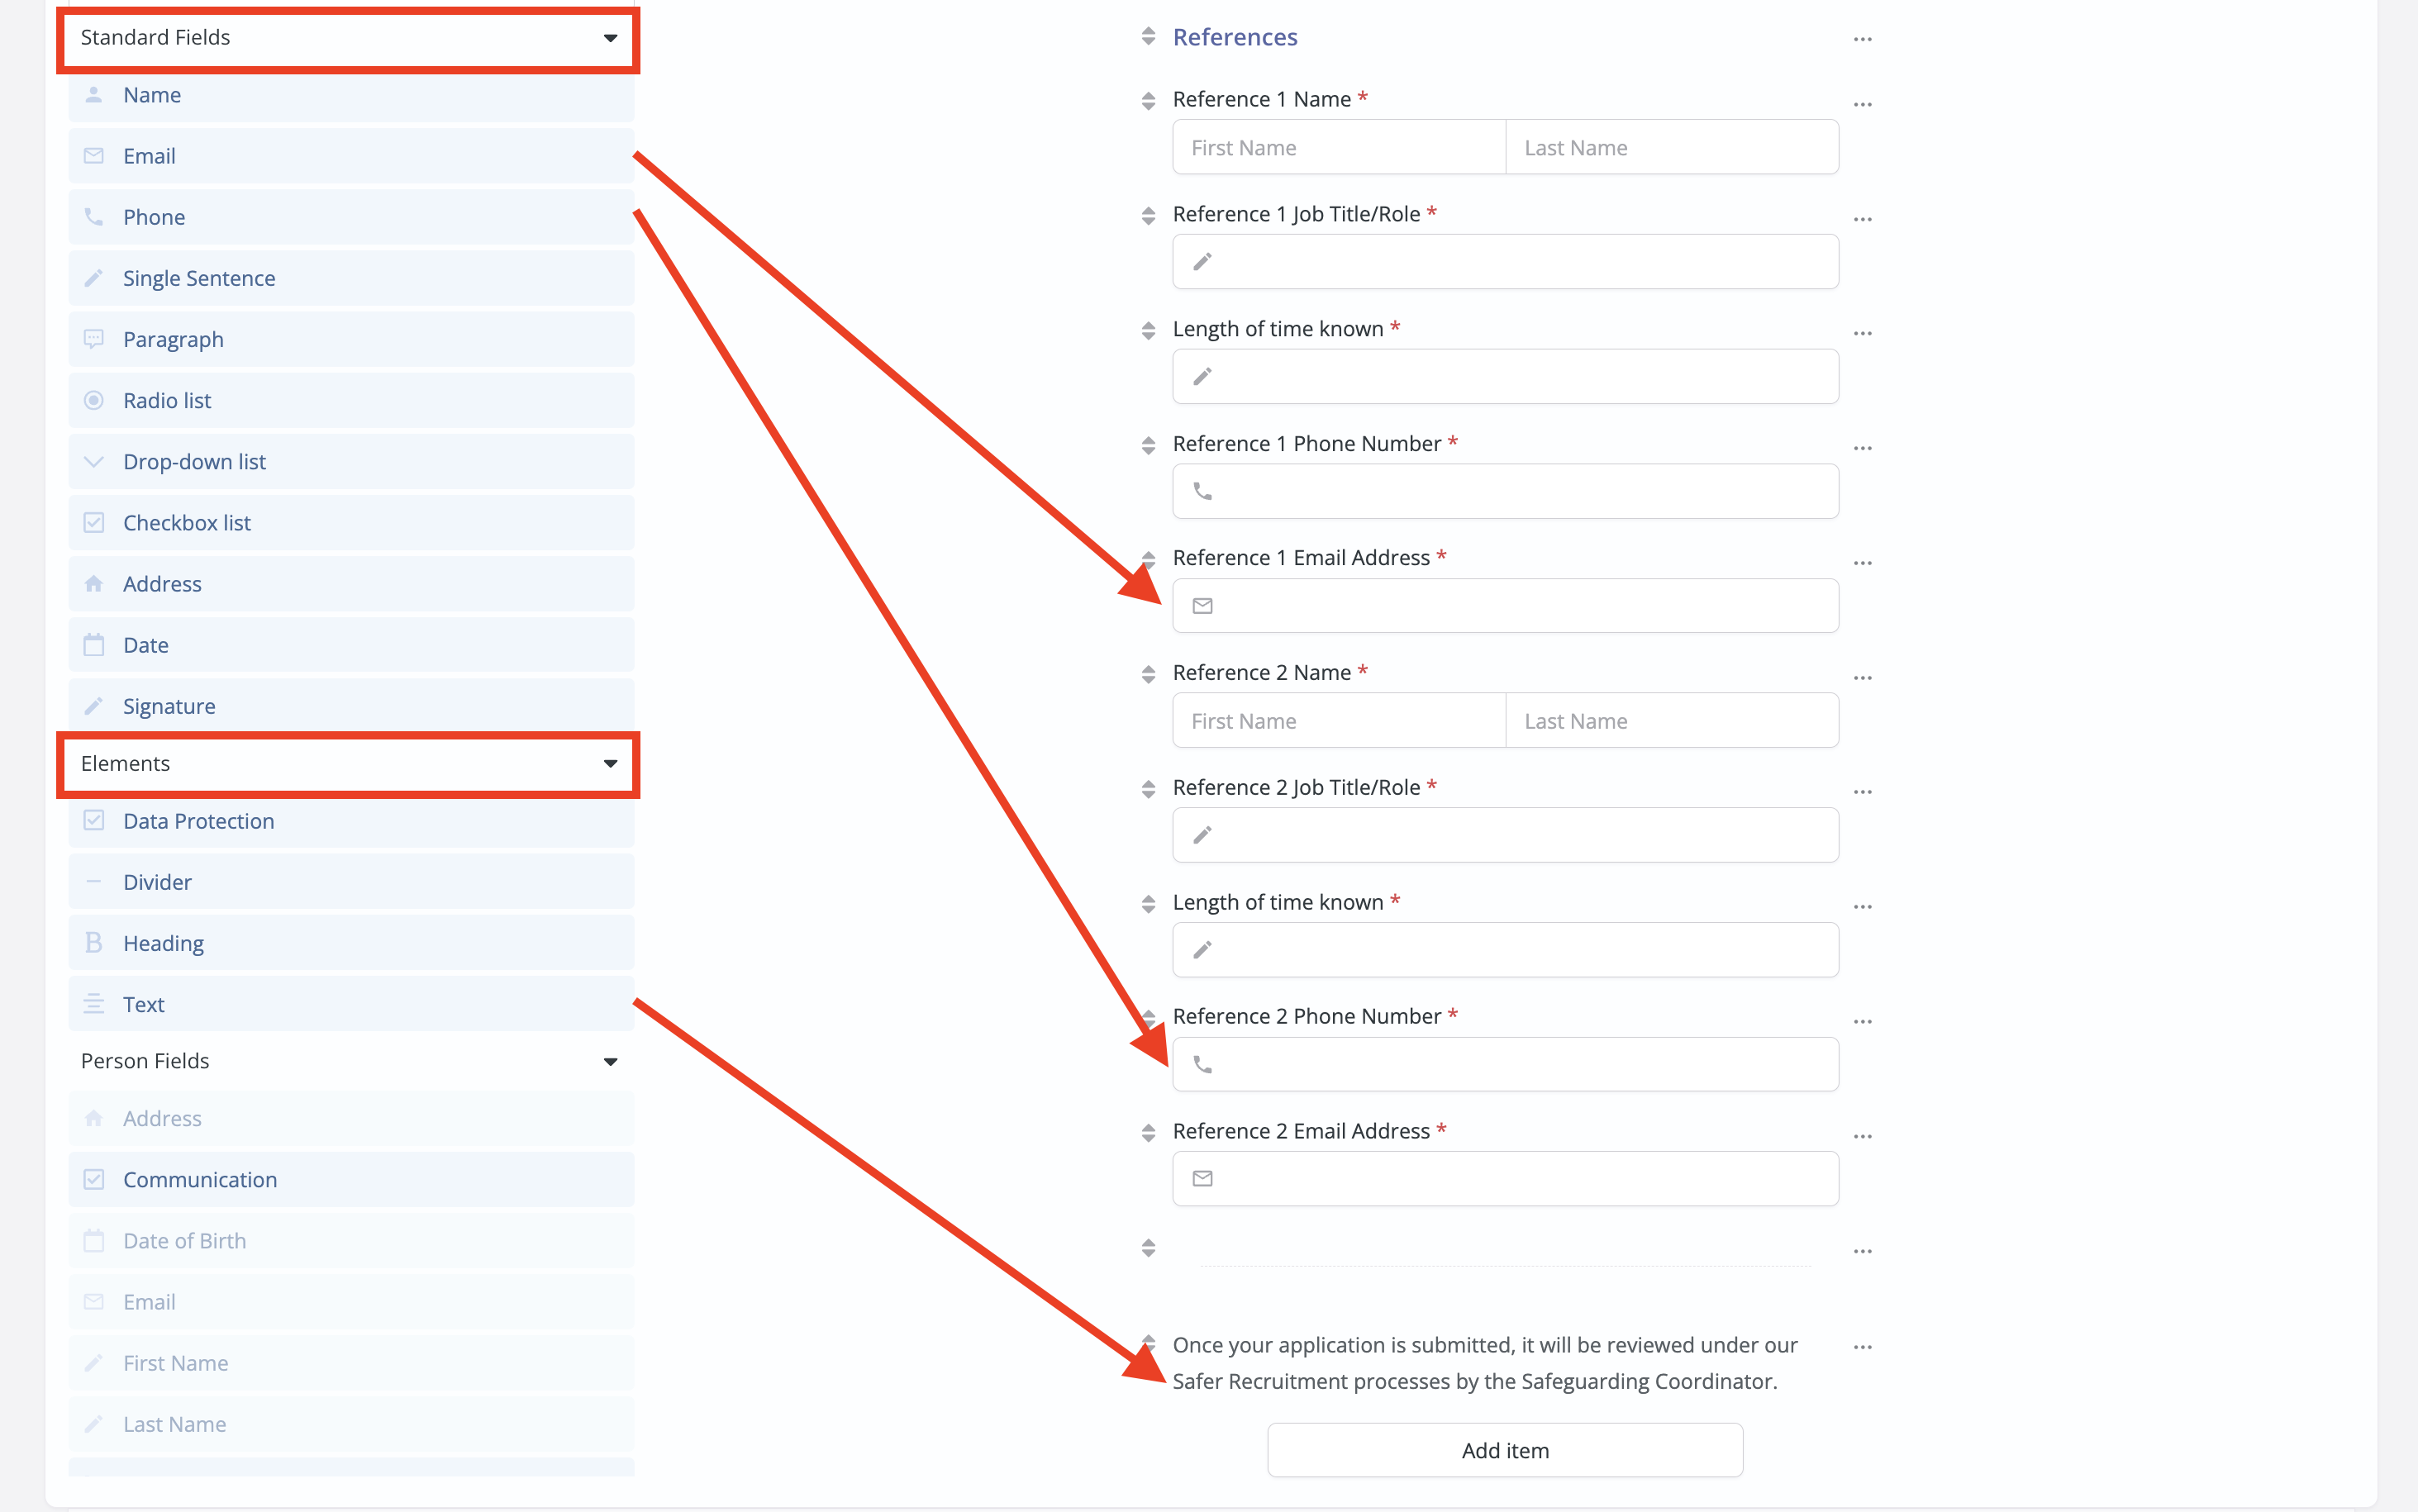
- Using the name and contact details options from the Standard Fields section to collect information about referees
Here's my example Form Setup section in its entirety before publishing:

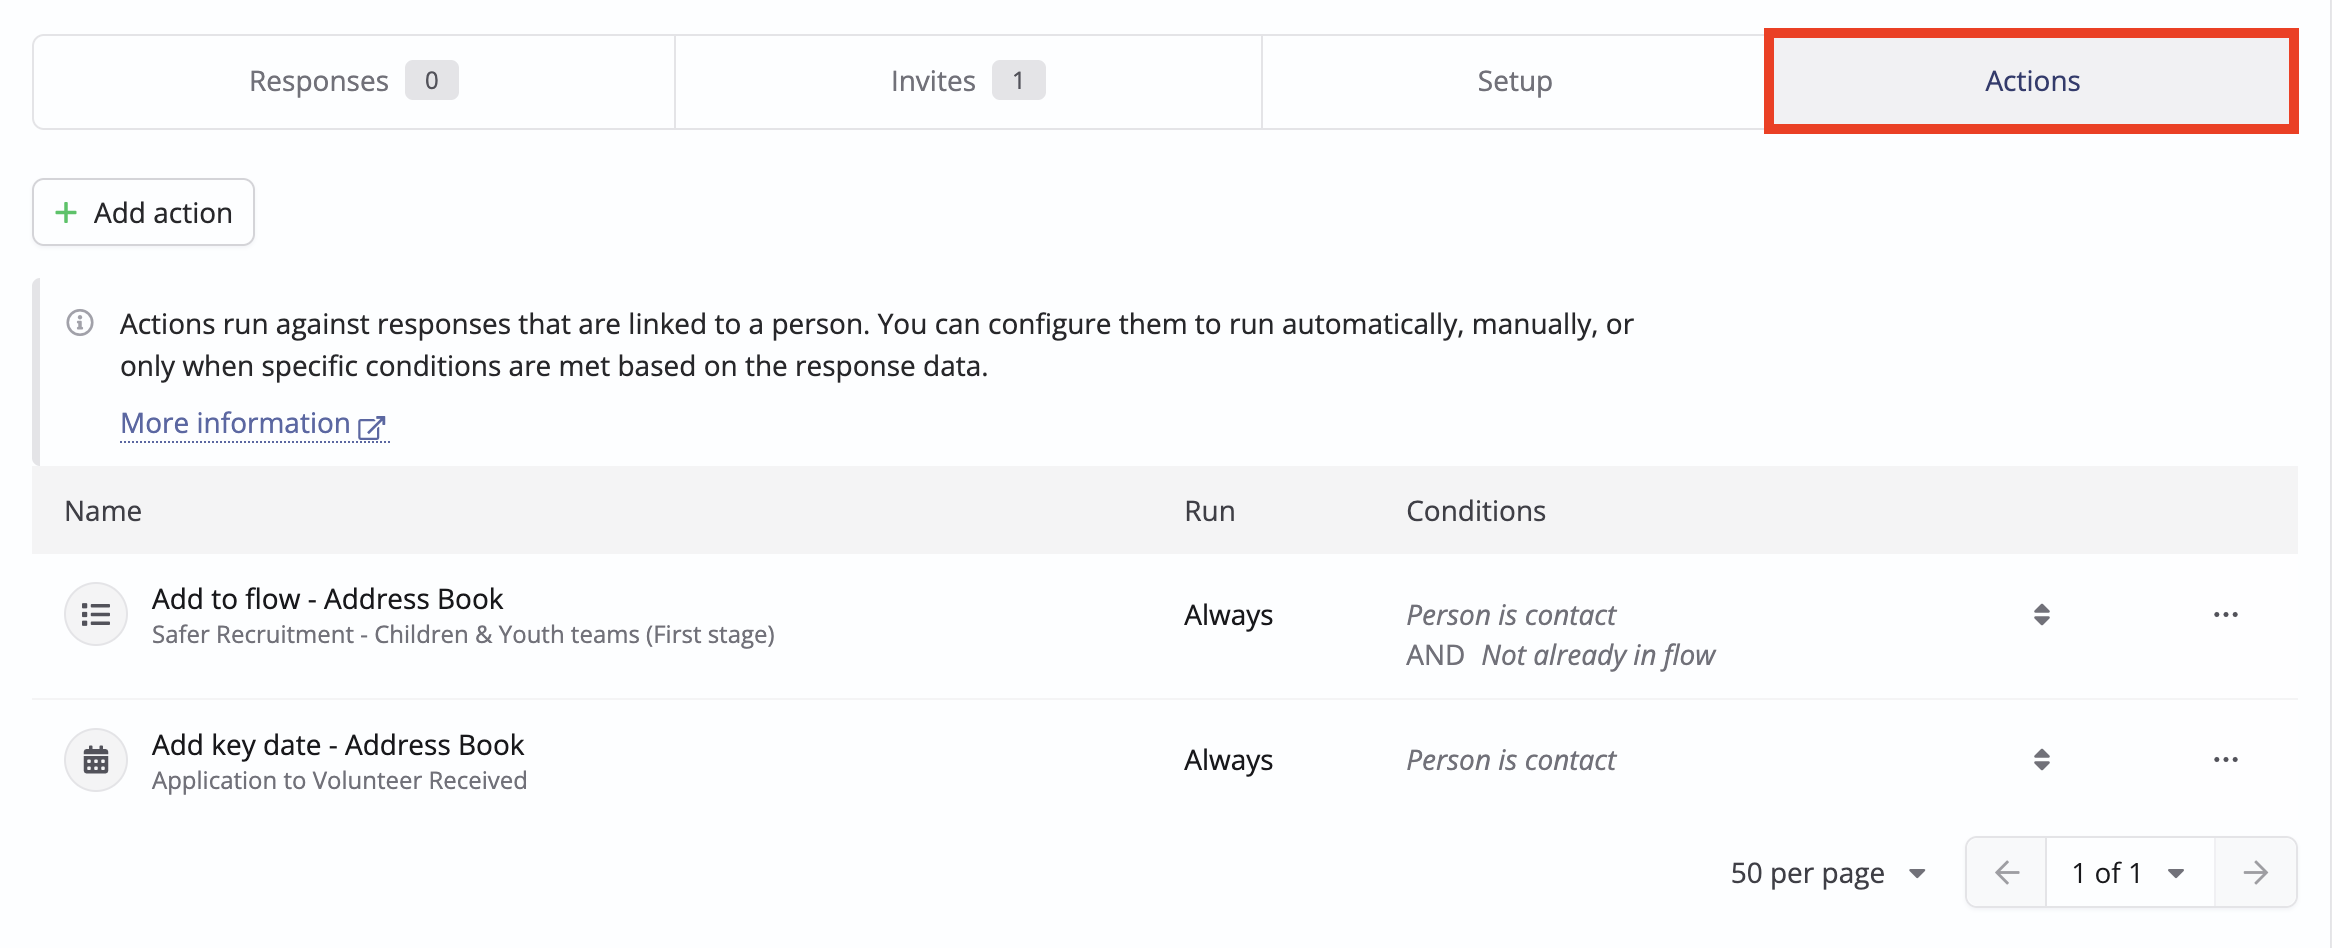
In the Actions tab, add any Form actions that you'd like to happen automatically once someone invited to complete the form submits their response. For example, you may want to add a note to the person's profile, add them to a key date (e.g. "Volunteer Application Received”) or tag, or a specific flow, such as a Safer Recruitment flow (see next section). You will need to create the flow that you want to add the person to before you can add that action to the form.
Once you're happy with the form, you can publish it and follow the steps in our Sending form invitations article to invite the potential volunteer to complete the application form.
Track the Application Process
For this next step, we're going to create a new Flow.
If you're unfamiliar with Flows, look at ChurchSuite's Flows support article. Flows are a feature designed to help break down repetitive tasks into defined stages of a process.
The actual workflow for processing someone’s application to volunteer may not be as linear as our example - you may find it helpful to map out what your volunteer application workflow looks like, all the different stages you'll work through - from someone’s interest in volunteering in a role, to the various checks that need to be carried out, to ongoing support and supervision. At each stage of your workflow, there may be a wide variety of actions - perhaps telephone calls, emails, assigning tags and key dates. We'll now create a Flow to translate those processes into Stages and Actions.
In my church, we used Thirtyone:eight for our Safeguarding knowledge hub and resource library, as well as using their Safeguarding helpline to advise our Safer Recruitment process. Thirtyone:eight is an independent Christian safeguarding charity that offers churches in England and Wales Safeguarding and DBS Services. The Flow I outline below broadly follows the Thirty-one:eight Safer Recruitment workflow, but you can tailor it to suit your own church's processes.
Essentially, this “Safer Recruitment" Flow functions as follows:
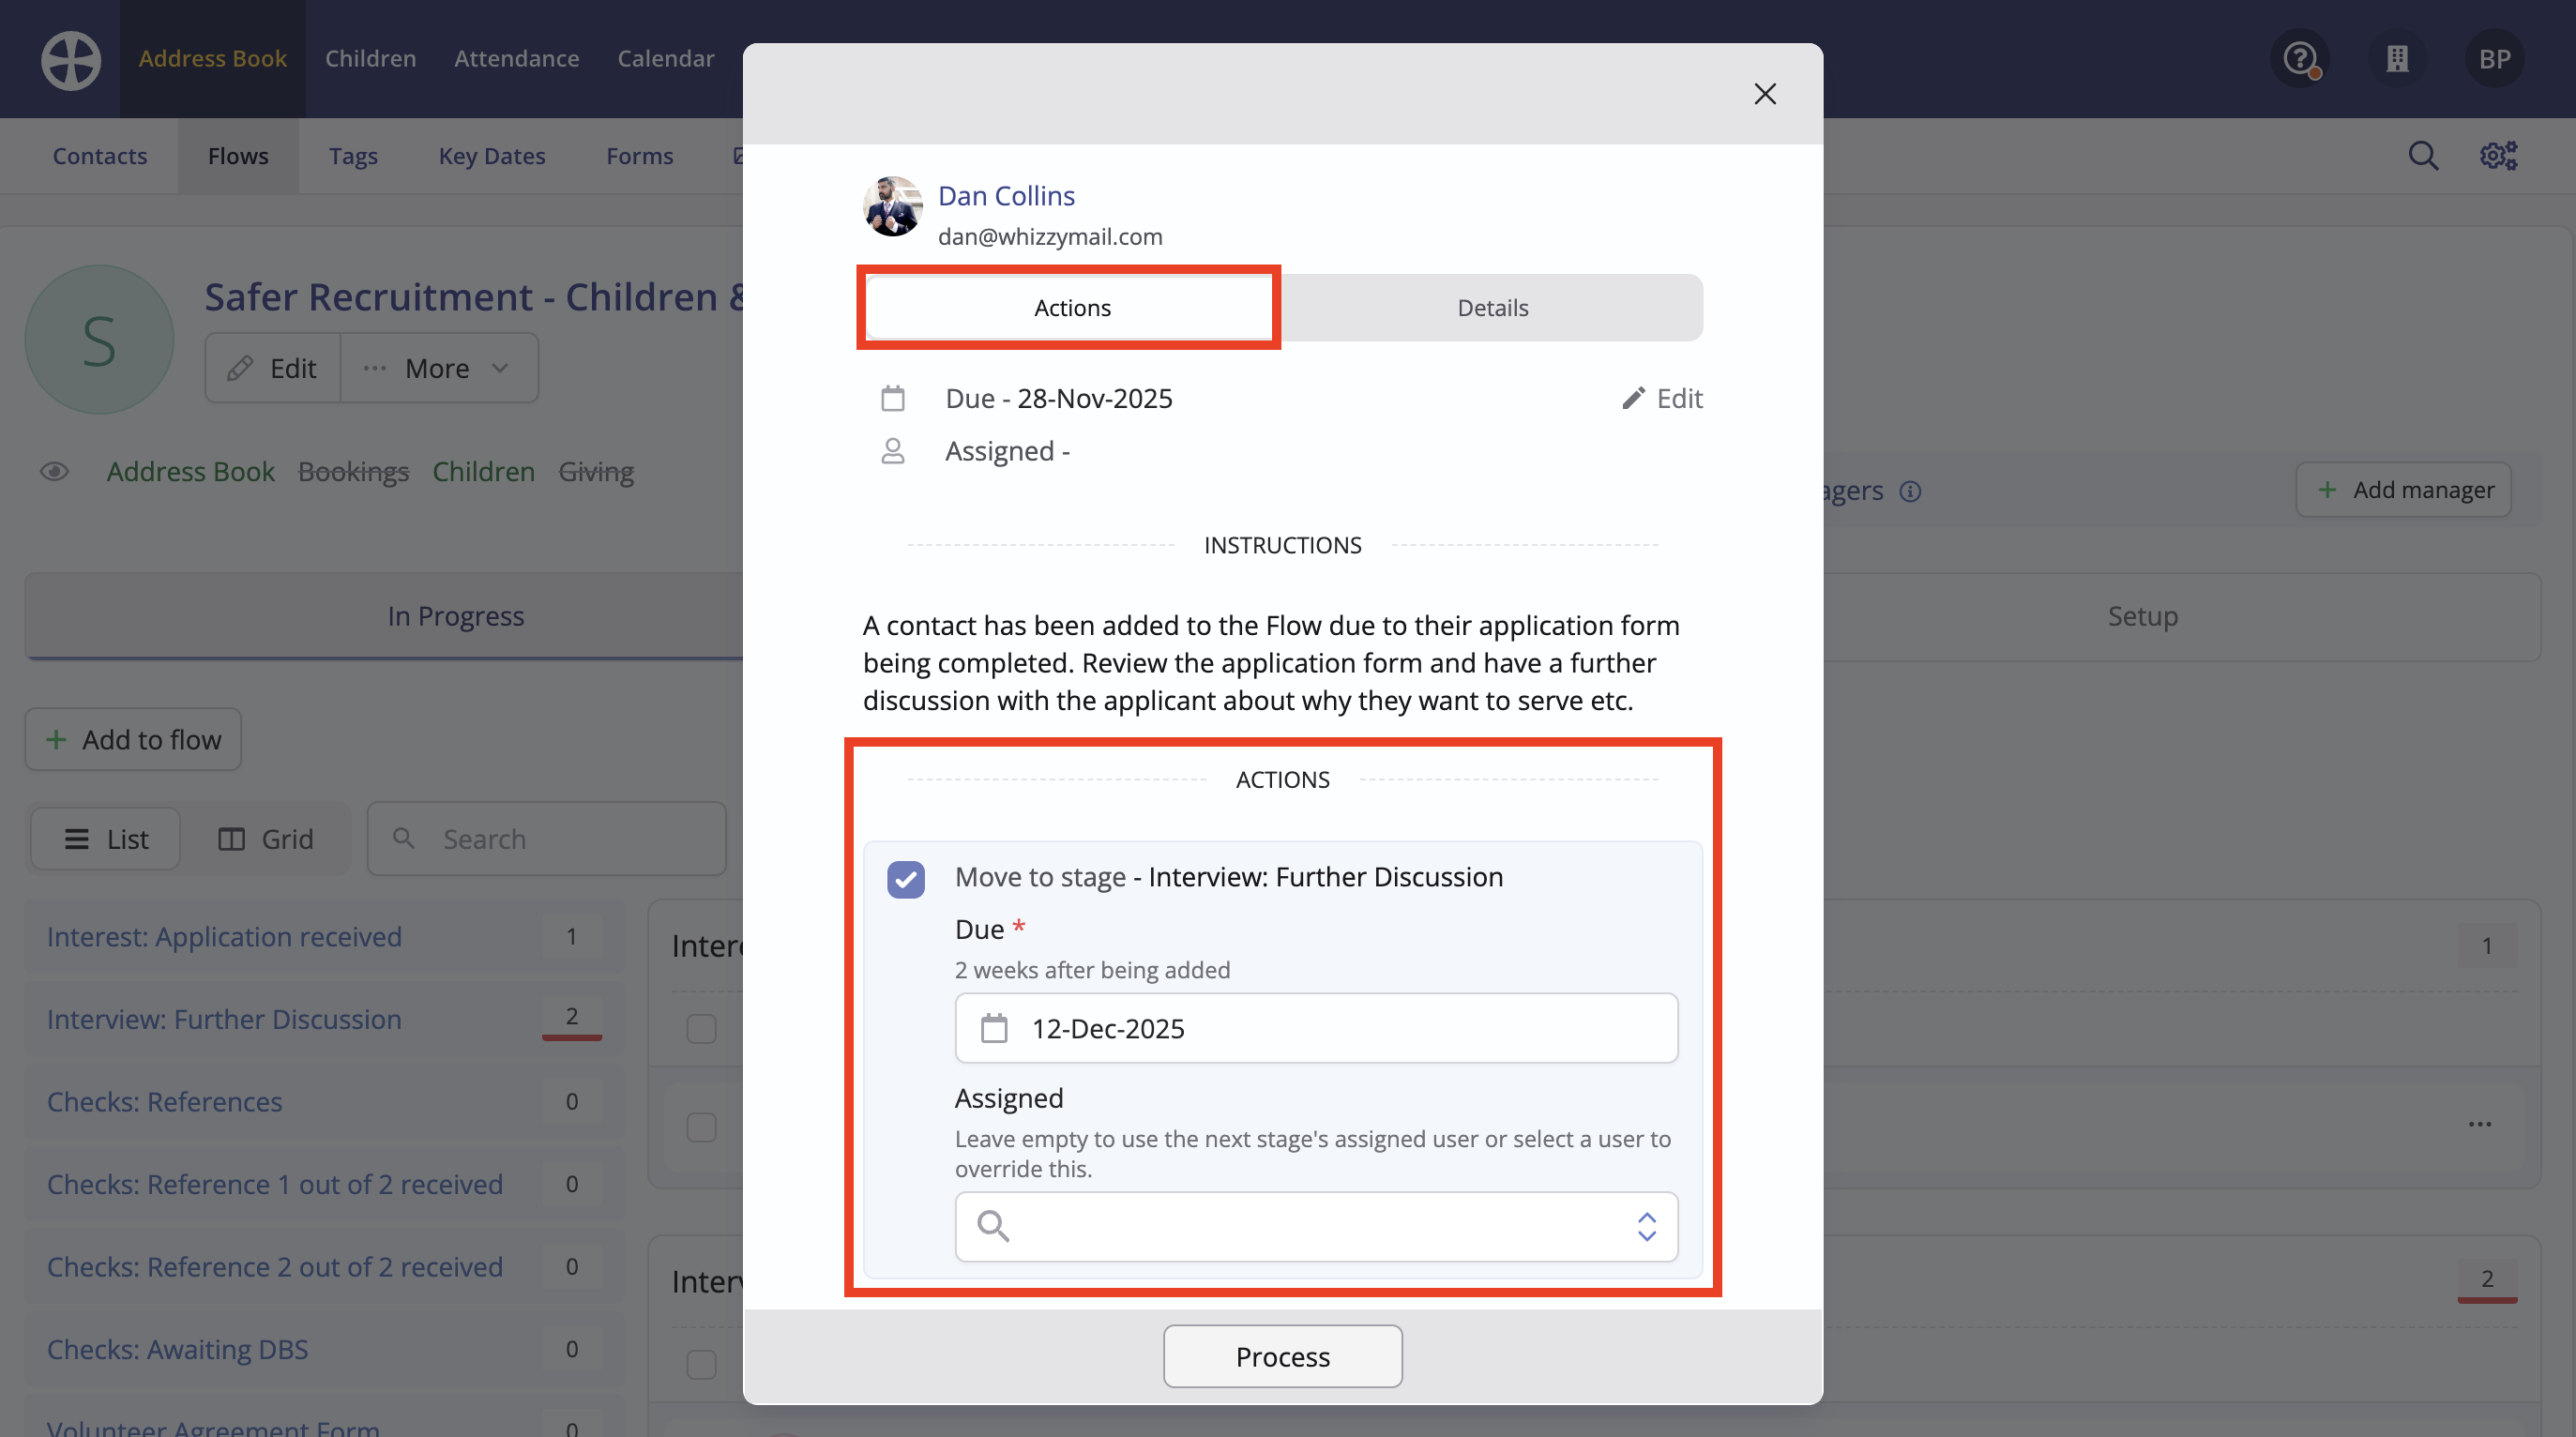
1. Interest: Application Received. On the Due date (0 days after someone has been added to the Flow), ChurchSuite will send me a reminder notification that a task is due. At this stage, I can review the application form, arrange a further discussion/interview with the person and move them to the next stage of the flow. You may wish to add an action to “Send Email” in this stage, inviting the person to an interview.
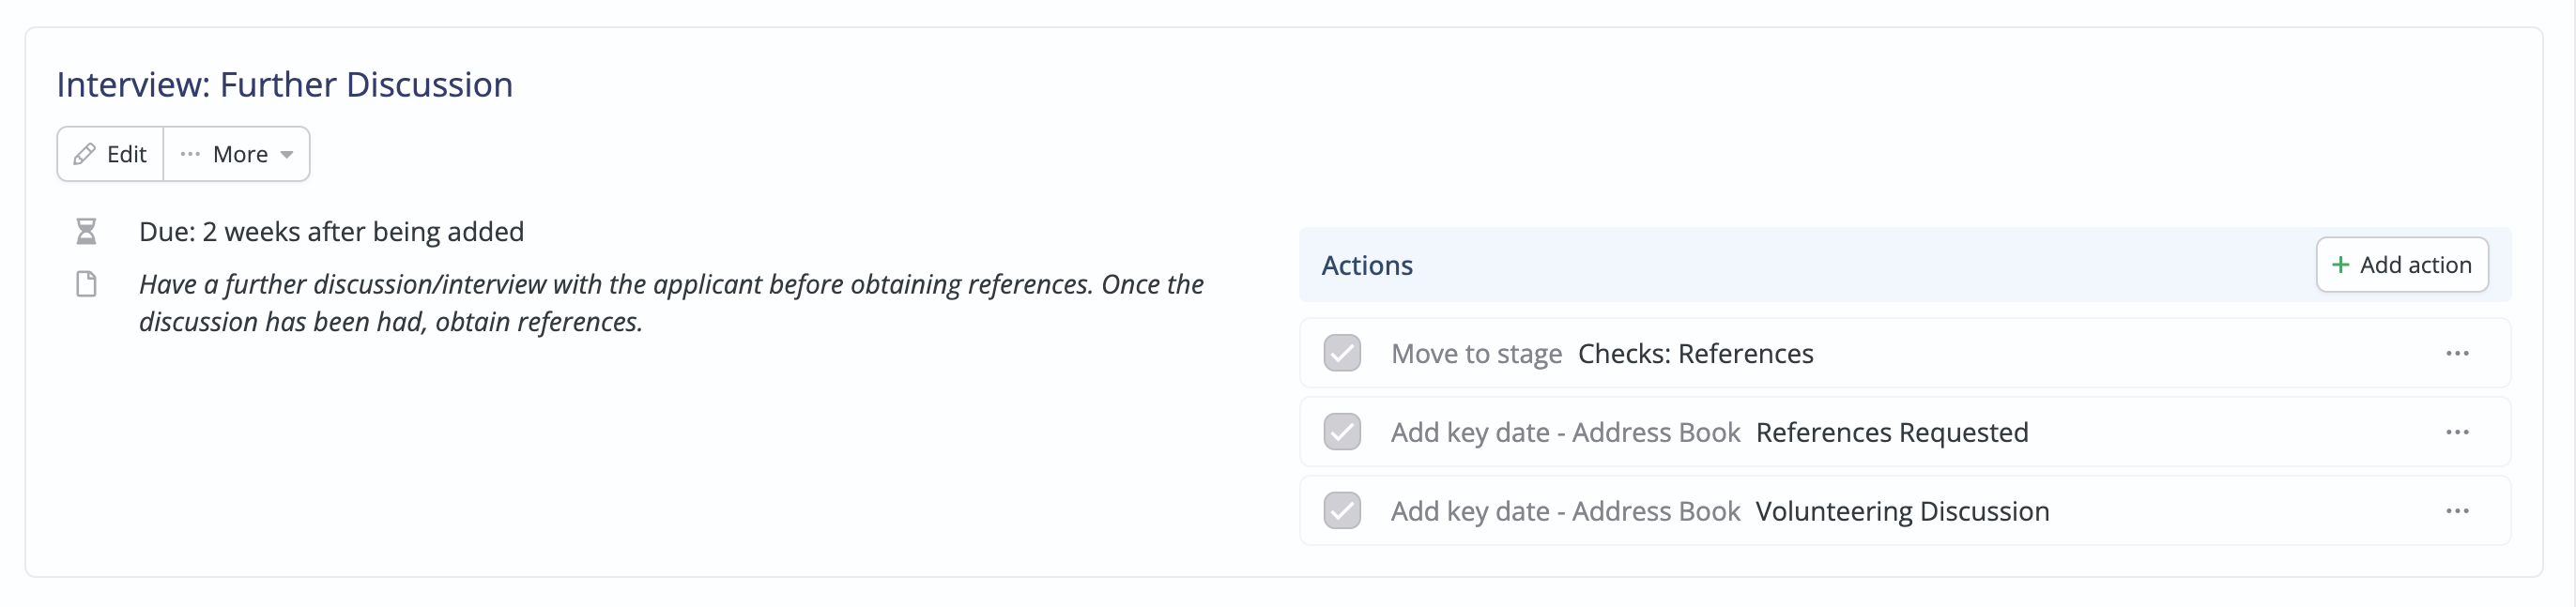
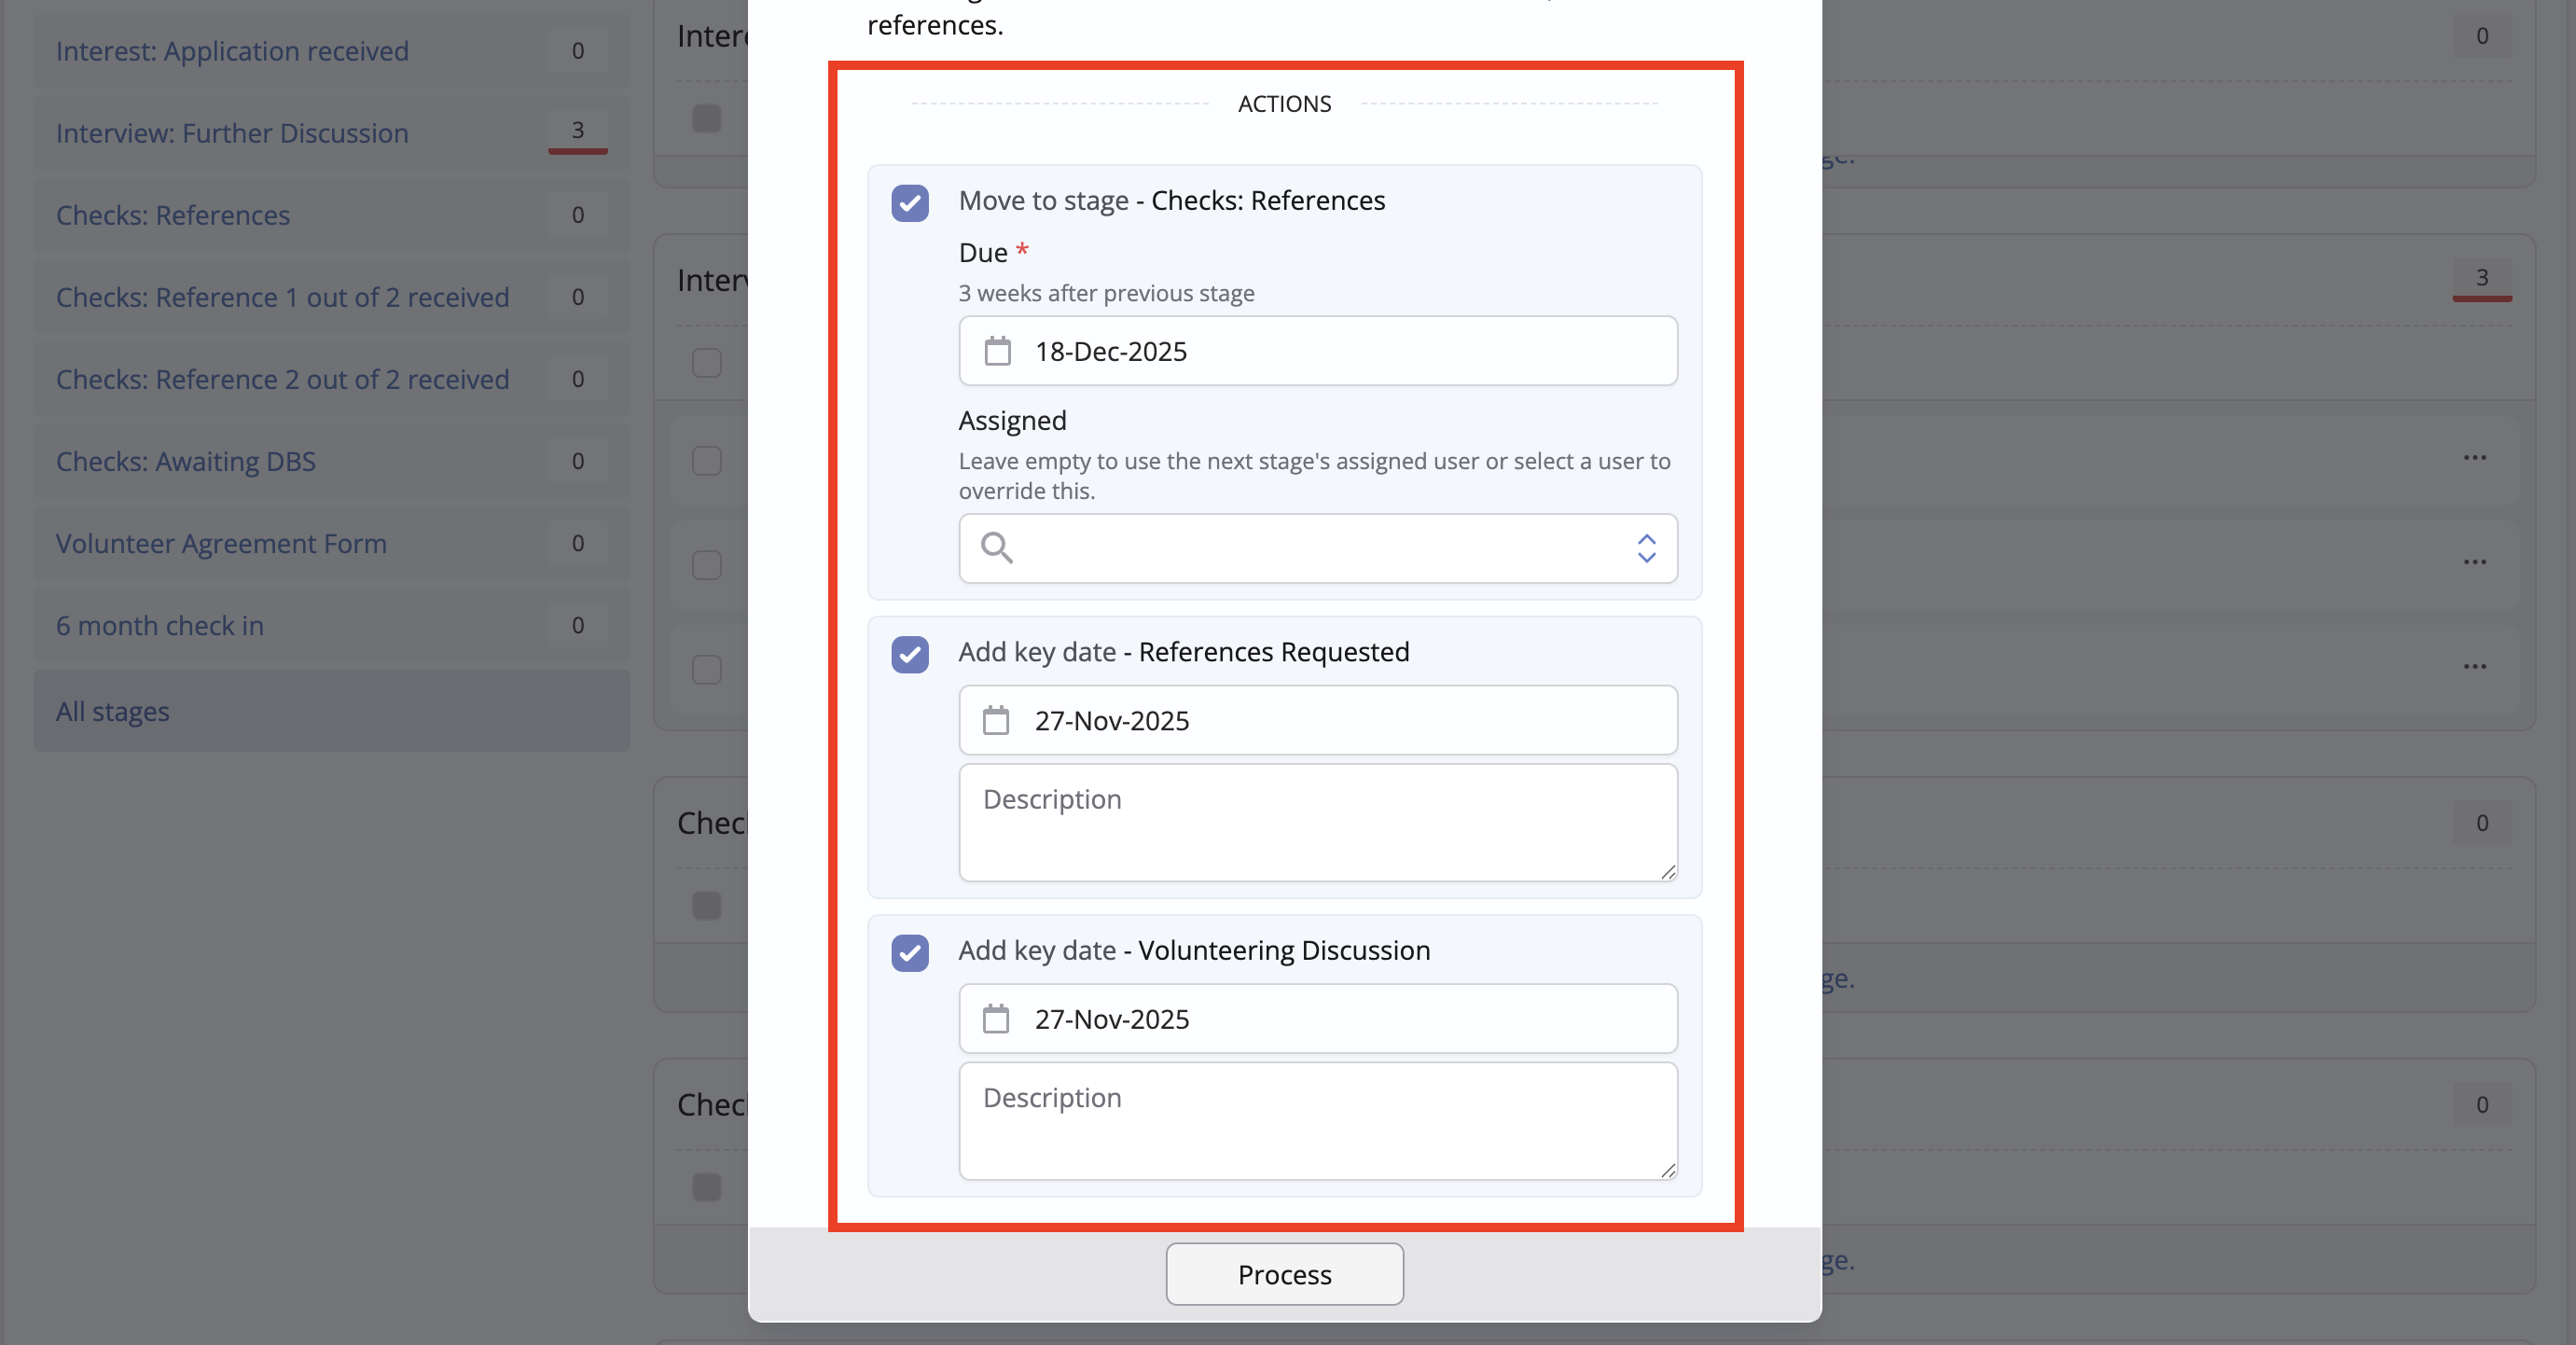
2. Interest: Further Discussion. After two weeks, I'll get a ChurchSuite notification reminding me that this stage of the flow is due. I should have met with the person to discuss their application and assess their suitability for the role, I may also add a Note against the person to record points from our discussion. Once I’m happy to move forward, I can then go ahead and do the relevant checks - in this case, I will contact the referees to request references. I’ll Process the person, move them to the next stage of the flow and add key dates to record the discussion/interview and the date references were requested.
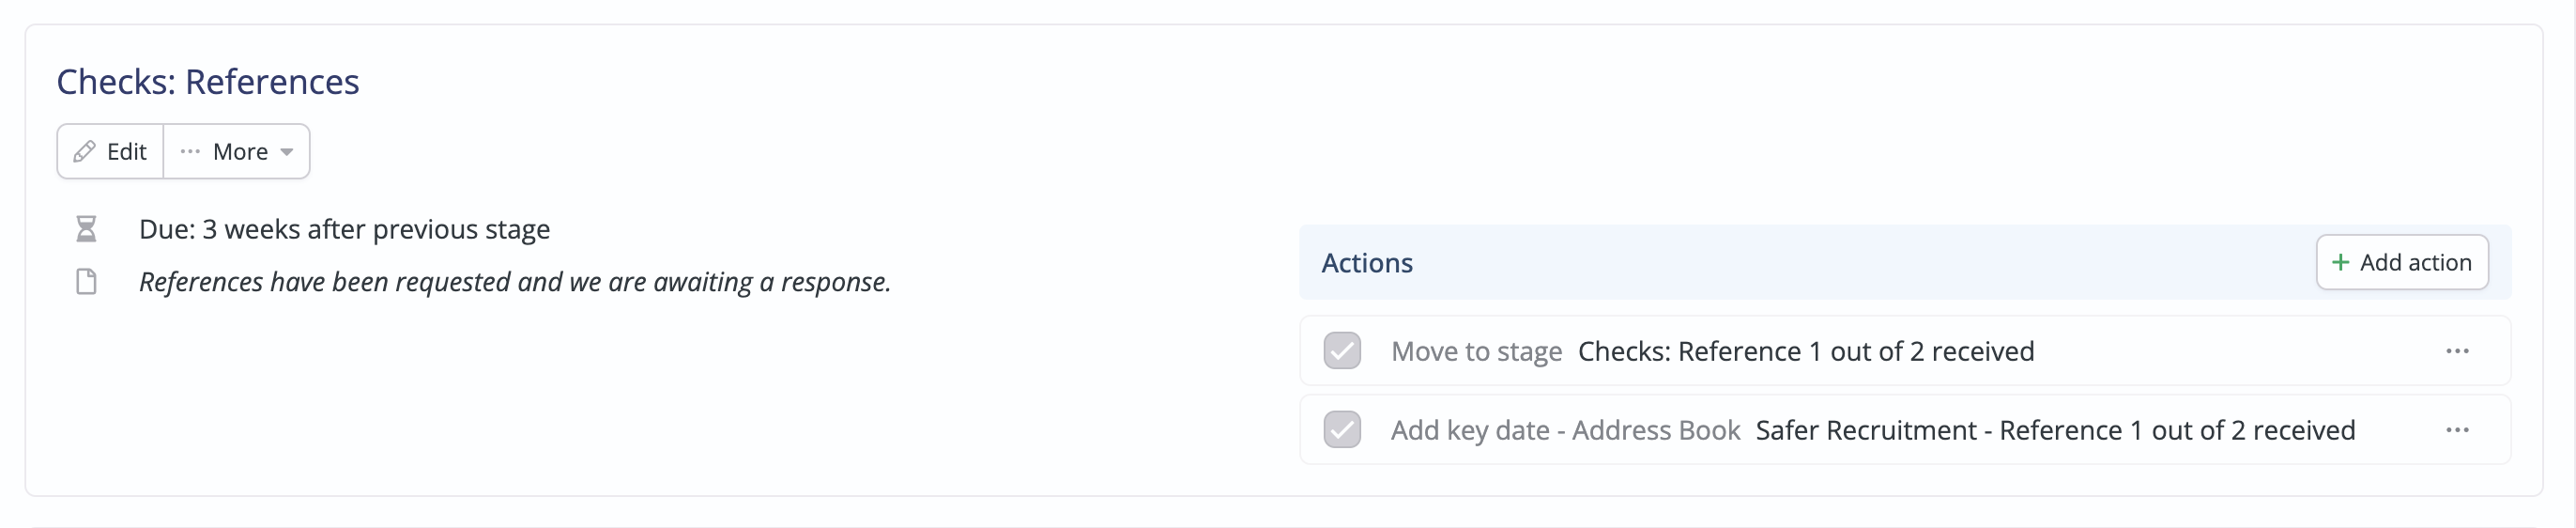
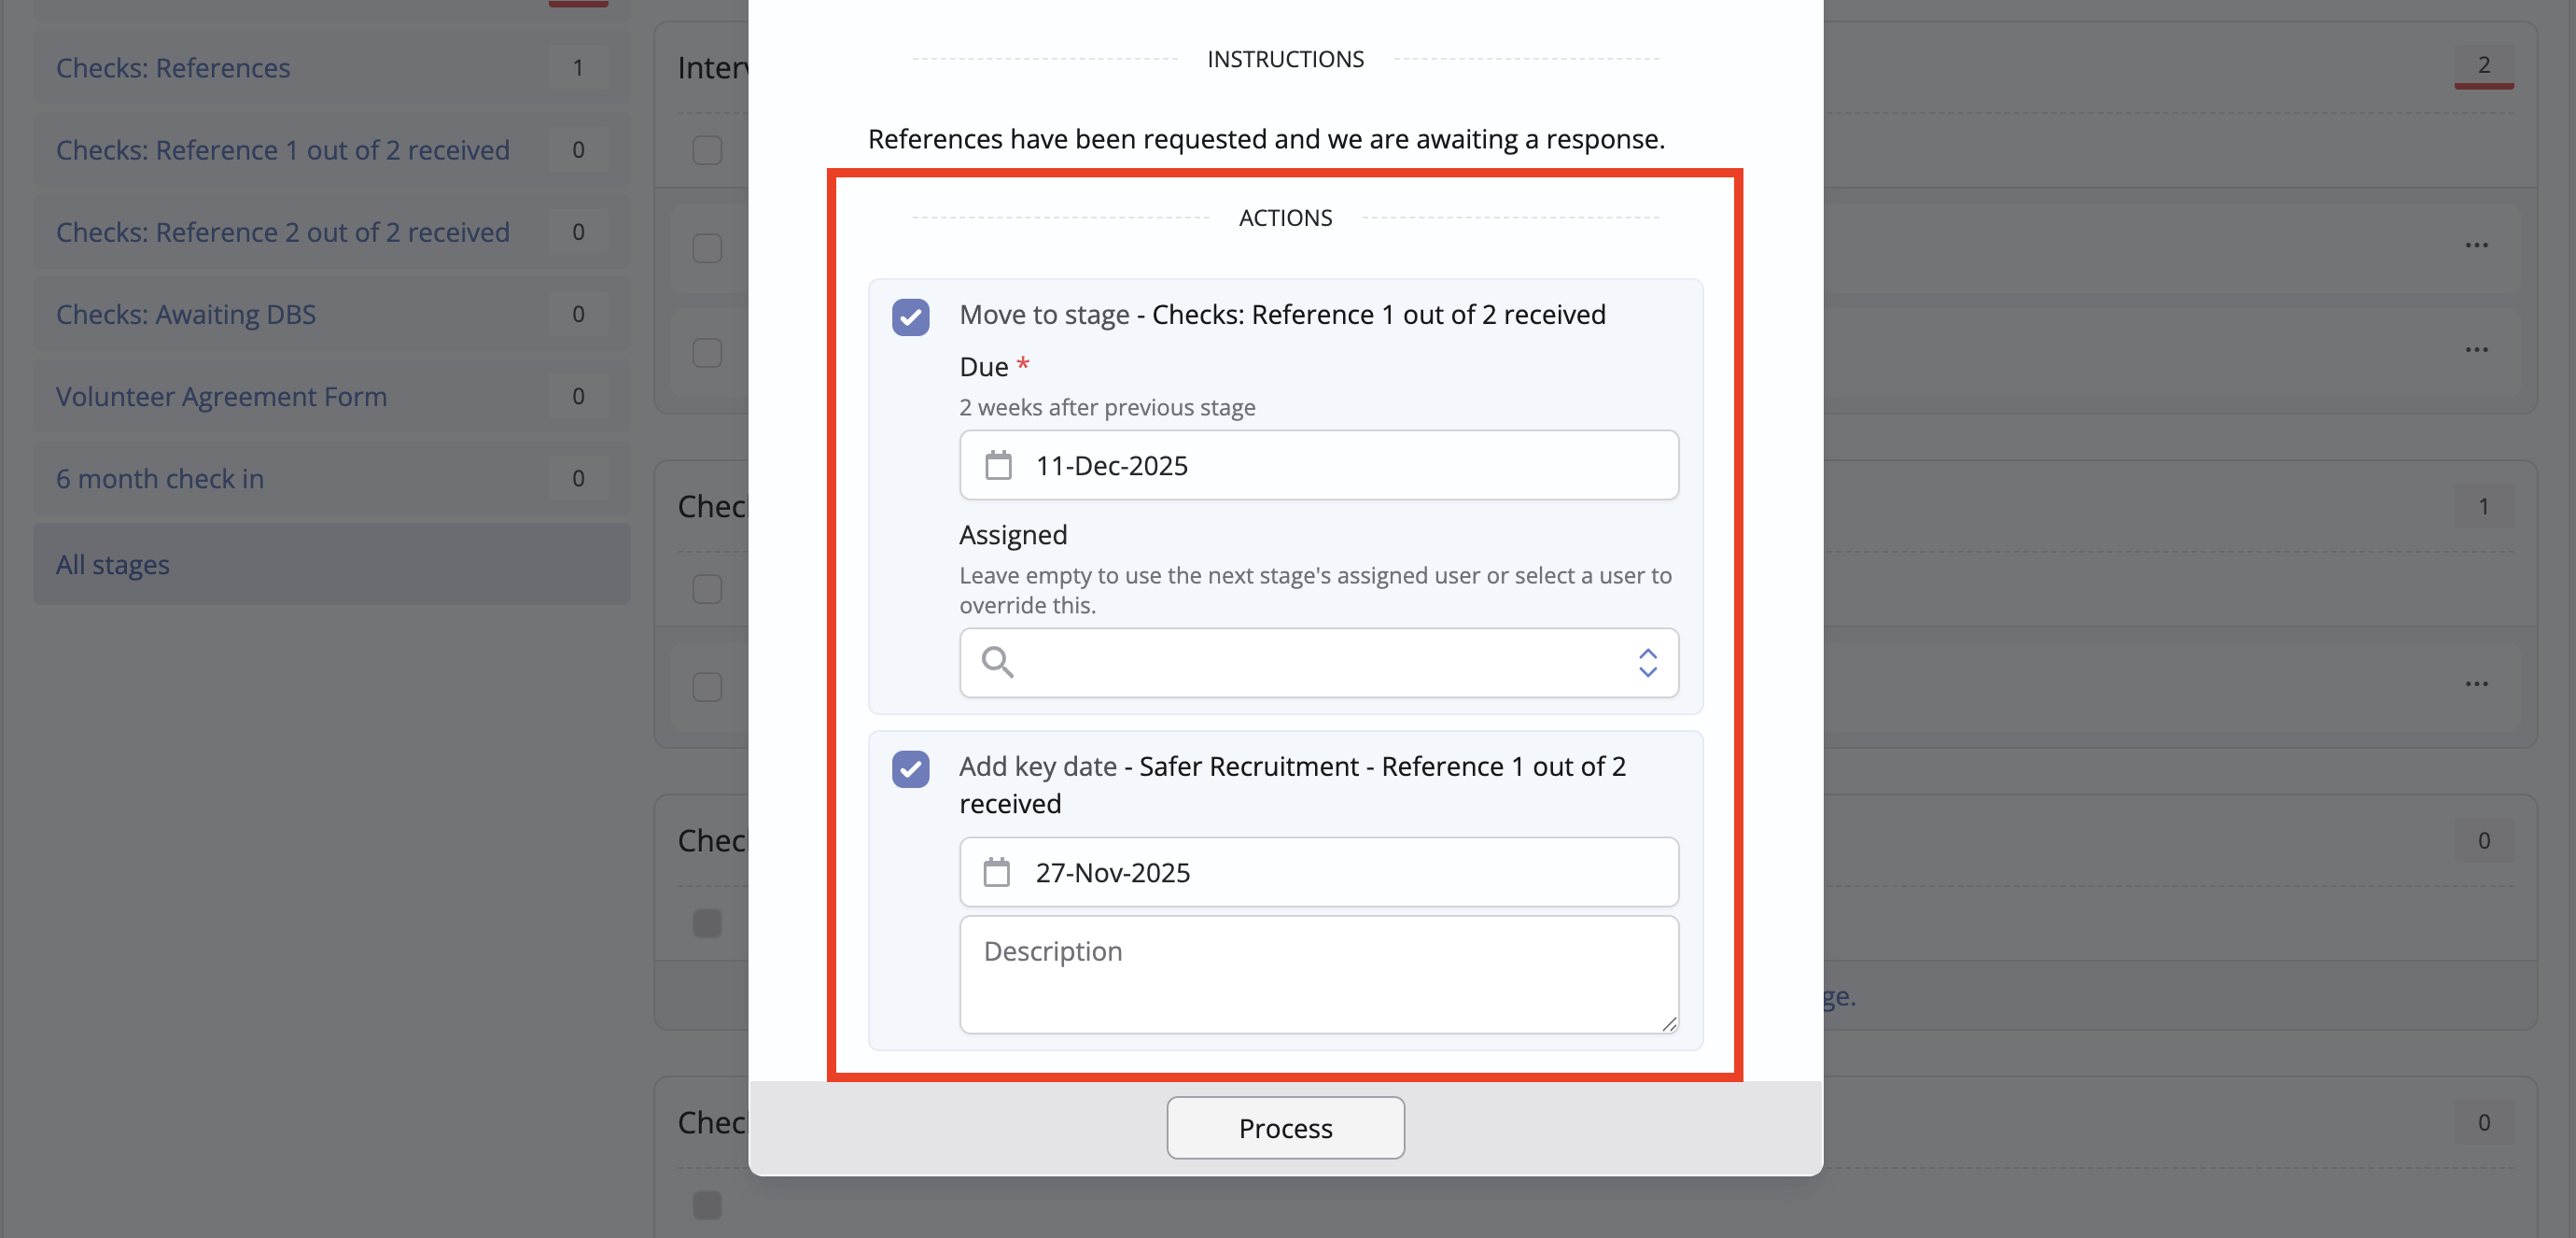
3. Checks: References. Three weeks after the previous stage, ChurchSuite will send me a reminder. At this point, if I’ve not heard from either referee, I’ll chase them up. If I hear from one referee before the 3 weeks, I can access the flow and Process the person through, moving to the next stage and adding a key date for the receipt of the first reference.
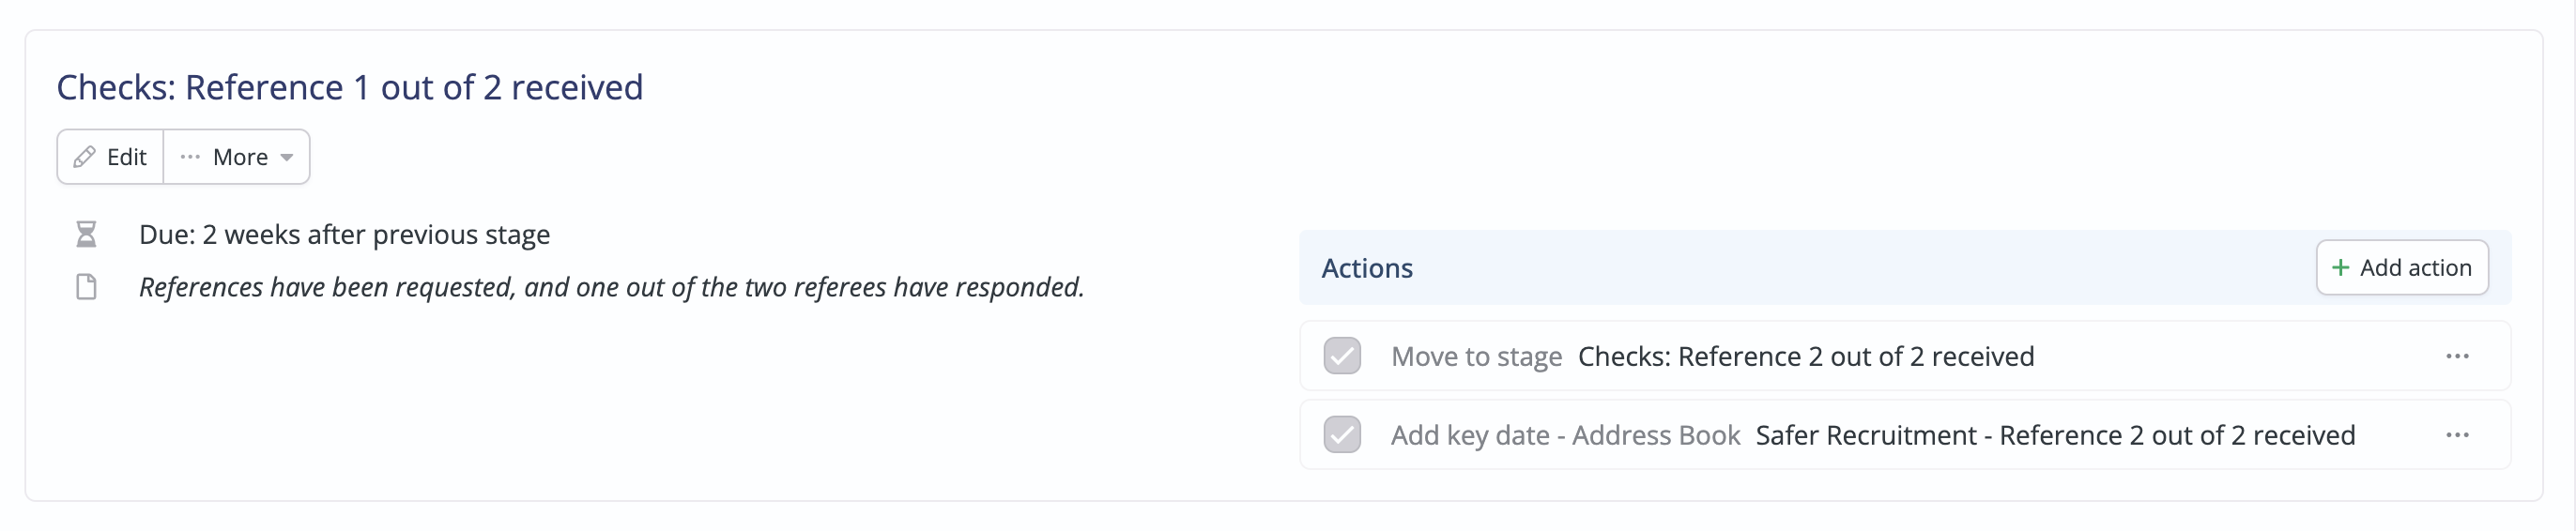
4. Checks: Reference 1 out of 2 received. 2 weeks after the previous stage, ChurchSuite will send me a reminder. At this point, if I’ve not heard from the second referee, I’ll chase them up. If I hear from the referee before the 3 weeks, I can access the flow and Process the person through, moving to the next stage and adding a key date for the receipt of the second reference.
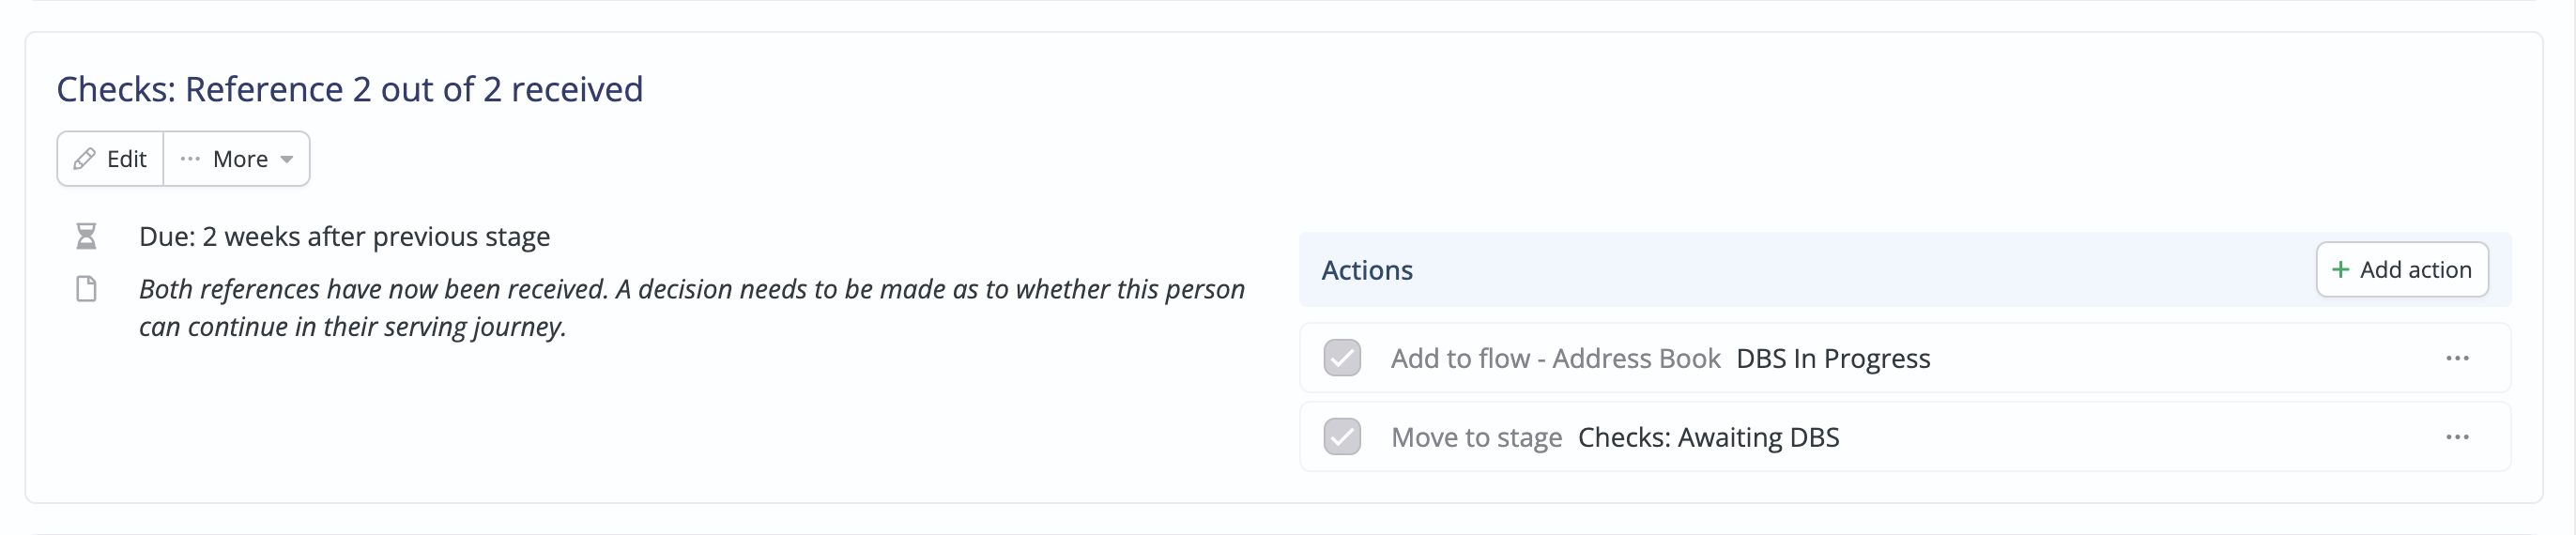
5. Checks: Reference 2 out of 2 received. 2 weeks after the previous stage, ChurchSuite will send me a reminder. At this stage, I’ll decide whether the person is suitable to continue through the application process and on to the next check. If so, I’ll process them through the flow to the next stage and also check the action to add them to another flow for a DBS Check, if they need it. See the Case Study on DBS Checks for more information.
6. Checks: Awaiting DBS. I’ll receive a reminder 6 weeks after the previous stage if I haven’t already moved the person to the next stage of the flow. Once their DBS certificate is received and the relevant steps have been followed on that flow, I can Process the person to the next stage. I may add a Note against the person to record any relevant information.

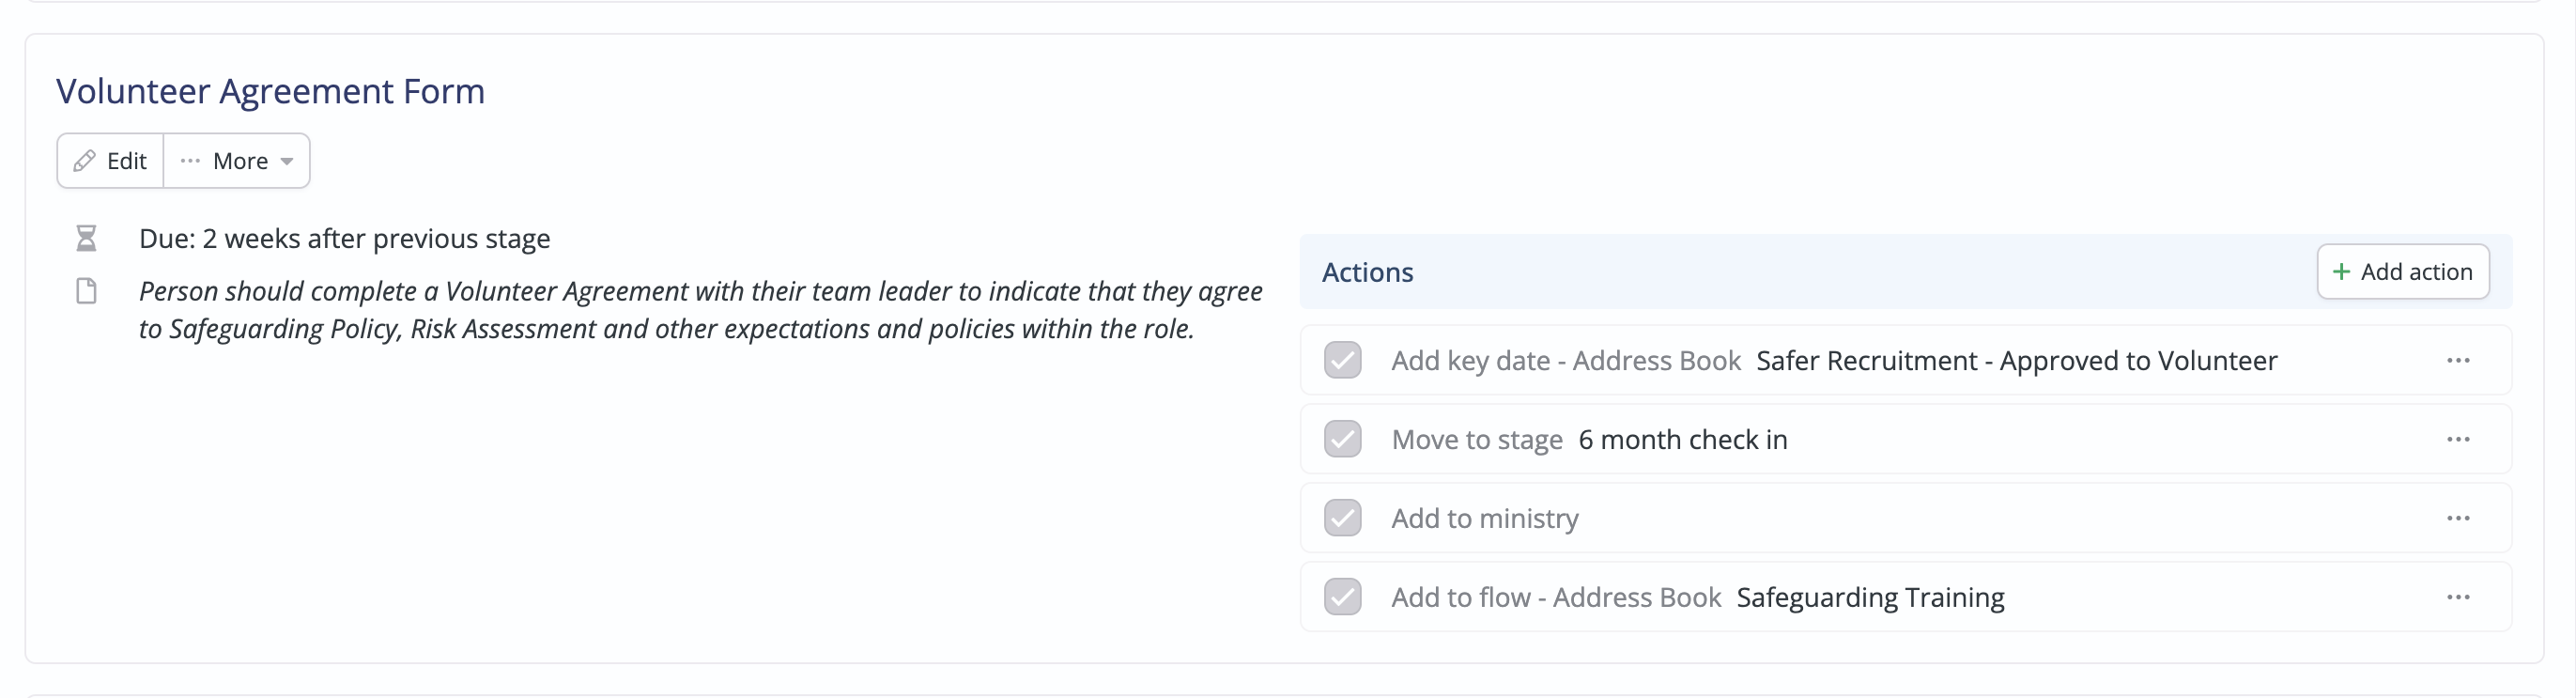
7. Volunteer Agreement Form. Now that all the relevant checks have been done, if I’m satisfied that the person is a suitable volunteer, I or a team leader will meet the person to discuss any relevant policies and expectations of the role. In this meeting, a volunteer agreement form will be completed. Once I receive this form, I can Process the person to the next stage of the flow, completing the following actions: Adding a Key Date that the person is approved to volunteer; adding to the relevant Ministry within the Rotas module; adding to the Safeguarding Training flow, so that the person can receive the relevant training; move to next stage.
8. 6-month check-in. 6 months after the previous stage, ChurchSuite will send me a reminder. At this stage, either myself or the team leader will formally check in with the volunteer. If the volunteer needs additional support or check-ins, I'll add a Note against the person to record this and adjust the due date for another 2 months. If they are happy and the standard ongoing support and supervision from their team leader is adequate, I'll add a Note against the person to record this and Process the person through to Completed.

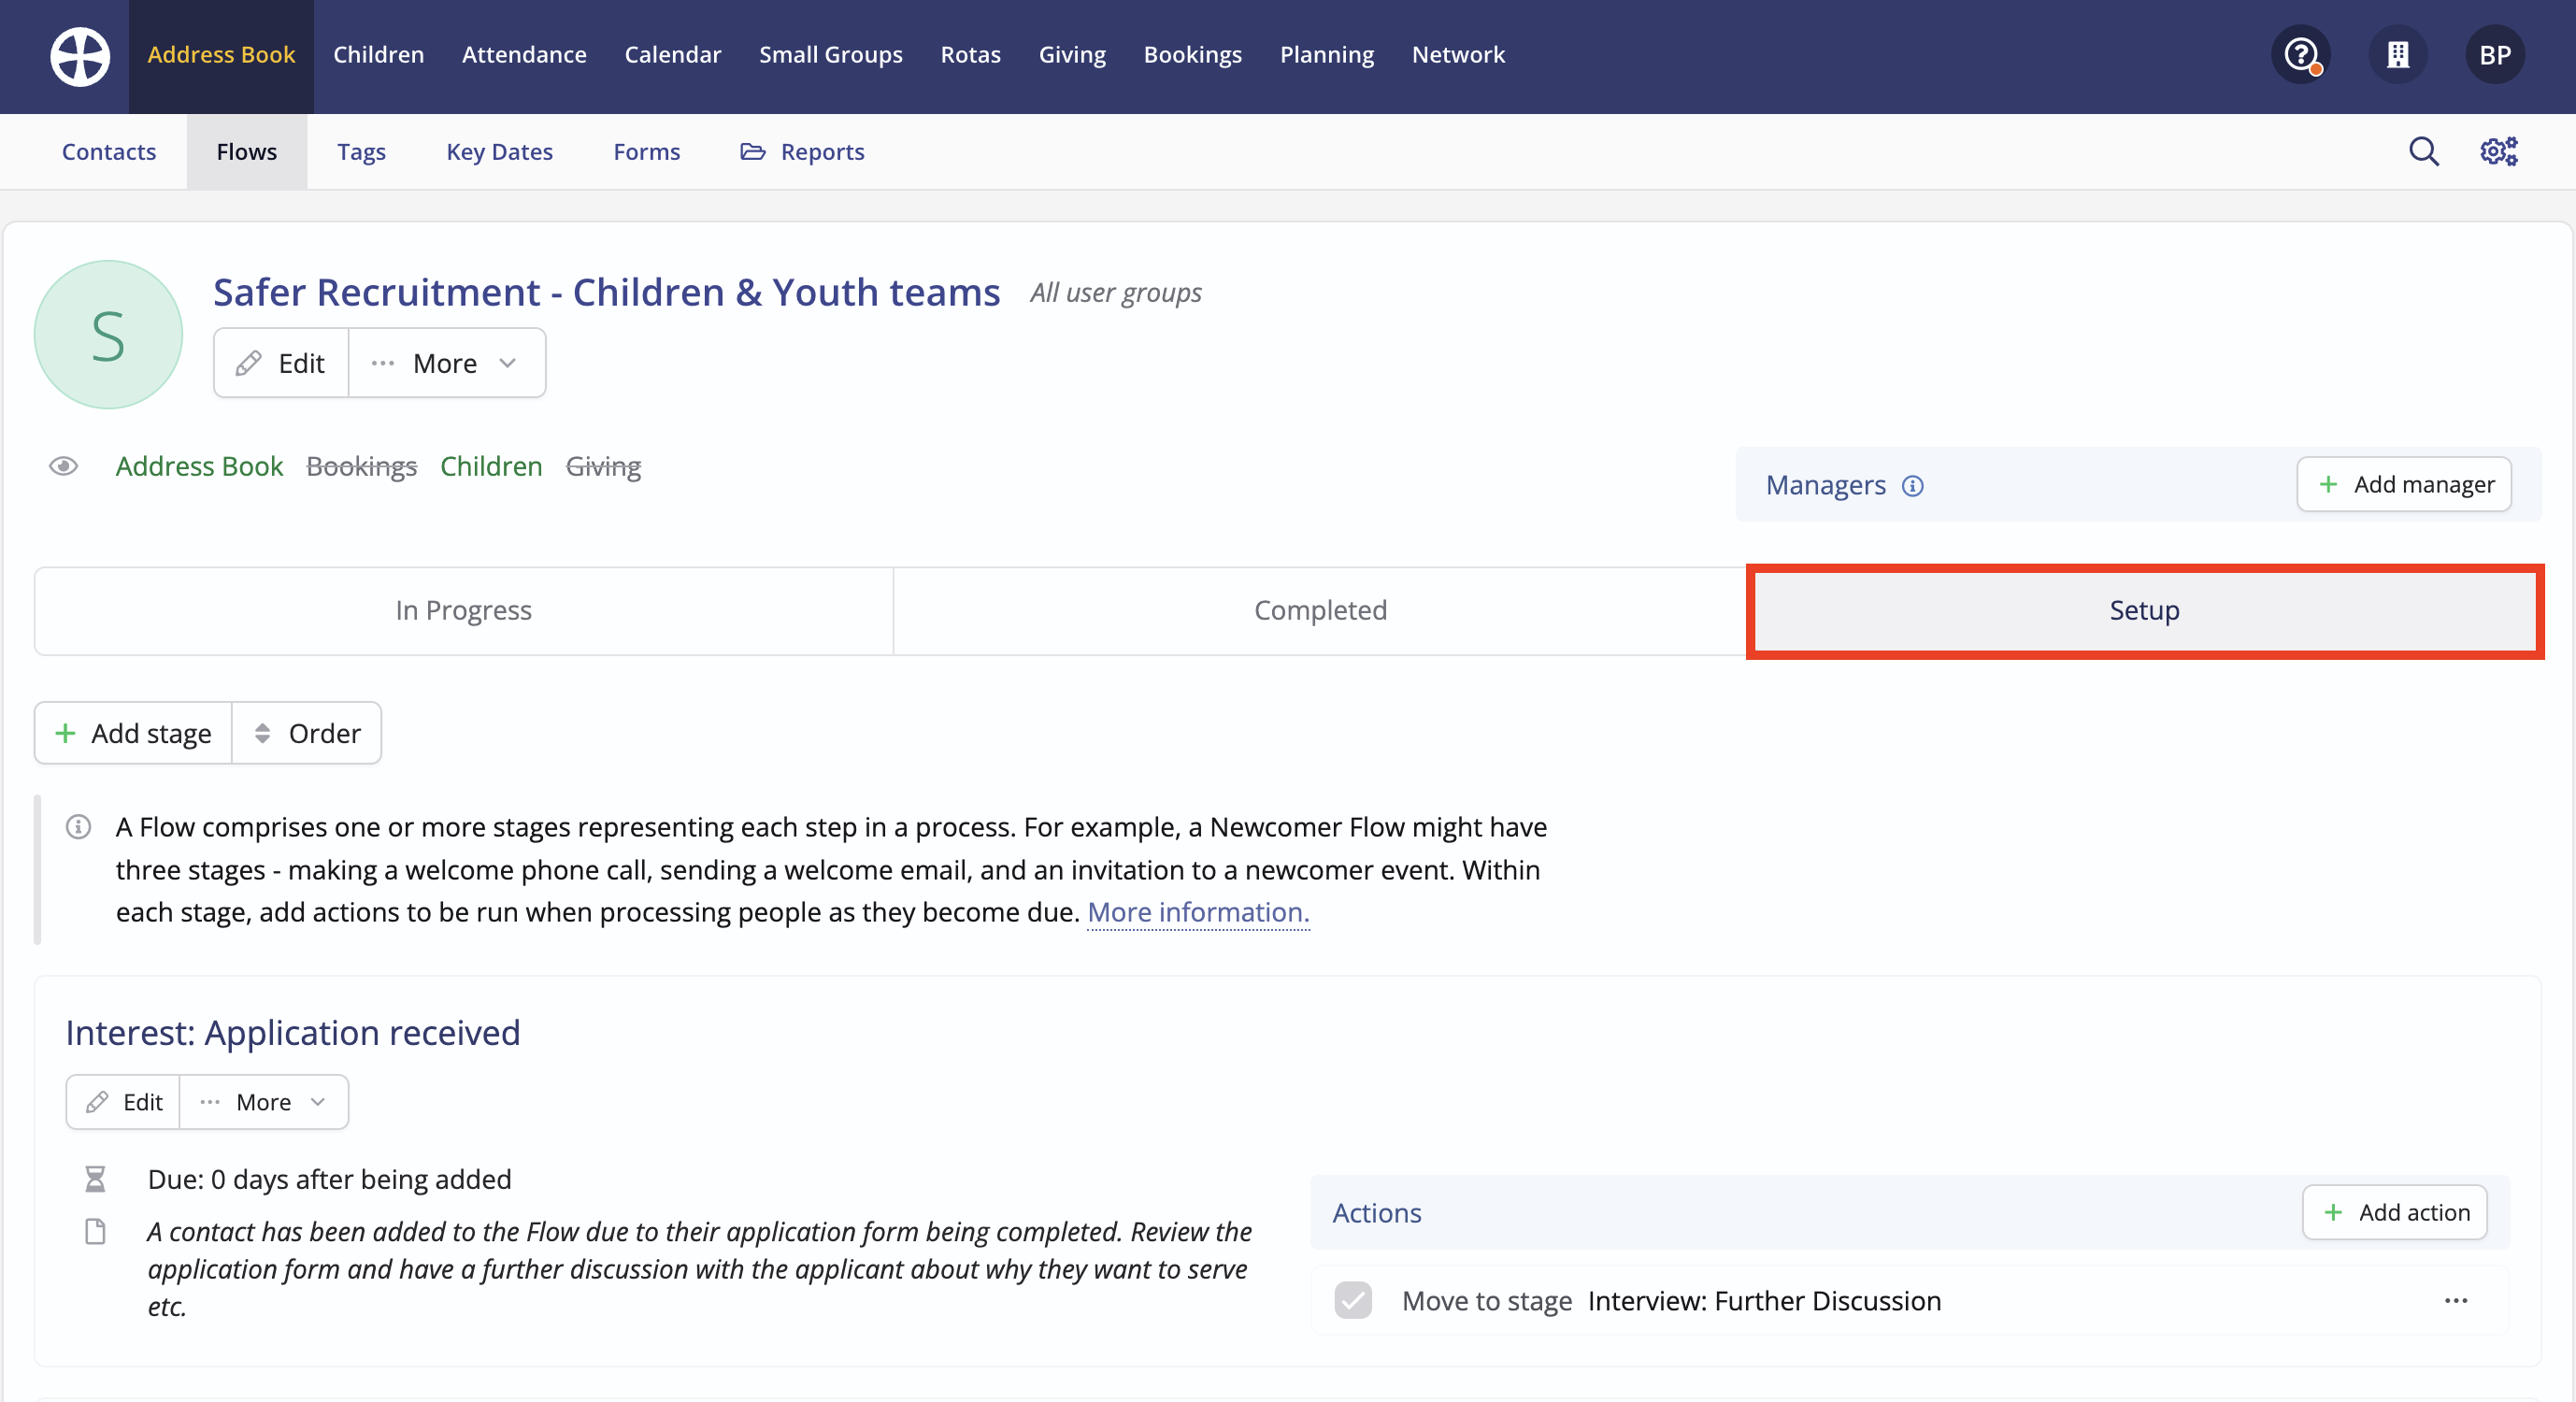
Adding the Flow
Give your “Safer Recruitment" Flow a suitable name, set any optional visibility restrictions and assign one or more Flow Managers who will receive Flow digests and updates. Next, add 8 Stages - using the +Add stage button - and add Actions and Settings as shown in the above screenshots.
Try to keep the actions in a logical order and note the Default state for each Action - some actions should have a ticked default state and others are unticked to give the User a choice when they are processing people through the Flow. Set the Due days for each stage - you can adjust these timings later if you need to extend the renewal process to suit your context.
Workflow for new applications
Let's walk through the User experience as you add and process new people through your Flow and review their application form.
As new people complete the Volunteer Application Form via the invite link you’ve sent them, they will also be automatically added to your Safer Recruitment flow, depending on the actions you set up in your form.
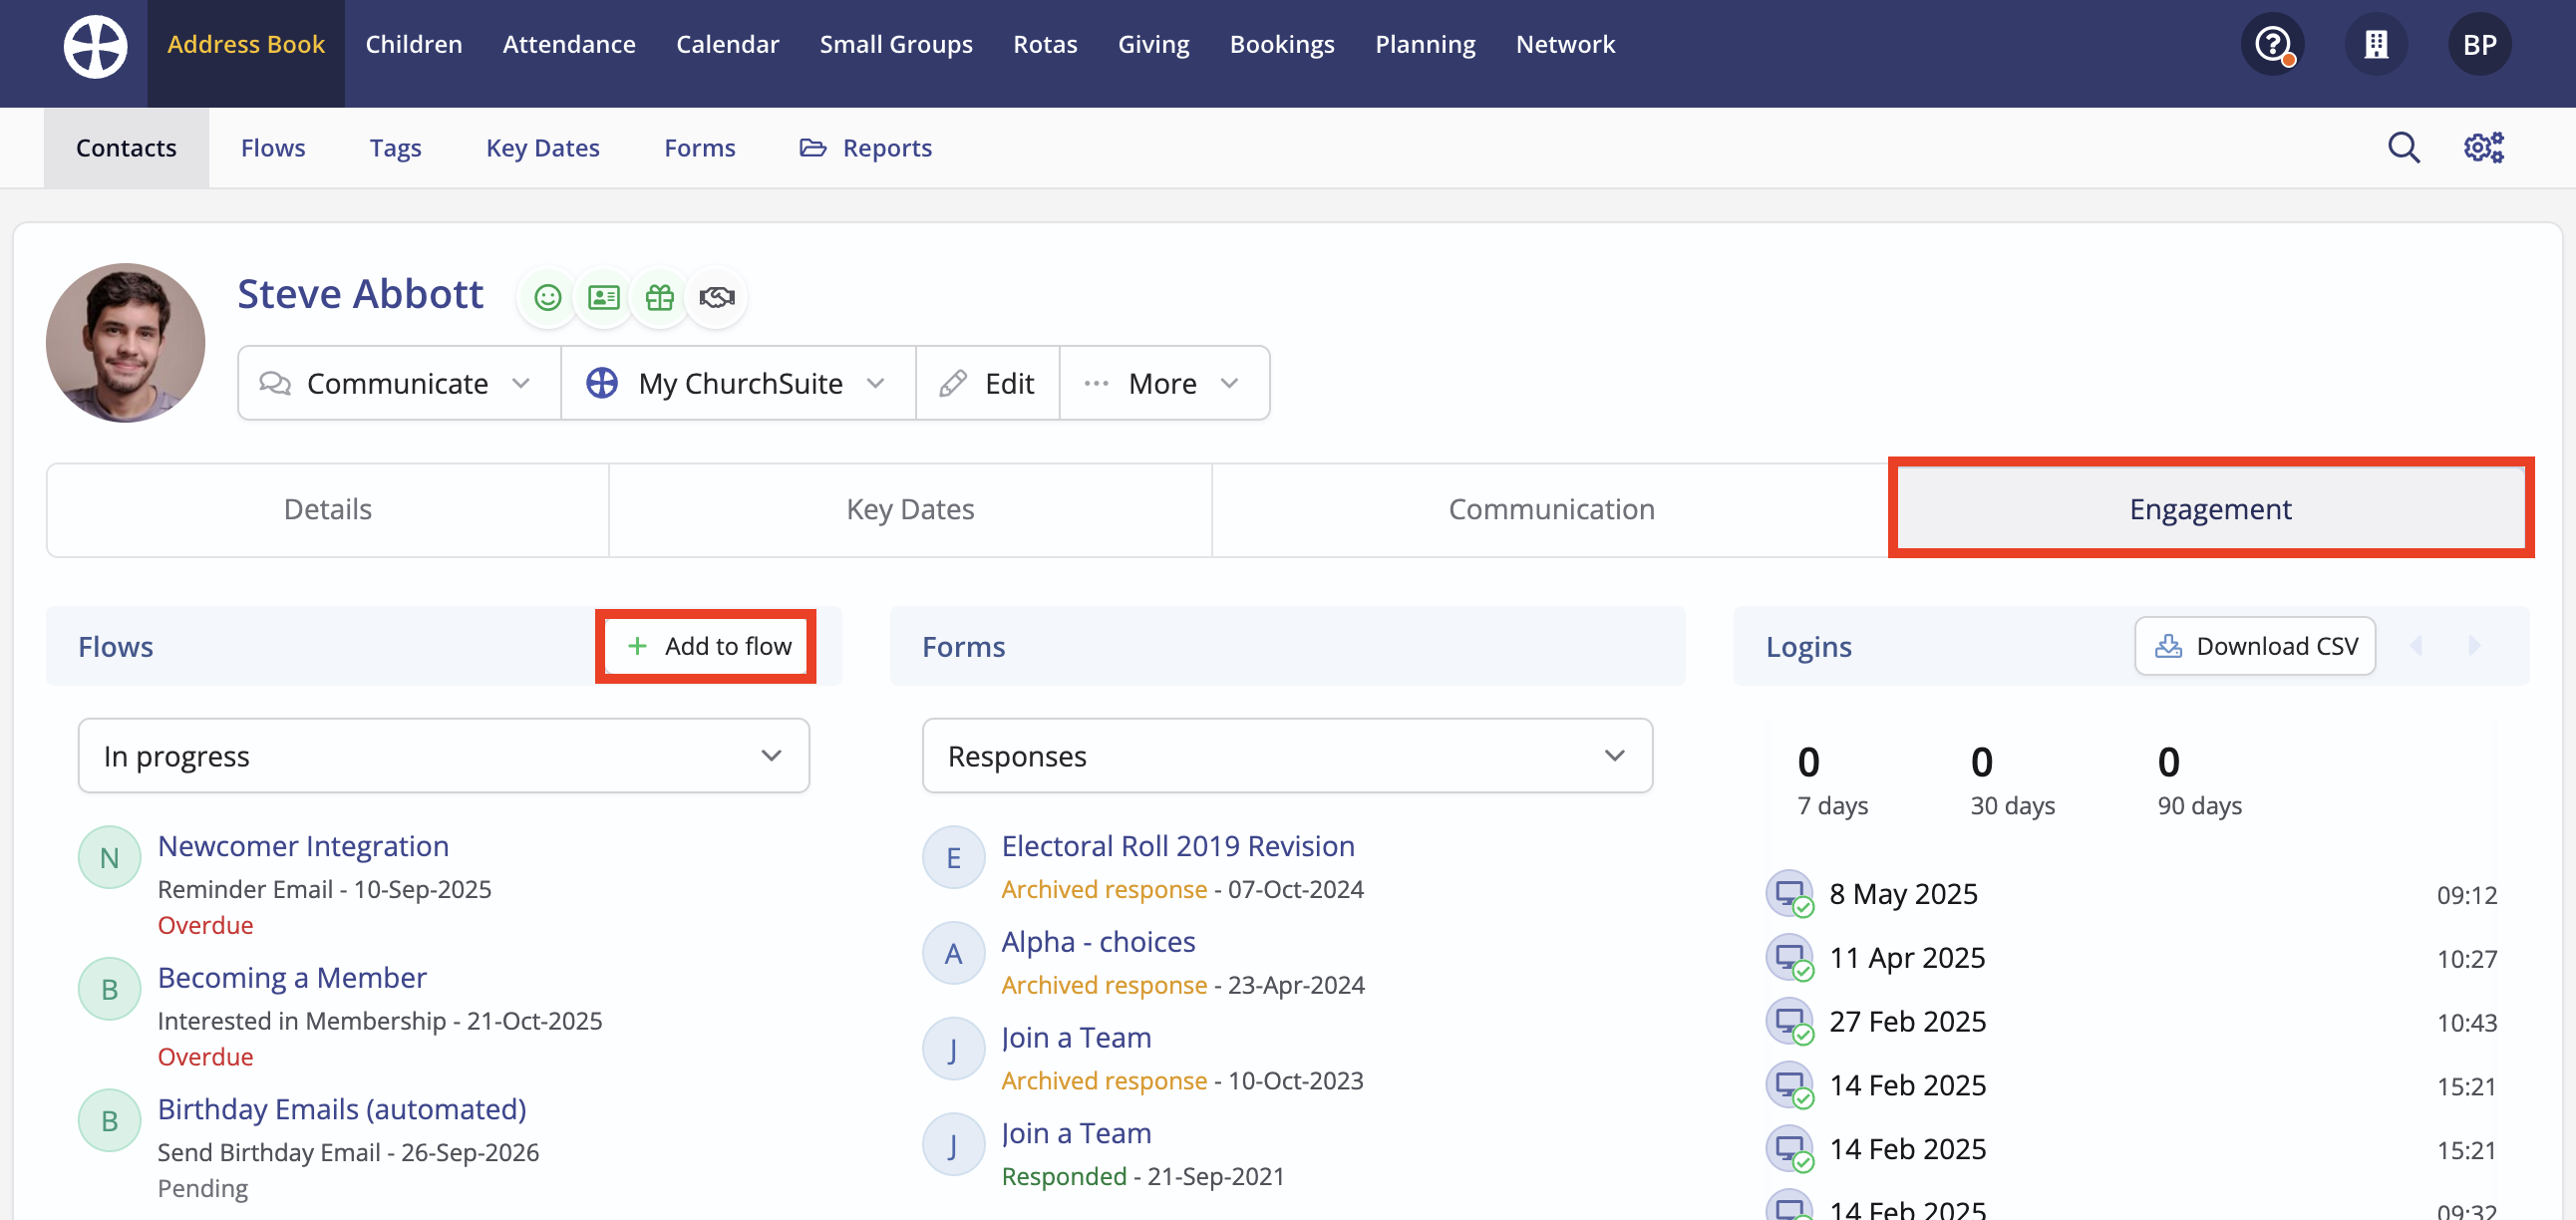
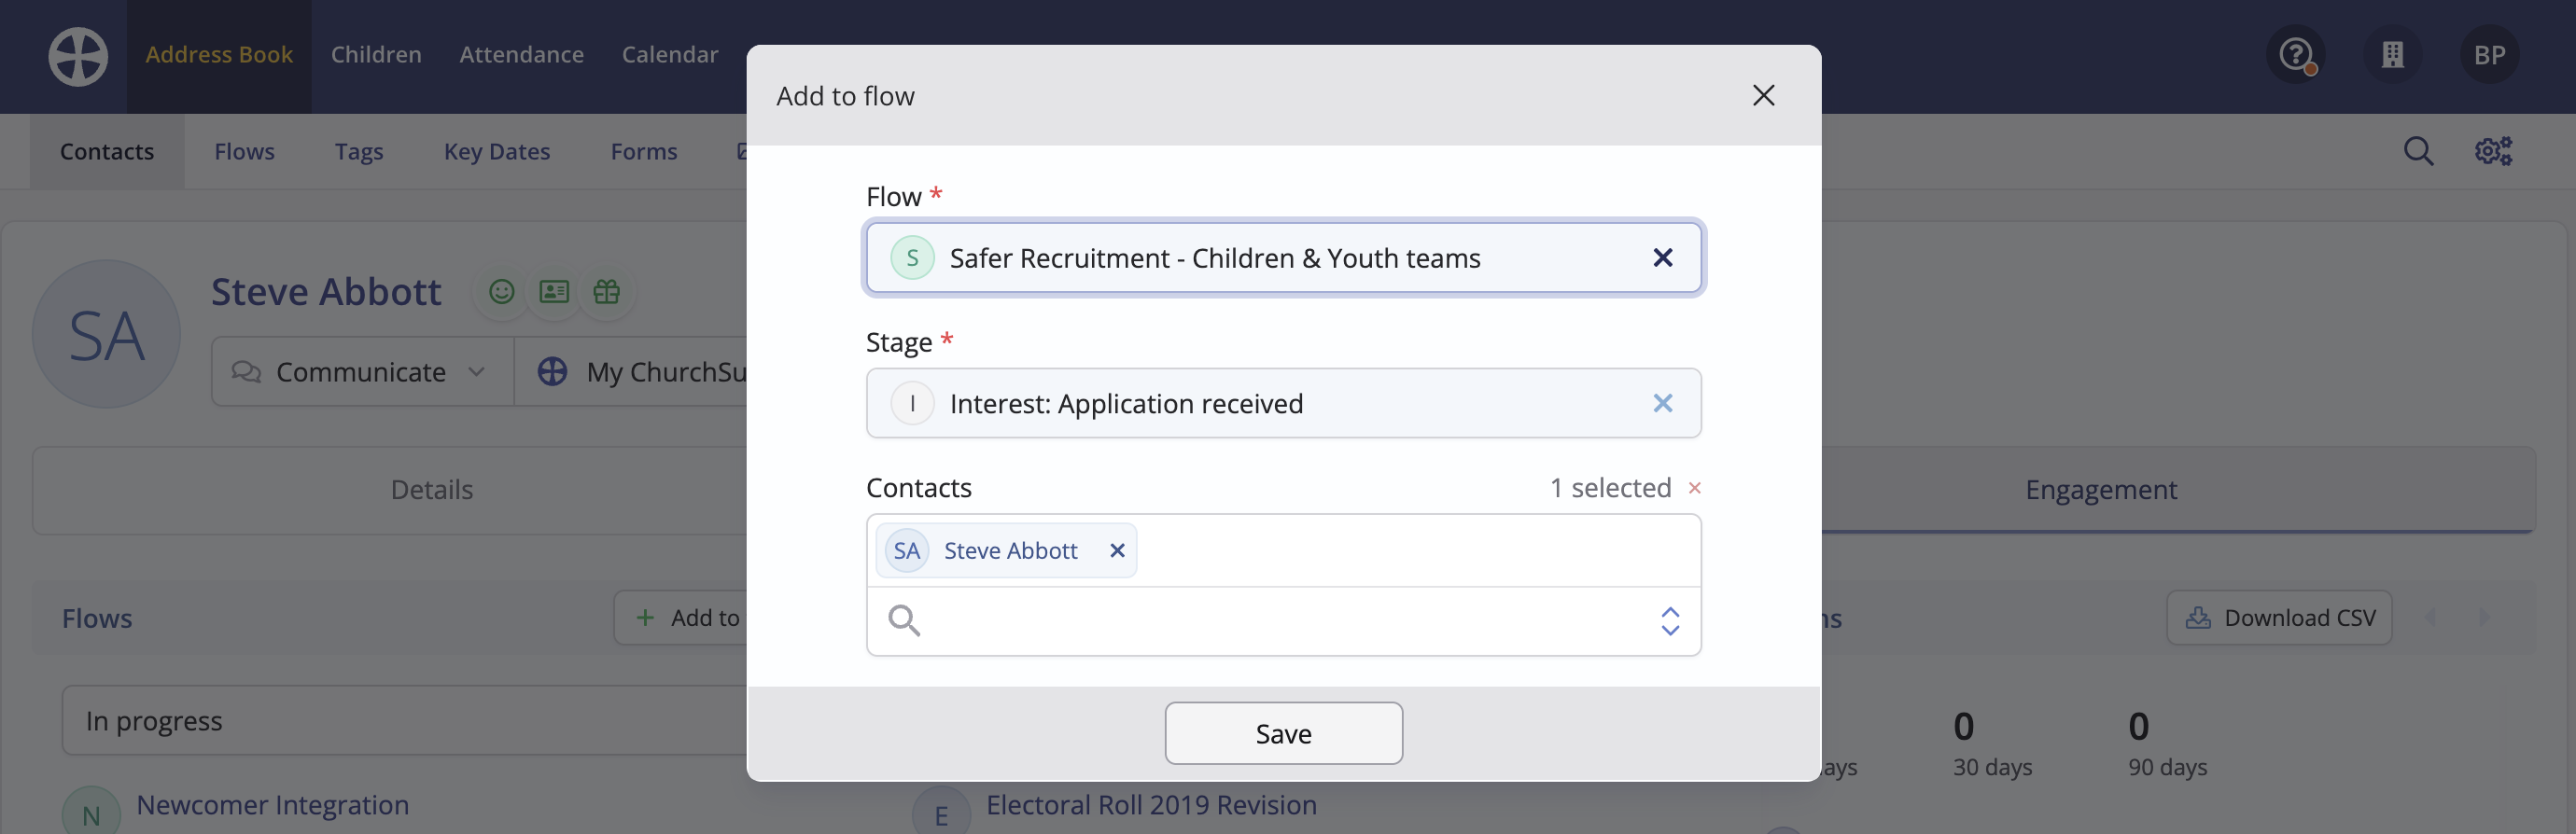
Alternatively, to manually add someone to the flow, go to their profile page in Address Book, click on the Engagement tab and select Add to flow.
Add to the relevant flow and select the stage you wish your contact to be added to. In this case, the contact should be added to the first stage of the flow. However, it may be relevant for a contact to be added to a later stage in your flow, in which case you can choose which stage you wish for them to be added to.
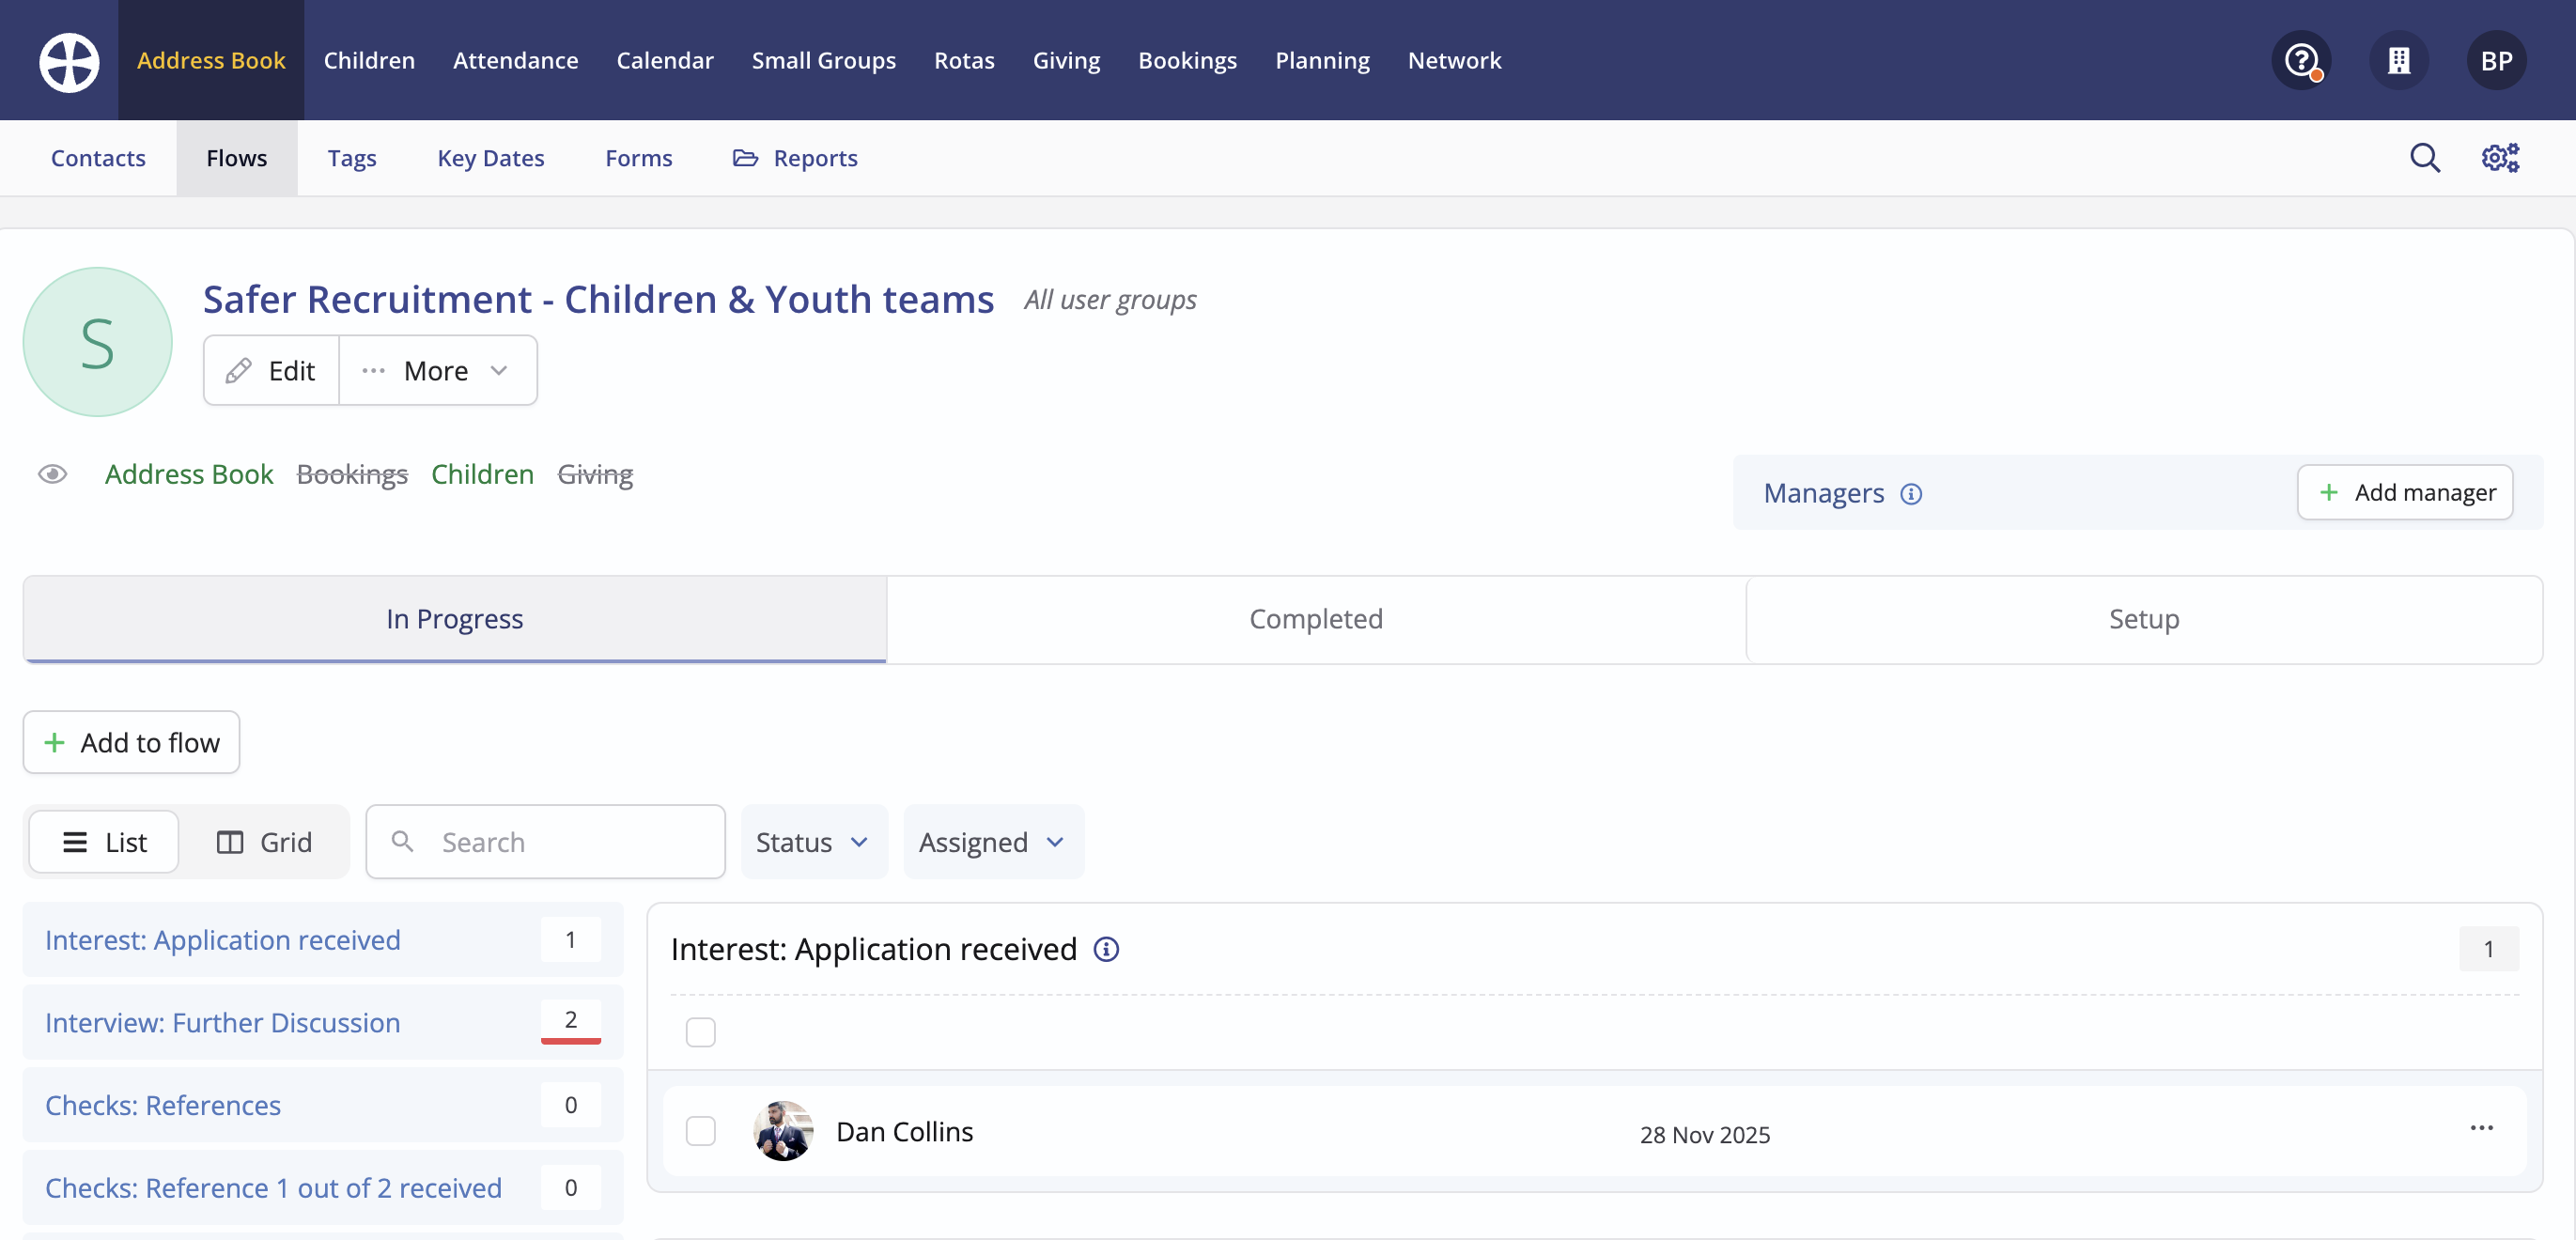
Open the “Safer Recruitment" Flow. In this example, Dan has been added to the Flow as he’s responded to an invite to complete the Volunteer Application Form.
In a separate tab in your browser, open the “Volunteer Application form” and review the responses. Based on the responses, prepare for communication with Dan, inviting him to a meeting to discuss his application.
In the first stage, click the Process button for the person you’re assessing.
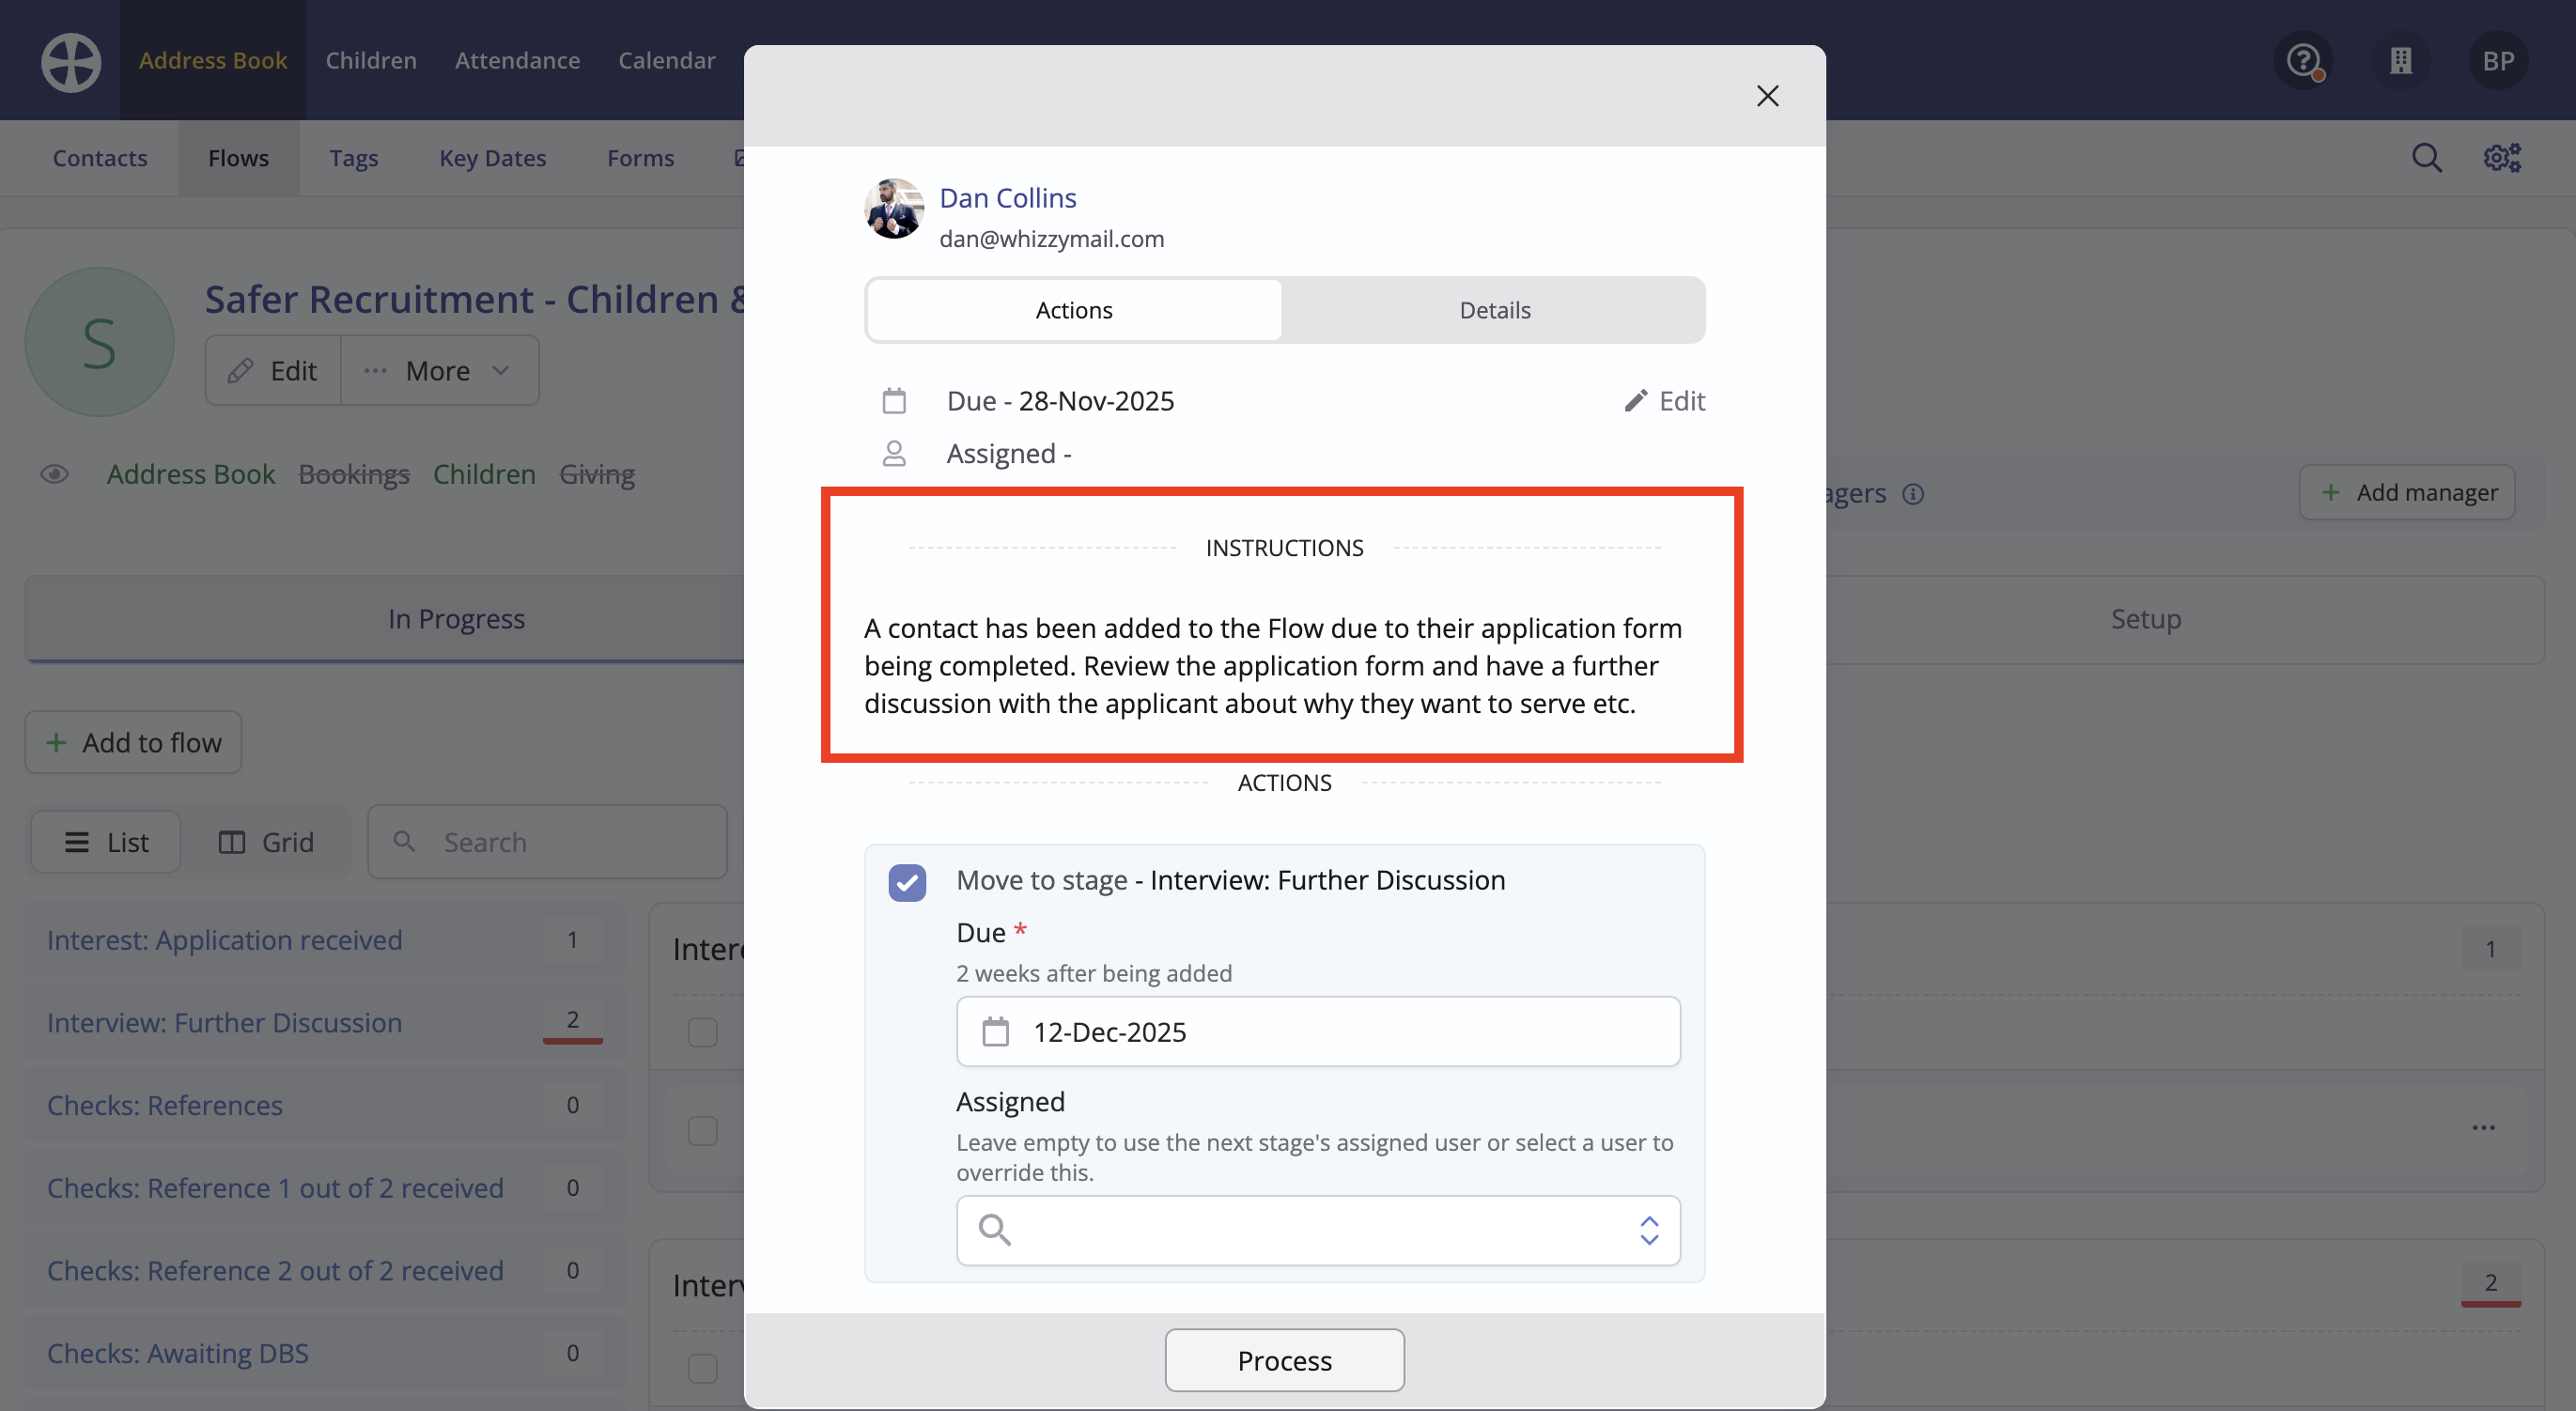
At each Stage in the Flow, you have the option to change the Due date, perhaps to postpone processing them to a later date, and the option to change which User is Assigned to action the person in this stage. After updating, close the process page by clicking the "X" in the top right corner if you wish to ensure no further actions are processed. On the Process pop-up, review the Instructions.
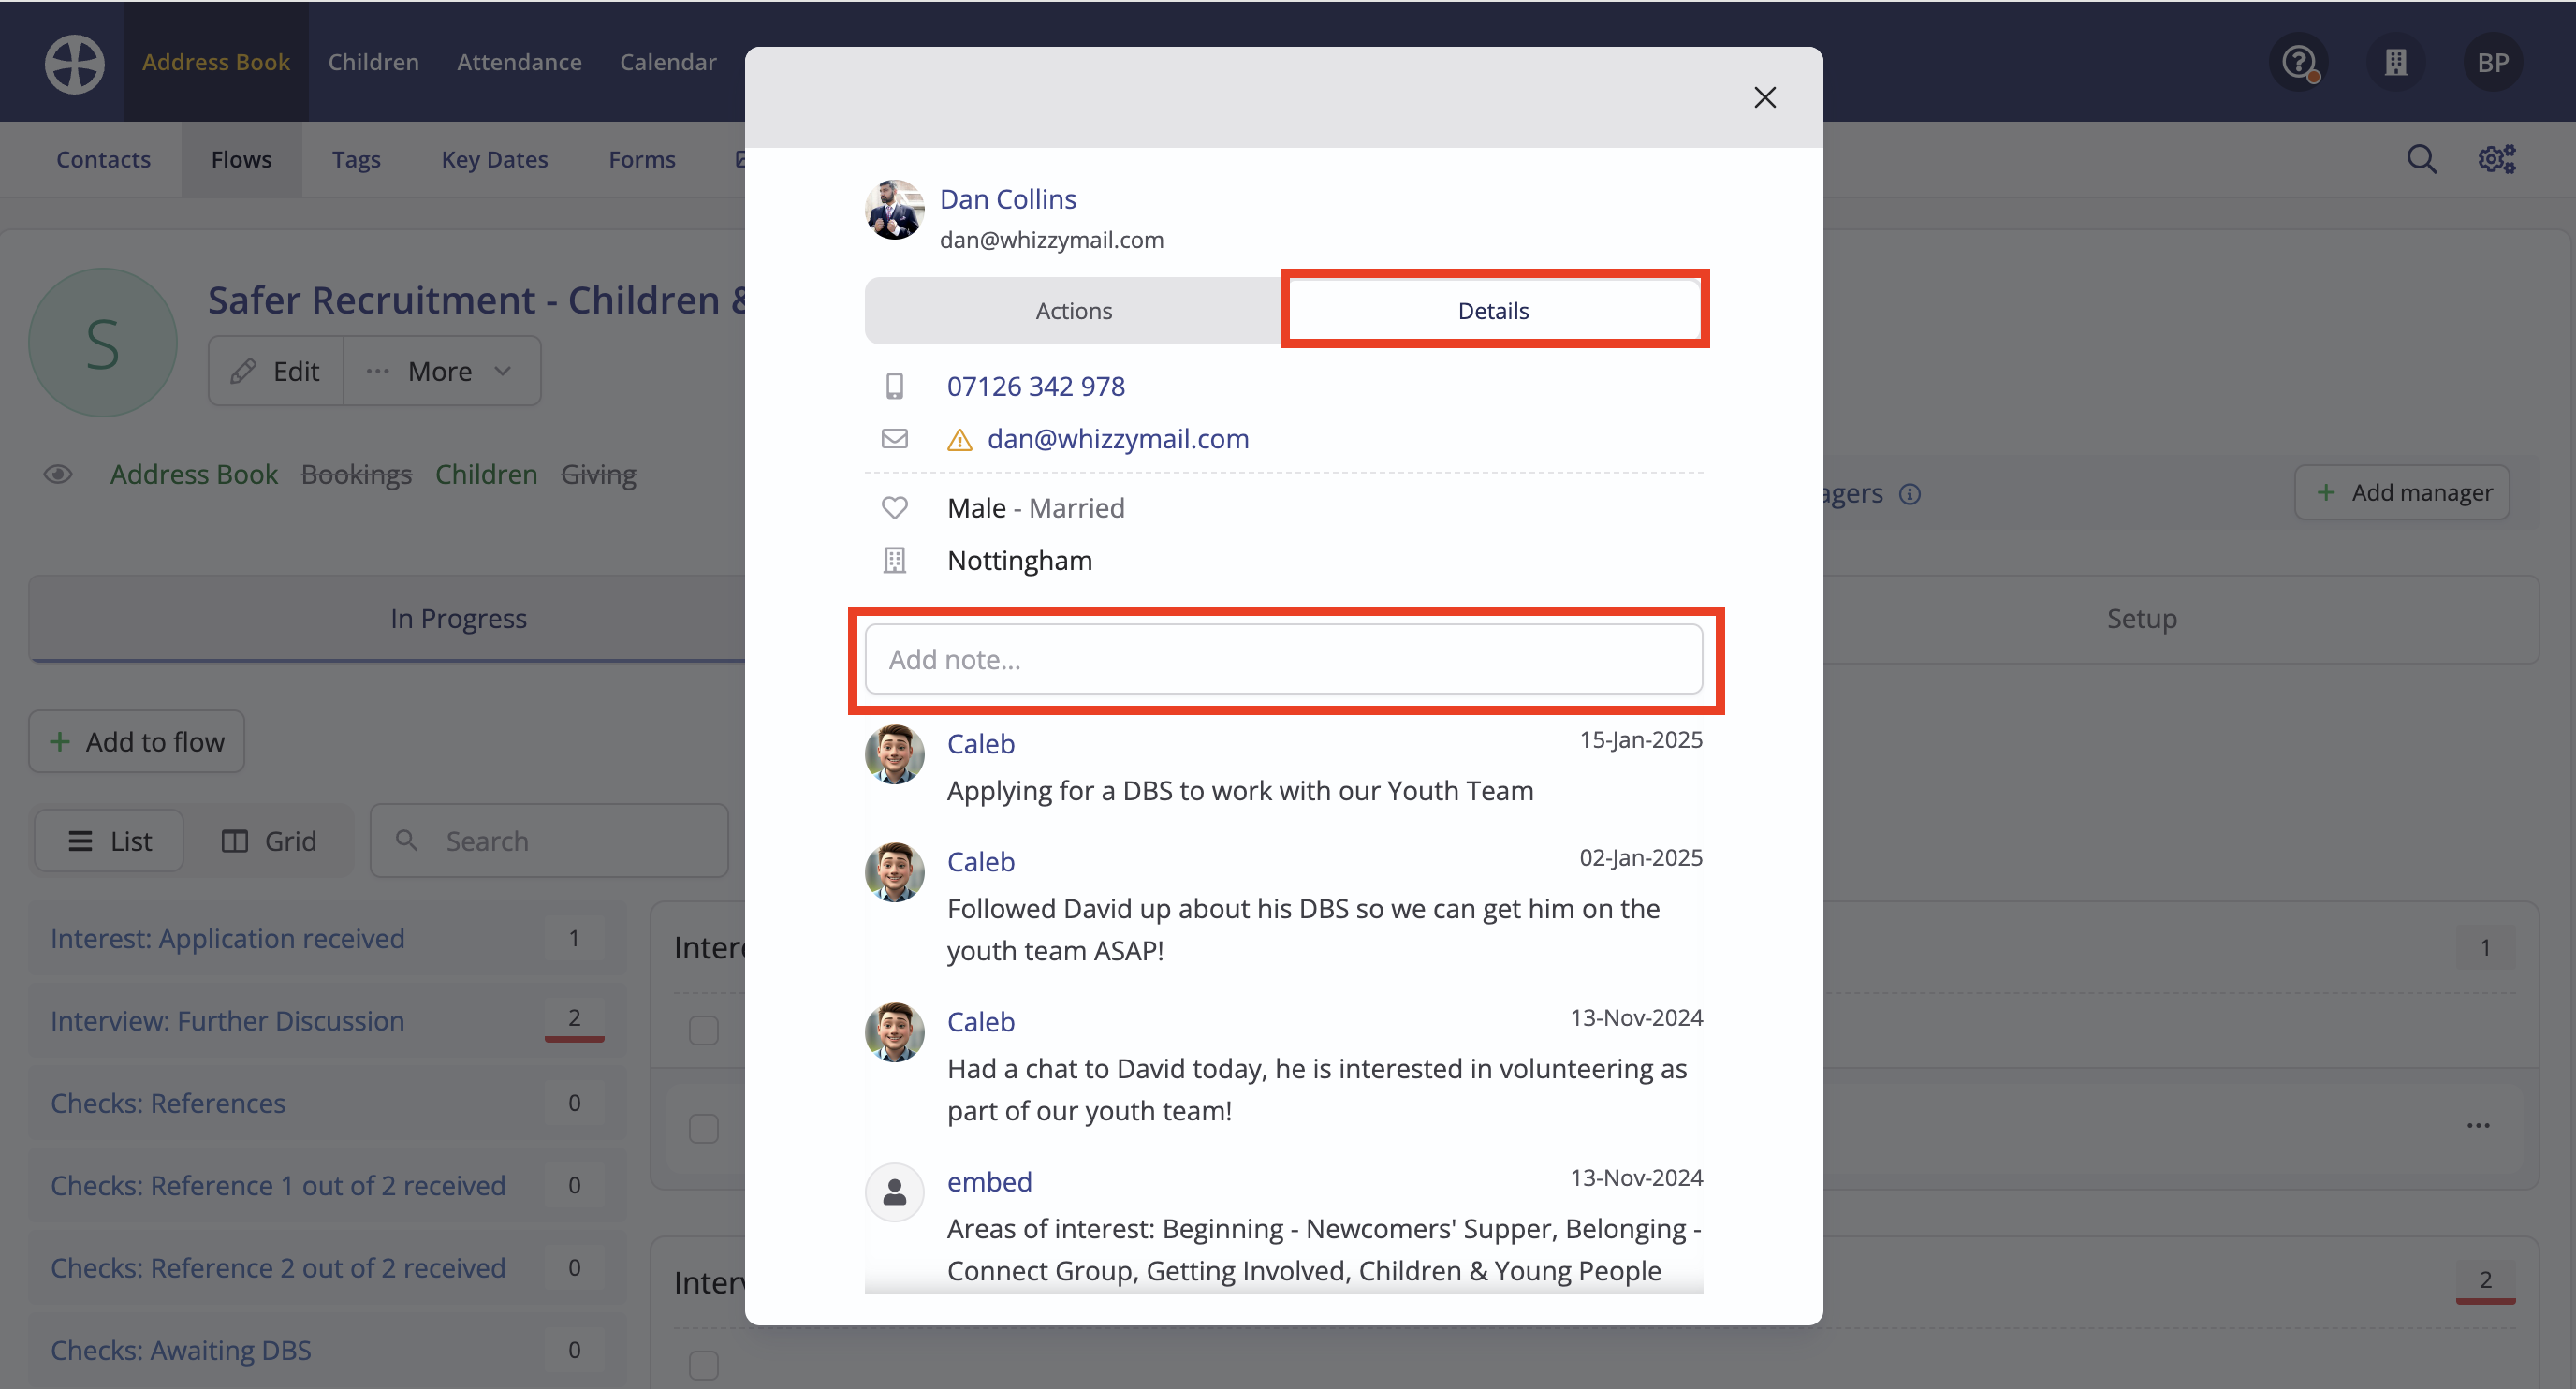
At each Stage, there is an Add note option on the Details tab of the pop-up and you can read previously added notes left by yourself or other users - helpful to keep track of phone call conversations, tasks completed or responses the person may make. You can also view the person’s contact details - particularly useful if you’re making a phone call to arrange a meeting.
Once you’ve arranged the meeting, head back to the Actions tab and review the ticked actions - you may want to update the Due date for the next stage to the day after your meeting is set. Click Process and all ticked actions will be processed. By default (unless you untick some of the actions) this will mean the person will be moved to the next stage with a the processing due date set.
You'll get an email notification when the next stage is due for processing if you've added yourself as the flow manager. At that next stage, find the person in the correct stage of the Flow and click the Process button. Follow the instructions and, once the instructions are completed, add dates into the Add key date actions to reflect when a discussion was had and when references were requested. Process to move them on to the next stage.
You'll get a further email notification when the next stage is due for processing. At that next stage, click the Process button again. If required, you might need to chase up referees. Once the instructions are completed, Process to add the Key Date and move them on to the next stage.
As you receive each Flow reminder notification, you'll continue to follow the Flow stage Instructions, add optional Notes and Process the appropriate Actions to move them to the next Stage.
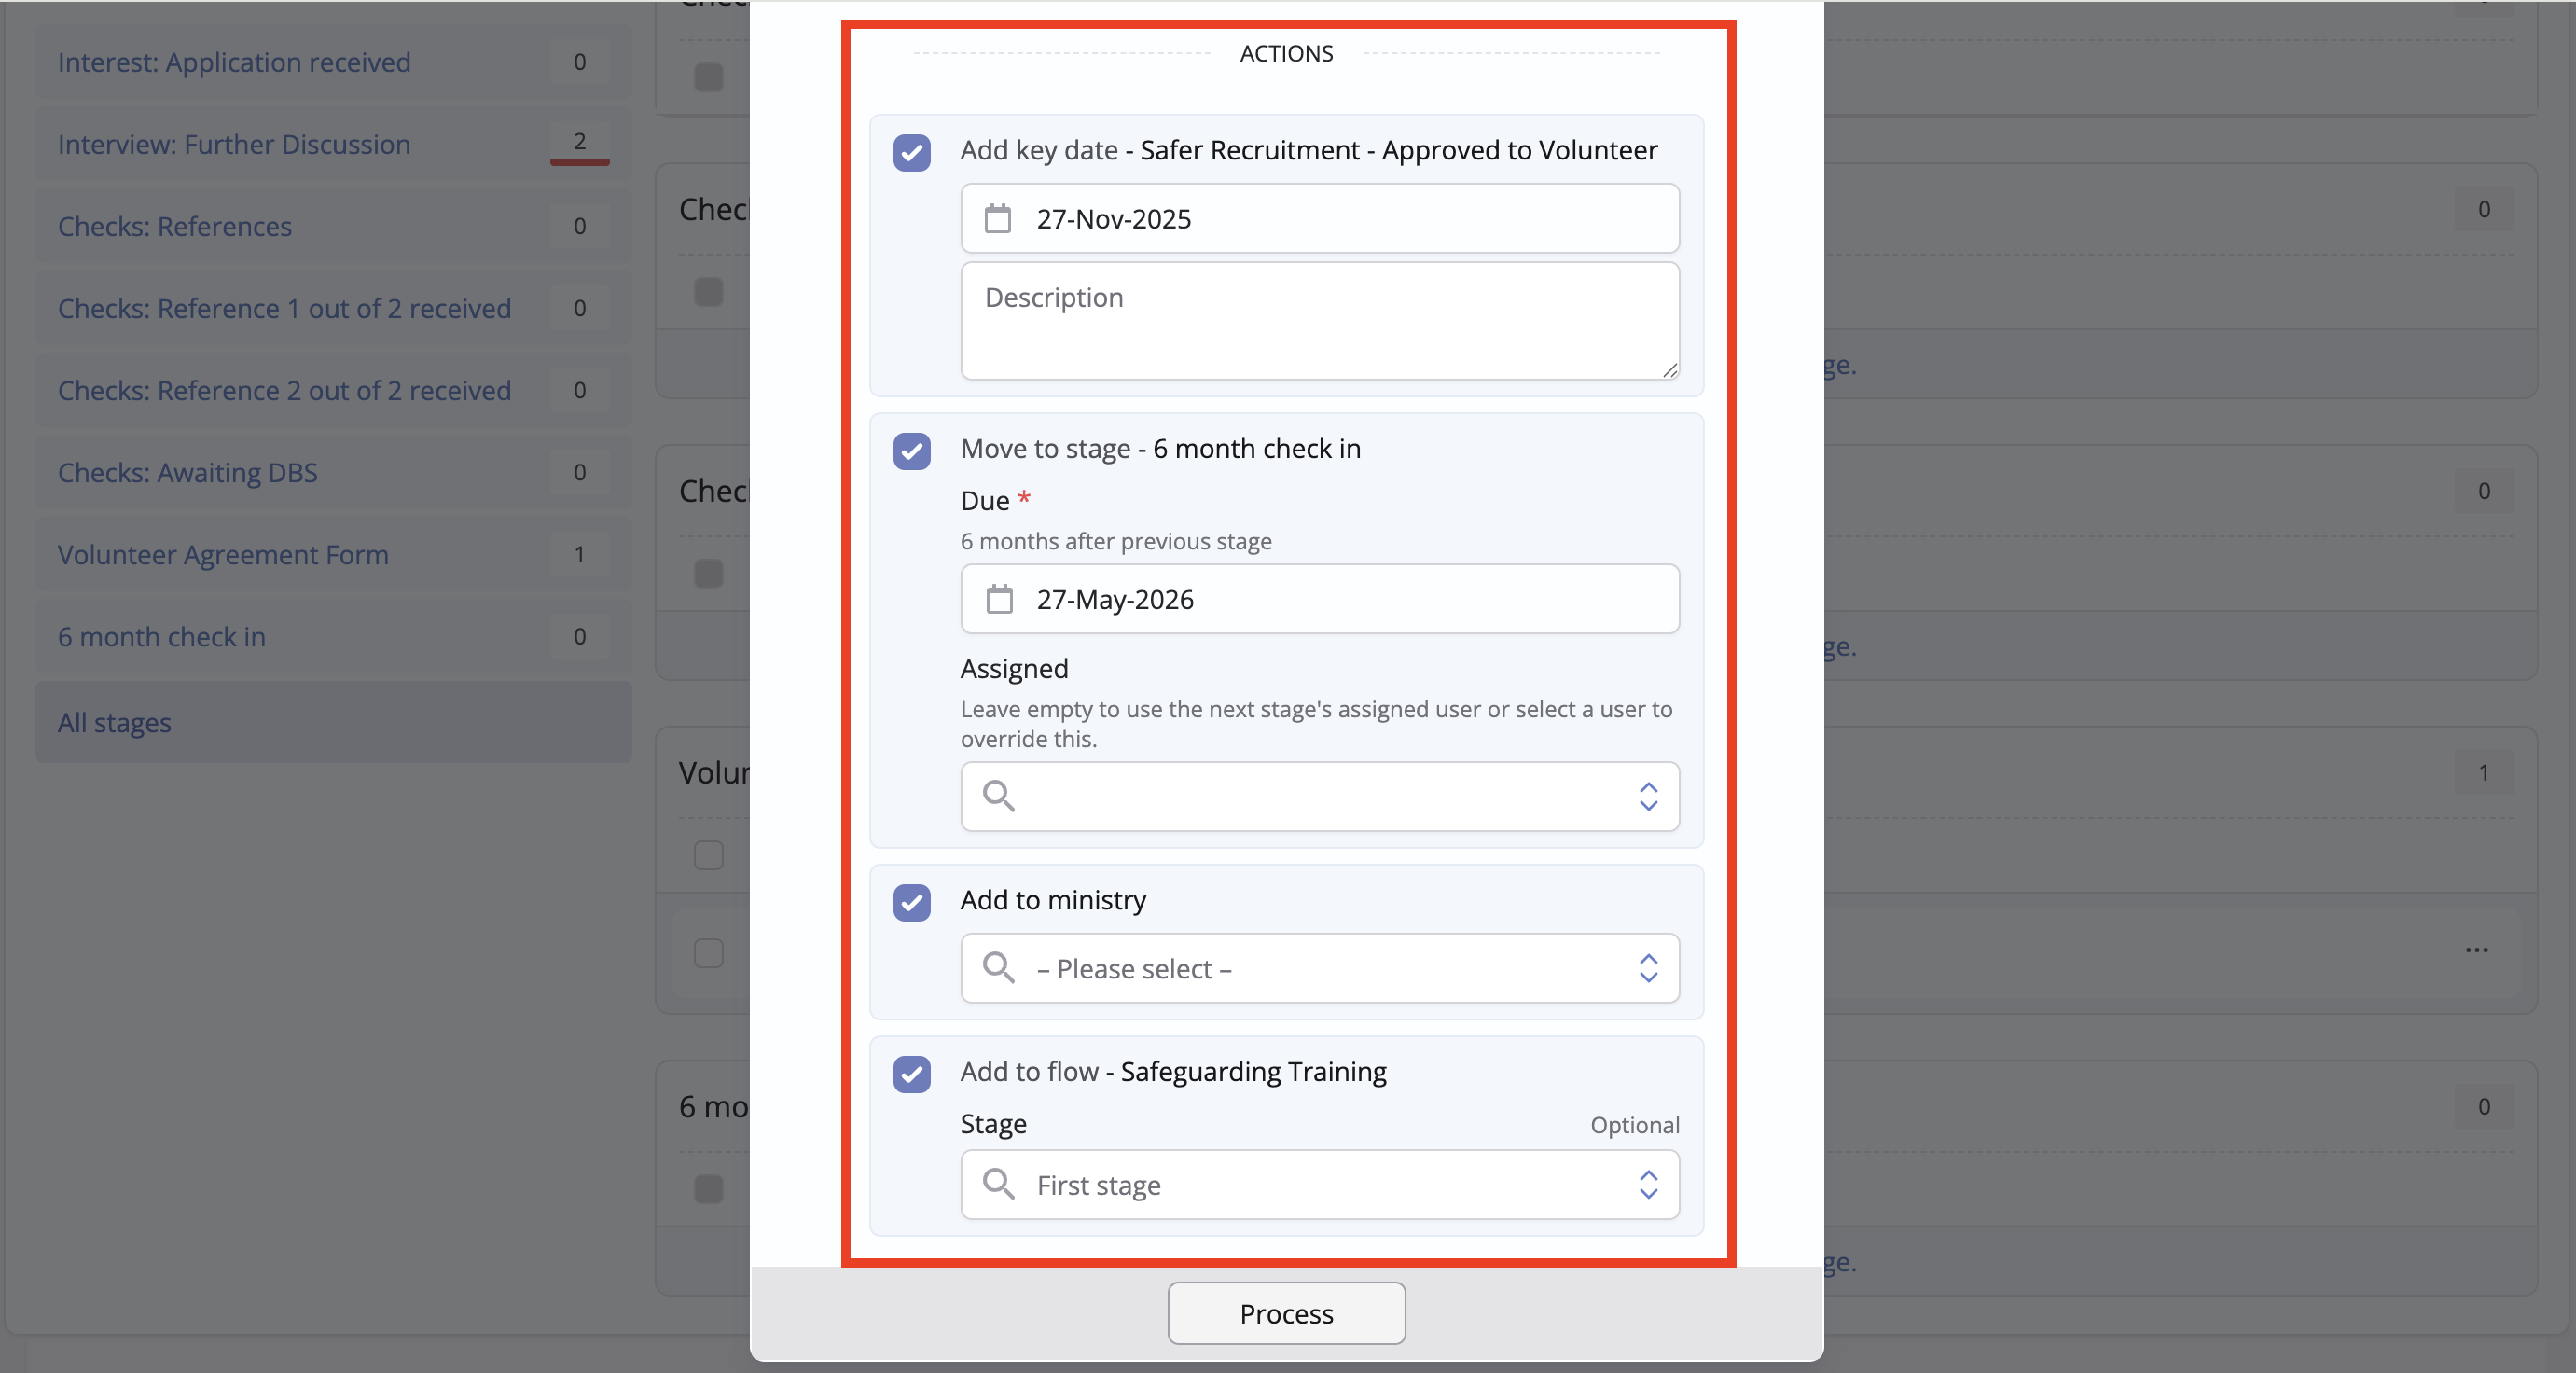
In the above screenshot, notice that you’re able to select a Ministry to add the person to and you can add them to another flow. There’s so much you can do with Flows!
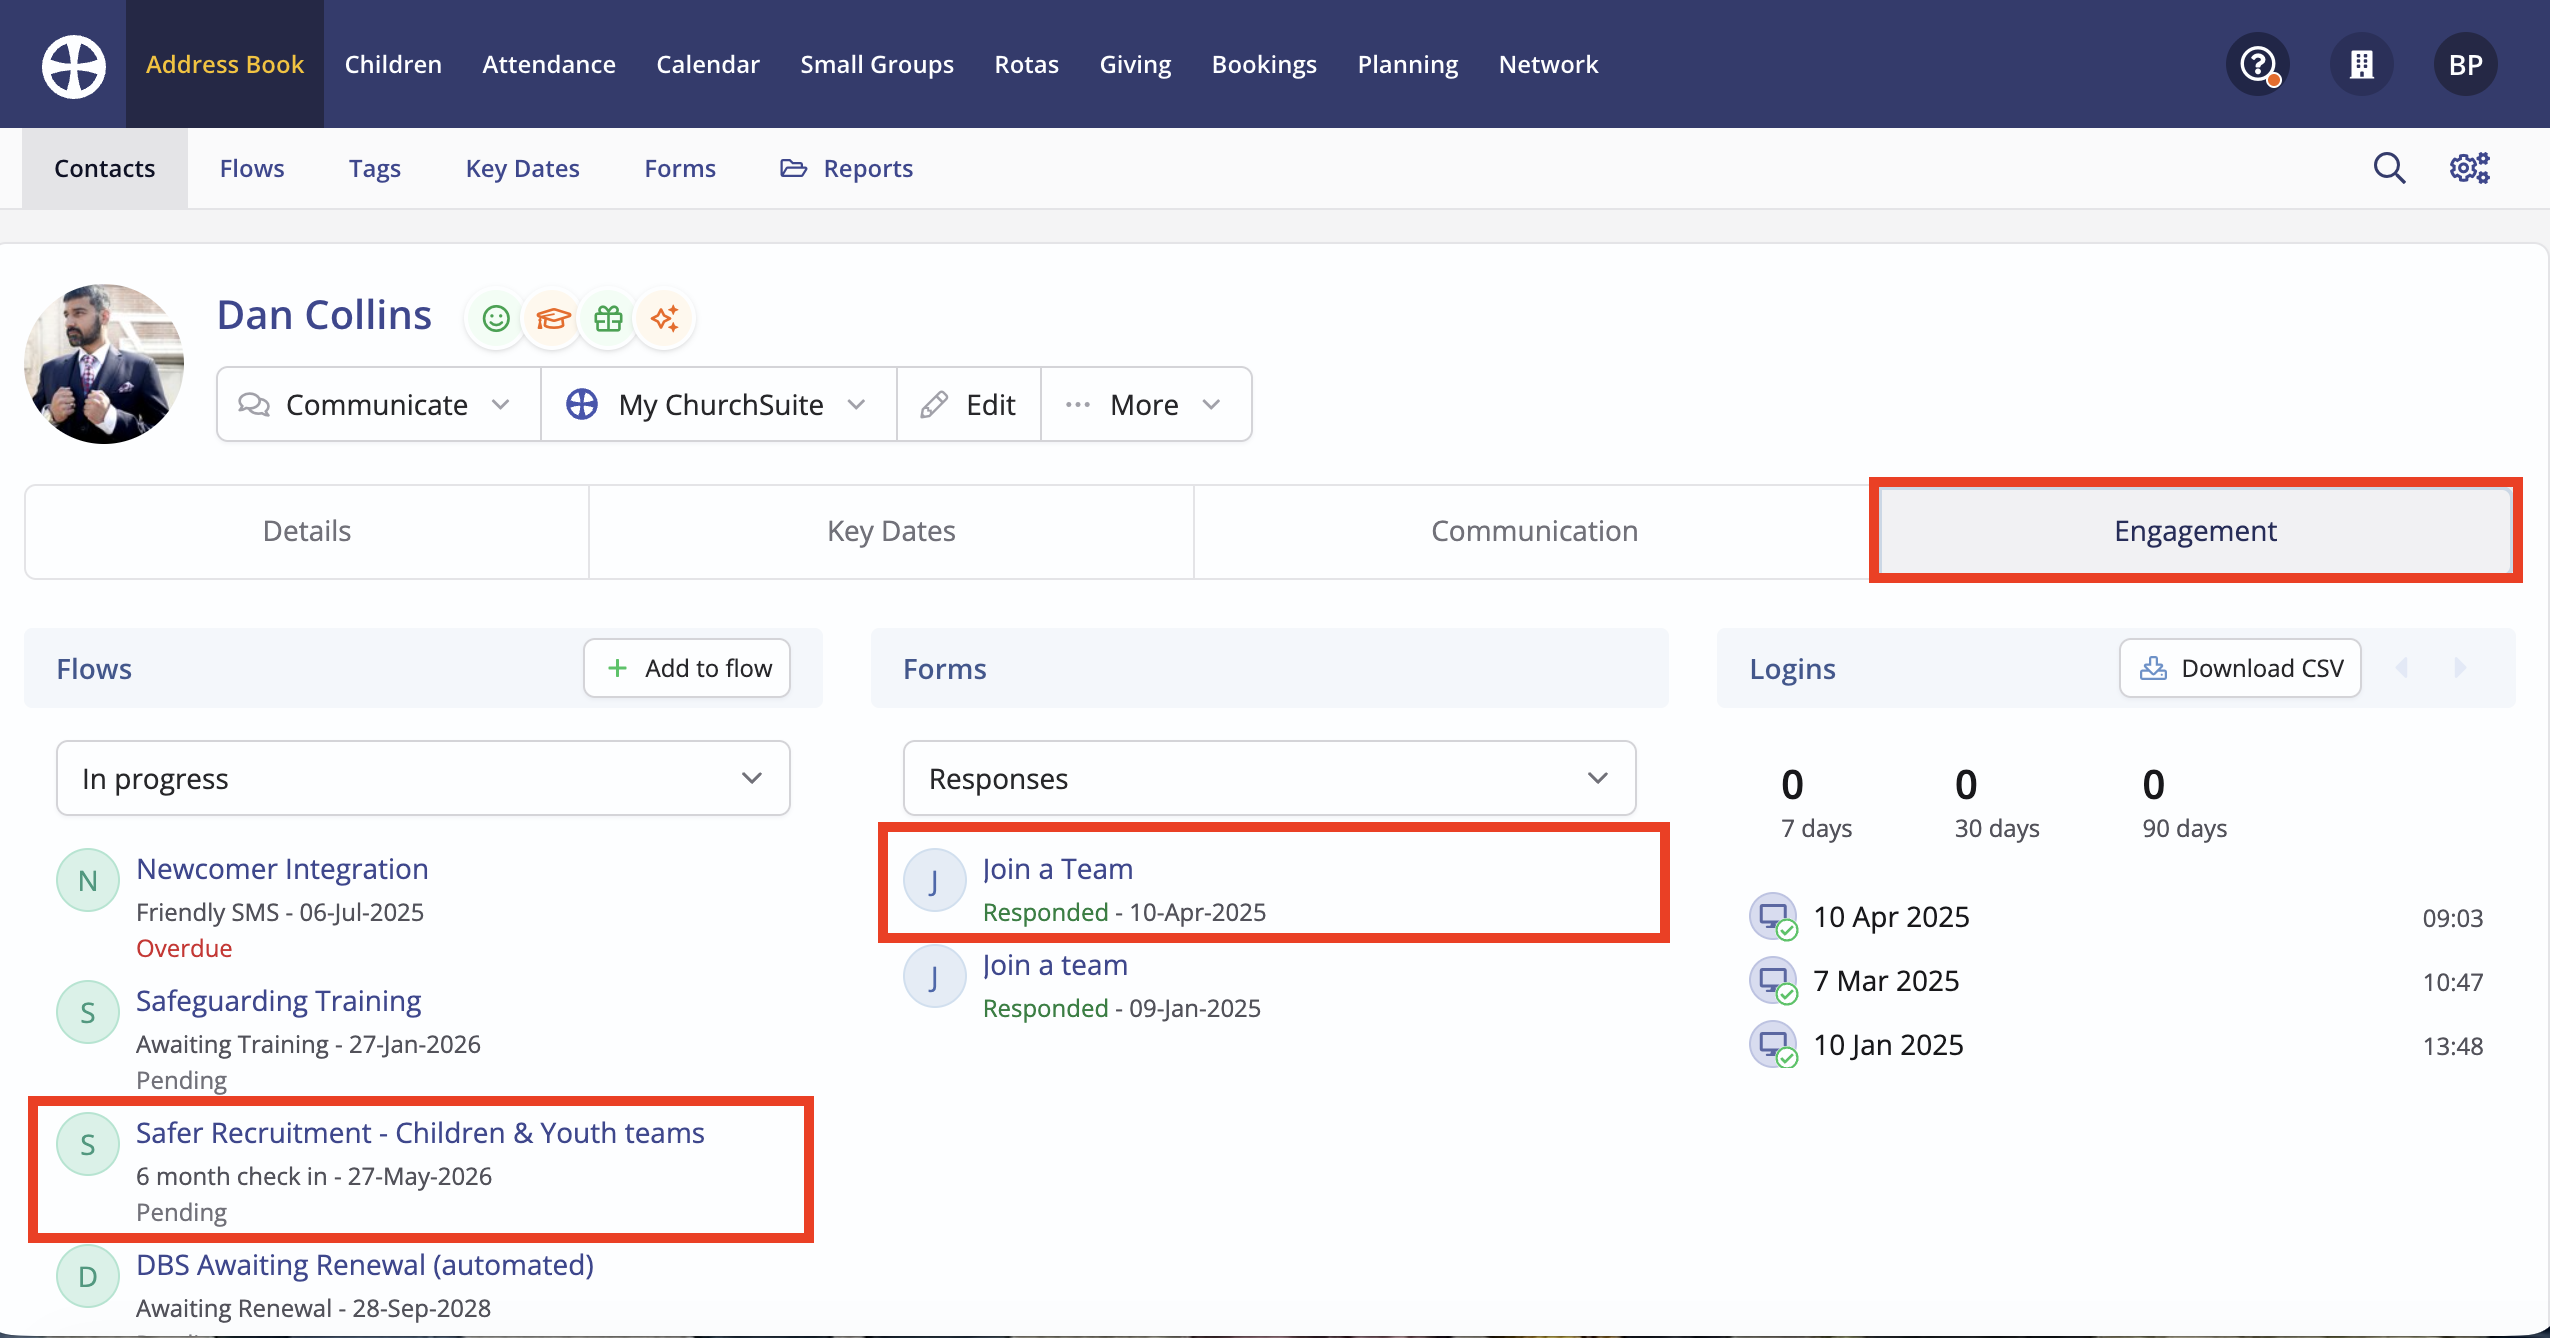
Note the Flows status and details of any Forms the person has responded to are shown on the contact's profile page within the Engagement tab:
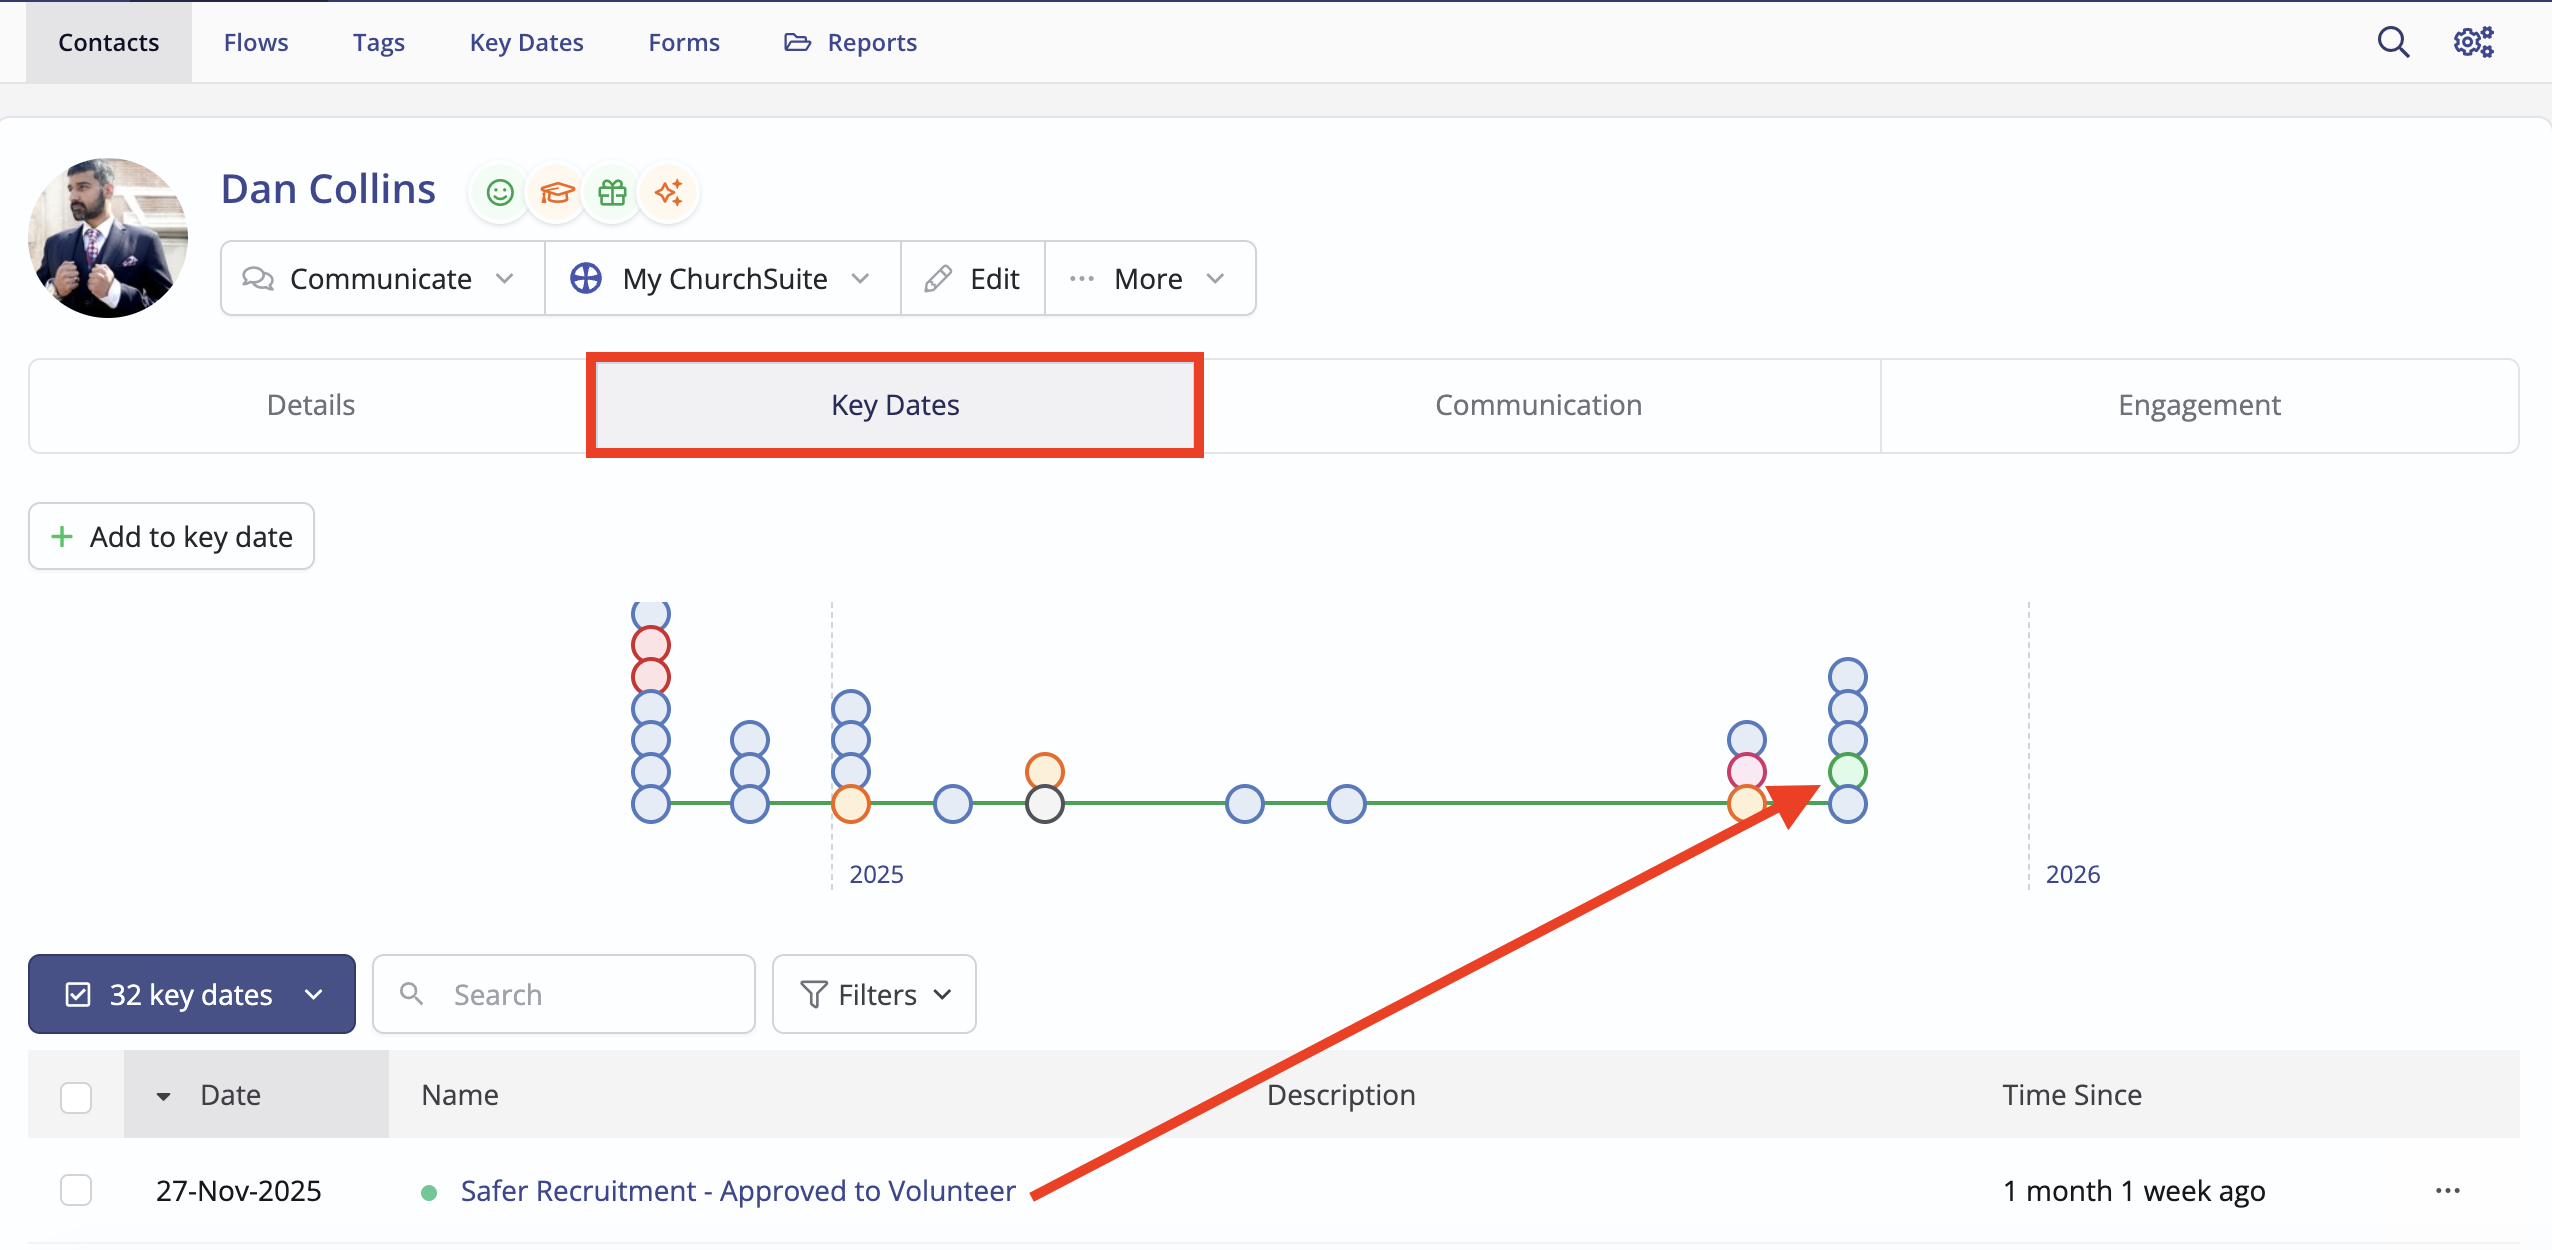
... and the historic Key Dates also show any previous Safer Recruitment activity on the Key Dates tab:
What next?
I hope the above Safer Recruitment suggestions are helpful to your church. If you have any questions, do get in touch with the support team at ChurchSuite; we'd be delighted to help. Email support@churchsuite.com
All the best!